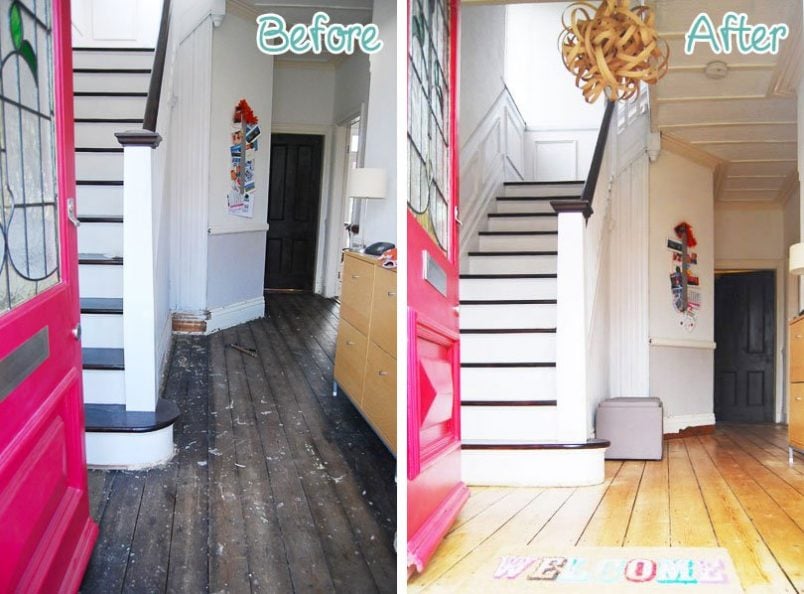
Some of the most frequent questions we get asked are about how to sand wooden floors. We’ve definitely sanded more than our fair share of floors and floorboards and know just how daunting the task ahead can feel.

Sanding your floors and floorboards is a lot easier than you probably expect and it’s totally possible to achieve a professional result even as a DIYer!
There are a couple of floor sanding questions that come up again and again, so we’ve put together this (very long) list of Q&As that will hopefully give you a good idea of what to expect if you’re considering doing the job yourself.
To make it easier for you to find the floor sanding advice you’re looking for, we’ve broken down the Q & A’s into 7 sections.
1. Before you start
2. Sanding Floors
3. Floor Finishing
4. Timescales
5. Cost of Sanding Floors
6. Maintenance
7. Tips & Tricks
Before You Start
WHERE DO I BEGIN?
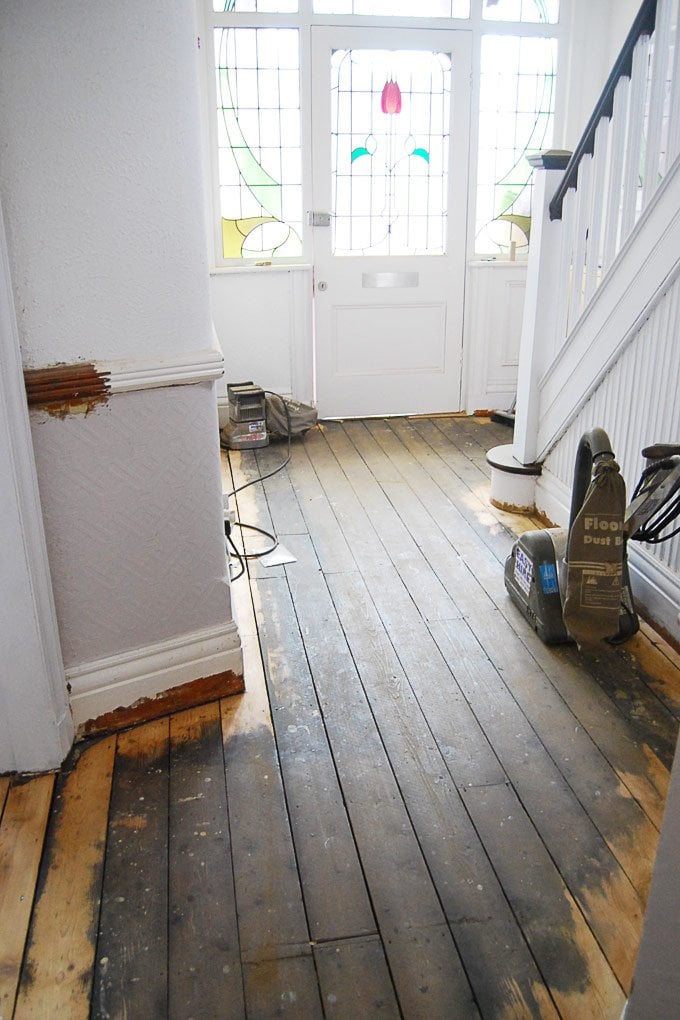
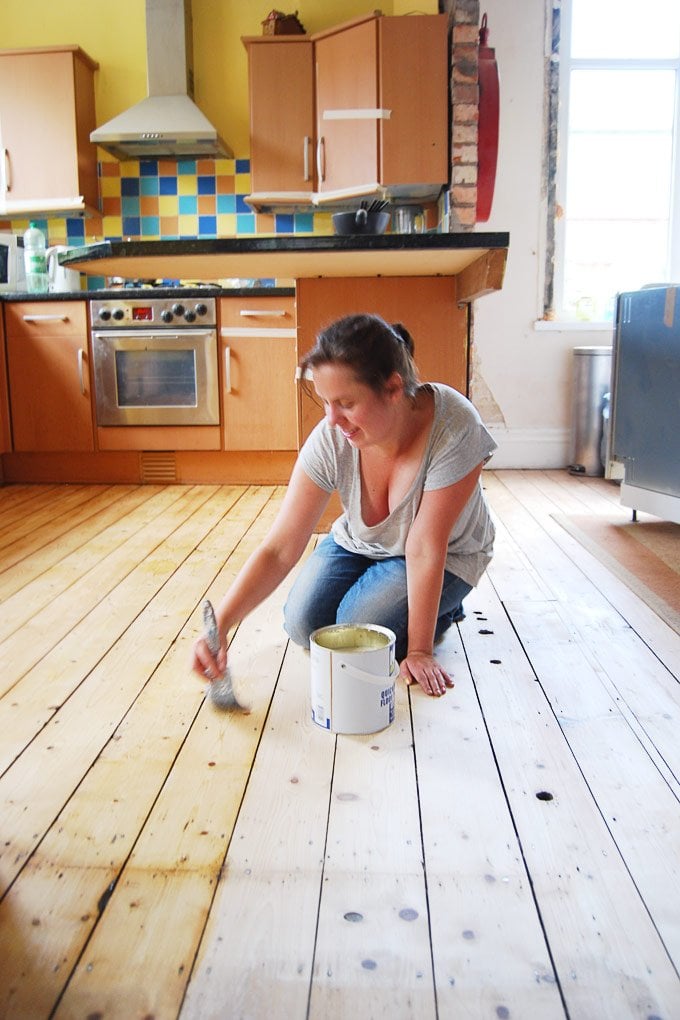
After completely emptying your room, remove any old floor coverings, nails and anything else that is attached to the floor and then give everything a good vacuum and clean.
Basically, you want an empty and clean surface to start working from.
DOES THE ROOM HAVE TO BE COMPLETELY EMPTY?
Ideally – yes. The big drum sander that you’ll be using is really bulky and you really need space to move around the room easily.
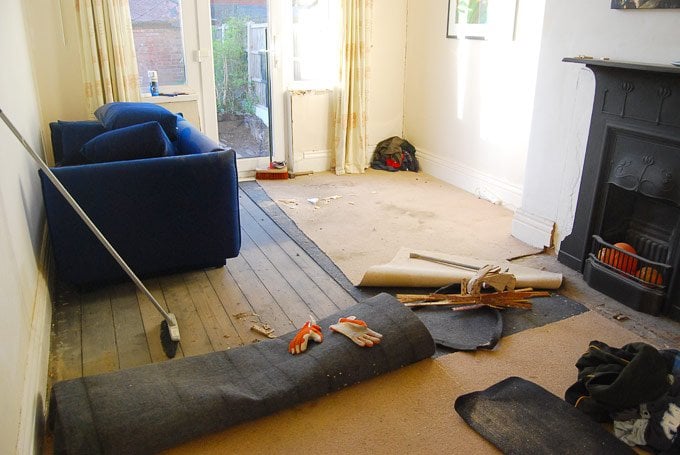
Having said that, when we sanded our dining room floor, we did leave our blue sofa and sideboard in the room because we just didn’t have anywhere else to put them.
We ended up completely sanding one-half of the room and then moved the sofa over to sand the other half of the room. Of course, it wasn’t ideal, but it wasn’t awful, either.
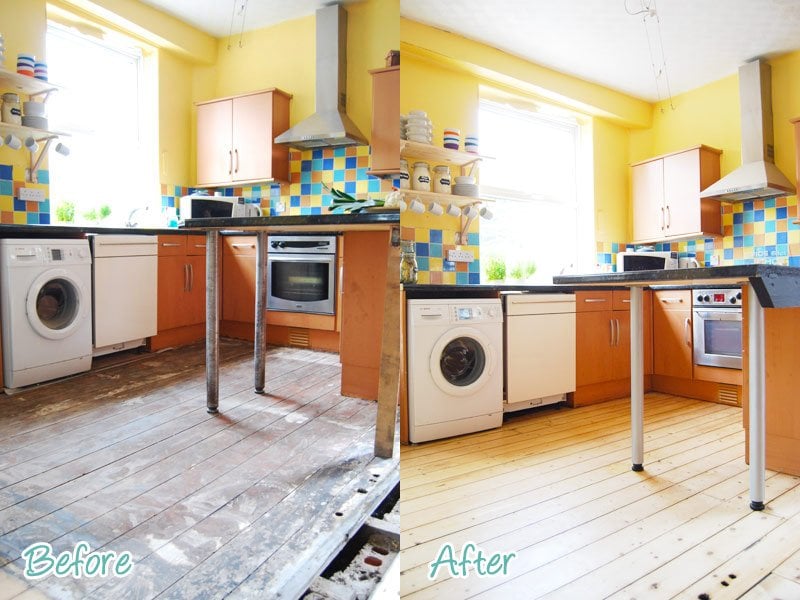
MY FLOOR IS IN A POOR CONDITION. WILL IT STILL LOOK OKAY WHEN IT’S SANDED AND FINISHED?
Probably.
Don’t get me wrong, if all of your floorboards are rotten and you have big holes everywhere, even the best sanding job isn’t going to make it look good.
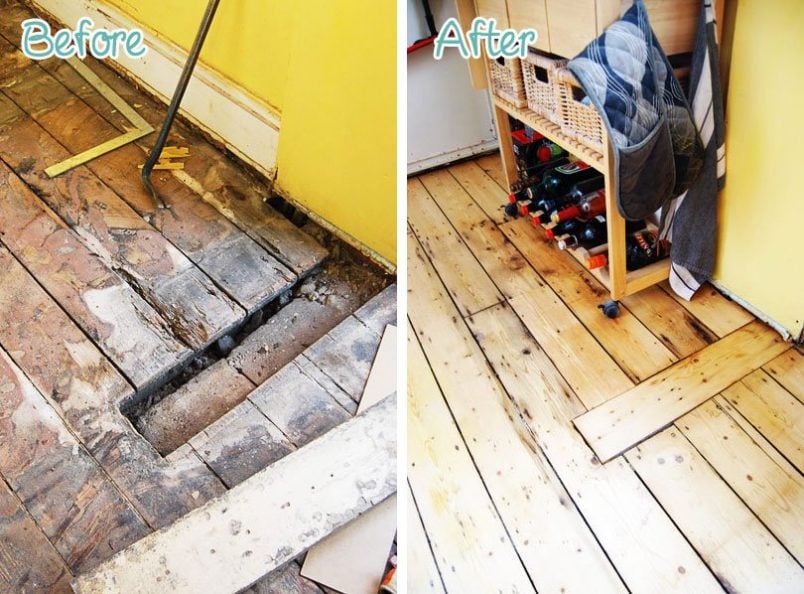
Having said that, our kitchen floor looked absolutely awful.
After replacing a few of the rotten floorboards and giving everything a sand, it’s actually not turned out too bad (although I should point out that this was always only meant as a temporary solution and really isn’t the quality of finish you should be aiming for).
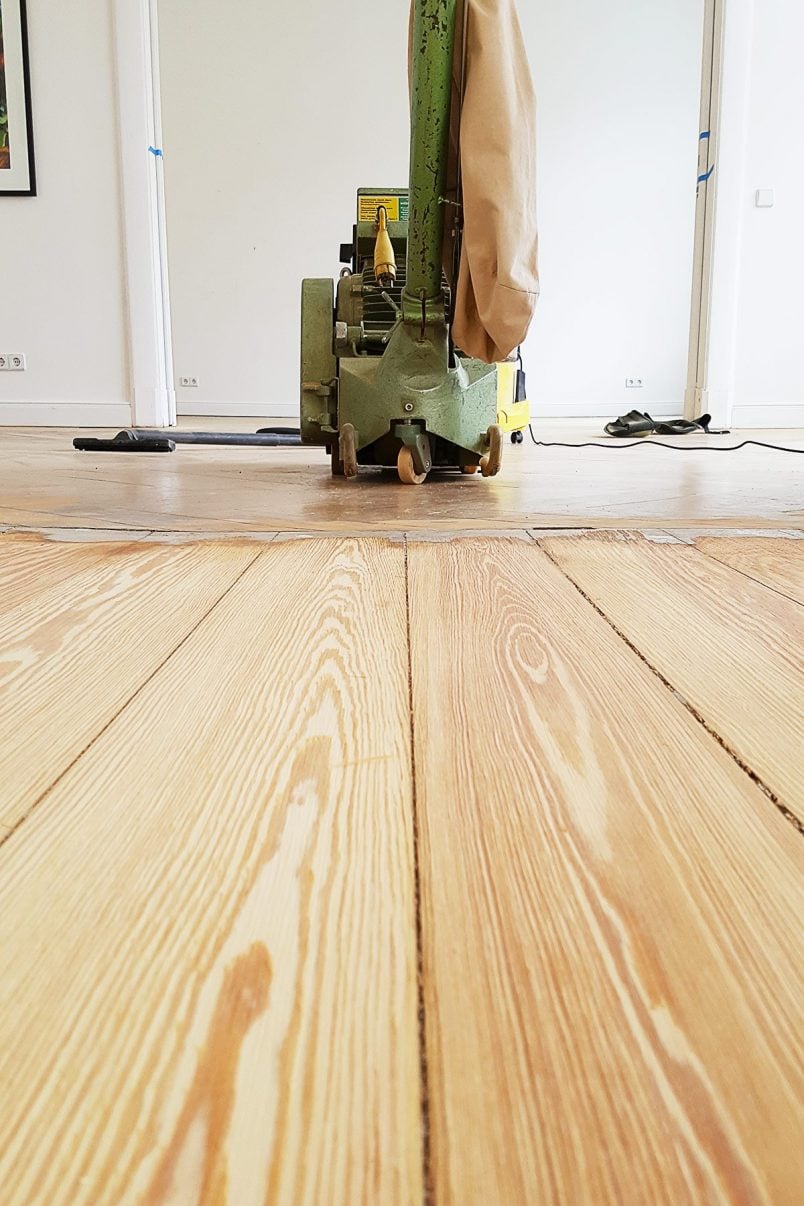
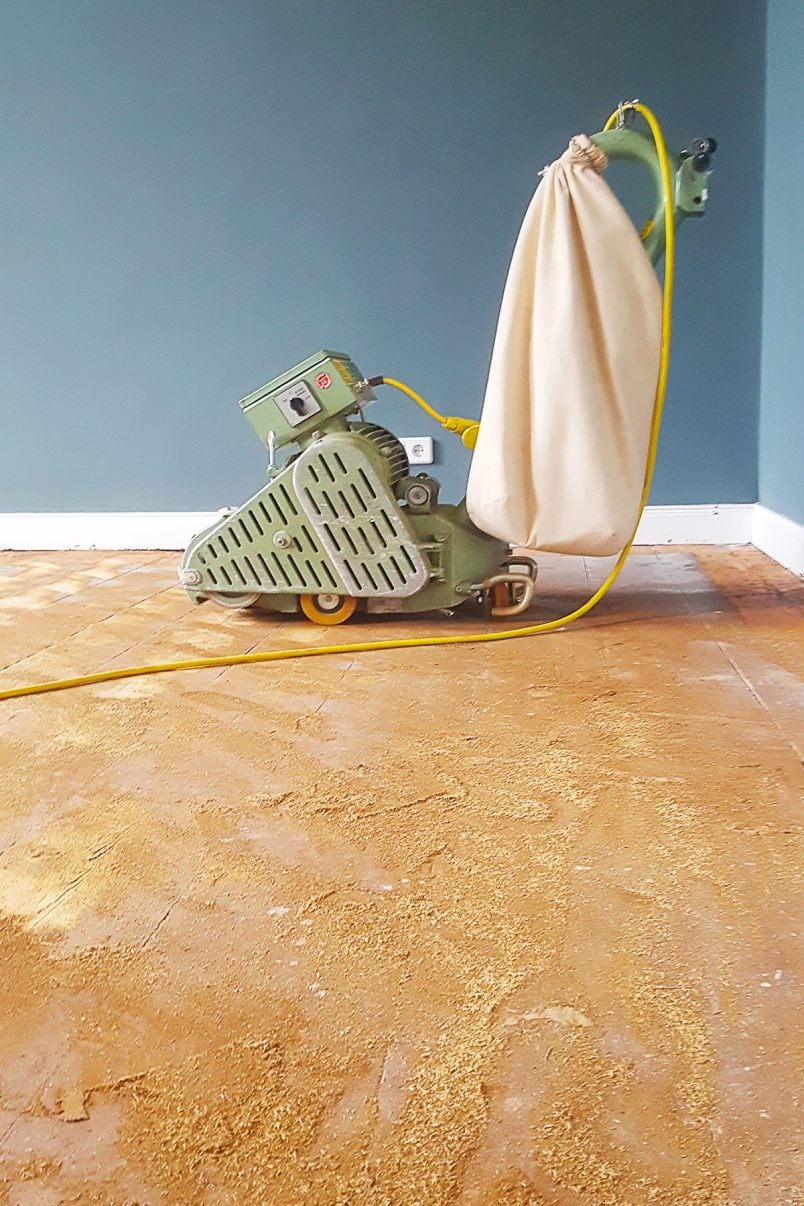
WHAT TOOLS WILL I NEED TO SAND MY FLOORS?
You will need a drum sander and an edging sander. A good hire shop will give you what you need and show you how to use the machines. No need to worry though as the tools are surprisingly simple to use!
ARE THERE ANY OTHER TOOLS OR EQUIPMENT THAT I’LL NEED?
This post contains affiliate links. As always, we only recommend products we love and think that you will, too! Read our full disclaimer here.
You’ll also need a hammer, a nail punch, lots of sandpaper in various grits, a vacuum cleaner oh, and lots of room in your bin! You will end up with lots and lots of bags filled with sawdust.
WHAT PROTECTIVE EQUIPMENT WILL I NEED?
It’s always important to be safe so you’ll definitely need some high-quality dust masks (we’d recommend FFP2), some ear protection (propper ear muffs are obviously best, but some earplugs will work, too) and sensible shoes.
IS THERE ANYTHING ELSE I HAVE TO PREPARE?
Make sure your floor is completely flat and nail-free. Every guide states that you should punch every nail of your floorboards into the wood so that it’s about 2mm under the surface.
DO I REALLY HAVE TO PUNCH DOWN EVERY NAIL BEFORE SANDING?
In our opinion – no. Of course, you can’t have any nails protruding out of the surface, but we didn’t find it necessary to punch down the nails at all.
I should point out that this is NOT recommended and you will definitely have to be careful with your sander, as it can catch on a nail and rip your sandpaper or worse, damage the machine.
The floor sanding company that tackled our living room floor also didn’t bother with this step. Definitely, something to do at your own risk!
Sanding Floors
Yes! Sanding your floors is easier than you probably think but it is physically hard work! Do your research and be well prepared.
HOW DO I SAND A WOODEN FLOOR?
You will have to sand around the edges of the room with the edging sander and sand the rest of the floor with the large drum sander.
If you have really, really uneven floorboards, you should start by sanding (with the large drum sander) diagonally to the floorboards to even the floor out and then move on to sanding in the direction of the boards. As a general rule, you always sand with the grain of the wood!
You will have to sand around the edges of the room with the edging sander and sand the rest of the floor with the large drum sander.
If you have really, really uneven floorboards, you could start by sanding (with the large drum sander) diagonally to the floorboards to even things out and then move on to sanding in the direction of the boards.
As a general rule, you always sand with the grain of the wood.
You can see our full detailed tutorial on how to sand wooden floors and floorboards here.
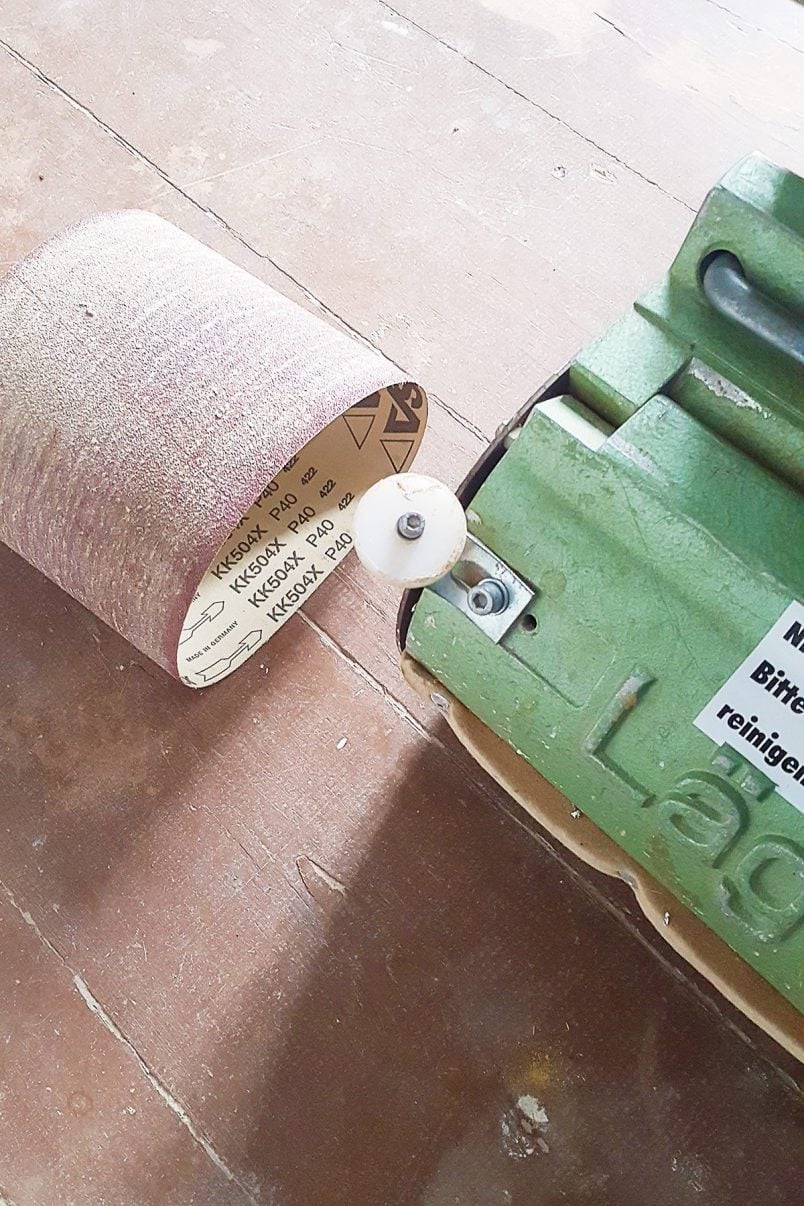
WHAT KIND OF SANDPAPER SHOULD I USE?
The type of grit will ultimately depend on your floor. What condition is it in? Are the floorboards wavy and uneven? Has it been painted or is covered in carpet glue?
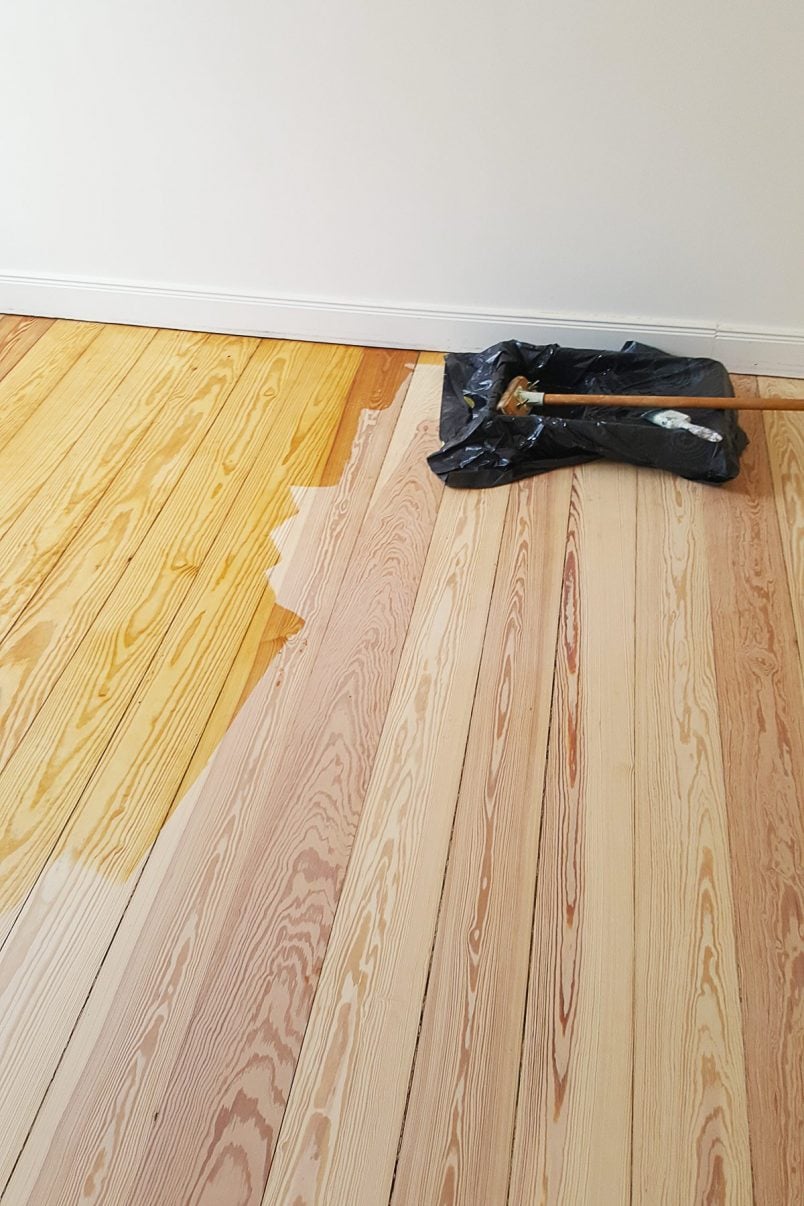
We used 16 grit, 24 grit, 40 grit, 60 grit, 80 grit and 120 grit. Start sanding the floor with some really coarse sandpaper to remove old layers of varnish and even your floor out. #
Only when your floors are free of the old layers of varnish, stain and grime can move on the less coarse paper.

If your floorboards are ‘just’ dirty or have a thin coat of paint on them, starting to sand with 24 grit sandpaper should be sufficient.
If your floorboards are really uneven or painted in a thick coat of paint, you will probably be best starting to sand your floors with 16 grit paper.
IF I’VE REMOVED ALL OF THE DIRT AND GRIME WITH THE COARSE PAPER, WHY DO I HAVE TO BOTHER SANDING IT AGAIN WITH FINER PAPER?
The really coarse paper will really eat into the floorboards and leave a very rough surface. With each sand with finer paper, you are removing and smoothing out the roughness of the wood.
Don’t skip the really fine paper either. It really does make your floor much smoother, more professional and easier to maintain.
HOW MUCH SANDPAPER WILL I NEED TO SAND A FLOOR?
Switch your sandpaper regularly – it’s definitely something we learned the hard way. The more frequently you switch the paper, the faster you’ll be able to sand the floors. Don’t underestimate the amount of paper you will need, either.
When hiring the machine you buy the paper, too, but usually, you can return any surplus. You don’t want to run out of paper, especially if you’re working at the weekend and can’t get hold of more!
For the large drum sander, we used about 12 sheets of 24 grit, 8 sheets of 40 grit paper, 8 sheets of 80 grit paper and 5 sheets of 120 grit paper. For the edging sander, we used about the same amount of each grit again.
IS SANDING FLOORS BY HAND POSSIBLE? CAN I USE A HAND SANDER TO SAND FLOORBOARDS?
No. Believe me, I tried. It would also end up being a false economy, as even if you don’t count the impossible amount of time it would take to do, you would probably also end up going through such a ridiculous amount of sandpaper that it may even end up costing you more than to hire a machine!
You will probably use a detail sander to finish off the corners of your room, so if you are tempted to see if sanding floors by hand is possible, give it a try in a corner where you’ll be using a detail sander for anyway. You’ll see just how long it takes to sand a small corner and can then work out how long it would take to sand a full room!
WHAT TYPE OF SANDER IS BEST FOR FLOORS AND WHAT’S THE BEST FLOOR SANDING MACHINE?
The quality of machines does vary a lot and you’ll generally find that the machines you hire at a DIY store aren’t as good as the ones the professionals use.
It’s definitely worth visiting either a dedicated floor sanding/supply shop or a hire shop rather than a general DIY store as they will be able to give you better advice on what machines will work best for your floors.
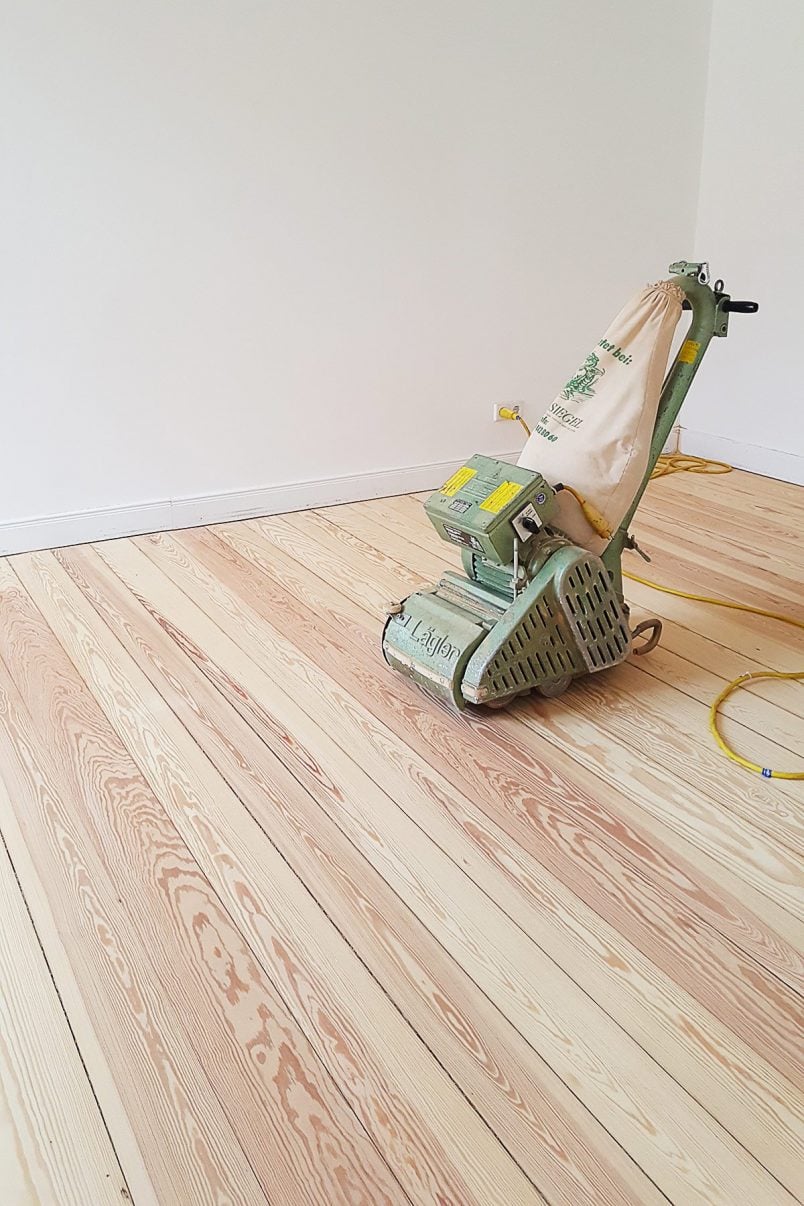
If you can get hold of one, we would always recommend using a Lägler ELF 200 as it’s by far the best machine for sanding floors and is really easy to use.
As a DIYer though, it’s unlikely that you’ll be sanding hundreds of square metres so don’t worry too much about using other machines as they will all do the job.
WHAT IS THE EASIEST WAY TO SAND A FLOOR?
Use the right tools, use the right grit sandpaper and change it often. Take your time and make sure that the drum of the sander never stays on the spot to avoid sanding grooves into your floor. It’s physically hard work but not difficult to do.
HOW DO I SAND PAINTED FLOORS?
It doesn’t matter if your floors have been painted, varnished or are just covered in a century’s worth of dirt and grime.
The process is always the same – empty the room, make sure your floorboards aren’t damaged and that the floor is safe and secure, sand the main surface of the room with the drum sander, use an edging sander for the outer edges of your room, clean and varnish, oil or paint when you’ve finished.

HOW DO YOU CLEAN BETWEEN SANDING YOUR FLOORS?
The best way to remove sawdust after sanding wood floors is with a good vacuum cleaner. The amount of sawdust you create is staggering and although a good drum sander will collect most of it, you’ll inevitably find that lots of sawdust will remain on the floor (and everywhere else in your home!).
We’d recommend investing in a vacuum cleaner that’s hard-wearing like the Kärcher WD3 that we have and love – as it’s pretty much indestructible, very affordable and you can use it with or without vacuum bags to save money.
After sanding and vacuuming for the last time before sealing your floor with varnish or oil, you can also wipe the floor with white spirit (it’s called mineral spirits if you’re in the US) to remove any fine sawdust.
This is optional (we didn’t bother on our floors but it’s something we do when sanding and painting furniture) but it will leave your floors perfectly clean for your chosen finish.
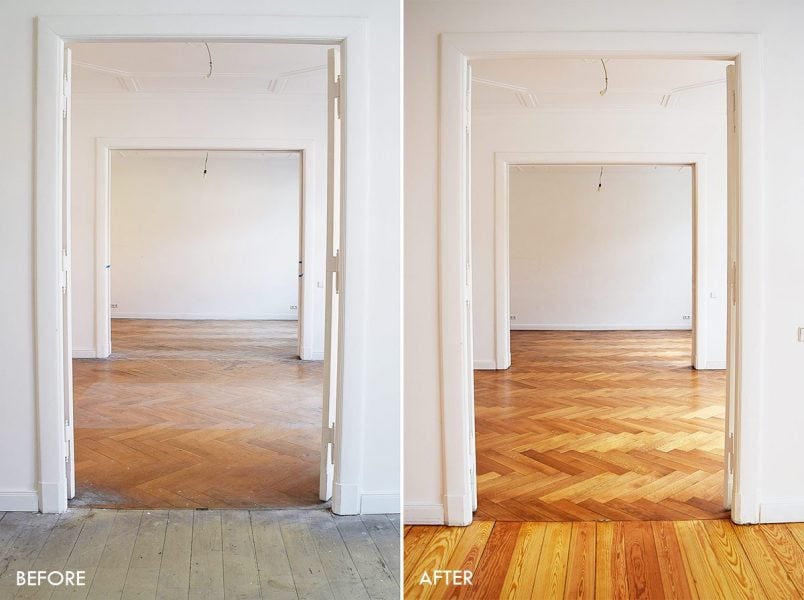
Floor Finishing – Varnishing, Staining & Oiling
WHAT KIND OF FLOOR FINISH SHOULD I CHOOSE?
We’ve opted for both varnish and oil in the past and really liked both. A lot will depend on the product you use though as some varnishes can make the floor look plastic-y and some oils (and varnishes) can change the colour of your floors significantly.
When it comes to both oils and varnishes there’s an almost endless choice of products to choose from. We highly recommend using Granwax Aquathane water-based varnish as it’s extremely easy to work with, has only a faint odour, dried really fast, and most importantly, is extremely hard-wearing!
It only took a couple of hours to be able to walk over the surface again after applying the varnish which made it ideal, especially for areas like our hallway and kitchen. Another reason why we highly recommend this varnish is that it didn’t make our floorboards yellow and had a really natural non-plasticy feel.
Another option would be to oil your floors which is what we did in our second home.
Oil definitely has a more natural finish than varnish but we did find day-to-day maintenance a tiny bit more involved.
Basically, you can’t let the floor get wet so any spills and drops of water have to be wiped up immediately or they will stain the floor. Other than that, we loved the finish and oiling your floor is a really easy thing to do, too!
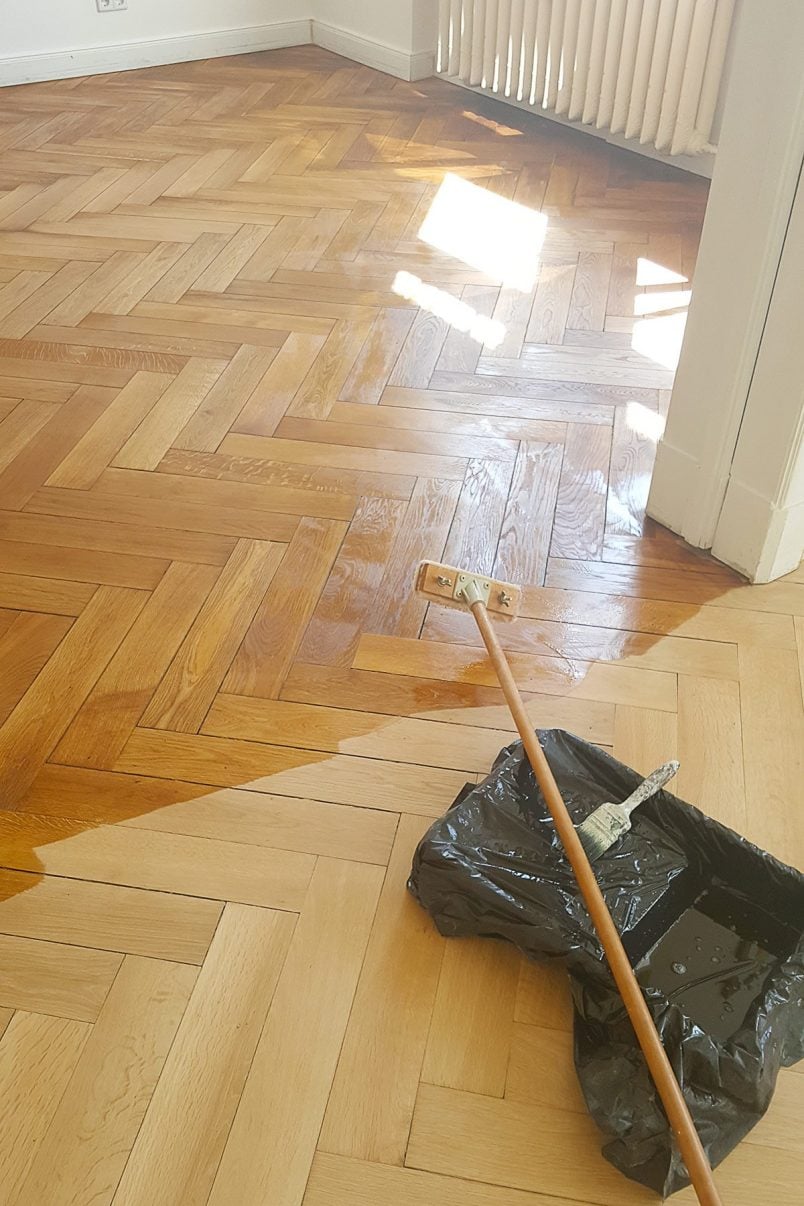
HOW DO I VARNISH A FLOOR?
This couldn’t be easier to do. Start by making sure you’ve removed all dirt and dust from sanding before varnishing. We only used a brush (this is the one that we used), but you could use a roller just as well. Let each coat of varnish dry completely before applying another.
We’d recommend 3 coats of varnish in low traffic areas and 4 in high traffic areas like your hallways. Always read the manufacturer’s instructions though, as the specifics can vary depending on the type of varnish you are using!
When applying the varnish, always make sure that you apply your brush strokes in the direction of the wood grain. That’s pretty much it. We found it easiest to work our way across the varnishing a few floorboards at a time.
HOW DO I OIL A FLOOR?
There’s almost no difference to varnishing it. Again, make sure your floor is clean and apply a coat of varnish with a rag or, as we did, a special oiling pad on a poll. When you’ve oiled the floor go over the whole surface with a clean rag to take up any excess oil.
Let the first coat dry before applying a second and third coat (letting each coat dry in between).
Exactly how you oil your floor will depend on the oil you use, so always read the manufacturer’s instructions!
WHAT IF I WANT TO COLOUR MY FLOOR?
We’d recommend using a stain and then a clear varnish on top. We’ve seen a few floors where a coloured varnish has been used which over time inevitably wears away and gets the odd chip and scratch.
As the colour chips away, any marks are then really visible. If you stain and then varnish the floor, for the most part only the varnish will wear away leaving any chips less visible.
WHAT KIND OF GLOSS LEVEL SHOULD I CHOOSE?
As with all decorative decisions, the choice is yours. We chose to finish the floor with a clear satin varnish.
We wouldn’t recommend using a matt varnish as the floor can quickly look dull on the other hand, a high-gloss varnish will show up any imperfections which is why we’d recommend opting for something in the middle like a satin finish.
WHAT KIND OF VARNISH SHOULD I USE TO VARNISH A FLOOR?
We used Granwax Aquathane varnish in satin and highly recommend it.
It’s what we used on all of our floors and is the same product that the professional floor sanding company used, too. We love it because it’s really easy to apply, dries quickly and has a great natural-looking finish that doesn’t have that plastic-y look and is extremely hard-wearing.
HOW LONG SHOULD I WAIT BEFORE VARNISHING A FLOOR?
Your floor is essentially unprotected after sanding. You should aim to get it varnished (or oiled) as soon as possible.
HOW MANY COATS OF VARNISH SHOULD I APPLY?
The manufacturer’s guidelines will vary, but as a rough guide around 3 coats for normal traffic areas and an extra fourth coat for high traffic hallways like hallways is what you should be aiming for.
HOW LONG BEFORE I CAN MOVE MY FURNITURE BACK INTO THE ROOM?
You shouldn’t move your furniture back till the varnished is entirely cured, which (depending on your varnish) can take up to 14 days! In most cases, this obviously isn’t possible and we only waited about 48 hours for most of our furniture.
Timescales
How long does it take to sand a room?
Don’t underestimate the amount of time it will take to sand your floor. The professional floor sander guy took around 2-3 hours to sand our living room floor – it took us a lot longer!
In numbers, it took the two of us about 25 hours to sand 4 rooms (totalling about 43m²). If you had just one room the same size, it probably wouldn’t take as long, as you’d have fewer edges and less manoeuvring to do.
How long does it take to varnish a floor?
Varnishing the floor is surprisingly quick. I’d say it didn’t take us much longer than an hour to varnish all the rooms once.
Cost of Sanding Floors
How much does it cost to sand a wooden floor?
We paid about £250 to have our living room floor (about 15m²) sanded and varnished. That works out at around £17/m². As a DIY job, the cost will depend on how many rooms you are doing in one go.
This is the cost breakdown of our epic floor sanding effort (dining room, hallway, first-floor landing & guest bedroom):
- The machine hire cost – Weekend hire floor sander and edge sander (Friday 14:00 – Monday 12:00) – £52.50 (special half-price offer)
- Large sanding sheets – £69.60
- Small sanding disks for edging sander – £46.80
- Varnish (we still had some leftover from our staircase restoration, so only needed one extra can) – £40.00
- Dust Masks – £4.18
Total: £213.08 – That works out at around £5/m².
Maintenance
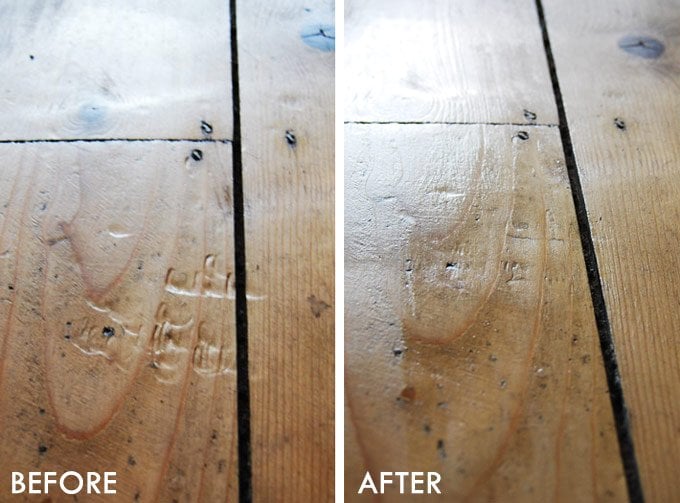
How does the floor hold up? Are there any dents and scratches?
Our floor is holding up really well. In general, we don’t really wear shoes in the house, which is probably something that helps keep the floor looking good.
Of course, there are a few dents and scratches, but they kind of add character to the floor and because we chose a clear varnish they are almost not visible.
If you have a dent that really bothers you, you can check out our guide on how to remove dents in wood here.
How do I maintain a sanded wooden floor?
We just give it a regular vacuum and wipe it down with a damp cloth. Really nothing special.
How long will it last?
As a general rule, you should think about refinishing your floors when you redecorate. Refinishing it doesn’t mean that you have to go to all of the sanding efforts again. It’s more a case of lightly sanding the surface and revarnishing it.
Tips & Tricks
Will it be dusty?
Yes. It gets everywhere. Try and seal off the room you are working in as much as possible. On a positive note, the dust is really light and easy to vacuum and clean away.
As I mentioned above, it’s a good idea to invest in a robust vacuum cleaner. We love our Kärcher vacuum cleaner – it’s indestructible and super affordable (well, so far at least!).
Is sanding your floors a DIY job or would I be better off getting a professional to do it?
It’s totally DIY-able, but be warned, it’s really, really hard work. The sanders are really heavy and I just wouldn’t have been able to lift the machine out of the car and into the house on my own.
Is there really a difference between a professionally sanded floor and a DIY sanded floor?
Having had some of our floors professionally done and having done some by ourselves, we can happily say that there is absolutely no difference.
Should I fill the gaps between the floorboards?
The gaps between our floorboards aren’t very large and we didn’t bother filling them. We have however insulated under our floors and also insulated the gaps between the skirting boards and floors.
Should I decorate the room before or after sanding?
Really it’s up to you. We’d recommend doing any of the dirty work like stripping wallpaper and skimming before sanding the floor, other than that it really doesn’t matter.
When sanding around the edges of the floor, you will inevitably knock your skirting boards, though, so finishing them off after sanding the floor is probably a good idea.
Do you have any tips for us?
Don’t underestimate the work required! Keep an eye out for offers. Some hire shops seem to have half price or 3 for 2 events. It’s really noisy – don’t plan on doing the work if your neighbours are home!
We hope that our guide on how to sand wooden floors has helped you! If you have anything else you’d like to know, just drop us a line, we’d love to help if we can!
PS. If you’re worried about making any floor sanding mistakes you see our guide to the top 5 Floor Sanding Mistakes & How To Avoid Them here.
SHOP OUR DIY ESSENTIALS


Tris says
It looks beautiful, but it’s definitely very time-consuming, I’m wondering whether to outsource this task to an external company… and in some places my floor is very damaged from furniture scraping :(
Christine says
That’s the question we always ask ourselves when doing and DIY project, too. It’s definitely hard work, but it saved us thousands, so for us, it was worth it.
Cx
Charlotte says
Hi there! Seeing some articles out there that I should be “screening” the floors with a buffer after I’m done sanding before I stain. That’s another step and another huge machine to rent. You don’t mention them anywhere here, so is it safe to assume you didn’t do that? Would you recommend skipping that step/is it a step you’ve heard of before?
Christine says
Essentially the answer to your question is – it’s up to you, Charlotte. For the best finish when staining the floors, you will have to make sure that the surface is really even and all sanding grooves have been removed. That’s why a buffer machine can be helpful. We never stained our floors so didn’t bother with one but we did use a buffer when we sanded our parquet floor to give it a very even finish.
In short, do I think you have to use one? No. As far as I’m aware “screening” refers to just removing the varnish without actually sanding the floors. Having said that, buffing the surface before staining it could give you a better result.
Hope that helps!
Cx
jacqui says
Hi there – i painted my wall but have now decided to sand my stairs – is there a wall of sanding the stairs without ruining my walls ive heard something called an edger can be used? Thanks
Christine says
You should be able to sand your stairs without damaging your walls, Jacqui. I’ve sanded whole rooms after painting the walls and I honestly think the order in which you do things is a personal preference. Having said that, a what you use to sand your stairs will depend on what condition they are in. An edge sander like the ones you use to sand floors will be too large for your treads but you can use a mouse sander and an orbital sander to sand the staircase. The most important thing is to start with the right grit sandpaper. Don’t use anything too fine to start with as it will take forever to sand your stairs. You may also want to check our this post where we share everything your need to know about sanding wood.
Hope that helps & good luck with your staircase.
Cx
Dolores Hill says
Hi there, I am (hopefully) wrapping up a DIY sanding job on our Edwardian floorboards. Today I had my first go using the 120 grit paper with the belt sander, and noticed with was leaving sort of ripple/skid marks in the wood. Not very obviously but definitely there. Do you know why this might be happening? And what I could do to prevent it or fix it? Thanks, Dolly
Christine says
Yay, congrats on (almost) finishing your floor! I’m not sure why there are ripples but I’d definitely check that the sandpaper is firmly attached to the machine and there’s no dirt between the sandpaper and drum. So sorry I can’t be more help!
Cx
Liz Scott says
Thank you for a fantastically useful guide! I know that filling gaps – some quite wide – will be essential for me. Can you give advice on how to do this?
Christine says
So glad you found it helpful, Liz! The gaps between our floorboards weren’t too big so we didn’t bother filling them. On the ground floor, we insulated under the floorboards so that we wouldn’t have any draughts and it wouldn’t be too cold in the winter. In the rooms where the gaps were too large, we actually took up all floorboards and pushed them closer together so that we wouldn’t be left with gaps. Obviously, that’s a lot more work but it was really the only way to remove the big gaps.
Having said that, there are special strips that you can squash between the gaps. We’ve not used them, so I don’t know how well they work but they might be something worth looking into. Another alternative is to fill the gaps with a mixture of sawdust from sanding the floor and wood glue. Squash the paste into the gaps and then sand everything again. Again, this isn’t something we did, so I’d definitely recommend doing a bit of research.
Hope that helps!
Cx
Claudia M says
Hi Christine,
Your floors look amazing!
Do you sand between varnish coats? I also, couldn’t understand how many different grits you used in a room before varnishing.
Thank you.
Christine says
Thank you so much, Claudia! I didn’t sand between coats of varnish. It’s something we always, always recommend when painting furniture but we decided not to bother with the floors. They were pretty smooth even though we didn’t sand between coats of varnish. The grits you have to use will depend on the condition of your floor. We’re actually in the process of creating a floor sanding checklist and a full e-book with everything (and more) you could ever need to know. Basically, though we recommend starting with 24 grit (we started with 16 grit in our last home where the floors were covered in really thick varnish), then 40, 80 and finally 120 grit.
Hope that helps but please reach out if you have any other questions and we’ll do our best to help!
Cx
PS. We’d love to see a picture of your finished floors! It’s hard work but I’m sure it’ll be so worth it!
Brett Ehlert says
The flooring looks great! You’re tips are really helpful. Thank you for taking the time to share this.
Christine says
Thanks, Brett! You’re welcome!
Cx
Gena Jihnson says
Did you pull your base trim to sand?
Christine says
Nope, there’s no need to remove it as you can sand right up to the edge with the edging sander, Gena. You’ll probably end up scratching and marking them slightly, but a quick touch up is much quicker and easier than removing and reinstalling them.
Cx
Joanne Mitchell says
Hi Christine
In your second home you used an oil rather than a varnish. Can you remember the name of the oil that you used?
Kindest regards
Christine says
We’ve not linked to the oil just because we weren’t 100% happy with it and only ever recommend products we’ve tried and tested ourselves and think that will really help others achieve great results, too.
The oil was perfectly fine and easy to work with, it just made the floorboards turn slightly yellow (to be fair, it did say that on the tin). If that’s not something that would bother you, the oil is Leinos oil – you’ll have to use Leinos 240 for the first coat and Leinos 245 for the following ones.
Cx
PS. Something you may want to try is the Osmo website where you can order 5 sample sachets of their oil for free to test the different finishes!
Joanne Mitchell says
Thank you for taking the time to put together this guide. It has been really useful. I am struggling with getting an even finish so will try the diagonal technique. (my floorboards are a mixture of curves and dips!
Christine says
Thanks for the feedback, Joanne! You might also want to check out our post about the biggest floor sanding mistakes we see again and again – maybe that will help solve some of your issues, too?
Happy Sanding!
Cx
Michael Birch says
hi . having read your tips and main article I’m well impressed. I think your website should be given out at the hire centre.
two things I’d like you to consider. advice on getting old glue up and cement, in the prep stages I found rather than ruin sanding sheets I could carefully use a chisel, sharp to scrap glue and blunt to tap off cement. Second thing is Vibration, maybe I was too cautious but I was taking regular breaks and keeping my hand circulation up.
Christine says
Haha, what a lovely thing to say, Michael! We didn’t have any glue or cement on our floorboards, so it’s not something we thought about, but you’re totally right that the sanding sheets can damage easily so removing any major dirt beforehand would be a good idea. We always recommend starting with fairly coarse sandpaper (we used 16 grit in our current home) if your floorboards are covered in a lot of layers of paint and dirt as the sandpaper will clog up a lot less.
Taking regular breaks is always a good idea. I’m not sure how much the vibration will impact your health if you’re just sanding a room or two but if you’re sanding a larger area, regular breaks are definitely a good idea!
Thanks again for taking the time to comment!
Cx
Ben Ralston says
Do you fill the gaps between the boards?
Christine says
No, we didn’t, Ben. We did, however, insulate all floors from underneath which is what I would recommend as it would be rather chilly otherwise.
Cx
Sam says
Hi,
Transformation looks great! We are Looking to do something similar ourselves, I’m curious as to how easy it was to replace parts of the floorboards as this is something we will have to do aswell.
Thanks!
Christine says
Replacing the floorboards was probably one of the easiest parts of this whole project, Sam. It really isn’t difficult to do, you obviously just have to look out for any pipes or cables that may be hidden under floorboards. The biggest problem is finding matching floorboards which is why we removed a couple of floorboards out of one room where we knew we’d be covering the floor. Using the same floorboards definitely helped blend everything together.
Hope that helps and good luck with your floors!
Cx
Holly Turner says
Hi Christine,
My partner has been sanding our floors in our Victorian house for the first time. The main sander we hired broke & they have been closed all weekend so he ended up using the edging sander to do the whole room. We have been left with swirls and circular sanding marks all over the floor. He’s kind of said he’s done and doesn’t feel there’s any more to do, that it’s just how it is & you won’t notice once you’ve varnished. I disagree but of course he doesn’t want anyone criticising his hard work no mater how diplomatic I was.
Whats you view on swirl marks? Surely we can get a much smoother finish?
Christine says
I really feel for you, Holly! Sanding floors is such hard work and I know exactly how you feel! I have some good news and bad news. The bad news is that any marks you see now will only be emphasised when you varnish the floor (sorry!) but the good news is that the big drum sander is much easier, quicker and a lot less hard work to use than the edging sander. I can totally relate to you not wanting to sand again but try to give yourselves one last push – it’ll be worth it!
Good luck!
Cx
James Draper says
Beautiful guide Christine and the pictures are especially helpful as well as stunning – great results! Thanks for sharing.
Christine says
Thank you so much, James!
Cx
April says
Hi Christine,
I was wondering how you dealt with the herringbone floors, we have his and wood tiles in our house (1966) and the rental company got all fidgety, told us to get about 3 to 4 different machines for each floor and started barking we should def just hire their specialist. Because apparently it’s impossible to DIY and drum sanders turn into lose horses as soon as you turn them on on these floors….
I’m all about understanding a drum sander might not be perfect, but the whole act of them selling me more products or their pro service not so much.
About half the floors we will be sanding is a “regular” hardwood floor and the tiles and herringbone are about evenly over the other half. Lot of it is hallway with a ton of corners.
Christine says
We sanded our herringbone floors by ourselves and it wasn’t much different than sanding floorboards. I totally agree with you that the rental company were just being a bit weird (although I obviously don’t know what kind of machines they have) and think it’s something you could do yourself. We shared a full post on how we sanded our herringbone parquet which you’ll hopefully find helpful but do let us know if you have any more questions and we’ll be happy to help (if we can!).
Cx
Anthea says
Hi there,
I’m hoping to start dealing with the many and varied drafts that blight our through-room – currently our kid’s playroom. There are drafts under the skirting boards (expanding tape tip gratefully received), around the old window frame, and some through the exposed floorboards (which will be sanded, varnished, and to some extent rugged). However, I am concerned not to OVER draft proof, as I know stopping a house of this date (1910) from breathing leads to rot in the long run. What is your take on this, and where do you draw the line? (You appear to have a massive gap under your front door for example!!! But that might just be the photo….)
Best
Anthea
Christine says
Draughts can be so annoying, can’t they, Anthea! I actually draw the line at any draughts which isn’t always easy in an old house. When we sanded our floors we added insulation under them and I have to admit that I wouldn’t have done it otherwise because the ground floor would too cold and draughty. You’re right though, it’s important to maintain ventilation in certain areas (like your floorboard joists for example) so it’s really important to consider the flow of air and where you insulate carefully. Other than that, we actually replaced most of our windows in our first home (partly due to the draughts) and are in the process of overhauling ours so that they’re draught free.
Oh, and our front door (I assume you’re talking about our Edwardian house) didn’t actually lead to the outside. There was a porch in front of it so any gaps didn’t matter too much!
Good luck with your draught proofing!
Cx
Barbara says
Hello!
Thank you for such an informative and helpful guide to sanding floors. As previous people have commented on it’s great to have advice for what you can/can’t get away with. I have just about 3 1/2 days over half term without kids and husband and am going to sand and varnish our kitchen floor – roughly 36m2. I am going to turn the heating up to speed up drying time. How long before I can walk on floor with socks on do you think? Thinking about access to fridge, water and coffee machine:-)
Many thanks!
Bx
Christine says
That’s a really difficult question to answer as it’ll depend on your floor and the type of varnish or oil you use. The varnish we used dried really quickly – that’s part of the reason we loved it. If you varnish in the evening you should be able to walk on it the next day without any problems. Blocking off the coffee machine sounds like a nightmare! ;)
Good luck with your floors – it’s hard work but so worth it! Do let us know if you need any help with anything else.
CX
Barbara says
Thank you for replying so quickly – I’ll sand early so I can varnish in the evening!
Barbara says
– and do you have a post on your pink front door? After the floors I’m on to my front door and want it pink too (there are too many grey doors in our street).
Bx
Christine says
Yep, we shared a few posts about our door (and our new one). Here are a few of them…
Front Door Makeover
We Have A Front Door!
Paean Black Front Door
We also shared a post on how to paint doors (based on our interior ones). The process is the same just make sure to use a wood paint that’s suitable for the exterior.
You might also find this post helpful where we share a few tips on painting.
Hope that helps but let us know if you have any other questions! More importantly though – good luck with your floors!
Cx
Annette says
Wish me luck, I am about to embark on sanding my WHOLE HOUSE (four 14ft square rooms, plus a long wide hallway, and three smaller rooms…. All up, maybe 1,300 square feet? I will hire a floor and edge sander, and probably run the hire shop out of paper! Some of the flooring is newer pine, and the rest is original Baltic pine, with Black Japan edges… I must say that I am feeling more confident after reading your tutorial, and even though I haven’t started yet, I can’t wait to see the finished job.
Christine says
Ohhh, that sounds like you have so seriously hard work ahead of you! I sanded all of the floors in our new home (about the same size as yours) but split it into two halves which about a month break in between (our floors needed a lot of sanding though). My biggest tip is to start with the right paper – don’t use a grit that’s too fine to start with as it’ll just take forever to sand the floors! You can see our new floors here.
Good luck with your floors – we’d love to know how you get on (and maybe see a picture, too)!
Cx
Annette says
Thanks Christine, I will definitely share some photos somehow! I will be throwing myself into the whole sanding job at once, because I know that if I split it up it won’t get finished! So looks like I will be basically killing myself over the period of about three days, but thankfully the floors aren’t too bad…. None of them are painted (there is Black Japan stain in the hallway, but I am not bothered if that remains, and I am not restaining that right now), two of the big rooms are newer boards and nice and flat. One big room’s boards have been quite hacked at the edges, to make them smoother for carpeting :( So sad. The other big room…. Still a mystery, I haven’t pulled the carpet up yet, and I can’t remember from the little corner I pulled up ages ago, lol. I figure I can start in the little rooms, especially the bathroom, in the corner where there will be a shower… It shouldn’t matter too much if I make some little gouges with the drum sander :/ Yes, will be having bare, varnished floor in the bathroom!
Christine says
It really sounds like you have everything sorted, Annette! Good luck with everything!
Cx
Natasha Wilson says
Hi Christine,
We are just in the process of purchasing a 1930s house and I have been reading up on your guide to sanding floors. I am not by any means a DIY person but I really fancy the chance to have a go at something where I can stand back and enjoy my accomplishment. I did wonder whether I could handle this, then realised the painstakingly long boring hours it too me to remove wallpaper and backing paper from our current property which took forever! I enjoyed reading your guide and feel confident this is something I can do, you give really clear instructions and good ideas on the products to use. I am looking forward to seeing what is underneath the swirly style carpets when we finally complete purchase! Thank you x
Christine says
Congratulations on your new home, Natasha! Sanding floors really isn’t difficult it’s just a lot of hard work. It totally sounds like it’s something you could easily tackle and it’s definitely quicker than removing wallpaper! (we managed after all!). Remember to take lots of pictures just so you can remember what your floor looked like before all of your hard work!
Good luck with everything!
Cx
Ben Viney says
Hi Christine,
Very impressed by your page! We are putting a lot of effort in to restoring our Victorian terrace and I’m taking a lot of inspiration from you guys.
We have removed the downstairs walls and now have a large open plan living space and we’ve exposed the old floorboards ready for sanding and like you, I would like to use a matt varnish which is hard wearing. I see tat you used Granwax Aquathane on yours but I can’t seem to find anywhere that sells it. It may have been discontinued. Have you got any other recommendations? Also, what sort of coverage might you get from a 5L tub?
Best
Ben
Christine says
Thanks for the compliment, Ben!
I’ve had a look at the Granwax website and the product names seem to have changed. I’ve compared the products on the internet with the one that we used and going by the description it looks like this is the one that we used.
We were really happy with the varnish and it held up amazingly well. You should get one coat of around 60 – 70m² from the 5-litre container although it’ll depend on your floors, too. The first coat tends to use up a lot more varnish than the next ones.
Hope that helps & good luck with your floors!
Cx
Maria McCourt says
What a shame Christine that he is no longer working, it must be a tiring occupation to be honest, it really looks and sounds like hard work, so I don’t blame him. I’ll be in touch should I need any other tradesman recommendations or hints on the floor if we do end up sanding ourselves!
Thanks so much for your prompt reply, you’ve been really kind.
Many thanks
Maria
Maria McCourt says
Hi Christine
Your blog is brilliant and all your projects look amazing.
We want to sand our dining room floor but feel it’s too much to take on ourselves, (we’re getting on a bit!!!!)
Can you recommend the professional sanding guy who did your Manchester floor. I would be grateful if you thought he did a good job and of course if he is still working his name or company name and contact number. There are several websites re sanding in the Manchester area but I would rather have a recommendation from yourself as your floors look amazing. (I know you have done the majority yourselves, shame we can’t hire you, ha ha)
Hope you don’t mind me asking for your help and advice.
Many thanks
Maria
Christine says
Thank you so much for the compliments, Maria!
I’d love to be able to help you but I’m sorry to say, that the guy who did our floors doesn’t sand floors anymore (he stopped a couple of years ago). I could give you recommendations for other trades but I’m afraid that I don’t know any other good floor sanders.
Keeping my fingers crossed that you find a good sander!
Cx
PS. You’d be amazed at how many people ask to hire us for the most random projects! ;)
Paul Olliver says
Hello there !!
As many have said before …. GREAT GUIDE !!!
Hoping you are still replying to messages (fingers crossed!!)…. So I have just spent the last 2 days sanding the living room floor and I am pretty pleased with the result. I’m not jumping with joy however because there is about 20% of the floor in the middle of the boards that are left with the old finish left untouched even with doing the diagonal run first :-((( I realize now that when hiring the floor sander the coarsest paper that was supplied was 40 grit and as in your guide I should have started with a 24 grit. Now that time is running out and the hired equipment has been returned I wanted to know what your advise on the quickest, easiest solution to get rid of the offending marks !!
Any advise muchly appreciated !!!!
Christine says
I totally feel for you, Paul! It’s those last bits that are most difficult to remove but getting rid of them is what will make the difference between an okay finish and a great finish.
Annoyingly, the only advice I can give you is to keep sanding. It definitely sounds like you needed to start sanding with coarser paper first (we even started sanding with 16 grit in our current home) but now that you’ve already sanded with 40 grit, it’s probably best to stick with it. Keep sanding, it’ll feel like nothing happening for ages but then all of a sudden the last bits in the middle will disappear. It’s not quick but it’s the only way to do it.
Good luck with the rest of your floors! It’ll be worth it in the end!
Cx
Ben says
Hi Christine
Brilliant website, thank you so much. We’ve just finished sanding one bedroom, stairs and landing (not far from you in SE Manchester :-) and it looks great. Couldn’t have done it without your fun and informative guide!
Thanks again,
Ben
Christine says
Thank you for the feedback, Ben! So happy to hear that we were able to help in a small way – even if you had to do all of the hard work! ;)
Cx
Tobias says
Good guide, saves me having to take the skirting boards off which i was considering.
One question, when varnishing, did you sand between coats? Cheers!
Christine says
You can, of course, take off the skirting because it will mark but we found that just touching up the odd mark here and there was much less work.
You should totally sand between coats of varnish, Tobias. I always do when painting any furniture, doors, etc. but have to confess that we didn’t on the floor. It was still smooth and we figured it didn’t matter if there was the odd bump on the floor.
Cx
Marc says
Hi!
Thanks for the great article!! It’s been so helpful!
I’m thinking of doing this myself but got a quote from a well recommended professional which comes out at just over double the cost…so it’s tempting to avoid my terrible DIY skills :)
Can I ask what you guys did with the furniture you left in the room?(sofa and sideboard) You said you left it in to sand but were you able to leave it there to varnish too? I’m just trying to plan the logistics of varnishing times and sleep :)
Christine says
I’m actually sanding the floors in our new home right now and I can honestly say it’s one of the worst jobs. I’ve only done a day and am already aching all over and I’m sure I dreamt about sanding last night! Having said that, it’s so worth it in the end!
We moved the furniture from one side of the room to the other and then back again – for both varnishing and sanding. The varnish we used dried quickly, so it wasn’t too bad. If at all possible, I’d definitely recommend moving the furniture out of the room though. It makes working sooo much easier!
Cx
Marc says
Thanks for your reply! That doesn’t sound like fun but hopefully it’s worth it in the end! :)
Can I ask what finish you’re using on your new house? I’ve seen a lot of people recommend osmo poly oil but the professionals I had out advised against oil recommending lacquer instead. Thanks!
Christine says
I’m aching all over but it really is worth it! (You can see some current pics in our Instagram Stories).
We’re going for an oil finish this time. I loved the varnish we used and would still happily recommend it but there are a lot of reasons that oil is a viable option, too. If you use a good oil the finish can be as hard-wearing as varnish but, as always, there are pros and cons. We’re planning on sharing a post about it (which will probably be too late for you). At the end of the day, it’s personal preference though!
Cx
Marc says
It looks like you guys are well underway!!
I just started today…man that edge sander is hard going!!
One thing I’m noticing is the finish is coming off the middle section of my floorboards find but mostly around where floorboards meet and some other points the sander doesn’t seem to be having much of an impact.
Do you have any tips? Do I need to go to a lower grit? (I started on 40 since the boards were previously sanded and finished just a long time ago and are now a bit worn) or does it mean the boards are uneven and I should do a diagonal pass? Or just get in there with the edge sander? (God I hope not! Haha)
Christine says
We are, Marc! I actually just finished the second coat of oil – just one more to go and then we’re done (for now). Oh, and yep, the edging sander is pure evil!
You’re right about the reason the boards being uneven – we had the same issue.
I’d definitely use a lower grit to start (maybe around 24 grit) – it’ll save you loads of time and energy. Depending on how uneven the boards are I’d say that sanding diagonally can be a good idea but if you’ve already refinished your boards in the past I’d assume that switching to coarser paper will do the trick.
Good luck – it’ll be worth it in the end!
Cx
Beth says
My partner and i are planning on sanding the entire house but starting up stairs first this week!! After reading this im preparing myself for major hard work! ? however as the walls are ready for painting, would you recommend painting before or after the sanding has been done or does it really not matter?
Christine says
We’re just preparing for another sanding job, too, Beth! I totally feel for you – it is hard work but it’s also really worth it!
If your walls are ready, I’d lean towards painting them first. You don’t want to end up with paint on your newly sanded floors or take any chances denting the floor with your ladder. There’s also no need for covering anything if you paint the walls first (yep, you can call me lazy!).
Having said that, it probably doesn’t matter too much.
Good luck with the sanding!
Cx
Naomi says
Hi there, thank you so much for this helpful post – it was invaluable! We have had a tiring week sanding 5 rooms in our house and have used an edge sander to get as close to the skirting boards as possible. However there is still an inch of really black varnish next to the skirting boards which the edge sander can’t get to. It makes all the rooms look unfinished and dirty. Did you have this problem? If so, how did you deal with it? The detail sander won’t budge the black varnish. Any advice would be much appreciated!
Christine says
You’re welcome, Naomi! We didn’t have the problem you described with the edge. The sander we used went right up to the skirting board and left nothing behind. I used a little palm sander to do the corners of our room – it worked but took forever so would only be viable for tiny areas.
I think your best option would be to use an angle grinder with sandpaper disks (using the same grades you used to sand the rest of the floor). This should allow you to get right up close to the skirting and an angle grinder should also be powerful enough to remove the black varnish.
Good luck!
Cx
Graham says
This is such a great post, am helping a friend with their floors and think it’ll take us more than 25 hours lol! Will be hiring a sander from Fat Lama for a weekend, think that’ll be enough time and also have seen some listed for a decent price on there.
Christine says
Yikes, 25 hours is a long time – we could all use more friends like you, Graham! ;) Good luck with the floor!
Cx
Claire says
I live on my own have removed all carpet and nails from living room floorboards in Victorian cottage and now want to sand it. Would it be best to hire a professional as I would be unable to carry sander up all of 15 steps into my property and have had shoulder surgery last year ? Is the sander also really hard to use on your own ? I await your advice, thank you
Christine says
In general, sanding a floor isn’t a difficult or complicated job. It’s hard work but if you take your time it should be perfectly doable on your own. The machines are really easy to use on your own, too.
Having said that, I couldn’t lift the large sander out of the car on my own and there was definitely no chance of me carrying it up the stairs. The edging sander is much smaller and lighter but it has a really strong pull on it when the disk rotates which may be difficult for you to use if you have problems with your shoulder.
Hope that’s some help!
Cx
Jamie Kitson says
Did you guys sand between coats of varnish? I’ve just put the first coat on and now the floor feels quite rough :(
Christine says
Any wooden surface will always be a bit rough after the first coat of varnish or paint. It’s mostly because the air in the wood will cause little air bubbles. We usually sand after every coat of paint or varnish with some fine sandpaper (around 240 grit). Having said that, we didn’t bother sanding between coats when we did the floor as it was only slightly rough and we figured it wouldn’t bother us.
Cx
Jamie Kitson says
Brilliant thanks. Since posting I’ve watched Ronseal’s helpful video which suggests only sanding before the last coat.
Christine says
You’re welcome, Jamie. I guess sanding just before the last coat will be more than enough for the floor. If you’re varnishing furniture or anything else you’ll be touching I’d definitely recommend sanding after every coat – you’ll achieve a much smoother and far more superior finish.
Cx
Carl says
This post is excellent so far as sanding and preparation work is concerned. It is a nicely laid out version of a genuinely approved method – well done and thank you. My only concern is advice on staining. I would not advise people on colouring floors when you have not done this yourself. The reason is your floors are softwood. Staining and colouring softwood, despite what manufacturers say is stupidly difficult because of the perfect sanding job required. Even then due to uneven grain structures your floor is likely to look blotchy due to how the wood soaks it up. Hardwood is the only wood you should really stain due to more regular grain structure. Additionally maintenance of floors vary heavily depending on product and manufacturers guidelines should be adhered to in all instances. Loads of help for all this elesewhere. Nevertheless, this was a great read so bravo.
Christine says
Thank you, Carl. I believe that if you want the floor to be a different colour (whether you do it yourself or not) it has to be done before the layer of varnish. If the varnish chips (which it will) at least the colour underneath will be the same. We stained our softwood stair treads and handrail and had absolutely no problem at all achieving a perfectly even finish. I guess it will always depend on the quality of products you use (We used Fiddes Non-grain raising stain) and possibly on the quality of the wood.
Cx
John Morris says
Thanks for a really useful article, and all your responses to the replies. We have about 8m2 of downstairs hallway to do, and possibly 16m2 of lounge. All the wood in the house is stripped down to bare pine, so we thought that to effectively do the same with the flooring would work well. The lounge is currently carpeted, but it could do with (yet another) clean, or replacing anyway.
We’re committed to doing the hallway, and because of the prominent pine skirting boards, doors and architraves, and staircase banisters we’re minded to oil the floorboards rather than varnish them, so that the boards and skirting match better, but I assume we can always varnish them at a later date if the maintenance of oiled boards gets too much. The good thing is that the skirting boards are pretty flush with the floorboards and the gaps between boards are mostly quite narrow.
We got a local carpenter to look at the state of the current boards. They were borderline for being sanded, and he spent about half a day removing screws, getting the nails to match, patching up the odd gash, and replacing some of the floorboards with ones we purchased from a reclamation yard. Once or twice he was able to turn a board upside down. Anyhow we’re already about £200 down!
He thought the lounge boards are likely to be much more sound than the hallway boards, since the latter are often pulled up and put down again for plumbing jobs. This was borne out by a quick inspection of some of the lounge boards, which at some point in the last 130 years have been variously stained and waxed/oiled, but not sanded.
The hallway should be a fairly easy job being downstairs, currently clear of furniture and not too large. Unfortunately the boards are laid cross-ways, so we’ll always be sanding at a right angle to the grain.
The main question is how easy would it be to varnish boards some time after having oiled them, but we’d welcome any other thoughts and observations.
Christine says
Our floorboards are varnished and we have been happy with them but I think that we’d oil them if we were to do the project again. Varnish seals the boards but oil is more natural. Apparently, little marks and dents show up less on oiled floors, too.
I think that it would be difficult to varnish over oiled floors without sanding them again first.
Hope that’s some help.
Cx
PS. I’d definitely recommend only sanding with the grain of the wood even if it is more complicated and involves some acrobatics.
Matt says
I notice your skirting boards have taken a bit of a sanding too, I’m tempted to do this to our kitchen and living room, though I’d be concerned that the machine would damage the bottom of the kitchen cupboards.
Christine says
You’re totally right, Matt. It’s almost impossible to sand your floors without damaging the skirting at least in parts, too. Whilst skirting can probably be patched, I agree that it could be a bit of an issue with your kitchen cabinets – maybe there’s some way of protecting them while sanding?
Cx
Yusur Al-Nuaimi says
Thanks for the great webpage.
I was wondering what you can use to clean the floorboards after sanding, hoovering and before applying oil finish? Some say that you need to use some thing with no residual so the oik is taken up by the wood. Can you help?
Christine says
We just vacuumed the floor and didn’t use anything to specifically clean it afterwards. IF you want, you can wipe it down with white spirit to remove every last bit of dust.
Cx
Victoria says
I’ve just found this through Pinterest x I’m so happy , I’ve been searching the Internet for this kind of information and have come unstuck. This is amazing and so useful!! Feel like I can do my floors now confidently , thank you. ?
Christine says
Thank you, Victoria! It’s really hard work but definitely DIYable and very rewarding (when it’s done!).
Good luck with your floors!
Cx
Buki says
Hi! I’m reading your blog at 4am for the upteenth time because we are due to sand our living and dinning room floors over the weekend! The floor looks in alright condition, a bit panicky about insulation.. Whether or not stop gap would do the trick. Anyway planning on sanding, sealing and varnishing Friday-Sunday! Thanks for the blog it’s given me hope!
Christine says
How exciting Buki! It’s really don’t difficult (although it’s hard work) so try not to worry too much!.
I think that something like stop gap will help, but it’s only there to avoid draughts and won’t insulate anything. I’d definitely recommend adding some insulation as it can be quite chilly in winter otherwise. If you don’t have access from beneath, you could lift a couple of floorboards (somewhere that will be covered later, as it’s easy to damage the edge) and access the space beneath that way.
Good luck with your floor and don’t forget to take some before pictures – you’ll quickly forget what it used to look like!
PS. Would love to hear how you get on!
Cx
claudia corrigan says
Hello,
I have been using your website so much as i’m currently doing up my first flat in an old Victorian terraced house and your advice has been invaluable! Thank you!
I’m planning to sand the original wooden floorboards this weekend and then will varnish or wax them. I have a few floorboards which have been replaced with newer ones – did you have this? Is is obvious once the floors have been treated? A few are also screwed down and i’ve not been able to take the screws out as the heads have been damaged over time. Did you have this at all? For the ones i can remove I’m not sure whether it’s best to countersink them back in or replace with nails. Were all yours nailed down?
I’ve also read lots of conflicting information about varnish vs wax, is wax less hardwearing?
Thanks so much,
Claudia
Christine says
Thank you for the feedback Claudia! It’s great to hear that we’re able to help!
Yes, we had to replace some boards, but we used some of our original ones from other rooms (where we knew we’d be covering the floor). So, for us there’s no difference. You’ll probably see a slight difference for a while, but as long as you use the same type of wood I don’t think that it will be much of an issue.
We didn’t have any screws, but I would probably be tempted to remove the ones that you can and replace them with nails. The nails are almost invisible in the wood, so the less screws you have the better. Having said that, it all depends on how perfect you’d like the floor to be.
Overall I wouldn’t worry too much about things being perfect – it’s all part of the character and when everything is nicely sanded it’ll probably all blend together, so that you won’t notice any imperfections.
We chose varnish because we have the floorboards in the hallway and thought that it would be better for a high traffic area and would involve less maintenance. At the end of the day, I think it’s more down to personal preference than anything else.
Hope that’s some help.
Good luck with your sanding!
Cx
Karen says
I sanded and varnished our living room floor about 8 years ago and we are about to do the same to our 2nd reception room and main bedroom – I’d forgotten the labour of love that it was the first time around and have been scouring “you tube” tutorials and DIY sites for information, before we start our new project – HOWEVER, I stumbled across your page and I’m so glad !! it’s the most easy to follow and informative – all the other sites show the “perfect” empty rooms and a professional gliding up and down with a sander and taking a lot of time with the preparation – you’ve explained concisely here what you can do , and what you can get away with not doing…. and the timescales involved. it makes me feel more prepared now – thanks !!! ps we are only now going to re-varnish the living room after 8 years, yes its been looking a bit worn for a while, but it’s only now that we’re redecorating so as you say, it’s the ideal time..
Christine says
Thank you so much for the feedback Karen! It’s much appreciated and it’s great to hear that our experience and tips will come in useful!
Good luck with your floors!
Cx
Graene says
Hi, great website! You’re both very inspiring!
We are well underway with the renovation of our own Edwardian detached 4 bedroom house in Bournemouth. It can be a bit overwhelming at times. We have two young children!
I had a question about the floors. We are restoring our hallway and dining room. The kitchen and dining room have been knocked through and a steel installed. The kitchen is original red quarry tile and so we will be digging this up and replacing with wooden floors. I am trying to find reclaimed 5 3/4 inch floor boards to match the dining room as it will be one room now. The problem I have is that over the years for electrics and gas and plumbing, people have hacked their way through some of the flood boards with saws. Some of the cuts go through 4 or 5 boards in a straight line. I would like to stagger these and repair but would appreciate any tips for cutting and replacing boards
Thanks for a great website! I love your house
Christine says
Thank you so much Graene! It’s overwhelming here sometimes, so it’s hard to imagine what it must be like with two children as well!
Some of our floors were in a similar condition as you’re describing yours and we also rejigged them so that it looked better.
We usually tried to turn the floorboards round so that the cut end disappeared under the skirting and the end that was previously hidden was now in the room – in our case the original edges were much straighter than the random cuts that tradesmen had done over the years.
I’d also suggest turning every second row of floorboards around so that you’re alternating the cuts between one end of the room and the other. Also, if you know where your furniture or rugs will be going, try to hide some of the cuts under them. We did that in our bedroom where a couple of the cut boards are now hidden under where the bed is.
Hope that makes sense, but if not let me know!
Cx
Kerri says
Just a quick hello from another couple slowly updating our Edwardian house in Verwood with two young children – hoping to sand down our floorboards in our hallway this weekend!
Christine says
Yay! I weirdly love sanding floorboards (although it is really hard work). Hope you’re coping well while renovating with children. I can’t even imagine how much more difficult that would make things, Kerri!
Have fun sanding your floors – always remember that your hard work will be worth it in the end!
Cx
Marlene Rees-Hayward says
Wooden floor just sanded 1960 style wood 5 small strips in squares Has come up like magic
What would you finish it with.Do not fancy a shine,can I just use a wax.
Christine says
Sounds great Marlene! I would either oil it or varnish it (I personally don’t think that pure wax would be hardwearing enough). Either work well and it depends on the look you’re after. You can get varnish that’s matt (we used Granwax Aquathane in satin which is also fairly matt) but I think it sounds like oil would be a good choice for you (something like this). We’ve used products by the same company in the past (although not this specific one) and have always been really happy with the quality!
Good luck with your floors!
Cx
PS. We’d love to know how you get on and what kind of finish you decide to go for in the end!
Ross says
Hi,
Just found your page and intend to have a good read through. Just a quick question though that would help greatly in my project time lines.
I intend to sand and stain my living room, hall and study. Should I do them all in one go or would I get the same seem less results if I spread the work and the cost out over a few months?
Many thanks.
Christine says
We’d definitely recommened doing as many rooms as possible in one go. It’s hard work, but worth it. You’ll only have to hire the machines once which will be more cost efficient, you’ll only have to clean your house once (the dust gets everywhere) and best of all you’ll have it all finished on one go.
In terms of cost it really won’t make much difference if you sand one room or more. Yes, you’ll have to pay for some more sandpaper, but the biggest cost is the machine hire which you’ll only have once.
Good luck with your floors!
Cx
Hector says
Hi Christine
I have been following your blog for a while now and has helped me with some tips on DYI. So I should start by saying thank you for posting so much helpful information.
I am writing this because I saw that you kept the original floorboards upstairs, they look gorgeous. I live in a fairly modern house (built about 9 years ago). The upstairs is carpeted wall-to-wall and we would like to replace it with some solid flooring (i.e. engineered wood).
I guess that my biggest concern in making such a big change is noise – and not so much the impact noise of footsteps, but the airborne noise of voices, TV and things like that. Wood conducts noise rather well and it would be really bad if the bedrooms upstairs lose a bit of privacy because of changing the flooring.
I know you live in an Edwardian house, which is different to mine. But can you please share your experience regarding noise?
Thanks,
Hector.
Christine says
Thanks for the feedback Hector. Yes, I would say that having a wooden floor makes things a bit louder. For us the difference isn’t big – especially as there are only two of us – but I think it will be different from house to house.
Cx
Dave says
Hi,
Your house looks amazing!
We’re decorating our daughter’s bedroom in our Victorian house and are planning on sanding the floor. The boards at the moment have the dreaded, black paint / bitumen stuff that Victorians apparently liked to paint on, all around the edge of the room. Looking at some of the pics, I think(?) You had some of that stuff too.
Did you strip it off first, and if so, what with? Or did you just sand it off?
I’ve read different things on different sites, most seem to suggest it needs stripping off first or it clogs up the sandpaper, but there don’t seem any great solutions for how to get it off?!
Christine says
Thank you Dave! We didn’t have any bitumen, just dark varnish. Whilst that’s not what we stripped, I wouldn’t go to the effort of trying to remove it first.
When you first strip the floorboards, you’ll be using a really coarse 24 grit sandpaper which doesn’t clog up too much. You also have to change the paper a lot anyway. When we had our floors sanded in the living room (before we realised it was something we could do ourselves) the floorsanding guy never went more than the 3-4 times the length of the room (with the coarse paper) before changing the paper. Even if you end up using a few more sheets of paper, it’ll probably still work out cheaper than having to buy a paint stripper, too.
Hope that’s some help – we’d love to know how you get on!
Good luck.
Cx
Jacob says
Hi there,
Really great guide – so informative!
I’ve just got a couple of questions as we’ve just moved into a Victorian flat on the second floor and want to get rid of the old carpet.
Do you think we’d have issues with drafts if we’re on the second floor?
There’s currently carpet, underlay and what looks like a thin mdf board covering everything, do you think we risk annoying our neighbours below if we strip back to just floorboards?
Finally, we also have to paint the room and probably replaster (no idea how to go about this btw). I’m guessing we should do this before tackling the floor?
After reading your guide, I think we’ll have to go down the route of getting someone in to do the sanding. It’s only the living room and hallway we want done and as it’s up two flights of steep steps, I’m guessing you don’t recommend attempting to drag the heavy machines up here ourselves…
Thanks again for the handy info!
Jacob
Christine says
Thanks Jacob!
I think you may still have a few draughts – mainly around the edges where your skirting boards and floors touch (on outer walls). You can insulate between the gap though, so I wouldn’t worry about it. (We shared a post about how we did it that you can read here).
Your neighbours will definitely hear you more. I’d also recommend checking if you’re even allowed to sand the floor – I remember hearing about cases where the lease on flats prohibits that kind of work.
You should do any plastering and dirty work before you sand the floors. Plastering can be really messy, so sanding after will ensure that you end up with a great floor.
I wouldn’t worry too much about the machines being heavy. I could carry the edging sander without a problem, it’s just the big drum sander that’s heavy. Jan carried it up our stairs on his own, but it would be a good idea to get someone to help you get it up the stairs if you have two flights to conquer. Basically it’s heavy, but should be doable.
Hope that’s some help! Good luck with your floors!
Cx
Jo-Ann says
Hi. did you not seal between the boards? I have been told by every company I have contacted regarding sanding my living room floor that this is a very important step. Now I’m wondering if it needs to be done at all? Saying that, I have 3 children who have a habit of spilling drinks, so it would probably be better to have gaps sealed.
Christine says
The answer to your question is yes and no ;).
No, we haven’t sealed the gaps (and none of the companies that we contacted when we had our living room sanded suggested it). We have however insulated under all of our ground floor floors, it would be way too draughty and cold otherwise. Now for the yes part – I can totally understand why people would recommend sealing the floor (although I’m not sure how it would be done to avoid spills or what it would look like). We are careful about not spilling things, but as we have a cellar underneath all of the house, we could access any leaks underneath if the worst was to happen.
Hope that’s a bit of help!
Cx
Megan says
Hi. Hope you don’t mind getting messages so long after your fabulous sanding job!
Quick question – I’m thinking of sanding our sitting room floorboards (currently carpeted) but I’m worried about drafts and being cold in the winter.
You mentioned insulating under the floorboards and skirting, but presumably this means taking off all the skirtings and lifting up all the floorboards? This would be quite a major job…..
Hope you can advise – look forward to hearing from you!
Many thanks
Megan
Christine says
Always happy to help if we can! We have a cellar under our home, so for us it was easy to access. Our house was really cold without insulation, so I’m not sure I’d recommend having sanded floors if you can’t insulate them. If you still want to risk it, there are strips you can install between the gaps in your floorboards that should help seal the draughts (Stopgaps).
I guess it all depends on how much you’d like to see your floorboards!
Cx
claire says
Hi!
Thanks for the helpful tips, we start tomorrow!!! x
Christine says
Thanks Claire & good luck!
Cx
Laraine Smith says
Hello
The last time we had our ground floor sanded was three years ago. I am a little disappointed that we seem to have two small areas where the wear and tear is obvious already, near the dining table where there is more footfall. Is it ok to try and patch up these areas by sanding these two areas back only and reapplying the exact same clear varnish that was used originally? Or will the floor look patched up?
Looking forward to your reply
Laraine
Christine says
It’s hard to say what would be best without knowing the exact situation. Varnished wooden floors tend to change colour over time, so I assume that any are you patch will be show up. The best way would probably be to give your whole floor a light sand and revarnish, but that all depends on how much work and time you’re willing to invest. I guess the question you have to ask yourself is will patching the floor make it look better or worse than it is at the moment.
Cx
Sarah says
Thanks for this article, read it a couple of times in preparation for this weekend! 2 hallways & a dining room to do by myself.
Couple of q’s:
1) how clean should the floor be before you start? We’ve just had a plasterer round so they are quite messy
2) for a narrow hallway, are we better using the edger rather than larger sander?
3) do you clean up all the dust etc after sanding, but before staining/varnishing?
Finally, how long after varnishing can you walk on it? We have 2 dogs!!
Thanks a lot, appreciate your help!
I hope I can achieve anything like your house, it’s gorgeous!
Christine says
Hi Sarah!
That sounds like a lot of work, but I’m sure it’ll be worth it!
1. Don’t bother cleaning your floors at all! There’s really no point – the coarse paper will remove everything!
2. You should sand in the direction of the grain of the wood. We found using the edging sander much more hard work than the large belt sander. If you can, I’d suggest using the belt sander as much as possible, but if your hallway is too narrow, then you’ll have to just use the edger.
3. Vacuum a lot! I’d go over the floor a few times before even thinking about varnishing it. If you’re really picky, you could think about lightly wiping the floor down with white spirit, but I personally wouldn’t bother – it’s the floor after all!
How long it takes before you can walk on the floor after varnishing, really depends on the varnish you use and the weather conditions. Our varnish dried super quickly (within a few hours), but we didn’t put any heavy furniture back till a few days later, as it will still take time to fully cure and completely harden. I’d say wait as long as you can!
Whilst it’s hard work, it is easy enough, so I wouldn’t worry about it too much!
Good luck, hope all goes well at the weekend!
Cx
Steph says
Thank you so much for posting this! I’m about to embark upon an epic sanding and sealing adventure after pulling carpet & tapping nails in for the last week (the nails were sticking out a lot). This post has given me the courage to collect the two sanders in the morning after a few moments of ‘am I crazy?!’. So I really appreciate the shot in the arm to get on with it. Thank you!
Christine says
Thanks for your kind comment, Steph! So glad to hear that we were some help. Although it’s really hard work, it is sooo worth it. I’m sure your floors will end up looking fab!
Good luck!
Cx
Nate says
Hi, thanks for the tips. Im starting this project myself on 3 rooms in my house. I was wondering how much square footage you guys were working on when you gave your #’s for how many materials you purchased. Could you give us a better idea of how many sanding belts are needed per sq. ft?
Christine says
It’s almost impossible to tell how much sandpaper you’ll need as it compeltely depends on the condition of your floorboards (how flat they are, how many layers of paint or stain are on them, what kind of paint or stain is on them, etc.) and how often you change the paper. In all hireplaces where I researed prices, you could return any unused sheets of sandpaper, but as a very rouch guide, we used about 30 sheets (10 coarse, 10 medium & 10 fine) for the large beltsander and about the same for the edging sander. The area we sanded was about 40m² (and it was in a good condition), but we did realise that we should have switched the paper more often.
Hope that’s some help, Nate – good luck with your sanding!
Cx
Claire says
Hi,
Just wanted to say thanks for all your amazing tips, your home is gorgeous.
We have just sanded our whole downstairs and love it! We have just ordered the varnish you recommend.
Thanks again, Claire
Christine says
Thank you so much for your kind comment. So happy to hear that our advice was some help and that you’re happy with your new floors!
Cx
Sara Ransom says
I complete on my new home (well it’s 1890 but new to me) this coming Friday… having read your blog and tips, I shall be hiring a sander from Monday for 3 days to do living room, dining room and hallway… I’ll let you know how I get on! I shall be very happy if it looks half as good as yours! Thanks for sharing your experience, I’m more prepared now and not quite so daunted as before but know I’m letting myself in for a lot of hard work! :-)
Christine says
Congratulations on your new home! Sanding is such hard work, but it’s so worth it – I’m sure your floors will turn out fab.
Cx
John Cadd says
I just sanded our 20 ft bedroom . Boards are 3 cms thick . I noticed the curves and dips in the boards were stopping the centres or edges being touched. That would wear down too much wood. It was all covered in a dryish bitumen black paint. So I switched to sanding across the room . Much faster . The wood colour is light fawn if you just get the paint off .Going deeper it looks much lighter. So I just took off the paint and left the wood where it was .
The sander leaves a painted border. I used a rotary wire brush for most of that and a multitool vibration machine to clean close to the skirting boards. An awkward low position to work in .Vaccuum as you do each section . Wear eye protection .If you use a mask it steams up the lenses.Then the dust gets on them .
The wood is old growth with fine grains. Don`t try a wire brush wheel on new wood .
I found that with the heavy sander even a fine grit sheet when new is very agressive at the edges.Maybe the designers can thin down the sheet edges a little .
A massive improvement in the house. My wife loves it to bits . I still have to varnish it .
Christine says
Thanks for sharing your experience and tips, John. So happy to hear that your floors turne out great, too.
Cx
Seb says
Thank you for this amazing guide! So helpful – you saved us so much time! And congratulations on the beautiful work.
Christine says
Thanks! Glad we could help, Seb!
Cx
Amy says
We’ve just sanded the floors in our lounge and was amazed by how much work it took but they look amazing now! Incredible what 115 of under carpet dirt created but definitely worth unearthing – your website was most useful throughout though so thank you!
Christine says
Thank you so much for the feedback, Amy! So happy to hear that we were some help and that you’re floors look great.
Cx
KarenAnita says
Awesome guide! You have such a brilliant job and so glad to see all your hard work has paid off. Our floors aren’t all that dissimilar to your Before pictures! I think we’l probably end up carpeting a large majority of it, but do you think we should give the floorboards a makeover beforehand? Or not worth the effort if they’re not on view?
P.S jealous of your beautiful large hallway! xx
Christine says
Thanks! We are really happy with how our floors turned out, especially since some of them really weren’t in a great condition. If you’re carpeting your floors, I really wouldn’t bother doing anything to them. All of your hard work would just be wasted.
Cx
PS. We love our hallway, too. It’s one of my favorite places in the house.
paul b says
Just a quick q on your stair decor.
What have you done on the tops, painted or sanded and varnished as they look stunning contrasting with the risers in white.
We have an 1840’s ‘Project’ house that needs some TLC and I am looking for ideas
Christine says
Thanks, Paul! We’ve posted a lot about our staircase in the past and you can check out the final reveal post (which includes links to all other staircase progress updates) here. Basically we stripped and sanded away all old paint, stained and varnished the treads and painted everything else. It took such a long time, but we’re still really pleased with the result!
Cx
Magali@TheLittleWhiteHouse says
It’s my dream to find the original wood floor upstairs that is for now covered under layers and layers of things added by each owner! It was a very interesting post!
Christine says
Oh, it would be amazing if you had wooden floors in your house. They’d definitely go with your cottage-y style! I admire your willpower for not ripping up everything just to have a look and see what’s there – not sure I could have resisted!
Cx