Ad – This post is in collaboration with Ryobi. All opinions and thoughts are of course our own!
This summer, we’re giving ourselves a push to improve our outdoor space and make it a more usable and pleasant space to be in.
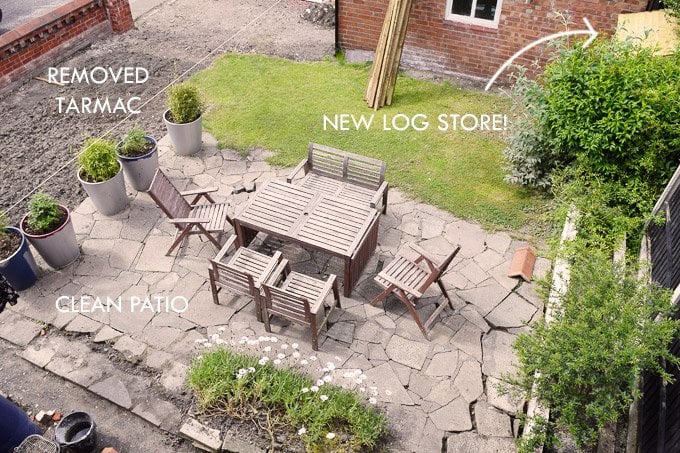
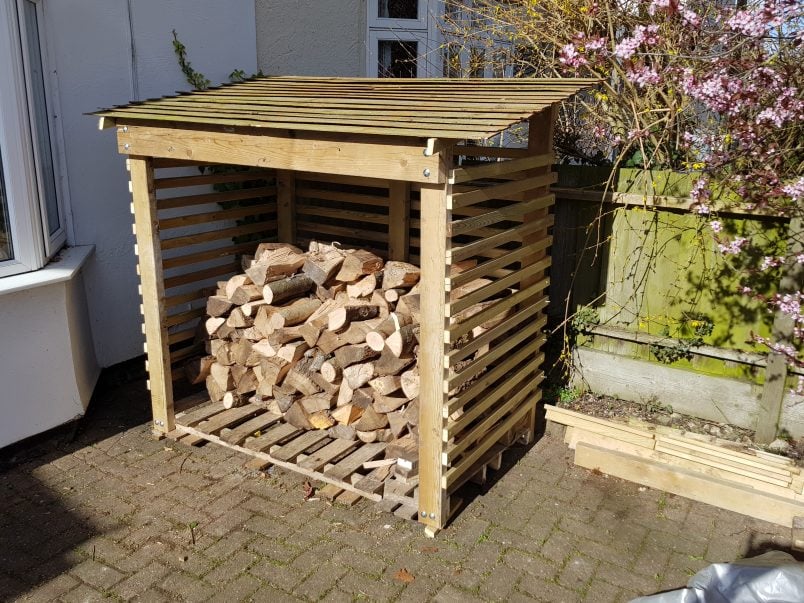
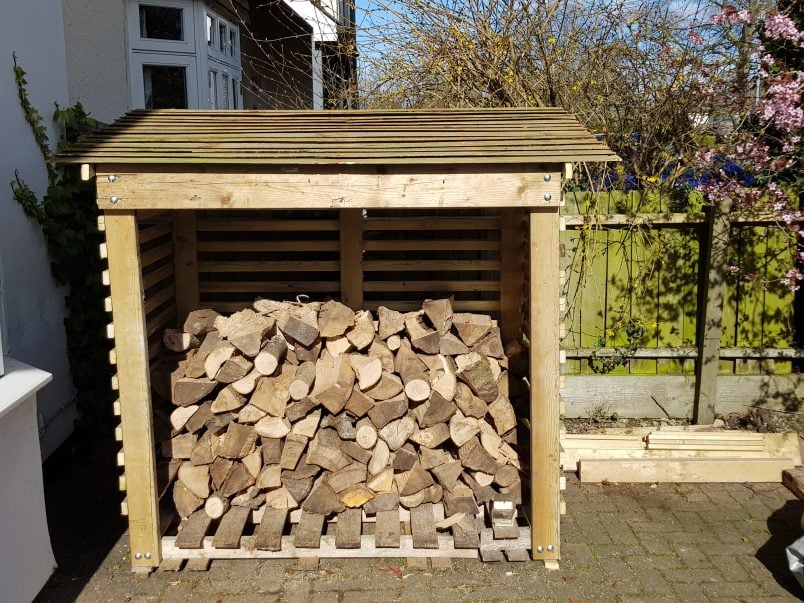
We’ve taken up some of the tarmac that covered most of the garden (more on that soon), we’ve cleaned the patio and now we’ve just finished building a log store, too!
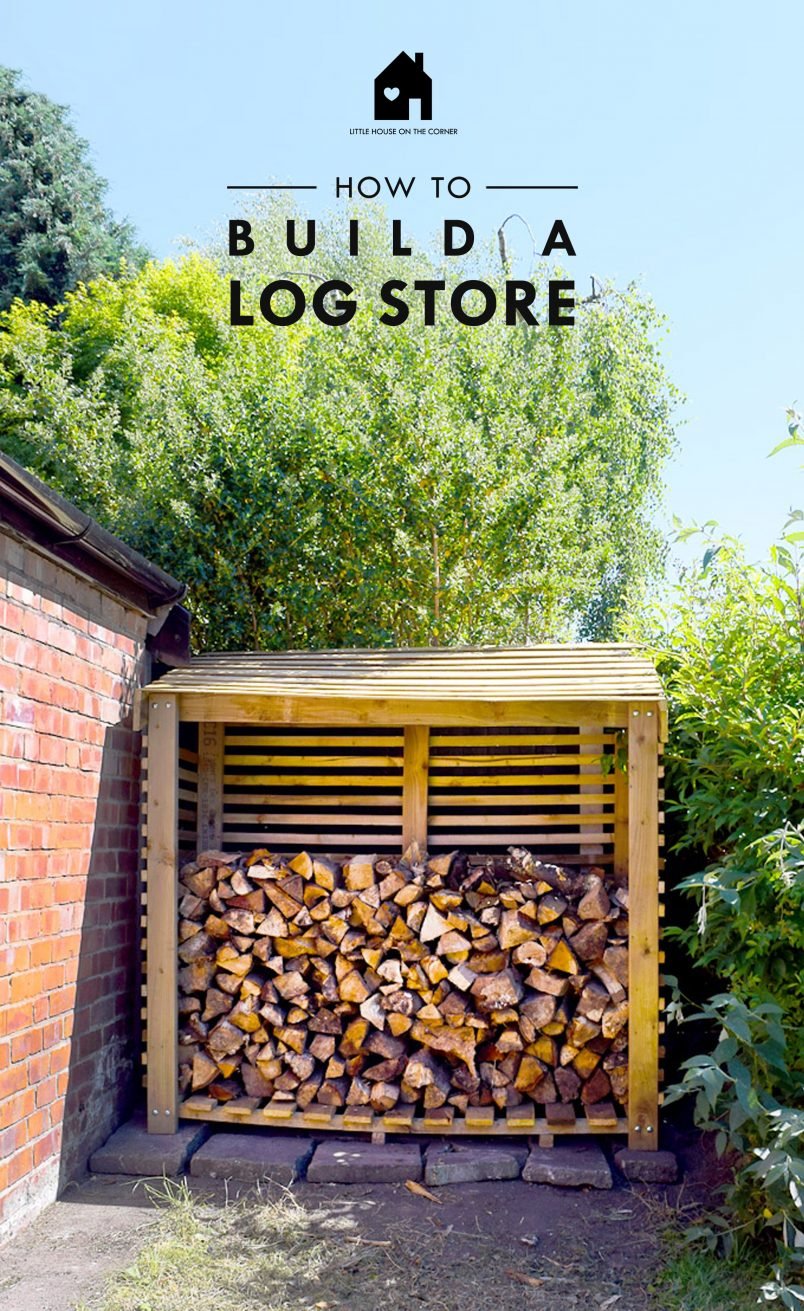
We’d looked at a few ready-made log stores, but the only ones we could find were fairly expensive, not as big as we would have liked and some of them were a bit flimsy. We knew we couldn’t store the wood in the big bags they came in and whilst the colder weather is hopefully still away off, it was definitely about time to get some proper storage sorted.
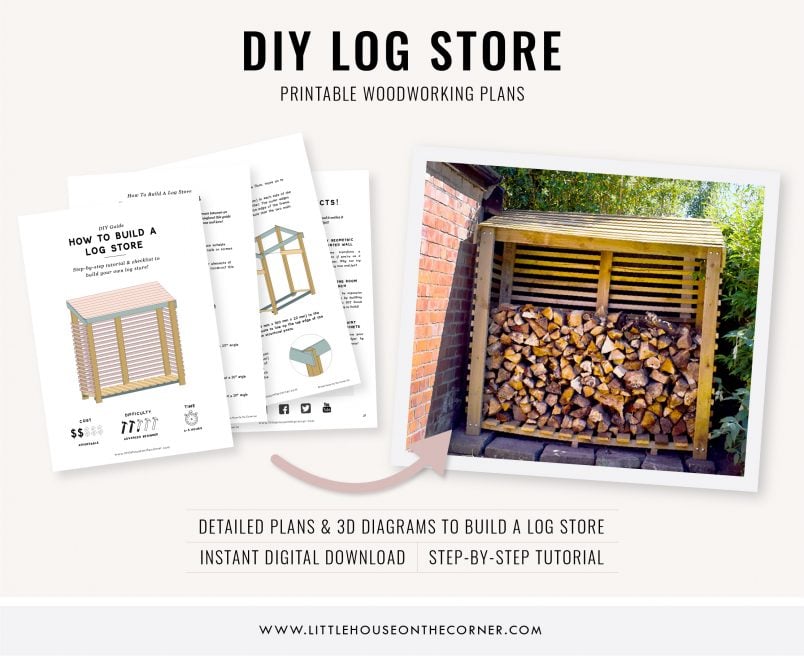
The most complicated bit about this project is calculating the supplies that you need, but there’s nothing stopping you making your own, as we’ve done it for you!
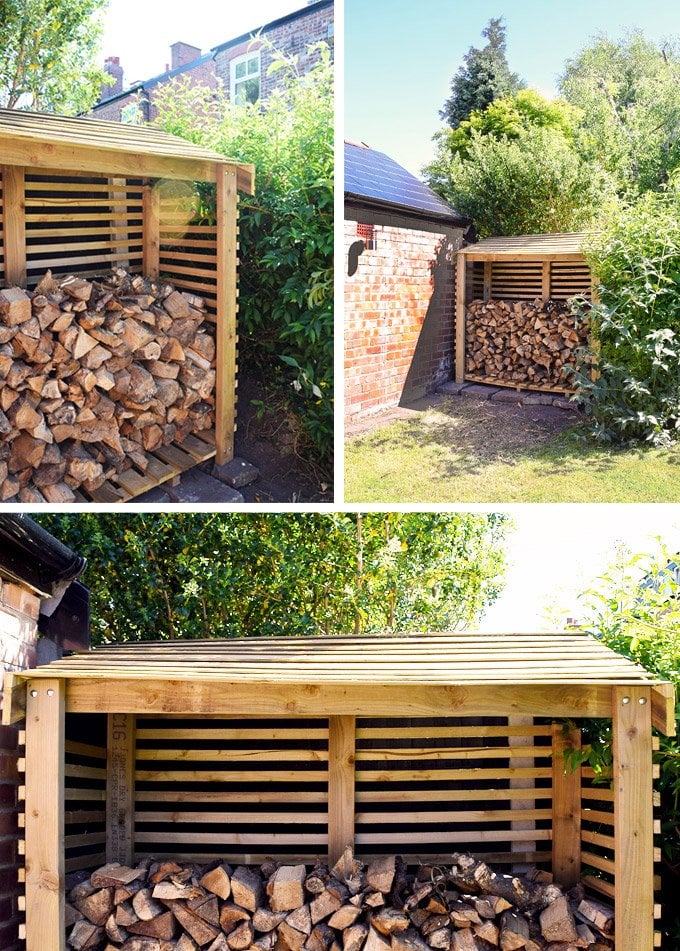
Our log store is about 1.8m x 1.8m which means that it’s big enough to hold all of the wood we need for a winter.
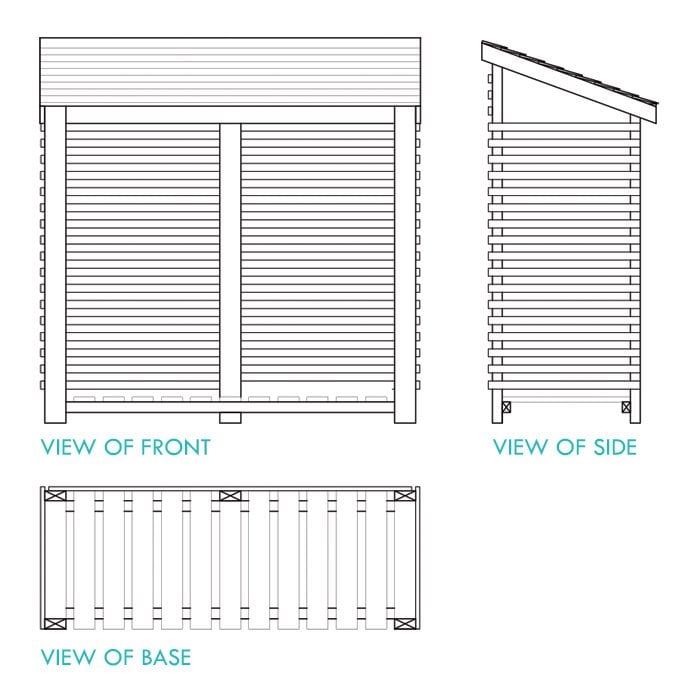
As much as possible, we planned our log store around standard available lengths of wood. This way we could avoid too many offcuts and waste and also save money. We’ve also set out all of the gaps so that they are the width of another panel which means that instead of having to measure, you can just use a batten as a placeholder to keep an equal distance.
But before you start…
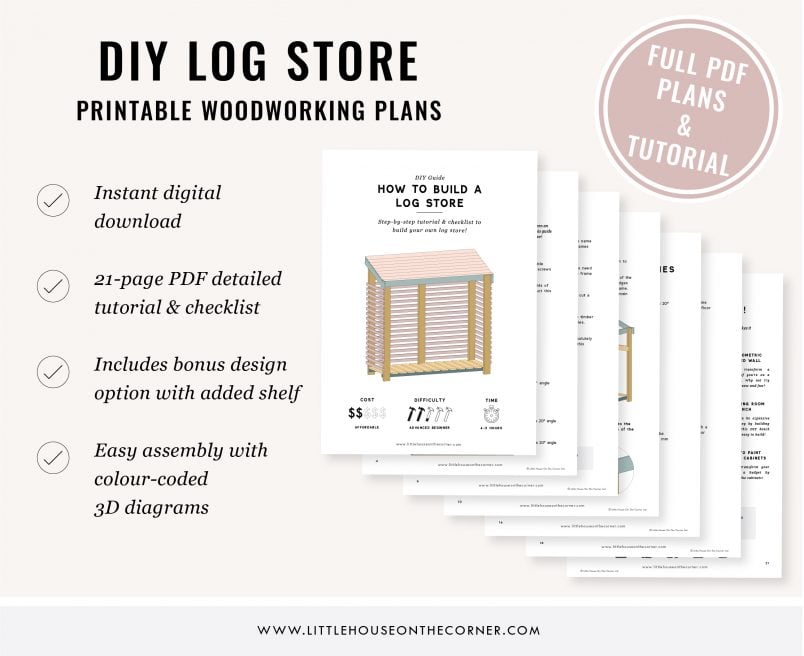
To make building this log store even easier, we’ve created a detailed downloadable tutorial with checklist, supply & cutting list and 3d colour-coded diagrams to make assembling this log store as easy as possible. It also comes with a bonus design option that includes a practical kindling shelf!
This is what you will need if you want to build a log store:
This post contains affiliate links. We only recommend products we love and think that you will, too! Read our full disclaimer here.
All wood we used is tanalised sawn timber. It’s fairly rough but cheap and perfect for outdoor use. All materials for this project came £90, which is less than we’d seen any log store available for. (With timber prices currently at an all-time high, expect to pay more for your timber at the moment).
Supplies:
- Main Structure (47x100mm): 3 x 1.77 m lengths (for the back), 2 x 1.567 m lengths (for the front), tops trimmed at a 20° angle – which is the pitch of the roof
- Roof Structure (22x100mm): 2 x 1.756 m lengths (for front and back), 2 x 0.855m lengths (for sides, front and back trimmed at 20° angle)
- Floor Structure (50x47mm): 2 x 1.756 m lengths (for front and back)
- Floor (22x100mm): 2 x 0.556 m lengths (for sides), 1 x 0.603 m length (for middle), 10 x 0.65 m lengths (for all other pieces)
- Roof Covering: 9 x 1.8 m Featheredge Boards
- Cladding (38x19mm): 32 x 0.669 m lengths (for sides), 20 x 1.718 m lengths (for back)
- Bolts & Nuts: 10 x M8 100mm bolts, nut & washer, 10 x M8 125mm bolt and nut (we used 150mm because we couldn’t find 125mm)
- Lots and lots of nails
Tools:
- Clamps
- Mitre saw
- Cordless drill and drill bit
- Hammer
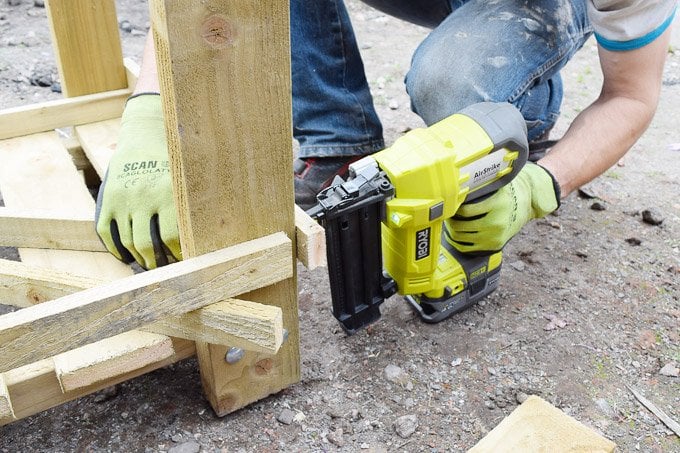
- Nailer

This is how to build a log store:
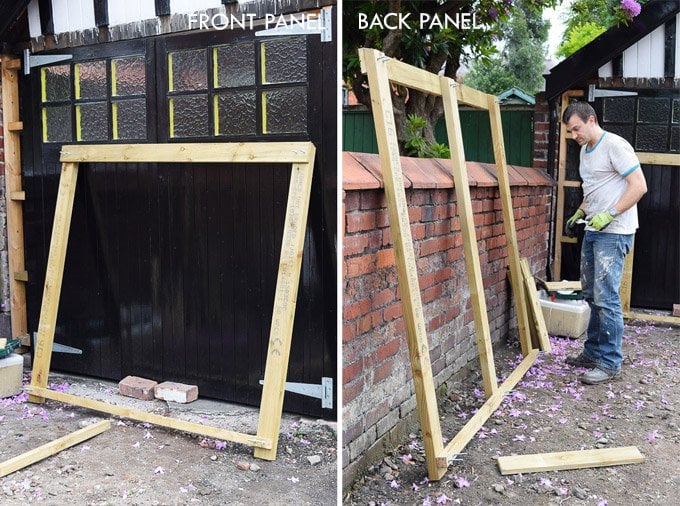
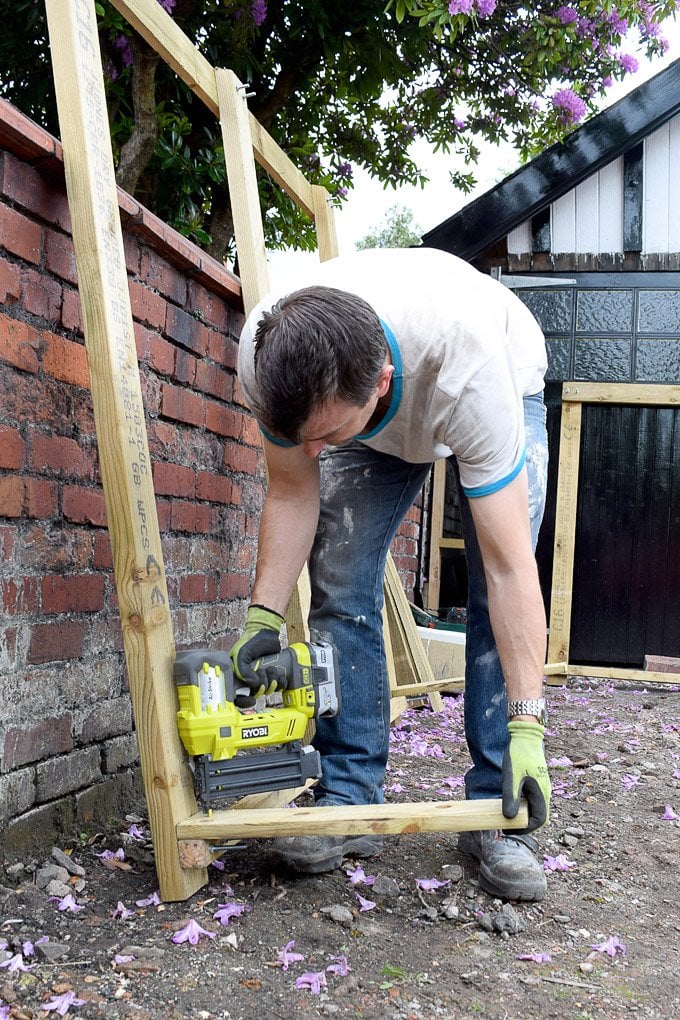
1. Build the front and back frames of the log store.
Start with the front frame of the log store and lay out the two side posts, one of the floor structure pieces and one of the long roof structure pieces.
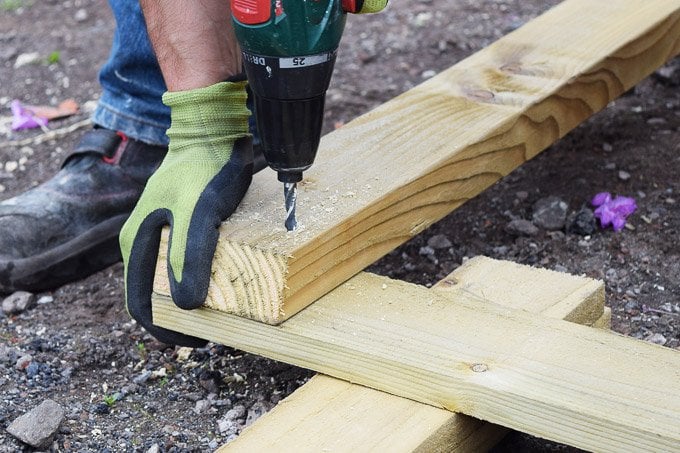
Drill two holes through the top and bottom of each main post. The top two holes should be 50mm from the top of the post (half the width of the roof structure beam), the bottom two holes have to be 75mm from the bottom of the post (half the width of the floor structure beam + 50mm distance from the floor).
Once you’ve drilled the holes, line up the floor and roof structure pieces and drill all the way through. Make sure they line up perfectly – you want them to finish completely flush with each other.
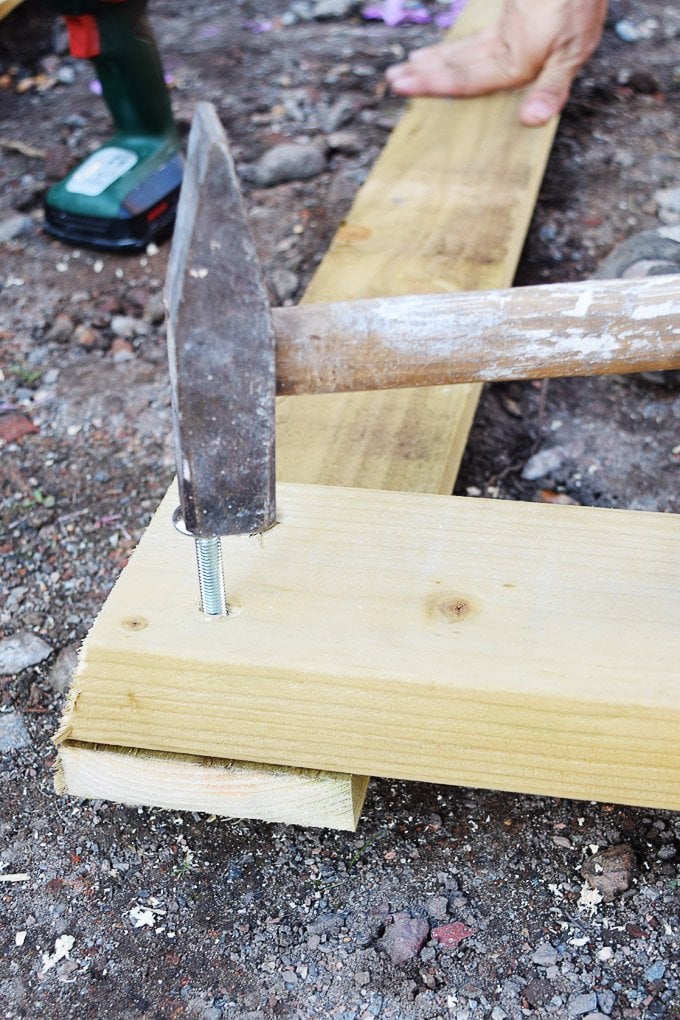
Then add the bolts (you’ll need the shorter ones at the top and the longer ones for the thicker wood at the bottom) and tighten everything. Repeat the process with the second post on the other side of the frame.
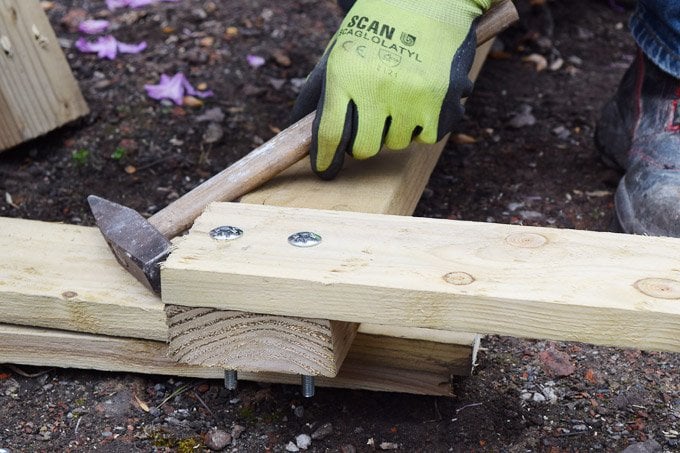
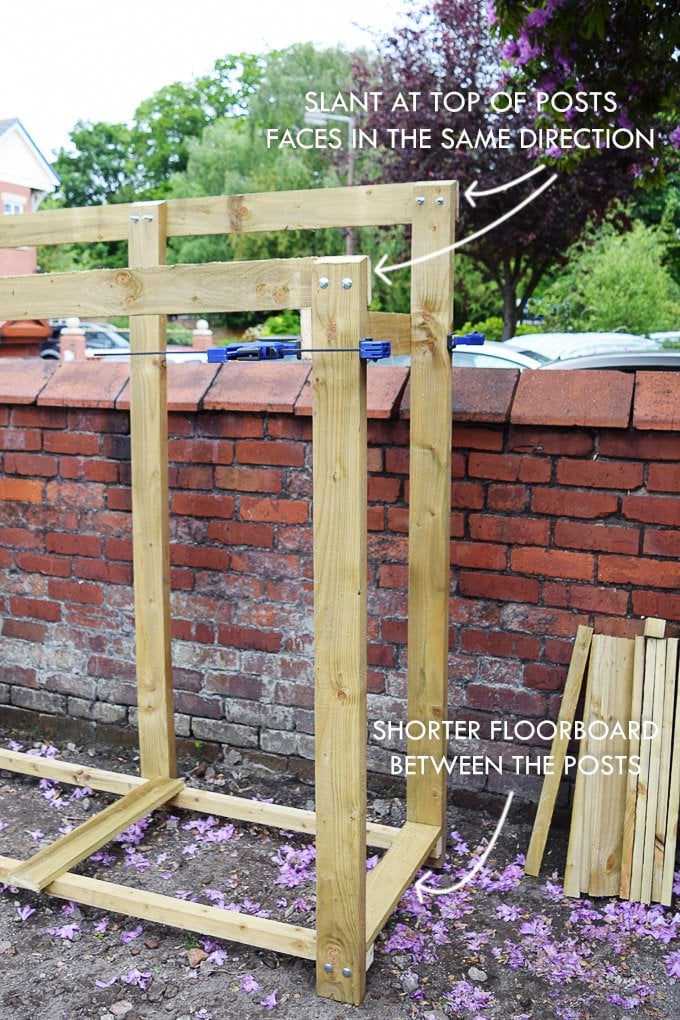
Then do the same for the second (back) frame of the log store. It’s exactly the same, except that you have an additional post in the centre. Make sure that the slants on the top of the posts face in the same direction.
2. Attach the two short floorboards to the outer sides of the first frame with your nailer.
Then line up the second frame so it’s congruent to the first and nail the other end of the floorboard to the second frame.
3. To make sure that the top of your frames are parallel to each other, clamp one of the not yet used (standard length) floor pieces to the top of the frames. The outer edges of the floorboard should finish exactly with the edge of the frame.
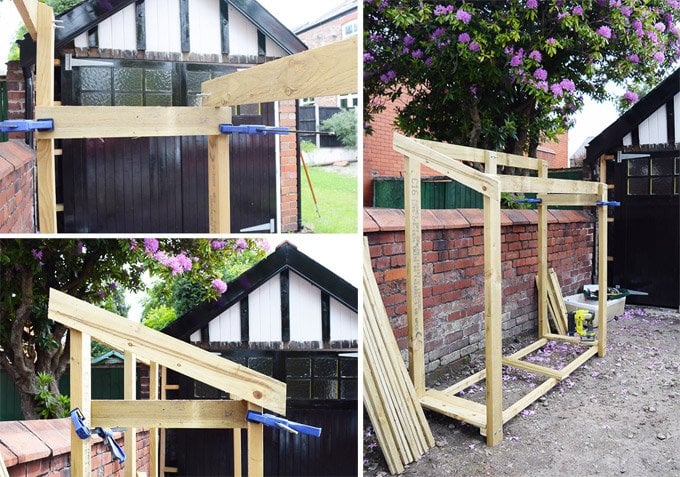
Once it’s clamped into place, it’ll hold your two frame pieces in place and allow you to attach the sides of the roof which you can just nail to the frame.
The roof has a slight overhang to the back and a slightly larger overhang to the front. To get both sides of the roof structure timber to line up perfectly, use a leftover piece of wood to help you line up the edges. We used a leftover piece of 50 mm wood as a guide – we rested it against the edge of the back frame and then lined up the edge of the roof timber with it.
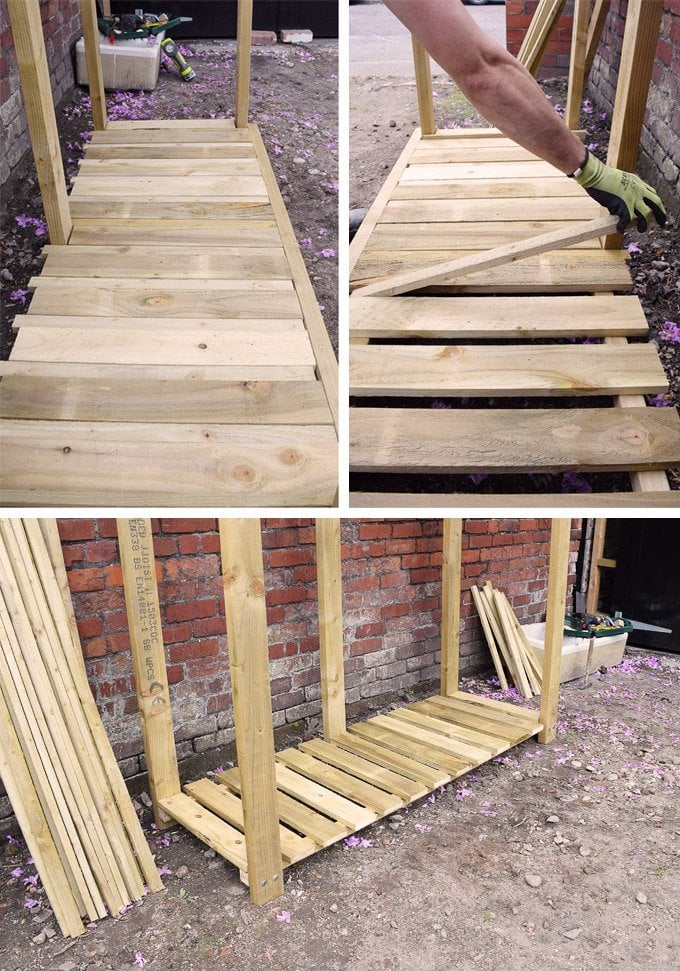
4. Now it’s time to attach the floor.
Lay the boards on the base with a piece of the cladding battens between each. You’re just using them to keep an equal distance between each floorboard and will remove them later.
The outer two floor pieces are the shortest, as they fit between the posts, the middle one is a bit shorter than the others as it fits in front of the middle back post and all of the others are the full width of the log store. Once you’ve set out the boards, nail them down using your nailer and remove the pieces of timber between the floorboards.
5. Then it’s just a matter of attaching the cladding battens to the outside of the frame. Again, using an additional batten as a guide to keep an equal distance between each row, work your way around the log store, nailing the battens in place one at a time.
We started our first row 38mm (one batten width) from the bottom. Once the first row was in place, things progressed really quickly. Check at regular intervals to make sure that everything is still level.
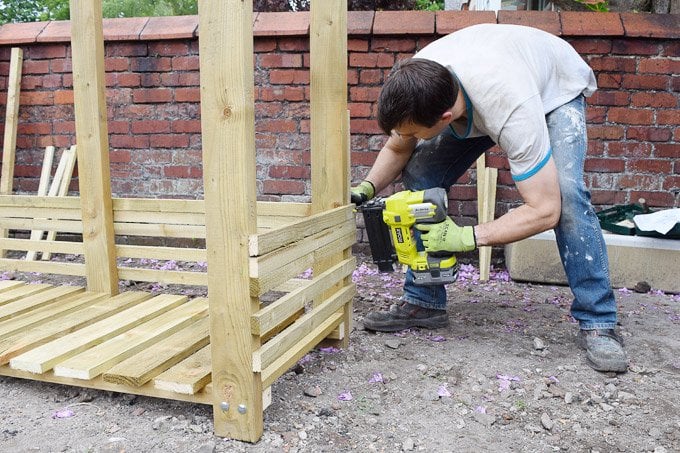
If we’d had to nail everything by hand it would have taken forever, but with the help of our nailer, it only took a few seconds per row.
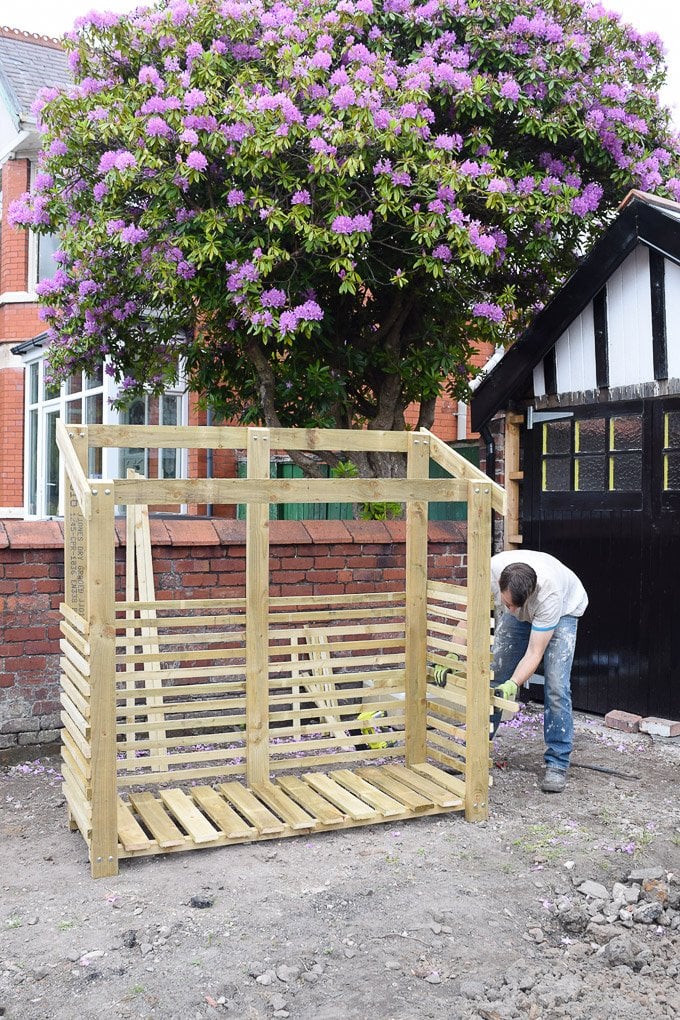
6. The last step is to nail down your roof. We used feather boards for this as they were not only the cheapest option, but they also have a slightly tapered profile which works perfectly on the roof. Lay out the boards across the roof with the narrower edge facing downwards.
The very front board and the very last board have to line up with the ends of the side roof structure pieces. If you’re using the same measurements as us, each board will overlap the other by 2.9 cm.
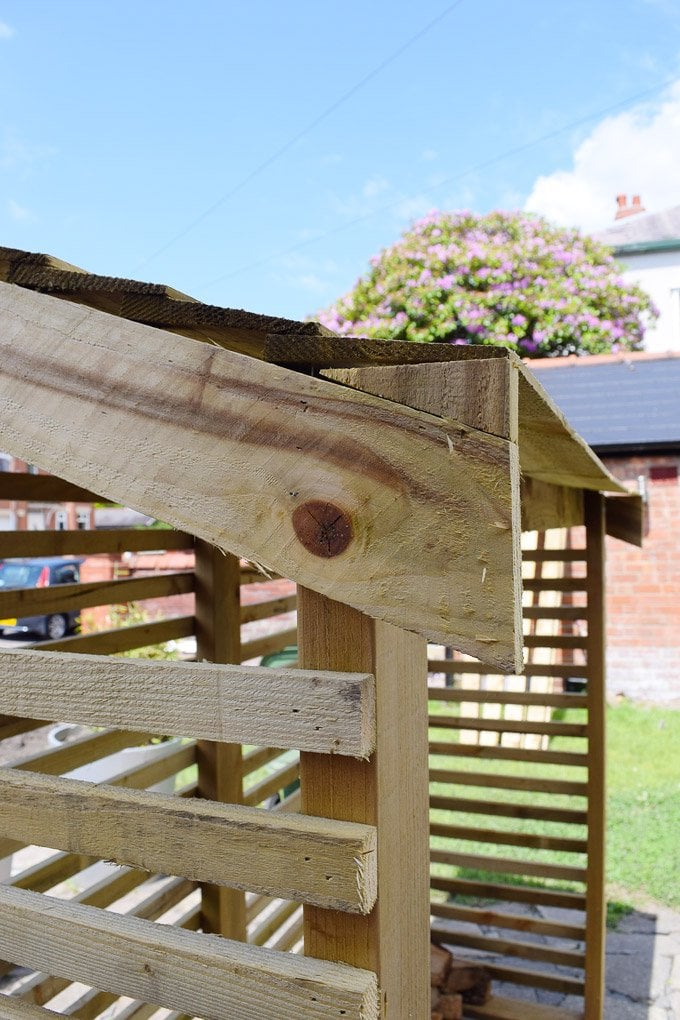
As you can see in our picture, you’ll have to add a small piece of wood to the bottom roof panel to give you the angle you need. We used an offcut of the wood that we had from cutting the angle on the side pieces of the roof structure.
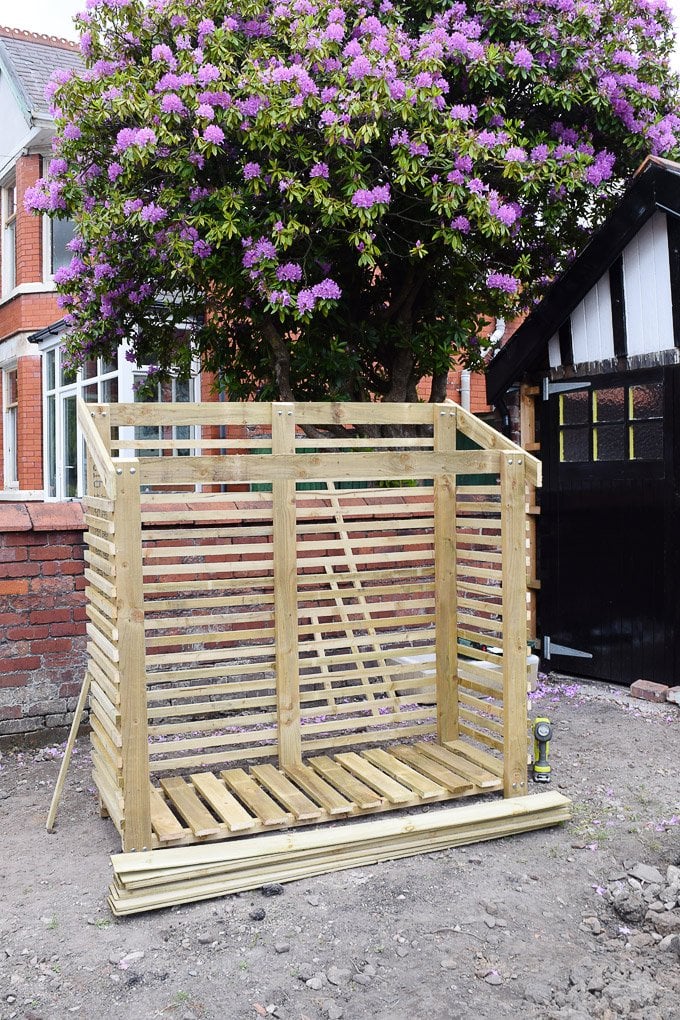
Now all that’s left to do is fill the log store with your logs!
This project may sound complicated as it seems like there are a lot of steps, but it’s actually really straightforward and easy to build. All in all, it probably took us about 4 hours to build (which included about an hour of cutting as we did some of it ourselves).
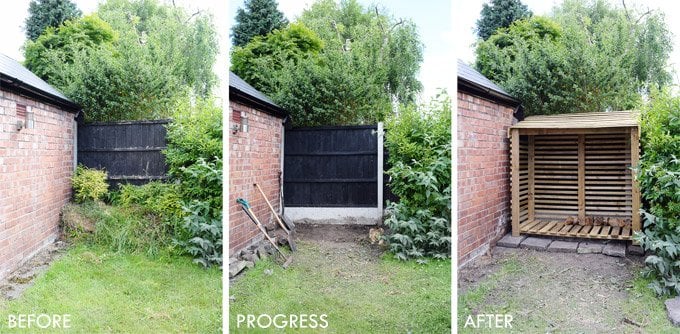
It actually took us longer to remove all of the weeds and dirt from the corner of the garden where we decided to place the log store!
It’s important to store your firewood correctly and our new log store will hopefully help us to do so.
Firewood has to be stored so that there is plenty of airflow around the wood, this means that you shouldn’t stack logs or stand the log store too close to a wall (leave a 5-10 cm gap) and also stack the wood so that air can circulate between and around it.
You also shouldn’t cover the wood with any tarpaulin or similar as it can cause condensation to build and allow mould to develop.
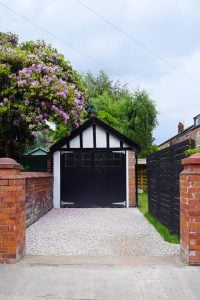
We’re really happy with how our log store turned out and it fits perfectly in the little previously unused and weed-covered area next to our garage (which looks like we planned it, but is a total coincidence).
We still love our wood burning stove and it’s still one of our favourite home improvements, especially as it helps us stay nice and toasty in winter. How do you stay warm in winter? Do you have a wood burning stove or another type of fireplace? How do you store your firewood?
Don’t forget that you can get your detailed DIY log store woodworking plans by clicking the button below!

Simon says
Thanks for this! Just made a log store using your guide and it was great! I made a completely different size (1.5m wide x 35cm wide) to just hold one 1 row of logs in a spare space alongside a wall. your guide worked well and I followed it, just making adjustments related to size. thanks, Simon
Christine says
You’re very welcome, Simon! I’m so glad our plans helped you build your own log store!
Cx
Gabrielle Mary+X says
Absolutely love the rhododendron tree 🌳💜🌸!, soo beautiful! Thank you for sharing this awesome diy log 🪵 store 🏬 venture!, and all your other ventures look good too! 👍 👏 🌟
Christine says
Thank you so much, Gabrielle! There’s always lots going on here and there are always new projects to tackle. It’s a good job we love it :)
Cx
Ray Attridge says
Hi. Was inspired to follow your design with a couple of mods .I used 50 by 100’s for floor supports front and back to prevent any sagging. I also changed to an ondulin roof which was relatively inexpensive but fully waterproof. Amazed by capacity when filled. Followed up by using same principles to repurpose a redundant dog kennel.
Photos available
Christine says
Thank you for sharing your experience, Ray! If I built the log store again, I’d definitely add a floor support or make the floor beams larger as you did.
We’d love to see pictures! Could you please send them to general at littlehouseonthecorner? I’ll upload them here then so that everyone can see your log store (if that’s okay with you!).
Cx
DAVID CLOUGH says
Used your basic design and instructions to build a log store last week. So much easier than listening to people waffling on on You Tube. Slightly bigger- 2400mm wide x 750mm deep x 1800 high. Now full of timber. Many thanks.
Christine says
Thank you so much for sharing your gorgeous log store with us! It looks stunning – you must be so pleased with it!
Cx
Wobs says
Inspired by your design, I taught myself Sketchup, and designed my own, using yours as a starting point. Results hopefully will be below. I used three Euro pallets as the base, and EPDM on OSB board for the roof, for durability. This worked out cheaper than using Wickes’ best roofing felt, and was ordered to size. I just had to cut off the excess. Should last longer as well.
https://flic.kr/p/2iMPABN.
Christine says
Wow, that’s a huge log store! It looks amazing and I’m glad we were able to inspire you to design and build your own! Thank you so much for sharing the result with us!
Cx
Daniel says
Love this and built it this weekend inspired by your blog. I only had to buy the bolts and cladding and a few screws (instead of the nailer). We got a wood burner last week and I’m delighted with how the log store turned out as I’m not the most confident DIYer! Thanks very much, I’ll check out some.of your other projects.
Christine says
Thank you so much for sharing, Daniel! I’m so happy that we were able to help you (in a tiny way). Your log store looks amazing (thanks for sending the pictures) and you must be so proud of the result!
It’s comments like yours that motivate us to share keep sharing our projects here, so thank you so much for sharing your results with us!
Cx
Oscar Andrews says
How do I add photos?
Please guide me.
Christine says
If you send over the photos by email (general at littlehouseonthecorner dot com), I’ll add them for you!
Cx
Rob says
Thanks very much for posting this. I used it as a template for mine, which I’m very pleased with. I would post a picture but not sure how!
I didn’t have a nail gun or even a separate screwdriver so it took bloody ages but worth it in the end.
A couple of things confused me about your design:
– how do the 1.8m roof slats fit when the roof supports they are fixed to are just outside the 1.8m width of the main frame?
– do your roof slats sag in the middle? I had to add an extra support there.
Christine says
Thanks for the feedback, Rob! So glad we were able to help inspire you to build your own log store.
Our log store is 1.756m wide. As the sides of the roof are attached to the main structure (slats that are 22mm thick) it then adds up to 1.8m which is also the length of the roof slats.
As you can see on the pictures, our roof does sag very slightly in the middle but we didn’t think it was worth adding an additional support in the middle
Cx
PS. If you send me a picture per email (general at littlehouseonthecorner dot com) I’ll upload it to your comment.
Steve Biggs says
You should be proud of creating such a comprehensive post. So many others I looked at didn’t detail all the actual wood measurements very well, which is the detail most people are looking for :s
Christine says
Thank you, Steve!
Cx
Lucy K says
Our power company recently removed trees that were interfering with the wires. We now have firewood to store. Saw your post on Pinterest and I was inspired! While watching it rain today, and with school about to start, I began thinking with a few tweaks this could also evolve into a separate, simple school bus shelter project. Funny how one project can quickly turn into the start of many more! Great post!
Christine says
Thanks for the feedback, Lucy! I’m always adapting projects to suit my needs – I guess that’s the fun of DIY as you can always make things your own!
Cx
Clare says
☺ Thank you for your reply. A great service. This is my first venture, but 3 posts up (harder thanI thought) in three days is going at almost the speed of light. Age 74, 5 tall, and try anything!
Keep well, and happy.
Clare of Devon
Christine says
No problem! Always happy to help if we can – do let us know if you run into any problems! Love your attitude – we should all push ourselves to try new things.
Good luck with your project!
Cx
Rich says
Hi,
Excellent resource !! Thank you!!
Built mine slightly smaller to a space that was available on my patio. Also added the middle upright to add further support and a small shelf for kindling. Nice project, although I didn’t buy a nail gun, so took a few evenings to complete. Materials cost about £100 delivered from a local timber merchant.
Satisfying build though :) Just got to chop the wood for it now!
Christine says
Thanks for sharing your build, Rich! It looks absolutely amazing! Love the extra kindling shelf, too.
Cx
Jerry T says
Hi Guys
I am not a great DIY person but, you are inspiring me to try this project. Kind of hate refurbishment, but loved Mechano so building from new is so much more fun… Anyway, I am kind of surprised that I haven’t seen anyone mention the length of the logs that are being stored!!! I have a space that is a little limited in depth and hope to fit it in there but I am concerned the log length with end up with them hanging out the front. That would kind of defeat the object!!! So, what length of log are you keeping and can I reduce the depth to 57cm for the whole structure? – Ill send a pic of the space…
Christine says
The length of the logs will depend on where you order them. They’re not uniform at all and vary quite significantly (even within one delivery load) but they’re all obviously cut so that they fit into standard fireplaces and log burners so they’re usually fairly short. To give you a better idea of the size, the logs in our store were stacked in two rows.
Cx
Paul says
Thanks for such a clear, well-written guide, which inspired me to start my own log store last weekend. After much deliberation and digesting your plans I finally got on with it. Using some available timber and an existing slatted fence on my boundary to form the back panel, lean-to style, saved a bit of money and resulted in a front frame 3.14m in length and 80cm deep.
Due to its length however, a single feather edge board won’t span the roof. So I’m considering using some surplus roof tiles, though this has complications. The roof structure will need reinforcement to cope with the weight, which is fine, but because of my ad hoc approach the pitch is very shallow, about 10 degrees. Received (internet) wisdom says the minimum pitch for roof tiles is 15-20 degrees. Now the frame could be disassembled and the pitch adjusted, but I’d rather avoid that. So I’m hoping even with a low pitch, water penetration will be insignificant as I believe the recommended pitch is to about preventing capillary action, which might not apply with an open structure anyway, but I don’t really know. As I live in Scotland rain and wind is more of an issue than in most areas. Any thoughts from anyone who’s gone about this would be most welcome as I press on with my build.
Thanks again for the great post and an enjoyable site. I’d second a few other commentators too, that a local timber merchant is the way to go for supplies and tips.
Christine says
Thank you, Paul! So glad we hear that we were able to inspire you!
That sounds like an enormous log store! I agree that the roof may become too heavy with tiles (and depending on which kind you’ll need even more pitch than 15-20°).
Having said that, it doesn’t matter if the timber gets a bit wet (and you’re right about the capillary action). You want it to be ventilated and storing the wood is more about letting it dry from the inside out and not the bit of rain that falls on it.
How about considering a felted roof? It would definitely be a lightweight option.
Cx
Paul says
You’re right about the pitch and tiles being too heavy. When I tried setting battens out I realised a minimum pitch is also required for the tiles to lie properly.
Sp I ended up using featheredge boards with a join in the span, which does let rain trickle through. Hopefully the air will dry them out overall. If it becomes an issue I might run a felt strip over the join.
Here are some pics of the finished article. It swallowed the first dumpy bag of logs easily as you can see. I’m hoping to supplement the wood I buy with wood foraged locally, but we’ll see how that goes. Some people think it’s more trouble than it’s worth by the time you’ve invested in the tools, labour and time to haul it all back and process it. The forestry commission up here in Scotland sell licenses to go in and fetch wood yourself and they’ll tell you where it’s been felled. You can’t take power tools though and there’s a lot of work involved in bucking, hauling, splitting and then, of course, waiting for it to season.
Thanks again for all the enjoyable content.
Paul
those pics….
Christine says
Thank you for sharing the pictures, Paul! It looks great – and enormous! I totally think it’s worth collecting timber yourself. Yes, it can be a lot of work but for a lot of people having a log burner and collecting timber is a kind of lifestyle choice. As you said, you can always supplement it with bought timber and you have more than enough space to store timber while it seasons.
Cx
Peter says
Fabulously helpful – thank you. Really enjoyed making this. Mine is 1.50m wide, 0.7m deep and 1.06m high at the back. I bought my timber at Travis Perkins but I wouldn’t recommend them to anyone – they couldn’t promise to deliver the timber until 3 days after I ordered it and then having stayed in all day for it to arrive (having confirmed in the morning it would be with me between 1 and 4) they never turned up. Very aggravating. Then the next day they delivered 22mm x 150mm boards because they had no stock of 22mm x 100mm left. Very unprofessional – use anyone but them.
Alex Merrall says
Hello to you both!
My Dad and I followed your excellent guide to building a log store over the course of this weekend and the final result is superb, much better than I think I could buy elsewhere for less money and just a little bit of effort. I hope you don’t mind but I’d like to make the following comments/ corrections to the cutting list and instructions?
1) You don’t specify the dimensions for the cladding batons other than saying “38mm wide” in step 5. We chose 19mm thick as they don’t need to be load bearing. We couldn’t get 38mm wide at our local supplier so went with 35mm wide but that just meant 21 batons along the back of the log store instead of 20, this will always be dependant on what’s available at the timber merchants!
2) The cladding baton lengths specified in the cutting list don’t match the dimensions listed for the store. The side wall batons are stated at 0.72m but the actual dimension for the store are 0.65m (the length of the longer floor boards so the baton dimension need shortening to 0.65m. The cladding batons for the rear of the store are stated at 1.72m but the actual dimension needs to be 1.76m based on the length of the horizontal roof structure supports.
3) As others have done, we added three additional supports for the floor, out of excess 47x50mm timber, in line with the rear central support and equidistant between this and the end supports. All three were 0.56m long.
4) We didn’t have the luxury of a nailgun so used 60mm long oval nails in it’s place. Oval nails are a must as there’s a risk that round nails will split the timbers and should be used in the direction of the grain on the thinner boards. Worth mentioning in case other builders don’t have access to to a nailgun?
5) You don’t specify, but we felt it was best to use non-ferrous clout nails to attach the featheredge boards, aluminium in our case. We pilot drilled the holes using a 2.5mm bit as the nails were round. We didn’t for the first nail and it split the board, see above! Clout nail have a wide head to aid securing the featheredge boards, whereas the oval nails don’t have a large head and risk pulling though the timber a it dries and warps etc. Carbon steel (ferrous) nail will rust and weaken the roof.
6) I’ve calculated that the log store has a volume of up to 1.3m3 when it comes to ordering logs. From what I’ve seen logs can be sold by the cubic metre so just thought this would be helpful to others when they order their supplies?
Absolutely love the website and have lost hours of my life this week looking at your home buying and DIY journey. You guys really are an inspiration and show what what can be done with a bit of thought and effort. My wife and I are 6 years into renovating our 1912 town house and it’s taking every amount of money, resolve, skill and patience that we can spare. You have been such an infectious inspiration to us! Thank you!
Alex.
Christine says
Wow, thank you for the feedback and taking the time to leave such a great and helpful comment!
We’re always happy to receive any advice and I’ll definitely check/update the measurements!
CX
Simon Jones says
Hi folks,
Joining the long queue of people here who have relied on your excellent instruction and pictures to build a log store.
I made mine a bit longer than yours and decided to do a roof with chipboard and roof felt and it has worked out great.
I would leave a picture, but can’t work out how to do that here!
Thanks
PS. Simon was kind enough to send us some photos of his gorgeous log store. You can see them here! Cx
https://wp.me/a2x19J-4j2
https://wp.me/a2x19J-4j3
Christine says
Thank you so much, Simon! DIY is always the best way to get exactly what you want. If you send us a picture (general at littlehouseonthecorner dot com) I’ll upload it for you – would definitely love to see what you made!
Cx
John says
Hi there, made this last weekend and just wanted to say its an excellent design with use of standard lengths where possible making it easier to do. Took about 4 hours to do in total. We made one modification in putting 3 supporting pieces of wood between the front and back sections which attached to the roof to give it more support, the feather board was flexing a bit otherwise.
Thanks for sharing this, really pleased with it.
Christine says
Thank you so much for your feedback, John! So glad to hear that you managed to build a log store you can be proud of!
Cx
Fraser says
Hi guys,
Where did you get your materials from that this project has only cost you £90?
My design is a bit shorter but also longer and I’ve been looking online at the usual DIY stores and also builders merchants and they’re all loads more than that! looking at exactly the same size timber for the frame but was planing on using feather boards for the back and sides as i thought it might be cheaper (maybe not!)
Cheers
Christine says
I’m not exactly sure where we bought everything but I assume it was here Portwood Timber (which is where we usually bought all timber supplies). A local timber merchant is probably your best bet both in terms of quality and price.
Cx
Bob Pope says
Hi, I need to build a log store and happened across your web site. I have to say it’s very formative and supplies all the information you require. However as a novice at this could you recommend a reasonable priced nailer. The last time I used one was when putting up fencing in the garden then I had to hire. Ever since then I ve always promised myself to buy one. Not being a professional at this, can someone to give me some advice on the proper type of nail gun to purchase
many thanks
Christine says
This is the nailer that we used. Yes, it’s not cheap but we love it. It works really well and we use it way more than we ever thought we would.
Cx
Ian says
I bought this one. Stapler
Bit cheaper, works fine, also love it :-)
Stevo says
What size nails did you use? I have bought a nail gun and tried 32mm brads but they do not hold at all. Did you use 50mm?
Christine says
Yes, we used 50mm brad nails.
Cx
Stevo says
Great thanks.
Superb post by the way. Just what I needed to build my log store. Many thanks.
Christine says
You’re welcome! Good luck with your log store!
Cx
Martin says
Thanks for the design. Just built mine, with the added shelf as some other have done. Thinking to add some of the leftover featherboard I have to the bottom to shelter the lower logs from splashback caused by runoff from the roof.
Christine says
You’re welcome, Martin! Adding the shelf is such a good idea – we’d definitely add one if we ever build another log store.
Cx
Rob Field says
I’m curious about the roof feather edge. You have yours with the thin edge towards the low point but I’ve seen other roofs with the thick end at the lower points. Is there any reason for choosing one way over the other?
Christine says
Essentially how you build your log store is up to you. There’s not necessarily a right or wrong way. We attached the feather edge board with the narrow side down so ensure that there was a smooth pitch for the water to run down. It also allowed us to nail down the board through the thicker part of the feather edge board.
Cx
Clare says
I am agonising over roof materials for a corner pergola seat that I am building, eventually to be clothed with a clematis and/or jasmine on a trellis suspended over the roof for air circulation. (My own invention so don’t bank on it as 100% viable). Your lovely log store has decided the matter – that I use featheredging. (No need to be totally waterproof). BUT, surely it is logical that: a) With their right-angle-triangle cross section it is necessary to ensure that they are the right way up so they can wedge neatly into each other. b) The thinner edge is at the top? My first ever project of this nature, so advice is welcome.
Christine says
That sound like a great idea, Clare. Which way round you attach the featheredge boards is up to you. We wanted the thinner edge to be visible which is why we built it the way we did. Which way around the boards are is purely down to personal preference as the roof construction is the part of your project that will give you the shape and pitch you need (that’s why there’s an additional triangular piece of wood at the bottom of the first featheredge board).
It’s difficult to describe but hopefully, the images in the post will make it clearer.
Cx
John Lloyd says
Nice project and well made, except why no explanation for the upside down feather edge boards on the roof?
Christine says
Thanks, John. There’s really only one way to lay the feather edge boards. You want to create a surface as smooth as possible so the water runs off it.
Cx
Ben says
Log stores now finished just a shame that it cost me 40 pounds will post photos
Christine says
Can’t wait to see it, Ben! Projects often end up costing more than you expect. Having said that £40 is still cheaper than buying a log store and yours is now probably much better quality than most available in DIY stores.
Cx
Ben says
How do I add photos
Christine says
Hey Ben! You can’t directly add photos in the comments but you can add a link to a Dropbox, Google Drive or Flickr album to share your pics with us!
Cx
sharon says
Inspirational. You make it look and sound very ‘do’able’. Here goes….
Christine says
It really is easy, Sharon! We’d love to see your result!
Cx
ben says
hi iv just come across your plans and looking at making some thing like what you have this weekend and the best bit is i can get all the wood for free from site just got to pick it up in the morning ( i`m a carpenter ) so will post some photos over the next few days to see what every one thinks
iv looked at some of the photos that others have posted and all the stores all look really good
if any one is needing any pointers with any thing els then just ask
Christine says
That’s lucky, Ben! Can’t wait to see your log store.
Cx
Garry says
Thanks for the plans! I’m going to have a go at this next weekend. I’m just making my shopping list as mine will be slightly smaller than yours.
In the list it doesn’t mention the size of the cladding wood, it has the lengths but not the other dimensions (unless I’m missing something). Could you tell me what size these are?
Christine says
You’re welcome, Gary! Essentially the size of the cladding is up to you. We used 38 x 19 mm timber (yep, we totally forgot to mention that in the post – thanks for the heads up).
Good luck with your log store. We’d love to see the finished result!
Cx
Richard says
Thank you for your guide I don’t think i would have attempted this without it.
I have made a fantastic log store with a few tweaks. I went with the fence posts and I made it 120 cm wide. I also wanted a bit of privacy from next door so I made a solid back and made the panels cover a wider area. If you are putting on a solid back then remember to recess the bolt heads. I reckon it cost me about £100 in total including fence paint (I’ve not done that yet).
I also added an extra shelf for kindling.
Thank you again for all the top tips.
Link to the finished product: Procude
Christine says
Thanks for sharing your log store, Richard! It looks fantastic – it’s always great to know that we’re able to help.
Cx
Barry Smith says
Exactly what I’ve been looking for and will use the plan and shopping list. However, I would use timbascrews from Screwfix (link below) instead of the coach bolts and deck screws instead of the nail gun. They save time, money and effort as neither need pilot holes drilling. I’ve used more expensive locking screws before but these ones are just as good and a fraction of the price. Either of the heads are good – hex or wafer – it depends upon which type of look you want to the finished product. Thanks for the plans.
Barry Smith says
Sorry…here’s the link to the Screwfix products…
Screws
Christine says
Glad you like it, Barry! I guess there are loads of options when building a log store. We used the nail gun because it make building the log store really quick and we didn’t want to see loads of screws.
Good luck when building your log store.
cx
Murray Cowell says
I would strongly recommend the use of a nail gun. No screw will ever be quicker than a nail gun. I didn’t drill any pilot holes at all when building my log store, and nailing the side battens on with the nail gun only took about half an hour. It would take hours to screw them all on, and it isn’t necessary because nails hold the battens in place very well.
Christine says
Totally agree with you, Murray! There’s also no pressure on the battens so nailing them to the frame is more than adequate.
Cx
Barry Smith says
If I had a hammer…I mean a nail gun but the song wouldn’t sound the same. I agree that nailing the battens would be easier with a nail gun…it’s the coach bollts I’m replacing…or should I say have replaced as I cracked on with the frame today…feather edge sides and roof, base slats and back tomorrow – job done…pictures to follow…including the super screws!!
Christine says
Can’t wait to see it, Barry!
Cx
Barry Smith says
Here’s a link to the finished project…Pic 1
Overall cost was about £90. The timber for the frame came to about £45 and I also used 3 packs of feather edge at £12 for a pack of 10. The Timbascrew were £8.50 for 100. I’ve got 2 different types as I used the remains of a packet I had from another project. The base and shelf timber are bed slats – £2 from the local recycling centre.
Time to build was about 2 days.
I built it back to front and then simply lifted and turned it around…having put the back and garage sides on first of course!!
The slight technical hitch with the pitch of the roof was overcome with a piece of gravel board…if I knew then what I know now I wouldn’t have bothered with cutting the tops of the frame at an angle!!!
The screws I used were Timbascrews from Jewson…no need for coach bolts they simply screw in and hold tight.
All of the feather edge was cut, drilled and hand nailed…I almost bought a nail gun and am glad I didn’t. I couldn’t think of another project I’d do that I’d need one for…and the one I almost bought only had 15mm nails/staples so wouldn’t have been any good.
Thanks for the plan/idea…good luck with the move to Berlin.
Christine says
Thank you for sharing your finished log store, Barry! It looks amazing – well done!
Cx
Barry Smith says
…and the wood in the store is the old pallet log store I made now ready for the fire!!
Mike Simonsen Jackson says
The fickr page for your wood store no longer loads up. I was just bout to start on my woodstore and wanted to use your pictures for guidance.
Barry says
Sorry. Accidentally deleted the album. Here’s the link if it’s of any use. Regards. Barry
Pic 1
Byron @Man Thats Handy Handyman says
Hi Jan and Christine.I just stumbled across your blog and really glad I did. This Log store looks really cool. I have a fire pit outside and think I might need to build myself one. My garden is a little smaller, living in London but being a handyman by profession I’m sure I should be able to build it. Thanks for sharing how you made it, it looks really nice. Well done
Christine says
Thanks, Byron! Glad to hear that you like it. Would love to see the result if you do decide to build one!
Cx
Byron @ Man Thats Handy Handyman says
Will do thanks. Might take a little while as I currently have a back injury that has kept me off work the whole year. But hoping to recover soon and get back to work asap.
Christine says
Ohh, hope you’re well again soon, Byron!
Cx
Paul says
I’d been unable to find a ready made log store in the dimensions I wanted and so I’d been toying with the idea of building one from scratch for a while. The details provided on your site are excellent and gave me the confidence to have a go myself.
I made mine a little narrower than yours (1.4m wide) and added a shelf, but it’s essentially the same design. I’m really pleased with the results:
Log Store
Thank you very much for posting this. Good luck with the rest of the house renovations.
Christine says
Thank you so much for the feedback and more importantly for sharing a picture of your fab log store, Paul! It looks fantastic (I would definitely build a shelf if I ever made another one) and it just goes to show that DIY projects can be totally achievable. So glad to hear that we were able to provide a bit of a guide for you to build your own – it really looks amazing!
Cx
Ian says
Hi both.
I wanted to thank you for posting your log store plans here, they’re really great and gave me the confidence to have a stab at it myself. I’ve never built anything like this before and it went very well by following your plans and looking at your photos of the build process.
I made a few adjustments as I couldn’t get exactly the same timber (so used fence posts!) and as another one of your readers did, I added a 3rd front post so I could put in the kindling store bit. I also put the roof sloping the other way as thats the direction most of the weather comes into my garden.
It took about 6 hours to put together once I’d got all the materials together.
I also bought a nail gun (I love it already!!), not the all singing and dancing one you have, but one from screwfix for a much more reasonable £29.99 – and it comes with a 2 year warranty. I’m well happy with it, it saved me hours! However my wife called my new found nailgun manliness into question by calling it a ‘stapler’!!??!!
It probably cost as much to build as buying one (including the cost of the nail gun) but it’s much more robust than any I’d seen beforehand.
Anyway, enough frivolity, here’s the result:
Empty
 ?dl=0
?dl=0
Full
 ?dl=0
?dl=0
A big thank you once again!!
Christine says
Thank you so much for the feedback, Ian! I’m so glad to hear that it worked out so well for you (so clever to use fence posts). I love the extra rack you’ve built for kindling and think it works really well on just one side of the log store (might have to add one to ours now) :).
Our nail gun is our favourite tool ever ;). It’s always about buying what works best for you and your projects, so it’s great that you were able to find a more suitable one for your needs.
Thanks for sharing – especially the fab pictures!
Cx
Murray Cowell says
Your choice of two-tone timber makes your log store an item of great beauty. And putting the slope the other way also makes it easier to access the logs.
Ian says
Thanks :)
Andy H says
Hi there, just wondered if you used 75mm or 100mm fence posts? Looks like 75mm from the picture but hard to tell. Thanks.
Christine says
For the main structure, we used 47x100mm timber – 3 x 1.77 m lengths (for the back), 2 x 1.54 m lengths (for the front).
Hope that helps.
Cx
Andy H says
I was asking Ian specifically but thanks for clarifying yours :)
Ian says
Yes, 75 mm :)
Murrayzz1 says
I was just about to design a log store from scratch when I found your website, so this has saved me absolutely loads of time and effort. To have a design that’s been tried and tested, and to have the full shopping list means I don’t have to go to all the effort of working that out myself.
You didn’t mention the width of the feathered edge boards, but I’ve calculated they must be 125mm.
I am also planning to add a shelf two-thirds of the way up for smaller logs and kindling.
I thought that it might be useful to add to your “shopping list” a “chopping list”, because it has taken me a while to work out what lengths of wood to buy and the most efficient way to chop it up.
Here’s what I’ve calculated – I got it all from Travis Perkins, who might not be the cheapest but they had everything in one place. I’ve left the URLs in but you can edit that out if you don’t want to promote a particular retailer. This includes the extra shelf, which requires an extra 2 x 0.56m lengths, 1 x 0.60m length and 10 x 0.65m lengths of 22x100mm and 2 x 1.76m lengths of 50x47mm.
2mm X 100mm X 4.8m: 3 off
Cut two of the pieces into 1 X 1.76, 1 X 0.90, 1 X 0.56, and either (1 X 0.60 and 1 X 0.65) or 2 X 0.65
Cut other one into the remaining 7 X 0.65
19mm X 38mm X 3.6m: 4 off
Cut each length into 2 X 1.72
19mm X 38mm X 4.2m: 12 off
Cut each one into 1 X 1.72 and 3 X 0.72
This will yield 36 lengths of 0.72m and 20 lengths of 1.72m
47mm X 100mm X 3.6m: 2 off
Cut each piece into 1 X 1.77 and 1 X 1.54
47mm X 100mm X 2.4m: 1 off
Cut 1 X 1.77 from this piece
47mm X 50mm X 3.6m: 1 off
Cut 2 x 1.76 lengths from this
Feather Edged Board Treated Green 22mm x 125mm x 1800mm
Also need an additional pack of M8 125mm bolts if you’re including the shelf.
All being well, this will go up next weekend, so I’ll add some photos when it’s finished!
Christine says
Thanks for the feedback! We’ve actually been meaning to add a cutting list (we even have one ready, it just needs to be tidied and uploaded) but thank you for sharing yours!
You’re right about the feather edged boards, I think they area a standard size though (which is why we didn’t include a measurement).
Good luck with building the log store – looking forward to seeing some pictures!
Thanks!
Cx
Murray Cowell says
Here are a few snaps of my log store. I noticed that in the pictures of your s the lower support was bowing in the middle under the weight of the logs, so I added an extra spur at the bottom to provide more support.
Detail of the rear frame, showing the extra batten for the shelf and the extra spur:
The extra spur supports the middle so that the wood doesn’t bow under the weight of all the logs:
… and is held in at the back with a couple of extra screws:
Super-fast method of nailing the side and back battens – just pile them up then nail every other one:
The finished article, looking rather beautiful nestling amongst the springtime blossoms in the sunshine:
Just need a few more logs now!
Christine says
Wow, it looks amazing. Thank you so much for sharing your log store! We really love to see other peoples projects. We’ve also added an extra support to the middle of the log store since sharing our plans. It’s fairly wide, so a bit of extra support for all of the logs was needed.
Cx
SeptimusFry says
Your extra support of the middle of the floor would be better if it were side-on rather than flat, much stiffer that way – but nicely done, I shall soon be making my own on the same lines.
Christine says
Good luck with your project!
Cx
Andrew Buglass says
Just started to make my log store as per your plan. I have a question – you state that the roof structure lengths are 180cm and the floor structure lengths are 176cm, and that all the corners should be flush. But if they are the top is longer than the bottom I.e. It’s not square. Am I missing something? Help please!
Christine says
Oh, you’re totally right Andrew. The roof covering is 180 cm, but the actual structure underneath has to be the same as the floor which is then 176cm.
Sorry about the mistake, do let us know if you have any other questions – we’d love it if you’d share your finished log store with us!
Cx
Cindy says
It looks great! I just made this little one for near the house earlier this summer. We must of had similar inspiration!
Love how the garden is coming together!
Christine says
Thanks Cindy! Your log store looks fab! They all kind of look similar, don’t they. ;)
Cx
mike says
Cindy – That one looks great too. How did you fix it to the ground, if you did at all? It looks like it could fall over if given a good shove…
Cindy says
It’s got 4 feet deep concrete footings. (That’s code here to get below the frost line) it would take a bit more than a good shove to make it move. :-)
Lins @Boo & Maddie says
Such a great project and it fits so well into that space! I want to build a log store but OH thinks I’m not up to it (he’s handy up to a point, mainly with electrics but of the two of us I’m handier I think ;) Maybe if I show him this he might reconsider! Really love it x
Christine says
Thanks Lins! I’m sure you could build this, it really was easy and Jan and I only argued once while building it (has to be something of a record) ;).
I love how the log store fits into the corner, even if it was a total coincidence.
Cx
mike says
It looks great!
I’ve been looking to build a logstore too, but it is one of those jobs I haven’t got to yet. Did you do the plans yourself, or adapt some that you got online? I think I will try and follow yours as it looks like what I am after and I don’t want to risk designing it myself!
Christine says
Thanks Mike! We drew the plan ourselves, but they are similar to a lot of other log stores out there. All of the ones we looked at were really basic and ours isn’t much different – therefore super easy to build!
Cx
Grant says
Hi there could u make me the cutting list for this project so I know what timbers to buy and quantity please as I’m a young man and would love to build it as a gift for my mum you can email me on grantfw65 at gmail dot com or comment on here that would be tremendous thanks
Christine says
Exactly what you will need will depend on the size of the log store that you want to build. I have been working on a cutting list for the size that we used but it’s not quite ready yet. There are some really helpful comments in the thread here one of which does include a cutting list.
Cx
Hermes Carlyon says
Hi, thank you so much for this easy-to-follow ‘manual’. Just built my wood store pretty much to your specifications. I added a diagonal in the middle to prevent sagging and painted mine a dull light blue! Also I had a box of 1000 dry wall screws to use up, which worked great, although will have taken much longer than a nailer of course! Cheers.
Christine says
I’m so glad we were able to help you! Your log store sounds amazing – love the idea of painting it! If you have time, we’d love if you’d send us a picture (general at littlehouseonthecorner dot com).
Thanks again so much for the feedback!
Cx