Hello & Welcome!
Have you ever been let down by a tradesperson? Or did you receive a home improvement quote that was so much higher than you expected? Have you bought a home that needs more work than you thought it would but have no budget to do it?
Well, that’s exactly how our home improvement adventures and this blog started out!
We’d just bought our first home and spent way more money than we could afford to be in the area we most wanted to live in. It was the worst house on the best street and it needed some serious TLC!
With no budget to do the work, progress was slow. We initially paid tradespeople to do some of the home improvement work but often the results weren’t as we’d expected and left our bank balance looking miserable.
We quickly realised that we’d have to get stuck in ourselves to get results we’d be happy with (and could afford). With no previous DIY experience, tackling a full-on house renovation seemed daunting, to say the least!
We started with small projects and quickly realised that most home improvements are easier than expected. Over the years, we managed to achieve more than we’d ever thought possible!
Now, we’re on a mission to help you with your home improvement projects!
Hey There!
We’re Christine & Jan, aka. the dynamic duo of DIY, and we want to help you with your home improvement projects and help you create a home that you will love!
Here on the blog, we share everything we’ve learned, along with helpful guides on how to complete hundreds of small and large home improvement projects. Just be warned, we don’t hold back here!
This is real-life, uncensored, nitty-gritty DIY. It’s not always pretty, it’s not always clean and tidy, and it’s definitely not always Pinterest-worthy. It’s our home, and these are real-life DIY projects!
There’s always another DIY project just around the corner, and we’re sharing everything we learned so that you can create your dream home, too!

DIY is easier than you think. Promise!
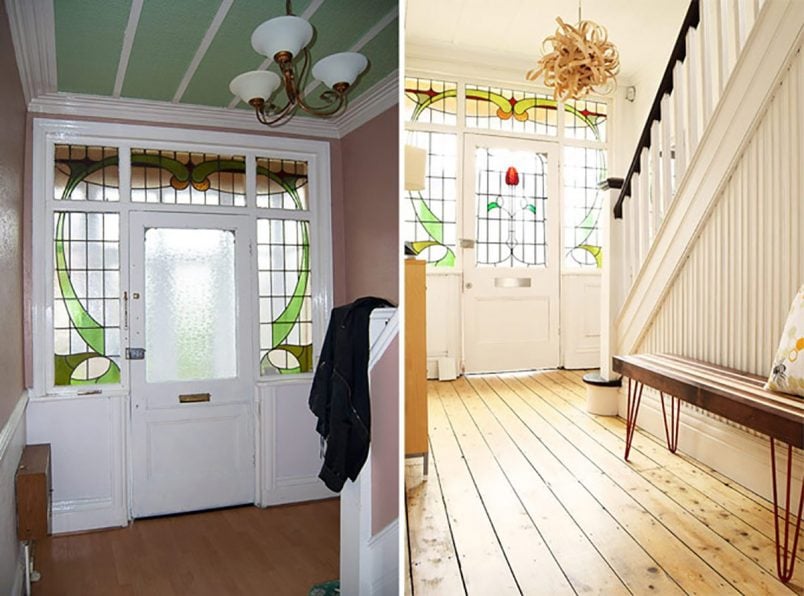
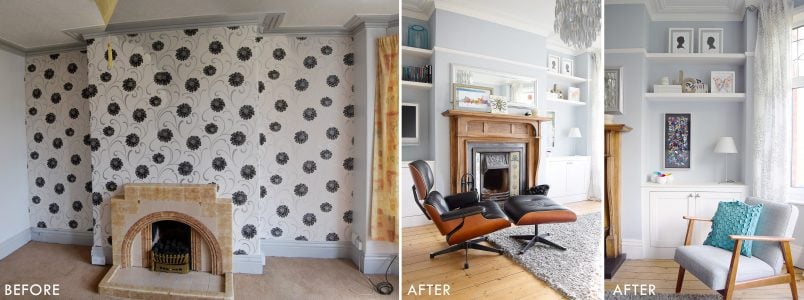
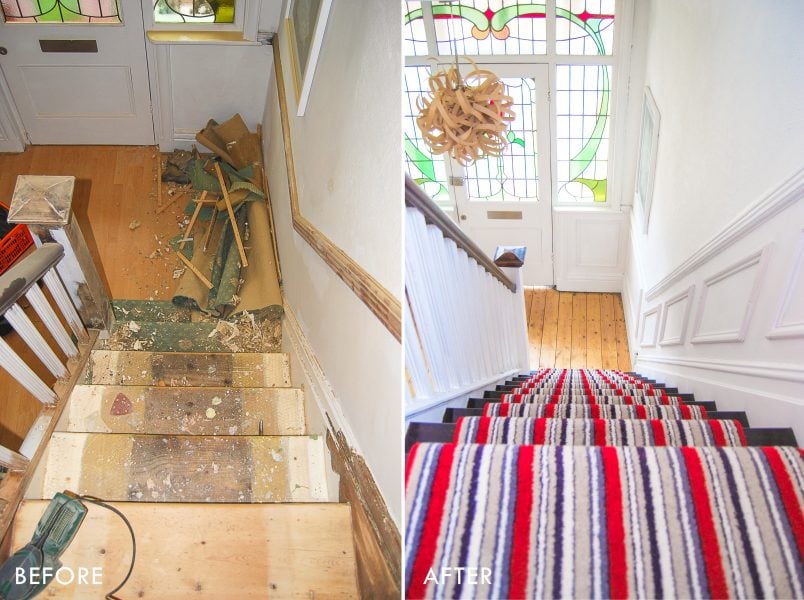
Over the last 10 years of DIY, we’ve tackled everything from simple painting & decorating projects right through to much larger projects like sanding our original wooden floors & floorboards, building a slatted fence in the garden, restoring our Edwardian staircase and even replaced our garage roof ourselves!
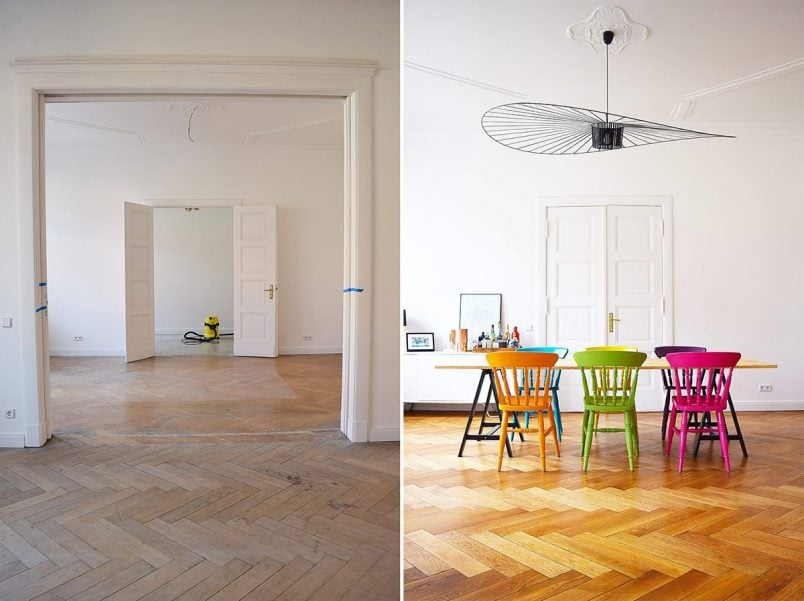
In September 2016, we made the huge decision to sell our Edwardian house in Manchester (UK) and move onto a new home improvement project and started renovating an art deco apartment in the centre of Berlin (Germany)! Yep, we didn’t just move house, we moved country, too!
But it didn’t stop there! After a few fun years in Berlin, we decided to embark on yet another adventure and bought a house near Amsterdam in the Netherlands!
It’s by far our biggest project ever, and there is so much work to do that it makes our heads spin just thinking about it. There are countless home improvement projects ahead, and we’ll be sharing all of our DIY adventures right here on the blog!
So grab yourself a cup of tea (or a power tool), make yourself comfortable and join us on our journey!
You can take the full tour of our homes here or check out some of our favourite projects here.
Want to get in touch?
We’re always here to help, so please get in touch if you have any questions or you need any advice on your home improvement project! It really makes our day to hear from you, so please feel free to leave a comment or drop us a line at general[at]littlehouseonthecorner[dot]com, and we’ll reply as soon as we can!
If we’re not blogging here (or stuck knee-deep in a dirty project), you can also follow our adventures over on Instagram, Twitter, Pinterest, TikTok and Facebook.
Jone says
Another well-written article by Christine and Jan. You can always count on these folks to be thorough with their instructions and pay attention to detail in their DIY projects. Great Read, thanks for sharing.
Christine says
Thank you so much!
Cx
Royal Glass says
Your home improvement journey is so relatable! It’s frustrating when tradespeople don’t meet expectations or when home improvement costs spiral out of control. It’s amazing to see how you’ve transformed your spaces with your own hands and on a budget. Looking forward to following your adventures and learning more from your experiences.
Christine says
Thank you!
Cx
Lowe and Bespoke says
Love the chairs in the art deco apartment, very cool.
Christine says
Thank you! We love them, too.
Cx
Sam says
I love all the funky colors and patterns, definitely my style! If you ever want to make a huge impact for a home reno, check out https://minimasliding.co.uk/. It won’t be a DIY project but the installers will do a quick job. They did mine and I basically opened up a whole side of my house to the back garden, its beautiful!
Sarah Stafford says
Looks amazing, you guys have done a fab job! When you are on to your next project we’d love to help with the bathrooms :). Sarah – hellobathrooms /
Christine says
Thank you so much, Sarah! We actually hope to move by the end of September – keeping everything crossed at the moment.
Cx
Freddie Parsons says
What a fantastic effort on this renovation, you guys must be super proud of your efforts. I guess you will be well on to your next renovation by now. Would be interested to know oif you have taken on any loft conversion projects?
Christine says
Thank you, Freddie. We are always renovating and I’m pretty sure there will always be a new project on the horizon. Haven’t got round to a loft conversion yet though…
Cx
Wendy says
LOVE this! I am excited to read more of your site! We have some work to do on our place and this should be just the place I need to get inspired to get started!
Christine says
Thanks! As always, there are lot’s more projects to come!
Cx
Interior blogger says
Great interior inspirations!!
Christine says
Thank you!
Cx
Renos says
You guys Rocked it! DIY renovating can be intimidating but look at all the great skills you have picked up! It’s ok to make mistakes. You learn how to fix them, am I right? It’s all good stuff! Thanks for sharing! This is an inspiratiion to homeowners all over the place!
Christine says
Thank you so much, Renos!
Cx
Lynne Marie says
Hello Christine and Jan!
I am an American living in Germany (I am in the Kassel area) My husband Jens and I just bought an Art Deco cottage in the country and are going through all the love-hate stresses of updating it. I am almost done sanding the stairs and your blog is giving me the motivation to tackle going whole-hog and completely sand down the risers, handrail, balusters and sides. If you can do it, I think I will survive it too hahaha.
We are also tearing down a wall to expand the kitchen and we’ll be replacing all the flooring in the kitchen and in two other rooms. We are also longing to re-plaster all the walls on the ground floor, but our budget might stop us on that one ;) I would say it is equal parts kinda fun /kinda scary.
It’s such a big deal when you buy a house with original features (the potential! the potential!) but lots of not so great past updates. The house deserves better, I just hope we can live up to it but also not really regret all the hard work we’ll have to do.
I just wanted to write and say howdy and also thank you for sharing your down to earth and very real experiences. Your projects really make me feel less intimidated by it all!
Cheers,
Lynne Marie
Christine says
Thank you for your lovely message, Lynne Marie! Your home sounds amazing and I’m so flattered that we’ve been able to motivate you to tackle more of the work yourself! I’m not going to lie – our staircase took forever to strip and sand but it was so worth it!
I totally agree with you about it being fun and a bit scary at the same time. There’s nothing quite like the buzz you get when you finish a project and can say I did that!
Have fun restoring your home and we’re always happy to help if you have any questions!
Cx
PS. I always go to the Documenta in Kassel. It’s a beautiful city.
Lee Thompson says
Hi guys. I can’t believe I have only just stumbled over your site but I am so pleased I have. Like Sherry above, I was searching for ideas on how to get rid of the pee smell from our little friends out of floorboards. What you have shared here is so much more. Over an hour later I’m still browsing through you’re site and all my other half can hear from me is ‘wow!’. I’m a part time ‘Maker’ of …… well, stuff really i guess with grande ideas of setting up a side line business. I’m really interested in up-cycling and currently working on making wine glasses from wine bottles and engraving them. I’m loving it. Next projects are going to be making bottle carriers, crates and small furniture items from wood pallets, some concrete items (candle holders, coasters, lamps and even a Game of Thrones dragon egg set that I’m half way through) and turning my Blacksmith’s old horse shoes into wine racks and other decorative things that I’ve not thought of yet ;) Keep up the great work, thanks for sharing all you have, huge well done on everything you have achieved so far and thanks for the inspiration. Best of luck to you both in you’re future adventures and keep us all posted! :-) x
Christine says
Thank you so much for your lovely comment, Lee! It’s comments like yours that keep us motivated to keep sharing our experiences here!
Your upcycling work sounds amazing – I love the idea of horseshoe wine racks!
Thanks again and I hope you managed to get the smell out of your floorboards!
Cx
Sherry Grovogel says
I am looking for how to get animal feces odor out my floor boards? I found your blog about bicarbonate & white vinegar! I’m going to try that, but have a question will this keep the animals from repeating in this area! It’s my mother-in-laws home & she had animals that went there prior so mine do now also! Or will I need to replace the floor boards?
Christine says
It’s always worth a try because it’s an almost free thing to do and it worked great for us! I very much doubt that it’s something that would stop them repeating, though! Good luck with your floor, Sherry!
Cx
Rob says
Hi Guys
I would like to say how lovely your home looks and it is a credit to you both. You have put in a lot of hard work and the results are superb. Very well done.
My mother passed away recently and my wife and I are going to move into her house. To say that it needs modernising would be an understatement and it will be a work in progress for a number of years. I was considering sanding the floors but was put off by so many negative stories from a number of sources. However, since reading about your adventures, I have decided to take the bull by the horns and get sanding. You have inspired me and I feel confident that I can do a good job and have the old place looking new and refreshed.
Thank you for sharing all your stories and experiences. I will let you know how I get on and, if it’s okay with you, will post any questions I might have in the hope that you can give me some advice if I get stuck.
Thanks again,
Rob & Theresa
Christine says
Thank you so much for your kind comment, Rob! I’m sorry to hear about your mother.
Starting a new project is always exciting with so many possibilities! Sanding floors is hard work but it’s also easy and very rewarding! We’ve written loads of posts about our different floor sanding experiences and have shared a lot of tips and tricks but do let us know if you have any questions and we’ll be more than happy to help (if we can!).
I can’t wait to hear how you get on! Don’t forget to take some before pictures – looking back at how far you’ve come is always the best way to stay motivated!
Good luck!
Cx
Rob says
Thanks for all your encouragement, Christine. I hadn’t really thought about keeping a photographic record but Theresa and I both agree that it’s a great idea.
I’ll let you know how I get on. I went out today and bought all of the tools that I will need, so at least they will make things a whole lot easier.
Thanks again for your advice. Please keep up the good work with the blog; it’s excellent!
Cheers,
Rob & Theresa
Anjelica Ramos says
Hiiii! oh wow, I love your blog you guys!! I am a newbie at being a wife. My husband and I have only been married for two months now and I was searching the net for ways to clean our house. I stumbled upon your printable checklist and fell in love with it! I checked your site and fell in love with your house even more. ^_^ You guys are amazing!! Good job with the DIYs…I am inspired!
Christine says
Ohhh, thank you sooo much Anjelica & congratulations on your marriage! Your comment really means a lot and it’s so lovely to hear that we’ve been able to inspire you!
I hope that you find our cleaning list helpful but do let us know if you need anything else. We’re always happy to help if we can!
Cx
Emily Alexander says
Hi there! Please can I ask what colour you have used on the walls of the living room?
Thank you!
Emily
Christine says
We share what we got where and what colours we used in the “Shop our home” section on the blog.
The colour in our living room was Dulux Steel Symphony 4.
Hope that helps!
Cx
Kate says
I love how inspiring and gorgeous your house and blog are! I’m renovating my bedroom and I will be painting my walls. Right now they are a bright blue semi-gloss on medium textured walls. I’m planning on painting them white with a satin (matte) finish. Unfortunately I know how difficult it is to paint over bright semigloss colors with white satin paint. I saw your article on how to paint over gloss and I appreciated it, but I live the US so Dulux Super Grip primer isn’t easily available to me. Any suggestions on what else I could do?
Christine says
Aww, thank you so much, Kate! The best way to paint over anything is always to do some sanding first. As we’re talking about your walls (and taking into consideration that they’re textured) I’d recommend using a liquid deglosser. It’s an alternative to sanding and should give you the clean and less-glossy walls to paint over with emulsion.
Hope that helps! We’d love to see a before & after when you’ve finished!
Cx
Paul says
Really chuffed to have fallen over your site – we are shortly going to complete on our “forever home” (I hate that phrase) which is an old Victorian semi outside Manchester. It’s not in a bad way, but it is going to have a load of work thrown at it to get it how we want it! I was looking for guidance on sanding floors when I came across your site – and you have answered the question on what our hall and stairs are going to look like by accident! We have a gorgeous original tiled floor in the hall but we want boards everywhere else (hence the sanding!). The bannister rail on the stairs is a deep cherry/mahogany wood (like yours in Manchester) but obviously we wanted lighter floors…so I couldn’t work out what to do with the stairs themselves…paint? strip and stain? carpet??
Your site has provided the answer – and we’ll be nicking your look!!
Thanks
Christine says
Thank you for taking the time to leave us such a lovely comment, Paul! You’re so lucky to have a tiled floor – I would have loved one but our house just wasn’t grand enough! ;) Glad you like the look of our stairs and hallway – it was definitely one of our favourite spaces in the house, too!
Good luck with your new home!
Cx
James J. Payne says
Wow! What a lovely home! Looking forward to some new renovated parts of your house! Thanks :)
Elgraw says
You’ve done really great work with renovating this house :) It look beautiful!
Elgraw says
looks* :)
Tom K. says
I love what you guys do! Thank you for sharing!
margaret craig says
Can you suggest how to treat a watermark on a lovely cast iron fire place like yours This is in a rented flat. It is starting to rust. It is on the mantelpiece caused by a leaking vase.
Christine says
I’d suggest giving it a rub with some fine steel wool which should remove the rust. When the rust has gone I’d then give the area (possibly the whole fireplace) a quick clean/polish with some WD-40 (which should help reduce the rust returning).
Cx
Linda Vine says
can I ask you what’s best with door frames and skirting boards. I hate painting them white and even if you sand the old gloss underneath the above paint comes off in places – we normally paint satinwood as it smells less and can get it off our hands etc easier. I was thinking about taking all the skirting boards out and the door frames and replacing them with wood but would it take chunks out of the walls when they are removed, causing more work and repairs?
Christine says
We completely stripped our skirting boards, sanded them and then painted them. (You can read about how we did it here) It’s really the only way to get a perfect finish. I’d avoid taking the skirting boards off if you can, Linda. It will be almost impossible to remove them without damaging the wall which will probably make more mess and work than it’s worth.
Hope that helps!
Cx
John Tyreman says
Great Blog and fantastic work. We have gap between floor and skirting board. Any advice on how to seal it.
Christine says
Thank you, John! We actually wrote a post on exactly that a while ago. You can read about how we solved the issue here. The main thing is that you don’t want to use caulk as it will get dirty and crack over time.
Cx
Ryan says
Hi guys love what you have done and there’s so many ideas for us to steal hehe,
Me and my girlfriend are just start our own 19th century renovation and we have a problem with damp at the minute, I believe there’s no need to do a damp proof course on the house as it needs to breathe but not quite sure on what we should do, so my question is did you suffer with any dampness on your renovation? if so how did you deal with it?
Thanks Ryan and Katie
Christine says
Thank you guys! Damp is one of those issues where opinions can vary drastically. At the end of the day it’s impossible to say what’s right to do as it will very much depend on your house. (Old houses often had a damp proof course which consisted of a layer of slate.) We personally didn’t have any damp (apart from in the cellar) so I guess we were lucky. I know that’s absolutely no help at all but because of all of the different factors involved you’re probably best getting a professional to look at it.
Cx
Amy says
We have just bought our Victorian house in Chorley, Lancashire! Your blog is insane and you have given me so much inspiration so thank you! Your home is incredible!!
Christine says
Congratulations on your new home and thank you for the complilments! Hope you love your new home as much as we’ve loved living in ours.
Cx
Victoria says
I can’t begin to tell you , how happy I am at finding your blog , we started restoring our home in October , a Victorian semi detached , we have fully enjoyed ripping everything out but now the hard work has started at making decisions on how to do different projects and where to begin , I’m sat up on a Friday night at 11.30 searching for help and inspiration and with your page have answered them all , can’t wait to share this with my husband tomorrow. Thank you
Christine says
So happy to hear that you found your way over to us, Victoria! It can be so difficult to know where to start, especially when so much needs doing. Just take your time – you’ll get there in the end. If we could do it, anyone can!
Happy DIYing!
Cx
Shelagh says
I have just found your blog. Your renovations are amazing you work sooo hard for those beautiful results. Well done.
Christine says
Thank you so much for the compliment Shelagh!
Cx
Daniel Brown says
Hello there Christine & Jan, I work for Lincolnshire Lime, one of the UK’s leading suppliers of Lime mortar and specialist building materials. Looking at your blog, i can see that your property is over 100 years old, and I would like to make you aware that when restoring old buildings it is crucial to use the correct materials. We supply a vast range of building materials specially for old buildings, which are essential as modern materials can cause serious damage to the house. For example, using cement or modern paint will cause the walls to no longer be breathable, which can cause catastrophic damage them. We are passionate about old buildings and ensuring that they are restored and conserved properly to prevent damage.
We love giving advice for conservation and restoration, so if you have any questions regarding restoring/renovating this property, do not hesitate to give us a call at 01469 531 227.
Good luck with this property,
kind regards
Daniel Brown
Lincolnshire Lime
http://lincolnshirelime.co.uk/
Jan says
Thank you for your kind and helpful comment, Daniel! Yes, we are aware that it’s important to use the correct materials on an old house. We’ve actually just been researching mortar for repointing our home, so will definitely be checking out your website!
J
Action Property Inspections says
What a gorgeous old house! Looking forward to seeing the renovation transformations.
Christine says
Thanks for the compliment!
Cx
Pamela Gossage says
My husband and I renoated a 1906 semi years ago. I will never forget how hard it was, but how great it was when it was done
Christine says
At the moment it’s just hard ;) – although things have improved a lot!
Cx
Valarie says
Love your staircase renovation. Just moved to England from the US and really want to update the staircase here. Your renovation was spot on to my idea and has convinced my husband it will work in our house.
Valarie
Newbury
Christine says
Thanks, Valarie! It’s hard work, but so worth it!
Good luck with your renovation!
Cx
Sabha says
Hi,
My husband and I have bought an edwardian house and it has the exact fire place you have and is unfortunately painted white. Thanks for the tips I will let you know how it goes. We have that awful beige tiled fireplace pretty similar to yours, what did you do to yours? I’m assuming knocked it down?
Sorry I wanted to ask a few questions. 1) what type of sander did you use on the floorboards? and did you varnish them after sanding? 2) how did you get the stairs that perfect?
I would be grateful for your input :-)
Christine says
I’ve seen our fireplace in a few fireplace shops, too, Sabha. It’s always a bit weird seeing it somewhere else! Yes, we knocked down the beige 1950s fireplace in the living room and replaced it with a period fireplace. You can read about it here.
We used a belt sander for most of the floor and an edging sander for the edges around the room. We hired them both at a local tool hire place. We shared a post on the process here. Yes, the floors are varnished. We are still really happy with the varnish we used, as it has a very non-plasiky look (some varnished do). We go into some detail about the varnish in the comments on the post about how we sanded our floors.
The stairs took for ever. The only way to get them as you want is a LOT of patience and time. If you’ve not already seen it, we posted about our staircase restoration project a few times. You can read more about it here.
Hope that’s some help! Happy to help if you have any more questions.
Cx
M says
I just found your blog and found it fascinating. As an expat, I have moved houses a lot to various parts of the world. So starting over from scratch is something that I am very familiar with. But, that being said, I have never put in this much work into a home ever. *bows low* I can’t wait to see what you guys do next.
I would love to receive new posts via email. Will ticking the box below be sufficient to get an email update every time you post? Thanks!
Christine says
Glad you found your way over to us! We’re so happy that you’d like to follow us! If you click on the little RSS icon in at the top of our sidebar, you can choose to get an update about new posts per email. If we’ve posted something new, we usually share a link on Facebook and Twitter, too.
Cx
grace says
Nice wood burner – just wondered which one it is!
Christine says
Thanks, Grace! It’s a Rais Q-Tee 57. We love it!
Cx
Linda says
Just found your blog. My hubby and I spent over 10 years restoring our Victorian home in Kent. Unfortunately, we had to relocate because of jobs. We know the pain and joy of bringing life back to an old house. Our home in Kent never looked so good as the day we put it on the market to sell (boo hoo).
When looking for a home in Scotland, we looked at new build home as the idea of moving into somewhere that didn’t require restoration was slightly appealing with a toddler. Nope, it was just not us, we love the character, high ceilings and space of period houses. So, we’re slowly changing an Edwardian house. I’d like to go back in time and stop the person who invented wood chip wallpaper. Grrrr!!
The kitchen is east facing and doesn’t get much light so we’re considering opening the dining room up to the kitchen to make it brighter. That’s how I found your blog and the work you’ve done to open up your kitchen / dining room.
Thanks for sharing.
Linda
Christine says
Hi Linda, thanks for stopping by! I fully agree, you just can’t beat period houses!
Removing the wall between the kitchen and dining room was the best decision we’ve made so far! It’s not only made the room work much better for us, it also feels much bigger than before.
Our dining room is (more or less) north facing, so it was one of the darkest rooms in the house. Now that we’ve opened it up, it’s sooo much lighter in the whole room.
Good luck on restoring the rest of your home – it’ll be worth it in the end (or at least that’s what I keep telling myself)
Cx
Charlotte Cox says
Yay another UK renovation blog! Looking forward to catching up on your posts and following your progress! C x
Christine says
So glad you found your way over to us, Charlotte!
Cx
Sarah says
Hi Christine and Jan, I just came across this site today, so glad I did. I got my keys last tuesday to my new house, well not so new. a 1920s semi, that hasn’t had any work done in years. It just had an old man living in it, pretty much the same layout as yours. So far I have knocked down two asbestos garages, stripped wallpaper and carpets from living room and dining rooms, also one of the bedrooms, and knocked down two built in wardrobes from the bedrooms. Like yourself I am knocking through from the kitchen to dining room, luckily my dad is a builder. But it needs lots doing, new electrics, damp proof, windows etc. I think it will be a while before I get there. At what stage did you move in? I hope to move in as soon as possible, but as of yet I don’t have cooker, fridge, bed or anything, and I am thinking it won’t be until damp proof course is done. How do you keep motivated? I love your front door and fireplaces. You have given me inspiration to maybe sand my floors, as luckily the floorboards seem to be in excellent condition, is that a messy job? And at what stage would you recommend to do that? before or after painting?
Thanks
Christine says
Wow, Thanks Sarah! Congratulations on your new house! Your description sounds very familiar ;). We moved in just a week after we got the keys. Except for a lot of cleaning we hadn’t started with any of the building work. We’ve had to live through it all – although we did have a cooker ;). Having said that we had no fridge for the first two weeks and we bought a bed on the day of the move.
We love our sanded floors! It was a lot of work (most of it done over just one hellish weekend) but it was so worth it and actually a fairly quick thing to do. Our floorboards weren’t even in a good conditions, so I’m sure that yours would look amazing. Just make sure to insulate under them, it’s just too cold otherwise. You can read about our sanding weekend here. It gives an overview of our timescales and a cost breakdown, so hopefully that will give you a good idea of what to expect. The dust gets everywhere, but it is easy to just clean away (unlike brick dust which seems to stick to everything). We sanded our floors before painting, but I think it would work just as well after painting. You will just have to dust your walls ;) and probably touch up your skirting. Either way it shouldn’t make to much difference.
Hope you visit again soon!
Cx
cam says
Hi! I’m just visiting your blog and found it interesting. I thought I’d add that I guessed you were somewhere in northern Europe because you have a garden, whereas we in the US have yards…and, I noticed you wearing sweatshirt amp; jeans while working outside in June. :-) Brrr!
Best of luck on the projects!
Christine says
Hi Cam! Yep, we live in the UK and until last week the summer had been particularly miserable. Luckily the sun has decided to make an appearance now!
Hope you visit us again, soon!
Cx
cam says
Yikes! Definitely enjoy your sunshine!
I really liked your before amp; after pics of the house (or “in progress”). The bathroom was a HUGE improvement.
Christine says
Thanks! Considering the bathroom was a really quick, cheap and temporary makeover, it really didn’t turn out too bad!
Still a lot to do though…
Cx
helen says
hello, i hope you dont mind me asking but who did you use to do sand your living room? I am in the north-west and hired an edging sander to do my hallway and landing. As satisfying as the results are, i do not want to do larger rooms myself! Have loved reading you blog!
Thanks
Christine says
Glad you like our blog! Have emailed you the details.
Cx
Cecile says
Hi Christine and Jan, well done with your DIY projects. I found your blogs as I am thinking of restoring an old cheap fireplace that I bought. I bought my little flat in the middle of the street :-)recently and have had grand plans to do it up! 5 months later the place is still a building site! After the initial enthusiasm I struggle to keep the motivation going and coming back to the flat feels realky deoressing at the moment. But I guess that’s what you get with really old houses, you keep finding stuff that needs repairing! Anyway realky well done with your projects and sorry to vent my frustrations on your blog. I guess alk the hard work will be well worth it in the end! x
Cecile says
Oops sorry for all the typos! My fingers are too big for my phone!!!!
Christine says
Happy that you found your way over to us Cecile! We’re glad we’re not the only ones that get frustrated! Sometimes it feels like staying motivated is the hardest job of all! Just remember, it’ll be worth it in the end and there’s nothing better than taking a step back and looking at all you’ve achieved!
Cx
melanielensonme says
really enjoy this site, may I ask what kind of paint and colour did you use on the wood fence ?
Christine says
Hi Melanie! Glad you like it! The colour we used for the fence is Cuprinol Garden Shades in Black Ash. You can order tiny testers on their website for only £1 each (if you’re in the UK).
Hope that helps!
Cx
Elisha @ Pneumatic Addict says
Where do you guys live? I’m guessing Europe due to A.) The washing machine in the Kitchen. B.) Calling wood “timber”, not lumber. And C.) You have a “garden” and we have a “yard”. I found your stairs re-do linked to another blog and I’m so happy I did! You guys are inspiring! I can’t even get myself motivated to wipe down my baseboards regularly! Good luck with everything!
Elisha @ PA
Christine says
Hi Elisha!
So glad you found your way over to us! Yep, we’re in Europe – to be more exact in the north of the UK. I hate having the washing machine in the kitchen! We have a big! project planned which will hopefully allow us to move it! We’ll hopefully be able to share some of the details with you soon!
Just between us, I can’t motivate myself to wipe down our skirting boards (baseboards) either! Just don’t tell anyone ;-).
Cx