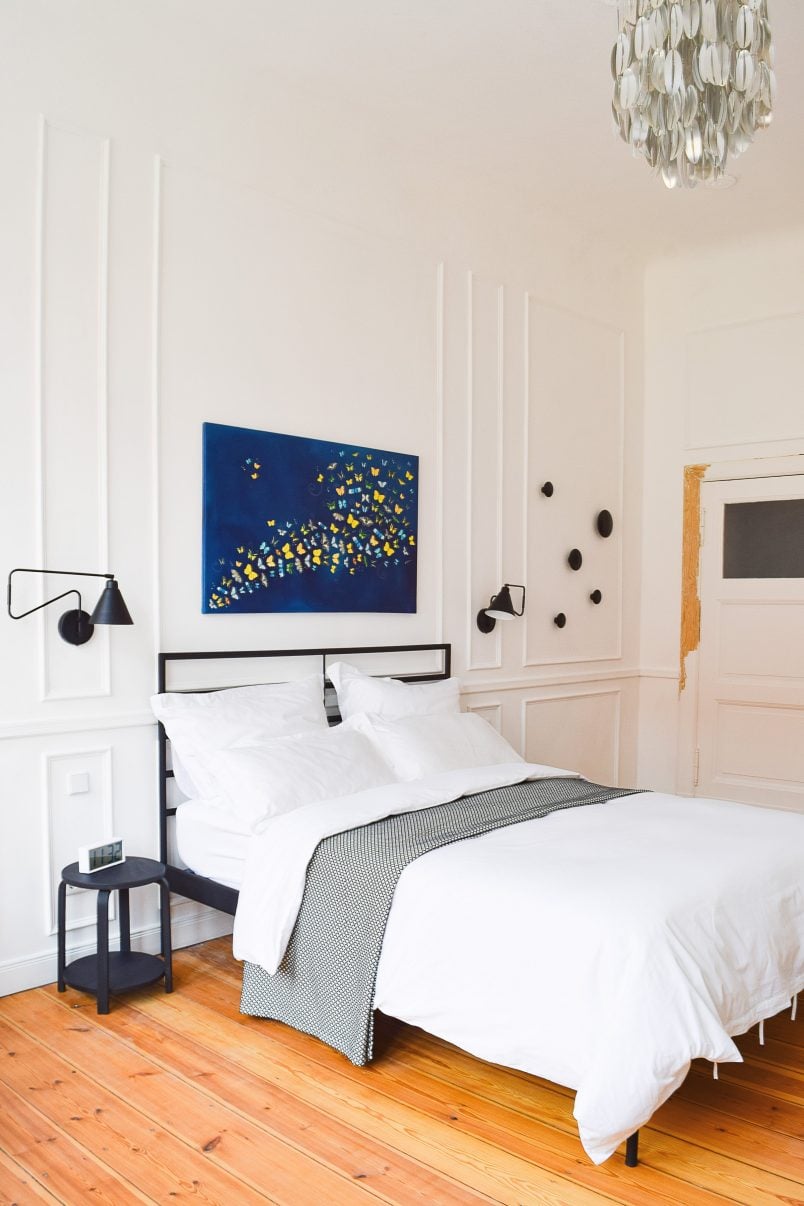
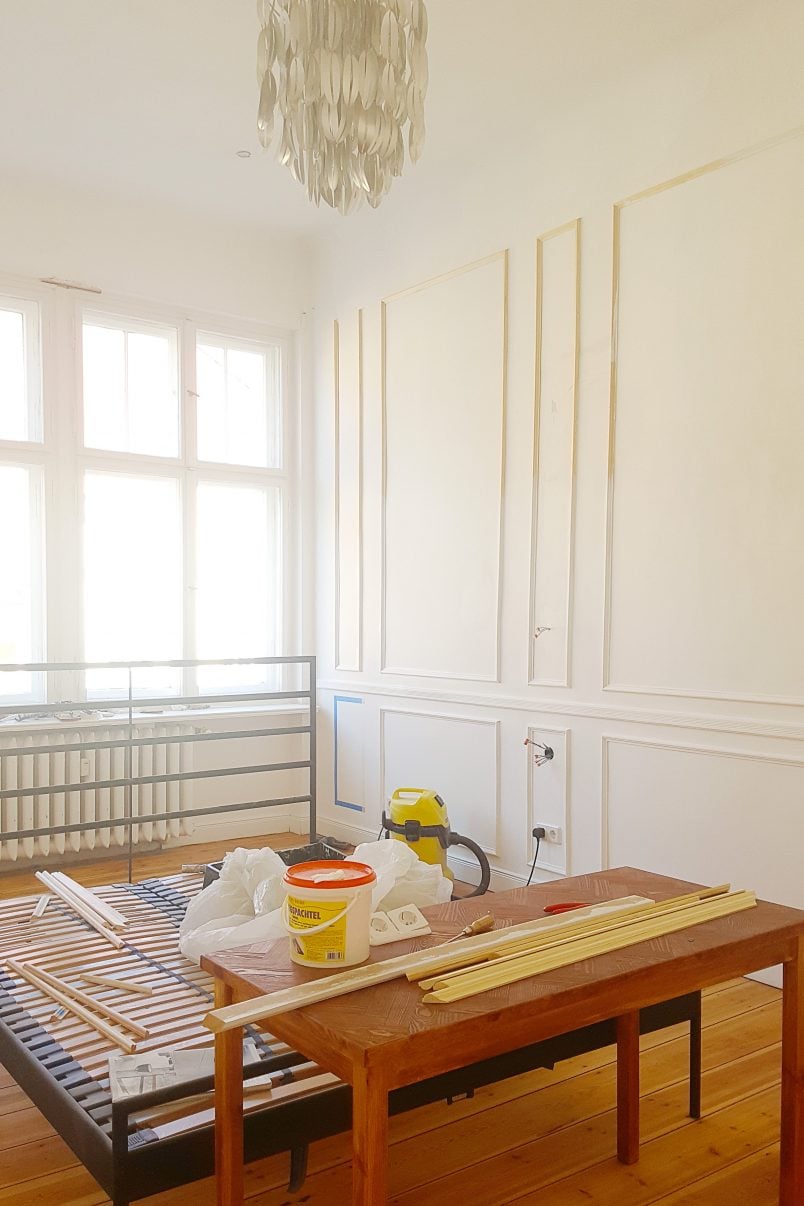
It may have taken us way longer than expected (we started the project back in December last year!) but we’ve finally finished panelling our guest bedroom – and we love it!
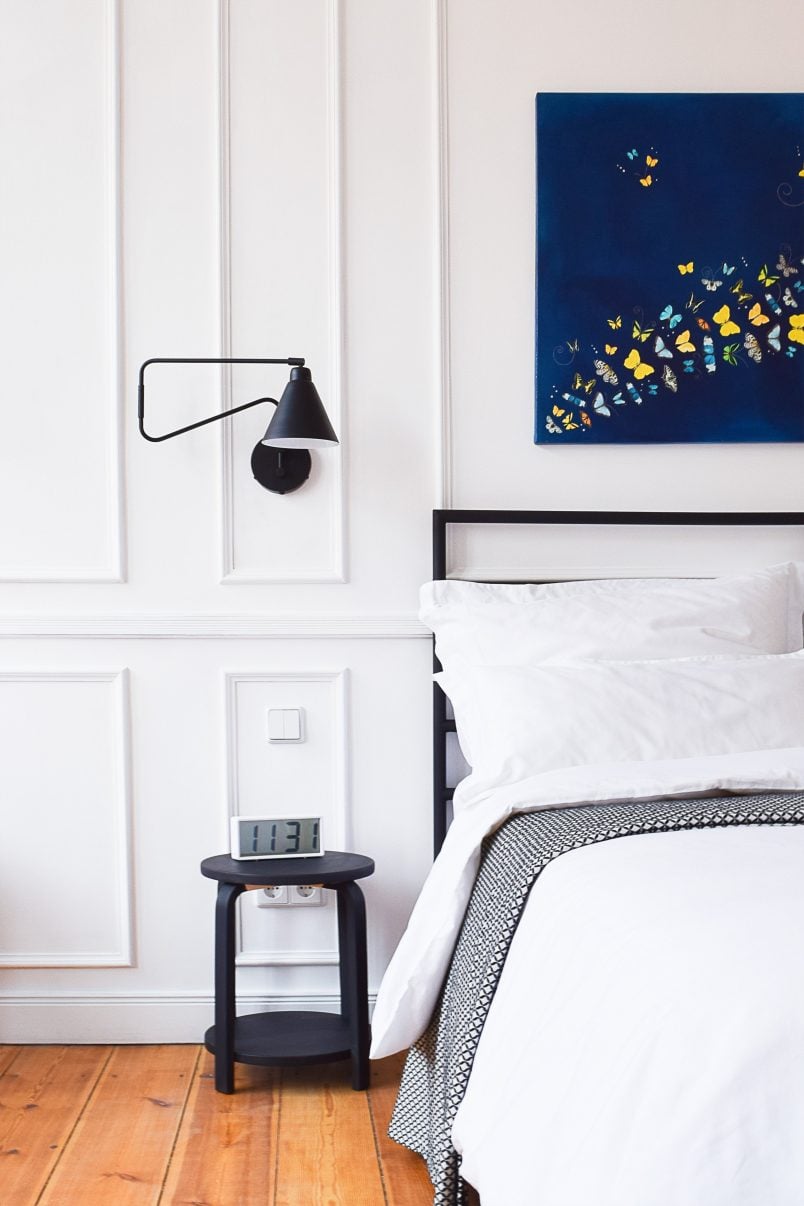
It adds interest, texture and a luxurious feel to any room and we think it suits the style of our apartment which is, let’s face it, way more grand than we are!
Installing panelling is a really easy DIY project and we learned a lot from the last panelling project in our house in Manchester where we added panelling to the wall along the side of our staircase.
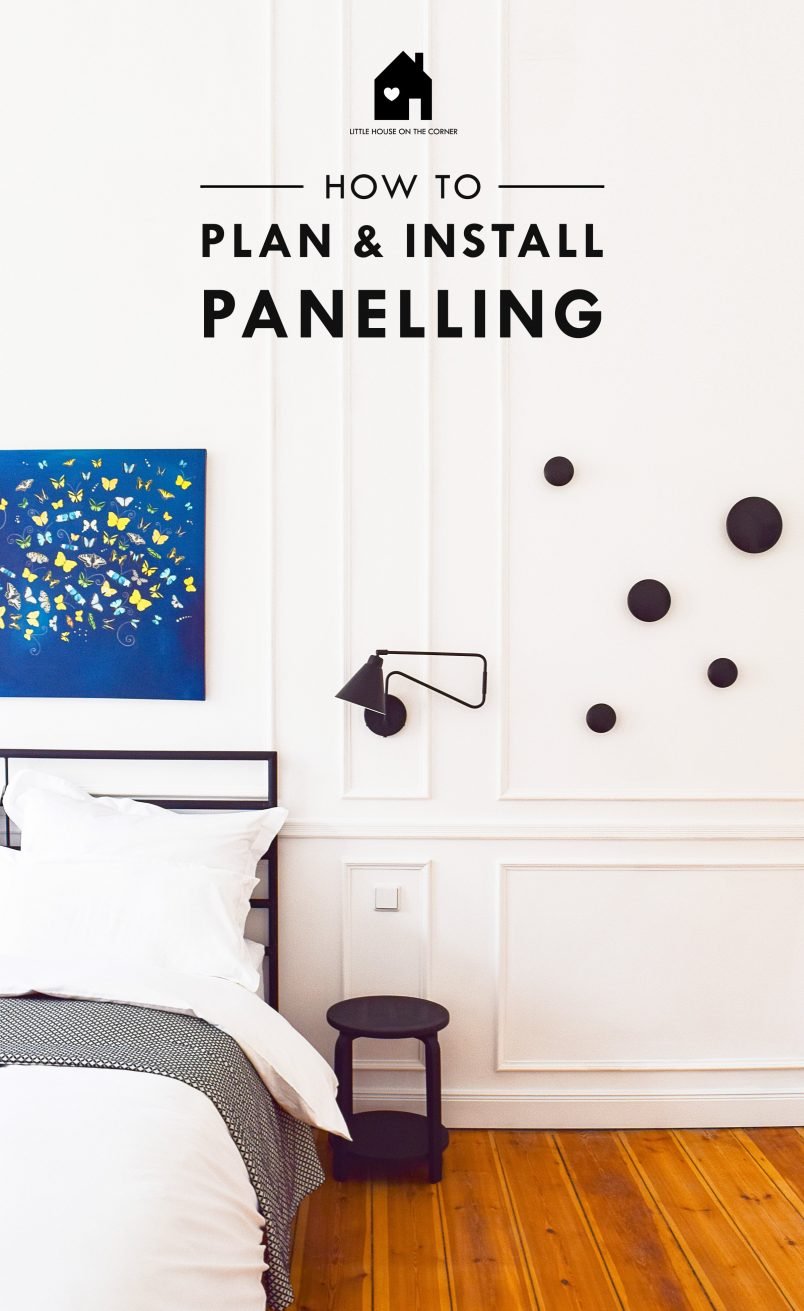
Planning the panelling for the staircase was easy but planning panelled walls for a whole room is a bit more involved. Don’t worry though, it’s still not difficult and we’re sharing the exact steps we took. (Just ignore the semi-stripped doorframe!)
Warning: We go into as much detail as possible to help you if you’re thinking of planning & installing panelling. There are lots of before, progress and most importantly lots of after pictures if you just want to skip straight through to those though!
This is what you will need to plan and install panelling:
* This post contains affiliate links to the products we used to complete this project. We only share products we love and think that you will, too!
Step 1 – Planning
- Tape measure
- Pencil
- Paper
- Ruler
Step 2 – Preparation
- Masking tape – lots of it!
- Laser level
- Ladder (depending on how high your panelling will be)
Step 3 – Installation
- Timber moulding strips
- Nail gun & nails – alternatively No Nails
- Mitre saw – alternatively fine saw & mitre box
- Sandpaper – about 120 grit
Step 4 – Finishing
- Caulk – lots of it!
- Caulk gun (this is the one we have – don’t opt for a plastic one!)
- Primer & paint to finish the panelling and room
Here are our tips on how to plan and install panelling on your walls:
Step 1 – Planning
This is the most important bit of this project and it’s also the most time-consuming part. It may seem like a lot of faffing to prepare such detailed plans and drawings but once you’ve perfected the planning nothing else can go wrong! It’ll also save lots of time in the long run!
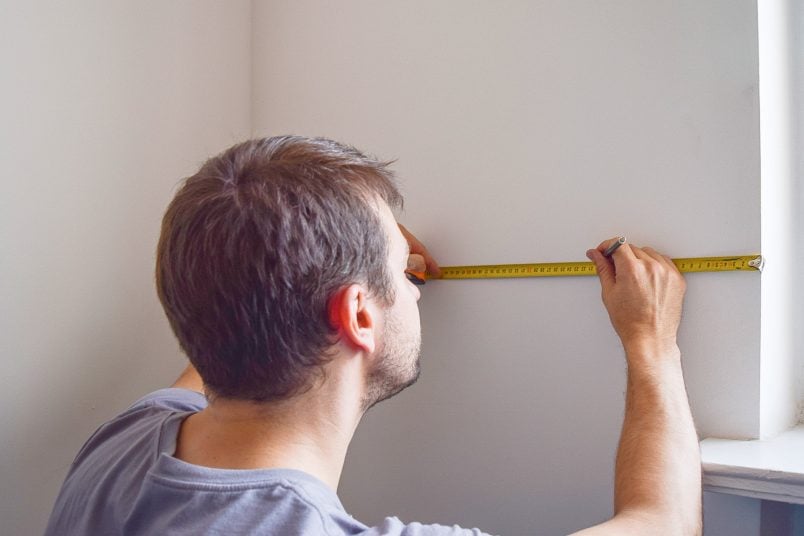
Start by measuring your room.
You want to measure every length, opening, bulge and recess. Also make a note of any fixture and fittings like sockets, light fittings or built-in furniture that can’t (or shouldn’t) be moved.
Draw a plan of your room.
You don’t need any fancy software to do this just the measurement you took, a ruler and pen and paper are perfectly fine.
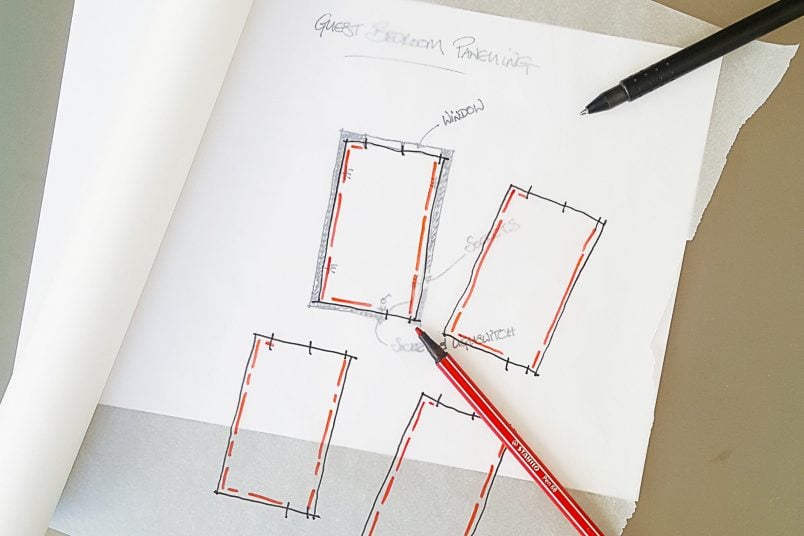
Once you’ve got your drawing you’re ready to start planning!
Design your panelling options.
Get yourself some sketch paper (any thin paper that you can see though is more than enough – even baking paper will do!) and lay it over your drawing.
Now it’s time to start sketching.
Your drawing doesn’t have to be perfect at this point it’s more about getting an idea of what could work and what your options are. As you can see, I also moved the furniture around in the drawing to line up with the panelling.
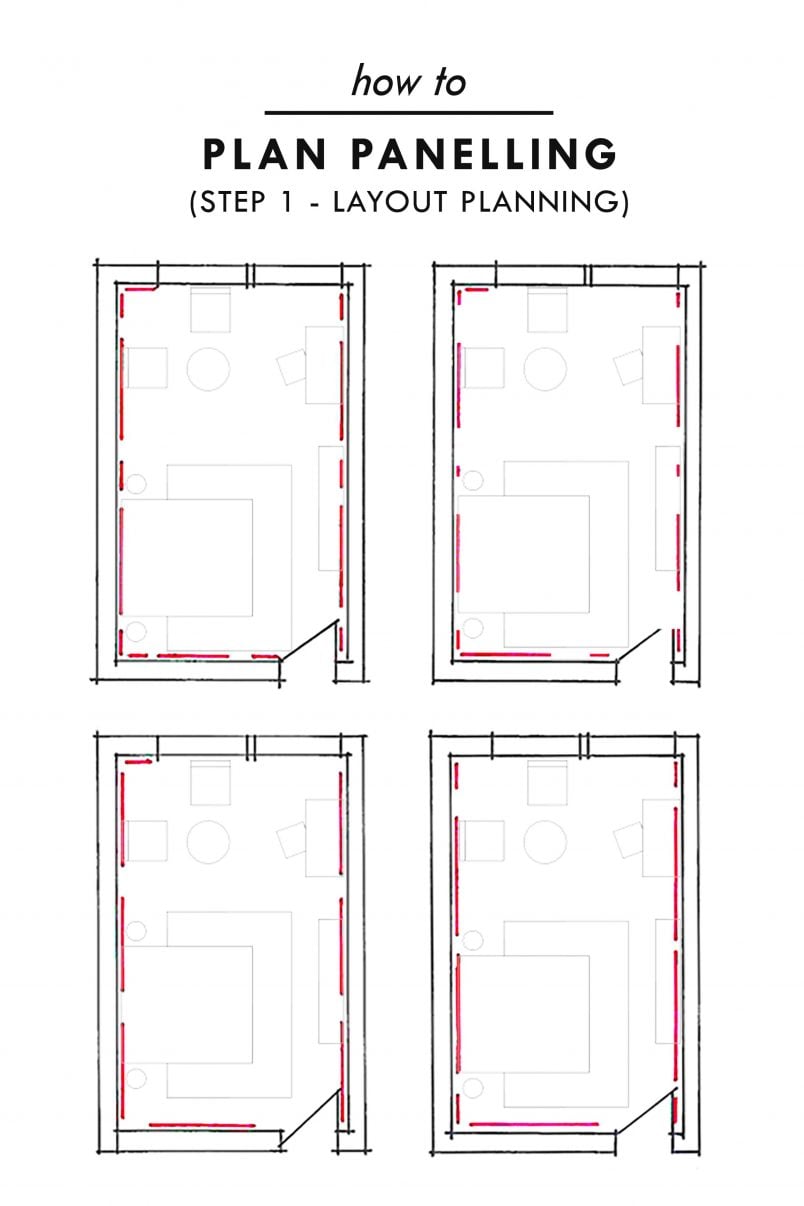
Have a look at your room.
Are all walls equal sizes? Do you have any specific features that need to be taken into consideration? Do you already have a look for the panelling in mind?
Start by drawing lines that represent the width of each of your panelling panels. Basically, you’re dividing your walls into sections. Literally, just draw lines along the walls of your room and try to find a pattern that works for you.
Here are some tips to get the pattern to work:
- Can you find a common width? How wide is the door? How wide is the smallest wall – could that be the panel size?
- Adjust the width of the panels.
- Adjust the width of the space between the panels.
- The sections don’t have to be the same size – you could use two or even three different panel widths. We’d recommend using no more than two or three different sizes to keep a coordinated feeling.
- Do you have any art that you want to be able to hang within a panelled section? Make sure the sections are big enough!
Try as many options as possible and even if you think you’ve already found the perfect solution, try and find a few more. You’d be surprised at how many more options you can find! Sometimes the ones you struggle to find are the best ones!
Note: Our drawings are more precise than they have to be for the purpose of showing you the steps. I’m sure no one could have made any sense of my scribbles otherwise!
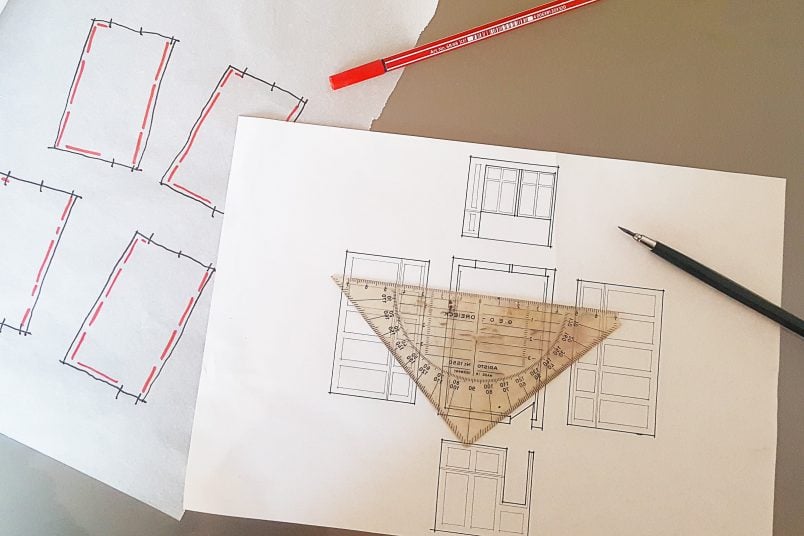
Start to prepare your detailed floor plan.
When you’ve decided on a design that works for you it’s time to get specific. Draw out the design in detail and to scale on the drawing of your room. When you’ve drawn in all panels it’s time to start thinking three dimensional.
Draw the elevations of your room.
Don’t worry, it sounds way more complicated than it is! Imagine that you’re folding down the walls of your room. You already have your floor plan so all you have to do is project the edges of the room upwards. Don’t forget to mark the positions of your windows and doors, too!
You should end up with something looking like this.
Draw the panelling.
Now that you’ve prepared your floor plan and drawn your elevations it’s time to add the panelling. You’ve already drawn the lines for your panelling on the floor plan so it’s just a matter of projecting the panels up onto the elevation (the same as you did with the walls).
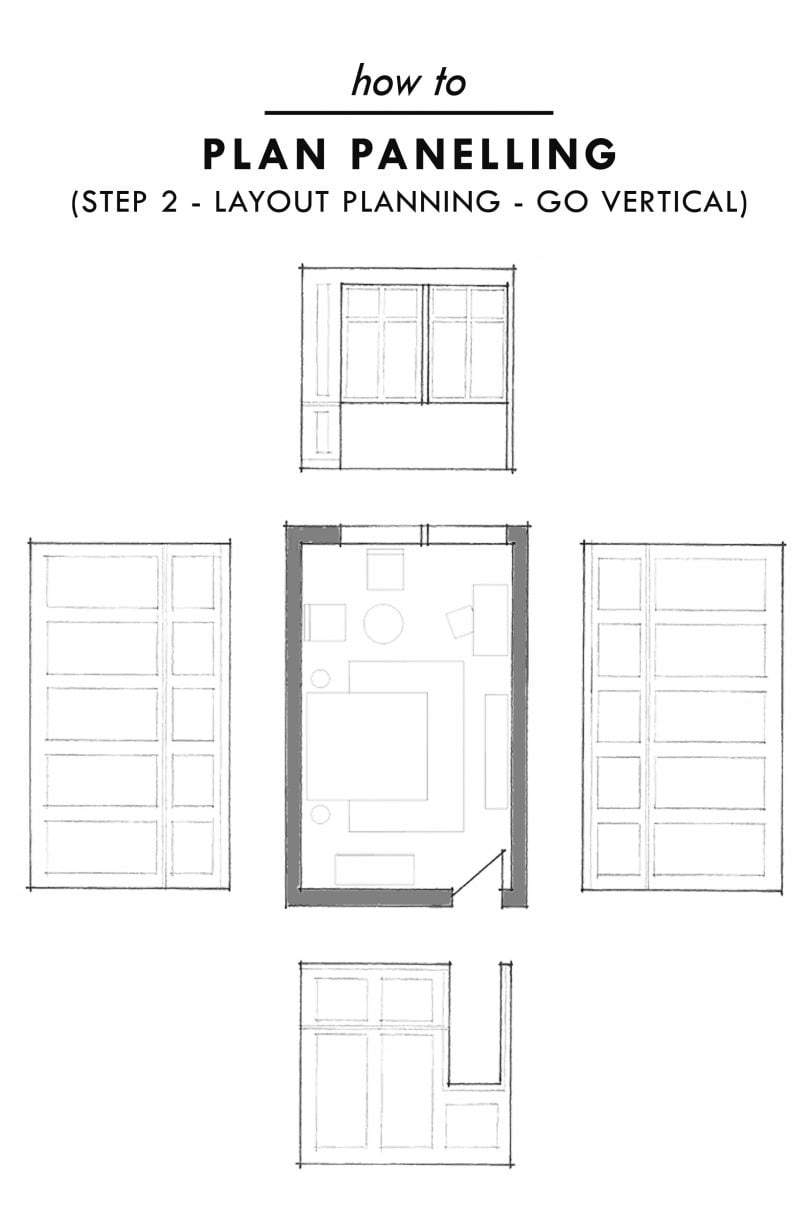
Now you can really start to see how the panelling will look in your room and you can start to think about how you may want to divide the panels further.
Do you want a dado rail or a picture rail? How high will your panels be? What gap is there between the skirting, will you have panels over doors and windows? And most importantly – how does it look? Do you like the scheme so far? Do the panel sizes look in proportion? Would any adjustments make it look better? Don’t forget to take the width of the timber moulding into consideration, too!
Make sure you’re really happy with the design before moving on to the next step. Remember, working out where the panels go is much easier and quicker on paper!
Here are some tips to get the pattern to work:
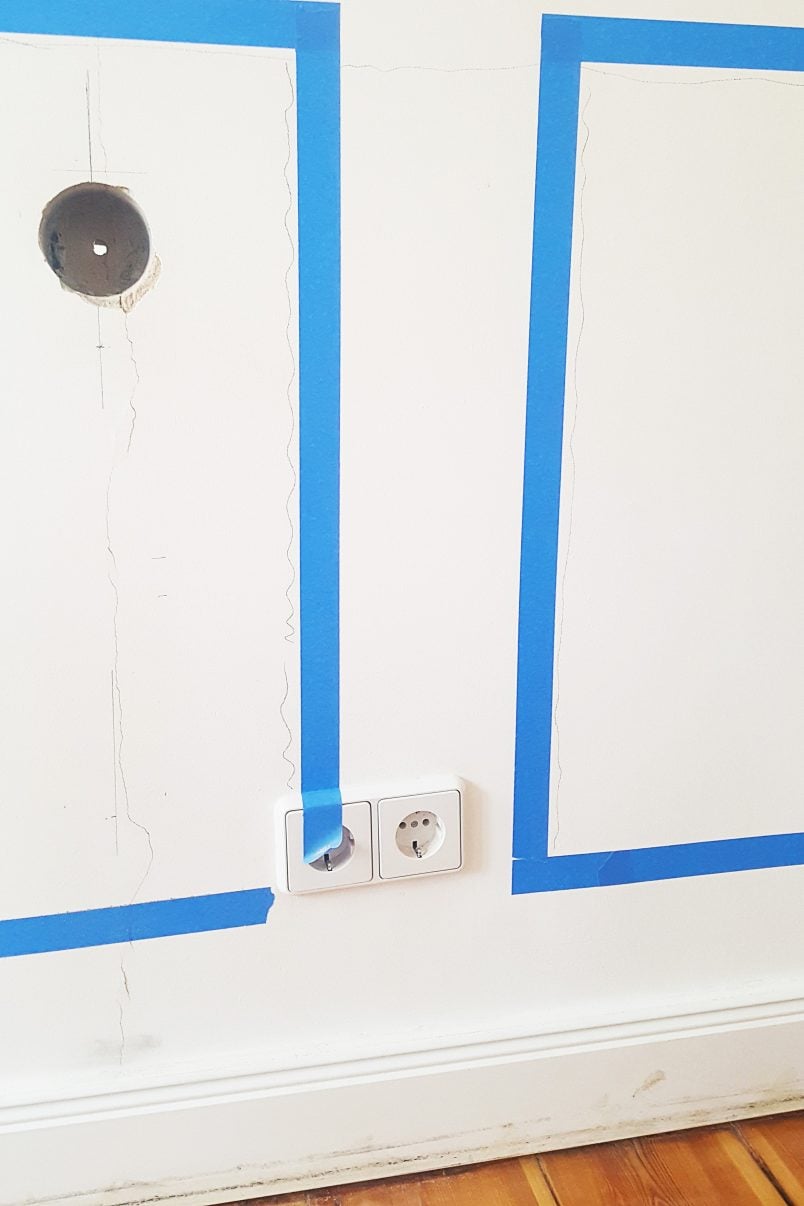
- Don’t forget to take the positions of sockets and switches into consideration! You don’t want to end up with a socket in the middle of a panel! Don’t assume they are at the same height!
- Take all of the walls of your room into consideration. It’ll feel more harmonious if the panelling on the opposite walls mirrors each other.
- Planning is the most important step of the whole process. Actually attaching the panelling is really easy as long as you’ve done your prep work.
Step 2 – Preparation
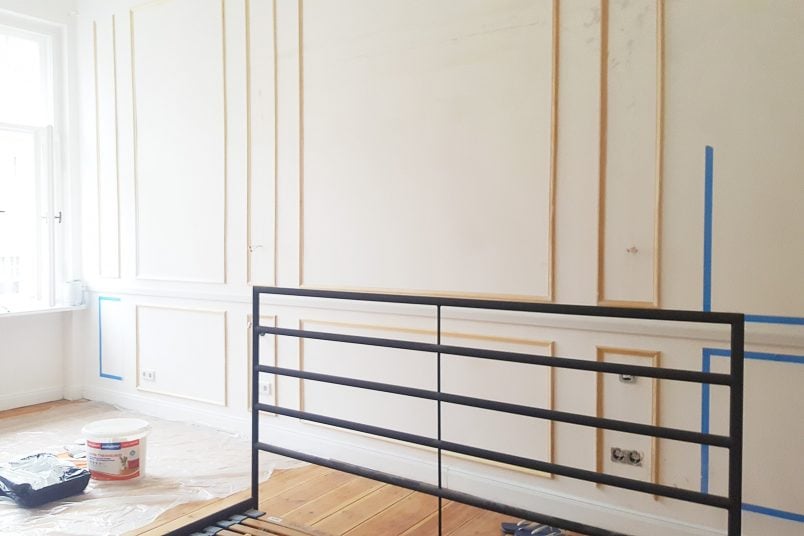
Transfer the measurements of your drawing to the walls.
Having worked out the design for the panelling it’s time to transfer it to your walls. With all of the planning you did in step one, this should be fairly easy.
Work your way around the room with your tape measure and pencil and make a mark where every vertical line/panel piece will be. Then make marks where every horizontal line/panel piece will be.
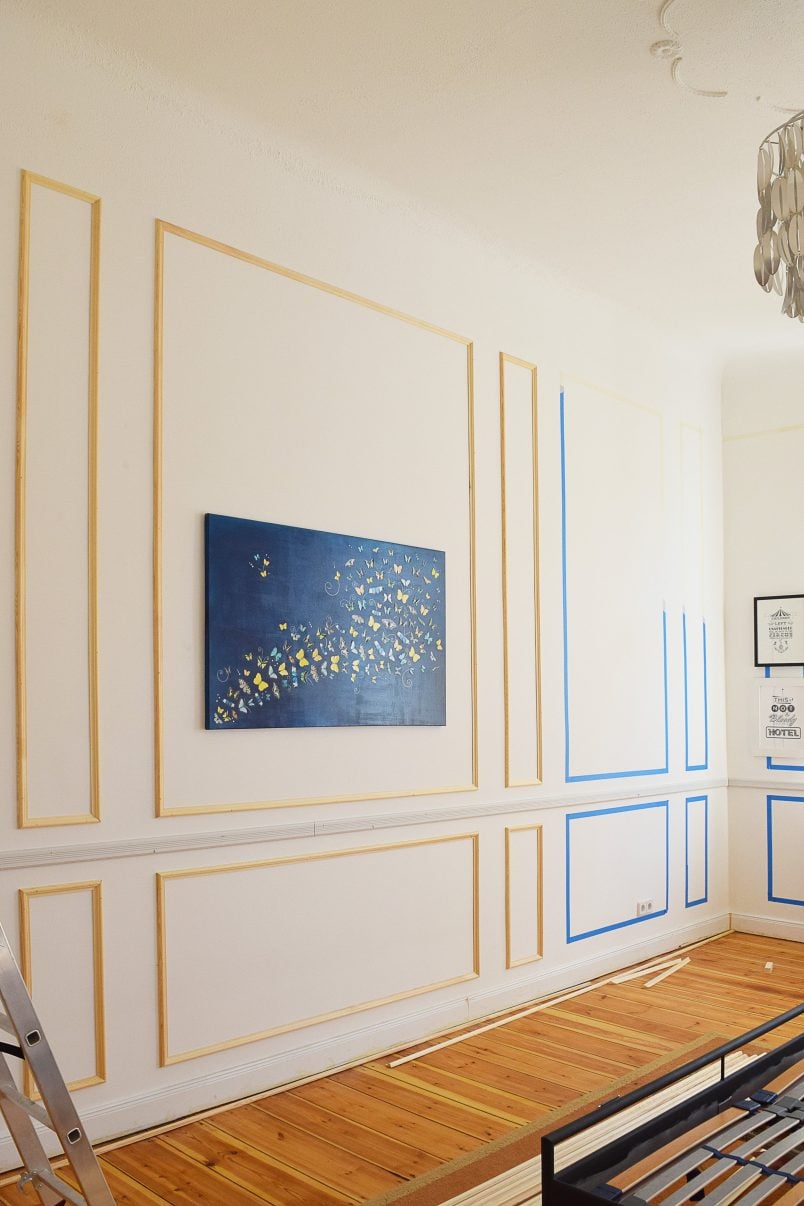
In our case, we’re installing a dado rail with a small panel beneath it and a larger one above it.
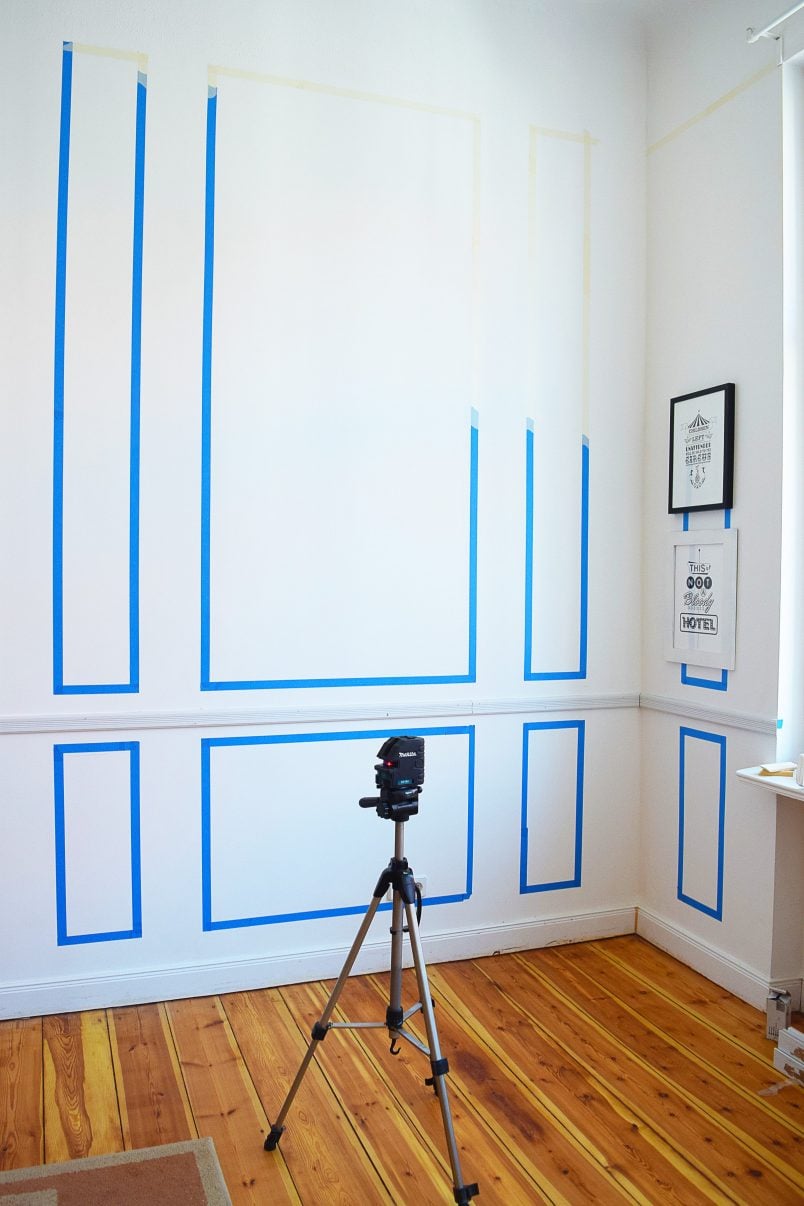
Tape your design onto the walls.
Your walls should now be covered with loads of little dots representing where you’ll be attaching your panels. To make life as easy as possible, we used our new laser level to project the lines onto the wall.
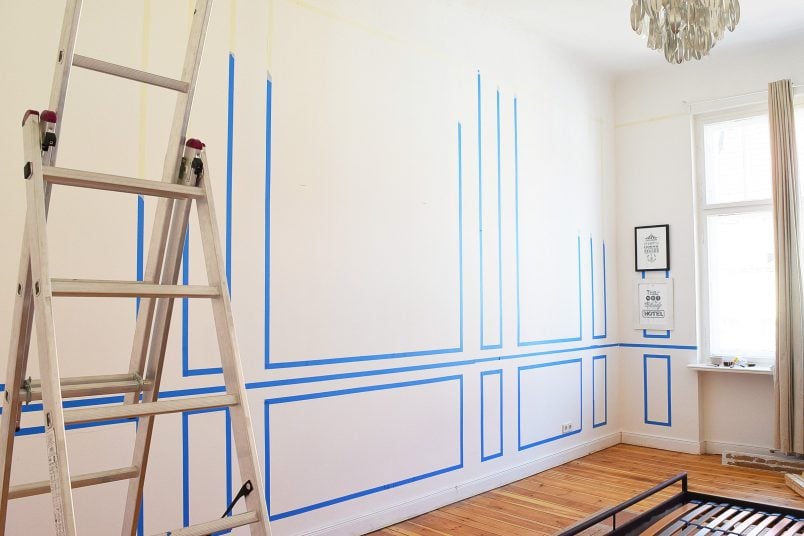
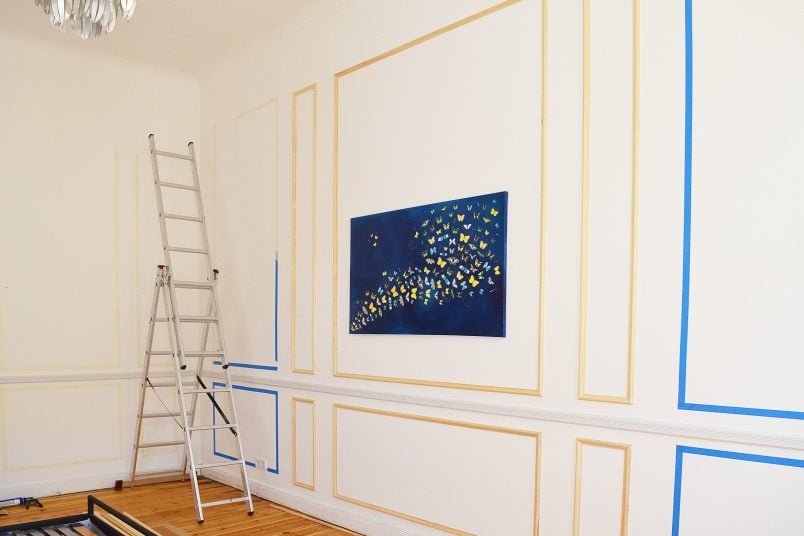
With our lines projected onto the walls, it was then just a matter of working our way around the room with a lot of masking tape and marking where the panels will be.

It was so quick and saved a lot of messing with a spirit level! Best of all you can project a line all the way around the room (both horizontally and vertically) which means that it’s ideal to get the panels on opposite walls to align perfectly with one another.
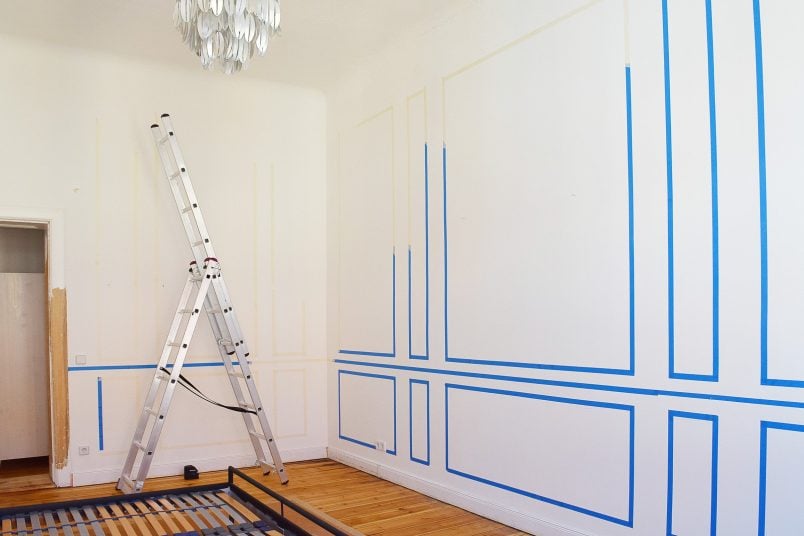
When it comes to actually attaching the panelling it’ll make life much easier if you don’t have to install it directly on the masking tape so it’s important to decide if you’re taping within the measured lines or outside of the lines. This way you can install the panelling next to the masking tape.

If you’re panelling a large room we’d totally recommend using a laser level like ours but a normal spirit level will work fine, too.
Step 3 – Installation
As weird as it may sound, installing the panelling is the easiest part of this project!
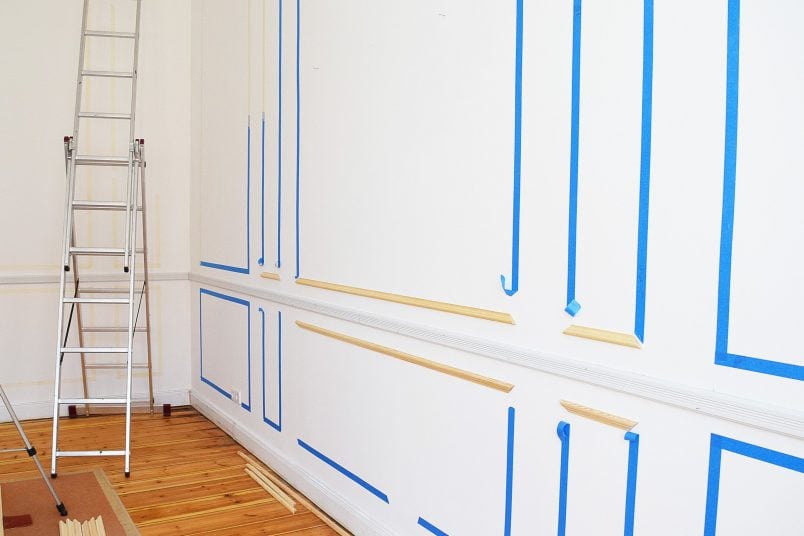
Cut your timber to size.
Double-check your measurements (more than once!) before cutting. It’s advice I give here all of the time but we’ve still made so many mistakes over the years! Measure twice, cut once!
You can cut the panels by hand with a fine saw and mitre box (which is what we did when we fitted the panels along the wall of our staircase) but I would really recommend using a mitre saw.
It may look like a scary tool but I honestly can’t believe we ever did any DIY without it and it’s easily one of our most used tools! Ours is an entry-level version that really wasn’t expensive.
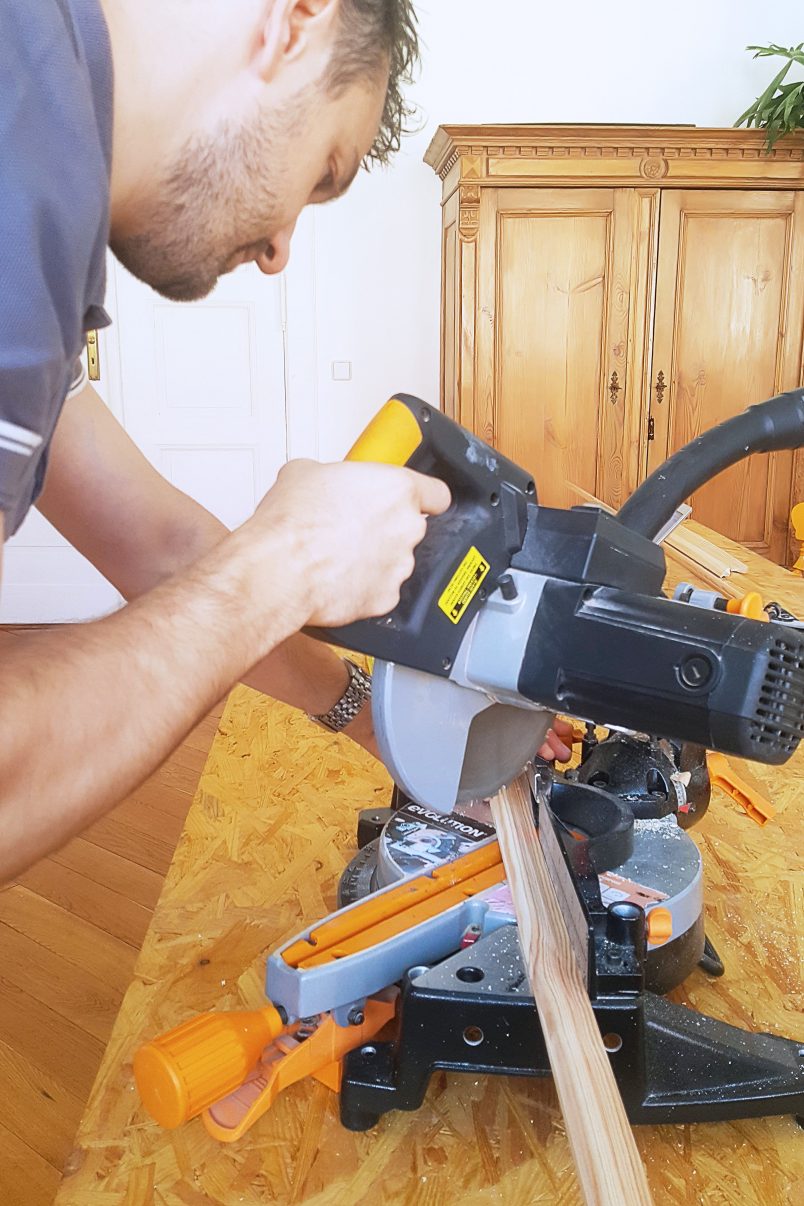
Give any edges that are rough a quick sand with some sandpaper (around 120 grit). The cleaner the cuts and edges are the easier it’ll be to attach the timber to the wall and achieve a professional finish.
If you have to join any pieces of panelling in length don’t just push two ends together. Cut both at a 45° angle so that they slot together. This way the join will be invisible when you’ve painted it.
Tip: We’d recommend buying your panelling at timber merchants and not a DIY store. We found the quality to be better but more importantly, the pieces of timber tend to be much straighter which makes installing them much, much easier!
Attach the panelling!
This is the step you’ve been waiting for.
We used No Nails to attach the panelling along our staircase wall but with so many panels to attach it’s not something I’d recommend for a larger project.
This time we used our nail gun to attach the panels (which is still our favourite tool ever!). Nail guns are really expensive and although we love ours we wouldn’t recommend buying one for just one project (although you’d be surprised how often you end up using it).
Luckily you can easily hire nail guns if you don’t want to splurge on one of your own.
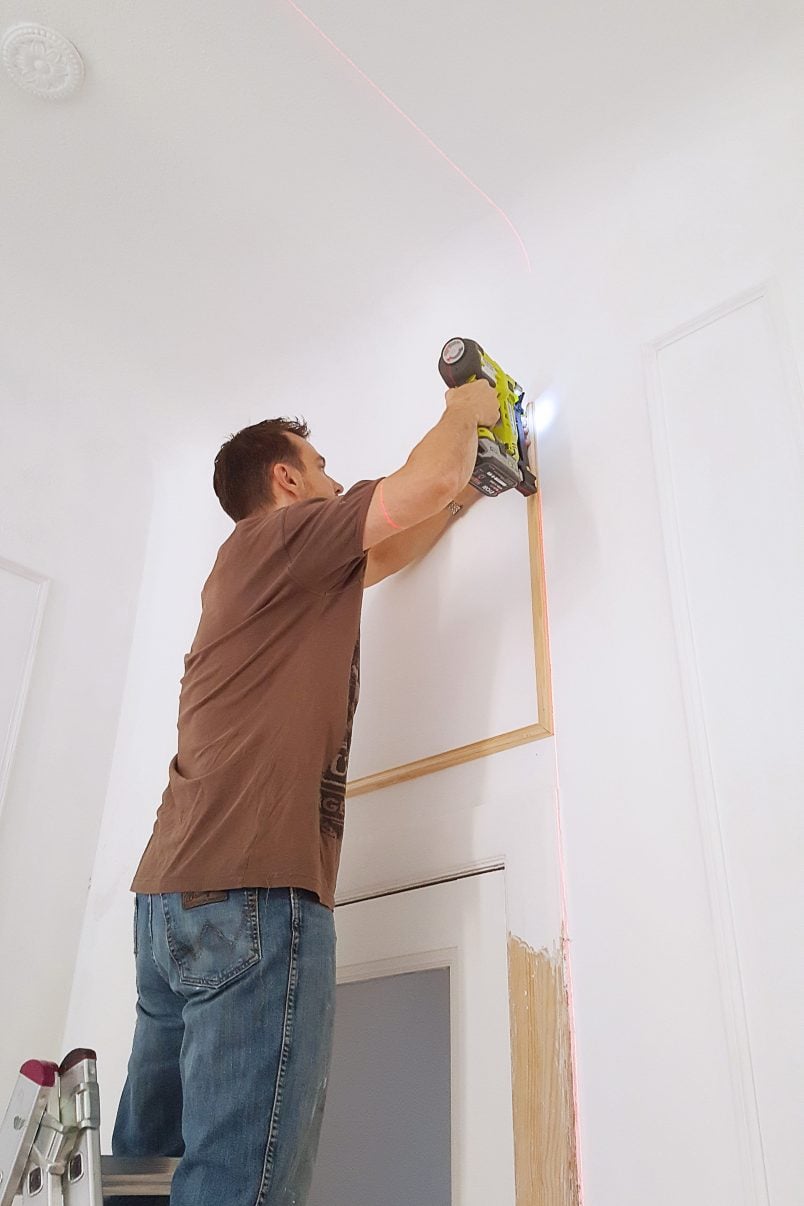
Attaching the panelling to the wall is the easiest and quickest part of this project. Hold the panel in position (depending on how you’ve planned either inside or outside of the masking tape edge) and nail it to the wall.
If you’re installing a dado rail, we’d recommend starting with it. It’ll be your main horizontal line and you can use it as a guide to making sure that every other panel you nail is parallel to it.
Because you taped the panelling pattern to the wall with masking tape you don’t need to do any measuring or even check if it’s level as you already did that in the previous step!
Ideally, you’ll have someone to help with this step as it’s so much easier if you have someone to hold the piece of panel while you nail it to the wall. Just remember to take the position of any cables or pipes into consideration before you start to nail into the walls!
We used No-Nails a couple of times where we thought there might be a cable (and still managed to nail into one – whoops!).
When you’ve finished attaching all panels remove the masking tape and you’re done!
Step 4 – Finishing
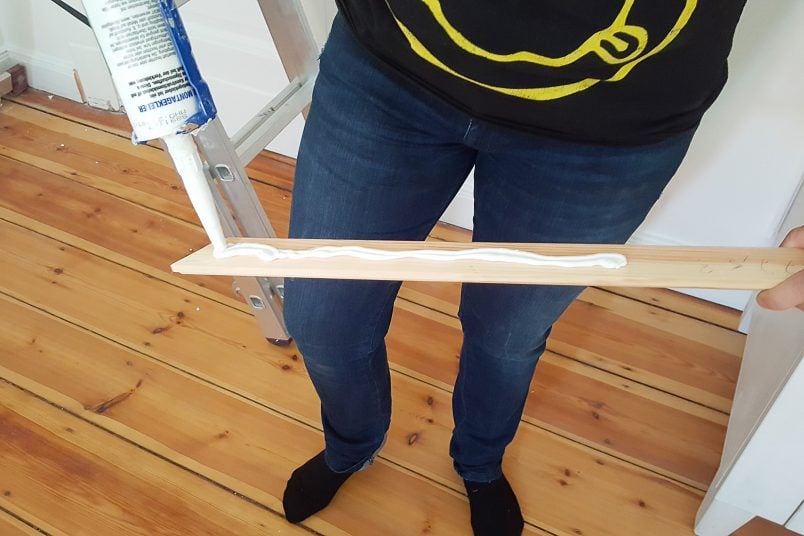
This step is a bit time-consuming but it’s vital to achieve a flawless and professional finish. You have to caulk every edge and join.
Caulk is your friend!
It’ll hide any imperfections, it’ll join the panels to the wall and it’ll make everything look tidy and clean!
To apply the caulk hold the caulk gun at an angle to the edge and squeeze a thin strip of caulk into the gap. Then dip your finger into some water and smooth the caulk pushing it into the edge.
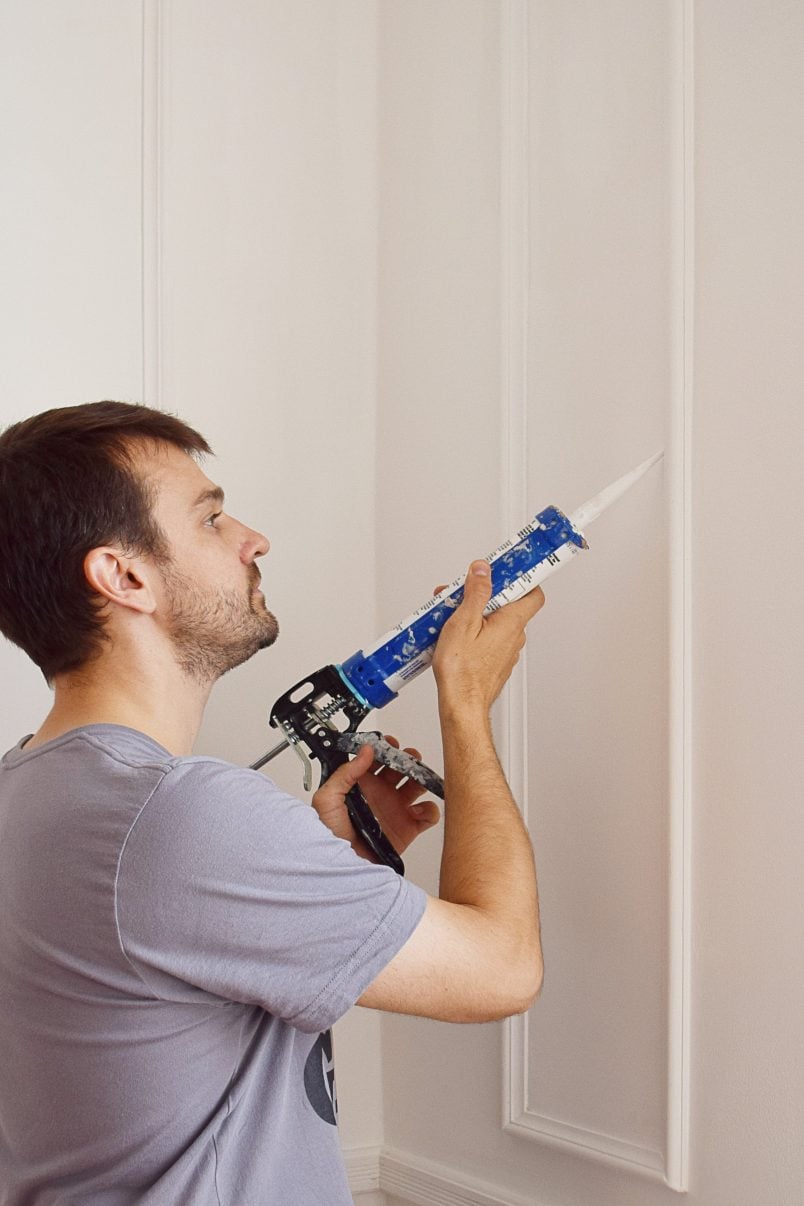
You can sand caulk when it’s dry but it’s a complete pain. It’s also much quicker to take your time getting the caulk right while it’s still wet.
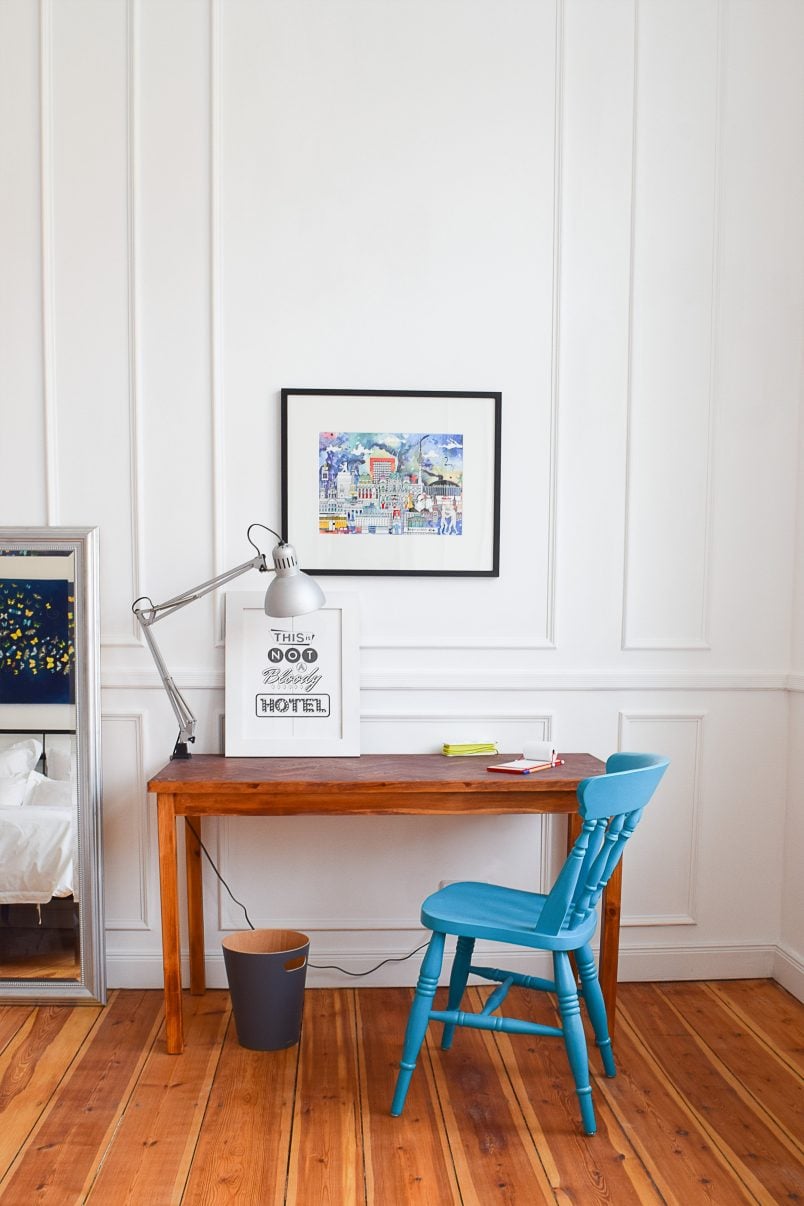
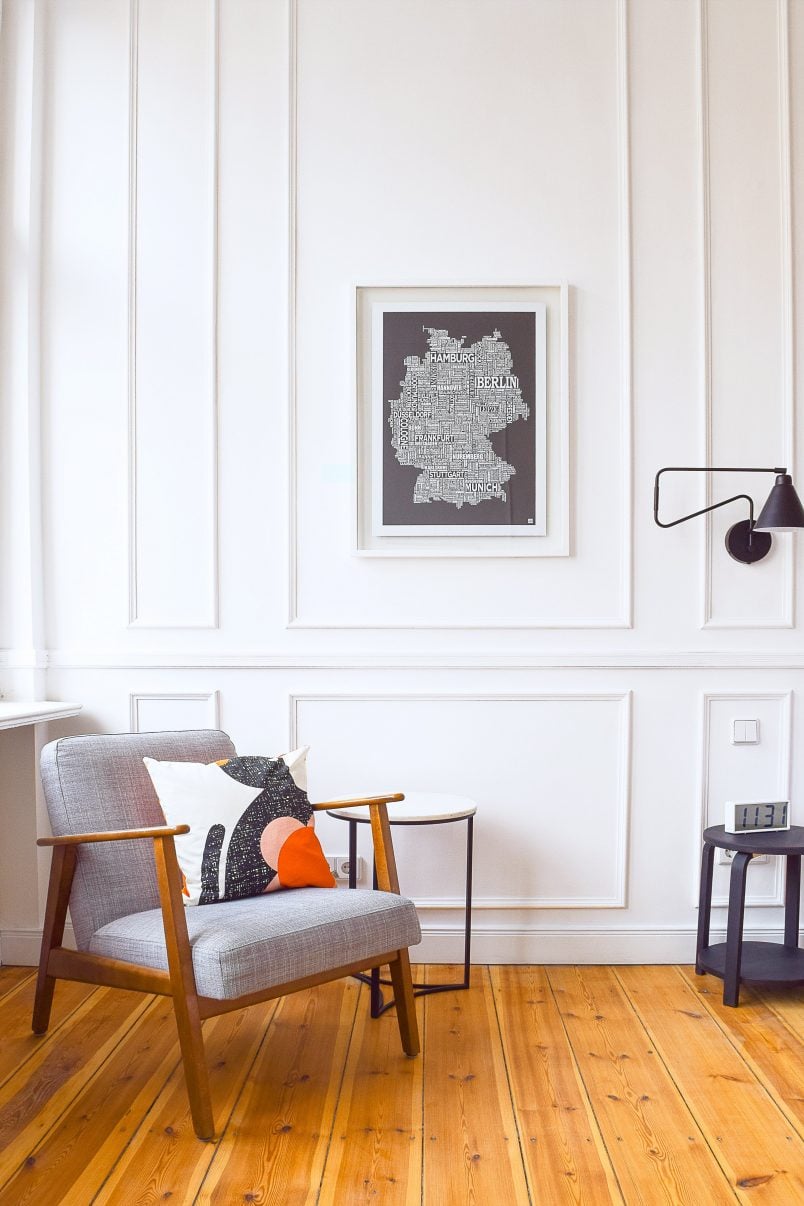
All that’s left to do is stand back and admire your new panelling!
We recommend waiting at least 24 hours for the caulk to dry before starting to paint the room.
Planning and installing panelling may seem super involved but actually, it’s not complicated or difficult at all. Really it’s just 4 steps (that we’ve gone into a lot of detail explaining) and most of the prep work can be done from the comfort of your sofa! Just take your time and make sure to plan and tape everything as precisely as possible.
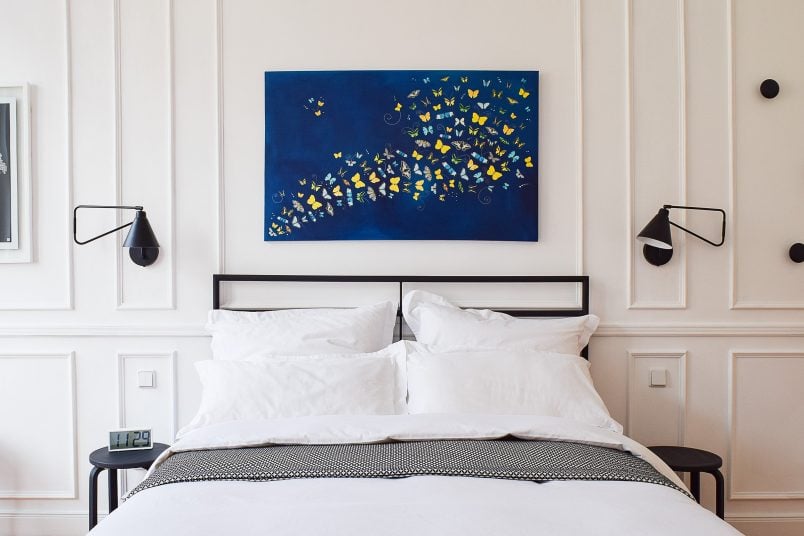
I love how our new panelling turned out! It’s really given the room such an elegant feel.
Tips on how to plan and install panelling:
Do
- If you have to join two pieces of timber to create a longer piece of panelling, cut both ends at an angle to join them. It’s a more secure connection and the join will be much less visible.
- Get your calculations right. We calculated the amount of panelling we needed 4 times and we still managed to miscalculate because we missed an entire wall. Both of us. Twice.
- When cutting multiple pieces that are the same size, cut yourself a template piece that you can use to check the size of all other pieces you cut. Making sure that all pieces are exactly the same size will make installing the panelling much easier!
- Use a nailer and mitre saw. If you’re only panelling a small area a fine saw and mitre box and some glue will work but I wouldn’t recommend it if you’re panelling a larger area or if your walls aren’t 100% straight.
- Use a laser level. It is, of course, possible with a normal spirit level but it might drive you mad and the project would take a lot longer to complete.
Don’t
- Don’t forget to take the position of sockets and switches into consideration! You don’t want to end up with something like this!
- Don’t forget to find out where cables and pipes are located. Although we were really careful we nailed into a cable! Needless, to say it wasn’t our finest DIY moment. Use glue if you’re even remotely unsure of the position of cables.
- Caulk is what makes the panelling perfect! Don’t even be tempted to skip this step! When applying caulk, wet your finger. It’ll make smoothing it much easier and cleaner.
- Don’t ignore your furniture and artwork. Think about where you’ll be placing your furniture and where you want your art to be displayed while planning the layout of the panelling.
Here are a couple of panelling questions we get asked again and again...
Yes! Planning the layout of your panelling takes time but installing it is easy and fairly quick, especially if you’re using a nailer to attach it. It’s something even a novice DIYer can easily accomplish. If you’re in an old house it’s likely that nothing will be straight. This can make installing panelling a bit more difficult as it can look wonky, even if it’s perfectly level and straight.
For this type of panelling, you can use a nailer or some strong adhesive to attach panelling to your walls. We’d recommend using a nailer as it makes installing the panelling quicker and easier, especially if you have uneven walls. This is the nailer we used to attach our panelling. We love it and highly recommend it.
Strong adhesive works well, too it’ll just take a bit longer to panel your room as you’ll have to wait for the adhesive to dry. The best adhesive for panelling is this glue that we used to attach our pictures rails and panelling in areas where we couldn’t nail.
We’d recommend either using glue or a nail gun to attach the panelling. Screws have fairly large heads and would be difficult to countersink. You’d end up with fairly large holes to fill which would be more difficult to hide, too,
The more panels you use the more expensive the project will be. The cost, especially if you panel all of the way up the wall quickly adds up. Make sure you know what you’re letting yourself in for! We spent about 400€ on this room.
As you can see, the room is so close to being finished! We still need to add curtains, I’d like a rug under the bed and there are the all-important finishing touches to add but we’re almost there now!
Do you love panelling as much as we do? Have you ever considered panelling any of your walls? What do you think of our white walls?

Nazish Shahab says
Appreciate your detailed post! I’m also looking into similar wall paneling for my formal dining room. The only issue is that I don’t own any power saws or know how to use them. In desperation, I’m leaning toward the pre-cut, polystyrene paneling option. I know, not the best option, but I’m still deciding.
Also, what would you recommend for the paneling design to continue on walls with windows? May I see a picture of your completed wall with windows?
Thank you.
Christine says
I’m so glad to hear you found our guide helpful, Nazish! Using a mitre saw isn’t as difficult as you expect. It’s actually one of the easiest and most beginner-friendly tools. All you do is place a piece of wood in it, hold the handle and chop it in half with the saw. It really couldn’t be easier to use, just watch your fingers. Our first saw, which we used for all projects for almost 10 years, was affordable, too. I totally understand that you don’t have one, though. Another option would be to hire one or borrow one from a friend. If you still don’t feel comfortable using a power tool, you could use a mitre box and a fine saw instead. There are a lot of cuts though, which is why we recommend using a mitre saw.
For an alternative, I’d recommend using panels by Orac decor.
As for the window design, you can see how we designed the moulding in lots of pictures where we’ve already taped the pattern to the wall next to the window. The window covered most of the wall, so we didn’t have many options.
Hope that helps & good luck with your panelling!
Cx
Leanne says
Great post, thanks Christine & Jan! Panelling the hall, stairs & landing of our new house is the next step in our renovation. (From your old next door neighbours in Stockport) x
Christine says
Thanks, Leanne! Sounds like your new hallway is going to look fantastic and adding panelling is a really easy project!
Cx
PS. Did you see that we moved again? Now living near Amsterdam :)
Paul Larsson says
Thanks for a great guide! This looks so good! May I ask for the measurements?
Christine says
Thanks, Paul! Which measurements would you like?
Cx
Rhonda says
Thanks for a detailed how-to! I plan to try this on one wall in a small bedroom! If I’m successful? Who knows where else I’ll venture!
Christine says
I’m sure you’ll be successful, Rhonda! We all have to start somewhere and (with a bit of planning) a panelling project is a great beginner-friendly project. As always, feel free to get in touch any time if you have any questions.
Good luck with your project!
Cx
Louise says
This was so unbelievably helpful, and has finally given me the confidence to give panelling in our bedroom a go! Such an in-depth article, and your panelling looks gorgeous!
Christine says
That’s great, Louise! It really isn’t difficult to do and a bit of planning before you start will help you get the panelling perfect in your home!
Cx
PS. Would love to see a picture when you’ve finished!
Roxy says
Love it! Best article I found so far on paneling!
Christine says
Thank you so much, Roxy! So glad you found it helpful.
Cx
Nikki Robertson says
I love this and my husband and I are going to attempt some panelling in our hallway ourselves! One question, when you painted the panelling did you just use the same emulsion as the walls? Normally I would paint wood with an eggshell. Thank you!
Christine says
How exciting, Nikki! Yes, we painted the panelling with emulsion. We wanted a completely flat finish and, as it’s only the guest bedroom, doesn’t get a huge amount of use or wear and tear.
We panelled the walls in our hallway in our last home and opted to paint the panelling there with satin wood paint for a more durable finish, though and that’s generally what I’d recommend for things like dado rails or areas that are more high-traffic.
Hope that helps and I’d love to see a picture of your panelled hallway!
Cx
Colleen says
Going to do this in our dinning room! Thank you so much for sharing your process. What color paint is this? Love it!!
Christine says
That’s great, Colleen – it really is easier than I’ve made it sound! The colour on the walls is not a fancy brand or colour – it’s just white paint!
Cx
iemam says
thank you this is most helpful This will certainly make me reconsider the 49mm profile I was going to go for!
Do you remember where you bought your beads from?
Ibrahim
Christine says
We bought ours at a local timber merchant. The quality of timber always seems to be better at these kinds of places than at DIY stores (the timber is less warped with fewer knots). For our panelling in our house in Manchester, we bought the panelling at Portwood timber. The guys there were always really helpful and had lots of different profiles to choose from.
iemam says
Very nice work. I am starting my own project but im having difficulty deciding on the moulding profile to use and especially its width. Could you please tell me the width of the profile you used for the picture frames? I’m inclined to buy one that is just under 2 inches. It’s a 4m (13ft) wide wall that I’ll split into three big frames (big middle and two smaller on the sides). I’m wondering if a 38mm (1.5inch) moudling would look proportionally narrow? Also did you know if you used an Ogee or Astragal profile?
Happy to hear your take on this.
Many thanks
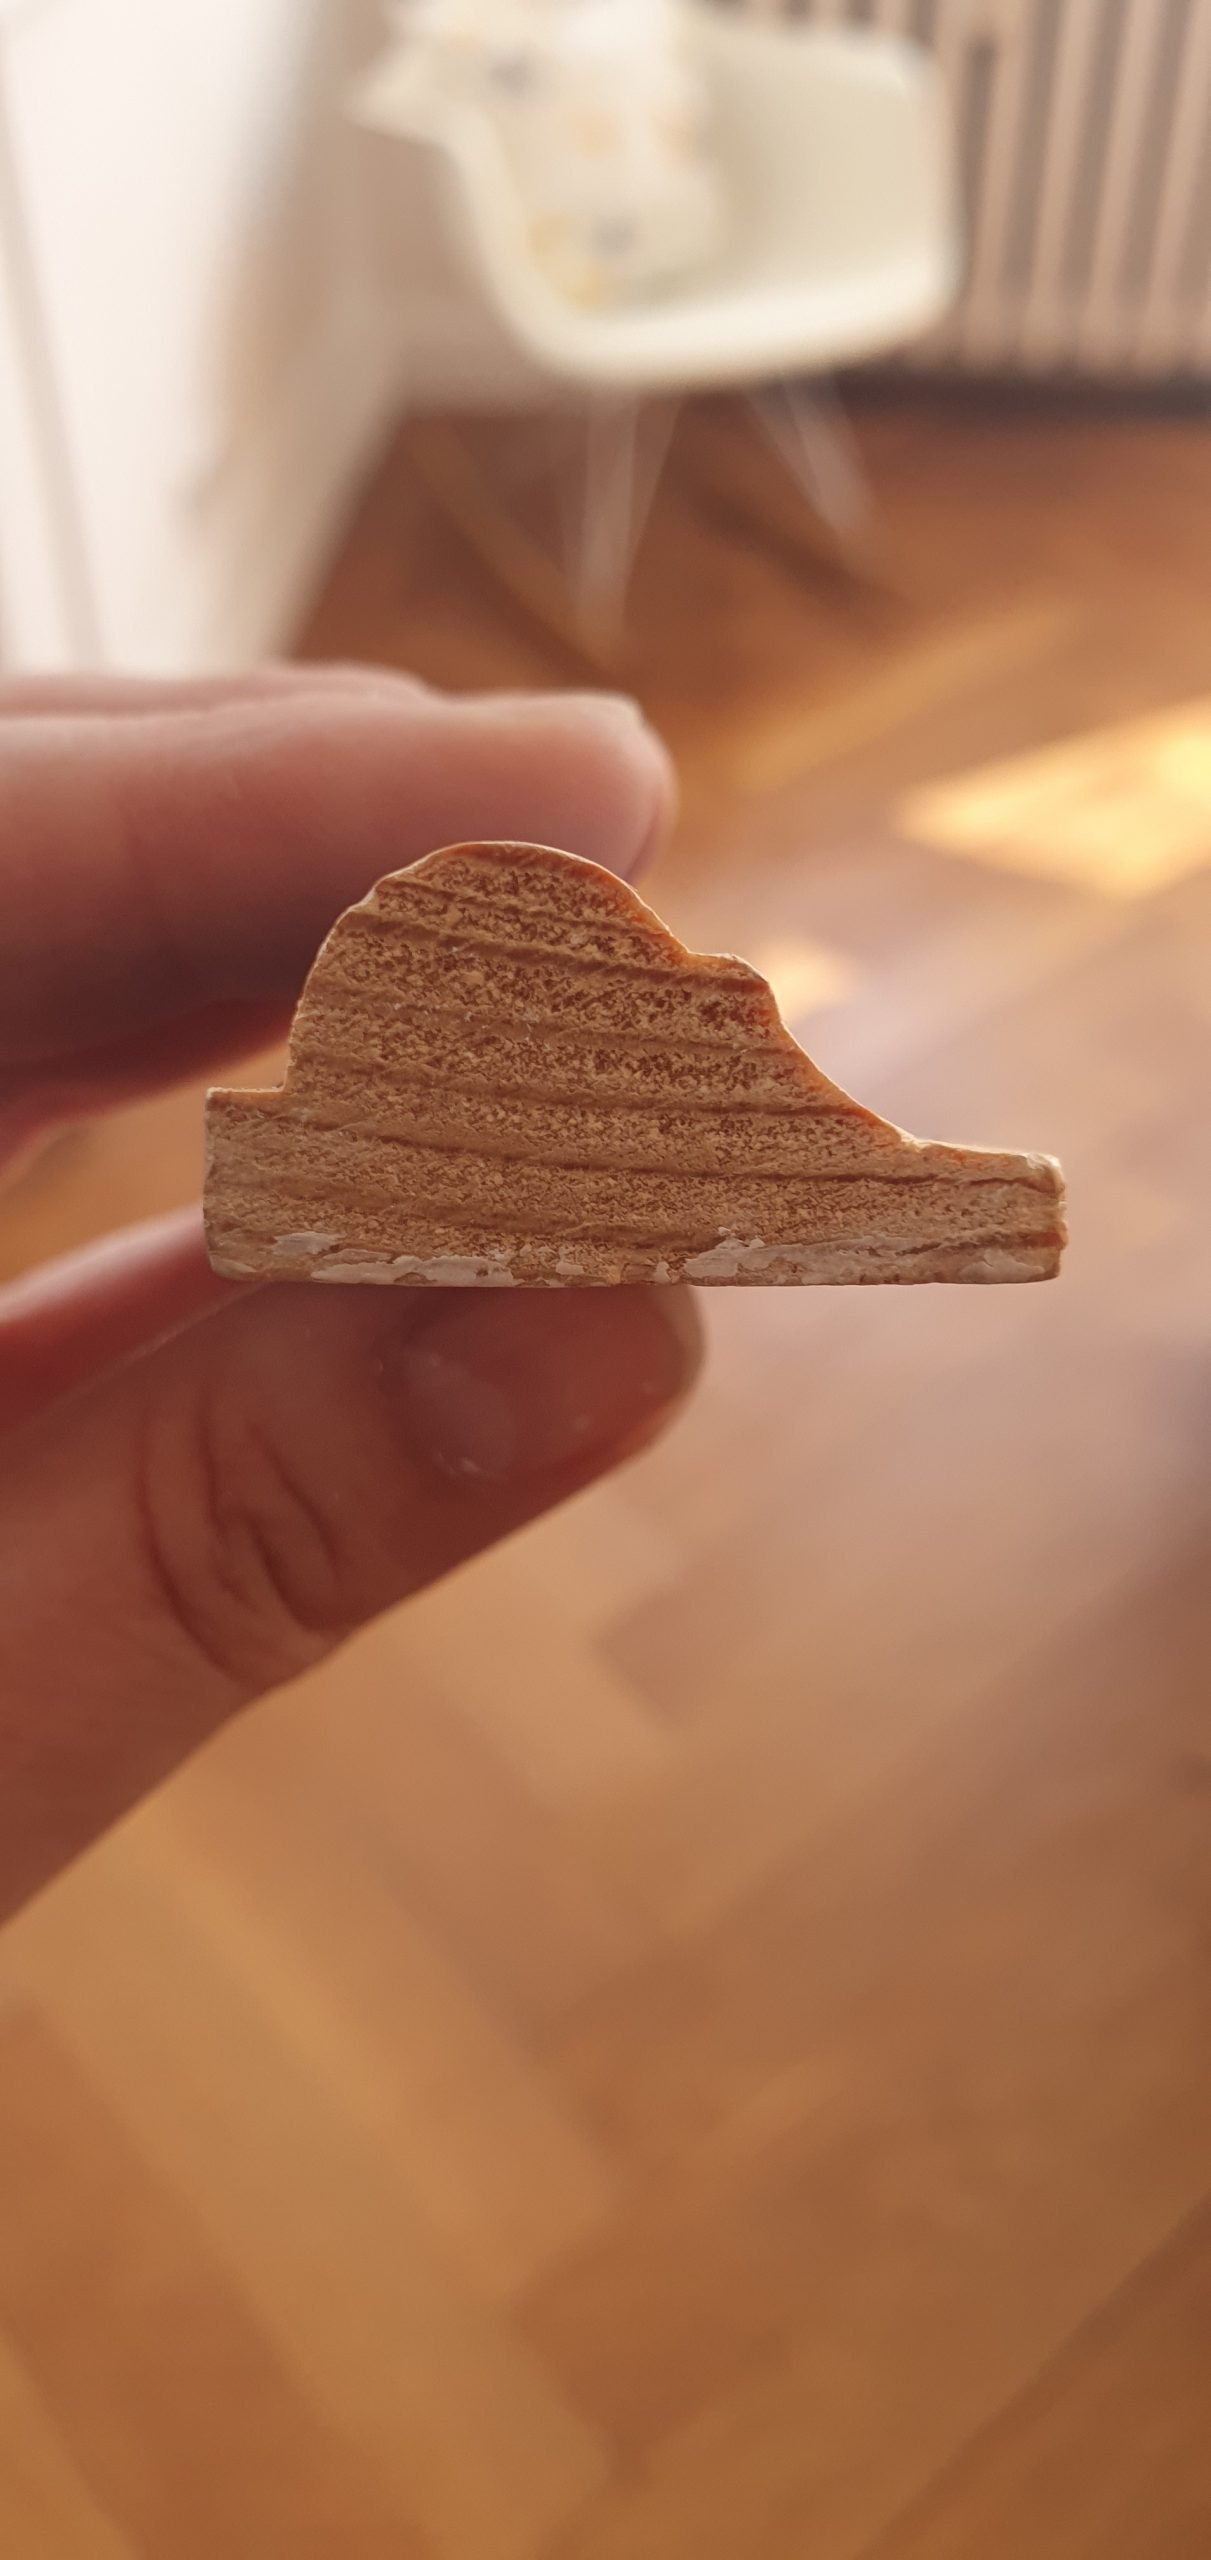
Christine says
Thank you! The width of our profile is 30mm. I don’t know the name of our moulding (it’s neither Ogee or Astragal) but I’ve attached an image that shows the shape of our profile. Which one you decide on, ultimately depends on the look you’d like to achieve. I personally would choose a slimmer version as I think it looks more elegant.
Cx
Erika says
I love this. Will definitely give it a try- you’ve made it sound simple with tour guide. Have you got a guide as to how you did the stairs? Struggling to find one that’s easy to follow. Thanks x
Christine says
Thank you so much, Erika! It really is simple! We didn’t really share a guide on how to do the staircase panelling but you can read the blog posts about the design of it here and the post about attaching it to the wall here.
It’ll hopefully help give you an idea of what installing it along a staircase will look like. I’d use the masking tape method we shared in this post to work out the design of your panelling and then take it from there!
Hope that helps a bit but let us know if you have any more questions!
Cx
Stefanie says
I have thought of this look for years. Finally this has given me the incentive to actually do it. Thank you for the step by step. It really makes the wall space elegant.
Christine says
It’s a really easy project and I love that we’ve given you the incentive to try it in your home, Stefanie!
I’d love to see a picture of your finished room when you’re done!
Cx
iemam says
Great job! I will certainly follow your steps. I wanted to also add a raised effect in the middle of the squared panel. I was thinking about using mdf board. Do you have a suggestion about this?
Many thanks
Christine says
Thank you! You could easily use a MDF panel to raise the centre. I did something similar on our front door which you can see here We Have A Front Door!
Happy DIYing
Cx
Sard says
Love how it looks . This is soo good a step by step guide you’ve Made it look easy lol
I will be attempting this tomorrow
But how would I do measurements on the stair wall? It Seems that will be hard ?
Christine says
It really isn’t difficult – the main part is the planning, especially along your staircase. I would measure and draw everything beforehand to give you a better idea of where you want the panels. The masking tape trick we used to get a better feel for how things would look when finished will probably also be really useful when planning a more complicated area.
Good luck and happy DIYing!
Cx
Sardd says
Is a nail gun ok to use in the wall? Does the no nail glue hold wood up on wall? Somone has told me I should not be using a nail gun and should be screwing It into the wall. So confused right now as my first attempt. Please help
Christine says
We had no problems using our nailgun on the walls. We did use no nails glue in all of the areas where we weren’t sure if there was a cable or a pipe and that worked well, too. The panelling has been up over a year now and nothing has moved so far! Just be safe and make sure you don’t nail into anything you shouldn’t!
Cx
Miss-Apple37 says
This is gorgeous!! So elegant!
Christine says
Aww, thank you so much!
Cx
Haley says
The final product looks great. I love the texture that it gives to the room.
Christine says
Thanks, Haley! We love the texture, too – the walls would have been too plain without it!
Cx
Karen Kurti says
I think it looks very classy and on-trend, and I’d love to do it in our hallway/staircase.
Christine says
Thank you, Karen! We’re really pleased with it, too (even if it took us forever to complete!)
Cx