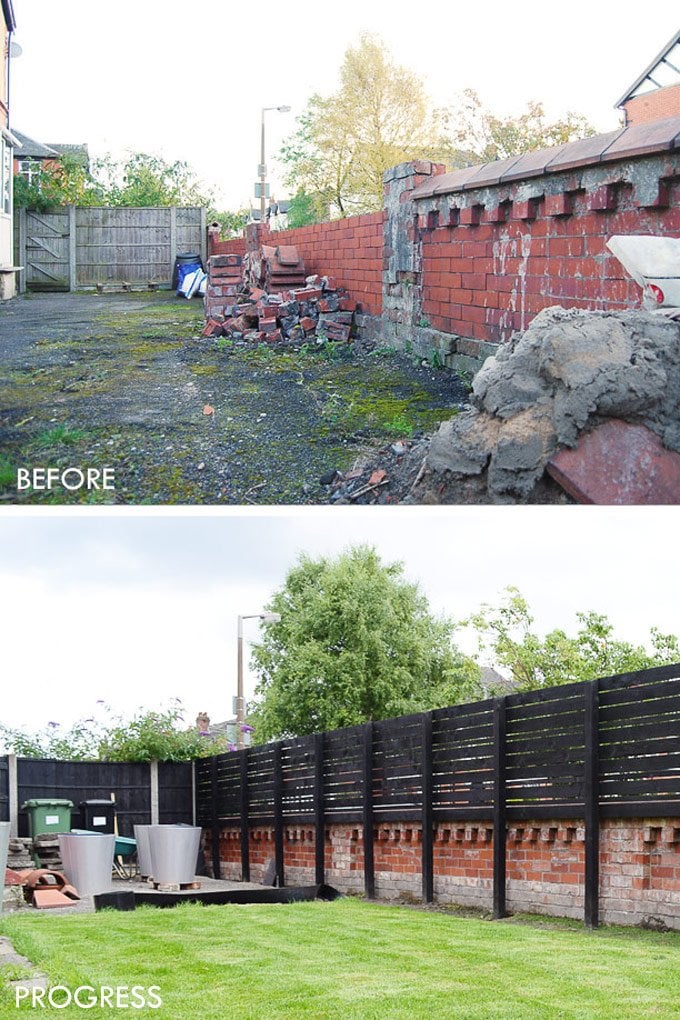
Although summer seems like a distant memory we’re still trying to focus on improving our outdoor space – which if we’re honest is still a bit of a mess.
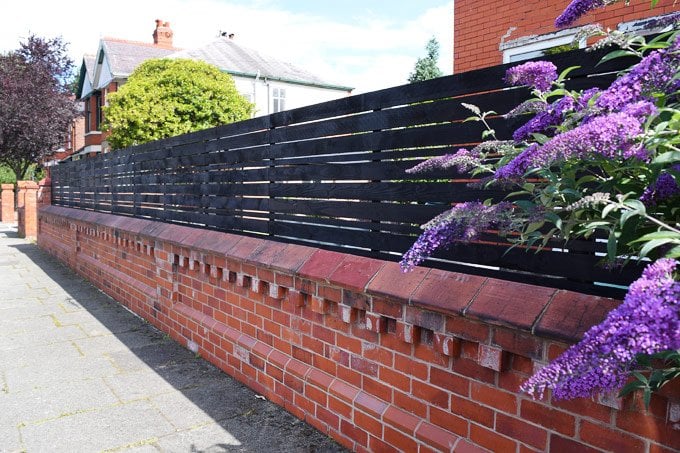
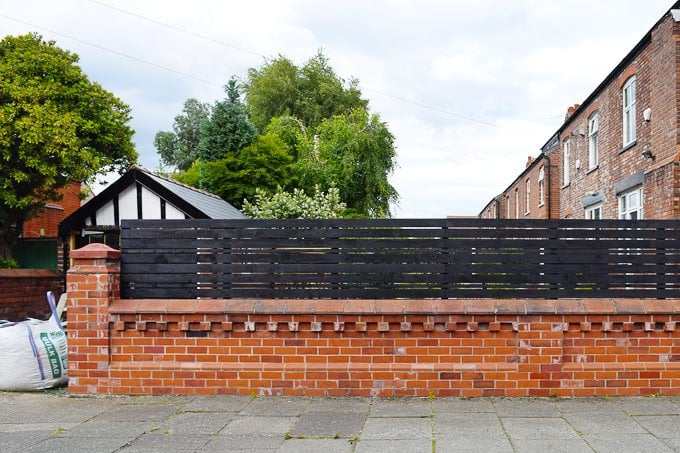
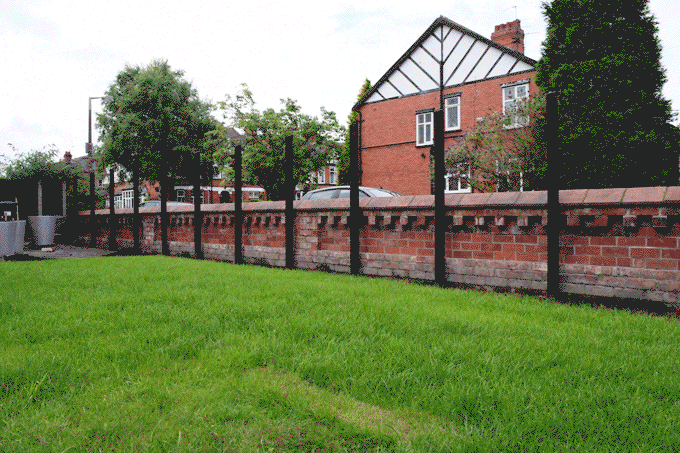
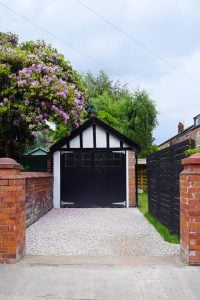
We’ve already spent countless hours digging up and replacing a load of the tarmac that covered most of the garden, we’ve replaced the garage roof and door, we’ve taken down the garden wall and had it rebuilt and we’ve just finished our latest project and have a gorgeous new slatted fence!
For us, a fence had never been much of a priority – whilst people can, of course, look over the wall and into our garden, we weren’t too bothered and really – we’re just not that interesting!
We knew that it couldn’t stay like that forever though, so after considering a load of different options (and comparing what felt like hundreds of different prices) we opted to build a horizontal slatted fence.
We, of course, considered installing a standard style fence but wanted something more contemporary looking. In an ideal world, we would have loved to install a slatted cedar fence, which we think is gorgeous but, because we needed about 15m fencing, would have been way out of our budget.
Neither option was really what we wanted and we struggled to make a decision. So basically we didn’t make one and ignored the situation until we could come up with a solution that we both liked and more importantly could afford, too.
When we started removing the tarmac in preparation for our turf, of course, the fence situation was a topic.
In the end, we decided that we should stop fussing and install a normal fence, so we went out and bought some fence posts and started to compare fence panel prices.
I’m not quite sure what happened between us buying the fence posts and starting to dig the holes for the fence posts, but something didn’t feel right and we weren’t convinced that we were doing the right thing – which can never be a good thing when you know that you have hours of work ahead of you.
Then it suddenly hit us – we could build a DIY slatted fence but instead of using the expensive cedar slats, we could just use standard tanalised wooden slats instead. As soon as we had the idea it seemed like such an obvious solution and we couldn’t believe that we’d not thought of it sooner!
All ready-made fence panels that we looked at were made from the same kind of sawn timber, which is quite rough, but treated so that it’s perfect for outdoor use.
Weirdly, we think that building our fence from scratch probably wasn’t more involved than if we’d installed ready-made fence panels. I know that it sounds mad, but the part of this project that took the longest to do was installing the fence posts. Nailing all of the slats to the posts only took about 4 hours and I don’t think that we would have been much faster if we’d fitted ready-made panels.
We’re so happy with how our fence turned out and are so happy that we opted to build a fence instead of choosing something that’s off the peg.
Building a fence yourself has a load of advantages, too. Not only do you end up with something that’s much more individual, but you can build it to the exact dimensions you need it to be. In our case, we would have been left with a weird little gap a the end if we’d tried to install standard panels.
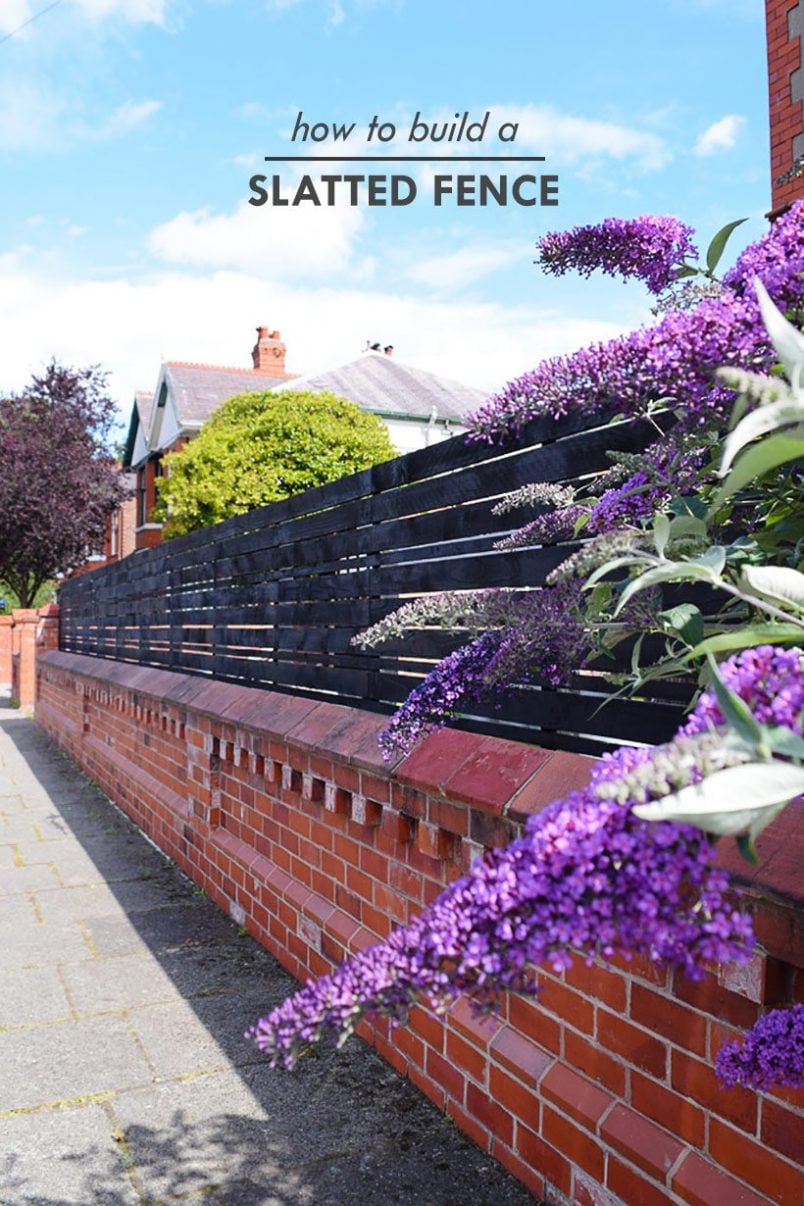
How To Plan And Build A Slatted Fence
1. Measure the exact length of where you want to build a slatted fence
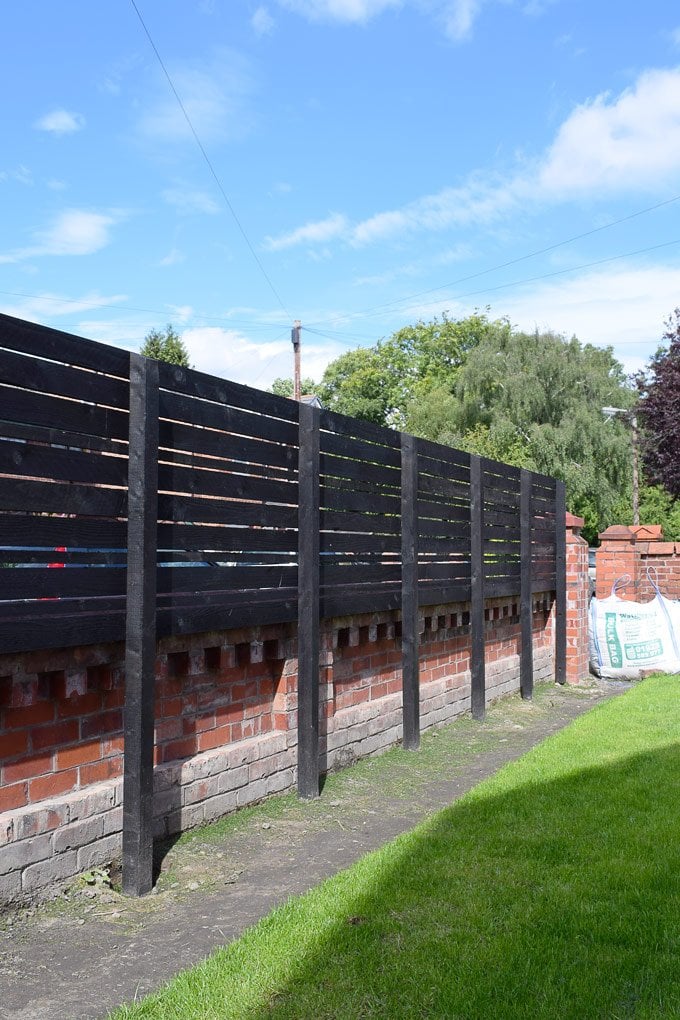
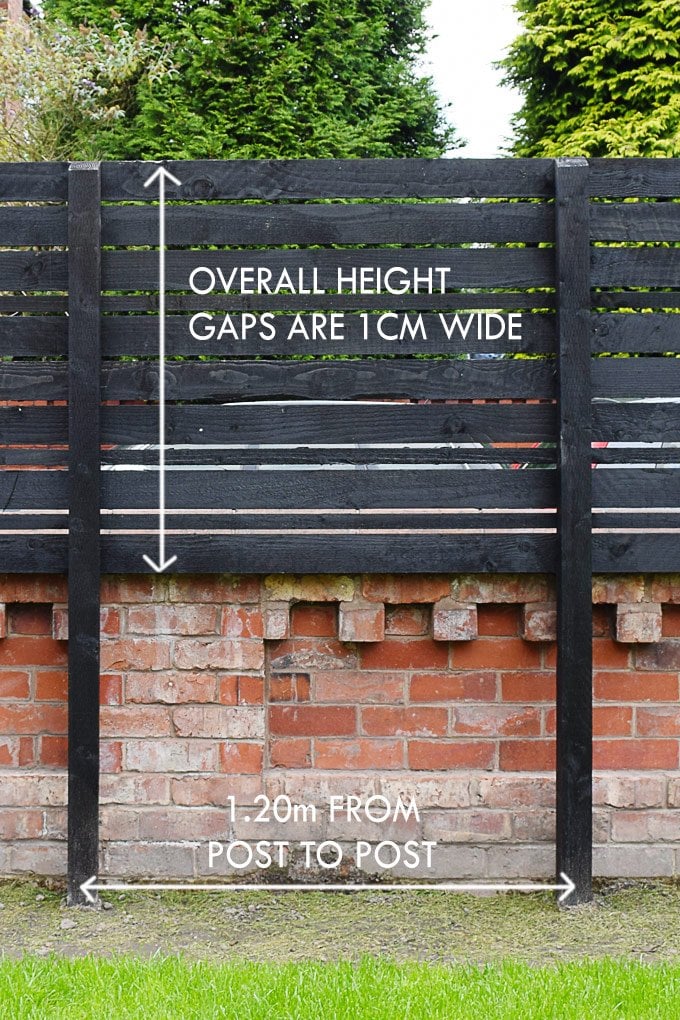
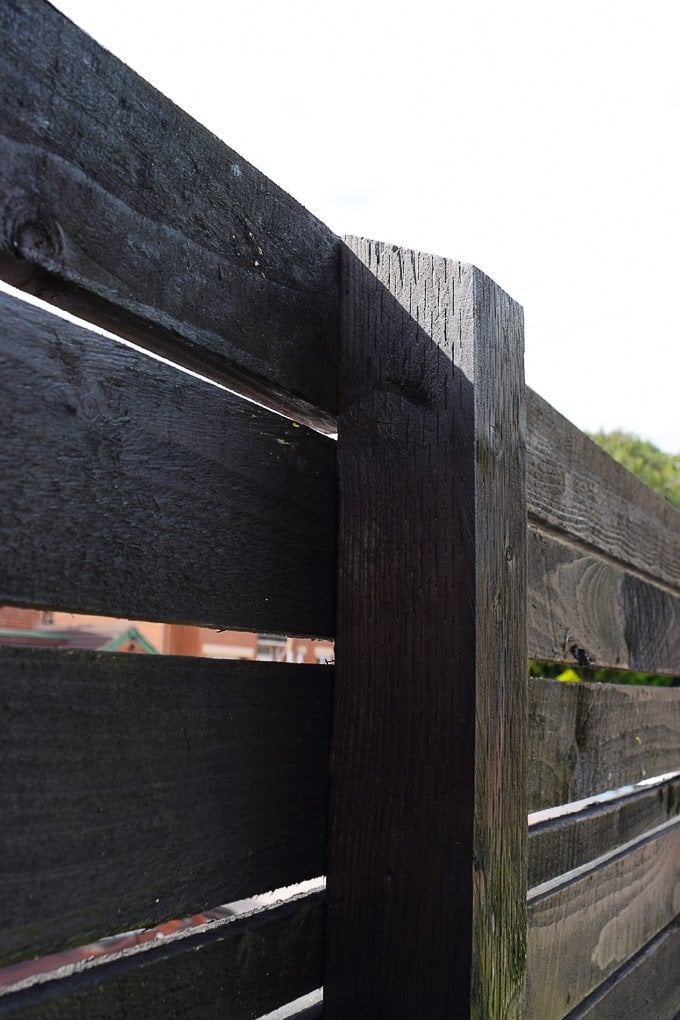
The slatted fence battens that we used were 3.6m (the wide ones) and 4.8m long (the narrow ones) – therefore, the fence posts had to be 1.2m apart (from centre to centre). We figured that it would be quicker to build the fence if we didn’t have to cut any of the timber, which is why we chose a common measurement of the two timber lengths.
Alternatively, you could calculate the distance between the posts by dividing the overall length of the finished fence by about 1.2m. This will divide your fence line into equal parts, but it also means that you’ll probably have to trim some of the slats later on.
Usually, fence posts are about 1.8m apart, but because softwood tends to be rather bent, spacing the posts about 1.2m apart allows you to straighten out the wood a bit more than if it was fastened at larger intervals.
2. Decide on the height you’d like your fence to be, then work out the order and pattern you’d like your slats to be in
We built our fence about 1.85m high (anything over 2m will definitely need planning permission).
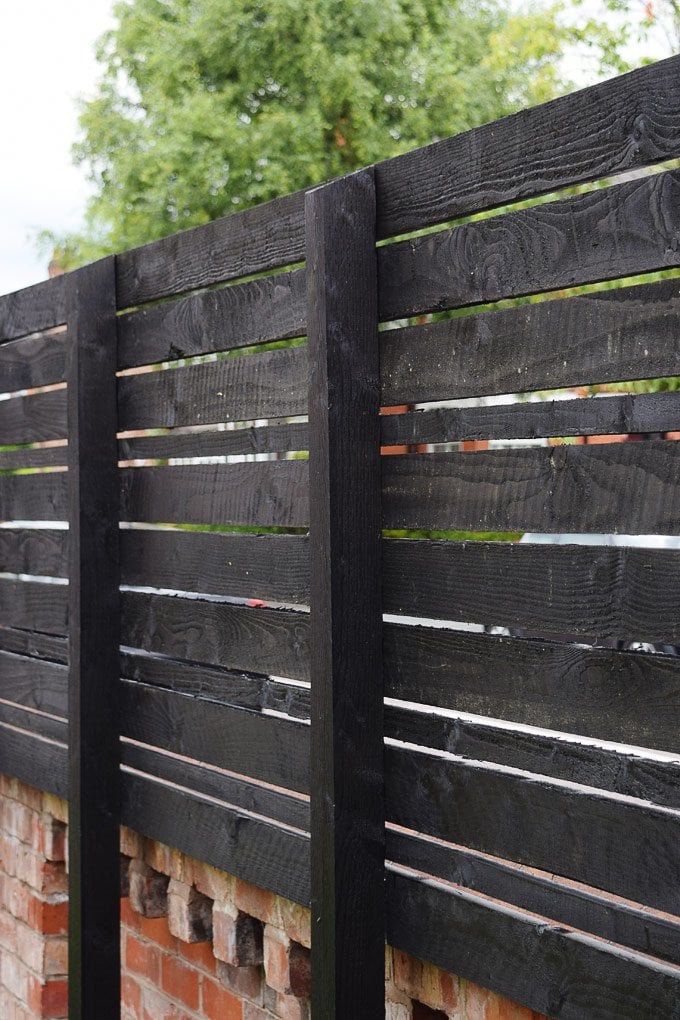
The panels we used are 100 x 22mm and 38 x 19mm (use tanalised timber that’s suitable for outdoor use) – we couldn’t get them in the same thickness but assumed that a 3mm difference wouldn’t be visible when the fence was finished. This is the combination of widths that we liked best, but you could use larger panels if you prefer.
3. A Quick Sample
The length of our fence is about 15 m. I already mentioned that we decided to work backwards from the available lengths of slats. This means that we need 13 fence posts (12 at equal distances and one extra one for the end).
The overall height of our finished fence will be about 1.8m. This meant that we had to use fence posts that are 2.4m long – 60cm of the post will disappear into the dug hole.
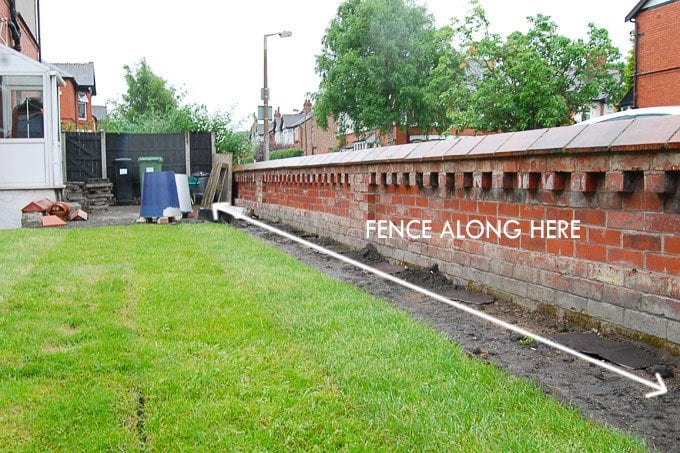
As we already have a bit of fence between the front and back garden, we decided to install our new one at the same height. We’re also building the fence next to our garden wall, so we decided to only have the fence over the wall and not in front of it. There really seemed no point in having the fence go all the way down to the floor if there is a wall in front of it anyway.
This post contains affiliate links. We only recommend products we love and think that you will, too! Read our full disclaimer here.
What You Will Need To Build Build A Slatted Fence
Tools:
- Post hole digger (this is post hole digger that we used)
- Nailer (this is the nailer that we have and love)
- Spirit Level (this is the spirit level that we always use)
- Tape measure
- Clamps (These quick-grip clamps that we used are perfect for this project!)
- Paintbrush (We absolutely love these paintbrushes. The quality is so good that we’ve been using the same set for almost 10 years!)
Supplies:
- 2.4m Fence Posts (ours are 75x75mm)
- Wooden Slats
- Nails – make sure that you used galvanised ones otherwise they will rust in a matter of hours!
- Postcrete (We used just over a bag per hole)
- Paint – our fence is painted in Garden Shades in Black Ash
Get The Tools & Supplies To Build Your Own Slatted Fence

How to build a slatted fence
1. Dig Holes
Measure the distance between the posts (ours are 1.2m from centre to centre) as exactly as you can and dig your hole. We ended up having to adjust a few that weren’t exactly where they had to be.
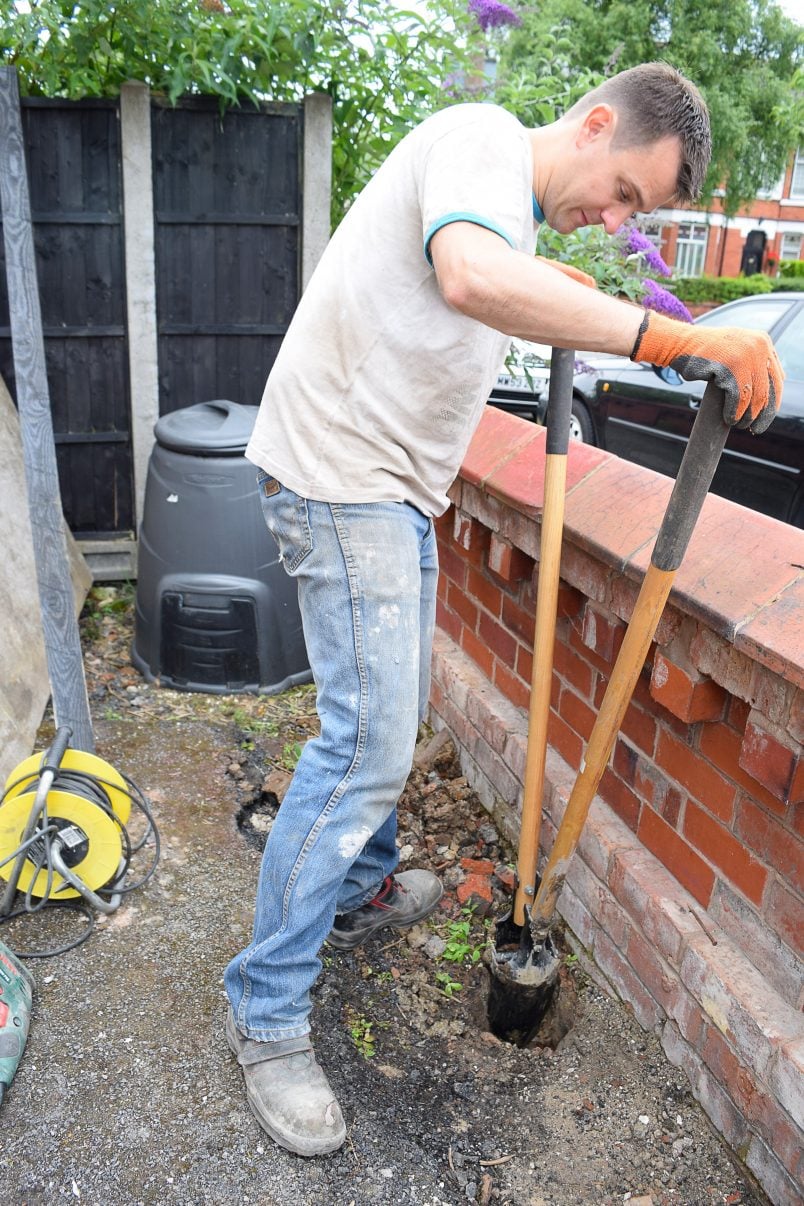
We used a fence post digger which worked well but don’t underestimate the strength needed to use it, especially as the hole gets deeper.
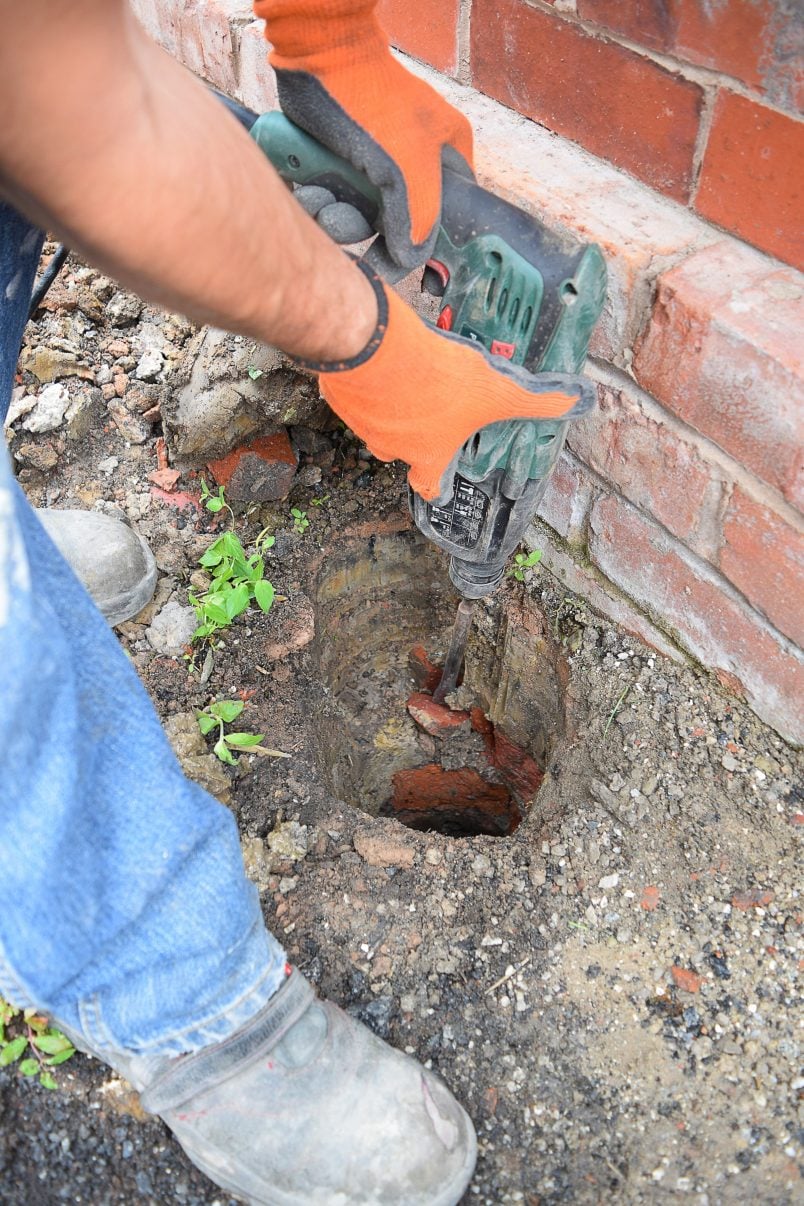
Because we’re building the fence close to the wall, we also had to remove bits of the foundations with our hammer drill. It wasn’t difficult to do, but it meant that it took us extra time to get each hole dug to a depth of around 60cm.
2. Paint All Timber
Because of all of the gaps between the slats, painting everything before you install it is much easier than painting it later. You don’t need any fancy tools for this. Just a good quality paintbrush and some outdoor fence paint will be enough to achieve a great result.
We painted our fence black, which may seem like a radical colour choice, but it turned out even better than expected. It makes the garden feel bigger, and all of the plants in the garden look much more vibrant and healthy against the dark background.
If you are painting a normal garden fence and are worried about the paint leaking through to the other side, you’ll find this post helpful where we share tips and tricks that will stop paint seeping through to the other side and keep your neighbours happy.
3. Install The First Fence Post
Throw a handful of gravel into the hole (it’ll help with drainage), place a fence post into the hole, and measure, measure and measure again.
You want to ensure it’s the right height and level on all sides.
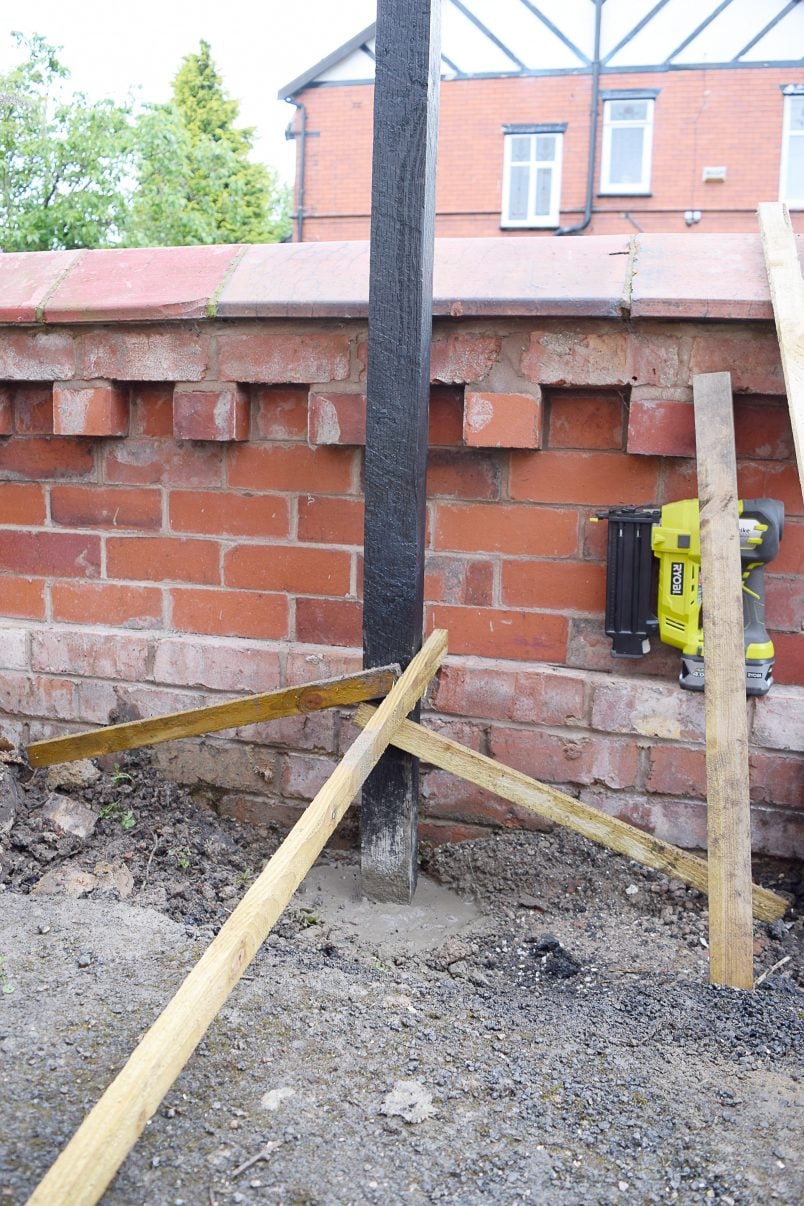
Then, nail 3 pieces of timber off-cuts to the base to keep it in position, fill the hole to about a third with water and add the Postcrete. Don’t even think about trying to level the post after adding the Postcrete – it dries super fast, and you won’t have enough time.

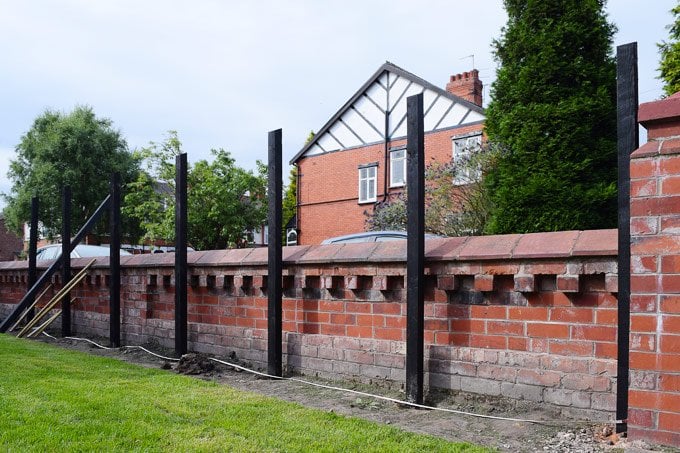
4. Install All Remaining Posts
Cut yourself a piece of timber, which is the length of the distance between the posts (centre to centre) plus the width of one post. For us, this was 1.20m + 75mm = 1.275m. Attach it to the first fence post with a clamp, making sure that the edge of the batten is flush with the outer edge of your fence post.
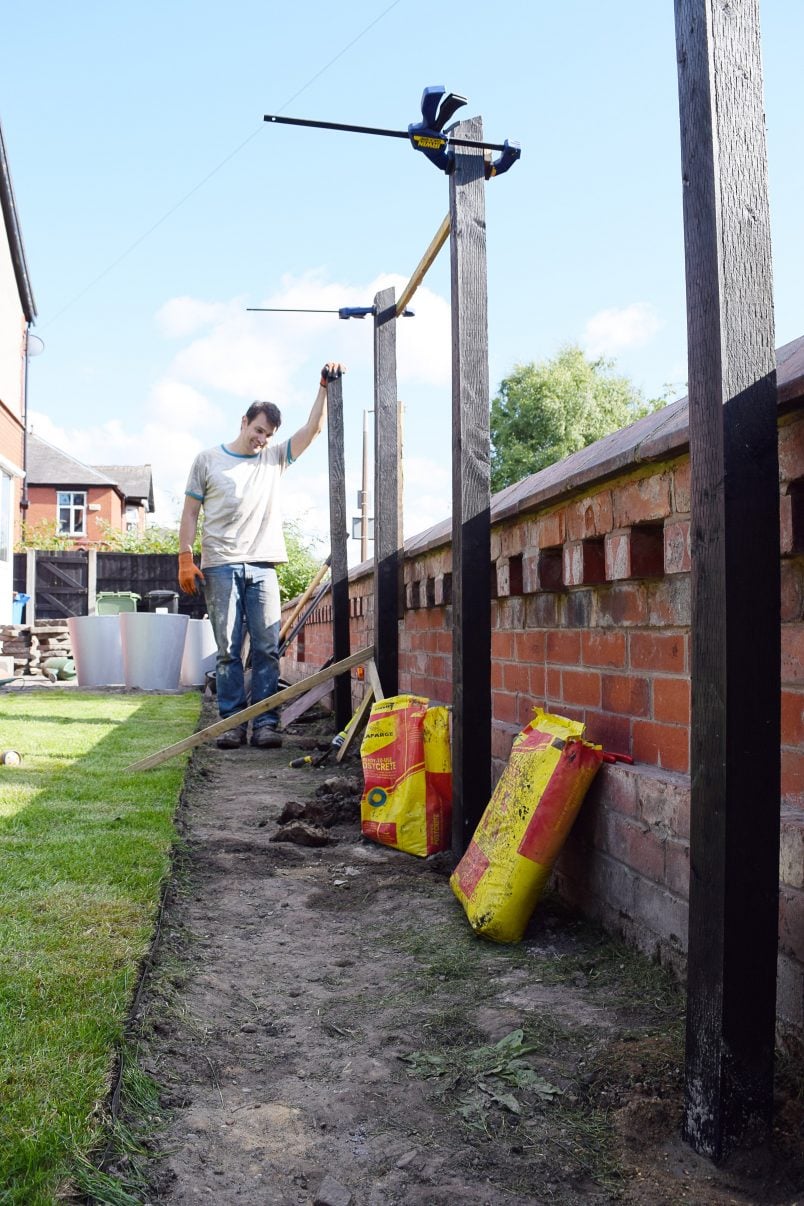
Place the second fence post into the hole (don’t forget the gravel) and attach the other end of the timber batten to the outer edge of the not yet installed fence post.
Using this method for all posts will ensure that the distance between each post is exactly the same. It also makes it easier to level the post, as it’s already held in place a bit and doesn’t wobble around.
Then, as with the first post, check that everything is level and at the required height before adding water and Postcrete to the hole.
For us, checking the height was easy, as we were able to measure distances from our wall (which is level). If you don’t have a reference point (your ground probably isn’t level), you can use a long spirit level going from post to post (or a shorter spirit level on a flat piece of long timber), but I’d suggest adding a string line as a guide to work along.
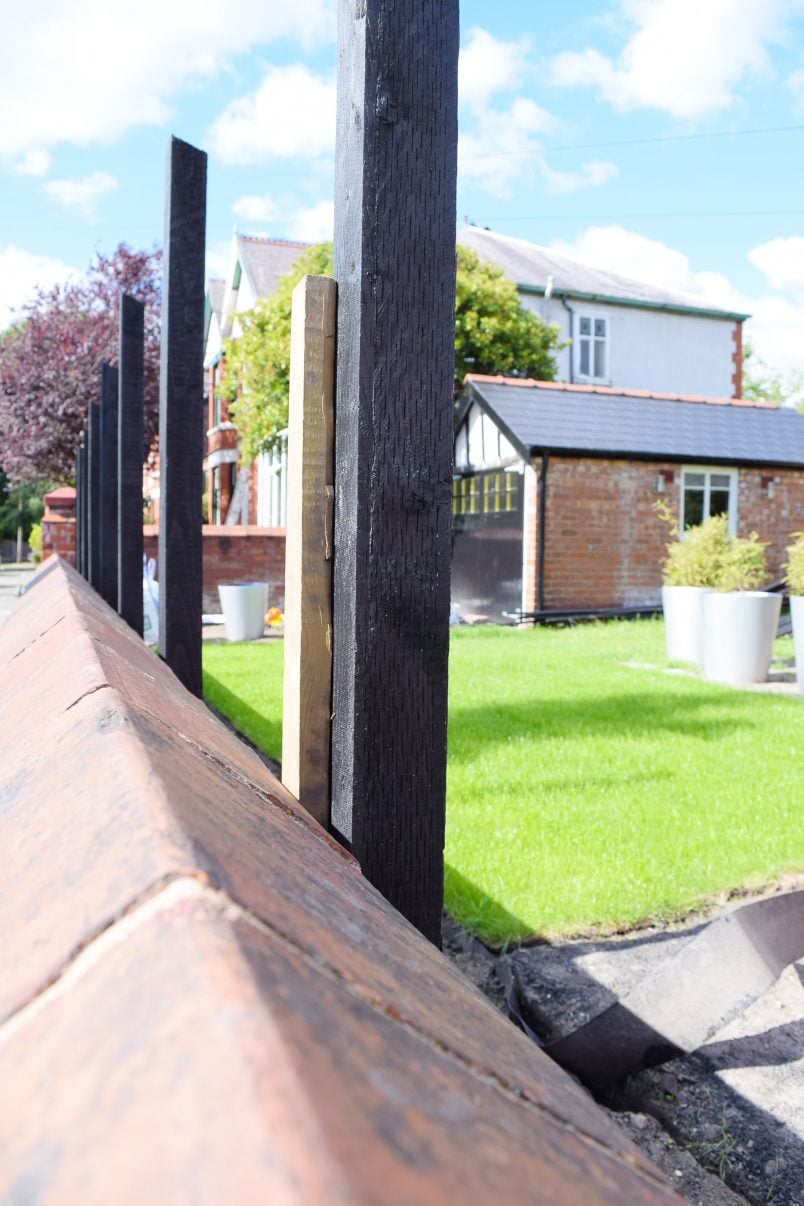
When setting out the post, we also used an offcut of timber that we placed between the fence post and wall. This way, we knew we were keeping an equal distance from the wall with every post.
5. Post Installation On A Wall
Because of the layout of our wall, our first post is attached to our existing brick gate post and not fixed in Postcrete like the other posts.
It was surprisingly easy to attach the post to the wall with the help of some fantastic little things called masonry bolts. We’d not heard of them before, but basically, they allow you to drill into masonry without the need for wall plugs.
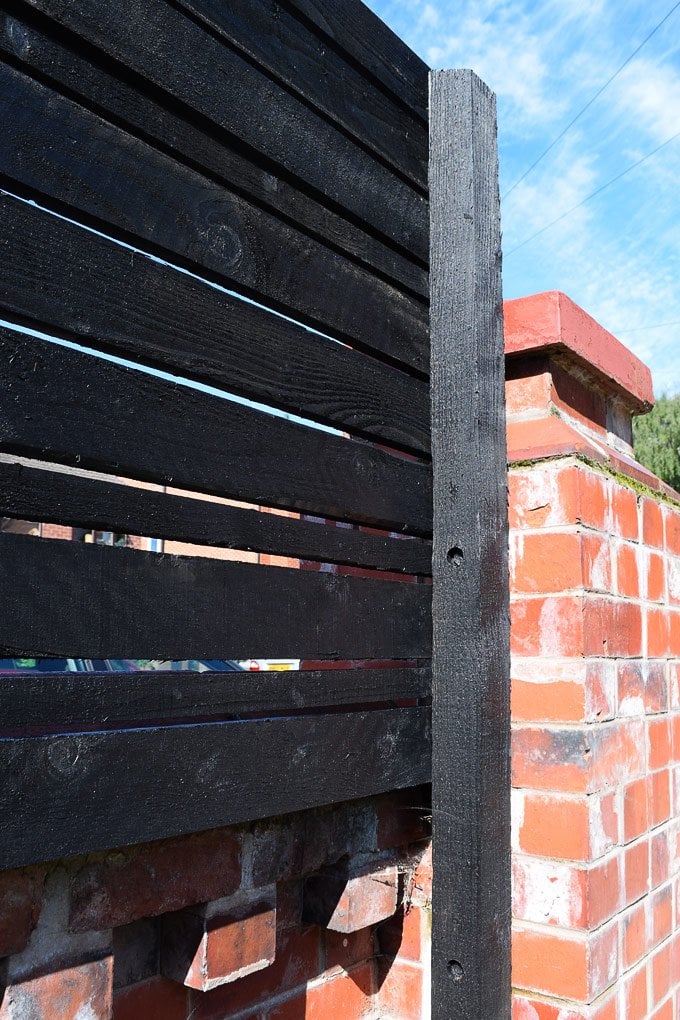
If you have a situation where you have to attach something to a wall, I’d definitely recommend them. (We watched a few YouTube videos on how to attach a post to a wall and found this one super helpful.)
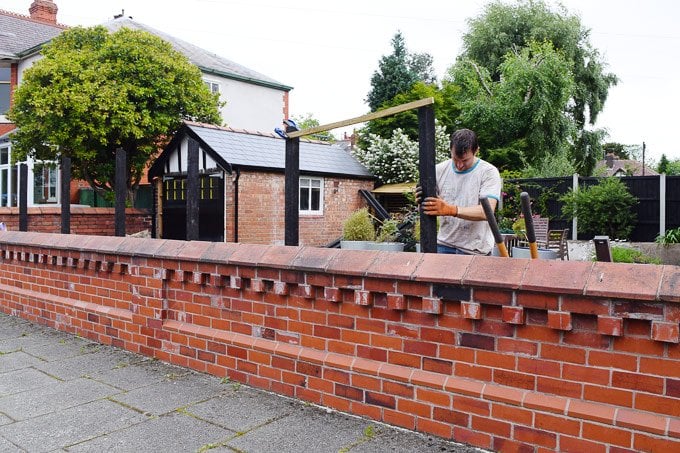
6. Install The Slatted Fence Panels
Most of the hard work is done now and attaching the fence panels was weirdly fun to do! It was so quick, especially compared to installing the fence posts, and you could see the fence take shape in a matter of minutes.
Starting with the bottom row (again, we used our wall as a reference), attach the first piece of timber with your nailer. Make sure it’s perfectly level, as this piece will be the guide for all others.
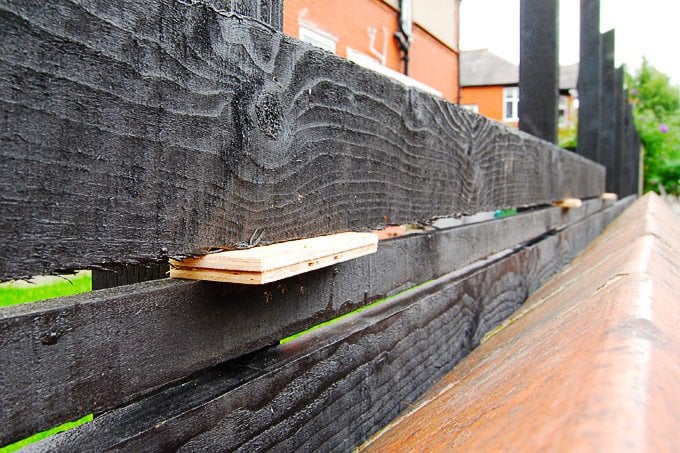
Once the full first row is installed, lay a placeholder piece on top of the panel. This will be the visible gap between the panels. We used some offcuts of wood that we still had lying around, but you could use anything as long as it’s firm.
Then, lay your second slat onto the placeholders, push it down firmly and nail it into place. Remove the placeholder pieces and lay them on top of your new slatted panel piece. Add the next panel, nail it into place and repeat the process until you reach the top of your fence posts.
7. Stand Back And Admire Your New Slatted Fence
Yay, you’ve finished – time to celebrate!

Top Tips For Building Horizontal Slatted Fencing:
- Paint or stain the timber first.
- Remember, depending on where you live, you may need planning permission if you want to build a slatted fence (or any other kind of new fence)!
- Think you can nail this by hand – don’t! It would take forever, and by using the nailer the little nails are shot so far into the wood that they become invisible!
- If you dig your holes for the fence posts but don’t get around to adding the post and concrete straight away, we’d suggest covering them up. A hedgehog fell down one of ours and got stuck! Needless to say, we felt like the worst people ever, but we managed to get him out and take him to a hedgehog sanctuary where we were told that he would be fine. Pfew!
- It’s a two-man job (at least for us DIYers). Yes, it would be possible to do it on your own, but having someone to hold the post while you measure makes it much, much easier!
- Don’t underestimate how long it takes to build a slatted fence, especially installing the fence posts. Overall we estimate that it took an hour of work for each post – which includes digging the hole and installing the fence post. As always, we were much quicker towards the end, but it still took about 13 hours to get all posts installed.
- We didn’t like the look of fence post caps so instead cut the top of our fence posts to an angle. This way the water will run off them, and they should hopefully stay looking good for a long time.
How Much Does It Cost To Build A Horizontal Slat Fence?
The cost to build our slatted fence is about £24 per metre. A standard featheredge fence costs about £28 per metre. There’s not much price difference between ready-made panels and our bespoke fence.
I know that building your own fence seems like more work than building one from ready-made panels, but for us, the by far most time-consuming part of this project was installing the fence posts, which took around 13 hours to do. Adding the slats took about another 4 hours.
We’re pleased with how the slatted fence turned out. We’ve still got a huge amount of work to do before work in the garden is finished. It’s an area of our home that we’ve probably neglected for far too long, but bit by bit, we’re finally starting to see things improve.
Do you have a project that you’ve been putting off? What area of your home do you tend to neglect most? Would you prefer a classic fence or a slatted fence for your garden?


Hamilton Concrete Works says
Great article! I enjoyed reading about your journey in improving your outdoor space and the decision-making process behind building a slatted fence. It’s impressive how you transformed your garden from a messy tarmac-covered space to a beautiful area with a contemporary-looking fence.
The DIY approach and using standard tanalised wooden slats instead of expensive cedar slats were smart choices, not only from a budget perspective but also to achieve a unique and individual look for your fence. It’s evident that you put a lot of thought into the design and execution, and the final result speaks for itself.
Christine says
Thank you so much! We love the finished result, too!
Cx
Mike G. says
Wow, this is really impressive. As a professional in this field, I can see the amount of detail and work that went into it, so kudos to you! My favourites from this project: i) the contrast between the cool black panels above and the traditional brick below, ii) the care you put into making things were level, and iii) the most important, the fact that you were able to inject your own personal style into this instead of opting for the cookie-cutter look (this has its place, but it’s nice to see personalities shine through)!
Christine says
Thank you! We’re so please with how the fence turned out, too.
Cx
Fence Contractor says
The before and after pictures are looking very nice! Well done! Even without a professional help you were able to accomplish this fine fence! For DIYer’s, I give it 10/10!
Christine says
Thank you! We love how it turned out, too!
Cx
Mamad says
This is exactly what I will be aiming to do very soon. I’ve never done anything like it before, so have been putting it off for a long time. Seeing your post has given me a lot of confidence. I was thinking of using screws to fix the panels to the posts, the nail gum sounds great, but a little pricey. I was also going to fix all the posts to the wall and not concrete into the ground. I may have to think about that one too. My first port of call will be the council to see if I need permission for it as it’s a grade 2 listed property.
Thank you for the inspiration :)
Christine says
Yay, how exciting, Mamad! You’re completely right – you will almost certainly need planning permission from the council if you’re planning on installing a fence of any kind. If you are allowed to install one though, I can honestly say that it was an easier project than we thought! We’d never done anything like it either but as long as you measure and calculate correctly, you shouldn’t have any problems.
We attached part of our fence to the brick wall with some masonry screws which could work for you (if you are allowed to drill into your wall). They worked so well and we’d highly recommend them as they are super easy to use. Given that your property is listed, I’d definitely recommend installing the fence without touching any original elements of the building but definitely speak to your local council first.
If you are allowed to build the fence, we’d love to see some pictures of the finished project!
Cx
Guillaumé says
Please may I beg to differ as one would not see the blocks of wood as one tends not to look at the fence from an angle which would allow one to see the blocks from the side. Even more so if the spacer blocks were to be a little less wide than the upright.
My major reason for my bloody nit picking is that I am about to embark on a similar project my self, by myself as my partner is not practical as yourself. The total length of the exercise is 70 meters. O.K. I am scared.
Christine says
Ultimately, any project is always about making it work to suit your home and taste. 70 meters is a lot to cover so I completely understand your reasoning!
Try to enjoy building your fence no matter what method you decide on.
Good luck!
Cx
PS. Don’t forget to check if you need planning permission for your fence!
Guillaumé says
C
Thanks for the ‘good luck”
No choice on planning permission as all works need p p, you just gotta pay and pay 163:00 pounds sterling.
I just love working with intent.
Guillaumé says
I do see what you mean but it still would have been less work and cheaper in materials to have a block of wood behind the uprights to face off the ‘decorative elements’..
Christine says
It wouldn’t have looked as good though. :)
Cx
Guillaumé says
It would seem to me unnecessary to have placed the uprights in a (hard work) dug hole. You simply could have made the uprights shorter and anchored them, higher into the existing wall with rawlbolts. The load is not too high as the slats are wood.
Christine says
Thanks for the feedback, Guillaumé. All of the fences in our neighbourhood were built the same way so we figured we’d stick with the tried and trusted method. The decorative elements of the wall also meant that it isn’t flat therefore making it difficult to attach anything to it.
Cx
John says
Have the nails stayed secure on the slats since the fence was installed? Have heard conflicting opinions on whether to use a brad nailer for securing fence boards.
Christine says
Two years in and it’s all still as it was on the first day. No problems at all so far!
Cx
Dave smith says
Can you advise how you would install a slatted fence on a slight slope? Do you slope the slats or stagger each section and keep it straight? Thanks
Christine says
I’d personally stagger each section. I think that keeping the slats straight will give you a cleaner look.
Cx
Dee says
Hi,
So love this fence and want to do similar for elderly parent’s front garden but was told it’s not allowed to be higher than 1M in front garden? Also told we need to ask and receive planning permission costing £200 before we start. Would love to know how you got around these problems.
Ps so sorry to hear you guys are leaving UK have really enjoyed reading all your diy exploits and gained valuable knowledge and tips. Thanks so much for all the time and effort spent documenting your lovely blog.
Best wishes,
xxx
Ps Very best wishes to you in your new home :)
Christine says
I’m afraid that’s all right, Dee. The council usually won’t let you add a tall fence at the front because it changes the appearance of the street too much. If your parents live on a corner plot like the same applies to the side, too. There’s really no way around it other than to apply for planning. You can easily do the drawings and submit them yourself which will save money but there will be an inevitable planning application fee and a very annoying 8-week wait. I’d give your planning office a call and ask them for advice.
PS. Thanks for your kind words about us leaving. We’ll definitely keep up the blog and are already hunting for our next home to renovate (we already have a viewing lined up)!
Cx
anthonyc says
That is a great job, looks fantastic. The black is quite stylish whilst being unobtrusive. Much nicer than the everyday golden and brown colours. Maybe the cost per metre could be further reduced with posts at 1.8m centres?
Christine says
Thanks! We’re really glad that we opted for the black colour – it really finishes it off. We used a 1.2m distance because we wanted to give the thin slats more support and were worried that they could sag if they were secured further appart.
Cx
John says
The fence looks so great! I definitely like the look of the dark, slatted fence on top of the low brick wall, and it’s really interesting that the part that should’ve been more time-consuming didn’t seem to make much of a difference at all when everything was finished up. Thanks for sharing.
James says
The fence looks great. Can I ask what type of slats you used and where you got them?
Thanks
Christine says
Thanks James! We used slats of 100 x 22 mm and 38 x 19 mm of sawn tanalised timber which is pressure treated and suitable for outdoor use. The timber is just the standard timber that you can get at any DIY store. We purchased our slats at a local timber merchant (because that’s where they were cheapest) and bought the fence posts (which are 100 x 100 mm) at Wickes because they had a 3 for 2 offer.
Cx
Matthew Coussens says
A really great way to add some privacy to your garden, some really good hints and tips as well!
Christine says
Thanks Matthew! It’s definitely one of the projects that we wish we’d done years ago.
Cx
Lins @Boo & Maddie says
There is no end to your talents!! You guys are so impressive as always, the fence looks great and it must be nice to feel a bit more privacy from the street x
Christine says
Haha, thanks Lins! We’re so happy with how it turned out and it really wasn’t difficult to build… just took longer than expected! The road where we live is fairly quiet with mainly neighbours walking along, but you’re right that it’s nice to feel a little less on show (especially when we’re working on mad building projects).
Cx
Jason page says
Great job guys. I have a fence up already but I am going to use the slatted look above my fence instead of trellice. We have a horrible looking building next to our house so this will disguise it. Where would be the best place to get your timber from? We have a tippers near us. Thanks. Jason. Starting a huge project in my garden.
Christine says
Thank you, Jason! We bought our timber at a local timber merchant. It costs about the same as it would if you bought the wood at a DIY store but the quality is usually much better and straighter and they’ll often deliver for free, too. This was our favourite place to shop anything timber but I’m sure you’ll be able to find somewhere local to you, too!
Good luck with the fence!
Cx