MENUMENU
  • Home
  • About Us
  • Work With Us
  • Our Favourite Tools

Little House On The Corner

DIY & Home Improvement

MENUMENU
  • Blog
  • Projects
    • Our Favourite Projects
          • DIY Outdoor Daybed with Canopy
          • DIY Outdoor Daybed With Canopy

          • DIY Epoxy Resin Dining Table
          • DIY Epoxy Resin Dining Table

          • 5 Floor Sanding Mistakes And How To Avoid Them | Little House On The Corner
          • What No One Will Tell You About Sanding Your Floors

    • Home Improvement & DIY
          • Hallway with Paean Black Front Door After Editing With Interior Presets for Lightroom by Little House On The Corner
          • How To Create A Home Renovation Budget

          • Floorsanding In Progress
          • What No One Will Tell You About Sanding Your Floors (& How We Did It)

          • How To Plan & Install Panelling | Little House On The Corner
          • How To Plan & Install Panelling

    • Painting & Decorating
          • painted wardrobe in Soumak by paint & paper library
          • How To Paint A Wardrobe

          • Dark Blue and Grey Painted Kitchen Cabinets
          • How To Paint Kitchen Cabinets + Tips For A Professional & Long Lasting Finish

          • What To Do When You've Chosen The Wrong Paint Colour?
          • What To Do When You’ve Chosen The Wrong Paint Colour & How To Fix It!

    • Furniture Upgrades
          • DIY Slatted Radiator Cover
          • DIY Slatted Radiator Cover

          • Beat Floor Lamp and Bar Cart
          • DIY Bar Cart

          • DIY Dining Room Bench | Little House On The Corner
          • DIY Dining Room Bench

    • Outside & Garden
          • DIY Logstore
          • DIY Log Store

          • DIY Slatted Garden Fence | Little House On The Corner
          • DIY Slatted Garden Fence

          • How To Lay A Gravel Driveway
          • How To Lay A Gravel Driveway

    • Free Printables
          • Cleaning Checklist - Free Printable
          • The Best House Cleaning Checklist

          • Free Printable Paper Houses for Advent Calendar
          • DIY Printable Advent Calendar Village

          • The Easy and Free Way To Organise Screws and Nails
          • The Easiest Way To Organise Screws And Nails

    • Craft & Art
          • DIY Pegboard
          • DIY Pegboard

          • DIY Modern Geometric Serving Tray
          • DIY Modern Geometric Serving Tray

          • DIY Guess Who Game - Setting Out Board | Little House On The Corner
          • DIY Guess Who Game

    • Cleaning & Organizing
          • Cleaning Checklist - Free Printable
          • The Only Cleaning Checklist You’ll Ever Need

          • DIY Floating Spice Rack | Little House On The Corner
          • DIY Floating Spice Rack

          • 30 Day Spring Clean Checklist - Little House On The Corner
          • 30 Day Spring Clean Challenge

    • Holidays & Festivities
          • DIY Giant Star and Snowflake Light | Little House On The Corner
          • DIY Giant Star and Snowflake Light

          • Free Halloween Printable Book Covers
          • Halloween Book Covers (Free Printable!)

          • Gingerbread style paper advent calendar village - Little House On The Corner
          • DIY Printable Advent Calendar Village

  • House Tour
        • Our Edwardian House
        • Our Edwardian House (1st Home)
        • Our Berlin City Centre Apartment
        • Our Berlin City Centre Apartment (2nd Home)
        • Take The Tour | Our Art Nouveau Apartment | Little House On The Corner
        • Our Berlin Art Nouveau Apartment (3rd Home)
        • berlin riverside apartment house tour
        • Our Berlin Riverside Apartment (4th Home)
  • Shop
    • The Little Corner Shop
    • Shop Our First Home
    • Shop Our Current Home
    • Our Favourite Amazon Finds

The Possibly Prettiest Wall In The World

  • Facebook
  • Twitter

The wall is done. Yep, you heard right – done.

Edwardian Garden Wall

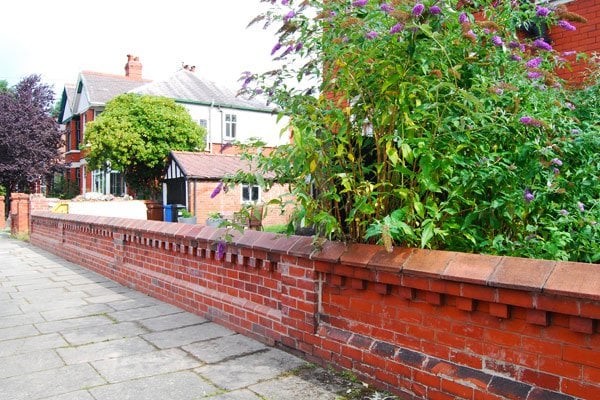
Can’t believe it’s finished? Didn’t think this day would come? Well, yeah, we were also starting to think it would never happen, but it was definitely worth the wait!

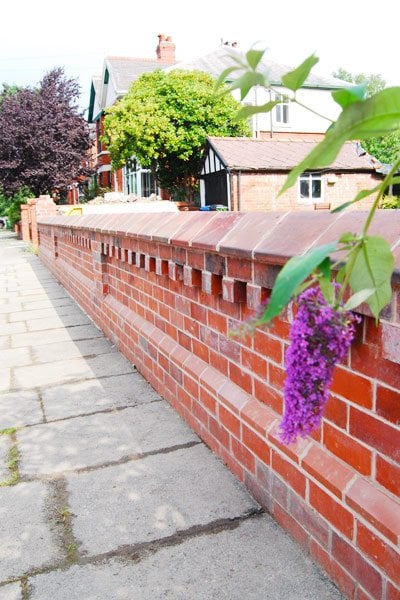
The result is pretty amazing and so much better than anything we could have achieved ourselves.

Edwardian Garden Wall

The joints are all completely even, everything is level and we even have a proper gate post that finishes the wall off at the end.

Edwardian Garden Wall

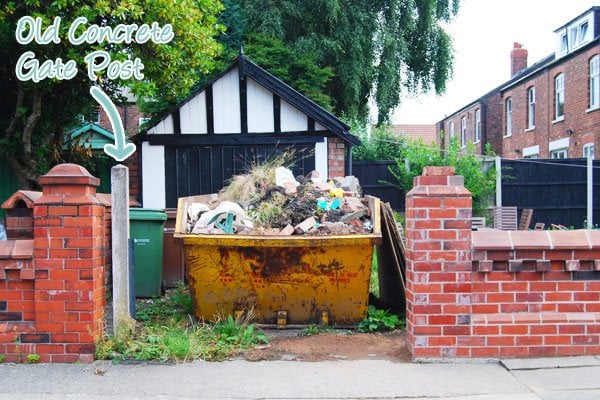
You can still see the old concrete gate post on the left side of the driveway that Jan still has to remove and we also need to find a terracotta pier cap to finish the top of the new post, but that will probably involve a lot of hours traveling from reclamation yard to reclamation yard and a lot of luck to get one to match the one that would have been there originally.

Missing Pier Cap

Having a wall again really takes some getting used to. Our garden has been such a complete mess/building site/danger zone for such a long time now, that you almost get used to falling or breaking an ankle when walking over to the bins.

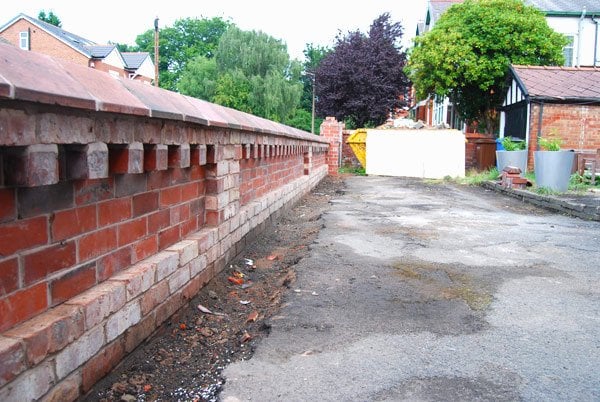
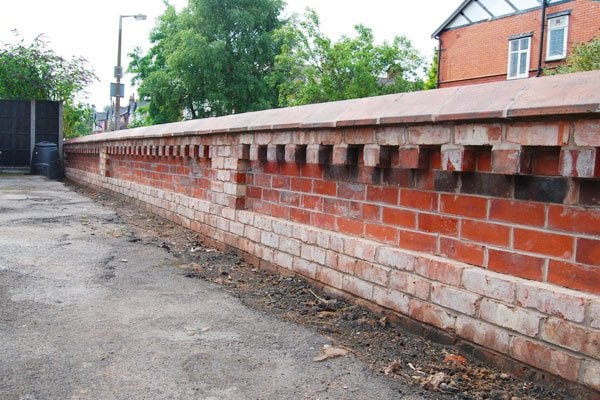
Thanks to some of the cleanest builders ever, we’ve now gone from this
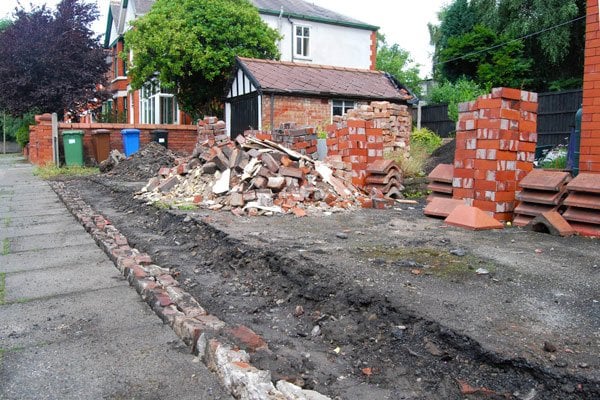
Taking Up Tarmac

To this

Edwardian Garden Wall

We’re really glad that we decided to take up a strip of the asphalt before the wall was built. It’ll definitely make removing the rest of it at a lot easier and reduce the change of us damaging our new wall.

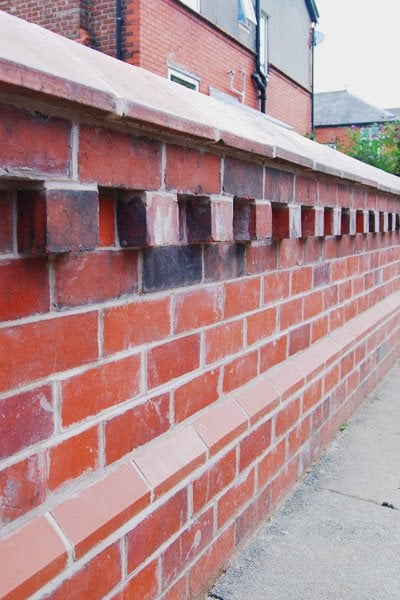
Looking at the wall from the inside of our garden, you can see that the bottom three rows are made out of a slightly different brick. This is the way it was before (and would have traditionally been made, too.)

Edwardian Garden Wall

Although the bricks are different, we think it actually adds to the character of the wall. But do the bricks look familiar? Okay, so maybe not to you, but they are the bricks that came from the wall that we removed between our kitchen and dining room.

Edwardian Garden Wall

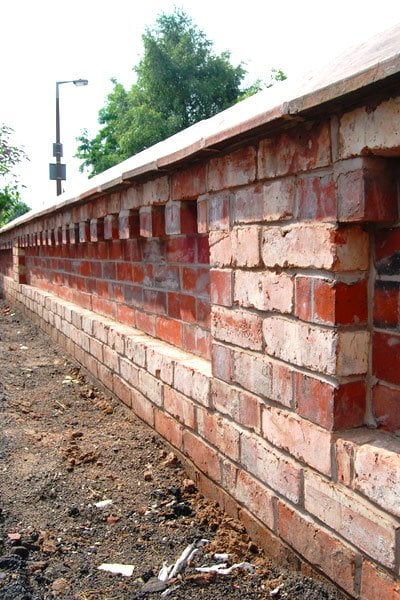
Even before starting work on our rebuilding our garden wall, we knew we wouldn’t have enough bricks to finish the job, so using the bricks that we’re left over from knocking down our interior wall made perfect sense.

With autumn now well on its way, it’s great to have a wall that we know isn’t going to collapse at the first sign of a bit of frost. I’m pretty sure that if we’d waited another winter there wouldn’t have been many bricks left to save.

Edwardian Garden Wall

Cleaning around 800 bricks for hours on end has got to be one of the most boring but best money-saving jobs we’ve done in the house so far. Whilst I hated every minute of it, taking down the wall and cleaning the bricks ourselves saved us about £600 (which has gone towards another project that’s just been completed! I sooo can’t wait to share!)

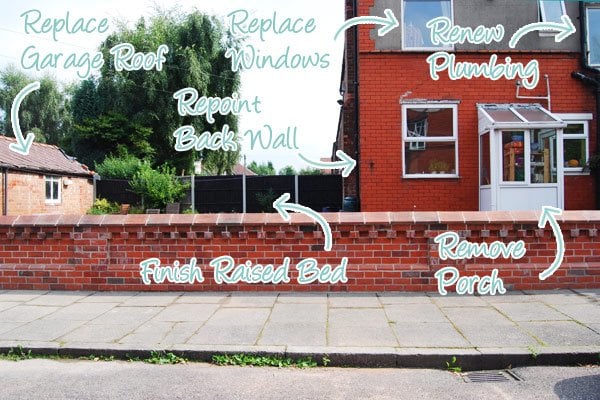
Now that the wall is finished, we can’t help noticing all of the other projects that still need to be completed.

Edwardian Garden Wall

But to start with, we now need to find a new garden gate. We’ve been looking at both wooden gates and wrought iron ones. It’s really difficult to decide… what would you choose? Do you have any projects you’re trying to get finished before winter kicks in? Have you ever done any horrible building related jobs to save money?

You can catch up on our other wall related posts here:

Part 1 – Another Brick In The Wall

Part 2 –  Down It Goes

Part 3 – It’s Getting Small

Part 4 – A Bit Of A Confession About The Wall

Part 5 – Tearing Up The Tarmac

  • Facebook
  • Twitter

Christine 13 Comments

the PAST
the FUTURE

Subscribe To Our Newsletter

Sign up with your email address for secret projects, DIY advice & lots of fun!

Privacy Policy

Leave a Reply Cancel reply

Your email address will not be published. Required fields are marked *

This site uses Akismet to reduce spam. Learn how your comment data is processed.

Comments

  1. Stacey @ dohiy.com says

    30/08/2013 at 15:07

    Fantastic wall! It’s good to pick your battles, isn’t it? Great use of the interior wall brick. Congrats!

    Reply
    • Christine says

      30/08/2013 at 15:42

      Thanks Stacey! Our builder was the one who suggested using the interior bricks which ended up saving us quite a bit of cash! Such a great idea (and builder)!
      Cx

      Reply
  2. caitlin says

    29/08/2013 at 17:49

    This looks so nice and tidy. I bet you and your neighbors are pumped. -Caitlin

    Reply
    • Christine says

      29/08/2013 at 18:11

      All of our neighbours have commented on house good the wall looks – I’m pretty sure there as relieved as us that it’s finally up again! The skip was removed about 10 minutes ago and for the first time in months it’s actually starting to look more like a garden again. Now all we need is a gate…
      Cx

      Reply
  3. mary says

    28/08/2013 at 02:23

    Just a gorgeous wall!
    Kudos to you and your mason.

    Reply
    • Christine says

      28/08/2013 at 09:44

      Thanks Mary, I’ll pass on your compliment!
      Cx

      Reply
  4. Lindsay P says

    26/08/2013 at 19:25

    For the missing terracotta post cap: I’m sure theres a local ceramic artist who could recreate one. It might not be the least expensive route, but probably wouldn’t be too pricey, and could save you a lot of time.

    Reply
    • Christine says

      27/08/2013 at 09:03

      That’s a great idea! Thanks Lindsay! We’ll definitely have a look into that possibility – the more options we have the better!
      Cx

      Reply
  5. Magali@TheLittleWhiteHouse says

    26/08/2013 at 12:44

    The wall looks amazing! I love both wood and iron gates, so I can’t really say… Just no plastic one, of course, but I don’t think that ever crossed your mind.

    Reply
    • Christine says

      26/08/2013 at 17:32

      Thanks Magali! We’re still undecided on the gate situation. You’re right – I’d never even thought about plastic ones, having said that, the price will probably influence our decision, too.
      Cx

      Reply
  6. Kerrie says

    26/08/2013 at 12:27

    Congratulations – what a difference! He did such a good job, I’m sure if feels great to know you did so much hard drudge work and he made it all look so beautiful.
    The only down side is that having something fixed does make you look at everything else with an even more critical eye, but everything in time.
    Cheers

    Reply
    • Christine says

      26/08/2013 at 17:29

      Thanks Kerrie! We’re really happy with the result, too. You’re right about the downside though. Fingers crossed we’ll manage to get a few other outdoor things finished this year!
      Cx

      Reply
Painting Checklist

Our Favourite Tools

*Contains Affiliate Links*

Things To Know

ABOUT US

CONTACT US

DISCLAIMER

Privacy Policy

Shop Our Home!

OUR FAVOURITE TOOLS

SHOP OUR HOME

Disclaimer

As an Amazon Associate I earn from qualifying purchases.

Please read our full disclaimer here!

Let’s Be Friends!

Keep Up To Date!

Subscribe for exclusive content and tutorials!

Thank you!

Copyright © 2023 · Little House On The Corner · This Website is powered by Cloudways and the Genesis Framework