After countless months of staircase restoration work and almost endless updates, the day has finally arrived! We’ve finished!
Can’t believe it? Well, neither can we, but our staircase restoration project is finally complete. Bet you never thought we’d say that!
I still can’t stop jumping up and down and running into the hallway to stare at our finished staircase, so please excuse us if there are even more spelling mistakes than usual (typing and jumping at the same time is surprisingly difficult!).
I’m sure you’d like to know all of the nitty-gritty details, so hold on and make sure you don’t slip on any wet paint! This may take a while…
Let’s start right back at the beginning.
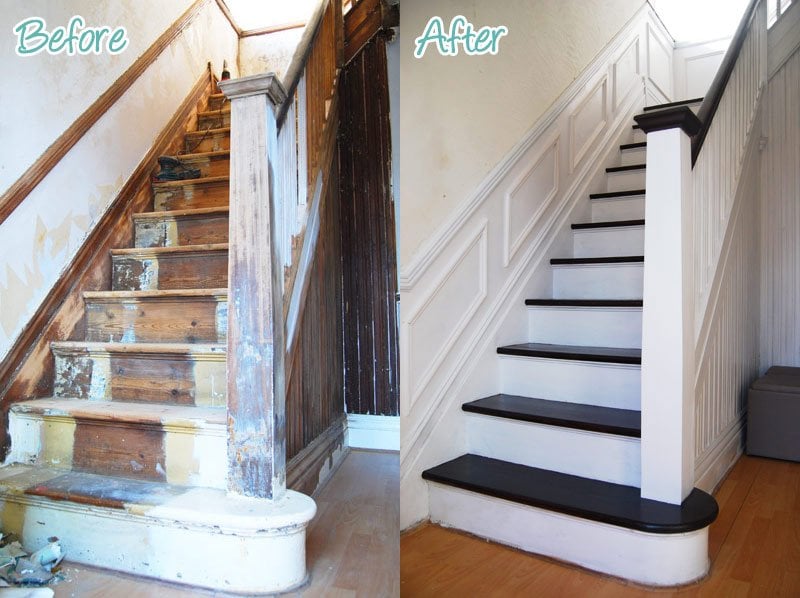
This is what our staircase looked like when we moved in.

Not a pretty sight, is it? The spindles were boarded up and everything had been painted so many times, that most of the detail in the wood carvings had been lost – not to mention our whole hallway being brown and green.
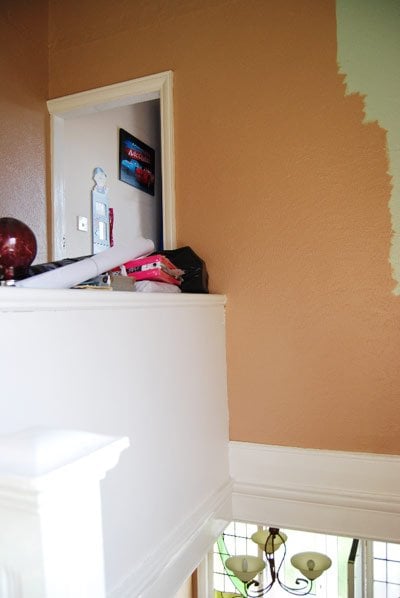
One day, just a few weeks after moving in, the brown started to get me so down that, in a complete fit, I painted everything white to brighten the place up.
It only took a few hours and made such an amazing difference, but when Jan came home from work the day I finished painting, he didn’t notice a difference! Can you believe it?! Eventually, everything will still need skimming, but for now, it will have to do.
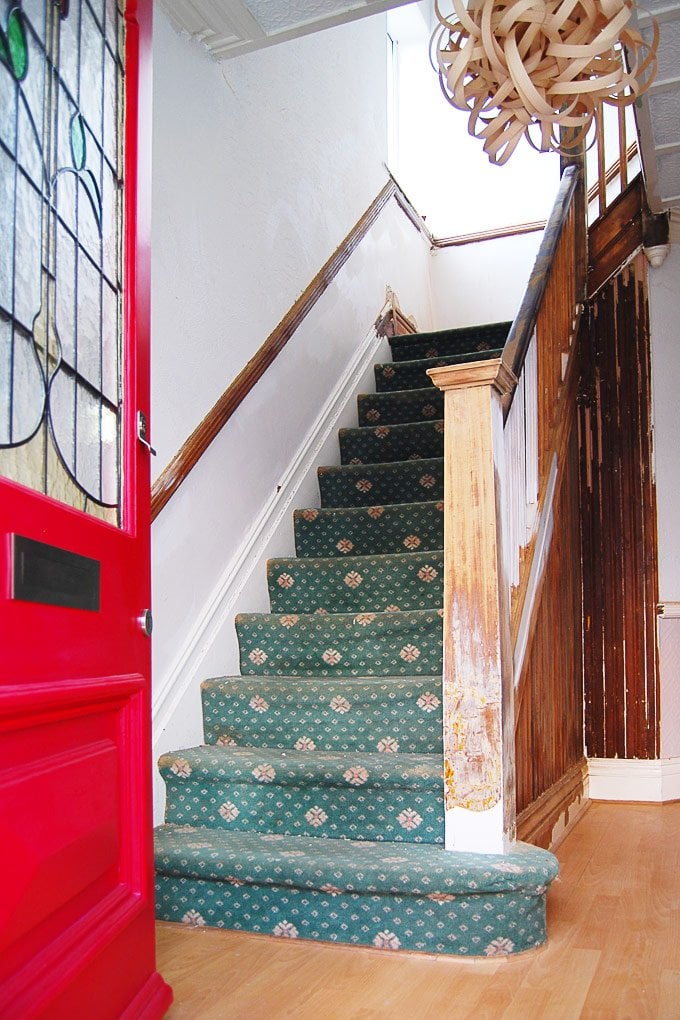
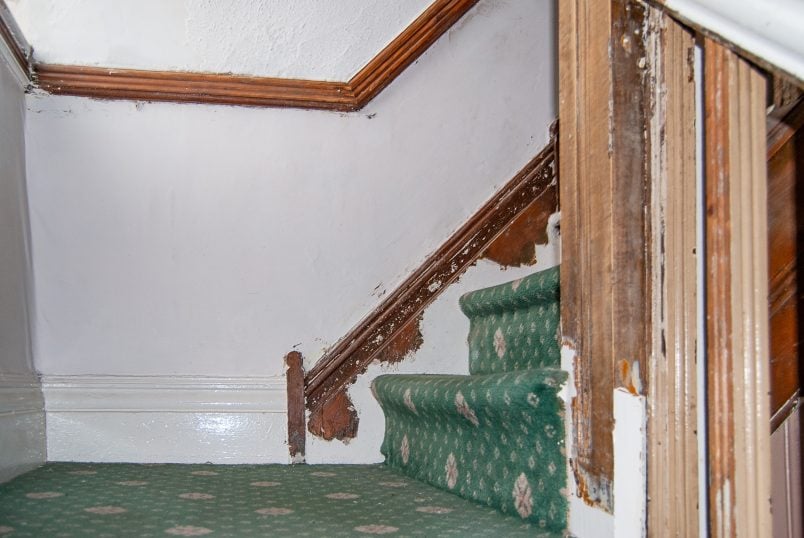
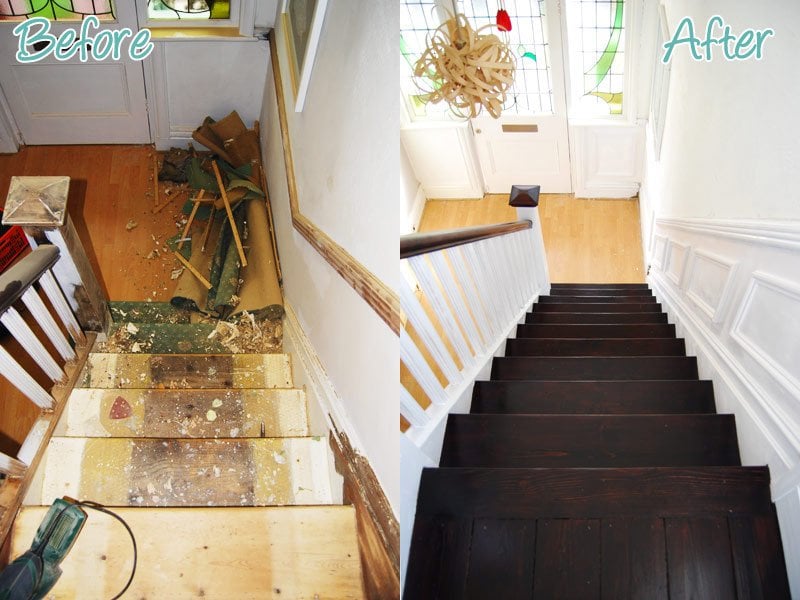
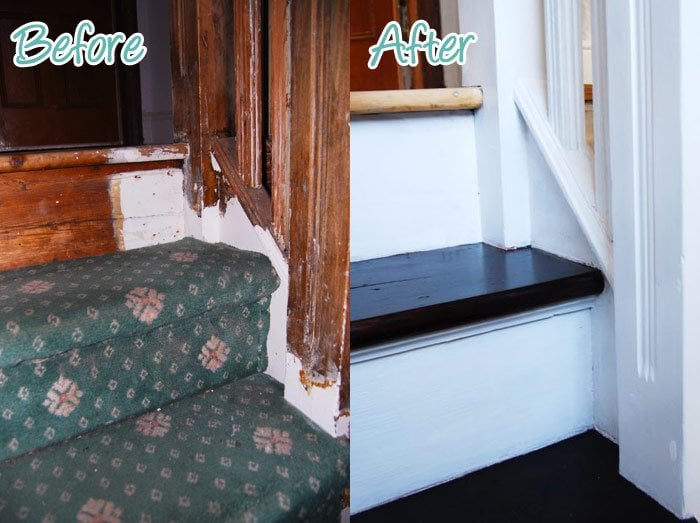
Okay, so the walls may look slightly better, but the rest is still awful. The carpet really wasn’t to our taste, and I even fell down the stairs twice just because it was so worn and slippery.
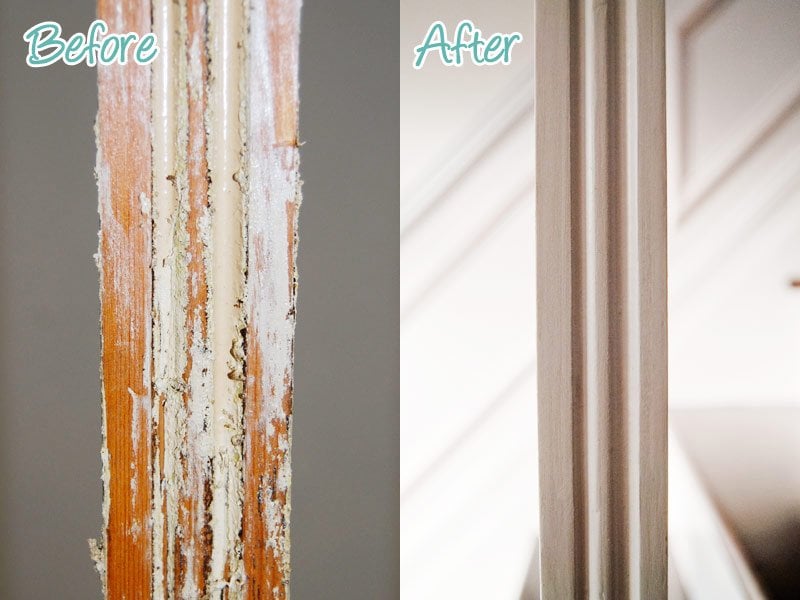
There were chips all over the painted wood, and everything was really dirty and had started to turn yellow.

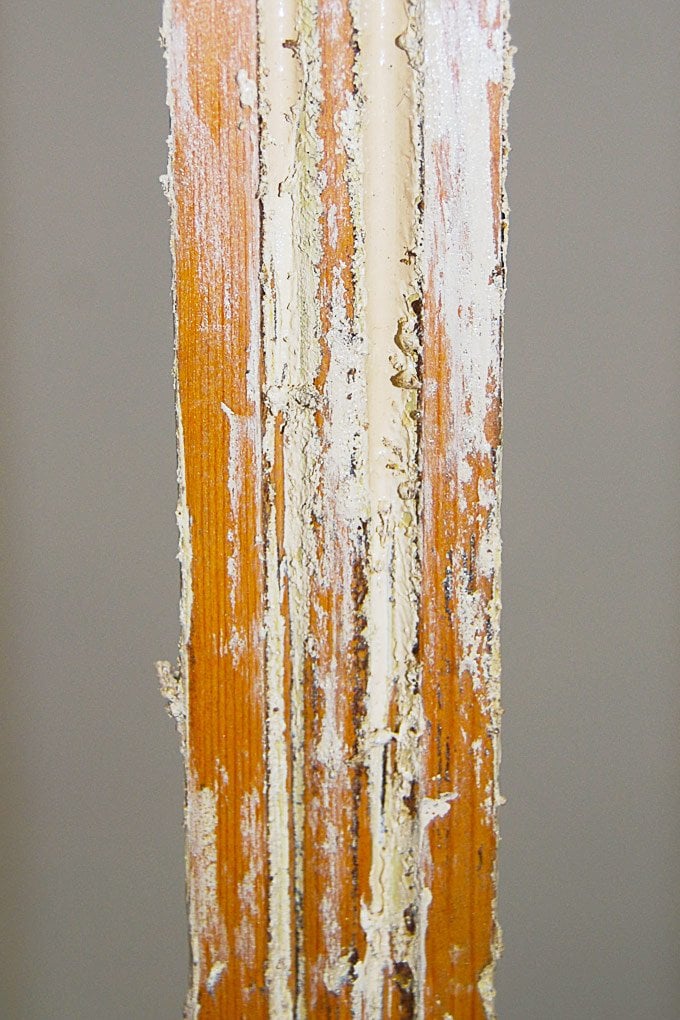
After removing the boards and lots of hours of stripping and sanding, things actually looked worse than before!
I’m not sure what kind of paint had been used for the spindles, but it kept going really sticky when trying to strip it with the heat gun. It went everywhere and was a complete pain to remove.
If you’re planning on stripping any paint, especially in an older home, it’s always important to carry out a test to check if you have any lead paint!
If we’d thought that the stripping had taken a long time, we really weren’t prepared for the amount of time it would take for the sanding.
You can catch up on the details of lots more sanding, stripping, and painting in our previous posts, which we’ll be linking to at the end of this post.
But now, for the moment, you’ve all been waiting for!
Drum roll, please… here it is – our finished staircase!
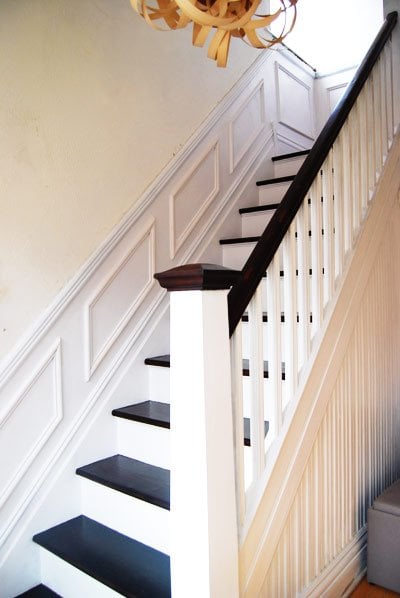
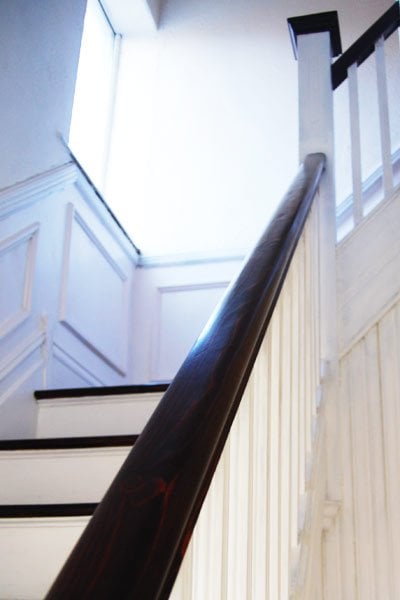
Although the steps are stained a very dark brown mahogany colour, the hallway is much brighter.
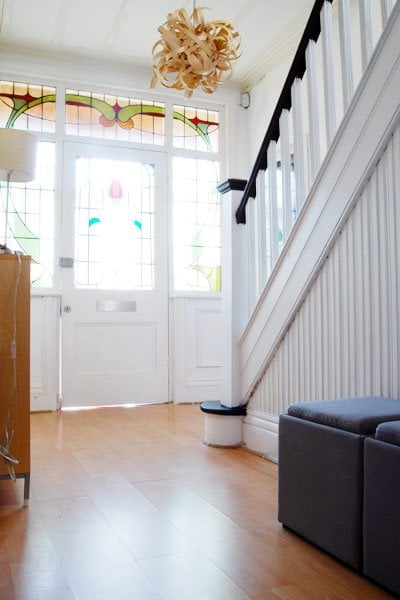
Everything is so much cleaner and neater.
We’re really happy with how the panelling turned out, too.
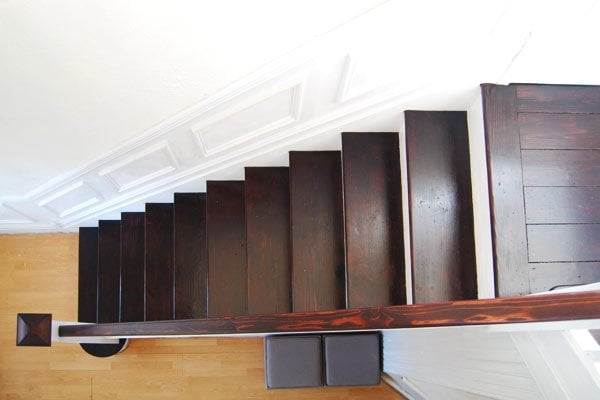
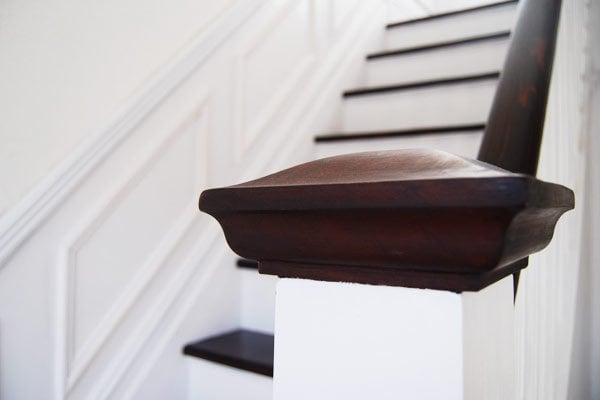
We love the contrast between the dark steps and the white risers.
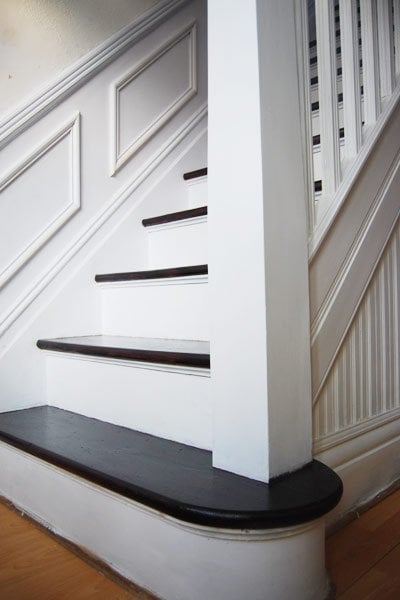
The handrail is stained the same as the steps, but we’ve waxed it instead of varnishing it.
The hallway floors, especially the upstairs one, both still need sorting. At the moment, we’re planning on sanding the original floorboards.

Considering the state our staircase was in when we started the restoration, we’re amazed that it has turned out so well.
As it’s taken us a ridiculous amount of time to complete this job, here are a few stats just to show how involved this project actually was.
250 hours of stripping and sanding
13 Splinters
9 Burns
3 Eye rinses (yes, we did wear protective goggles)
Countless scratches and cuts
3.5 l of paint
24 hours painting, staining and varnishing
1 roll of masking tape
Lots of swearing
1 fall down the stairs (not quite sure how that happened…)
As always, here are our side-by-side before and after shots.
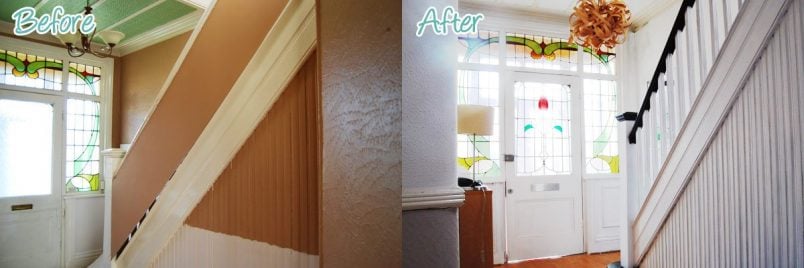
Isn’t it amazing what a difference a bit of hard work and paint can make?
The spindles are so much better now!
Everything took such a long time to strip, sand and paint, but looking back at what it used to be like, it was so worth it!
The whole hallway feels completely different!
We’re so happy it’s finally completed! We’re still planning to have a runner installed but haven’t been able to decide which carpet to go for.
If you’d like to catch up on all the previous steps of our staircase restoration in more detail, you can check them out here:
Staining, Painting & Varnishing
More importantly, you can read about how all of the other lovely Duelling DIY ladies are getting on here:
Have you ever started a project that seemed to take forever to complete? Have you ever restored a staircase? What do you think of our restoration? Was all of the work worth it? Let us know which carpet we should go for!
Marysa says
I can totally relate to this project! We have refinished the stringers and the spindles.
Originally, we were going to refinish the pine, but it is in rough shape. Then we were going to fully carpet the stairs, but I am worried about things like pet accidents and other things. In the process of painting our stairs, and it gives me hope to see your finished project!
Christine says
It was such hard work but it was soooo worth it! We did eventually add a runner (which had always been the plan) and absolutely loved the squishiness it added. It also made the staircase less slippy. Maybe that would be an option for you, too? You can see our runner here.
It sounds like your staircase is going to look fab – we’d love to see a picture when you’ve finished!
Cx
Norm Muelleman says
I am just about ready to tackle my staircase. I have a 1903 large Victorian in a St. Louis suburb. Overall, the house was in great shape. But the 80’s dark green carpet on the stairs..urgh! I have to have back surgery, so I’m debating whether to tackle before or after. But I’m going to stain the entire staircase and handrails/ballisters, then runner down the center. I got some spray-on stripper that Lowes highly recommended. I also have a detail sander, and lots of sanding sponges. Any other tips?
One side question: Did your house have any dips or drops in the flooring? I have dips in my upstairs…some quite pronounced, and I’m not quite sure what to do with those…especially wanting to put hardwood in the rooms.
Christine says
We’re so happy with how our staircase turned out but it is a project that takes a long time (probably longer than you expect) so it’s definitely worth making sure you have enough time to complete it – there’s nothing worse than staring at half-finished projects and not being able to do anything about them!
I’d definitely recommend checking if you have lead paint (you can buy test kits at most DIY stores) before you start to strip any paint – safety first! It’s a job that will seem to take forever so just keep reminding yourself that it’ll be worth it in the end!
We didn’t have any big dips in our home (we have a few larger ones now) but as long as they don’t bother you too much I think it’s part of the charm of living in an older property. If you do want to remove them you will have to take up the existing floor and adjust the beams beneath by adding strips of timber to level out the structure before adding a new floor on top.
Hope that helps & keeping my fingers crossed that your surgery goes well!
Cx
Vanessa says
Well done! I know that you suffered through that but the results are so well worth it.
Christine says
Thanks, Vanessa! We’re so pleased with how it turned out, too!
Cx
Tina Green says
Such a lovely restoration
I have moved into a house and uncovered exactly the same stair spindles, the bottom stairs are perfect but l need to renew all the top floor.
I have searched the internet.
Have you any ideas where l can purchase the same spindles..
Please help
Christine says
It’s unlikely that you’ll be able to find the exact same spindles but there is still an easy solution! We had our original mouldings reproduced and I’d suggest the same for your spindles. We wrote a post about it which you can read here but basically, we took some of our moulding to a joinery, they made a cutter (which cost around £75) and then made all of our new moulding which matches the original perfectly. The per metre price was about the same as purchasing it from a DIY store and the only additional cost was the cutter.
Hope that helps!
Cx
sandra says
Ive started to strip my stairs as the whie paint chipped there brown paint under,then a stain,worried now that there lead in it as started to feel sick and get head ach my house was build in the 30s,have got a child as well so dont want to make her ill…
Christine says
Ohh, Sandra! You’ll almost certainly have lead paint in a house that’s from the 30ies! You should definitely stop immediately. We wrote a post a while ago on how to deal with lead paint. Maybe there’s some information in there that can help you.
Stay safe!
Cx
Peter says
You done some amazing job! It looks really good!
I am on the process of restoring my staircase and the problem i have is that the steps have quite a lot of holes which i have filled with the wood filler and some screws stickin out. Will the Fiddes Raising stain you used cover the screws and filler?
Thanks in advance
Christine says
Thank you, Peter! The stain will cover the filler but as it has a different consistency than the wood, there will be a noticeable difference to the rest of the tread. The stain, however, won’t cover any screws. I’d recommend testing what you’re trying to achieve on one step first. There’s no point in doing all of that work only to find that you’re not able to achieve a result you’ll be happy with.
Good luck!
Cx
Nick Roady says
I’m currently undertaking a simliar project on my staircase which looks very similar. The staircase was constructed in 1885 and has many years of built up paint on the railings and spindles. Although its to late to help you out, hopfully other people who find your page looking for tip will see this.
I too was having the same issues with non-toxic strippers and heat guns. The old paint was turning into something like chewing gum and was a nightmare to remove. The secret is ammonia. Older paint especially pre-70’s was many times made with or from buttermilk. Ammonia disolves the buttermilk easily and quickly and it absorbs right into your rag or sponge. After you get through the layers of latex or possibly lead paint use ammoina to dissolve the buttermilk based paint.
I can see from the pictures you’ve posted thats exatly what was happening to your project.
Christine says
Wow, that’s something I’d never have thought of trying! Thank you for sharing your experience, Nick. If we ever strip paint again (I have a feeling we will) we’ll definitely give it a try!
Cx
SANDRA says
Huge job I’m sure! Can I ask how you got around to painting your staircase high ceiling walls? I have been trying to figure that out on our end without having to rent any extra equipment to do it or hire professionals.
Christine says
Of course you can Sandra! We used a standard extension pole for the roller. As it’s almost impossible to get the paint right into the corners with the roller, we taped a paintbrush to the pole to touch up any spots in the corners we may have missed. As you can see it was really high tech ;)
Hope that helps!
Cx
Cat says
I know this is a pretty old thread now but I was wondering if you have a photograph of where the staircase meets the first floor landing. I love your staircase and would very much like to do something similar with ours but I recently stripped the floorboards and sealed them with clear satin varnish and worry about what it will look like if I have dark steps meeting a pine landing – I hope that makes sense.
Christine says
Thanks Cat! We’re always happy to help and I can totally relate to your concerns – we had the same discussion before staining our steps. I’ll take a few pictures and send them to you per email.
Hopefully it’ll make it easier for you to decide on what’s right for you!
Cx
Helen says
I’m currently restoring our 1930s staircase and am on the stage of ripping up the carpet and removing the stair treads. Looking forward, I want to stain my tread and paint my risers. We have 3 youngish children and I’m worried about them slipping on varnished stairs. Do you ever slip at all? Love your blog by the way!
Christine says
Thank you so much Helen! Yes and no… but we personally didn’t have any problems, but I would be wary if I had children running around. We have since added a runner up the stairs (we’d always planned on adding one) and it’s something that I would probably recommend. You can read our post about the runner up the staircase here.
Cx
Fionn says
Hi. Thanks a lot for sharing all your insights. Did you fill the gaps between your floorboards with anything?? A lot of dust undermine that needs sealing off… any ideas???
Thanks
Fionn x
Christine says
You’re welcome Fionn! We filled the gaps between the skirting boards and floor (which you can read about here) and insulated under all floors (which you can read about here). Because we insulated under the floors, we didn’t bother filling the gaps between the boards themselves.
Cx
Debra zombek says
WOW Beautiful ! I can totally appreciate all the hard work you put into it ! Take it from someone who also has an old house that had loads of layers of paint on beautiful old wood that was screaming to get out and show off its glory ! I started my staircase ( should have taken before pics) and halfway through I am having a tough time finishing it !!! My other woodwork took years to complete cause I was also working full time , but the stairs are particularly hard cause you need to keep them clear for household members to use
Christine says
Thank you so much Debra! Comments like yours make our hard work even more worth it! Yes, it is a ridiculous amount of work, but the result is so much better for it and I personally would do it all again (allthough I’m not in a hurry to ever strip any woodwork again!)
Cx
Holly says
Beautiful job!! We are looking at restoring our old staircase now – this gives me hope!
Christine says
Thanks, Holly! Our stairs were in such an awful state and still turned out great. I guess it just shows what a you can achieve with a bit of hard work.
Cx
Kirsty says
Hi Christine!
I am in the process of sanding down the stairs with 80 grit!
Did you sand them again after with 120 grit?
Also did you then paint the risers with the eggshell finish paint first then stain the treads? did you put any primer on the stairs beforehand?
Afterwards sand the risers again with 240 grit?
I’m not sure of the order of what to do so just wanted some advice:)
Also I have just checked Fiddes website and I cant see any ‘Dark brown Mahogany’ was it just called ‘Brown Mahogany’
Sorry for all the questions!
many thanks!
Kirst x
Christine says
Wow, that’s a lot of questions!
Depending on the state of your stairs I’d be tempted to start sanding with something less than 80 grit and them move on to finer paper. After sanding away all of the paint and old stain with the coarse 80 grit paper we sanded everything again with 120 grit to give a smoother finish.
I stained the steps before painting the risers, not sure it makes much difference though. Either way you have to be careful not to get paint on the treads. We didn’t prime the risers as the paint we used was self-priming. Between coats of paint, you will find that the paint doesn’t dry completely smooth and that there are a few airbubbles. That’s perfectly normal and that’s why you should sand any painted surface between coats of paint with minimum 240 grit paper to remove any of those imperfections.
The stain colour we used was called Rich Mahogany.
Hope that’s some help – always happy to answer any questions!
Cx
Kirsty Brierley says
You are so amazing!!
Thank you ever so much Christine!!
I’ve just finished all the stairs with 80 grit:)
I need a really good hand lotion after all this sanding lol!!
Kirst xx
Christine says
Aww, thanks Kirsty!
My hands were so rough after sanding our staircase that I was sure I could have sanded them just using my fingers ;)
Cx
Bea says
What a fantastic job! It looks amazing! I love your stairs, what product did you use to darken treads and handrail? Would love to do my stairs I just don’t think they could ever look as good as yours. Keep up the good work.
Christine says
Thank you, Bea! We used a Fiddes Non-Grain Raising Stain in Mahogany to stain both the treads and handrail (I think we applied two coats). The handrail was then waxed & polished and the treads are varnished with Granwax Aquathane Floor Varnish in Satin – which is the same varnish that we used on all floors in the house.
Our stairs were a complete mess before starting to restore them. I think everyone thought we were mad and that they weren’t salvageable. It a lot of work, but I’m sure your stairs could turn out just as you want them!
Good luck! Cx
Amy platt says
I cannot believe I’ve only just come across your blog! I can’t even tell you how I found it but I’m so glad I did. You guys are amazing! I’m so inspired I’ve bought a sander and heat gun. Can you tell me where you bought your lead testing kits from please? I’m concerned as our home was built in 1886 and appears to have just had paint layer after paint layer applied to the ornate coving and skirting boards, taking away the detail hidden underneath *sigh*
Thanks, Amy
Christine says
So glad you found your way over to us, Amy! We ordered our lead testing kit online (at Amazon). Most of the detailing of our original woodwork and cornise was lost under layers of paint, too. It’s loads of work to remove it all, but sooo worth it!
Good luck with your restoration, hope you pop back again soon!
Cx
Linda says
Hard work, but absolutely lovely result. Love the panelling.
The house we’ve bought needs the hall carpet replaced and a bit of tidy up on the wood. It’s a brown thick carpet but its a tad slippy … Oh yep a broken coccyx for me after a slip. We’ll be going for a pale runner carpet but it will be a while before we get to that job. Kitchen first.
Christine says
Thanks Linda! It’s a never ending list of jobs on old houses, isn’t it? We’d love a stair runner, too, but it’s slipped far down the priority list. Heating and plumbing are next on the list…
Cx
PS. I lost house of how many times I slipped on the horrible carpet and fell down the stairs. Luckily I never broke anything and certainly didn’t do anything as painful as breaking my coccyx! Outch!
Sandra says
Holy Cow! This is amazing! You should be very proud!
Christine says
Thanks Sandra! We’re really happy with the result and soooo glad that it’s finally finished!
Cx
amanda says
ok, seriously, this is rad. just saw your blurb on apt therapy and had to come over to see more details and i’m in awe. job incredibly well done!
Christine says
Thanks Amanda! So glad you found your way over here and like our staircase!
Cx
katie says
This looks amazing! I love the dark treads with all the white!!
Christine says
Thanks Katie! We’re really happy with how it turned out, too.
Cx
Pam says
WOW!!!!!!!!!!!!!
I can’t say it enough…WOW, MY GOODNESS WOW!!!!!!!!!!!!
It is amazing!!!!!!!!!! Your hallway and stairs are so beautiful and elegant!!!
The whole entrance way is gorgeous. Was it worth it????? YES!!!!
You forgot to mention how many bottles of wine were consumed during the renovations.
I’m doing the happy dance for you while you’re jumping up and down!!!!
Love it, love it, LOVE IT!!!!!
I guess you know how I feel:)
Pam
xox
Christine says
Thank you so much! Yep, the work was definitely worth it!
Cx
Katja @ Shift Ctrl ART says
WOW what a completely awesome transformation! I love everything you did. What a perfect stain you used on the threads and hand rail. Absolutely beautiful!!!
Christine says
Thanks Katja! I fussed for ages deciding on the colour of the stain, so glad you like it!
cx
jb @BuildingMoxie says
Over from the Ugly Duckling’s. I don’t think I have ever seen quite that baluster detail, you must have been very happy to discover that. wow! and from someone who isn’t unfamiliar with stripping balusters … with a paint key. Now … How I love thee? Let me count the ways. I too love the dark and light (new flooring at least on the landing?) love the chandie and the wow… the stained glass and not to forget how I love me some good looking shadow boxes. well done… all the way around. you have one good looking foyer there. cheeers.
Christine says
Thank you for your kind comments! Now the staircase is finished we should probably start on the rest of the hallway.
Cx
Jess says
Wow! How fantastic! I am sad that we have horrible stone stairs and can´t do something like that! It was really worth the work! I am proud that you are my sister!
Christine says
Awww… thanks! You’re stairs look so much better than before. We’ll have to house crash your home so that everyone can see the amazing transformation you’ve achieved!
Cx
Jess says
Ok it does look better than before but still never as good as yours! MMhhh are you really sure you want to show our house? :-)
Christine says
Can’t wait for the runner. I think it will be even better then
Cx
Sue Warren says
Is it possible you could share how you improved your stone staircase. My son has one that is an awful state after he took up the carpet and is struggling for ideas. Thanks Sue
Kerryn Hewson says
Epic! And I can’t wait to run up and down it myself. :) And see what it looks like with the Rainbow runner! Enjoy the results of all your hard work!!
Christine says
So happy! Can’t wait for the runner as it will really finish things off. The steps are a bit slippery at the moment, too.
Love it!
Cx
anne @ wit wisdom and food says
Holy cow! I love the finished stairs and the entry with that amazing stained glass. You should be very proud of that. I just saw the finished project on Ugly Duckling House and now I am going to go back through and read all your posts about this. Very cool.
Christine says
Thank you Anne! It was a lot of work, but so worth it!
Cx
Magali@TheLittleWhiteHouse says
Amazing difference. You did such a good job. You can be proud of yourself and rest a little while until next project!
Christine says
Thank you Magali! I have to admit that I’m feeling particularly proud of myself at the moment. Very tempted to open a bottle of bubbly to celebrate! ;-)
Cx
Anne @ Planting Sequoias says
Wow! The before and afters are truly stunning! This looks great and was well worth your hard work in my opinion (I can say that since I was not the one who actually had to do it…).
Christine says
Awww, thank you! So happy it’s finally completed. Yep, it was worth all of the work, although I’m not sure I would have said that about half way through when I was covered in dust and paint!
Cx