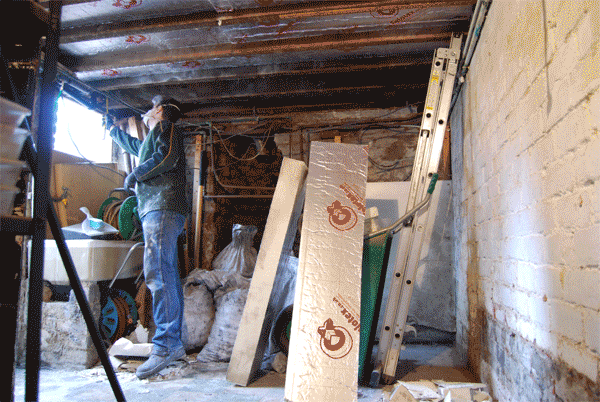
We have a bit of a confession to make – we still haven’t completely finished taking down our cellar ceiling! But, we’ve not been as lazy as it may seem, as we’ve already started on insulating it!
Progress has been fairly slow, but we’re finally starting to see some results. The back cellar room, which we’re planning on using as a little workshop, is almost finished. The other rooms are still a work in progress.
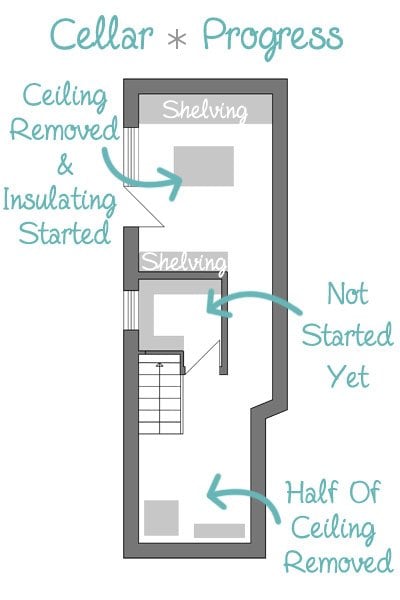
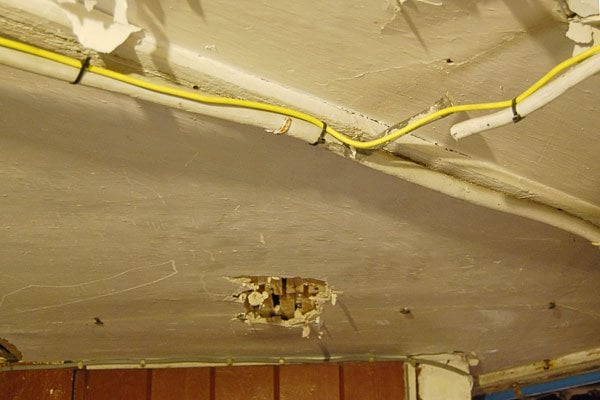
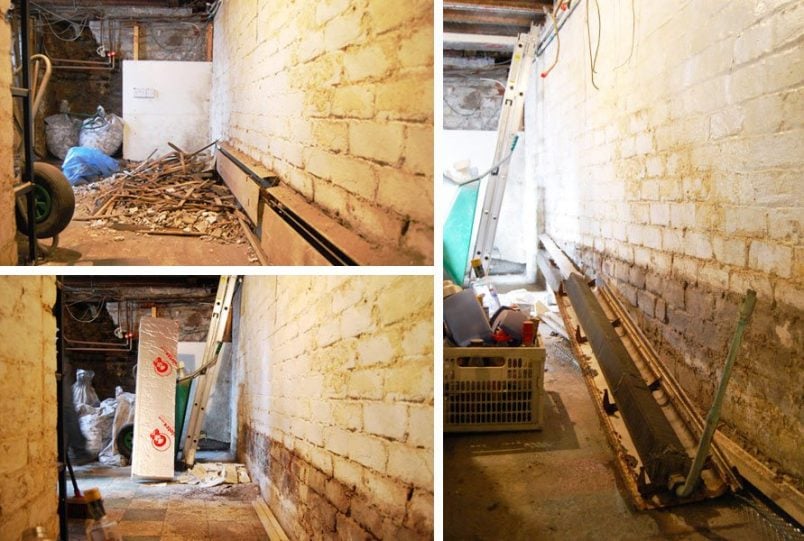
For the most part, we’ve finished removing the lath and plaster ceiling. It made a huge mess and it took us over 5 trips (with a fully loaded car) to the tip in order to get rid of the rubble.
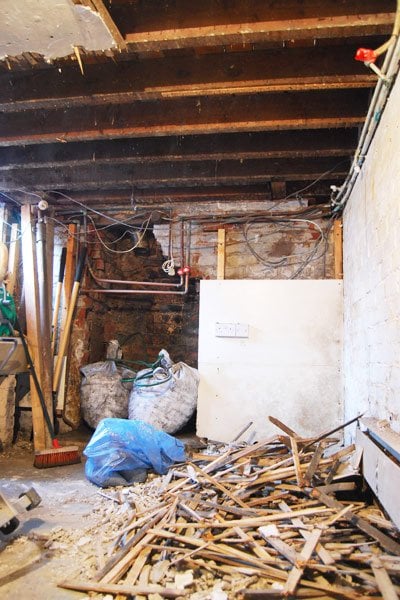
There are still a few heating and gas pipes that need to be removed/ repositioned so that we can finish removing the rest of the ceiling, but it’s already a huge improvement on the cracked and damaged plaster that was there before.
We also had a good clear out (it’s surprising how many almost empty paint cans and random junk we managed to collect in just a few years), removed two ugly old & unused radiators and had a bit of a clean.
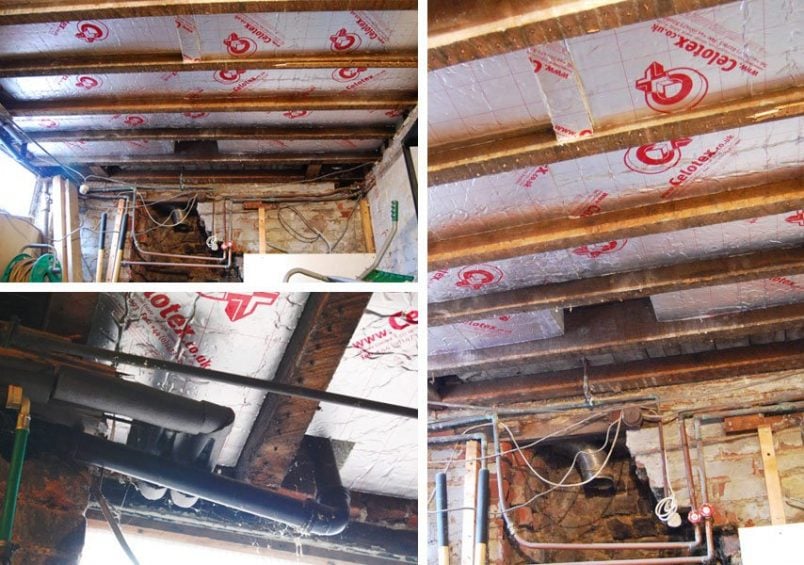
It took a surprisingly long amount of time (probably because of the amount of cables and pipes) to remove the ceiling, but luckily the insulating part was a bit quicker. We already insulated under our living room floor a few years ago, so had a bit of practice which maybe helped a bit, too.
Adding extra insulation to your floors is a job that’s easily DIYable, but you will need to comply with the relevant Building Regulations for where you live. In England, if you are upgrading your floor, you will need to achieve minimum a U-Value of 0.25 W/m²K (for new floors it’s 0.22 W/m²K).
This is the method that we found worked best for us:
1. Measure the distance between your joists. At both ends – ours were almost never parallel.
2. Transfer your measurements onto the insulation panel.
3. Cut off the piece of insulation you need with a saw. We just used a standard hand saw which worked perfectly. There was really no need to buy any special equipment.
Our tip: We sometimes cut the insulation slightly too big. We found that the easiest way to trim it to size, was to insert it (as far as possible) between the joists and then, using the joists as a guide, cut along the edge of the insulation panel with a saw.
4. Squash the insulation into place. If you’ve cut it properly, it should stay between the joists on its own. If it slips, use some battens at the side of the joists to hold it up.

When insulating your floor, you basically have two aims: Windtightness (Cutting down on draughts and minimising the passage of air around the insulation which will result in heat loss) & Insulation. That’s why it’s important that there are no gaps around the insulation boards.
If you find that you’ve cut a board a bit too small, you can fill the gaps with draught excluder tape (the same kind that we used to fill the gap between our skirting and floorboards) or, if you have any larger gaps, you can use expanding foam filler and mineral wool insulation.
After a few calculations, we decided to insulate under the floors using PIR insulation boards. These rigid insulation boards are roughly twice as effective as mineral wool insulation, which effectively means you only need about half of the thickness.
According to our calculations, we would have only needed about 90 mm of insulation, but we decided to increase the thickness to 110 mm. In our case, that means that we actually comply with the Building Regulations specification for new builds. It’s always important to check current rules and regulations as things constantly evolve and change, though!
There is absolutely no need to insulate the floors of your upstairs rooms in your house when the rooms underneath are insulated. It’s only important and effective to do when the rooms or space below aren’t heated.
Hopefully, we’ll manage to finish insulating the cellar this weekend. It’s really starting to get cold here in the north of the UK and with our heating and radiator situation not being ideal (hopefully that will be sorted soon, too) we really need to make sure that our house can retain as much heat as possible.
Are you doing anything in order to insulate your home before winter kicks in? Or, if you’ve already insulated your home, has it made a difference?
Nabil Chaouch says
Hi,
Nice job, I was just wondering after several years now if you have observed any condensation or any “wet” zones specially near the outside wall.
I’m going to isolate my cellar but I could not find any recommendations for using PIR isolation here in the Netherlands.
Kind regards
Nab
Christine says
We never had any moisture issues, but we ensured the cellar was still well-ventilated and no airbricks were blocked. This was in our house in the UK, and we’ll be using wood fibre insulation to insulate our house in NL. It’s really important to consider any moisture, and I’d always recommend consulting a professional to advise your specific situation and home.
Hope that helps!
Cx
Lee says
If i just apply the full sheets to the underside of the joists, will this make any difference?
Christine says
You should never create pockets of air when it comes to (most) types of insulation, Lee. It can cause all sorts of moisture problems from condensation and general moisture in the room. Exactly how you have to lay the insulation will depend on the type of floor you have and the way your home is constructed (it’s important not to block airbricks). That’s why adding insulation to the underside of the joists isn’t something that’s possible.
I’d definitely recommend getting in touch with an insulation specialist or architect to check what insulation method will work best in your home.
Hope that makes sense & good luck with your insulation efforts (we’re doing our loft at the moment and it’s so cold!)
Cx
Darren says
Hi there
Lovely house and great job you guys have done.
You have convinced me to put insulation in my mothers cellar (my feet are freezing as I type this).
I will probably go with the same make of board you used. I will do the other room (same size) afterwards and hopefully I will get under the hallway with the leftover boards.
My room is 5.5 x 4.5
Could you advise further on the calculations you used? I just noted a big jump in price for the 110mm board, so maybe I could go less.
BTW – I thought there would be 90 degree (aluminum maybe) strips/fixings for this type of thing. Did you find anything other than baton?
Warm regards
Darren
Christine says
Thanks, Darren! It’s always important to check current building regulations and rules before you tackle a project like this as things are always changing. We aimed for a U-value of 0.22W/m. What thickness of insulation you use will depend on your floor and the type of insulation you use as the U-values are different for each but I’d be surprised if anything less than 90mm would be enough to comply with building regs. You might find this article by Kingspan helpful when working out what you need. There’s no need to use any fancy fixings to attach your insulation. Generally, it should be cut as exact as possible and not need any help staying in place but just hammering a nail or two into the side of the joist should be plenty to stop it moving. (We only use a batten once I think.) Please remember that it’s important to not block airbricks and you have to leave part of the beam exposed so that you don’t cause condensation! Please also make sure to install the insulation correctly to avoid any thermal bridging! Installing the insulation is easy, but you really need to make sure that it’s been done correctly otherwise you could cause a lot of damage to the floor structure.
Hope that helps!
Cx
sue fletcher says
We too have insulated our cellar ceiling with celotex insulation which is butted up to the floorboards of the room above. Like yours our joists in the cellar are still ventilated from below so I’m thinking this should be okay, just worried when I see other sites recommending leaving a gap. We have also put wooden batens on the walls and screwed foil backed plasterboard onto them to cover the brick. There is an open air vent to the outside and a radiator in the cellar. Do you think this will be okay or is there a risk it may cause condensation/damp problems? Thanks for any advice
Christine says
I believe that not having a gap is the right thing to do but it will, of course, depend on your home and your exact circumstances. If you’re unsure it’s probably a good idea to get someone to look at it. We had no problems with our insulation and we checked every now and then to make sure there was no condensation – maybe that would be a good idea for you, too?
Cx
David Palfreeman says
Hiya, we’re going to be undertaking pretty much the same project over the coming months. The same insulation has been suggested by a friend. I was just wondering have you over boarded insulation underneath? Also in relation to pulling down the old stuff – I know how messy it can be as I’ve already pulled down a section. Did you have anything other than a mask and eye protection on?
Christine says
The insulation was easy to work with and we didn’t overboard it because we were concerned about blocking the airflow which could possibly end up creating condensation. Yes, pulling down the old stuff is really messy but we didn’t take any precautions other than masks and eye protection (I think I may have worn a hat, too).
Cx
David Palfreeman says
Fantastic, thanks a million. Will be starting over the next couple of weeks.
matt says
Hi, thanks for this handy post :)
We’re thinking of doing the same thing in our basement. We’re in an old Victorian terrace with a big, draughty and very cold cellar.
A question: Did you leave space between the top of the insulation boards and the floorboards? I’m concerned about cutting off ventilation around the joists and floorboards.
But if you used 110mm boards there should have been some space left between insulation and the boards, right?
Thanks!
Christine says
Thanks Matt!
Our insulation is butted up directly against the floorboards and in my opinion that’s the way it should be done. Our joists are still ventilated from below and I think that you’d probably create a thermal bridge if there’s a gap. Opinions on this do seem to be divided though. If you’re unsure I’d recommend getting in touch with a company that supplies underfloor insulation like Kingspan. They’re usually really helpful and can advise on the best build up for your floor.
Cx
Roger says
Great walkthrough. Can I ask how many square feet (or meters) the space was that you insulated? I am looking to insulate my cellar and am debating between fiberglass and a solid material, cost effectiveness, and efficiency etc. I would be insulating approximately 1,000 square feet of floor. over a concrete cellar where my boiler lives.
Christine says
Thanks Roger! I’d say we insulated about 60m² of which we insulated about 20m² with mineral wool and the rest with ridged insulation.
Cx
Robert says
Fantastic images; especially the animated one. Really makes me feel like I’m with you observing the work. Best of luck with the project!
Ian says
How long did the project take you? It’s something I’ve been wanting to do in my cellar for some time
Christine says
Taking down the ceiling probably took about a day and insulating another 1-2 days. Using ridged insulation is probably a bit more involved as you have to cut it exactly to fit between the joists.
It was definitely worth the work though – the room above is much warmer now.
Cx
Jeffery says
Great looking project. You’re obviously doing the research to do a quality job. PIR is a new material to me, I’ll have to go take a look. Thanks for the tip!
Christine says
Thanks Jeffery. There’s no point doing a job if you’re not going to do it properly!
Cx
Russ says
Have you considered the ‘breathability’ of the house with all this gap sealing and insulation.
Like yourselves I have often considered insulating but despite the mass amount of propaganda that encourages us to insulate everything, I found a few people who would argue this case. When you read into it in more detail, breathability makes so much sense. There are already many horror stories out there where people have over insulated.
This article is a great insight into what i’m talking about, which I urge you to read.
http://climatechangeblog.historic-scotland.gov.uk/2013/09/traditional-buildings-are-cool/
What IS a traditional building? It’s very simple – an ‘traditional building’ is a structure built with solid walls (stone, brick, timber frame) using breathable materials.
Christine says
Thanks Russ! We completely agree with you! There’s a trend to over insulate everything. We constantly have people coming round trying to sell us cavity wall insulation. Our cavity is only about 4cm, so it makes absolutely no sense and would almost certainly cause more problems! Insulating is definitely something that should not be undertaken be lightly and we check ours on a regular basis to make sure everything is still bb okay. At the end of the day, as long as you still have enough airflow too remove any moisture, you should be okay.
Cx
cindy says
Nice job with the insulation. Since your doing such a good job of making sure the heat stays upstairs, how will you keep your pipes in the cellar from freezing? Or isn’t that a problem in your neck of the woods?
Christine says
Thanks for reminding us about that, Cindy! You’re exactly right of course. We already insulated most of the pipes in the cellar and we will definitely be taking care of the new ones that we’re replacing and moving before it starts to get very cold.
I wish we did live somewhere where it was warm enough not to worry about stuff like that!
Tim says
Hi guys
Just wondering what you will do with the pipe work and cables. Will these sit on top of the insulation, rather than between the joists?
Christine says
Good question,Tim! All of our pipework and cables sit under the insulation, so luckily it’s not too much of a problem. Where the pipes go up and through the floorboards, we’ve cut holes into the insulation which we’ll then be filling with expanding foam filler.
Cx
Anth says
We are, recently, renting an old farmhouse & our bedroom is above the old dairy. The dairy is, naturally, freezing! Our bedroom seems to suffer the same…the radiator is boiling but has little effect.
Do you think a layer of insulation on the dairy ceiling will be of benefit?
I don’t want to start renovating as we are only tenants, but I do want to do as much as i can so we can stay relatively warm. We are off-gas too, and finding that oil is really expensive!
Christine says
I totally feel for you, Anth! The first winter in our house was so cold that we could see our breath in the kitchen in the mornings!
I wouldn’t advise adding a layer of insulation on the ceiling, though. As much as it’s tempting it probably won’t help as I assume there are airbricks between the ceiling and floor which would still mean that the cold air flows under the floor therefore not solving your problem. Depending on how the floor/ceiling is constructed, insulating it could also cause condensation to build which could subsequently cause serious damage to the structure of the floor. I know that that’s not much help and I’m always for adding insulation but in this case (and without knowing exactly what your floor construction is like) it’s something that could do more harm than good. Maybe you could talk to your landlord and get the ceiling properly insulated?
Cx
anth says
Thanks for the reply, I will check what’s under the floor upstairs…the landlord is totally disinterested in anything we say about the property.
Likely we will be moving, but we love the location which is a real shame.
Rats in the attic, cluster flys and really difficult to keep it warm throughout. Stone built farmhouse in Yorkshire, great views and confirmed we want country-living but maybe not this property.
Christine says
That’s such a shame, especially when it sounds like your home could be lovely. At least it’s helped you decide what your future home will look like.
Fingers crossed that this winter’s not too cold!
Cx