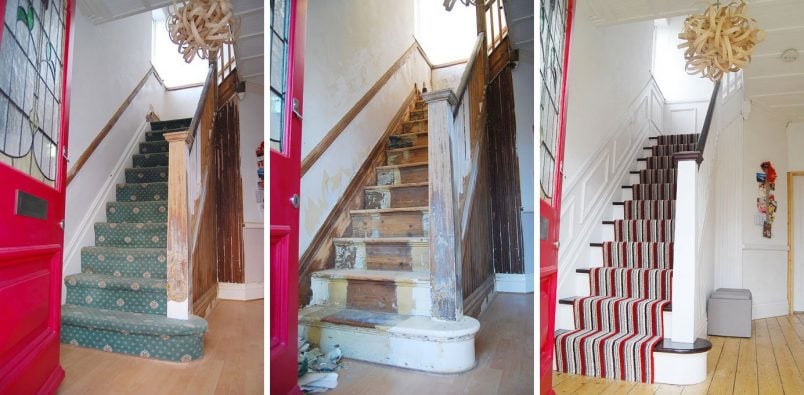
Just 4 years after moving into our home and 2 short years after starting to restore our staircase, we’re so happy to say that it’s completely finished and will never ever be touched again!
Okay, so admittedly the staircase stripping, sanding, staining and painting was completed a while ago, but now we’ve finally had a runner installed, too!
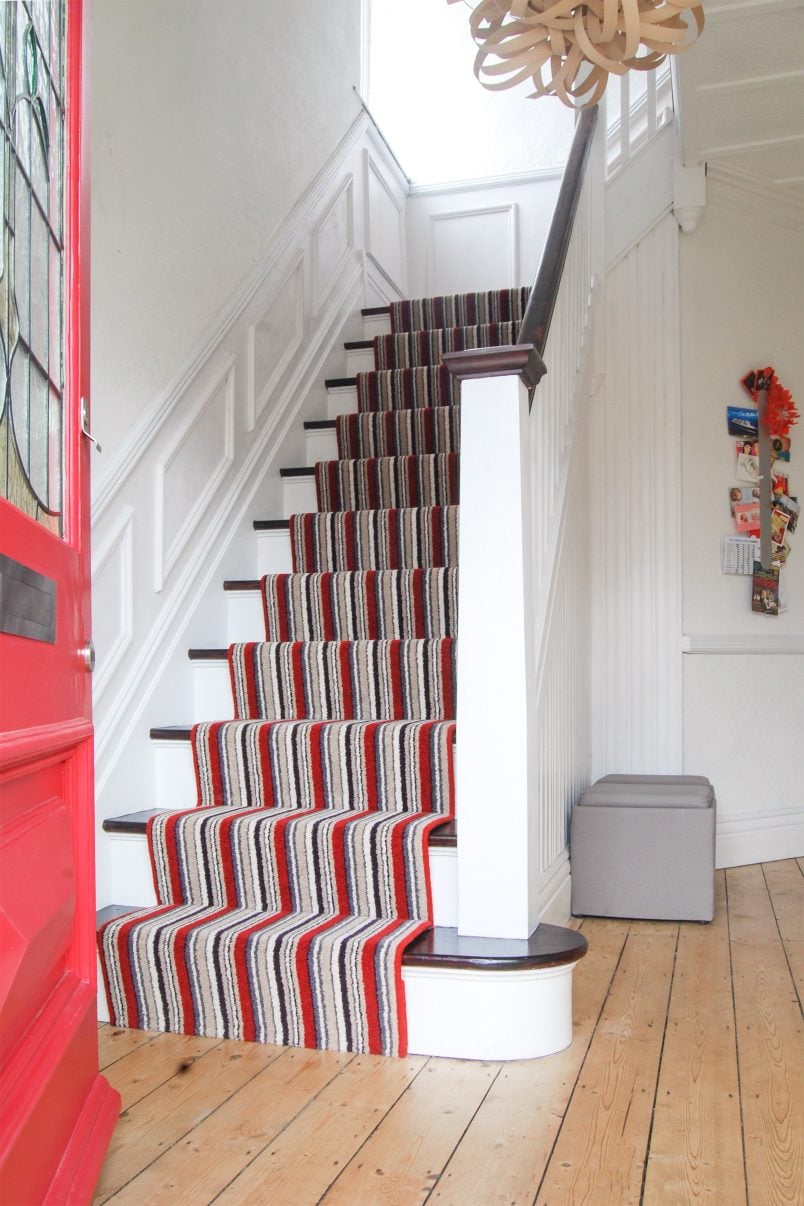
This was possibly one of the quickest projects we’ve ever tackled – probably because we didn’t do it ourselves. The bit that took longest was undoubtedly trying to agree on a runner that we both liked!
It’s probably our own fault, as we took what felt like about 20 samples home from the carpet shop (it’s surprising how different they look in your own home next to the staircase) and spend what felt like forever weighing up the pros and cons of each one.
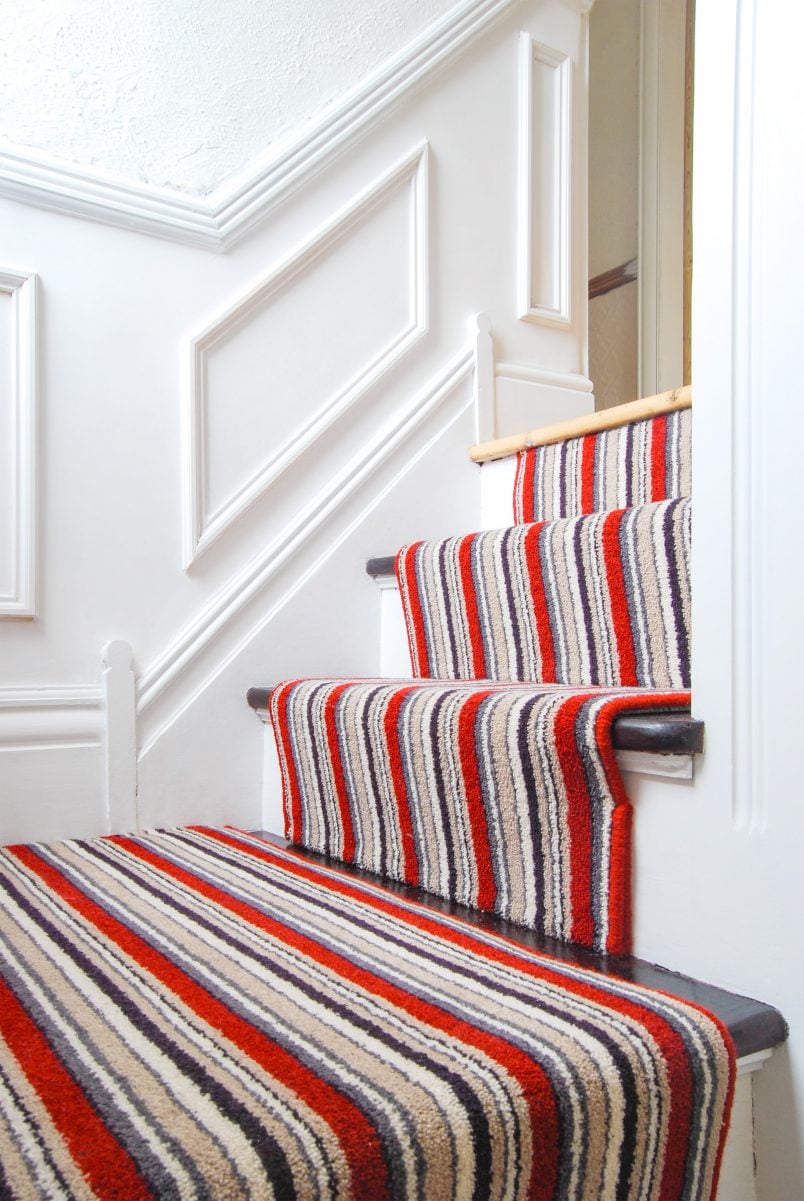
After ordering the carpet (it’s called De Stijl by Kingsmead Carpets) it was cut to size and then had to be sent away to have the edges bound. All in all it took about 3 weeks until it was actually installed.
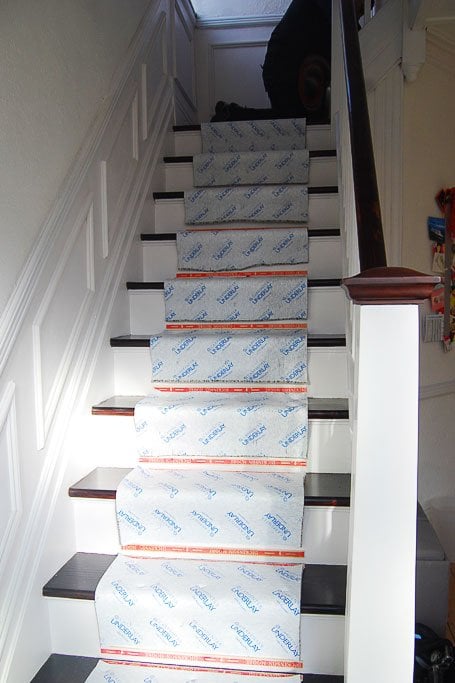
As you know, we try to DIY most jobs, but this is one job that we feel is better left to the professionals and the fitters were so fast that it was almost impossible to snap some progress pictures.
We couldn’t be happier with the result.
I’ll admit, that I wasn’t sure we’d made the right choice at first, but I guess it was just the totally different look than the one we’d gotten so used to, that we had to get over.
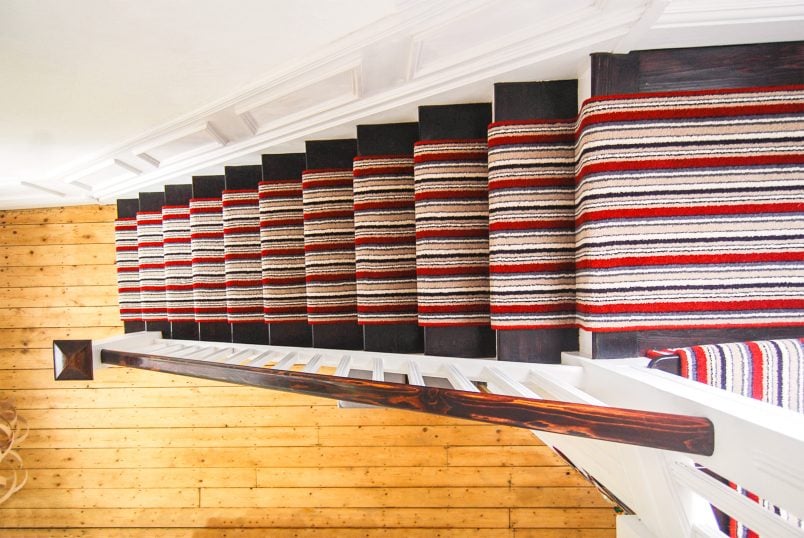
It’s so soft and luxurious and we think that it really finishes the staircase off.
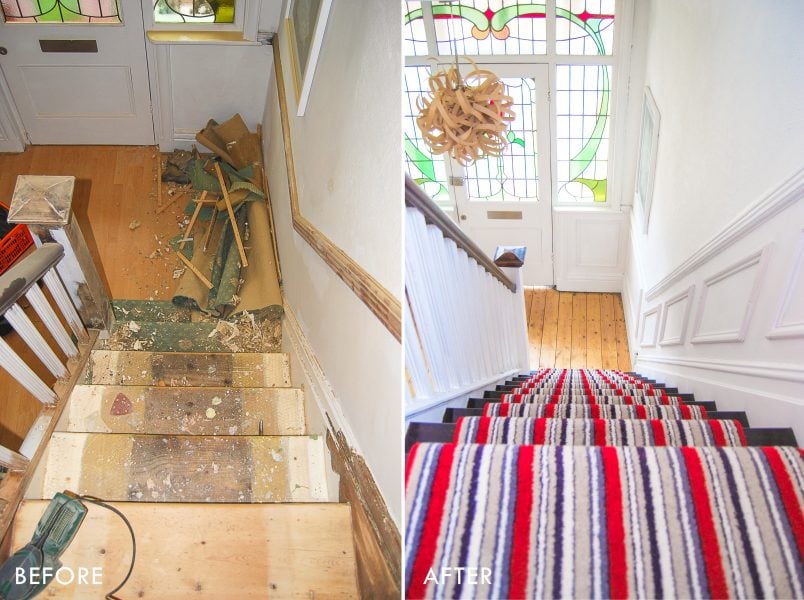
It’s actually total changed the sound in the hallway, too. We hadn’t really noticed an echo or anything before, but now that the carpet is in, it really helps keep sound down – not least because or treads don’t creak anymore – well, not quite as much!
Our hallway is definitely one of the spaces in our home that has changed the most. It’s almost hard to imagine that it once used to be covered in brown paint and that the staircase had be boarded up and hidden under a worn out and smelly green carpet.
Do you prefer carpet on the stairs or do you like to leave the wooden treads on show? Do you have a runner on your stairs?
Leah says
What products did you use on the stair threads? Did you dye the wood and then varnish it? Did you use Osmo? I hear you about how intense the process is. I’ve been working on my Edwardian staircase for 8 months!
Christine says
Yes, we dyed and varnished the wood, Leah. That’s what we always recommend as it will look good for a long time, even if you chip the varnish the stain will still be there so the chip won’t be visible. The products we used are Aquathane varnish and Fiddes Non-Grain Raising stain. Both of which we highly recommend.
Yes, it’s an epic process, isn’t it?! I need to start on our house in our new home (it’s more than twice the size) and I’m already dreading it.
Hope that helps a bit!
Cx
Erika Winklebleck says
I love this! I would love to know the approximate cost for this. I have the same issue in my hallway staircase, It has been painted and I have pets, so it is chipping terribly, What paint and stain did you use?
Christine says
Thanks, Erika! We used Fiddes Non-Grain raising stain which we love and is really easy to apply. Then it’s varnished 4 times to avoid any chipping. The steps held up beautifully but the plan had always been to install a runner for some texture and softness. The price will, of course, depend on the carpet you choose (the prices can vary significantly), where you are and how complicated your stairs are but as a very rough guide, we paid about £400 for our runner a couple of years ago.
Cx
Sara says
Hi Christine Thank you for sharing your beautiful staircase pitcures, it all looks amazing. I am just wondering of you could tell me what you call the stairs panellimg when you ordered it. I have seen the link where you purchased it from but not sure what it is called to order, also can you give me an idea of what it cost please? Many Thanks sara
Christine says
Thank you for the compliments, Sara!
The panelling is just timber moulding strips that we cut to size (we’ve actually just finished panelling the whole guest bedroom using the same method – we’ll share the reveal soon!). It’s available in lots of different profiles and is really quite inexpensive. I can’t remember exactly how much we paid but it was around £1.50 per metre.
Hope that helps but let me know if you have any other questions!
Cx
Kayleigh says
Hi both! This is just amazing. I’m so glad I stumbled across your blog. I feel like I’m you, but 3 years behind! The staircase project has been ongoing for 8 months now, and we are waaaay off carpeting with a runner yet, but that doesn’t stop me thinking and planning ;) I was wondering if your runner is one long piece of carpet or if it is made up of a few pieces? If it is a few pieces, where is the join, and is it noticeable at all? Thanks! Kayleigh
Laura says
It looks fantastic! Never thought of stripy carpet before, I thought it would be too ‘busy’ but it looks great. Sure I’ve asked before and forgotten the answer but where did you get your panelling from?
Christine says
We looked at carpets where the stripes were much more narrow and we decided against them for the same reason. I personally think that having a wider stripe in every now and then is what makes it less busy.
We installed the panelling (which is just made of decorative timber strips) ourselves. You can read more about it here.
Cx
Kate Francis says
Ooo – love the carpet! Definitely prefer carpet on stairs both aesthetically and for the sound level benefits! :)
Christine says
Aww, thanks Kate! We really happy with it, too and think it really finishes off the staircase.
Cx
Jessica@CapeofDreams says
The runner looks great. The stairs looked good without it, but it adds a special touch. It also must be nice that it muffles sounds.
Christine says
Glad to hear you like it, Jessica. It really feels so soft and it’s definitely a much more luxurious feel when walking down the stairs.
Cx
Antonia Ludden says
What a result! Looks really lovely. We are at stage 2 currently and have stalled. Just can’t find the energy to tackle all that sanding. But when I look at your finished stairs, the hard work does seem worth it :)
Christine says
I can’t tell you how many times we lost motivation in the middle of the project, Antonia. I worked out that we stripped, sanded and painted the staircase for about 250 hours, but we’re obviously happy with the result – and yes, the hard work is worth it!
Cx
The Least Shrew says
Looks gorgeous, the before and after is amazing! Could use some runner rods to really finish the look, IMO :)
Christine says
Thanks. We had originally planned on having the rods, but the people at the carpet shop advised against having stripes and rods together. It was fine by us as it worked out a lot cheaper! ;)
Cx
KarenAnita says
It looks beautiful! And even aside from the carpet, you can tell how much hard work you’ve put in because the staircase itself just looks SO elegant compared to the ‘before’ pictures – which I can totally relate to by the way! Makes me even more excited to get our stripey carpet in – hopefully in the next fortnight, fingers crossed :)
Karen x
Christine says
Thank you – glad to hear that you like it! You’re right, it was a ridculous amount of work, but now that it’s done we’re so happy that we put in the effort. Can’t wait to see your finished hallway!
Cx