We hope you’re all not getting too excited about this week’s staircase restoration update. There has been a distinct lack of progress.
Last week, we told you about plastering the wall alongside the staircase in preparation for our panelling that we’d hoped to install this weekend.
We ordered the moulding last week, but it’s still out of stock! We’re probably a bit mad waiting for the specific moulding, especially as you can see that there are lots of options to choose from (and there are another 4 pages).
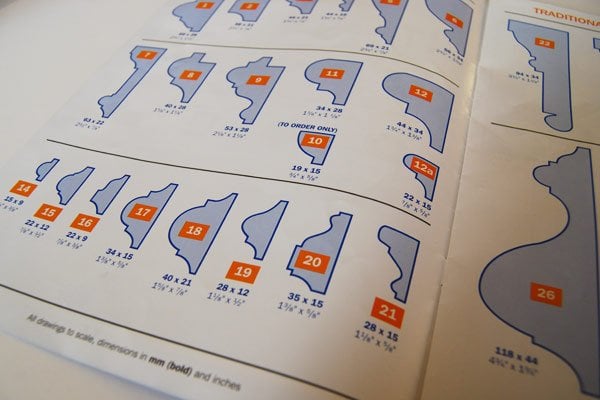
The moulding we’ve decided to choose is number 20. It’s the only moulding that has a flat surface as well as curved areas, which we think will go perfectly with the existing dado rail, which also has flat elements.
As we really want to attach the panelling before giving everything a final sand and coat of paint, there aren’t a huge amount of other things that can be getting on with.
We decided that the best thing to do is to prepare everything so that we can start attaching the panelling as soon as it arrives – which, fingers crossed, should be tomorrow.
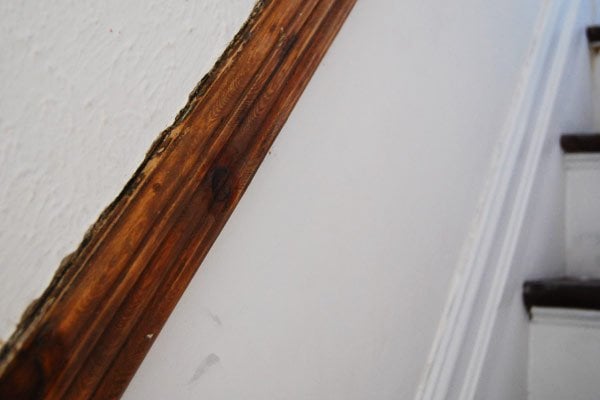
The one big job we managed to complete was sanding and painting the dado rail.
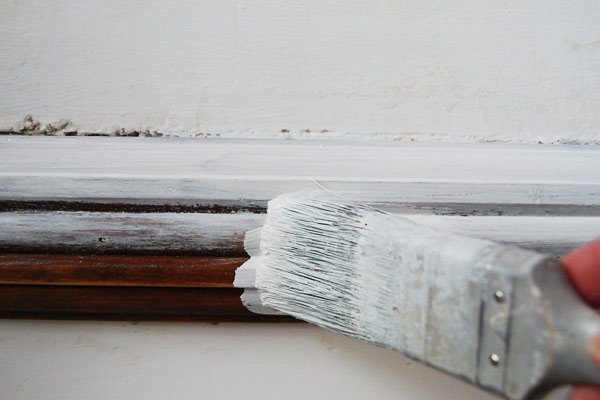
We’ll still have to caulk around the edges, and the whole wall over the dado rail will have to be replastered at some point, as it’s covered in awful Artex. For now, though, it’s a huge improvement.
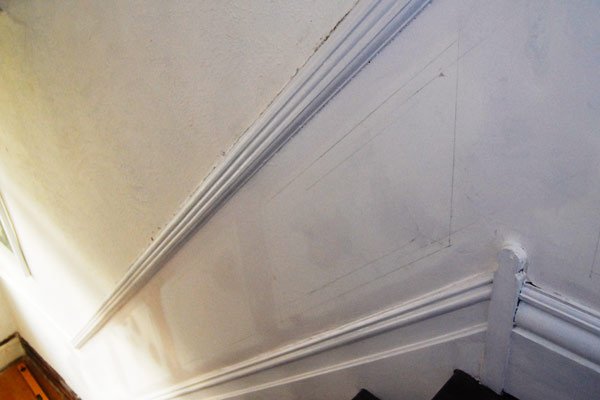
You can also just about see that I’ve already measured and marked the areas for the panelling so that all we have to do is cut it to size and attach it to the wall – if it ever arrives.

Take a look at how much better all the other duelling ladies are doing.
Sandra @ The House of Bing
We’re so close to completing the stairs now; just one more final push! Hopefully, we’ll be able to share some big improvements with you next week!
Darrell Walker says
Hi,
Where is that catolouge from that you ordered the dado rail? I’m looking for something to match a bit that’s damaged in one of our rooms but it’s proving to be more difficult than I thought.
Thanks.
Darrell
Christine says
Yep, matching up something can be pretty much impossible, Darrell! We got our timber here: https://www.iitimber.com/. If they don’t stock what you’re looking for, I know that there are places that will copy a piece of moulding for you. Keeping our fingers crossed that you find what you’re looking for!
Cx
Darrell says
Thanks for that Christine, I’ll have a peruse. The mission I’m attempting is even more ambitious (crazy) than it sounds. The long version is that the previous owners obviously had an issue with one of the walls in the master bedroom which meant they had to repair the wall and lost the cornice(just from that wall) in the process. So after scouring the Internet and not getting too close, and getting collosal quotes to get a match made I resorted to actually constructing my own from other mouldings. Sounds insane but I manged to make an exact replica of the part that goes in the corner which should be easy to scale up. What I’m struggling with is the projection which essentially looks like a relatively simple dado rail. Ironically I initially thought that would be the easy part… Not so sure now :-) I’ll let you know how it goes.
Christine says
That definitely sounds like a mission, Darrell! As you’re obviously up for a challenge, I have another suggestion. I know that our neighbours had to replace a bit of their cornise and had a template made. It’s basically a steel strip that they moulded to a piece of the existing cornise to get the exact shape and then supported the shape with some wood. You can then fill the corner where you’re trying to replace the cornise with some plaster and use the mould as a kind of comb to shape the paster to the desired shape. We’ll definitely be borrowing their template to repair some of our cornise (ours is the same as theirs) but haven’t tried the method yet ourselves.
Hope that makes sense! Good luck with your effort – can’t wait to hear how you get on!
Cx
Darrell says
Hey Christine! That does sound like an intriguing idea! Do you have any pictures of it? I’m interested to see what gauge of steel they used and how they used the wood to support it. Was it something they bought purpose built or did they just fashion it themselves? The only problem with the “comb” method for me is that it’s an entire 5m+ wall that I would need it for, and I would never have the skill for that, however, with some tweaks perhaps I could use the mould and set some plaster in it. Any more info you have on this technique I’d be really grateful to hear about it. My girlfriend is keen to start a blog on the work we’re doing so you should be able to see some progress (hopefully) on there when that’s up and running. We just moved in about a month ago so it’s early days, but we’re just taking it one room at a time :-) Thanks again for your ideas.
Darrell
Christine says
Congratulations on your new home, Darrell! I’ll have a chat with our neighbours and take some pictures of the tool and let you know more as soon as possible. If you can rest the tool against the wall and ceiling when “combing” the paster into shape, I think that you might have enough of a support to form the plaster into the shape it should be. It’s probably one of those things that sound easier than they are to actually do. ;)
Good luck with your renovation efforts!
Cx
Darrell says
Thanks again Christine. I’ve seen a YouTube video of this method where they’ve set up a rig for the comb to run along the ceiling, looks impressive, but that may be slightly over engineered for what I need. I’m still interested in the comb method for tidying up the hallway perhaps. Anyway, I look forward to the details and I’ll email you some pics of the progress so far.
Darrell
Sandra says
Hi Christine!
What is a dado rail? Is it different than a chair rail? Just think of how awesome it’ll be when it is all finished!
Christine says
Hi Sandra, I’m pretty sure that chair rails and dado rails are the same thing. Fingers crossed that you’re right about it being great when finished! The wood for the panelling finally arrived today, so with a bit of luck we’ll be able to attach that by next week!
Cx