MENUMENU
  • Home
  • About Us
  • Work With Us
  • Our Favourite Tools

Little House On The Corner

DIY & Home Improvement

MENUMENU
  • Blog
  • Projects
    • Our Favourite Projects
          • DIY Outdoor Daybed with Canopy
          • DIY Outdoor Daybed With Canopy

          • DIY Epoxy Resin Dining Table
          • DIY Epoxy Resin Dining Table

          • 5 Floor Sanding Mistakes And How To Avoid Them | Little House On The Corner
          • What No One Will Tell You About Sanding Your Floors

    • Home Improvement & DIY
          • Hallway with Paean Black Front Door After Editing With Interior Presets for Lightroom by Little House On The Corner
          • How To Create A Home Renovation Budget

          • Floorsanding In Progress
          • What No One Will Tell You About Sanding Your Floors (& How We Did It)

          • How To Plan & Install Panelling | Little House On The Corner
          • How To Plan & Install Panelling

    • Painting & Decorating
          • painted wardrobe in Soumak by paint & paper library
          • How To Paint A Wardrobe

          • Dark Blue and Grey Painted Kitchen Cabinets
          • How To Paint Kitchen Cabinets + Tips For A Professional & Long Lasting Finish

          • What To Do When You've Chosen The Wrong Paint Colour?
          • What To Do When You’ve Chosen The Wrong Paint Colour & How To Fix It!

    • Furniture Upgrades
          • DIY Slatted Radiator Cover
          • DIY Slatted Radiator Cover

          • Beat Floor Lamp and Bar Cart
          • DIY Bar Cart

          • DIY Dining Room Bench | Little House On The Corner
          • DIY Dining Room Bench

    • Outside & Garden
          • DIY Logstore
          • DIY Log Store

          • DIY Slatted Garden Fence | Little House On The Corner
          • DIY Slatted Garden Fence

          • How To Lay A Gravel Driveway
          • How To Lay A Gravel Driveway

    • Free Printables
          • Cleaning Checklist - Free Printable
          • The Best House Cleaning Checklist

          • Free Printable Paper Houses for Advent Calendar
          • DIY Printable Advent Calendar Village

          • The Easy and Free Way To Organise Screws and Nails
          • The Easiest Way To Organise Screws And Nails

    • Craft & Art
          • DIY Pegboard
          • DIY Pegboard

          • DIY Modern Geometric Serving Tray
          • DIY Modern Geometric Serving Tray

          • DIY Guess Who Game - Setting Out Board | Little House On The Corner
          • DIY Guess Who Game

    • Cleaning & Organizing
          • Cleaning Checklist - Free Printable
          • The Only Cleaning Checklist You’ll Ever Need

          • DIY Floating Spice Rack | Little House On The Corner
          • DIY Floating Spice Rack

          • 30 Day Spring Clean Checklist - Little House On The Corner
          • 30 Day Spring Clean Challenge

    • Holidays & Festivities
          • DIY Giant Star and Snowflake Light | Little House On The Corner
          • DIY Giant Star and Snowflake Light

          • Free Halloween Printable Book Covers
          • Halloween Book Covers (Free Printable!)

          • Gingerbread style paper advent calendar village - Little House On The Corner
          • DIY Printable Advent Calendar Village

  • House Tour
        • Our Edwardian House
        • Our Edwardian House (1st Home)
        • Our Berlin City Centre Apartment
        • Our Berlin City Centre Apartment (2nd Home)
        • Take The Tour | Our Art Nouveau Apartment | Little House On The Corner
        • Our Berlin Art Nouveau Apartment (3rd Home)
        • berlin riverside apartment house tour
        • Our Berlin Riverside Apartment (4th Home)
  • Shop
    • The Little Corner Shop
    • Shop Our First Home
    • Shop Our Current Home
    • Our Favourite Amazon Finds

Matching Original Period Moulding

  • Facebook
  • Twitter

It’s always exciting to see progress and having plastered and painted our fourth bedroom a few weeks ago, we’re super excited to be seeing some more leaps forward.

How To Paint New Plaster

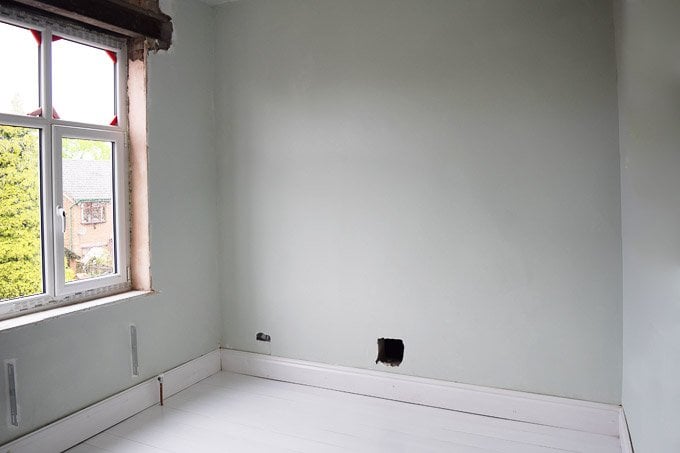
Whilst the small bedroom still needs to be finished off, we managed to make a bit of progress in the guest bedroom and finally got round to plastering, painting and finishing off the area around the new window.

Matching Original Period Architrave & Moulding

We already tackled most of the room a while ago, but we couldn’t call it finished until we completed the back wall which included having the window replaced, finishing the plastering and painting and then adding the final bits of trim and picture rail.

Matching Original Period Architrave & Moulding

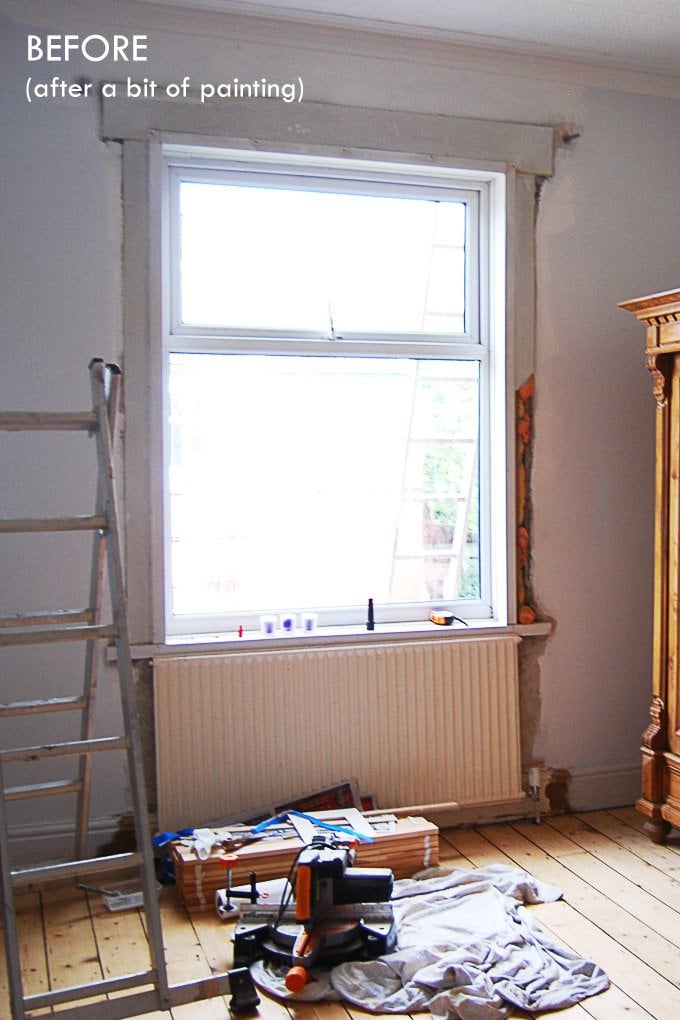
Our previous windows had been badly fitted which meant that not only were there draughty gaps around them but also that all of the area around the window where there would have originally been wooden trim had been covered in cheap, ugly and badly fitted bits of plastic – and a wobbly plastic window sill!

Matching Original Period Moulding

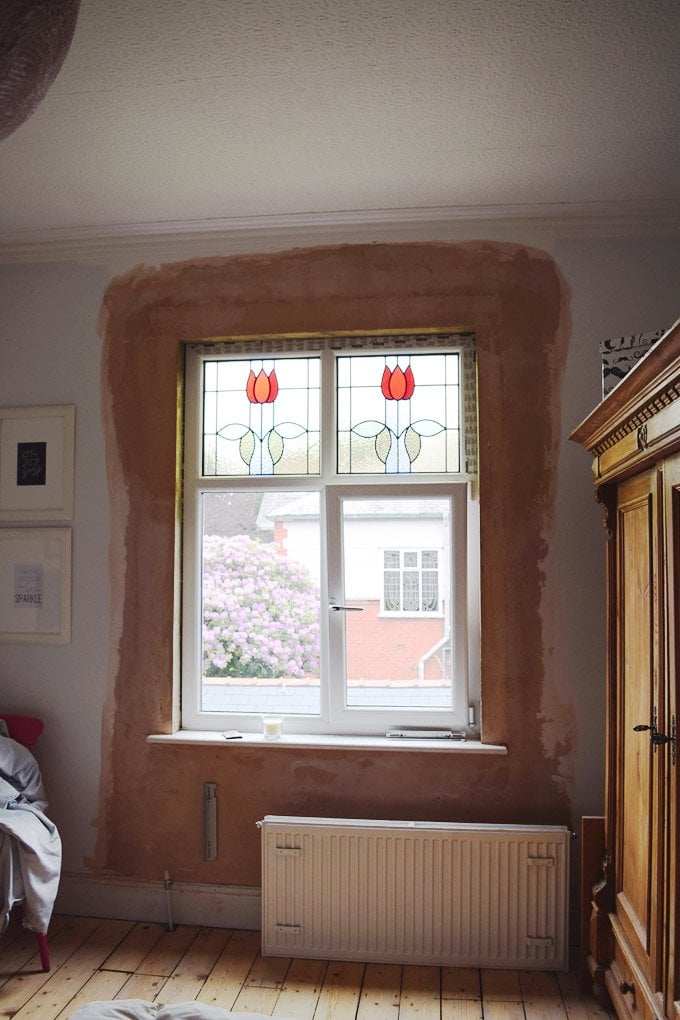
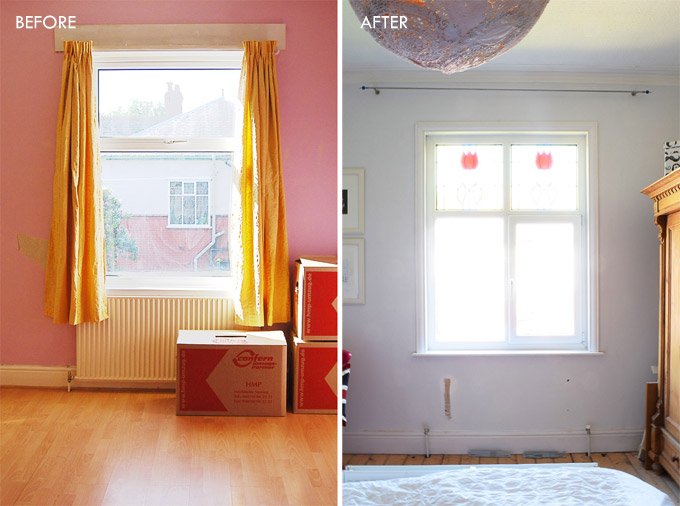
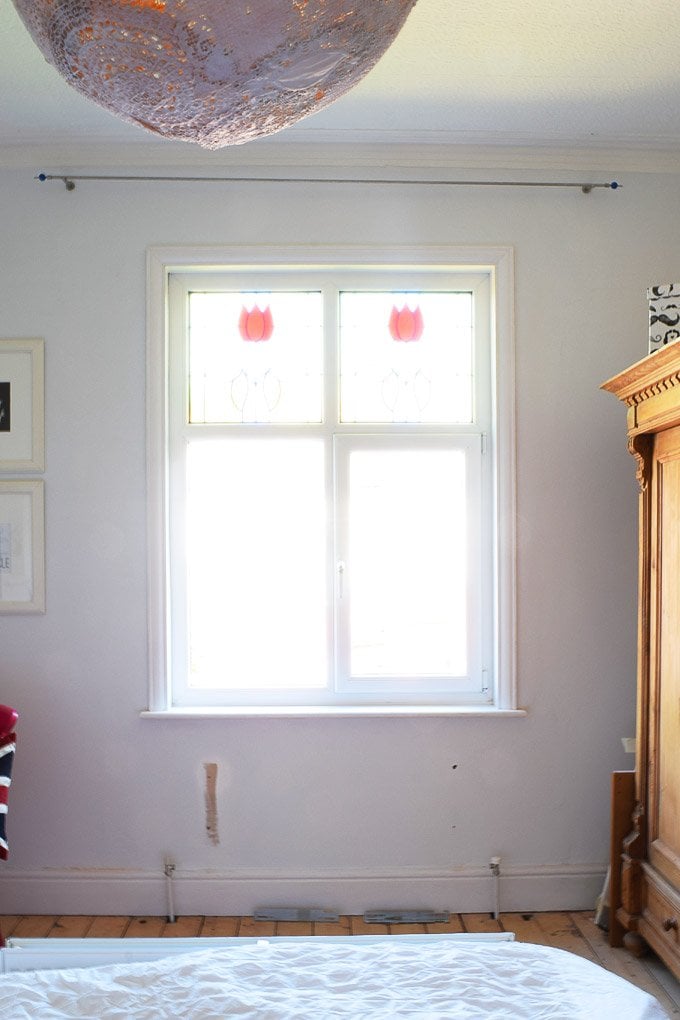
Now, we not only have a new window with some beautiful stained glass, new plaster and a painted wall, we’ve also reinstated the original wooden architrave.

Matching Original Period Moulding

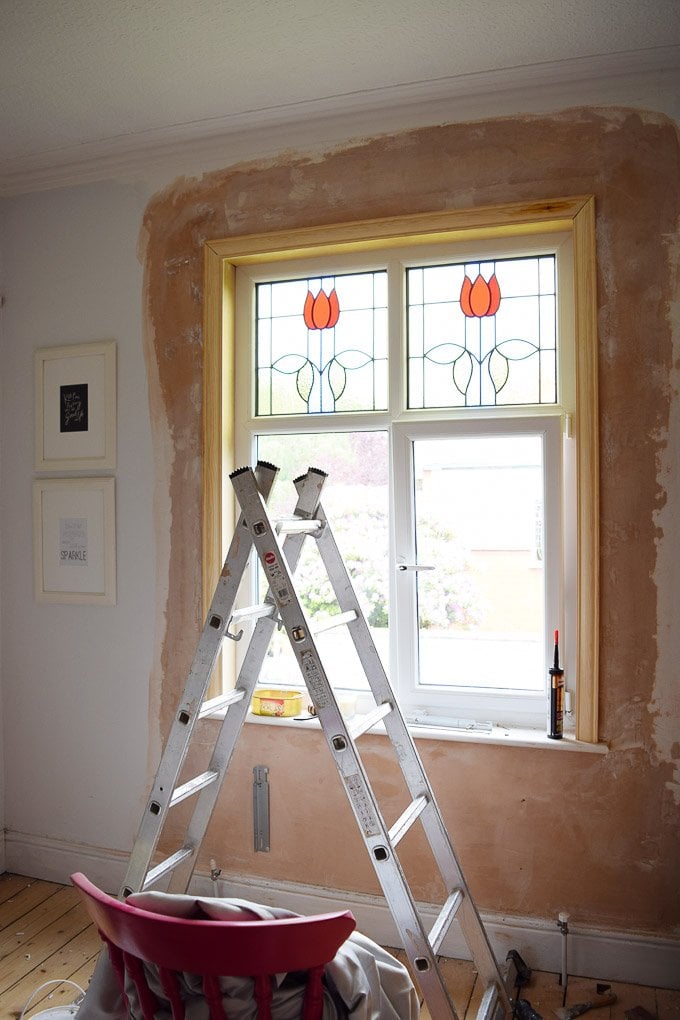
Plastering, painting and fitting a new windowsill was easy, reinstating the architrave was another matter. Yes, actually fitting one was easy (it was just a matter of nailing it into place with our nail gun), but finding one to match the original that would have been there was another matter.

We could find loads of different mouldings, but none of them were even similar to the original architrave that would have been there.

Matching Original Period Moulding

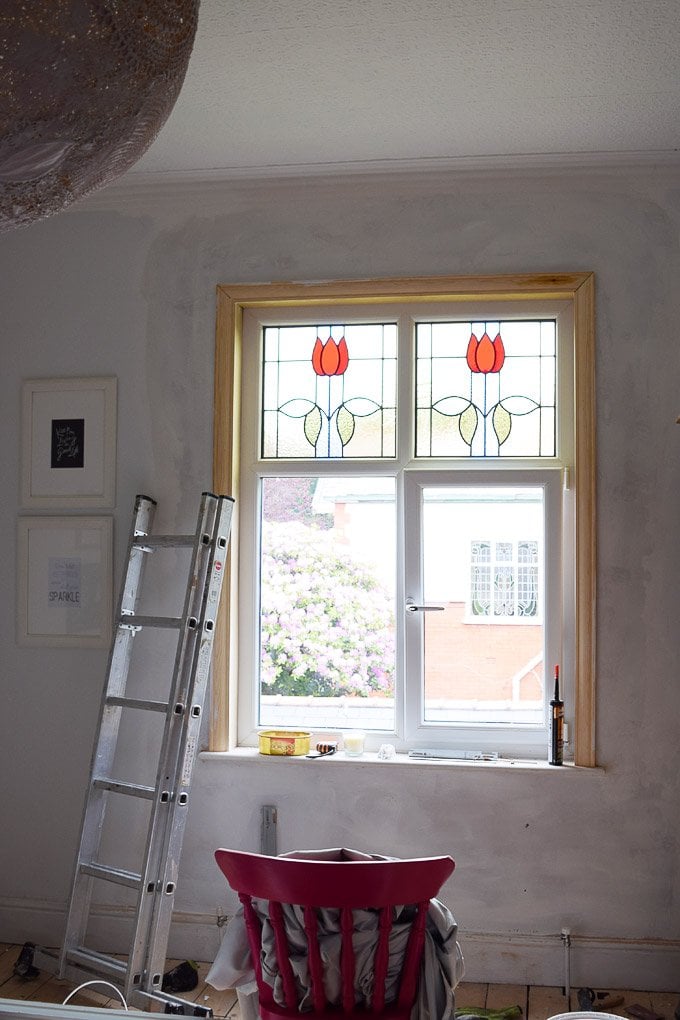
I know that we were being totally picky, but none of the ready-made mouldings would have matched the doorframes (which are a slightly larger version of the architrave around the window) and none of the moulding would have really done the new window justice.

Matching Original Period Moulding

Luckily we found out, that it wasn’t difficult at all to match existing moulding as you can just have it made – so that’s what we did! We took a small sample of the existing architrave that we had to a local joinery, from which they were able to make a template to cut the new architrave. It really couldn’t have been easier.

Matching Original Period Moulding

It’s obviously a more expensive solution than buying standard moulding, but once you’ve had the cutter made (which is a one off charge), the cost of the wood is only similar to what you’d buy in a DIY store. All in all, we think the architrave really finishes the window off and are happy that we went to the effort of having it made.

Do you sometimes go the extra mile to get things “just right”? Are you lucky and still have original period moulding in your home? Do you love period features as much as we do?

  • Facebook
  • Twitter

Christine 7 Comments

the PAST
the FUTURE

Subscribe To Our Newsletter

Sign up with your email address for secret projects, DIY advice & lots of fun!

Privacy Policy

Leave a Reply Cancel reply

Your email address will not be published. Required fields are marked *

This site uses Akismet to reduce spam. Learn how your comment data is processed.

Comments

  1. Tim says

    27/05/2020 at 21:20

    Very good quality plastering. Well done. And thanks for publishing such an interesting blog. Ok, I’ve found it quite late. But better late than never.

    Reply
  2. Cynthia says

    16/02/2016 at 16:10

    Lovely house! We have removed the laminated floors from our Ewardian home and had the floorboards sanded. However, it is so cold! Do you find your home to be cold and drafty due to the wooden floors?

    Reply
    • Christine says

      16/02/2016 at 16:54

      Thank you Cynthia! We’ve insulated under all of our ground floor floors (you can read about it here and here) and also sealed the gap between our skirting and the floor (you can read about it here). It’s definitely something I’d recommend doing. It’s not difficult to do, will save on your heating bills and will keep you nice and warm, too!
      Cx

      Reply
  3. caitlin says

    30/06/2015 at 22:27

    That looks lovely and yes I do think going the extra mile makes a difference. Can’t tell you how bummed I get when I look at local real estate sites that show Victorians that have had all of their period detail removed -it’s horrible! We refer to them an “google houses” as that is what many young, rich, tech bachelors seem to prefer here in SF! :(

    Reply
    • Christine says

      01/07/2015 at 08:23

      Totally agree, it’s so sad when people rip out original details, it’s part of the charm after all. People who prefer a bland box sould buy one of thouse then ;).
      Cx

      Reply
  4. mary says

    24/06/2015 at 22:17

    It looks beautiful.

    Reply
    • Christine says

      25/06/2015 at 09:47

      Thanks Mary!

      Reply
Painting Checklist

Our Favourite Tools

*Contains Affiliate Links*

Things To Know

ABOUT US

CONTACT US

DISCLAIMER

Privacy Policy

Shop Our Home!

OUR FAVOURITE TOOLS

SHOP OUR HOME

Disclaimer

As an Amazon Associate I earn from qualifying purchases.

Please read our full disclaimer here!

Let’s Be Friends!

Keep Up To Date!

Subscribe for exclusive content and tutorials!

Thank you!

Copyright © 2023 · Little House On The Corner · This Website is powered by Cloudways and the Genesis Framework