MENUMENU
  • Home
  • About Us
  • Our Favourite Tools
  • Get In Touch

Little House On The Corner

DIY & Home Improvement

MENUMENU
  • Blog
  • Projects
    • Our Favourite Projects
          • Favourite Projects
          • DIY Slatted Garden Fence | Little House On The Corner
          • DIY Slatted Garden Fence

          • Floorsanding In Progress - 16 Grit Paper | Little House On The Corner
          • What No One Will Tell You About Sanding Your Floors (+ How We Did It!)

          • How To Plan And Install Panelling | Ultimate DIY Guide On How To Install Panelling Yourself | Little House On The Corner
          • How To Plan & Install Panelling

    • Home Improvement & DIY
          • Home Improvement Projects
          • DIY Thin Floating Shelves | Little House On The Corner
          • How To Build Super Thin Floating Shelves

          • DIY Log Store | DIY Guide: How To Build A Log Store | Little House On The Corner
          • How To Build A Log Store

          • HOW TO LAY A PLYWOOD FLOOR

    • Craft & Art
          • Art & Craft Projects
          • DIY Pegboard
          • DIY Pegboard

          • DIY Framed Instagram Photo Display | Little House On The Corner
          • DIY Frames Instagram Photo Display

          • DIY Guess Who Game - Setting Out Board | Little House On The Corner
          • DIY Guess Who Game

    • Painting & Decorating
          • Painting & Decorating Projects
          • What To Do When You've Chosen The Wrong Paint Colour (& How To Fix It!) | Little House On The Corner
          • What to do when you’ve chosen the wrong paint colour (& how to fix it!)

          • Kitchen Makeover | Little House On The Corner
          • How To Paint Laminate Kitchen Cabinets

          • DIY Geometric Painted Walls | Little House On The Corner
          • DIY Geometric Painted Wall

    • Free Printables
          • Free Printables
          • House Cleaning Checklist | Free Printable | Little House On The Corner
          • Cleaning Checklist – Free Printable

          • Halloween Book Covers - F0ree Printable | Little House On The Corner
          • Halloween Book Covers – Free Printable

          • DIY Halloween Treat Boxes | Free Printable | Little House On The Corner
          • Halloween Treat Boxes – Free Printable

    • Furniture Upgrades
          • Furniture Projects
          • DIY Herringbone Desk | Little House On The Corner
          • DIY Herringbone Desk

          • DIY Wooden Bench
          • DIY Wooden Hallway Bench

          • DIY Copper Towel Ladder | Little House On The Corner
          • DIY Copper Ladder

    • Outdoor & Garden
          • Outdoor & Garden
          • DIY Slatted Garden Fence | Little House On The Corner
          • How To Build A Slatted Fence

          • How To Lay A Gravel Driveway

          • DIY Logstore
          • How To Build A Log Store

    • Cleaning & Organizing
          • Cleaning
          • Cleaning Checklist - Free Printable
          • Cleaning Checklist + A Free Printable!

          • Ultimate Guide: How To Clean Brass - Ketchup | Little House On The Corner
          • How To Clean Brass

          • DIY Floating Spice Rack | Little House On The Corner
          • DIY Floating Spice Rack

    • Holidays & Festivities
          • Holidays
          • The best mulled wine! (click through for the recipe)
          • The Best Mulled Wine Recipe Ever!

          • DIY Christmas Napkin Rings - Free Printable | Little House On The Corner
          • DIY Christmas Napkin Rings

          • DIY Dowel Tree Advent Calendar | Little House On The Corner
          • DIY Wooden Dowel Advent Calendar

    • Travel
          • Travel Posts
          • Szechenyi Bridge
          • A Weekend In Budapest

          • Riesenrad im Prater Wien | Little House On The Corner
          • A Long Weekend In Vienna

          • Lake Bled
          • 72 Hours In Ljubljana

  • House Tour
        • Our Edwardian House
        • Our Edwardian House (1st Home)
        • Our Berlin City Centre Apartment
        • Our Berlin City Centre Apartment (2nd Home)
        • Take The Tour | Our Art Nouveau Apartment | Little House On The Corner
        • Our Berlin Art Nouveau Apartment (3rd Home)
        • berlin riverside apartment house tour
        • Our Berlin Riverside Apartment (4th Home)
  • Shop
    • The Little Corner Shop
    • Shop Our First Home
    • Shop Our Current Home

How To Install A Window Sill

  • Facebook
  • Twitter

Having finally had our guest bedroom window replaced a few weeks ago (it now has the stained glass, too), finishing off the rest of the wall around the opening is well overdue.

New Window

We absolutely love our new window, but at the moment the area around the window is still just a mess.

The plan is to add a window sill as well as an architrave like there would have originally been around the window when the house was first built.

We are trying to replace as many missing period features in our home as possible and installing trim around the window is definitely a feature we’re keen to reinstate.

It’s one of the last jobs needed to be able to completely call this room finished, so we’re really excited to get it installed and painted!

How To Install A Window Sill

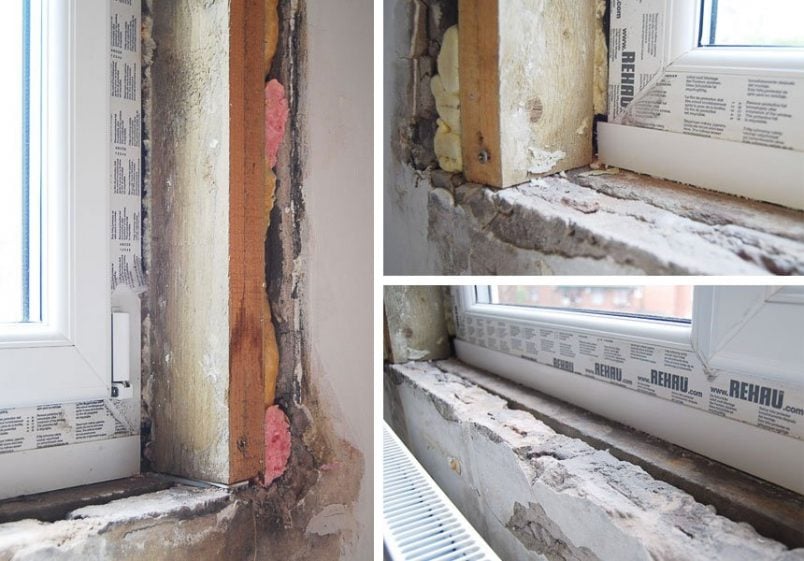
The first step in finishing off the window is to install a new window sill. Obviously, we removed the horrible plastic coverings and windowsill when having the new window installed, but that’s basically just left a mess of dusty, dirty and crumbly plaster and brick.

This is what you will need:

This post contains affiliate links. We only recommend products we love and think that you will, too! Read our full disclaimer here.
  • Window sill – To make our lives easier (and because we don’t own a router) we decided to buy ready made timber window sills. The sill is basically a piece of timber that comes in different widths and already has a rounded edge.
  • Cordless Drill & Drill Bits
  • Jigsaw
  • Wall plugs and screws
  • Liquid Nails
  • Sandpaper
  • Paint (and possibly primer)
  • Caulk
  • Cardboard
  • Scissors & Pencil

This how to install a window sill:

1. Preparations

Clean the area and remove any dirt, rubble and lose bits of plaster.

2. Make a template

We used a few pieces of old cardboard to make a cutting template.

We already decided on the depth of the window sill when we bought it, so really just had to work out where to place the cuts. Using a piece of cardboard as a template makes it easier to work out how and where you have to cut the window sill and minimised the risk of making a mistake on the actual piece of wood.

How To Install A Window Sill

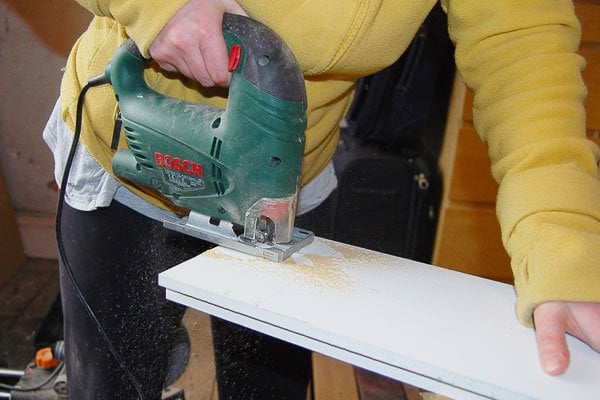
3. Cut your window sill

Using your template, mark the cutting lines on your window sill. Double-check your measurements and then use a jigsaw (or a normal handsaw if you don’t have one) to cut out the necessary corners.

How To Install A Window Sill

Test to see if it fits and trim and sand as necessary.

4. Install the window sill

We used a combination of No Nails adhesive and screws to attach the window sill.

After double-checking that the sill fits and double-checking that it is level (ours wasn’t so we added a few strips of thin wood underneath to even things out) mark your drill locations and prepare a wall plug for the screw.

How To Install A Window Sill

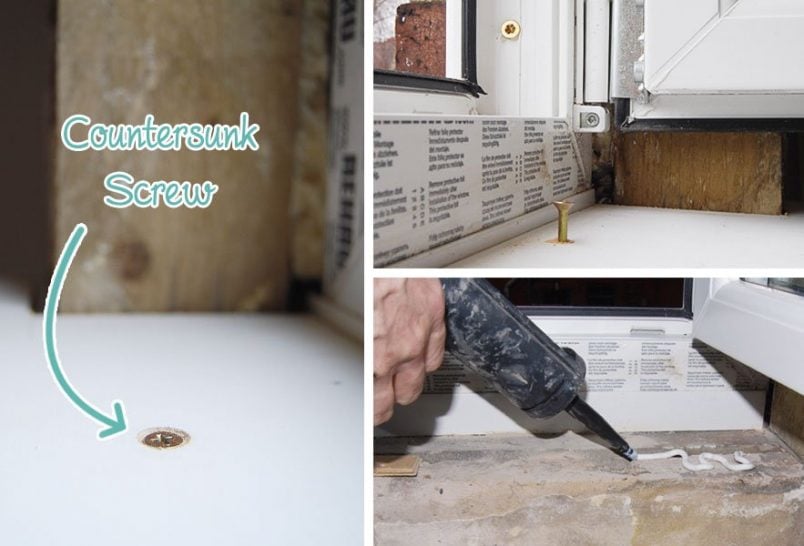
Next, apply some liquid nails and then drill your window sill into place. In our case, our edges aren’t perfect, but it wasn’t too important, as we are having the walls around the window and window sill skimmed, so any gaps will be covered.

5. Finish

After installing the window sill, all that’s left to do is fill the holes, sand, caulk and paint everything. In our case, we’re waiting until the wall is plastered and the architrave is installed, but it’s already a huge improvement.

How To Install A Window Sill

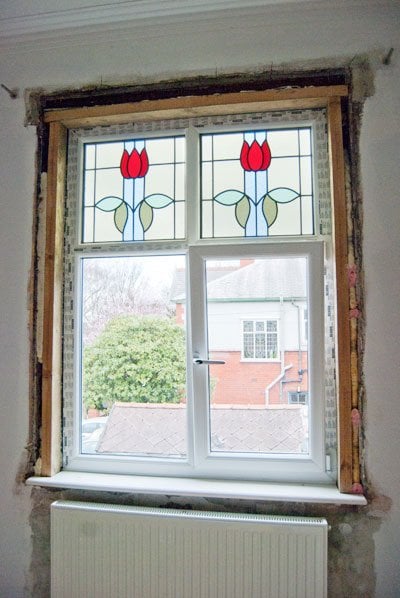
Having a window sill already makes the window feel much more finished and even the room feels more complete than ever before. Now, all we need is for the plasterer to turn up!

Have you ever installed a window sill? Do you also find that it’s sometimes those little finishing touches that make everything come together?

Christine 4 Comments

the PAST
the FUTURE

Subscribe To Our Newsletter

Sign up with your email address for secret projects, DIY advice & lots of fun!

Privacy Policy

Leave a Reply Cancel reply

Your email address will not be published. Required fields are marked *

This site uses Akismet to reduce spam. Learn how your comment data is processed.

Comments

  1. KarenAnita says

    19/03/2014 at 12:17

    Really does frame the window doesn’t it? Feels so odd seeing a window without a sill! Well worth the effort. Once again, your DIY skills amaze me! I’ll just go back to struggling with standard decorating haha xx

    Reply
    • Christine says

      20/03/2014 at 12:36

      I can’t wait to add the architrave – if the window sill already makes such a difference the architrave is definitely going to make an impact!
      Cx

      Reply
  2. Magali@TheLittleWhiteHouse says

    17/03/2014 at 20:27

    A window sill does make a difference. I had mine installed by the carpenter, but I gave specific instructions as I thought they could make the windows more beautiful or uglier! Your stainglass looks lovely.

    Reply
    • Christine says

      17/03/2014 at 22:11

      Thanks, Magali! Having seen the difference the window sill makes, I can’t wait to add the trim – I think it’ll completely finish things off. We’re having it specially made, so it’ll take a while to complete.
      Cx

      Reply
Painting Checklist

Our Favourite Tools

*Contains Affiliate Links*

Things To Know

ABOUT US

CONTACT US

DISCLAIMER

Privacy Policy

Shop Our Home!

OUR FAVOURITE TOOLS

SHOP OUR HOME

Disclaimer

As an Amazon Associate I earn from qualifying purchases.

Please read our full disclaimer here!

Let’s Be Friends!

Keep Up To Date!

Subscribe for exclusive content and tutorials!

Thank you!

Copyright © 2022 · Little House On The Corner · This Website is powered by Cloudways and the Genesis Framework