MENUMENU
  • Home
  • About Us
  • Work With Us
  • Our Favourite Tools

Little House On The Corner

DIY & Home Improvement

MENUMENU
  • Blog
  • Projects
    • Our Favourite Projects
          • DIY Outdoor Daybed with Canopy
          • DIY Outdoor Daybed With Canopy

          • DIY Epoxy Resin Dining Table
          • DIY Epoxy Resin Dining Table

          • 5 Floor Sanding Mistakes And How To Avoid Them | Little House On The Corner
          • What No One Will Tell You About Sanding Your Floors

    • Home Improvement & DIY
          • Hallway with Paean Black Front Door After Editing With Interior Presets for Lightroom by Little House On The Corner
          • How To Create A Home Renovation Budget

          • Floorsanding In Progress
          • What No One Will Tell You About Sanding Your Floors (& How We Did It)

          • How To Plan & Install Panelling | Little House On The Corner
          • How To Plan & Install Panelling

    • Painting & Decorating
          • painted wardrobe in Soumak by paint & paper library
          • How To Paint A Wardrobe

          • Dark Blue and Grey Painted Kitchen Cabinets
          • How To Paint Kitchen Cabinets + Tips For A Professional & Long Lasting Finish

          • What To Do When You've Chosen The Wrong Paint Colour?
          • What To Do When You’ve Chosen The Wrong Paint Colour & How To Fix It!

    • Furniture Upgrades
          • DIY Slatted Radiator Cover
          • DIY Slatted Radiator Cover

          • Beat Floor Lamp and Bar Cart
          • DIY Bar Cart

          • DIY Dining Room Bench | Little House On The Corner
          • DIY Dining Room Bench

    • Outside & Garden
          • DIY Logstore
          • DIY Log Store

          • DIY Slatted Garden Fence | Little House On The Corner
          • DIY Slatted Garden Fence

          • How To Lay A Gravel Driveway
          • How To Lay A Gravel Driveway

    • Free Printables
          • Cleaning Checklist - Free Printable
          • The Best House Cleaning Checklist

          • Free Printable Paper Houses for Advent Calendar
          • DIY Printable Advent Calendar Village

          • The Easy and Free Way To Organise Screws and Nails
          • The Easiest Way To Organise Screws And Nails

    • Craft & Art
          • DIY Pegboard
          • DIY Pegboard

          • DIY Modern Geometric Serving Tray
          • DIY Modern Geometric Serving Tray

          • DIY Guess Who Game - Setting Out Board | Little House On The Corner
          • DIY Guess Who Game

    • Cleaning & Organizing
          • Cleaning Checklist - Free Printable
          • The Only Cleaning Checklist You’ll Ever Need

          • DIY Floating Spice Rack | Little House On The Corner
          • DIY Floating Spice Rack

          • 30 Day Spring Clean Checklist - Little House On The Corner
          • 30 Day Spring Clean Challenge

    • Holidays & Festivities
          • DIY Giant Star and Snowflake Light | Little House On The Corner
          • DIY Giant Star and Snowflake Light

          • Free Halloween Printable Book Covers
          • Halloween Book Covers (Free Printable!)

          • Gingerbread style paper advent calendar village - Little House On The Corner
          • DIY Printable Advent Calendar Village

  • House Tour
        • Our Edwardian House
        • Our Edwardian House (1st Home)
        • Our Berlin City Centre Apartment
        • Our Berlin City Centre Apartment (2nd Home)
        • Take The Tour | Our Art Nouveau Apartment | Little House On The Corner
        • Our Berlin Art Nouveau Apartment (3rd Home)
        • berlin riverside apartment house tour
        • Our Berlin Riverside Apartment (4th Home)
  • Shop
    • The Little Corner Shop
    • Shop Our First Home
    • Shop Our Current Home
    • Our Favourite Amazon Finds

Relight My Fire

  • Facebook
  • Twitter

Our main aim after the first winter in our new house was to make sure that we could warm our home and that we will never be so cold again. We already insulated under our living room floor, which helped keep in some of the heat, but we also decided that the 1950’s style gas fireplace in our living room had to go.
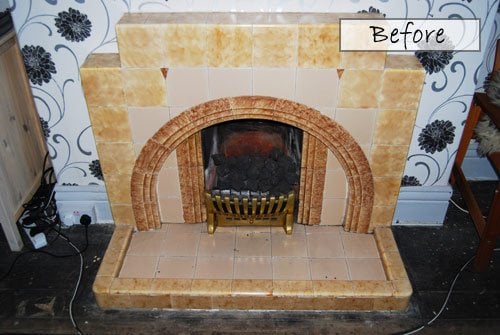
Fireplace Before

Not only did it not go with the style and period of the house, it also wasn’t safe. After much deliberation, we decided to replace it with an original Edwardian fireplace. Because of the quite significant costs involved, we also looked at reproduction fireplaces but these just weren’t as good as the originals.

If you have a new fireplace fitted, you have to use a HETAS registered company (they are the official body that approve solid fuel domestic appliances). Our local fitter also checked the chimney and chimney lining, to make sure that everything was safe and in order for our new fireplace. They also made sure, that everything complies with building regulations and registered our new fireplace with our council.

Our fitters were really friendly and quick. So quick in fact, that the old fireplace had gone before I could even take a picture! You can see our new slate hearth is already in place, too.
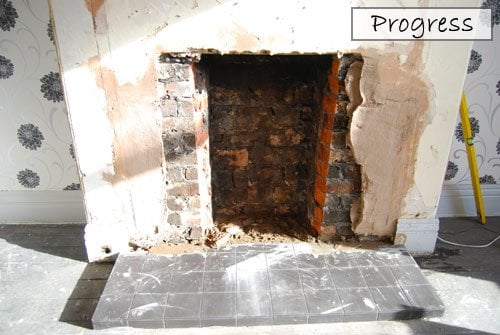
Fireplace Opening

After a few more hours of work, this is what it looked like. We chose the tulip design on the tiles to match the tulips in our new stained glass windows.
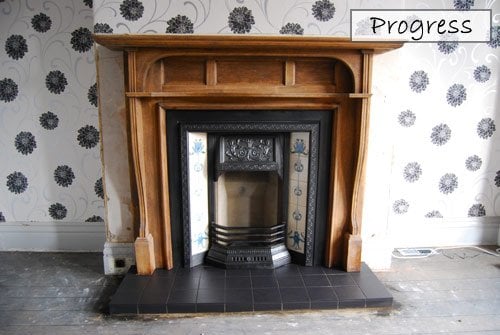
Edwardian Fireplace

As we live in a smoke control area, we are only allowed to burn approved fuels. This means that we can’t burn wood. To start with, we struggled lighting the coals. It takes a while for them to heat up and burn, but when they do, they give off a lot of heat. This is what the fire looked like last winter.
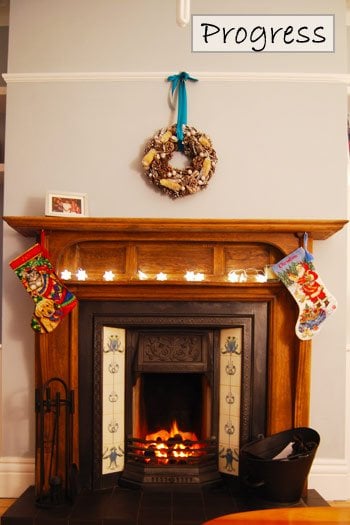
Edwardian Fireplace After

It’s such an improvement. Even if the rest of the house is still really cold in winter, we can at least heat the living room. It still sometimes takes us a few attempts to get the fire going, so if anyone has tips on lighting a coal fire, please share them with us.

*You can check out our complete guide to Restoring, Maintaining and Running a period fireplace here!*

  • Facebook
  • Twitter

Christine 9 Comments

the PAST
the FUTURE

Subscribe To Our Newsletter

Sign up with your email address for secret projects, DIY advice & lots of fun!

Privacy Policy

Leave a Reply Cancel reply

Your email address will not be published. Required fields are marked *

This site uses Akismet to reduce spam. Learn how your comment data is processed.

Comments

  1. Richard Robinson says

    29/06/2021 at 19:56

    Hi Christine,
    Many congratulations for everything you have done. We’ve lived with solid fuel open fires for a few years and here are my tips for hassle-free fire-lighting.
    1. Clean out all the old ashes (beware, they can still be hot from the night before, so best left until afternoon.
    2. Put down a layer of kindling in the centre of the grill (say 6-8 sticks)
    3. Put a fire lighter on top of the kindling
    4. Carefully arrange coals/smokeless ovoids around the firefighter
    5. Light the fire lighter
    6. Add the final coals/ovoids on top of the lit fire lighter without extinguishing the flame.
    7. Be patient! It will take 10 mins for the kindling to catch, and 60 mins before you get real heat from the fire.
    Hope this helps
    R/

    Reply
    • Christine says

      30/06/2021 at 10:54

      Thanks for sharing those tips, Richard! That’s exactly how we used to light the fire after we got the hang of it (we currently don’t have a fireplace). The top-down method works so well, doesn’t it?
      Cx

      Reply
  2. Lindsey says

    05/12/2020 at 04:18

    Hi! Can you please tell me where you purchased the wooden surround? Is it also original or did you buy or build it? I would love one like this. Thanks so much!

    Reply
    • Christine says

      05/12/2020 at 08:04

      It’s an original surround that we bought at The Antique Fireplace Restoration Company. The guys there were really helpful, but I’d also recommend checking out local reclamation shops to find an original one.
      Hope that helps, Lindsey!
      Cx

      Reply
  3. Alison says

    01/11/2013 at 11:22

    Hi both – lovely job you are dong! just a question re. chimney – I am getting conflicting advice from various HETAS engineers I have asked for quotes as to whether or not I need to line the chimney before installing a cast iron fireplace. Some say yes others no. Chimney sweep who checked it for me says its ready to go but now am not sure! did you have this problem?

    Reply
    • Christine says

      01/11/2013 at 12:37

      We had a load of conflicting advice, too. Basically it all depends on the condition of your chimney. If your chimney sweep says it’s okay, it probably is, as he’s not trying to sell you a flue liner. We heard that companies will try to sell you a liner whether you need it or not! Our chimneys were both in a decent condition and our open cast iron fireplace in the living room doesn’t have a liner. Our new wood burner in the dining room on the other hand does, because were advised, that the stove would work more efficiently with a flue liner. I doubt that a liner would effect the efficiency on an open fireplace though.
      If you do decide to go for a flue liner, there are different types available. If you burn coal (as opposed to wood), it burns at a very high temperate and there are flue liners available that are more suited to that.
      As long as you get the necessary HETAS certificate, it probably won’t matter which option you go for.
      Hope that’s some help!
      Cx

      Reply
Painting Checklist

Our Favourite Tools

*Contains Affiliate Links*

Things To Know

ABOUT US

CONTACT US

DISCLAIMER

Privacy Policy

Shop Our Home!

OUR FAVOURITE TOOLS

SHOP OUR HOME

Disclaimer

As an Amazon Associate I earn from qualifying purchases.

Please read our full disclaimer here!

Let’s Be Friends!

Keep Up To Date!

Subscribe for exclusive content and tutorials!

Thank you!

Copyright © 2023 · Little House On The Corner · This Website is powered by Cloudways and the Genesis Framework