MENUMENU
  • Home
  • About Us
  • Work With Us
  • Our Favourite Tools

Little House On The Corner

DIY & Home Improvement

MENUMENU
  • Blog
  • Projects
    • Our Favourite Projects
          • DIY Outdoor Daybed with Canopy
          • DIY Outdoor Daybed With Canopy

          • DIY Epoxy Resin Dining Table
          • DIY Epoxy Resin Dining Table

          • 5 Floor Sanding Mistakes And How To Avoid Them | Little House On The Corner
          • What No One Will Tell You About Sanding Your Floors

    • Home Improvement & DIY
          • Hallway with Paean Black Front Door After Editing With Interior Presets for Lightroom by Little House On The Corner
          • How To Create A Home Renovation Budget

          • Floorsanding In Progress
          • What No One Will Tell You About Sanding Your Floors (& How We Did It)

          • How To Plan & Install Panelling | Little House On The Corner
          • How To Plan & Install Panelling

    • Painting & Decorating
          • painted wardrobe in Soumak by paint & paper library
          • How To Paint A Wardrobe

          • Dark Blue and Grey Painted Kitchen Cabinets
          • How To Paint Kitchen Cabinets + Tips For A Professional & Long Lasting Finish

          • What To Do When You've Chosen The Wrong Paint Colour?
          • What To Do When You’ve Chosen The Wrong Paint Colour & How To Fix It!

    • Furniture Upgrades
          • DIY Slatted Radiator Cover
          • DIY Slatted Radiator Cover

          • Beat Floor Lamp and Bar Cart
          • DIY Bar Cart

          • DIY Dining Room Bench | Little House On The Corner
          • DIY Dining Room Bench

    • Outside & Garden
          • DIY Logstore
          • DIY Log Store

          • DIY Slatted Garden Fence | Little House On The Corner
          • DIY Slatted Garden Fence

          • How To Lay A Gravel Driveway
          • How To Lay A Gravel Driveway

    • Free Printables
          • Cleaning Checklist - Free Printable
          • The Best House Cleaning Checklist

          • Free Printable Paper Houses for Advent Calendar
          • DIY Printable Advent Calendar Village

          • The Easy and Free Way To Organise Screws and Nails
          • The Easiest Way To Organise Screws And Nails

    • Craft & Art
          • DIY Pegboard
          • DIY Pegboard

          • DIY Modern Geometric Serving Tray
          • DIY Modern Geometric Serving Tray

          • DIY Guess Who Game - Setting Out Board | Little House On The Corner
          • DIY Guess Who Game

    • Cleaning & Organizing
          • Cleaning Checklist - Free Printable
          • The Only Cleaning Checklist You’ll Ever Need

          • DIY Floating Spice Rack | Little House On The Corner
          • DIY Floating Spice Rack

          • 30 Day Spring Clean Checklist - Little House On The Corner
          • 30 Day Spring Clean Challenge

    • Holidays & Festivities
          • DIY Giant Star and Snowflake Light | Little House On The Corner
          • DIY Giant Star and Snowflake Light

          • Free Halloween Printable Book Covers
          • Halloween Book Covers (Free Printable!)

          • Gingerbread style paper advent calendar village - Little House On The Corner
          • DIY Printable Advent Calendar Village

  • House Tour
        • Our Edwardian House
        • Our Edwardian House (1st Home)
        • Our Berlin City Centre Apartment
        • Our Berlin City Centre Apartment (2nd Home)
        • Take The Tour | Our Art Nouveau Apartment | Little House On The Corner
        • Our Berlin Art Nouveau Apartment (3rd Home)
        • berlin riverside apartment house tour
        • Our Berlin Riverside Apartment (4th Home)
  • Shop
    • The Little Corner Shop
    • Shop Our First Home
    • Shop Our Current Home
    • Our Favourite Amazon Finds

Bathroom Door Restoration

  • Facebook
  • Twitter

The original Edwardian internal doors throughout the house were boarded up when we moved in.

This is what the bathroom door looked like. If you are thinking it doesn’t look too bad, you would be right.
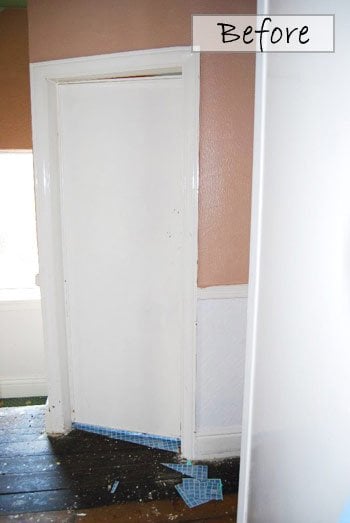
Bathroom Door Before

But after removing the board to show the original panels it looked more like this (It’s the same door, but the picture is taken from inside the bathroom):
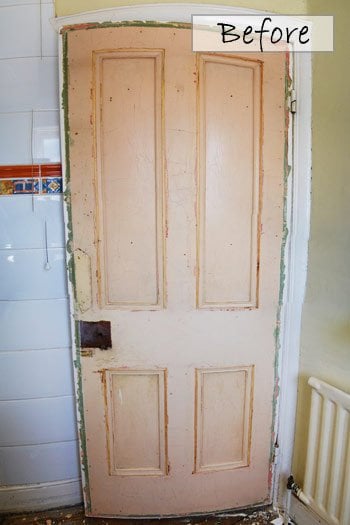
Bathroom Door

And close up it was more like this:

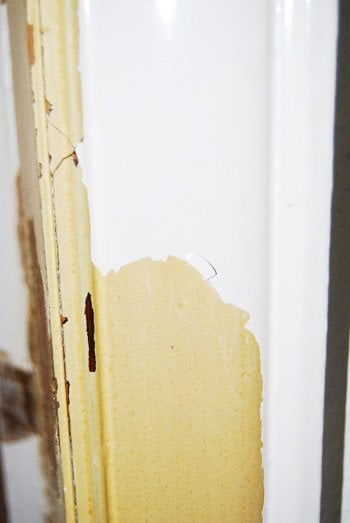
Door Frame Detail

The frame and door were covered in loads of layers of paint which was chipped all over the place. The amount of paint also meant that most of the detail in the wood was lost.

With the help of a heat gun we stripped away the layers back to the original wood. (You have to be careful when stripping old paint, as it can contain lead) It took days to remove all the paint and then still looked quite messy.
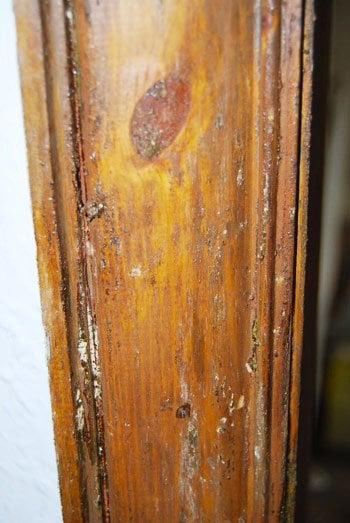
Stripped Door Frame

So after a few more days of sanding, this is what it looked like. Not bad for a 100-year-old door frame.
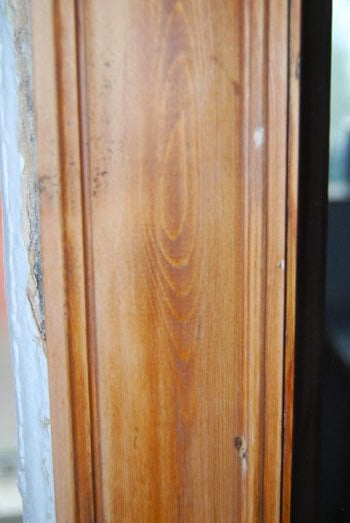
Sanded Door Frame

We striped and sanded the door as well. It seemed to take for ever and in future we will probably have the other doors dipped – it’s still loads of work to just strip the frame!

Then, when all the sanding was done, we got rid of the dust and treated the knots with knotting solution. This is really important, as we obviously missed one of the knots, and it is already turning yellow.

Now for the painting.

We have chosen a white eggshell finish for all the internal woodwork that we are painting. We definitely didn’t want a shiny gloss finish and the eggshell just gives it an ever so slight sheen when the light shines on it. All in all it probably took about 3 full days of work spread out over about 4 weeks to completely finish the door.

In order to get the paint to cover completely we had to apply 3 coats. We also lightly sanded the surface with 240 grit paper between each coat to get a perfectly smooth finish. Last but not least, we attached our new door knob.

And here is the result.
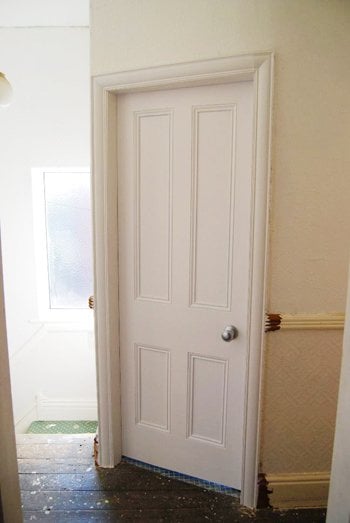
Bathroom Door After

Here are the side by side before and after pictures for you:
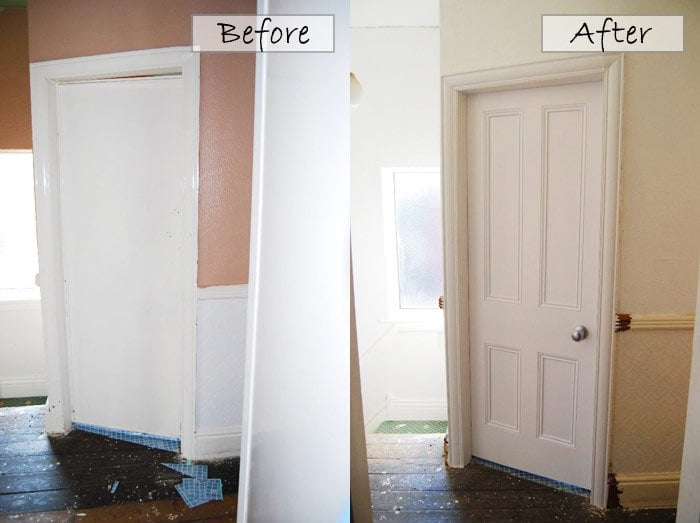
Before and After Door

You can see that there is loads more detail.
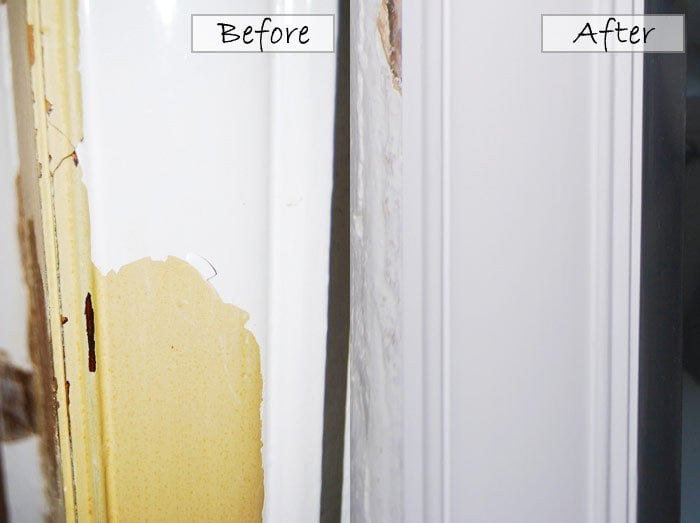
Door Detial Before and After

Although it was loads of work, we think it was worth it. We especially love the detail that is now visible. The door would actually look new if it wasn’t so warped!

  • Facebook
  • Twitter

Christine 12 Comments

the PAST
the FUTURE

Subscribe To Our Newsletter

Sign up with your email address for secret projects, DIY advice & lots of fun!

Privacy Policy

Leave a Reply Cancel reply

Your email address will not be published. Required fields are marked *

This site uses Akismet to reduce spam. Learn how your comment data is processed.

Comments

  1. Ironmongery Experts says

    10/10/2018 at 16:52

    You did a great job, it is also good idea to change hinges and handles to go with the new style

    Reply
    • Christine says

      14/10/2018 at 20:06

      The hinges are the original ones, so we will eventually strip and tidy them.
      Cx

      Reply
  2. Lucy wellings says

    25/04/2016 at 18:03

    Hi, I love your blog! I’m in the same situation at he moment, I’ve stripped my doors. But the sanding just doesn’t seem to be getting much better. I really wanted to leave the wood bare but feel it’s been abused too many times over the years.
    Do you have any tips for sanding the small intricate bits in the alcoving?

    Many thanks
    Lucy

    Reply
    • Christine says

      26/04/2016 at 08:06

      Thank you, Lucy! Sanding can be such an awful job and it’ll often seem like you’re not making any progress. I wish I had some clever tips for sanding the fiddly bits, but it’s just perseverance and the thought of the perfect end result that’ll get you through it.

      The only things that may help are using good quality sandpaper and you could also try wrapping the sandpaper around things like pens or small blocks to get into grooves and curves.

      I know it’s not much help, but sticking with it will give you the best possible result!
      Cx

      Reply
  3. Mandy says

    03/02/2014 at 22:27

    Hi. I just stumbled across your site & it’s fantastic! So inspirational. We have a 1926 semi in Yorkshire, with few original features other than the front door which is similar to yours. We are about to start a complete refurb of our house & I am thrilled to have found your site!! I am looking to replace the awful modern internal doors with four panel doors like yours. Just out of interest, where did you get your door handles from & how did you find the company that had your glass panel from the door & did the stained glass for your new windows?

    Keep up the fantastic work!

    Reply
    • Christine says

      04/02/2014 at 07:55

      So glad you found your way over to us, Mandy & thanks for the compliment! Our internal door handles are Delamain plain knobs in satin with concealed fixings. You’ll find loads of suppliers if you google them!
      Finding the stained glass panel for our front door was just pure luck! I called a few companies for quotes and just happened to stumble across the company that had our panel. Couldn’t believe it!
      Good luck with your renovation!
      Cx

      Reply
  4. None says

    24/01/2014 at 23:06

    Stunning work!!! Out of curiosity, what precautions did you take when dealing with lead paint?

    Reply
    • Christine says

      25/01/2014 at 08:46

      Thanks! Looking back, we probably didn’t take quite enough precautions (we wore masks and ventilated), but we have since been busy stripping more painted surfaces. We’re actually finishing off at the moment and hope to share the results next week!
      Cx

      Reply
  5. Doyounoah says

    13/11/2013 at 13:28

    Wow incredible! What a fab job you’ve both done here :-)

    Reply
    • Christine says

      13/11/2013 at 13:32

      That’s so kind! Thank you!
      Cx

      Reply
Painting Checklist

Our Favourite Tools

*Contains Affiliate Links*

Things To Know

ABOUT US

CONTACT US

DISCLAIMER

Privacy Policy

Shop Our Home!

OUR FAVOURITE TOOLS

SHOP OUR HOME

Disclaimer

As an Amazon Associate I earn from qualifying purchases.

Please read our full disclaimer here!

Let’s Be Friends!

Keep Up To Date!

Subscribe for exclusive content and tutorials!

Thank you!

Copyright © 2023 · Little House On The Corner · This Website is powered by Cloudways and the Genesis Framework