MENUMENU
  • Home
  • About Us
  • Our Favourite Tools
  • Get In Touch

Little House On The Corner

DIY & Home Improvement

MENUMENU
  • Blog
  • Projects
    • Our Favourite Projects
          • Favourite Projects
          • DIY Slatted Garden Fence | Little House On The Corner
          • DIY Slatted Garden Fence

          • Floorsanding In Progress - 16 Grit Paper | Little House On The Corner
          • What No One Will Tell You About Sanding Your Floors (+ How We Did It!)

          • How To Plan And Install Panelling | Ultimate DIY Guide On How To Install Panelling Yourself | Little House On The Corner
          • How To Plan & Install Panelling

    • Home Improvement & DIY
          • Home Improvement Projects
          • DIY Thin Floating Shelves | Little House On The Corner
          • How To Build Super Thin Floating Shelves

          • DIY Log Store | DIY Guide: How To Build A Log Store | Little House On The Corner
          • How To Build A Log Store

          • HOW TO LAY A PLYWOOD FLOOR

    • Craft & Art
          • Art & Craft Projects
          • DIY Pegboard
          • DIY Pegboard

          • DIY Framed Instagram Photo Display | Little House On The Corner
          • DIY Frames Instagram Photo Display

          • DIY Guess Who Game - Setting Out Board | Little House On The Corner
          • DIY Guess Who Game

    • Painting & Decorating
          • Painting & Decorating Projects
          • What To Do When You've Chosen The Wrong Paint Colour (& How To Fix It!) | Little House On The Corner
          • What to do when you’ve chosen the wrong paint colour (& how to fix it!)

          • Kitchen Makeover | Little House On The Corner
          • How To Paint Laminate Kitchen Cabinets

          • DIY Geometric Painted Walls | Little House On The Corner
          • DIY Geometric Painted Wall

    • Free Printables
          • Free Printables
          • House Cleaning Checklist | Free Printable | Little House On The Corner
          • Cleaning Checklist – Free Printable

          • Halloween Book Covers - F0ree Printable | Little House On The Corner
          • Halloween Book Covers – Free Printable

          • DIY Halloween Treat Boxes | Free Printable | Little House On The Corner
          • Halloween Treat Boxes – Free Printable

    • Furniture Upgrades
          • Furniture Projects
          • DIY Herringbone Desk | Little House On The Corner
          • DIY Herringbone Desk

          • DIY Wooden Bench
          • DIY Wooden Hallway Bench

          • DIY Copper Towel Ladder | Little House On The Corner
          • DIY Copper Ladder

    • Outdoor & Garden
          • Outdoor & Garden
          • DIY Slatted Garden Fence | Little House On The Corner
          • How To Build A Slatted Fence

          • How To Lay A Gravel Driveway

          • DIY Logstore
          • How To Build A Log Store

    • Cleaning & Organizing
          • Cleaning
          • Cleaning Checklist - Free Printable
          • Cleaning Checklist + A Free Printable!

          • Ultimate Guide: How To Clean Brass - Ketchup | Little House On The Corner
          • How To Clean Brass

          • DIY Floating Spice Rack | Little House On The Corner
          • DIY Floating Spice Rack

    • Holidays & Festivities
          • Holidays
          • The best mulled wine! (click through for the recipe)
          • The Best Mulled Wine Recipe Ever!

          • DIY Christmas Napkin Rings - Free Printable | Little House On The Corner
          • DIY Christmas Napkin Rings

          • DIY Dowel Tree Advent Calendar | Little House On The Corner
          • DIY Wooden Dowel Advent Calendar

    • Travel
          • Travel Posts
          • Szechenyi Bridge
          • A Weekend In Budapest

          • Riesenrad im Prater Wien | Little House On The Corner
          • A Long Weekend In Vienna

          • Lake Bled
          • 72 Hours In Ljubljana

  • House Tour
        • Our Edwardian House
        • Our Edwardian House (1st Home)
        • Our Berlin City Centre Apartment
        • Our Berlin City Centre Apartment (2nd Home)
        • Take The Tour | Our Art Nouveau Apartment | Little House On The Corner
        • Our Berlin Art Nouveau Apartment (3rd Home)
        • berlin riverside apartment house tour
        • Our Berlin Riverside Apartment (4th Home)
  • Shop
    • The Little Corner Shop
    • Shop Our First Home
    • Shop Our Current Home

How To Refresh Wooden Furniture

  • Facebook
  • Twitter

[Ad – This post is in collaboration with Ryobi.]

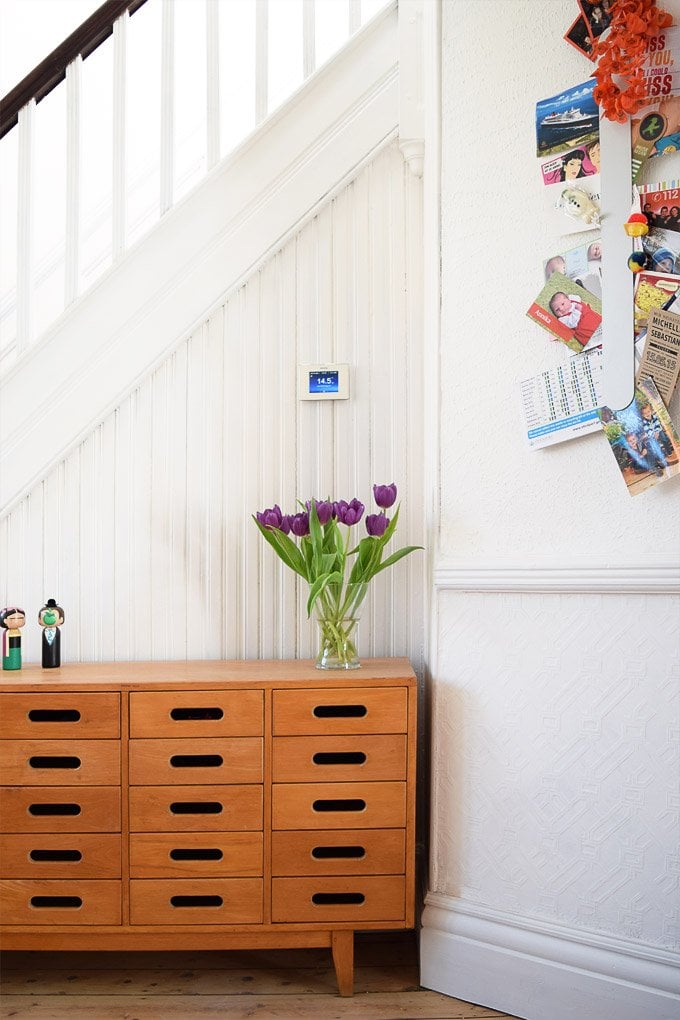
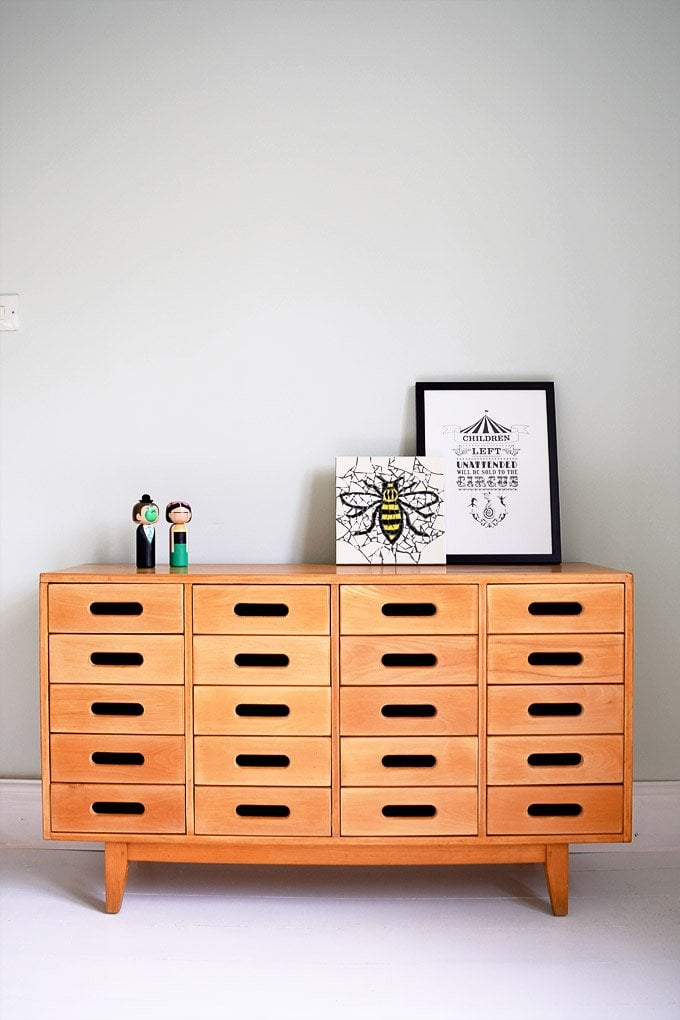
If you follow us on Facebook you will possibly already have seen, that we recently managed to purchase a fantastic new sideboard from one of our local antique centres.

How to restore wood furniture

Unsure what to do with it, we thought we’d ask you guys what you think so we ran a quick survey to see if you think it should be painted or left natural and the results are in!

Survey

You all definitely thought that it should be left in it’s natural state, so that’s exactly what we’ve done!

I know that some of you thought we were completely bonkers to even consider painting the sideboard, but the quick picture I took with my phone didn’t quite show the reality of the situation.

In reality, it a bit too orange, some of the drawers were coming apart, it was dirty, sticky, had scuffs, marks and one rather nasty looking watermark right on the top.

How To Restore Wood Furniture

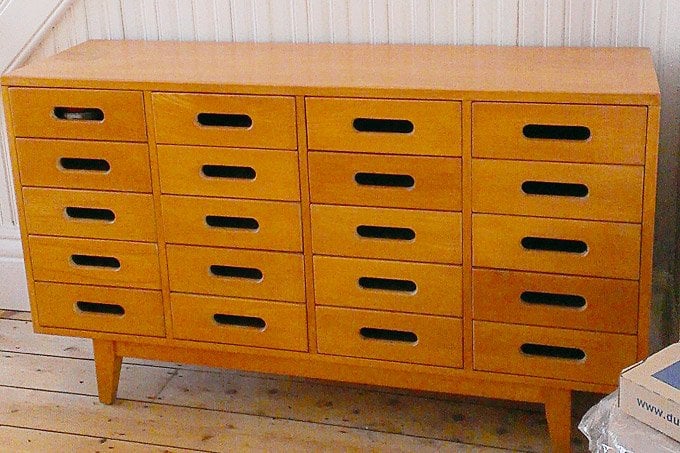
Overall though, it was in good shape and we wouldn’t have bought it if we didn’t think it could be repaired. Luckily it was nothing too major and nothing that a bit of cleaning, sanding and gluing couldn’t solve.

How To Restore Wood Furniture

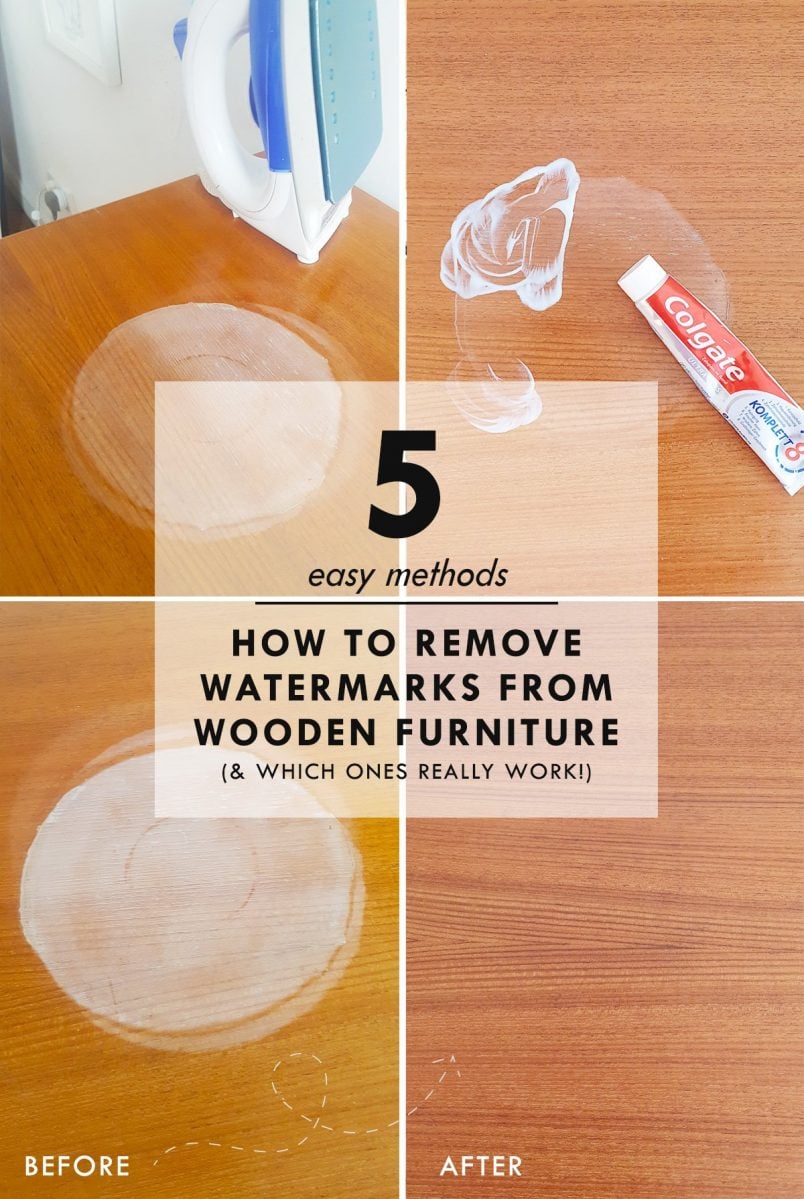
The main issue for me (and one of the reasons that we’d even considered painting the sideboard) was the large watermark on the top. Don’t get me wrong, I’m not expecting an old piece of furniture to look new and signs of use are definitely part of the charm, but a big watermark is not one of the prettiest things.

How To Restore Wood Furniture

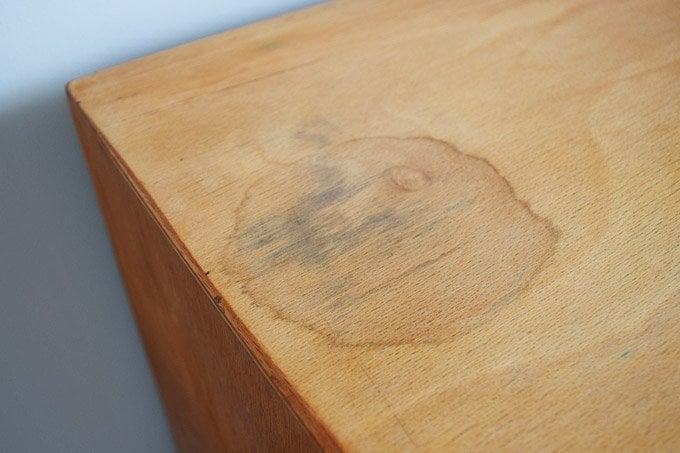
We’ve already tried to remove it, but none of the methods we’ve tried have worked, so for now it’s going to have to stay.

Other than the watermark, it was really easy to give this sideboard a new lease of life. After giving it a thorough clean with some sugar soap to remove all of the dirt and stickiness, it was just a matter of giving the whole sideboard a sand with our new random orbit sander.

It’s the perfect tool to sand surfaces and made it so easy to remove most of the dints, marks and scuffs leaving a perfectly smooth surface ready to wax.

How To Restore Wood Furniture

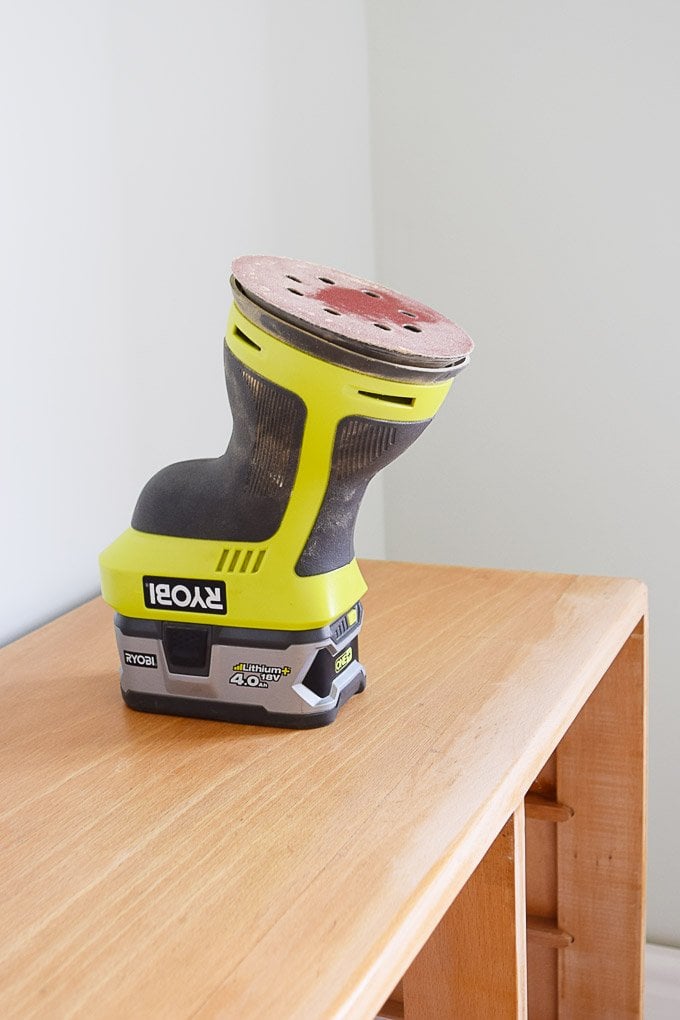
Unlike the solid wooden front of the drawers and the edge of the sideboard, we assume that the top surface isn’t solid, so we were careful not to sand it too much. We also only used quite fine sandpaper (180 grit), which just lightly removed the top layer of the wood.

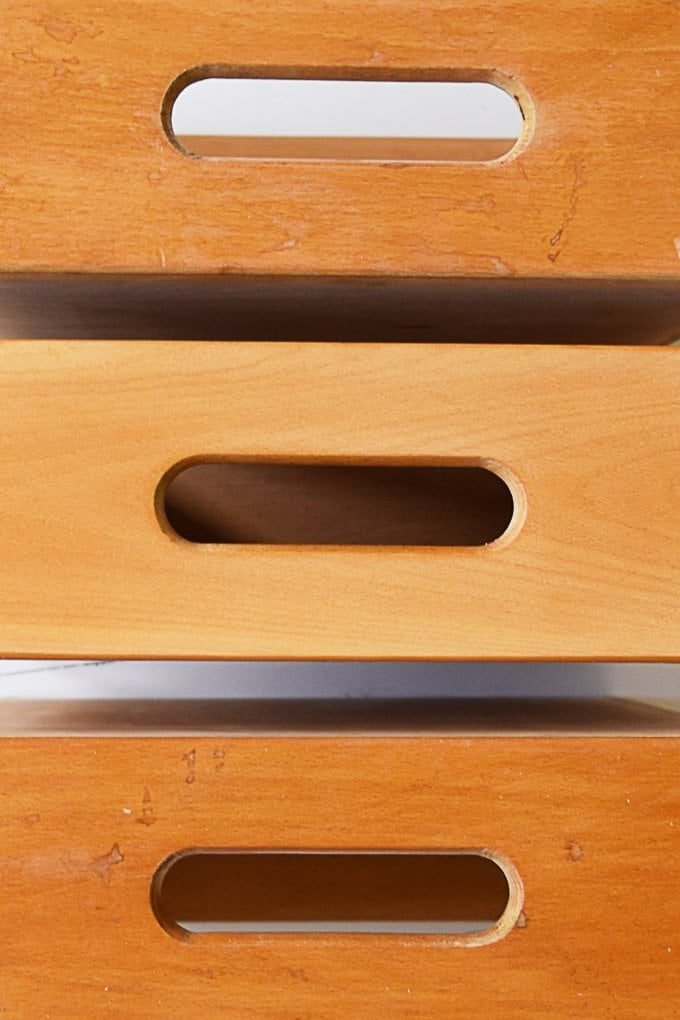
Although we’d already cleaned the drawers before sanding, they were still marked and scuffed quite a bit. After just a few minutes of sanding and a quick wax, the front of drawers look completely different – they even look a shade lighter as you can see on the middle drawer with we’ve already sanded.

How To Restore Wood Furniture

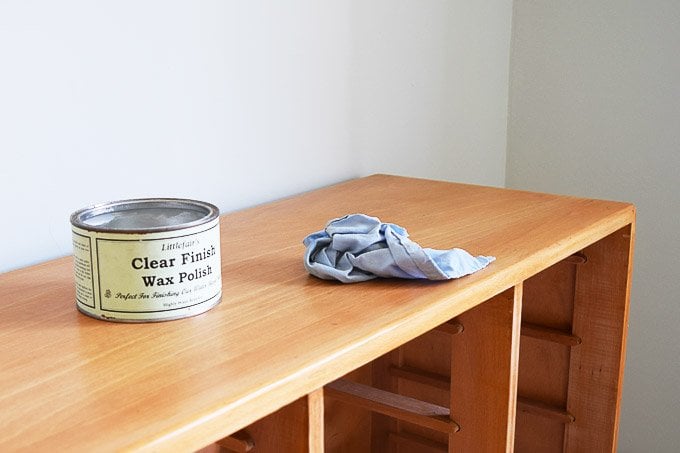
After sanding everything, it’s time to get out the wax. Make sure to remove all of the dust from sanding and then, using a soft cloth (we usually use and old T-shirt) work the wax into the wood and let it dry.

How To Restore Wood Furniture

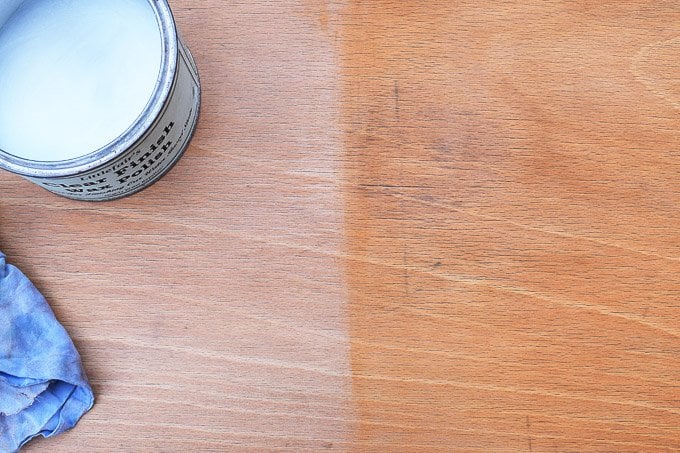
It really changes the colour of the wood and you can almost feel how it’s feeding it. After the wax has dried, use another clean cloth to give it a polish. Just rub the surface (in direction of the grain) until it’s smooth and shiny. At first you’ll almost feel the cloth sticking to the wax, but the more you rub it, the smoother it gets.

How To Restore Wood Furniture

We’re so happy with how it turned out, the finish is much more even and it feels fantastic, too. It’s so smooth and looks so much better than before.

If we’d had to sand it by hand it would have taken such a long time, but thanks to Ryobi and our random orbit sander, it probably only took about half an hour to get the whole sideboard sanded.

How To Refresh Wood Furniture

Have you ever been lucky and found a second-hand piece of furniture you love? Do you love to use power tools as much as we do? Do you have any ideas on how we can remove that ugly watermark from the top of the sideboard?

If you like this post, you’ll love these ones, too!

7 Step Guide How To Paint Wood Furniture
How To Paint Wooden Furniture
Dark Blue and Grey Painted Kitchen Cabinets
How To Paint Laminate Kitchen Cabinets
How To Remove Watermarks From Wooden Furniture - Tried & Tested Methods That Really Work - Little House On The Corner
How To Remove A Watermark From Wooden Furniture
Ultimate Guide: How To Clean Brass - Ketchup | Little House On The Corner
How To Clean Brass

Christine 8 Comments

the PAST
the FUTURE

Subscribe To Our Newsletter

Sign up with your email address for secret projects, DIY advice & lots of fun!

Privacy Policy

Leave a Reply Cancel reply

Your email address will not be published. Required fields are marked *

This site uses Akismet to reduce spam. Learn how your comment data is processed.

Comments

  1. Stacey at Dohiy says

    30/06/2015 at 03:37

    Wood bleach (oxalic acid) might work — but you’d have to sand the top again. It’s gorgeous either way!

    Reply
    • Christine says

      30/06/2015 at 11:09

      I’d read about bleach, but was worried I would make things worse. I guess it’s worth a try if all else fails though!
      Cx

      Reply
      • caitlin says

        30/06/2015 at 22:18

        i second the oxalic acid, this stuff is often used on decks and boats. You should have no problem if you first treat the spot and then do a treatment to the entire top to avoid blotching.

        Reply
        • Christine says

          01/07/2015 at 08:26

          Thanks for the tip Caitlin! I’ll definitely give it a go. Treating the whole surface makes me worry less about ending up with a patch of white instead of the water mark.
          Cx

          Reply
  2. Ellen says

    29/06/2015 at 19:31

    Gorgeous! Great find! Did you try the mayonnaise trick for the watermark?

    http://www.centsationalgirl.com/2009/03/diy-salvaged-dresser/

    Reply
    • Christine says

      29/06/2015 at 21:57

      Thanks Ellen! No, we didn’t try mayonnaise – will definitely give it a go though. Thanks for the tip!
      Cx

      Reply
  3. Louise says

    29/06/2015 at 10:34

    Looks really lovely! I was thinking about the water stain, if it did not go out maybe a piece of thin white composite on top, or put a colored darker wax on the frame? It would be a different look.

    Reply
    • Christine says

      29/06/2015 at 11:06

      Thanks Louise! We’re still unsure what to do about the stain – which is why we’d considered painting it in the first place. I do like the idea of a darked wax though!
      Cx

      Reply
Painting Checklist

Our Favourite Tools

*Contains Affiliate Links*

Things To Know

ABOUT US

CONTACT US

DISCLAIMER

Privacy Policy

Shop Our Home!

OUR FAVOURITE TOOLS

SHOP OUR HOME

Disclaimer

As an Amazon Associate I earn from qualifying purchases.

Please read our full disclaimer here!

Let’s Be Friends!

Keep Up To Date!

Subscribe for exclusive content and tutorials!

Thank you!

Copyright © 2022 · Little House On The Corner · This Website is powered by Cloudways and the Genesis Framework