Since knocking down the wall separating our kitchen and dining room, along with removing the horribly stained carpet and sanding the floorboards, we’ve been spending much more time in the new kitchen-diner enjoying the larger open-plan space.
There is still one big problem that needs sorting – our heating or rather non-existent heating! With winter just around the corner and no heating in the room (the only radiator was on the kitchen wall that we removed), we’ve made one huge step towards keeping warm when the temperatures drop and have installed a wood-burning stove!
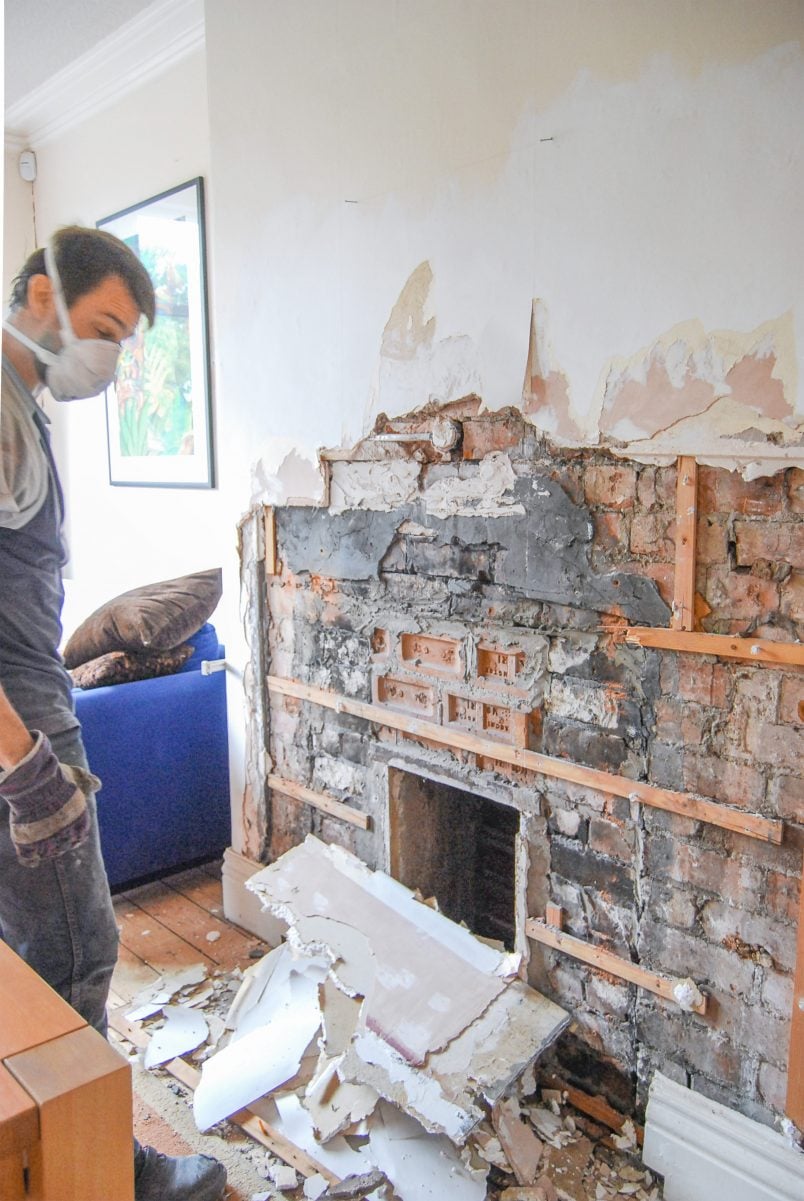
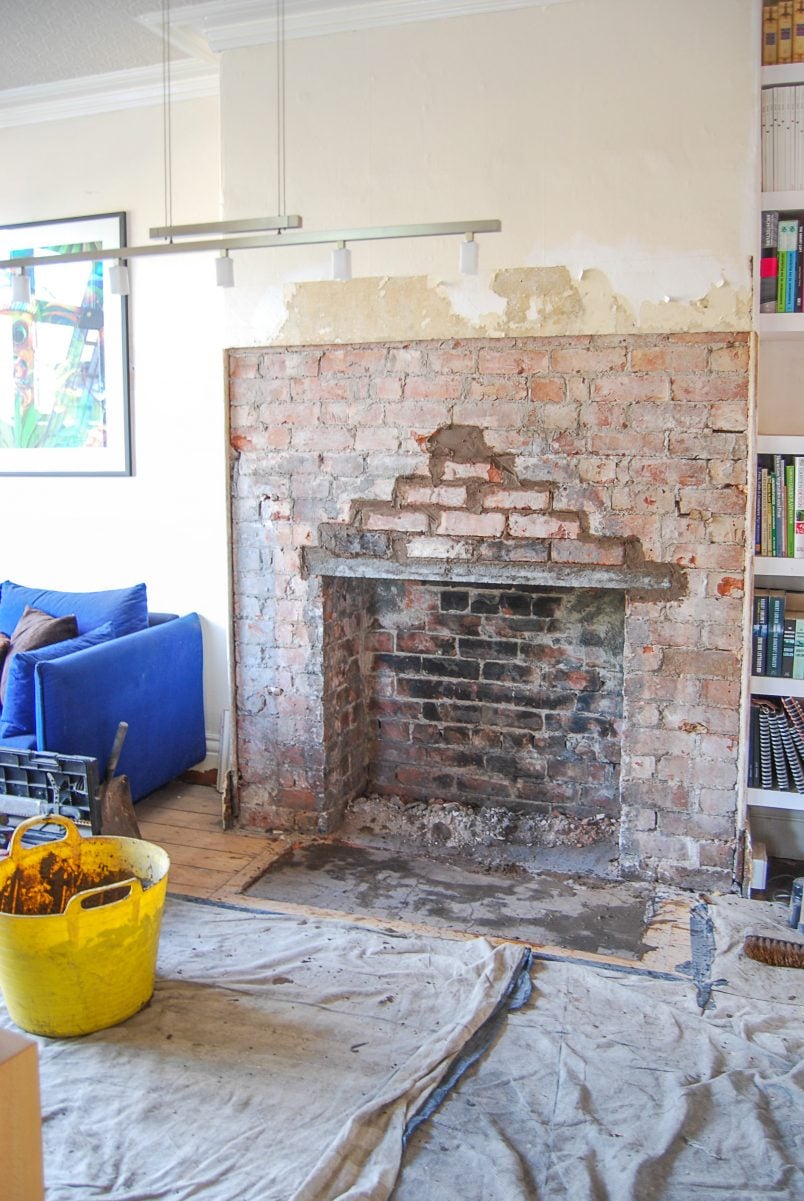
But, before we show you our gorgeous new log burner here’s what the ugly, useless, and unsafe gas fire that was in the dining room looked like before installing our new log burner.
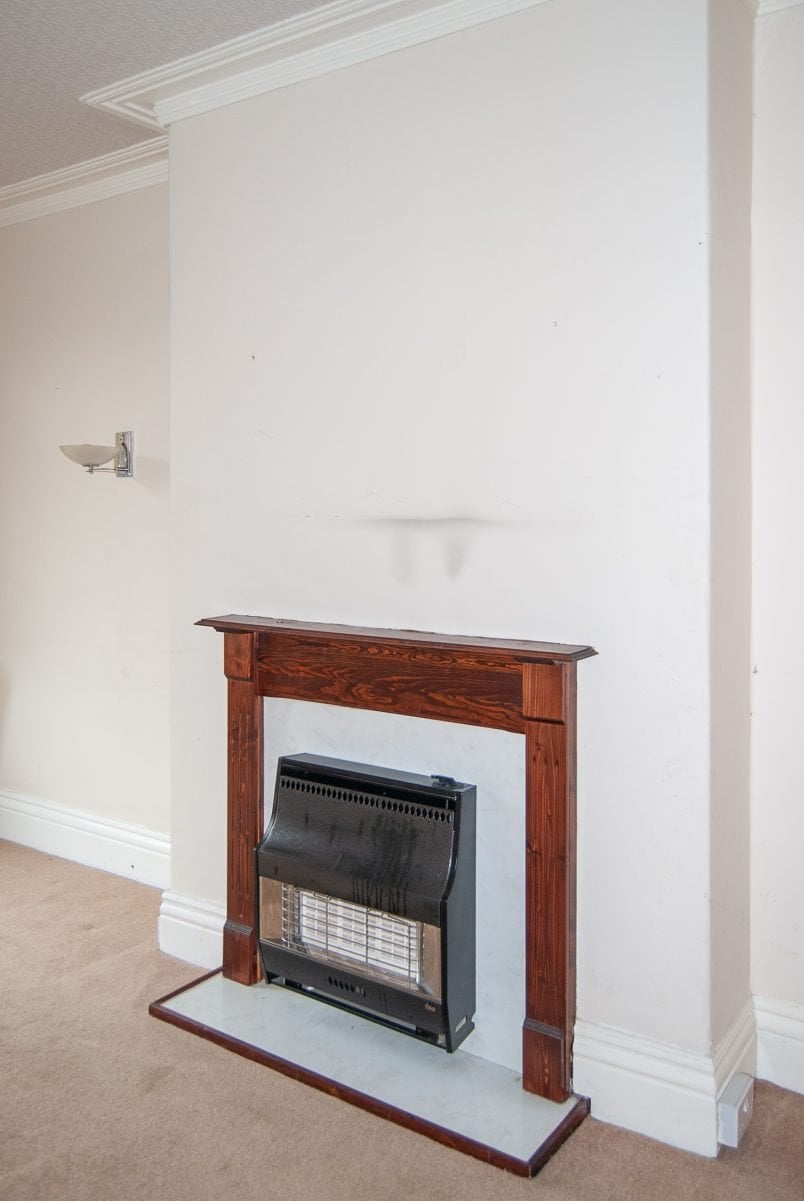
It’s not exactly a thing of beauty, is it?
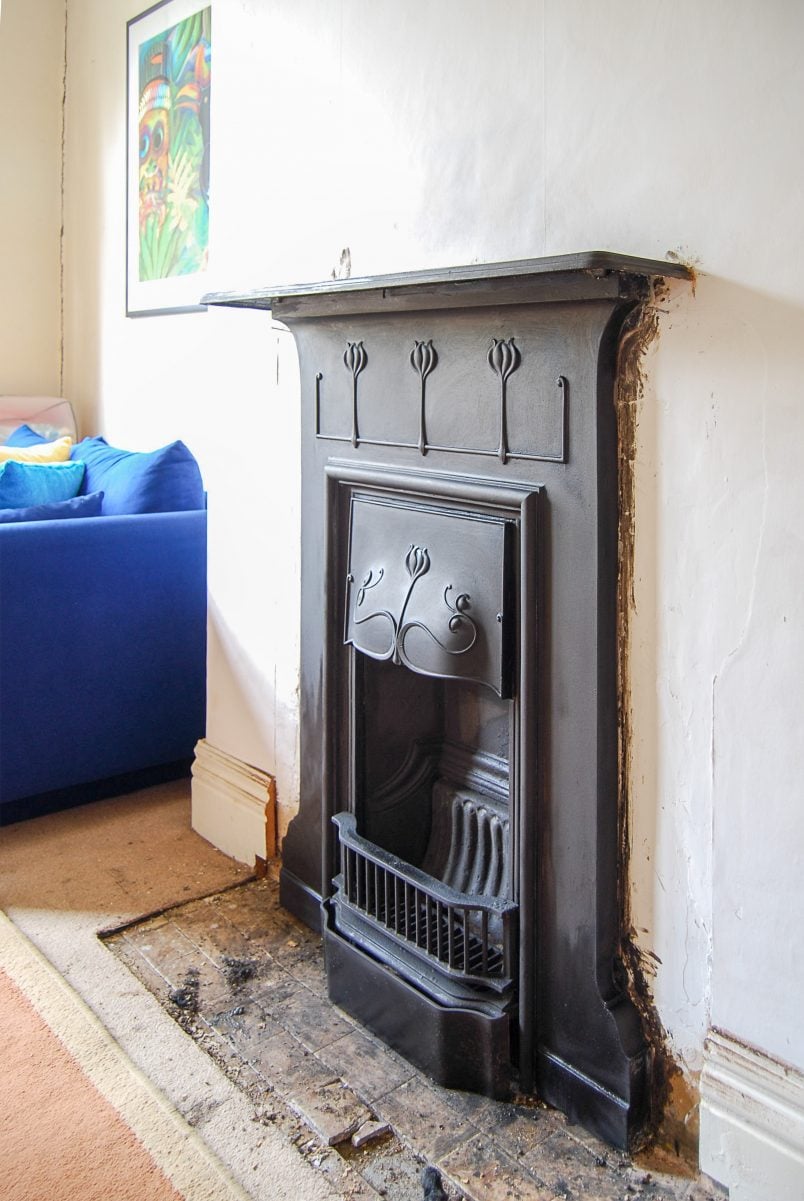
For safety reasons, we had the gas connection capped pretty much straight after moving in and removed the redundant fireplace before covering the hole with a temporarily Edwardian fireplace that we’ve now moved to our guest bedroom.
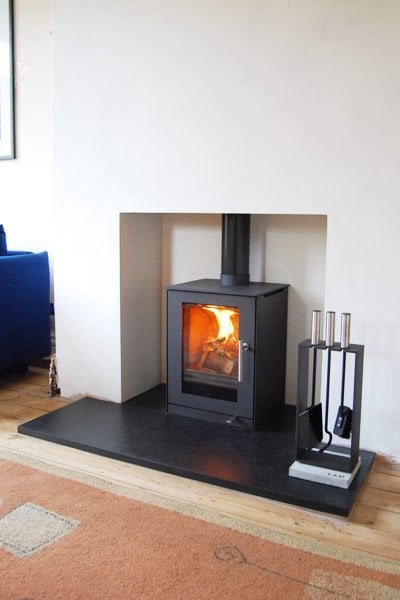
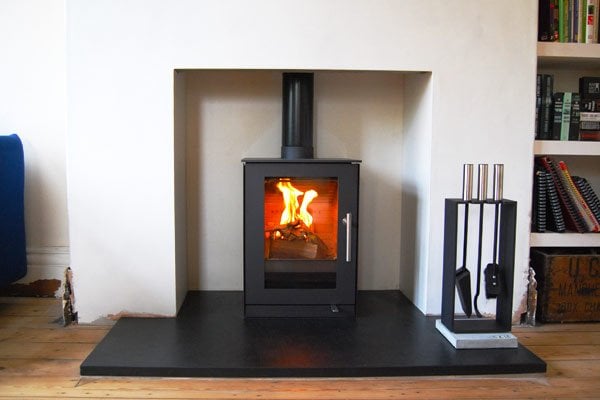
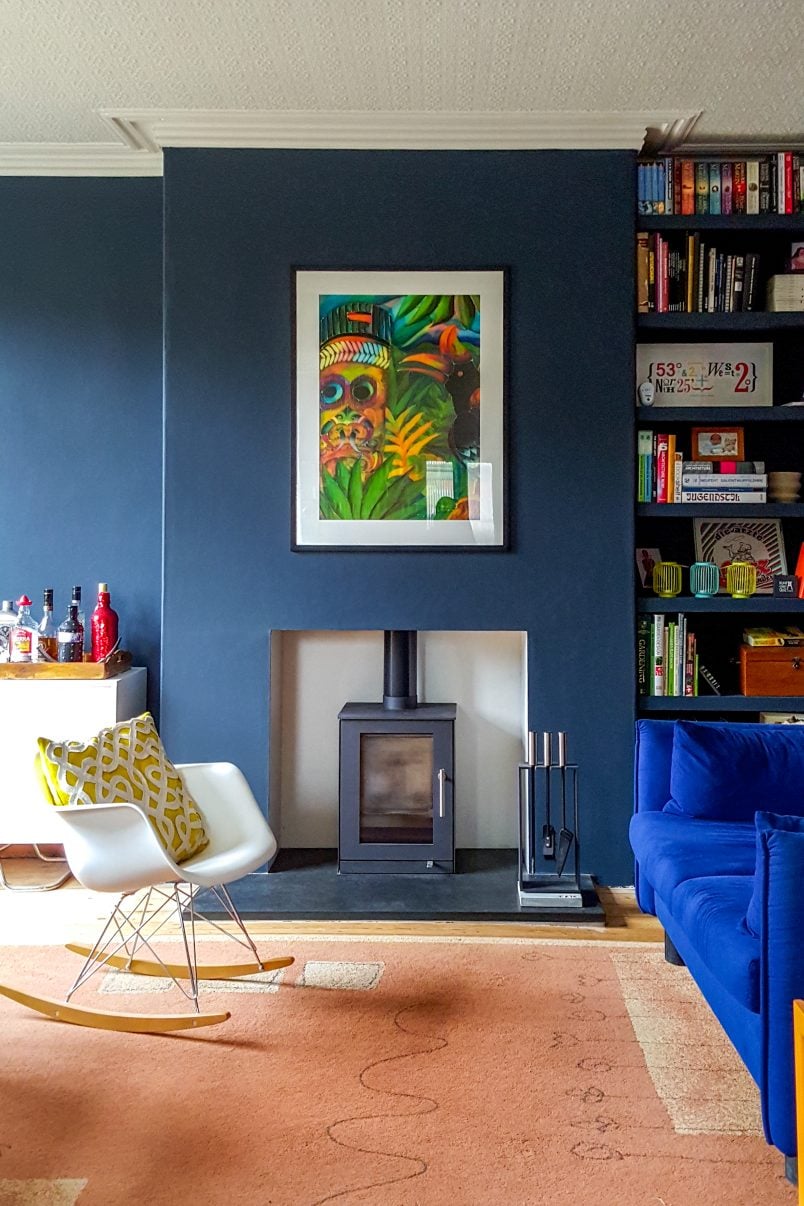
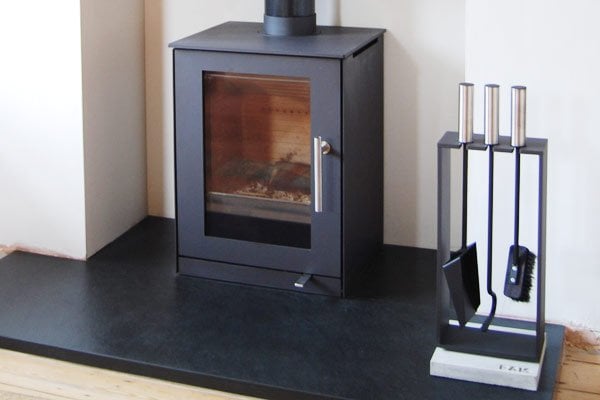
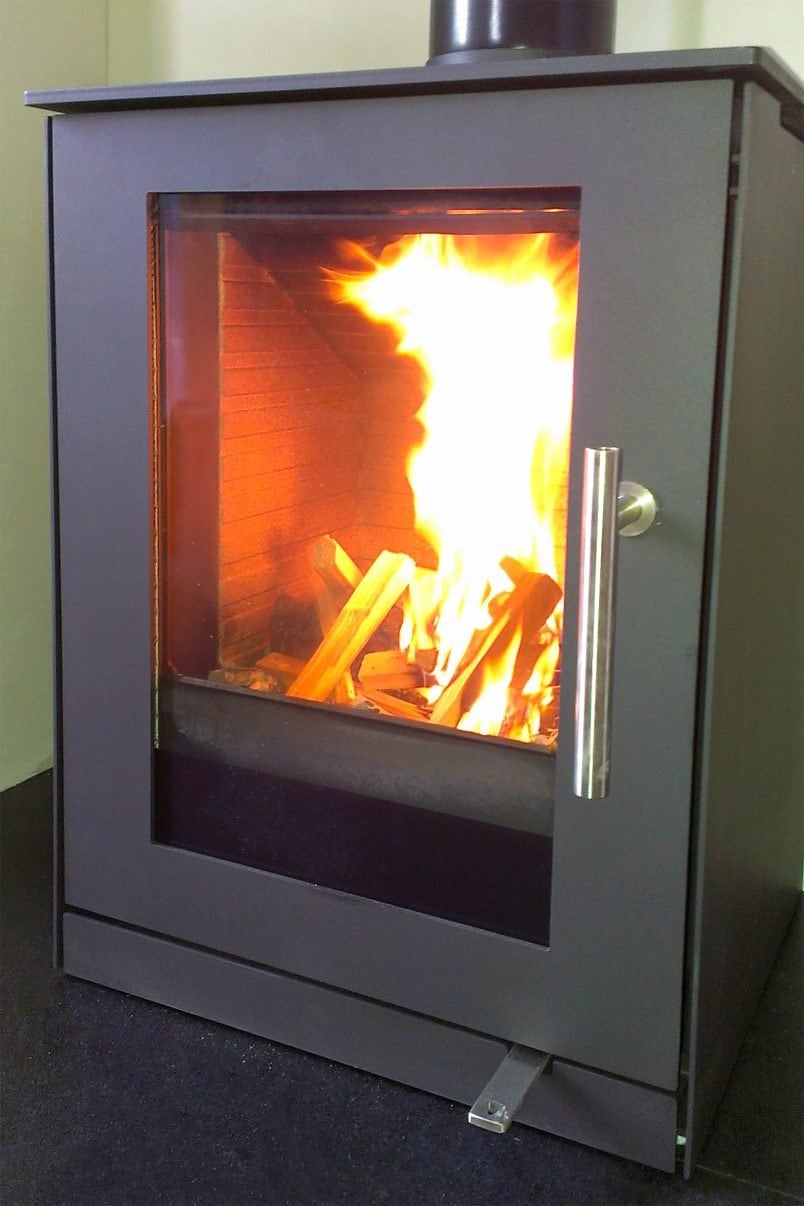
Now though, we have a gorgeous new wood-burning stove that’s not only amazing to look at but it’s super efficient at heating the whole room, too!
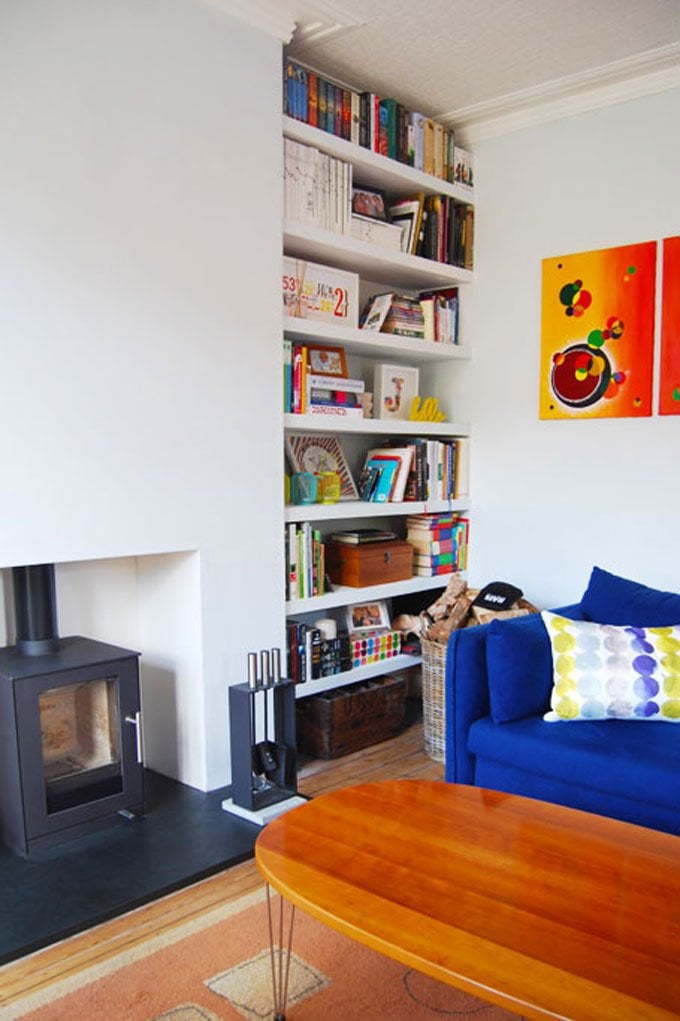
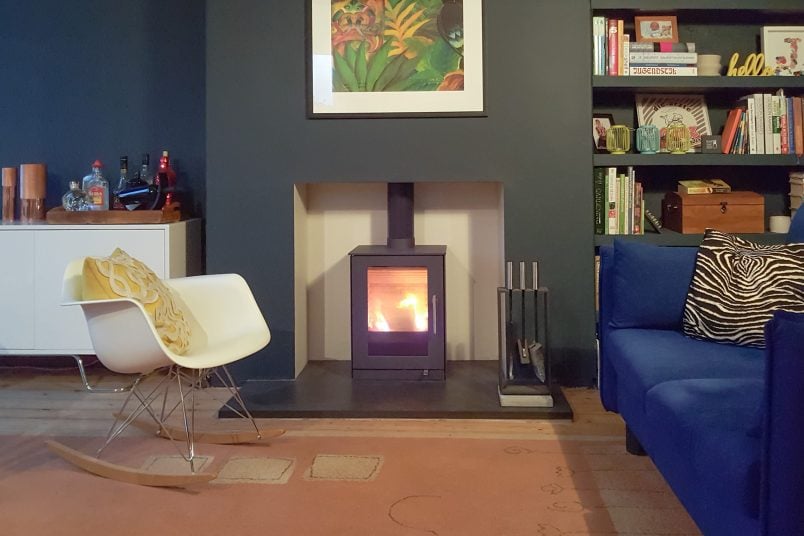
We absolutely love our new wood burner – it’s a Rais Q-Tee in case you’re wondering – but not one of the cheapest home improvements you can do so we’re sharing what you should know when having a wood-burning stove installed along with some practical and money-saving tips to get the best possible result in your home.
Here’s everything you need to know about having a log burner installed:
1. Start By Having Your Chimney Checked
Before you can even start shopping for a log burner, you’ll need to check if installing one in your home is even feasible.
Your chimney has to be in a good condition and you will have to adhere to a lot of building regulations like having a hearth that’s a certain size and thickness, distances between the log burner and the back and sides of the walls along with a few other considerations like the materials you have to use ventilation, you’ll need a carbon monoxide detector and will have to have your chimney swept regularly.
What you need to do:
If your chimney hasn’t been used for a long time, have it inspected by a registered chimney sweep and have a smoke test carried out. A smoke test will identify any faults which could cause fumes to escape through gaps in the masonry joints or connections in the flue pipes when using your wood-burning stove.
If your chimney leaks smoke, you’ll have to have some repairs carried out and/or your chimney lined.
Flue liners are basically flexible tubes that, at one end, connect to your stove and run the entire length of your chimney and at the other end, exit to the top of your chimney and transport the fumes outside. They are available in different sizes depending on the type of wood burner you are installing.
Our chimney was in an okay condition, but we still opted to have a chimney liner installed as it’s something that will improve the efficiency of your stove, will help keep your chimney clean and will reduce the risk of a chimney fire.
2. How To Choose A Wood Burning Stove
Once you know what you need to do to get your chimney ready for your new log burner, you can start to prepare it for the installation and, of course, start shopping for your new log burner!
What you need to know when choosing your wood burning stove:
It’s so easy to get carried away when shopping for your log burner as there are countless amazing ones to choose from. They come in all shapes, sizes and styles from super traditional to minimalist and modern.
It took us ages to decide on the actual stove and, after much consideration, we opted for this sleek Scandinavian stove which we bought at a local wood-burning store.

Along with the design of your stove, there are a few other important aspects to take into account.
Do you live in a smoke control area?
If you live in a smoke control area (most cities in the UK fall into that category) you’ll legally only be able to have a wood burner installed that’s DEFRA approved.
These approved stoves have controlled emission levels and will provide a minimum level of combustion so that the wood burns efficiently.
What heat output do you need?
There are online calculators that will help you work out what kind of heat output your stove will need. It’s important to remember that any stoves with an output over 5kW will require additional ventilation.
You’ll need a carbon monoxide detector
It’s a legal requirement to have a carbon monoxide alarm fitted in the same room as your log burner. If any fumes and gases reach dangerous levels, the alarm will go off and warn you about any problems.
It’s always important to be safe!
You’ll have to ensure adequate ventilation
Something that a lot of people don’t realise when installing a fireplace or log burner in the UK is that you’ll need adequate ventilation. This is so that the stove has enough air for the fuel to burn completely and for the chimney to operate correctly.
If your stove is over a certain wattage (currently more than 5kW), you’ll have to have a vent fitted which can cause draughts.
Something else you have to take into consideration if you’re installing a wood burner in an open plan kitchen dining room are extractor fans which create negative pressure that can cause the gasses and smoke from your wood-burning stove to be pulled back into the room.
It is possible to have the two in the same room but there are a couple of additional requirements for this set up. Some wood burning stoves have outside air ducts or you could install additional air vents. It’s definitely worth discussing your requirements with your HETAS installer as they’ll be able to give you advice to suit your home and needs.
What kind of hearth do you want and need?
Generally, the hearth has to have a depth of at least 500mm in front of and a minimum of 150mm on either side of the stove.
To comply with current building regulations it also has to be non-combustible and thick enough (at least 12mm) so that you can’t accidentally push furniture (or anything else) over the edge and too close to the wood burner.
There are also other distances to take into account like the distance of your stove and flue to any combustible materials and walls.
For more detail, all of the distances, sizes, rules and regulations are covered in Part J of the building regulations and it’s important to take all of these measurements into consideration as they will impact the type of stove you can install.
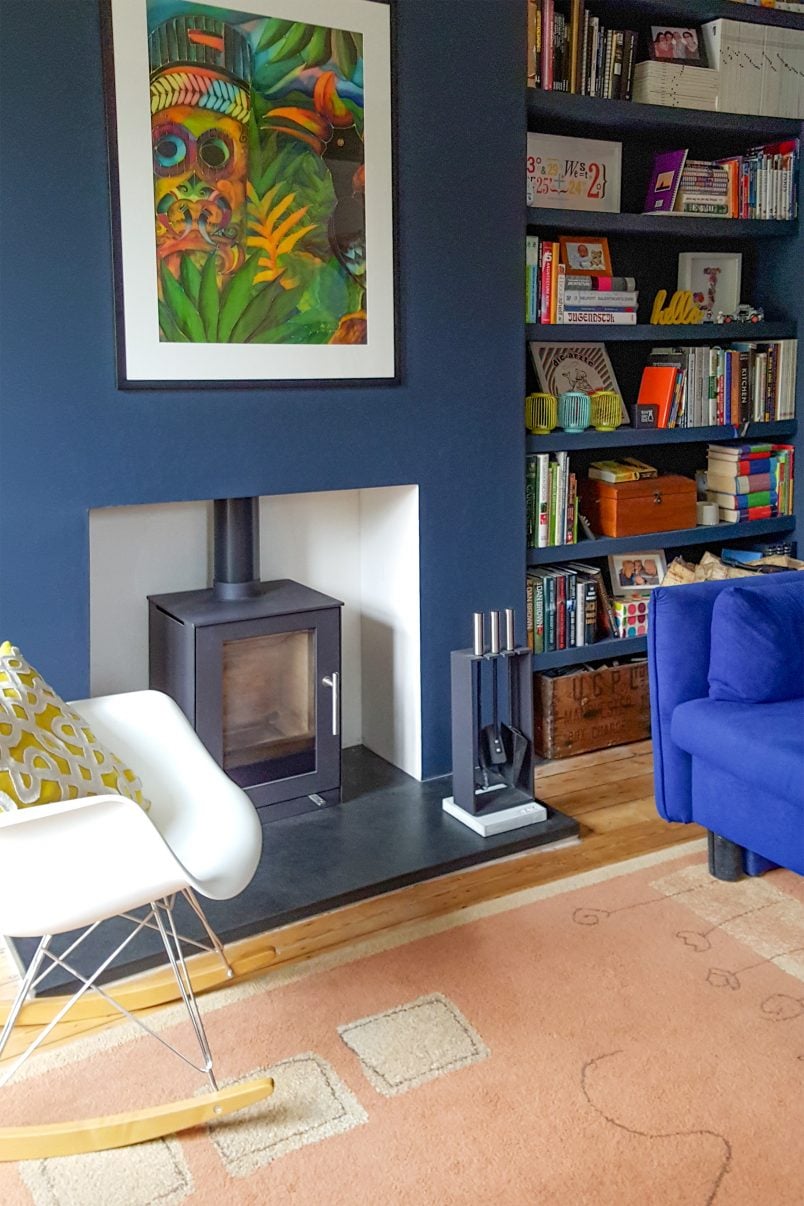
We opted for a gorgeous slate hearth without seams in the dining room. It looks really sleek any modern and matches the style of our log burner perfectly.
Another great and slightly more affordable solution would be to have the hearth tiled which is what we did in the living room. There’s an almost endless choice of tiles and stone to choose from, just make sure that you choose something that’s hard-wearing and easy to keep clean.
You (probably) don’t need planning permission
Unless you live in a listed building or conservation area, you don’t need planning permission to install a wood burner. It’s always a good idea to check with your local council to see what the rules and regulations you need to adhere to in your area, though.
You will always need a certificate of compliance that the work carried out complies with building regulations, though.
Complying with Building Regulations is essential!
Whilst you could install your stove yourself, you will need to adhere to building regulations and you will have to have your new stove inspected to get building regulations approval.
This inspection can easily cost around £300 which is why it’s generally more cost efficient to have your stove installed by a HETAS approved installer who will ensure your stove complies with regulations, notify your council of the building work and will issue the necessary certificate of compliance for you.
If you don’t have the official paperwork to prove that your stove has been installed correctly, you could even invalidate your home insurance!
Don’t forget that building regulations are constantly changing so it’s important to check what regulations you have to adhere to when installing a log burner. Don’t worry too much, though – if you use a HETAS registered installer, they will be able to advise you on what you need to do!
3. Start The Preparations
We were still in the process of working out how to solve our whole heating issues and weighing up the pros and cons of having a log burner installed when I came home one day to find Jan taking the chimney apart! At least it made our decision to go ahead with the project easy!
We’re always conscious of how much things cost and there’s no getting around the fact that having a log burner installed is expensive.
As usual, we try to do as much work as possible ourselves to save money. When getting quotes for the job we discussed the possibility of doing some of the dirty preparation work ourselves. Luckily the contractors were all more than happy for us to prepare the opening, which not only saved us around £250 but also allowed me to use our hammer drill properly for the first time.
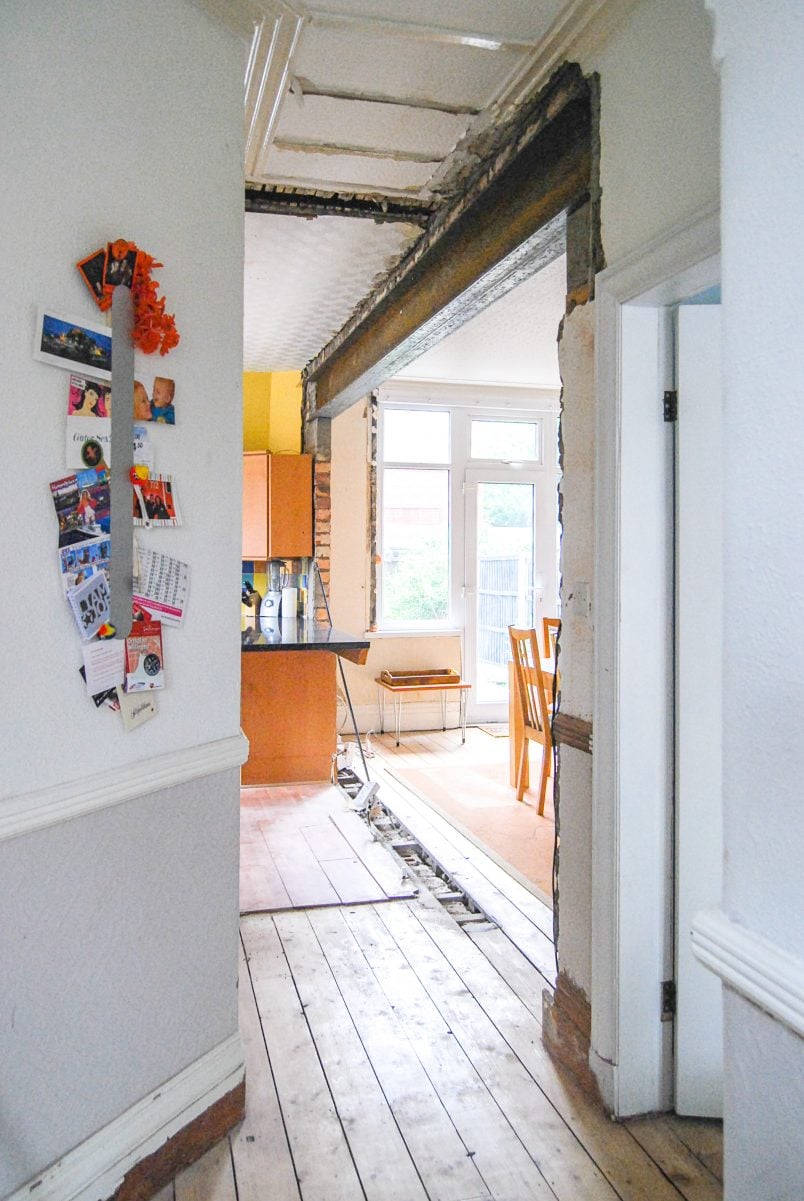
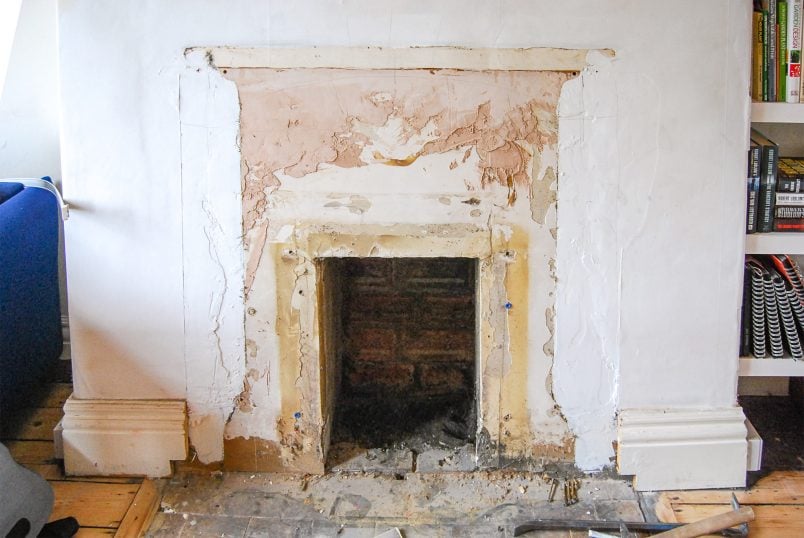
We removed all of the additional brickwork that had been installed around the old gas fireplace and wanted to open up the chimney breast back to the original Edwardian opening.
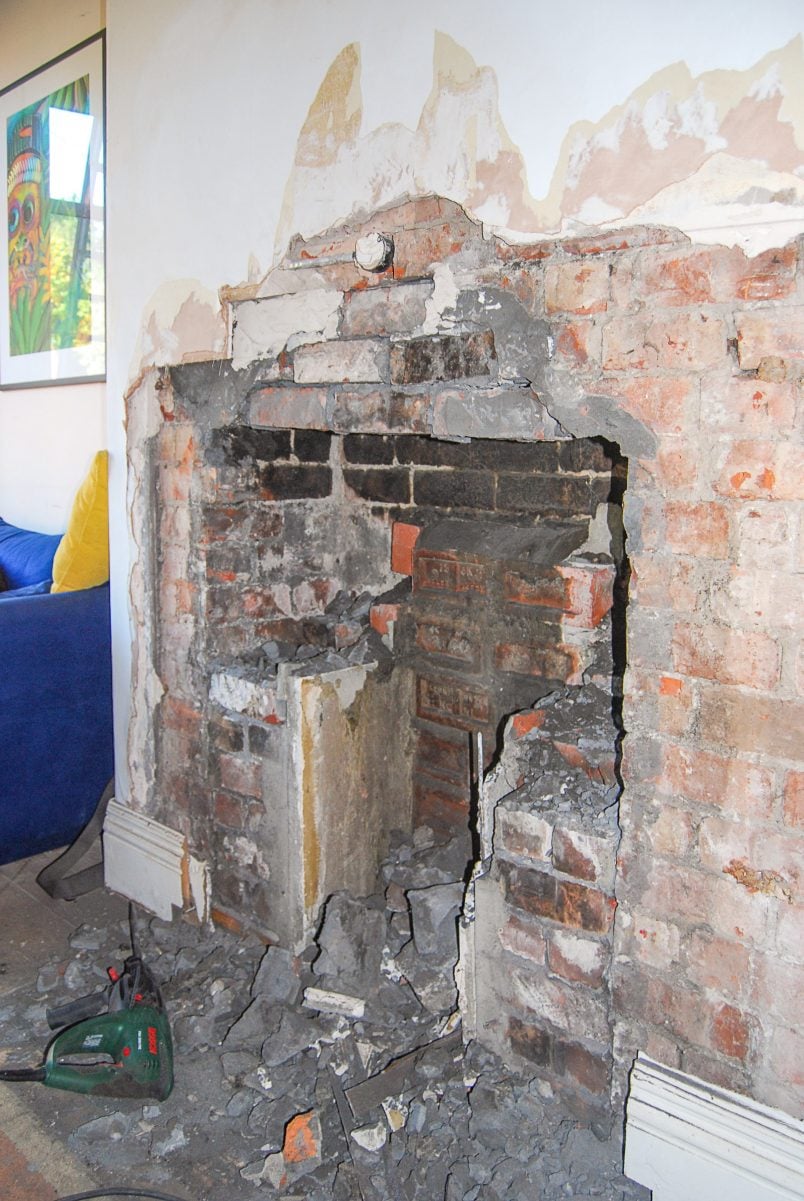
Normally in old houses, there would be a supporting brick arch holding up the chimney breast (I’ve dashed where it should have been in the picture below). Well, I’m sure you can imagine our surprise when we didn’t find an arch or a lintel and realized that half of the chimney breast was floating in mid-air!

Luckily it always wasn’t as bad as we initially thought and after a quick discussion with our fireplace contractor and builder, we were given the go-ahead to remove the bricks and rubble – even without a lintel.
Miraculously the bricks directly over the opening didn’t even fall down and just stayed hovering over the big new opening.
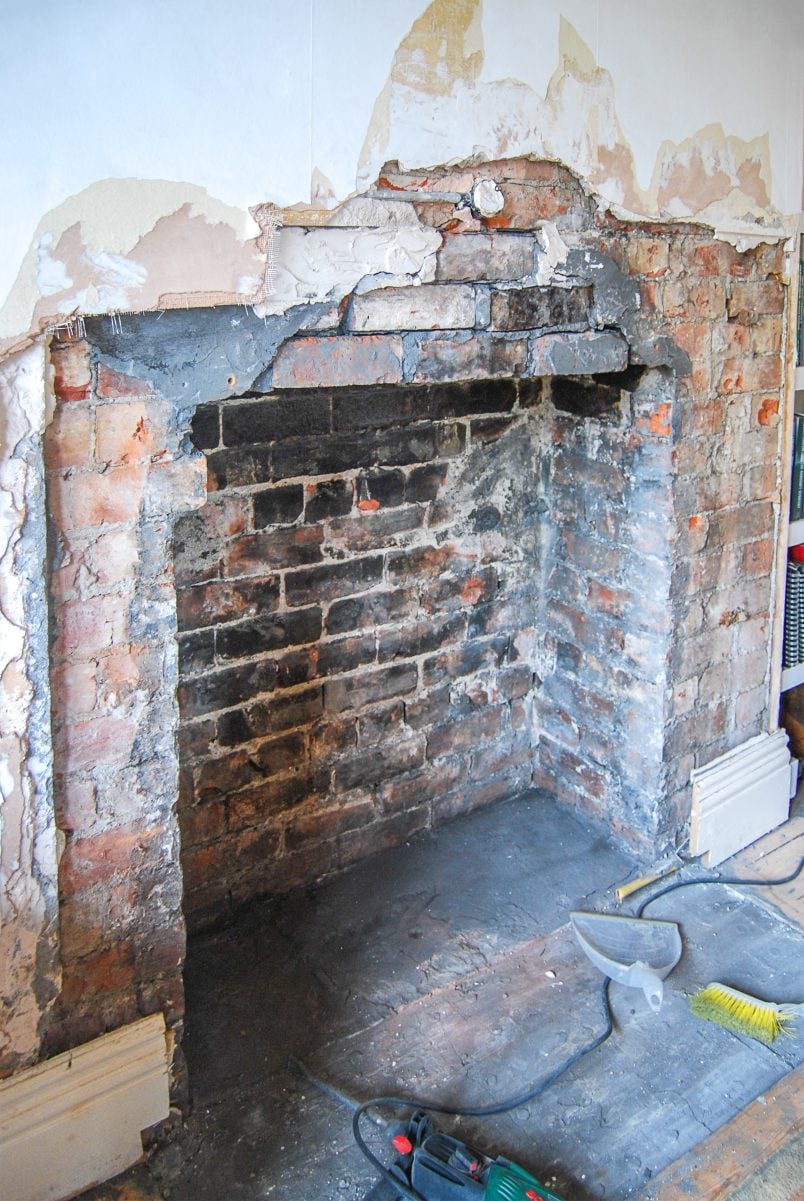
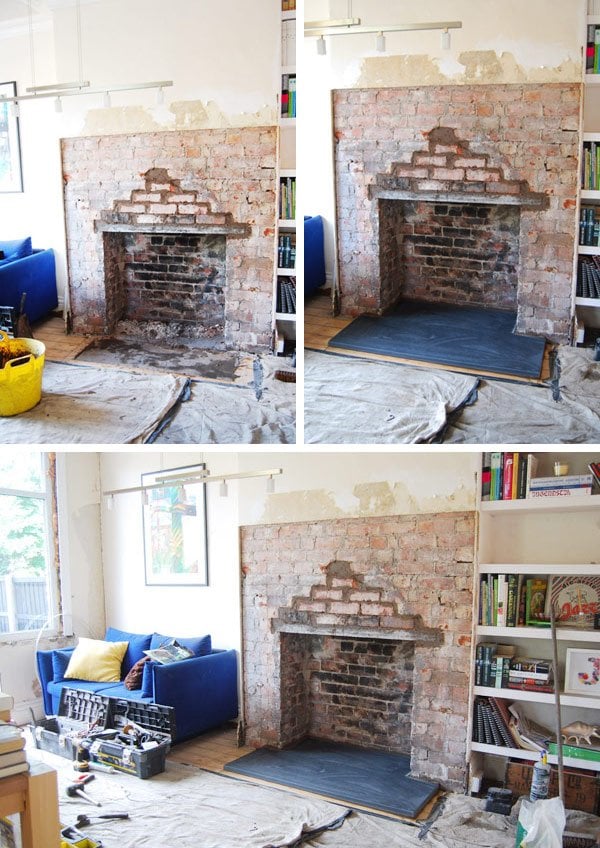
The day after preparing the opening aka. chiselling away at some old brick and dragging them all outside, our fireplace contractor came round to start installing our new wood-burning stove.
4. Having A Wood Burning Stove Installed
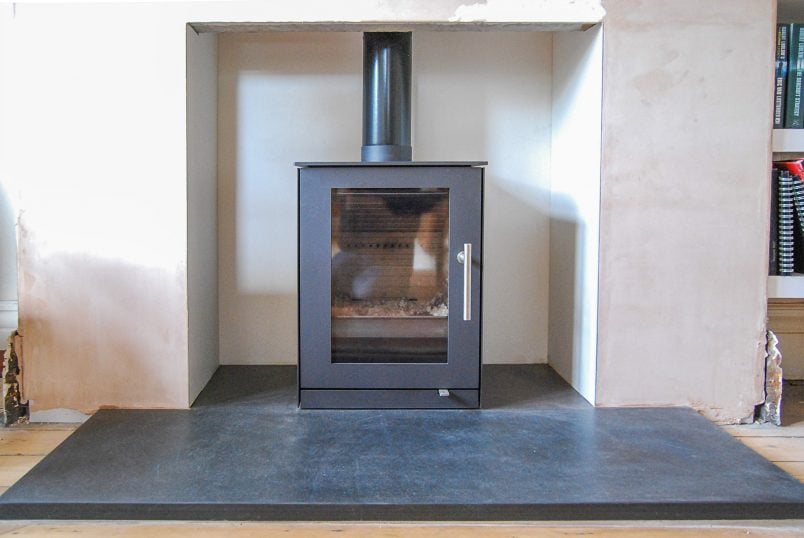
From start to finish the whole wood burner installation process took two days.
On the first day, the tradesmen installed a new lintel in the hole I’d prepared, fitted a new slate hearth, installed ventilation and installed the flue liner. They even managed to replaster the exposed brickwork on the chimney breast which I was particularly happy about as it hadn’t been part of our contract and we’d agreed on a fixed price for the work!
Then on the second day, all that was left to do was install the stove.
All in all, it was a really straightforward process and was fun to watch because everything came together so quickly.
I’m absolutely in love with our new wood-burning stove. As well as looking great, it works amazingly well and gives off more heat than we’d expected! With some help from our new wood burner and a few other little planned house upgrades, this will hopefully be the first winter in our house where we’re not cold.
5. Other important things to know
Do wood-burning stoves require much maintenance?
You’ll have to clear away the ash of your burned logs regularly and wipe down the clear window as that will get smokey, but in terms of chimney maintenance, you’ll just need to have that swept once per year.
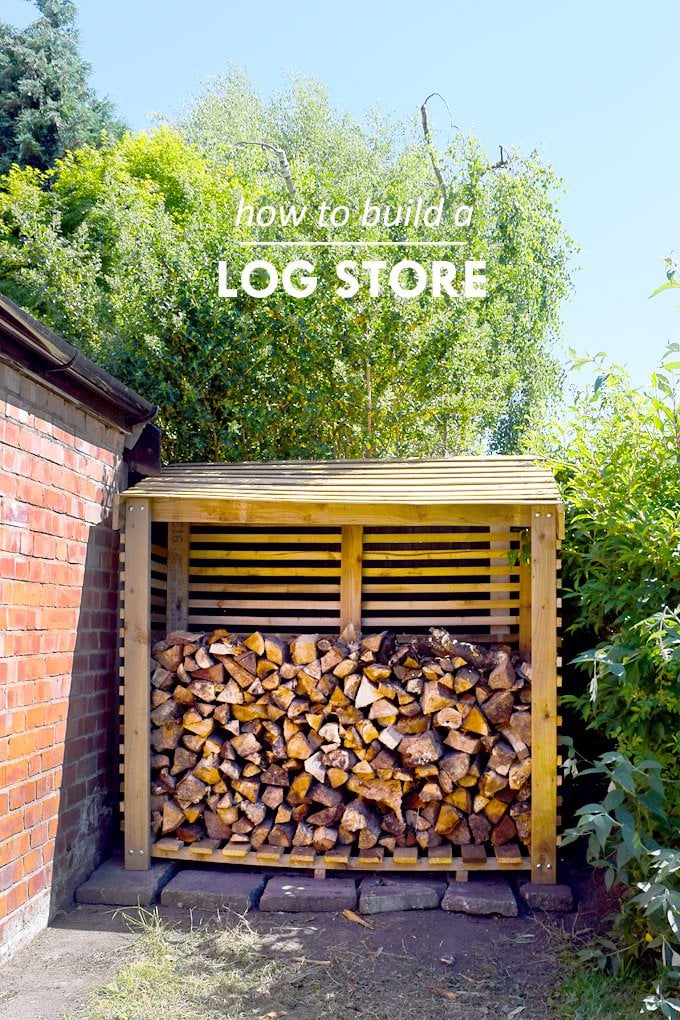
How do you store firewood?
The best place to store your logs is outside and somewhere sheltered. Don’t pile the logs too close to the wall as moisture can develop at the back. You always want to make sure that the air can flow around the logs to ensure that they are well ventilated and dry until you burn them.
We built a great log store that stores up to 2 cubic metres of logs which is perfect to store all of your timber for the winter. You can get our log store plans here.
How do I clean a log burner?
Maintaining our log burner involves minimal effort. Every second time we use it, we empty the tray with the ashes and give it a rough sweep. You should avoid letting water near cast iron as it will cause it to rust. To keep the outside of the log burner clean we give it an occasional dust and, if it’s really dirty, clean it with an old rag and some WD40.
Cleaning the glass couldn’t be easier. All you have to do is wet a sheet of old newspaper and dip it into the ashes. Then rub the ash over the glass to remove any old soot then just give it a wipe with a piece of clean kitchen paper for a sparkly clean window.
6. Money
There’s no getting around the fact that having a wood burner installed is not a cheap home upgrade. Our stove is high-quality and we opted for a solid slate hearth which both increased the total amount we paid but one of the biggest expenses is the building work that has to be done.
For us, it was something we were happy to invest in and it will hopefully help us reduce our other heating costs slightly, too.
To give you a better idea of how much it costs to have a log burner installed, here’s what we paid:
Log Burner | £1173
Companion Set | £190
Carbon monoxide detector | £15
Installation including lintel | £400
Flue liner | £750
Slate hearth | £250
Chimney sweep | £70
Total: £2848
Running costs:
We use our log burner regularly during the winter (about 2-3 times a week) and go through roughly 1,5 large bags of hardwood timber a year. Depending on where you live, the cost of logs will obviously vary but as a rough guide, a large bag will cost about £115.
Here are the top 5 things you need to know before choosing a wood burning stove:
- If you live in a smoke control area you have to install a DEFRA approved stove.
- You’ll need adequate ventilation. If your stove is over 5kW you’ll need to install a vent.
- You have to install a carbon monoxide detector.
- You (probably) don’t need planning permission but your stove has to comply with building regulations and you’ll need a certificate of compliance.
- You should have your chimney lined. Even if you don’t have to, it’ll make your stove more efficient and will be safer, too.
Do you have a log burner in your home? Do you love it as much as we love ours? Are you doing any home upgrades to improve your house before the cold winter months kick in? We’d love to hear your experiences so leave us a comment below and let us know if you found this guide helpful and share your experience!
James says
Please don’t say you paid somebody to install that lintel? Lintels need an overhang of 150mm minimum, that is a very poor job and i would encourage anyone who reads this to not follow the advice shown in the image as that is shocking. This would not pass building regs and should be done correctly.
Christine says
Of course we paid someone to install it and don’t worry – it was well over 150mm on each side, James. It was signed off by building control before being boxed in. It’s always important to follow the rules and regulations, especially when it comes to anything structural.
Cx
Sian says
Hi. I’m about to have a stove installed. My first one ever. Come across your fabulous blog which I found absolutely useful not to Mention very read worthy, so thank you. I’ve had a few issues already. First company that arrived quoted me for a fire, but when I saw it, it was tiny and I wasn’t happy as it was not the look I wanted. So I went to another company who then told me that my chimney depth wasn’t large enough to take a flu liner so that I wouldn’t be able to have one without having the entire chimney breast taken away. The only reason I’m having a log burner is because I was going to have the fireplace taken away and my partner said why pay thousands of pounds to have the fireplace taken away when I can pay thousands of pounds to have a log burner and have a feature in the room which makes complete sense. If only I knew the issues I was going to have So I went back to the original company. He said that the chimney is enough room to have a liner and so I have gone with them to fit it. However, I now find is the log stove with log store is too tall for my fireplace (tell me this tye day before installing) and I didn’t order a log store and I have now been recommended another log burner which is 6.7 KW but with that means I have to now have an air vent and I’m unsure where they’re going to find a wall for that to go on so my issues are ongoing until the installation comes tomorrow. I hope finally that it gets installed with little issues and I can enjoy some costly nights in front of the fire very soon. It’s cost me £3250.
Christine says
Thank you so much for the compliments about our blog, so glad to hear you find it helpful, Sian!
Having a wood burner installed is not always straightforward (which is something we found out in our current house, too).
Ultimately, the cost will always depend on the size of your room and the height of the house (along with things like location, access, etc).
As far as I can remember, you don’t need a vent if you stay under 5 kW. The amount you need will of course depend on the size of the room and, ultimately, how you want to use the fire (is it your main heat source, for example). There are online calculators where you can check what kind of heat output is right for your room.
In any case, it’s vital that you get a HETAS certificate for your home insurance and for compliance issues if you want to sell your house at some point.
Now, just a couple of extra tips (again these will vary depending on where you live but should give you an indication of what’s possible).
Our current chimney breast is 27cm deep and we had a flue liner installed for a roughly 9m high house. The updraft (if that’s what it’s called) isn’t perfect but it works and you can have a ventilator fitted on the roof if the liner isn’t large enough (although I’m sure there will be a minimum liner size, though).
The installation is always going to be expensive and we paid a lot to have ours installed in our current house because of the height of our house. I will (eventually get around to) writing a review of our new wood burner which isn’t deep at all but still has a 12kW output. We like it but I honestly feel like the one we shared in this post was better.
Hope that helps but do let us know if there’s anything else we can help you with!
Cx
Kathy says
Hi
I love your fireplace. We”ve just fitted a wood burning stove. We have painted the back and sides brickwork in heat resistant black paint. I love the smooth look of yours Did you have skimalux fitted and painted. Love the slate is this. Grey.
Christine says
Thank you, Kathy! The fire resistant board was installed by the fireplace fitter so I’m not exactly sure what he used. We didn’t bother painting it (although we were told we could) as it was already smooth and white.
Cx
PS. Boo & Maddie rendered and painted their fireplace recess. Maybe her post is worth would help you! http://booandmaddie.com/how-to-painting-a-rendered-fireplace/
Gerry says
I think we’d all like to know how much this cost? That’s an important thing to mention in a DIY blog! :)
Christine says
We’re always happy to share where we got what and how much we paid. Costs are always dependent on the individual situation, though. The installation of the wood burner was about £1500 which included lining the chimney and the hearth. You can pay as much or as little as you’d like for the stove itself.
Cx
Gabriel Stebbing says
Hi! congrats on the stove (and the site) – it looks awesome! We’ve just been through a very similar process – in fact, we had the contractor enlarge the fireplace as well, as we’ve a baby due imminently and are complete novices: we didn’t want to risk messing it up. Anyway, we’re super pleased with our new stove and hearth, but we’ve noticed we’ve got the same issue that you have in these photos. At either side of the chimney breast, where the front skirting has been removed, the bias-cut edged of the skirting on each flank are sticking out, unfinished, and we have unfinished plaster that’s been exposed. Now, we’re thinking of removing the ‘flank’ pieces of skirting and plastering down to floor level all around, but have read that this often isn’t a good idea. But we like the idea of a ‘clean’ look around the chimney breast. The other option is simply removing the skirting, sawing off the points of the skirting so they’re flush with the front, sticking them back on and then finishing by painting etc. But that’s definitely a second choice. Intrigued to hear what you did! We need all the advice we can get! Many thanks
Christine says
Thank you, Gabriel! Since posting about our fireplace we have managed to finish some more work in the room including the area where the skirting is. We’ve not specifically posted about it, but you can see pictures of the area in this post. Basically, we’ve done exactly what you are thinking about doing. We removed the skirting pieces, plastered to the ground (it’s important to leave a small gap between the skirting and the floor otherwise the plaster will crack) and then cut off the two pieces of skirting that we’re sticking out. Instead of cutting them flush with the wall, we cut them at a 45° angle away from the wall. I personally think that it gives it a better finish than if it was flush.
Hope you enjoy your stove as much as we do!
Cx
Gabriel Stebbing says
Hi! Thanks so much for the speedy response. Looks like that’s what we’ll aim to do as well. Your whole living room looks so great now. All best. Gabriel
KB says
Hi! Looks wonderful! Could you share the name of the stove you chose? I love it!
Christine says
Thanks, we love it, too! The wood burning stove is a Q-Tee by a company called Rais.
Cx
Jane says
Hi,
Love your stove! Looks really slick. Where did you source your slate slabs? We’d like to install our own but are having trouble sourcing them.
Thanks!
Christine says
Thanks, Jane! We’re still really happy with it, too. I’m afraid that we can’t help you with the slate. It was sourced and fitted by the guy who installed our stove, so we don’t actually know where it came from.
Sorry we can’t be more help. Good luck in finding what you’re after!
Cx
Jane says
Do you mind emailing me the details for your fitter? We live in South Manchester too! :)
Christine says
No problem! Will send over the details.
Cx
Kash says
Hi Guys
Fantastic work on the fire, we’re doing the same thing in our front room but can’t decide on which log burner. Can you please make our decision for us? i.e please tell us the make, model and cost of your log burner. Fantastic site, keep updating and have a great Xmas and New Year.
Kash.
Christine says
Thanks, Kash! That’s really not an easy question to answer. What woodburner you can go for will really depend on your house. The size of the woodburner you need will depend on the size of the room, if you live in a smoke control area your choice will also be limited to approved appliances and last but not least it will also depend on your chimney. It’s also worth noting, that the stove installation (which has to be done by an accredited installer) is almost always more expensive than the actual stove.
Our woodburner is a Rais Q-Tee 57 (it comes in different sizes and finished) and is 4,7KW.
Hope that’s some help!
Cx
Kash says
Many thanks for the info and warnings,
Actually, we measured the room and need a stove that output’s between 3-5kw. I’m worried that 5KW may be too much but you don’t really get many under that, well not good looking ones. OK, so now you’ve chosen our Stove, i’ve got myself a Thor hammer, asked the builder if it’s ok to release the animal inside me without releasing the brickwork above and he’s given the OK. Last set of questions, is your hearth marble? How big is the opening in your chimney breast cavity(1mx1m?) and lastly, where did you get your chrome handled tools from. Promise no more questions and have a great Xmas and New Year. :D
Christine says
You’re welcome, Kash – as as many questions as you want! We were told that it’s important to choose a stove that’s the right size for the room. Having said that, the maximum heat output obviously depends on how much wood you burn in one go – you can always put a log less on if it’s too warm!
Our hearth is slate (oiled). It’s made out of two slabs – one at the back (in the chimney) and one at the front. The opening our chimney breast is 94cm wide and 89cm high. It’s the size of the original opening that was there – the size of the opening that you can go for will depend on your brickwork. Our companion set is the Rais Tetra Tool Set for Floor Standing (it’s also available for wall mounting).
Have a great Christmas!
Cx
sara says
It looks beautiful and stylish! -Its so cool to see the interior of a fireplace…makes the task of updating less intimidating.
I’m pinning this as I have a far to large red brick fireplace in my living room and you have done such a wonderful transformation!
Christine says
Thanks Sara, that’s so kind! Updating it was actually not a problem at all – especially as this was one job that we didn’t do ourselves! ;)
Cx
caitlin says
This looks so fantastic. I LOVE everything about it -the spare, squared out chimney, the slate hearth, the modern wood stove and no decorative mantle! It looks awesome, awesome, awesome. Kudos to you for the vision to mix in some modern details into your Edwardian home.
p.s. I wish my winter prep was as exciting….I’m repairing my roof for the winter rain :(
Christine says
I guess that means you like it, Caitlin? ;)
The kitchen and dining room had almost no original period features left when we moved in and having knocked through the rooms (and we’d like to maybe extend at some point) it just felt right not to go with a more modern feel.
Our other winter prep is really not as exciting. We’re still busy messing around in the dirt – trying to insulate under our floors!
Cx
sj says
That’s a nice looking stove. I like the lines.
Christine says
Thanks SJ! We love it, too!
Cx
Stacey at dohiy.com says
Christine, it’s gorgeous. That’s how modern is done right!
(Plus: HAMMER DRILL, WOOO!)
Christine says
Thanks Stacey! It’s really nice and warm, too!
Cx