Lighting is something that Jan and I have always struggled to get right. Not necessarily because we don’t know which areas need light and where to place a lamp but because we can rarely find lamps that we like.
I’ll never forget the first time we went shopping for lamps and wandered into a lighting shop where the saleswoman followed us around the small store (like we were going to stuff a huge chandelier under our jumpers at any moment) and all she kept saying when we asked questions was “but you can get something cheaper elsewhere”. Needless to say, we didn’t buy anything on that occasion (we actually went straight into a shop a few doors down and bought three lamps and spent a small fortune) but we still find it tough to find lamps we like and are affordable.
We do believe investing in quality pieces that will stand the test of time, but lighting can be super expensive and after buying a house that needed a lot of work, we quickly learned how to make our money go further and making a lot of our own lamps is one of the ways we do so (as well as enjoying being creative of course).
If you’ve been following us for a while, you’ll already know that we’ve already made a few of our own lampshades. We still love both of our veneer shade in the hallway (you can see how we made them here and here), our paper lampshade in the office still does the job (you can see how we made it here) and although we were never happy with how it turned out, the doily lamp we made for our spare bedroom is also still hanging (you can see how we made that one here).
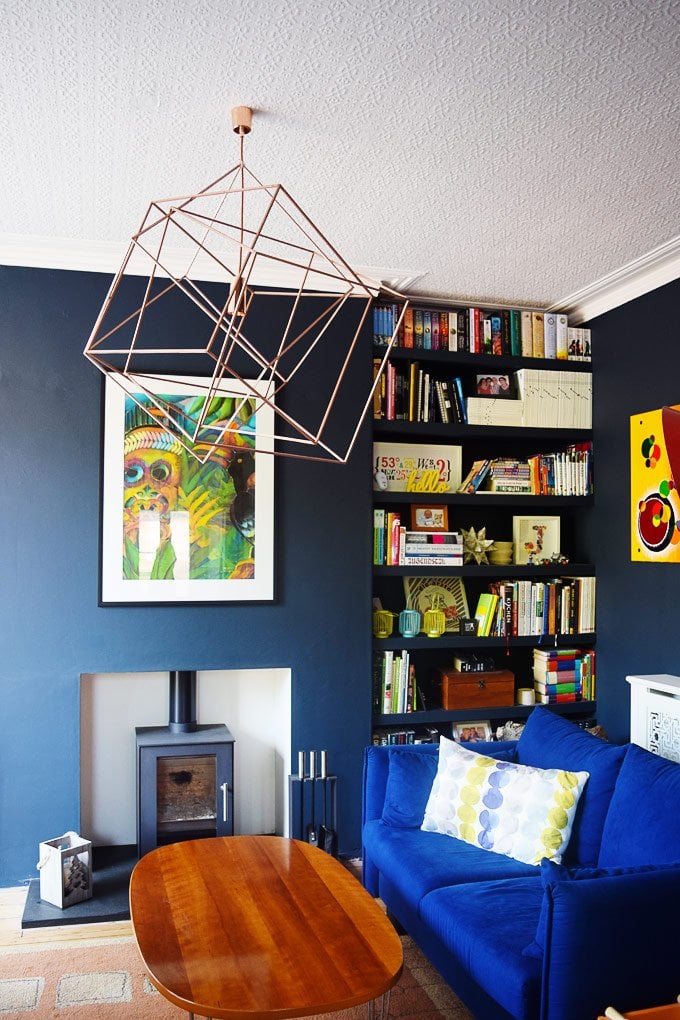
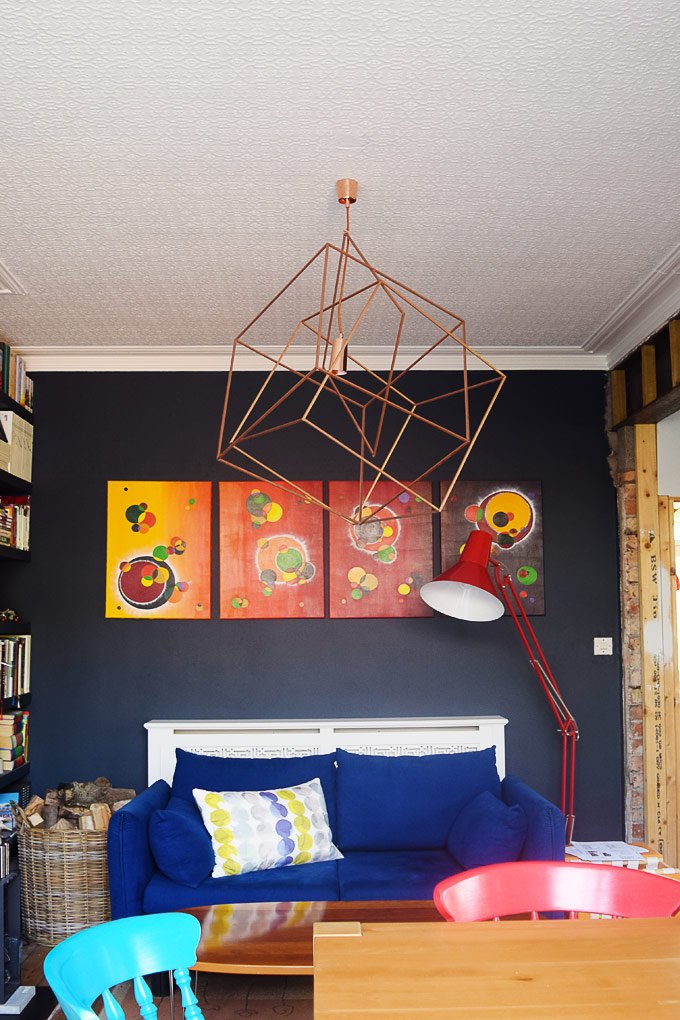
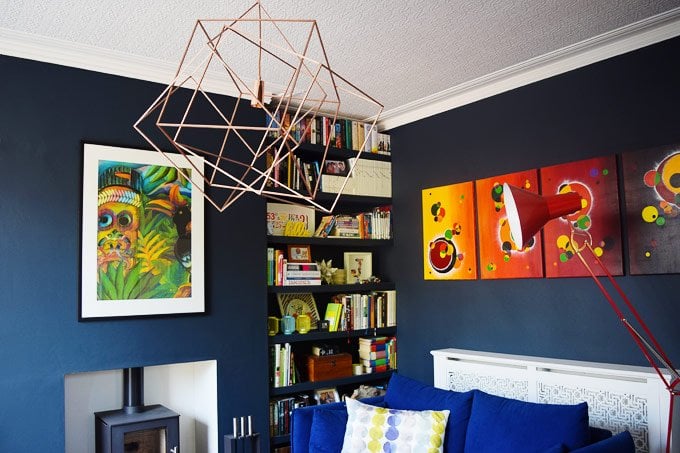
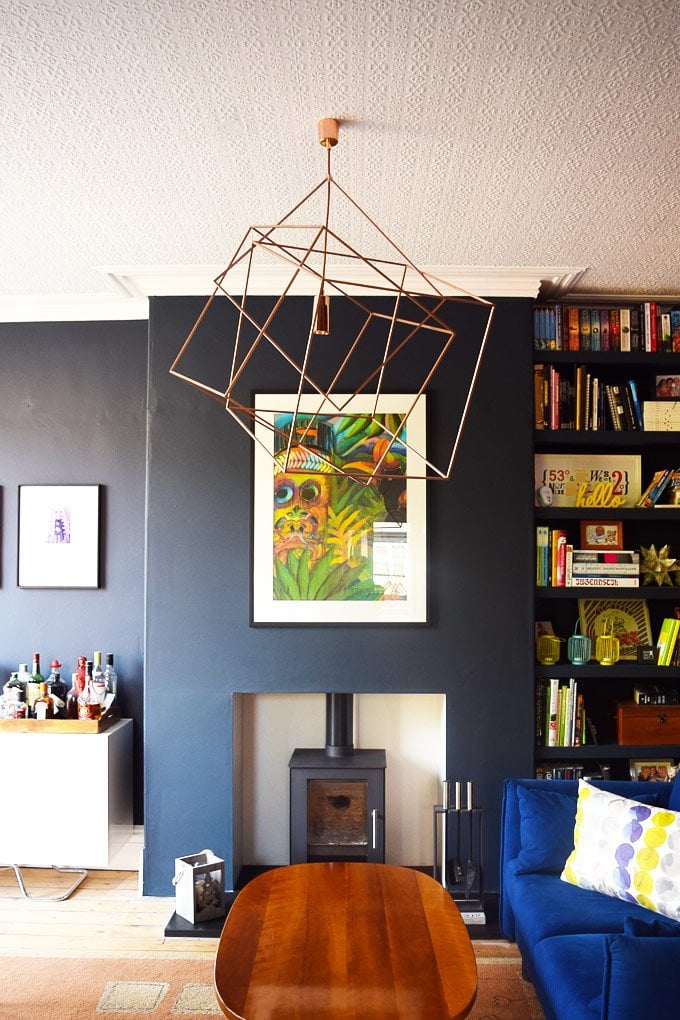
Now (after just 5 short years) our dining room also has some lighting and instead of a cable hanging from the ceiling we now have a new DIY Copper Chandelier.
I can’t believe that we waited such a long time to finally sort our lighting in the dining room. Having knocked down the wall between the kitchen and dining room, it’s one of the rooms we spend the most time in and even a bare bulb hanging from the ceiling would have been better than nothing at all!
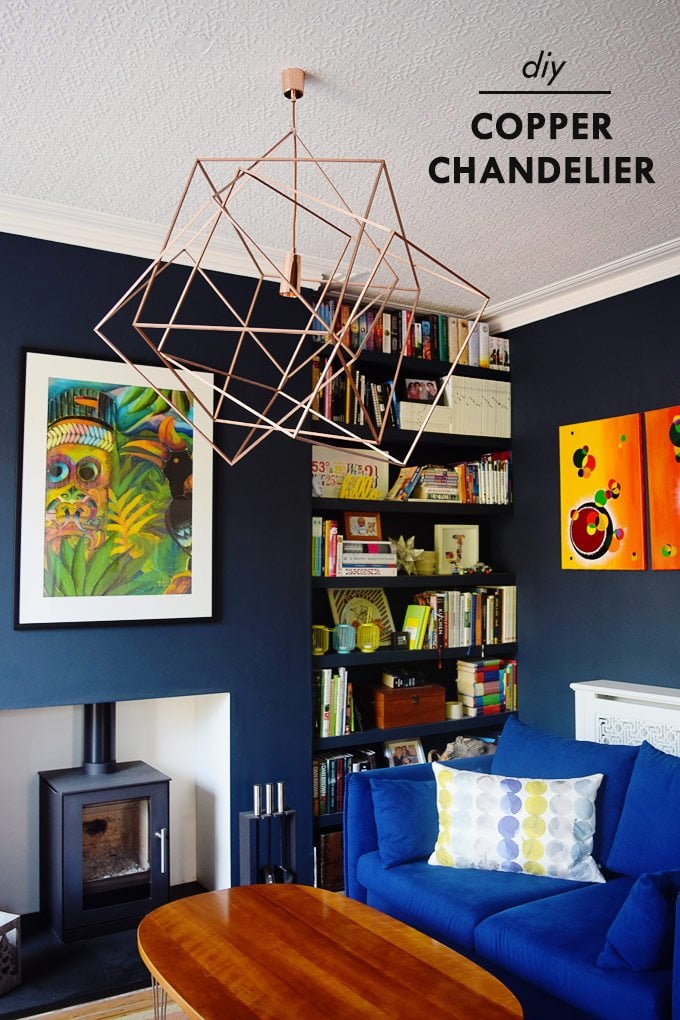
If you’d like to make your own DIY copper chandelier, this is what you will need:
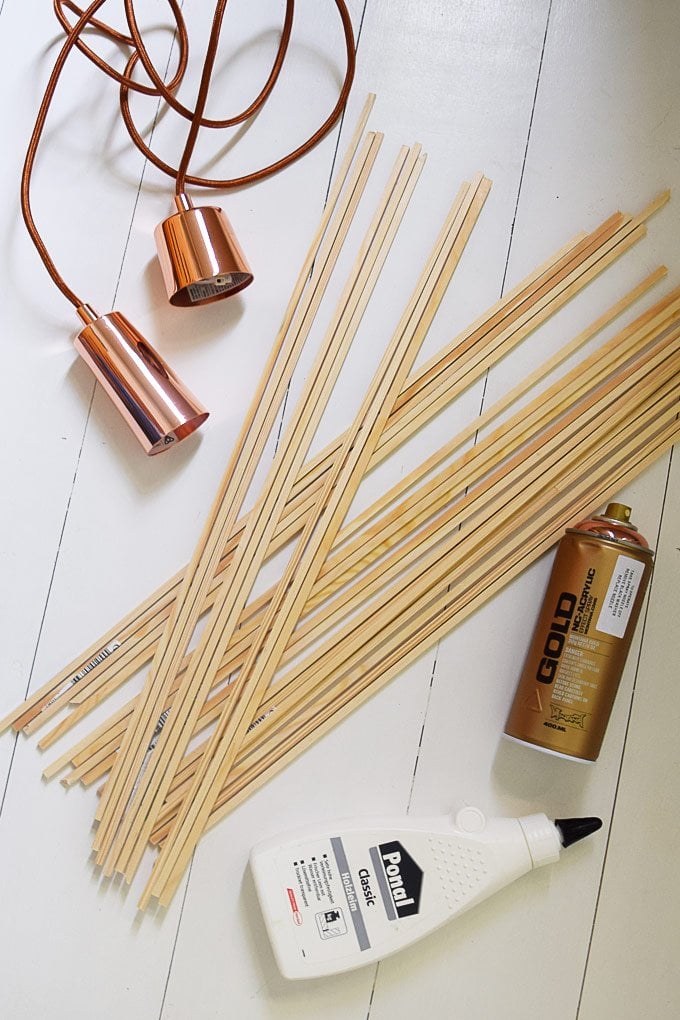
- 36 strips of timber (we used 12 x 2.4 m lengths of 6 x 6 mm strip wood)
- Wood glue (we always use Ponal which is by far the best wood glue available)
- Spray Paint (we went for a metallic copper colour, but you can, of course, choose any – we always use Montana Gold spray paint which comes in hundreds of different colours and is amazing. We used Montana Gold spray paint on our guest bedroom table and it really was amazing and really metallic – you can read about it here)
- Pendant lamp (you’ll probably not need one, but as we only had wires poking out of the ceiling we needed a new lamp, too. We used this Plumen Drop Cap in copper to match the shade)
This is how to make it:
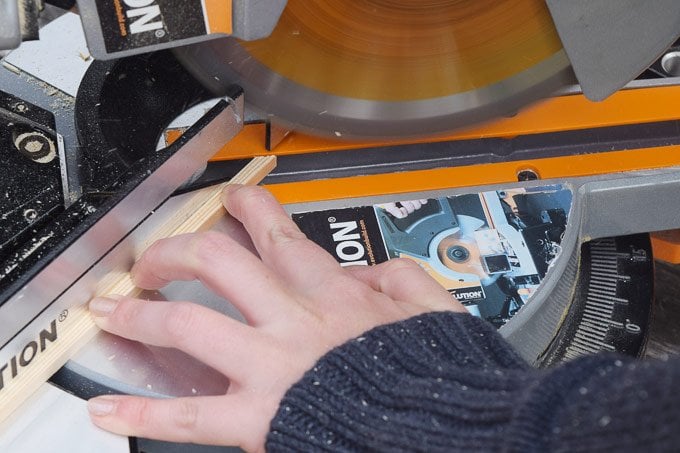
#1 Cut your strips of wood to size. You’ll need 24 that are exactly the same length and 12 that are a bit shorter by two times the thickness of your strips.

These are the measurements that we used: 24 strips at 500mm and 12 strips at 488mm (500 – 2 x 6mm).
#2 Next cut each end of 24 longer strips at a 45° angle. We used a mitre saw but you could use a mitre box and hand saw, too.
#3 Once you’ve cut all of the pieces to size it’s time to get out your spray paint. Usually, we wouldn’t paint a project until it’s finished, but because the finished DIY copper chandelier is quite large (with only a small area that actually needs spraying) and parts of each cube touch each other, we thought it would be easier to line up the strips of wood and spray it first.
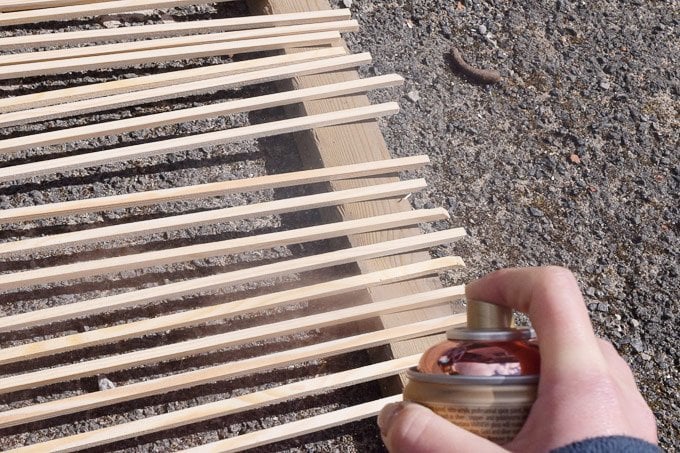
We tried not to get too much spray paint on the ends because we figured that the glue would hold better when glueing wood to wood (without a layer of spray paint in between). Any areas you miss now can easily be touched up when the DIY copper chandelier is assembled, so it doesn’t matter too much if it’s not perfect yet.
#4 Now it’s time to start glueing your cubes together. All in all, you’ll be making 3 cubes that will interlock. Using the longer pieces with the 45° angles, glue six individual squares together. They will form the top and bottom of the cubes. Let them dry before moving on to the next step.

#4 Once you’ve got your six squares glued together it’s time to get three-dimensional. Glue one of the cubes together by glueing the four shorter strips of wood to the corners of one of the squares and then glue the second square on top.
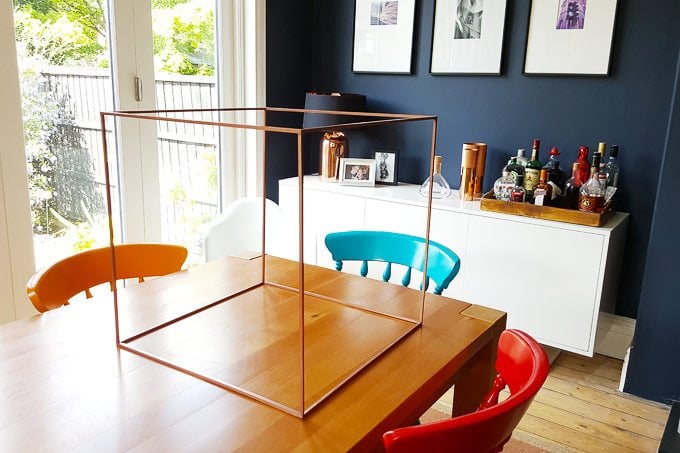
#5 When the first cube has completely dried start to assemble the second one. This second cube has to interlock with the first cube. To do this place the base of the second cube at a 45° angle under the finished first one. Then glue the 4 strips of wood to each corner. Now place the second square on top of the first cube and glue it to the second cube.
#6 When both of your cubes have dried it’s time to move on to the last cube. Glue the four remaining strips of wood to the corners. Then turn it onto its side and slot it into the other two cubes. Then attach the last remaining square.
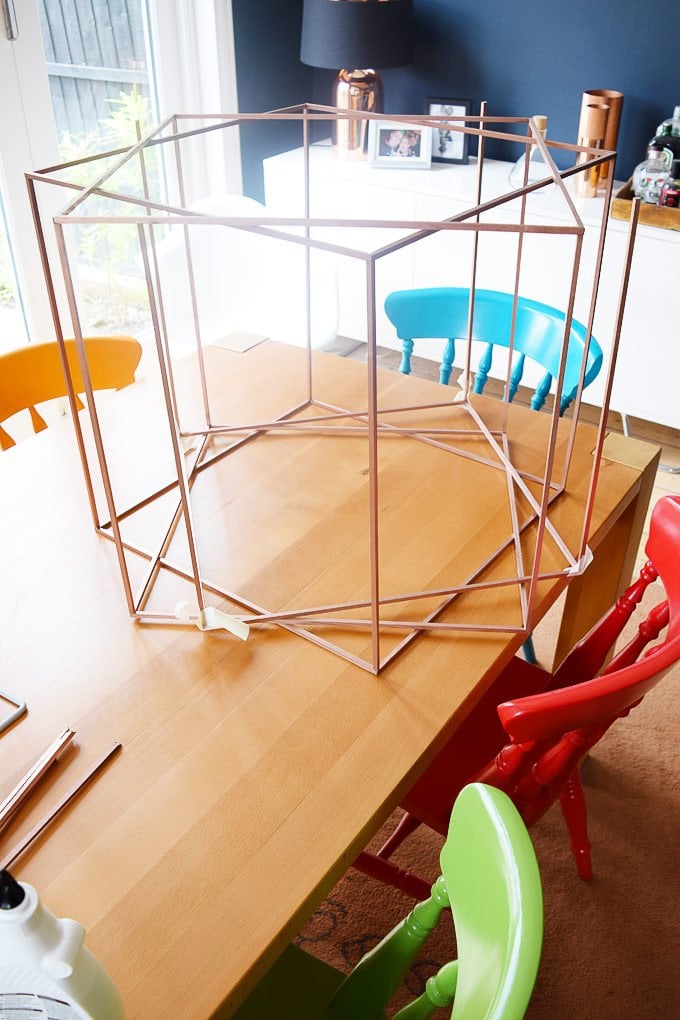
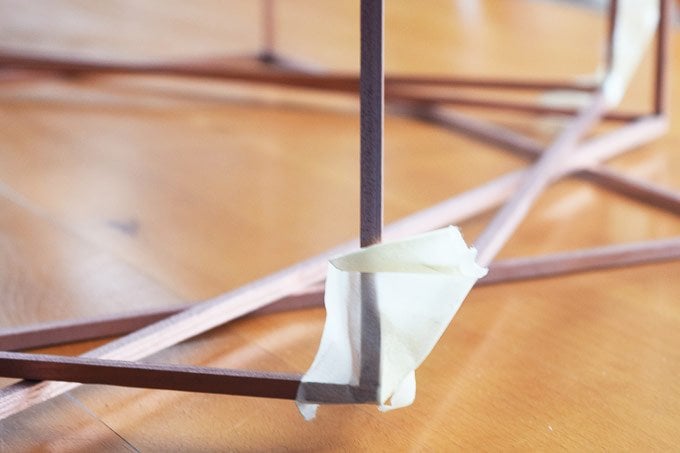
To keep things from sliding around, we used some masking tape to hold the pieces in place until they had dried.
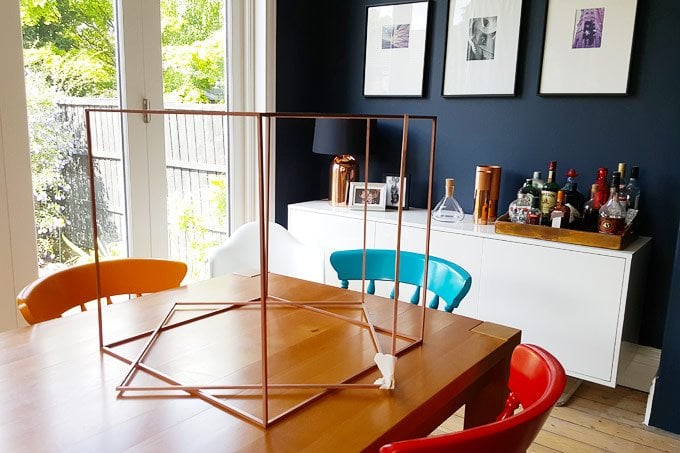
#7 When everything has dried give the chandelier another coat of spray paint (if needed). To hang the shade to your pendant we used a super high tech solution – a piece of copper wire (that we swiped out of an old bit of cable). Wrap one piece of wire around one of the corners of the shade and then wrap another piece around the cord.
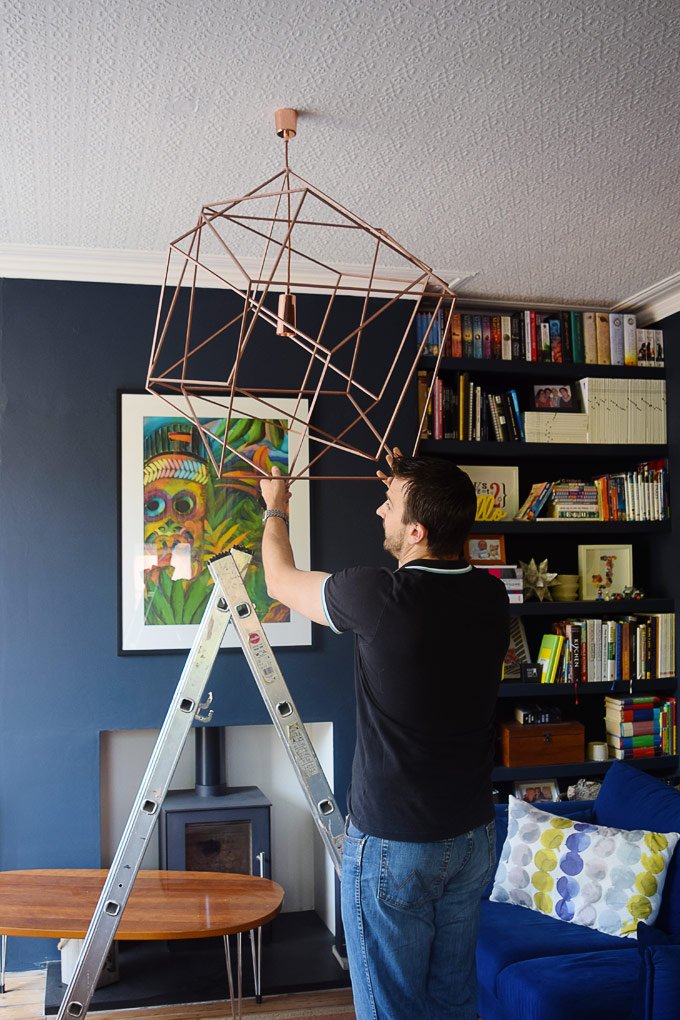
Then lift your shade into position (you’ll definitely need a second person to help you with this) and carefully rotate your cubes until you’re happy with the design. Then attach the piece of copper on the lampshade to the piece of copper on the cable and make sure they’re firmly attached to each other.
Tips:
- Try to be exact as possible when cutting the 45° angle. If it’s not exact your cubes won’t be square.
- Hold the strips of wood as steady as you can while cutting. They’re quite flimsy, so tend to wobble around a bit. If they move the wood is likely to split.
- The larger the cube the more difficult it is to keep it square, especially if you use thin strips of wood.
- If you use a Plumen light fitting like we did, you’ll also have to use a Plumen lightbulb. We didn’t realise it, which is why we don’t actually have a lightbulb in our lamp. Ups.
We’re still undecided to if we love it or not, but either way, it’s definitely an improvement on what used to be there. Now, all we need is a lightbulb!
Do you have jobs in your house that you tend to put off? Is lighting something that you struggle with, too? Do you have any tips for us on where to find great lighting?
PS. You might want to read our this post before you attempt this project!
abi says
This really is beautiful! Thank you so much for sharing!!!
Amanda says
Browsing through your archives, I came across this gem! What are some of your inspirations for your creative lighting fixtures?
Christine says
Ohh, thank you, Amanda! Usually, there’s a mixture of inspiration involved. We like to make lighting as it’s often so expensive to buy light fixtures! For this one, I’d seen an actual geometric copper light in a shop that was way, way out of our budget. Ours ended up looking nothing like the one I’d seen but that’s not necessarily a bad thing! We’re definitely influenced by things we see on the internet and on Pinterest but often we have random supplies left lying around and I try to come up with projects so not to waste anything! That’s how we ended up making our concrete picture frame, too.
Cx
Kerrie says
Hi Christine, there seems to be a problem with the images in this post. All I can see is the word ‘Picture’ instead of an image
Christine says
Haha, that was a bit of a mistake. I accidentally scheduled the wrong date and the post isn’t due to go live until next week! Ups! Actually just hung the chandelier this morning!
Cx