Ever since completing our concrete bookends, we’ve been dying to make something else out of concrete. It’s such a lovely material to work with, with endless possibilities and this time we decided to make a concrete picture frame.
The principles of making this DIY concrete picture frame are the same as the concrete bookends that we made, but it is much more involved – mainly because you will have to make the mould for the frame. None of the steps are particularly difficult, but it does take a bit of time.

If you’d like to make one of your own, here’s how we did it. (Don’t be put off by the number of supplies and tools you’ll need, you probably already have most of them lying around).
This is what you will need:
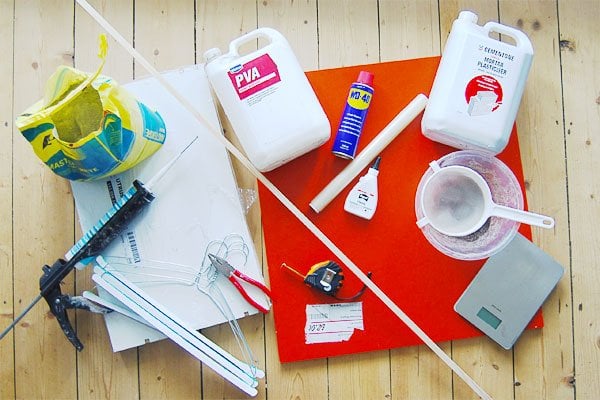
For the concrete mixture:
- PVA
- Plasticiser
- Cement
- Sand (not shown)
- Water (not shown)
For the concrete mould:
- Wooden Base, preferably sealed – we used an old door that we found for £2 in the Ikea bargain corner)
- Timber offcuts
- Silicone
- Screws & screwdriver
For the frame:
- Stripwood
- Wood glue
- Old dry cleaning coat hangers or any other wire
- Two sheets of picture frame glass
- Tape
- Picture hangers
Tools & General Supplies :
- Scales (we used our kitchen scales)
- Bowl for mixing the concrete
- Sieve
- Plyers to bend wire
- Saw (we used our mitre saw which we’d recommend, but you could use a mitre block and handsaw)
- Tape-measure
- WD-40
This list seems long, but making the frame is actually pretty straight forward.
This is how to make it:
As a general overview of the process involved, you start by building the mould for the concrete. This consists of an inner and an outer frame. The concrete is then poured into the area between the two frames. Then after a bit of waiting, the concrete dries, you can remove the mould and frame your art.
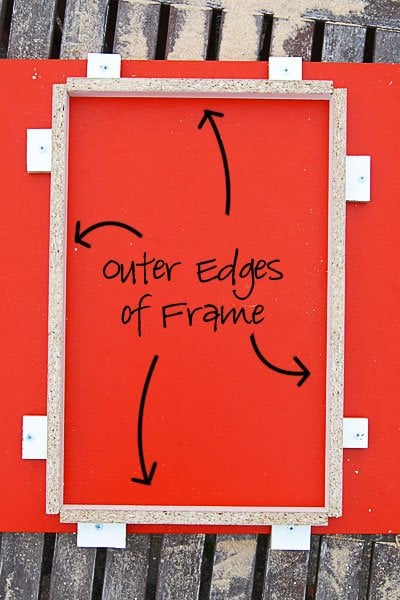
#1 Prepare your mould
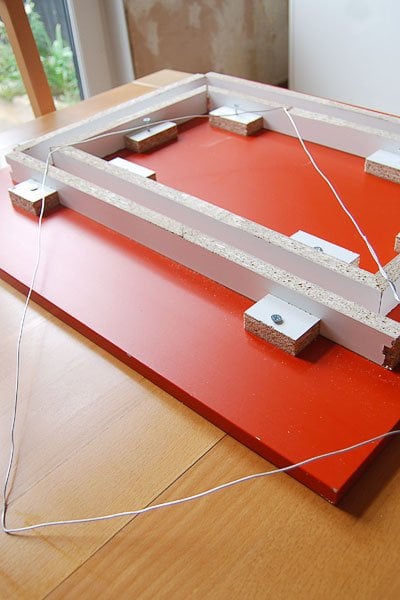
Start by building the outer frame of the mould. For this, you will need your base (ours had a smooth Formica-y surface, so we weren’t too worried about the concrete sticking to it) and strips of wood. They should be as wide as you’d later like your frame to be thick.
Cut them to size so that you can build a rectangle on your baseboard and fix them into place. We used scrap bits of wood that we screwed around the edge to ensure that they couldn’t move.
#2 Seal the outer frame
To make sure that no concrete can escape through any little gaps, we sealed around the inner edges where the base board and frame meet with some silicone. This probably wasn’t a necessary step, but we just wanted to make extra sure no concrete could escape.
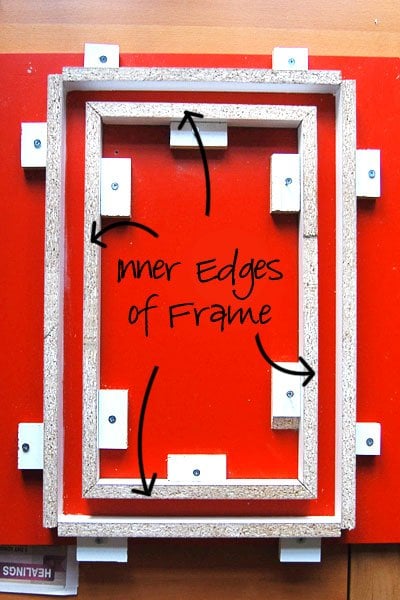
#3 Prepare your inside mould
In the same way, that you prepared the mould for the outside of the frame, you can now prepare the inside mould. Cut your strips of wood to size and screw them onto the board. Make sure that the distances from the inner edge of the outside frame and the inside frame are equal on all sides. This time, we mitred the corners as the concrete will run up to them and we didn’t want any raw edges.
#4 Prepare the second frame
This is where things get a bit more complicated. You can already see the part of the mould where you’ll later be adding the concrete, but in order for you to be able to hold the glass, you’ll have to build a little ledge in the concrete for the panes of glass to later sit in front of.
It sounds a bit more complicated than it is. If you were to cut through the frame, this is what it would look like.
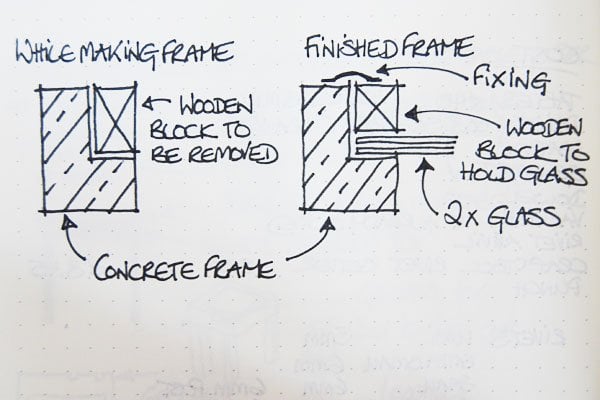
For this ledge you’ll have to make two separate wooden block frames – one will be the mould for you to pour the concrete against and one will be the frame that, when the frame is finished, sandwiches the glass into place. The frame that you’re using as a mould will have to be higher than the frame you’ll be using for your finished concrete frame because it has to include the thickness of your panes of glass.
#5 Prepare your reinforcing steel
Without going into too much detail, concrete is strong in compression but has almost no tensile strength. That’s why concrete is usually reinforced with steel, which has great tensile strength.
Bend a wire rectangle to the size of your frame. Double check that it’ll fit inside the area of the frame where you’ll later be pouring the concrete (you really don’t want to be messing when you’ve mixed your concrete) and place to one side.
#6 Prepare your concrete
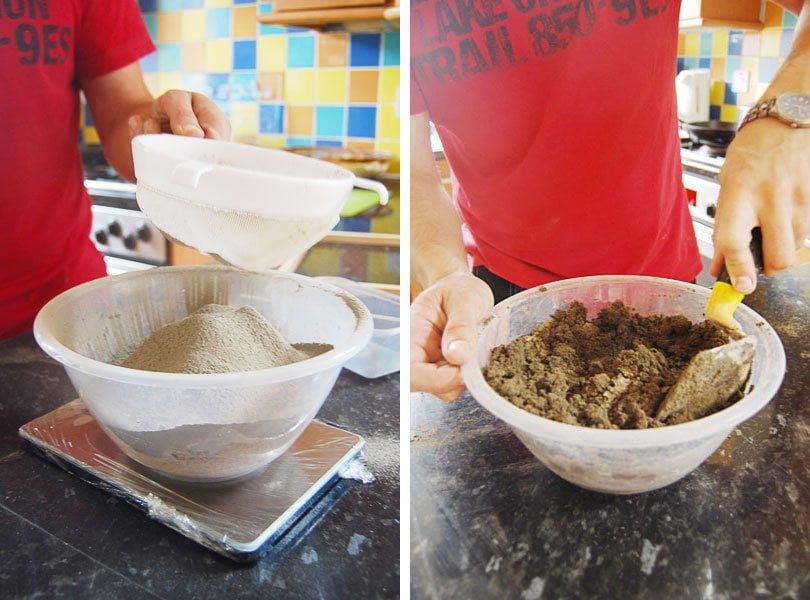
We used the same concrete recipe that we used for our concrete bookends. Weigh out your ingredients as exactly as possible. The ratio of sand to cement should be 60% to 40%. In addition, we used a few more additives like plasticiser (4%), PVA (4%) and water.
In numbers, this is what we used for the frame.
- 2520g Sand
- 1680g Cement
- 66g Plasticiser
- 66g PVA
- Water (the exact amount will depend on how dry your sand is)
Start by combining the sand and cement. We sieved the concrete, to make sure that the mixture is completely lump free. In a separate container combine the plasticiser, PVA and some of your water. Then, combine the two mixtures along with more water and mix well. (You want the mixture to be quite stiff and not too sloppy. The plasticiser allows you to use less water than would normally be necessary.
#7 Fill your mould
This probably the nicest part of the whole job. Start by spraying your mould with WD40. It’s probably not needed, but a bit of extra slipperiness can’t be a bad thing for later on when you remove your frame from the mould.
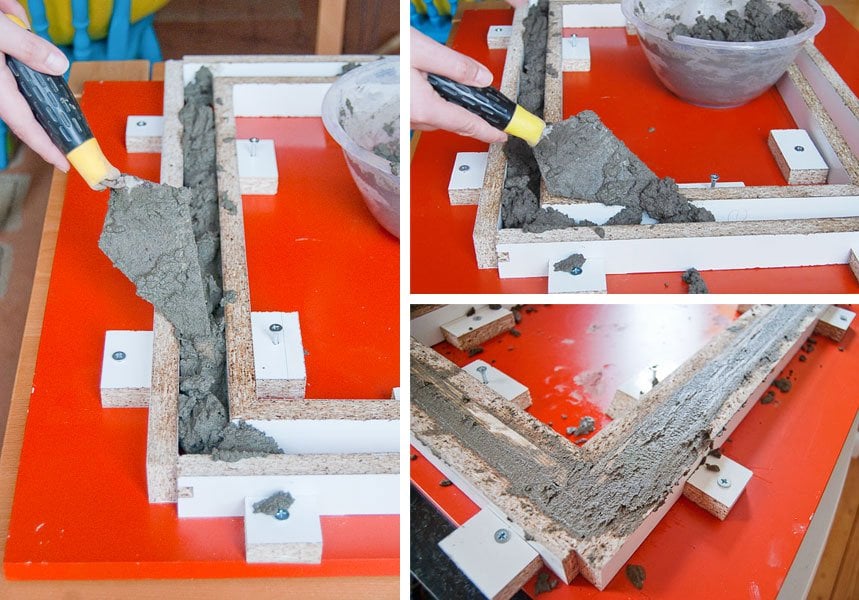
Then you can start to fill it with concrete. Just work your way around the mould, making sure that you press the concrete into every last corner of the frame. After filling your frame about 1/3rd of the way up, place your wire rectangle into the concrete, then continue to add the concrete till the mould is almost full.
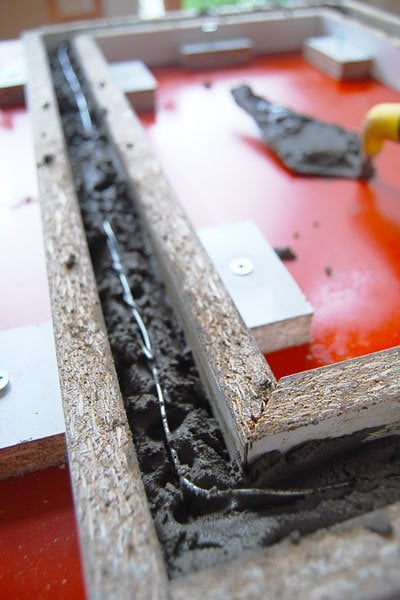
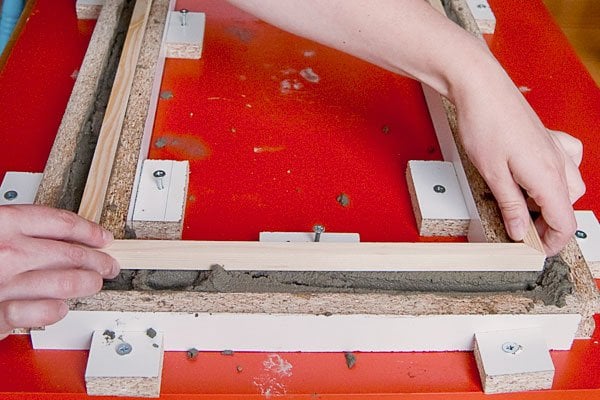
Now place your inner wooden frame into the mixture and squash into place. It’s really important that everything is level (this will be the back of your frame). Add the remaining concrete and fill your mould so that it’s completely full to the top.
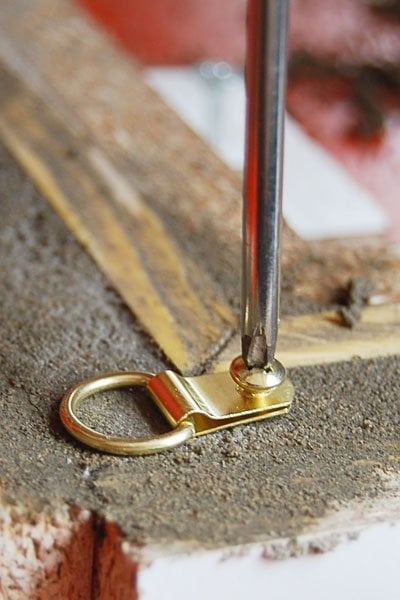
#8 Wait for a little bit
After an hour or two your concrete should have set a bit and be firm to touch, but not solid. Now it’s time to add your frame fixings. You won’t be able to screw into the concrete when it’s set, so you’ll have to attach them now. Just measure out exactly and screw them to the concrete.
#9 Wait some more
Don’t be tempted to remove the frame from the mould until your concrete has completely set. It just won’t be firm enough and will crack if you move it too soon. Even when you think your concrete has set, give it an extra day or to just to make sure that it’s set all the way through. We waited about 4 days before we even considered removing the mould.
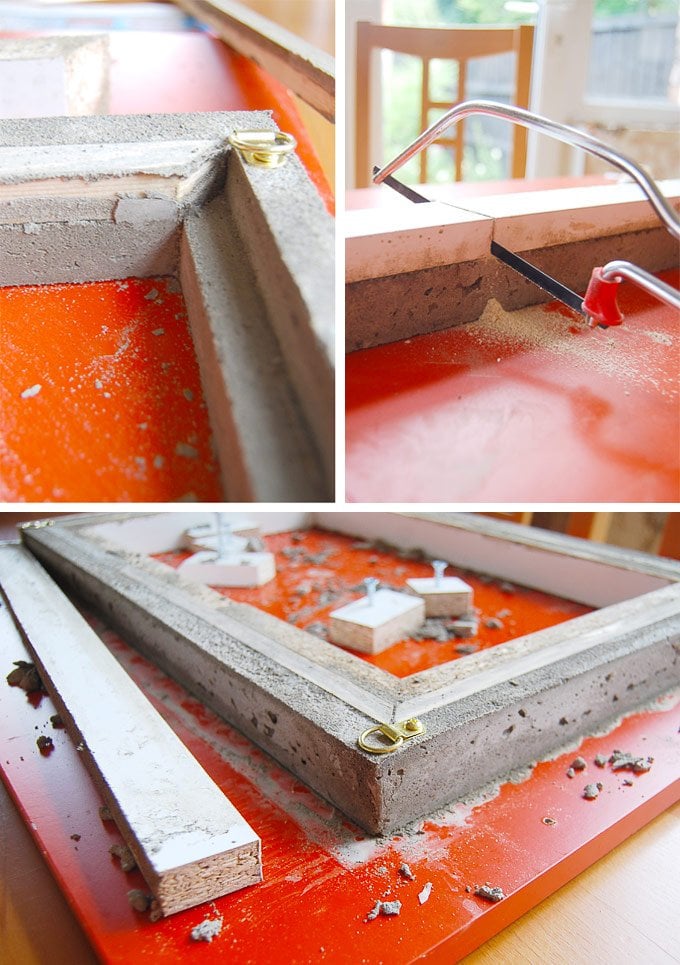
#10 Remove your frame from the mould
When you’re 100% certain that the concrete is completely solid, you can start to remove the pieces of your mould. Be really careful, as the edges and corners will be delicate and can easily break off.
#11 Add glass
Add your first piece of glass (we had ours cut at a picture framing shop for just a few pounds) and then add your piece of art before adding the second piece of glass.
#12 Add your wooden frame
Now it’s time to add the second wooden frame that you prepared. If you’ve done your calculations right everything should be flush.
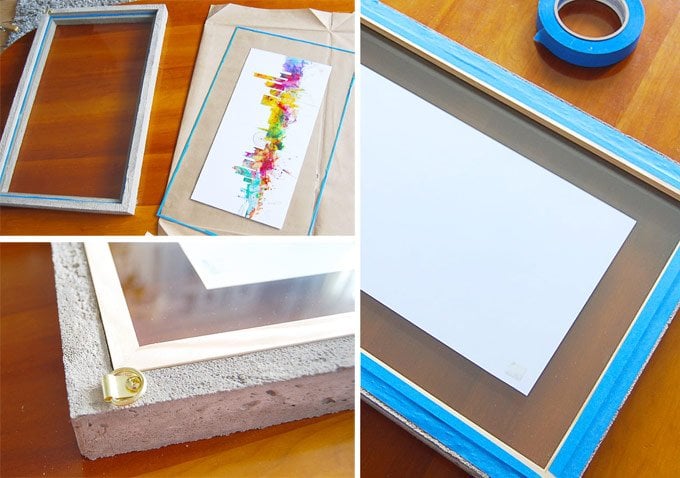
Now all that’s left to do is tape the wooden frame to the concrete frame to hold the glass in place.
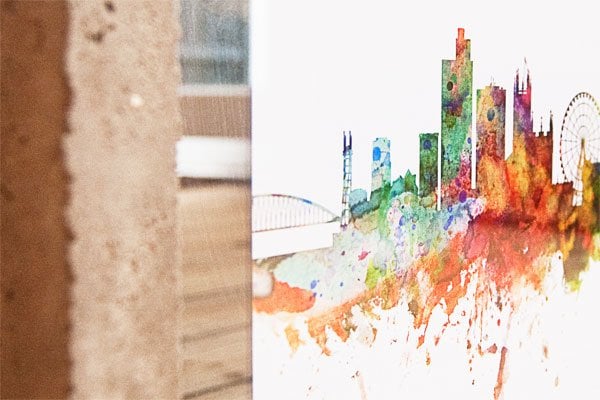
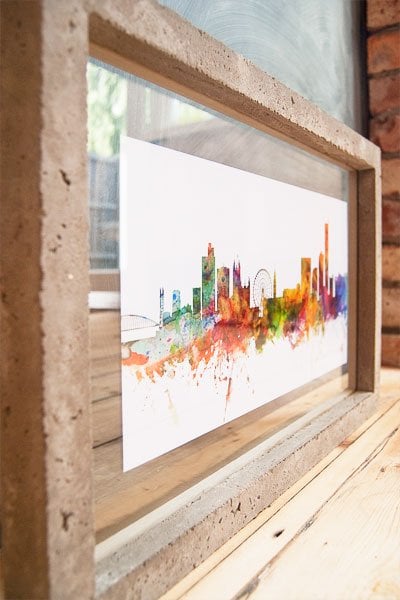
We’re really happy with how it turned out. Yes, there are a few little imperfections and a few little air holes where we didn’t compact the concrete enough, but we actually really like it because of the little imperfections.
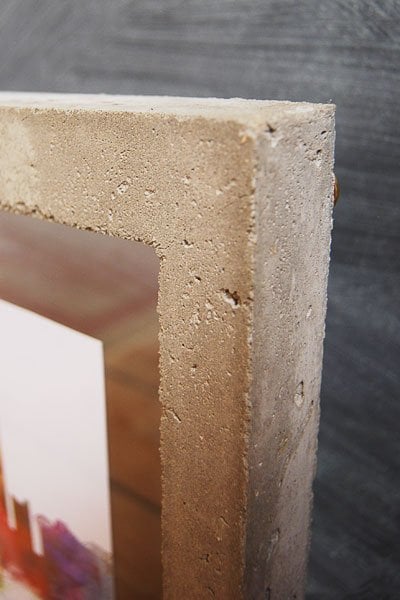
It has a lovely rough and industrial feel which contrasts really well with the delicate watercolour art (it’s the skyline of Manchester) in the frame.
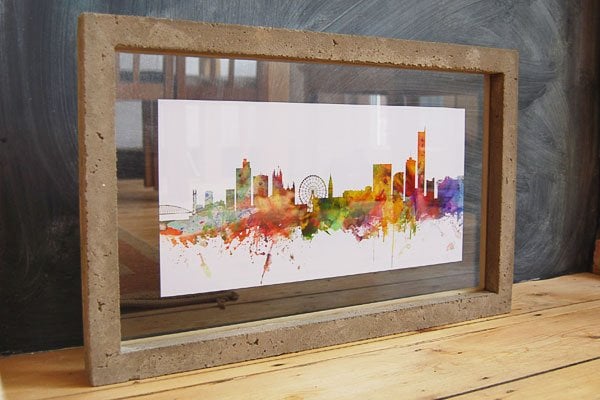
Now, all we need to do is find a place to hang it!
Have you ever made anything out of concrete?
PS. If you like this project, you might like some of our other concrete projects, too!
DIY Concrete Quote Bookends
DIY Concrete Dipped Vase
DIY Concrete Letter Magnets
DIY Concrete Advent Stars
DIY Concrete Letter Bookends
Jeff says
Great tutorial! One question, it looks like you’ve given the concrete an aged finish in the final photos unless it’s just the camera? Any pointers on how you achieved this? Thanks again.
Jeff
Christine says
Thank you, Jeff! We didn’t do anything additional to the concrete – it’s exactly as it came out of the mould. I just compared the original to the photos and there’s no real difference.
Hope that helps!
Cx
Jeff says
That does, thanks again!
Ken Fallowfield says
Dear Christine, I found your article on the concrete picture frame very interesting and easy to follow. Would it be possible to explain how you arrive at the total amount of mix before you allocate the 60% sand and 40% cement?
I am guessing that you work out the volume required from the finished form but I am unable to figure out how you convert that into a total weight.
Hoping that you can be of assistance
Regards
Ken
Christine says
Glad you like our tutorial, Ken! The total amount we used was complete guess work. We started with the sand (that looked like it could fill the frame) and then worked from there. We didn’t calculate by volume. We’d recommend mixing a bit more mixture than you think you’ll need.
Cx
Ken Fallowfield says
Thanks Christine that will work for me – the fewer the technicalities the better.
Apart from enjoying your blog, the photos of your house also made me nostalgic. I have lived in South Africa for many years and your house reminds me of my home town – Urmston. In fact, apart from being on a corner, your home has exactly the same layout as a friend of mine’s current house. So similar that you could possibly be neighbour’s.
Keep up the good work
Regards
Ken
clara says
Dear Christine
im trying to do a concrete frame like yours but the concrete seems to glue into the mould and when i try to remove it breaks….
any tips/suggestions?
thanks x clara
Christine says
We used wood scraps that had a smooth coating (they were furniture boards we picked up at Ikea) on them, so had no problems at all with anything sticking. We also sprayed everything with WD40 – which is what I’d recommend you try to stop things sticking. Other than that, I guess it’s just a matter of being very careful!
Sorry we can’t be more help – would love to know how your frame turns out!
Cx
clara says
Dear Christine
Thanks very much for your tips! they actually were very helpful, please find the final results on my IG account – @clara_dias4
Many Thanks
clara
Christine says
Great to hear that it worked out!
Cx
Chelsea says
Hello there, I don’t suppose you make these to order?
Christine says
Hadn’t really thought about it, Chelsea! It wans’t too hard to do, why not give it ago yourself!
Cx
KarenAnita says
This is awesome! You have so much more patience than me. Love the piccie you chose against the concrete too xx
Jan says
Thanks Karen,
it is all Christine’s doing! I am (almost) useless with these things ;-)
Jan
Eavan says
This is such a creative idea! I’ve been really into the industrial look lately… Thanks for sharing :)
Christine says
We love the industrial look, too, Eavan!
Cx
Jessica@CapeofDreams says
You picture frame is great. I think that the industrial look works particularly well with the cityscape art. I made decorative leaves with cement a couple of years ago, but I haven’t done anything since. It has been my plan to make stepping stones for a path from the sidewalk to our front door, but it has been a plan for two years and hasn’t happened yet!
Christine says
I’m glad we’re not the only ones with plans that don’t seem to happen! I’ve loved your leaves for a while, it’s another thing we added to our to-do list a while ago…let’s see when we get round to it!
Cx
Kerryn says
Really love the picture and it works so well with the glass and concrete textures. You’re getting a little too clever now. ;)
Christine says
Haha, thanks! Not sure you’re right about being too clever though…
Cx
Jan says
Love your frame Christine on my ‘must do’ list. May I ask where you got that gorgeous print from? The concrete frame shows it off beautifully. Well done your posts always renew my motivation to keep going Thank you
Christine says
Thanks so much – it’s kind comments like yours that keep us going, Jan! The print is an Etsy find. Ours is the Manchester Skyline, but loads of others are available, too. Here’s the link to the shop: https://www.etsy.com/uk/shop/artPause.
Cx