As you know, we love grabbing a bargain and there’s nothing better than finding a great piece of furniture or fabulous piece of art at a knock down price.
![]()
The only problem with picking up pieces at these kinds of places, is that they’re usually not in the best of condition. They’re always dirty, they’re usually scratched or dented and in general are in need of a bit of TLC.
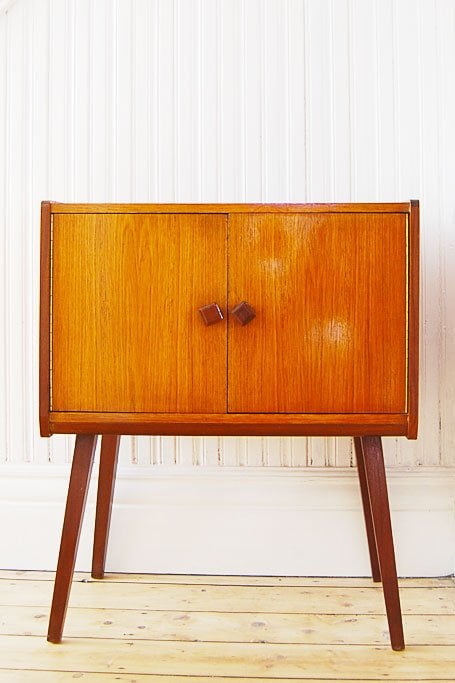
You’ve probably already seen the little cupboard in our guest bedroom that we found at our local antique/ reclamation shop.
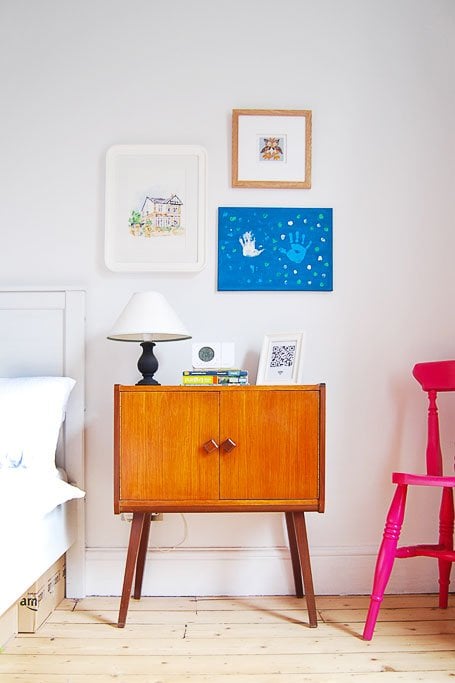
It’s been in the bedroom for about a year now, but we have a bit of a confession to make. Except for a quick clean, we haven’t really bothered to repair and restore it.
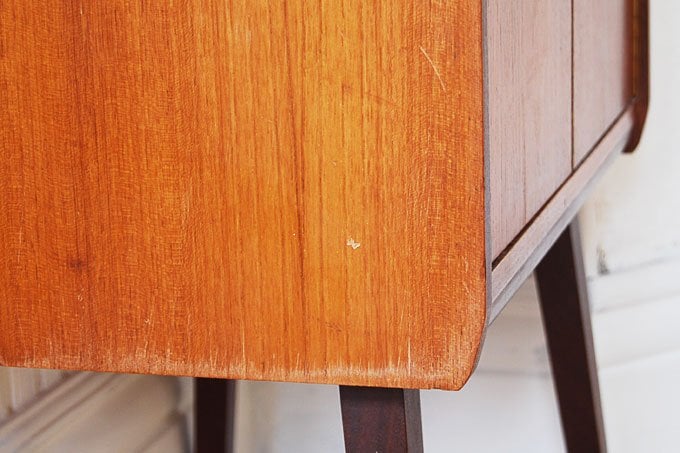
Whilst it looks fine from a distance (and it isn’t really in an awful condition), it is a bit scratched and could just do with a general tidy up.
Having purchased more than our fair share of used furniture, we’ve developed a go to method of refreshing the pieces before they make it into our home and, unless we buy something with the purpose of taking it to pieces, we usually pick things that are in a fairly good condition, which obviously makes our “restoration” work much easier.
The 3-Step Process To Refresh Wooden Furniture
#1 Clean, clean & clean
For us, the most important step before starting to work on anything, is to give it a really good clean. When we know that we’ll be painting the furniture, we always use sugar soap. In this case, as we’re keeping the natural wooden finish, we used natural soap for wood (like this one) which is much more gentile to the wood.
Just wipe down your furniture with your cleaner and some water. It should be patted dry straight away to reduce the risk of any water marks. You also shouldn’t use microfiber cloths – because of their structure they can leave little scratches in the surface.
It’s probably also worth mentioning that sugar soap is really gritty, so can damage delicate surfaces. If you’re concerned, try it out on a test area first.
#2 Repair
If there are any scratches or dents, these need to be repaired before polishing and treating the surface. Any small dents can be removed by using the same method we used to remove the dents in our floor.
Small scratches can be polished away with a polish that’s specific to that type of wood. You shouldn’t polish it too often (less than once a year) as the polish will create a film on the surface of the furniture that will become greasy and attract dust.
Alternatively you can use shoe cream in a matching colour or, when treating light furniture, even use Vaseline.
#3 Rejuvenate, feed & polish
After carrying out any repairs, it’s time to refresh the furniture. Old wooden furniture that hasn’t been taken care of can be quite dry and really thirsty. How to treat the furniture will depend on the type of wood and how it’s been treated in the past (varnished, oiled, waxed, etc.).
Because of the quick and refreshed look that polishes can achieve, they are a popular choice, but are something you should be wary of using. You should also avoid polishes with silicon oils or other mineral oils, as these penetrate the wood and can’t be removed, therefore making any future surface restorations impossible. You should also only use products that are specifically designed for your type of wood. Otherwise, if you’re working on a proper antique, you could do more harm than good!
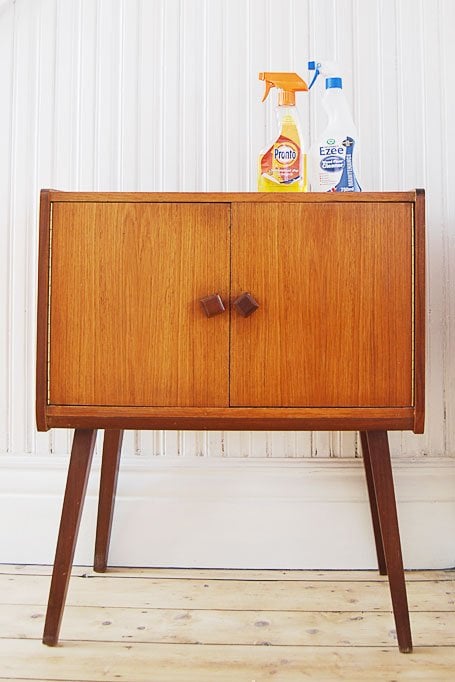
We decided to use a wood oil to treat the cupboard. Oil is great, as it penetrates the wood and permanently protects the surface from dirt and moisture. Oil is also great, as it doesn’t close the pores of the wood which means that it can still breathe.
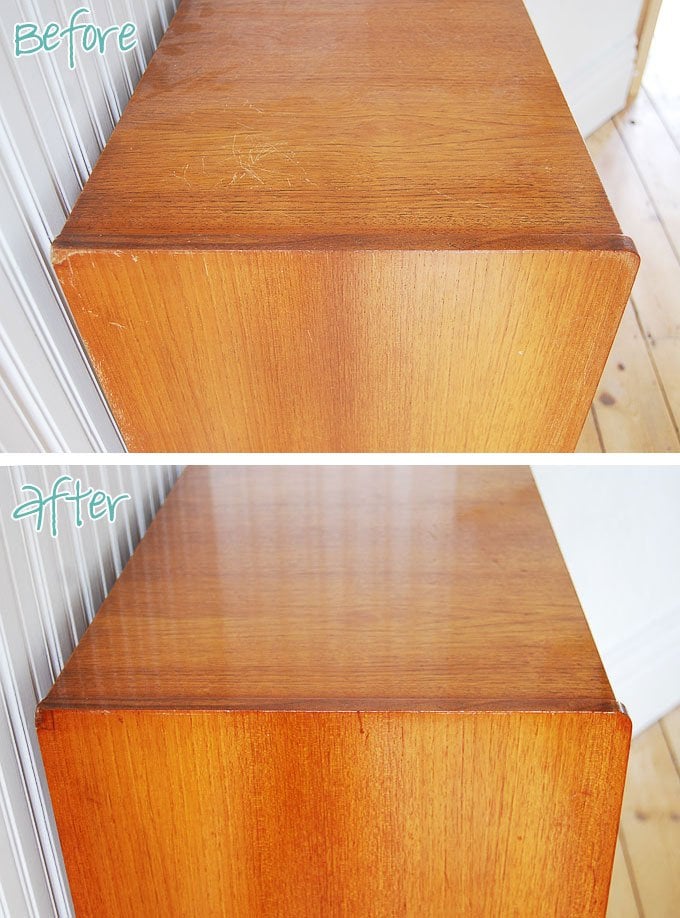
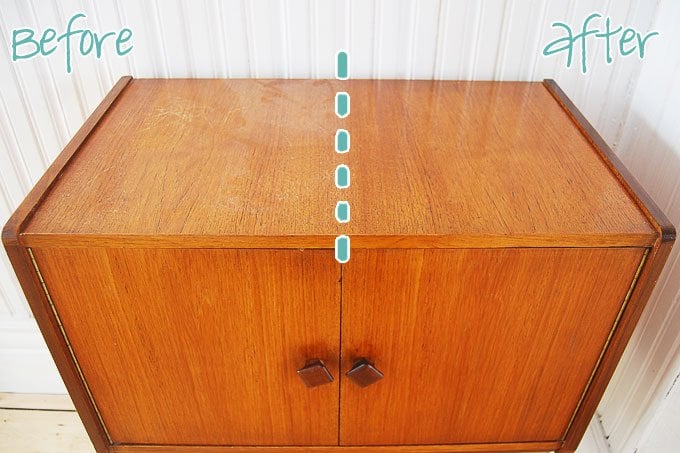
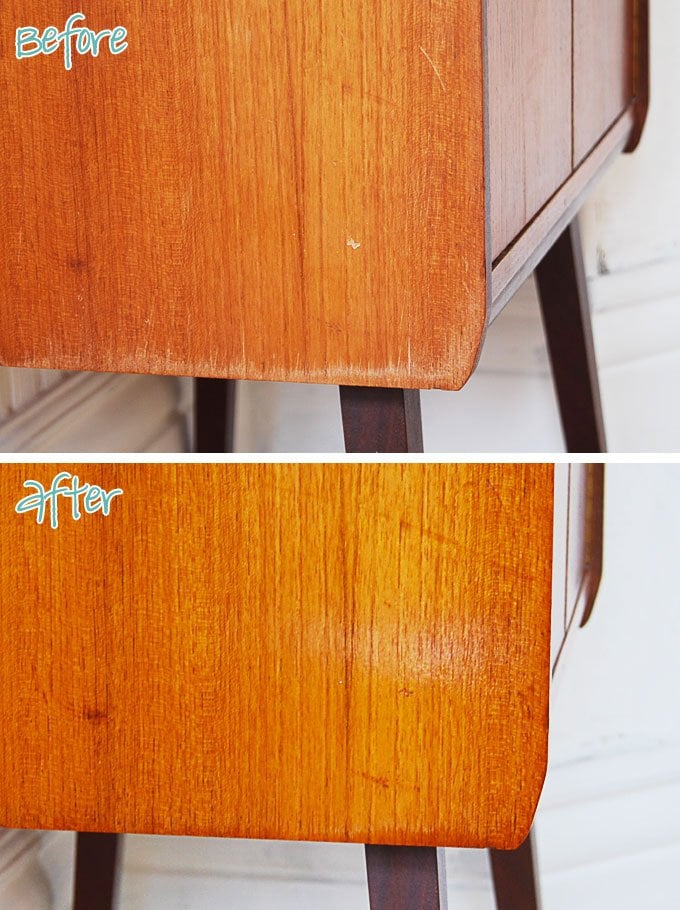
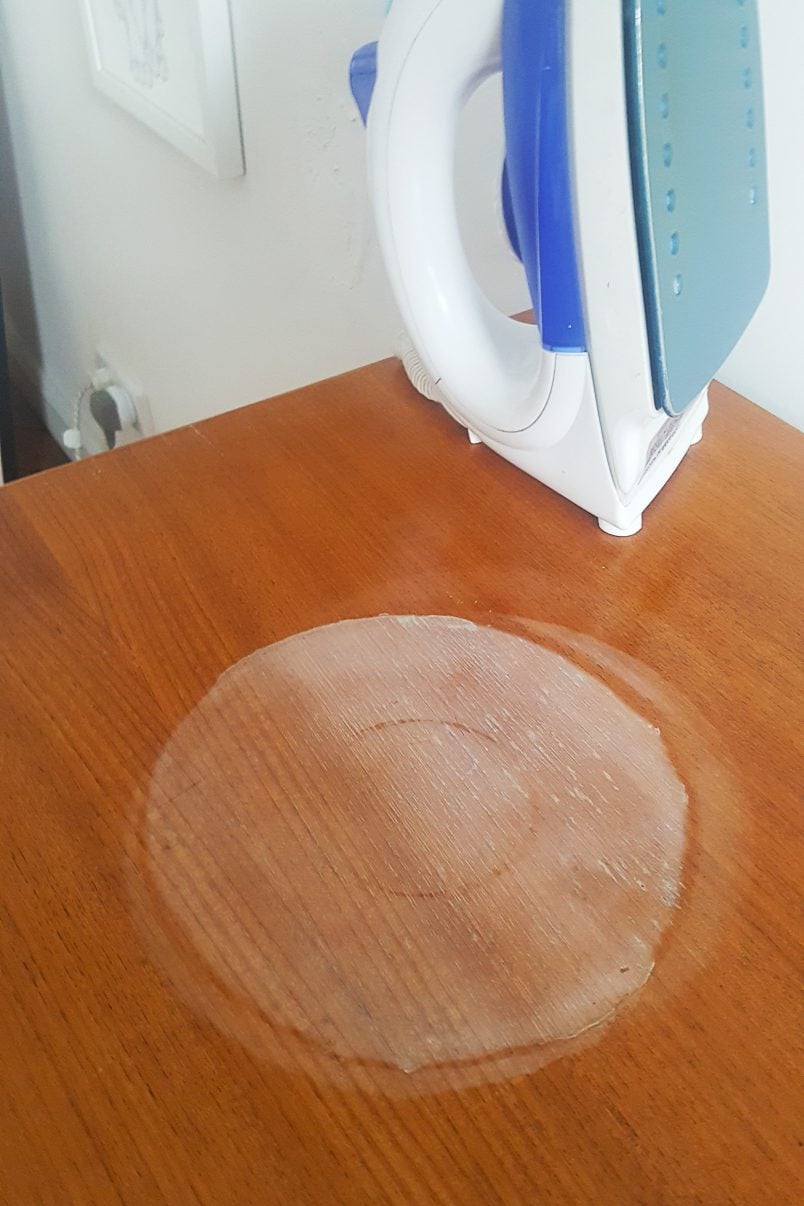
Considering the little cupboard (it’s actually a record cupboard) didn’t look too bad to start with, we were really surprised at what a massive difference a bit of cleaning and polishing made.
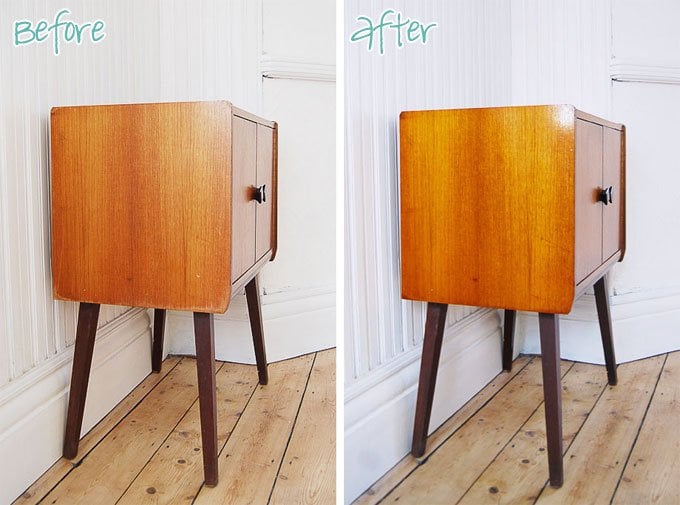
It’s hard to capture how big difference it actually is. The colour of the wood has changed slightly and is much more vibrant than before. The natural texture and grain of the wood is also much more visible now.
Do you love to shop at flea markets and antique fairs, too? Have you recently restored a piece of furniture?


Jesse Jamison says
I just hope that the scratch cover polishes will cover the worst of the scratches in my furniture and I appreciate the tip of not doing it more than once a year. However, I do have some fairly big scratches on one of my tables. I’m thinking it will be best to just leave that repair job to the pros. I imagine I should still clean and fix as many of the problems I can on my own, though. It should make the pros job easier.
Christine says
I’d always leave any bigger problems to the pros, Jesse. If you’re thinking of taking the table to a professional I wouldn’t bother attempting any repairs yourself. It’s probably not worth the effort and it I’d be surprised if it made any difference to the pros if they repaired more than one scratch.
Cx
Christine says
I recently bought a Rococo bed. It has some damage from someones previous attempts to ‘restore’ it. Sadly, the heavily carved footboard has a stain of some sort brushed over it. Can see fine brush streaks that are not in line with the grain. I don’t know what the application is but I’d like to remove it then re-oil the footboard. I’m hoping you can offer me some advise on how to go about it? Thanks in advance!
Christine
Christine says
It sounds like you’ve managed to find a great bed, Christine. It’s difficult to recommend anything without knowing the type of wood and stain/paint used on it. Our favourite paint stripper is Peel Away. There are different types available depending on what type of paint you’re looking to strip and what kind of wood you have. (We by far preferred the smelly caustic one which seemed to work much better.)
Good luck!
Cx
Christine Baker says
Thanks for replying.
My bed frame is walnut. Most of it is as original regarding it finish. Just that outside face of the foot board has been messed with. I think they’ve already stripped it then stained it… its just in all directions. So far I’ve tried using 4 0 wirewool n linseed oil. It seems to be rubbing out the random streaks but it’s also lacking the ‘redness’ of the rest of the bed. Beautiful golden colour walnut (bookend veneer) Maybe I shold do the whole bed in this method (slow n laborious I know). I understand this will also de-value the antique n I’m kind of reluctant but I don’t know how to restore the reddish colour.
Any more advise???
It only cost £163. Very pleased.
Christine says
It’s always difficult to know what the right thing is to do when it comes to more valuable pieces (even if you managed to grab a bargain). It sounds like you could do with some professional advice – maybe it’s worth taking some pictures to a local joinery or antique place to see what they say would be best to do?
Cx
Christine Baker says
Hello again Christine.
Thanks. I don’t know why I haven’t asked my son! He’s a bench joiner/cabinet maker.lol. I’ll ask him.
In using the wire wool, white spirit n linseed oil, it’s actually removed the cross grain brush marks. I’ve then used just linseed oil, allowed it to soak in n buffed it. It looks fabulous so far (tho admittedly I’ve only done the hand carved roses bit in the centre of the footboard!) My husband who thought it a waste of money, now thinks it’s looking amazing!?
Thanks again, Christine.
C.x
Christine says
Always happy to help if we can! :)
Cx
Mary Scholes says
We have a kitchen /diner and my oak dining table has gone very sticky. It doesn’t matter what I use I can’t get rid of the stickiness. I was thinking of using sugar soap to try to remove this sticky coat. Can you please offer any advice.
Many thanks and love the furniture you’ve restored.
Mary
Christine says
We always use sugar soap to clean any furniture that we’re planning on painting. It really removes all dirt, but you have to be careful as it’s really strong and can damage the surface. You will probably have to refinish the surface of the table though. For us, sugar soaps works best on varnished or oiled surfaces. I’d suggest trying a small test area somewhere where you can’t see it like the underside of the table or a leg first – just to be on the safe side!
Cx
Mary Scholes says
Thanks for the advice Christine. Will certainly give it a try and let you know the results
Christine says
No problem, always happy to help if we can! Just remember to be careful – sugar soap is really abrasive.
Cx
Sylwia says
Hi
Love your corner house. your local antique shop looks amazing. Please could I have their name / address?
Christine says
Thanks Sylwia! We mainly visit two antique/second hand shops. There’s one in Levenshulme called The Antiques Village and there’s another in Failsworth called Old Mill Antiques. Both are of course hit and miss as their stock changes a lot, but it’s always worth a try.
Cx
Wooden Furniture says
We do not have restored any furniture but i like the way that you work on it and made more beautiful than before.. I love the 3-step process
Christine says
Thanks! We’re not experts, but it turned out pretty well. Not sure I’d recommend it for propper antiques, but it definitely worked well for a second hand bargain.
Cx
Fin Langman says
Great tutorial and lovely little blog. We have a 2 bed Edwardian maisonette in SW London that we’re about to start doing up. I have a bunch of old furniture ready to be polished and/or repainted. My husband teases me every time I by something else about how I haven’t touched the other stuff yet! Also enjoyed your posts on wallpaper and paint stripping… we have A LOT of woodchip and thick gloss paint to remove ;)
Christine says
Sounds like you have your work cut out, Fin! We always jump at the chance to buy something we like at our local antique place. We may not need it now, but you never know when something fab is going to come along again!
Cx
Jo says
I’ve recently finished upgrading a grubby old writing bureau and before that a teak sideboard for my dining room. The photographs of both are on my instagram page @moogiesgirl if you fancy a neb.
I used spray paint on both for a flawless finish but would only recommend using spray if you have a garage or shed you can spray in.
Next up a blanket box (which I’ve had for years and never got round to sorting) for our bedroom then maybe a wardrobe and drawers for the spare bedroom if I can find any I like the shape of for a reasonable price.
Christine says
Wow, you’ve definitely been busy, Jo! We tried spray painting outside once – definitely not a good idea! ;)
Cx
Jessica@CapeofDreams says
Great find! It is such a cute little cupboard, and it looks so much better now that it had received the treatment it deserves. I used this method recently to refresh my kitchen cabinets and have them looking like new.
Christine says
Thanks Jessica! We’re really happy with how it turned out. Your kitchen looks great, too! It’s amazing what a bit of cleaning and polishing can do!
Cx
Trish says
Good timing! I bought a bed at an auction for £4 a couple of months ago and this fool of Took managed to drop the headboard on Sunday and made a big chip in the wood (I think it’s polished oak). I had a look at those hard wax fillers on the internet but I’m a bit dubious. Don’t suppose you’ve tried it before? Any tips?
Love that record cabinet btw!
Christine says
A bed for £4?! Lucky you! Depending on where and how big the chip is, I’d try to remove it using the method we used to remove the dents in our wooden floor. It worked really well for us and I’d just repeat the process until the grain of the wood has risen again. If it’s too deep, the wax filler sticks aren’t actually a bad choice (I’d use the ones where there are multiple colours in the pack so that you can mix them to match your wood exactly – Fiddes does something called Furniture Care Pack).
Good luck with whatever method you go for!
Cx