MENUMENU
  • Home
  • About Us
  • Work With Us
  • Our Favourite Tools

Little House On The Corner

DIY & Home Improvement

MENUMENU
  • Blog
  • Projects
    • Our Favourite Projects
          • DIY Outdoor Daybed with Canopy
          • DIY Outdoor Daybed With Canopy

          • DIY Epoxy Resin Dining Table
          • DIY Epoxy Resin Dining Table

          • 5 Floor Sanding Mistakes And How To Avoid Them | Little House On The Corner
          • What No One Will Tell You About Sanding Your Floors

    • Home Improvement & DIY
          • Hallway with Paean Black Front Door After Editing With Interior Presets for Lightroom by Little House On The Corner
          • How To Create A Home Renovation Budget

          • Floorsanding In Progress
          • What No One Will Tell You About Sanding Your Floors (& How We Did It)

          • How To Plan & Install Panelling | Little House On The Corner
          • How To Plan & Install Panelling

    • Painting & Decorating
          • painted wardrobe in Soumak by paint & paper library
          • How To Paint A Wardrobe

          • Dark Blue and Grey Painted Kitchen Cabinets
          • How To Paint Kitchen Cabinets + Tips For A Professional & Long Lasting Finish

          • What To Do When You've Chosen The Wrong Paint Colour?
          • What To Do When You’ve Chosen The Wrong Paint Colour & How To Fix It!

    • Furniture Upgrades
          • DIY Slatted Radiator Cover
          • DIY Slatted Radiator Cover

          • Beat Floor Lamp and Bar Cart
          • DIY Bar Cart

          • DIY Dining Room Bench | Little House On The Corner
          • DIY Dining Room Bench

    • Outside & Garden
          • DIY Logstore
          • DIY Log Store

          • DIY Slatted Garden Fence | Little House On The Corner
          • DIY Slatted Garden Fence

          • How To Lay A Gravel Driveway
          • How To Lay A Gravel Driveway

    • Free Printables
          • Cleaning Checklist - Free Printable
          • The Best House Cleaning Checklist

          • Free Printable Paper Houses for Advent Calendar
          • DIY Printable Advent Calendar Village

          • The Easy and Free Way To Organise Screws and Nails
          • The Easiest Way To Organise Screws And Nails

    • Craft & Art
          • DIY Pegboard
          • DIY Pegboard

          • DIY Modern Geometric Serving Tray
          • DIY Modern Geometric Serving Tray

          • DIY Guess Who Game - Setting Out Board | Little House On The Corner
          • DIY Guess Who Game

    • Cleaning & Organizing
          • Cleaning Checklist - Free Printable
          • The Only Cleaning Checklist You’ll Ever Need

          • DIY Floating Spice Rack | Little House On The Corner
          • DIY Floating Spice Rack

          • 30 Day Spring Clean Checklist - Little House On The Corner
          • 30 Day Spring Clean Challenge

    • Holidays & Festivities
          • DIY Giant Star and Snowflake Light | Little House On The Corner
          • DIY Giant Star and Snowflake Light

          • Free Halloween Printable Book Covers
          • Halloween Book Covers (Free Printable!)

          • Gingerbread style paper advent calendar village - Little House On The Corner
          • DIY Printable Advent Calendar Village

  • House Tour
        • Our Edwardian House
        • Our Edwardian House (1st Home)
        • Our Berlin City Centre Apartment
        • Our Berlin City Centre Apartment (2nd Home)
        • Take The Tour | Our Art Nouveau Apartment | Little House On The Corner
        • Our Berlin Art Nouveau Apartment (3rd Home)
        • berlin riverside apartment house tour
        • Our Berlin Riverside Apartment (4th Home)
  • Shop
    • The Little Corner Shop
    • Shop Our First Home
    • Shop Our Current Home
    • Our Favourite Amazon Finds

Remove Dents In Wood – Easy Repair In Just 10 Minutes

  • Facebook
  • Twitter

These dents mysteriously appeared on our living room floor and, needless to say, are one of those things that weren’t quite planned. Repairing the floor has been on our very, very long To-Do list for a while. But now it’s done!

Edwardian Living Room With Fireplace and Eames Lounge Chair | Little House On The Corner

All in all, it took less than 30 minutes of work to repair the floor and I’m really surprised how easy and effective the method we used was. You can even use the same method to repair other wooden surfaces like furniture, moulding, doors, etc.

Here’s our Step by Step guide on how to remove dents in wood (floors or furniture)

How To Remove Dents In Wood | Little House On The Corner

This is what you’ll need to remove dents in wood:

  • Sandpaper (we used 120 grit for the floor, but would use something finer on furniture)
  • Damp tea towel
  • Iron
  • Varnish, Paint or whatever other finish the item you are working on has

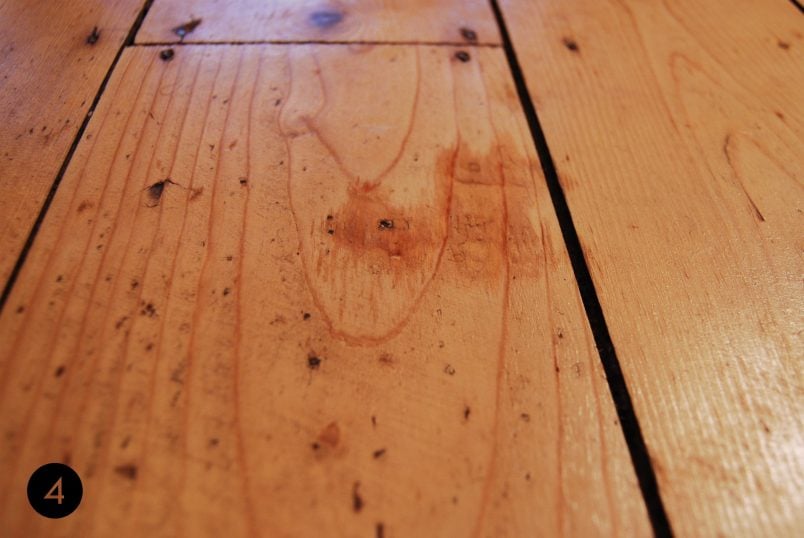
1. Prepare Your Floors

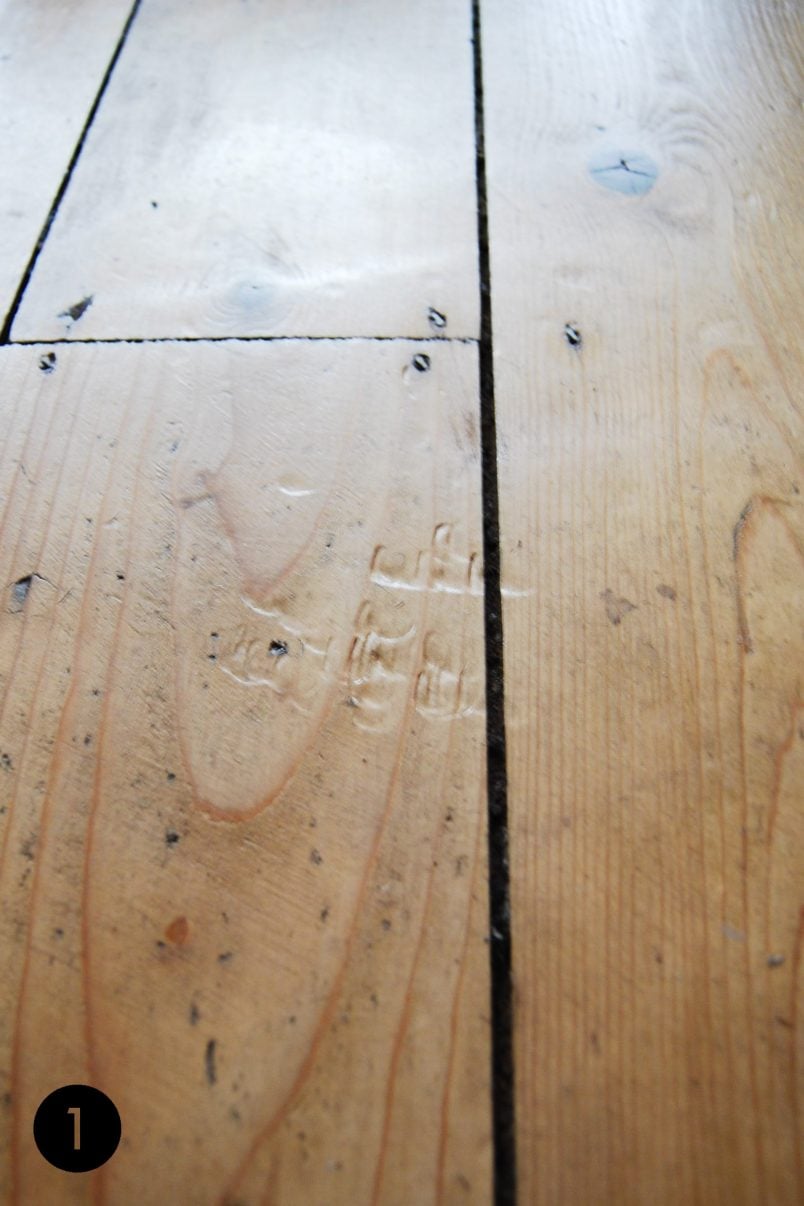
This is the floor before starting work. I have to admit that I was slightly sceptical about the method, but it worked so well! We can’t recommend it highly enough! 

You can see that there are clear marks that look like they may have been caused by a stiletto heel.
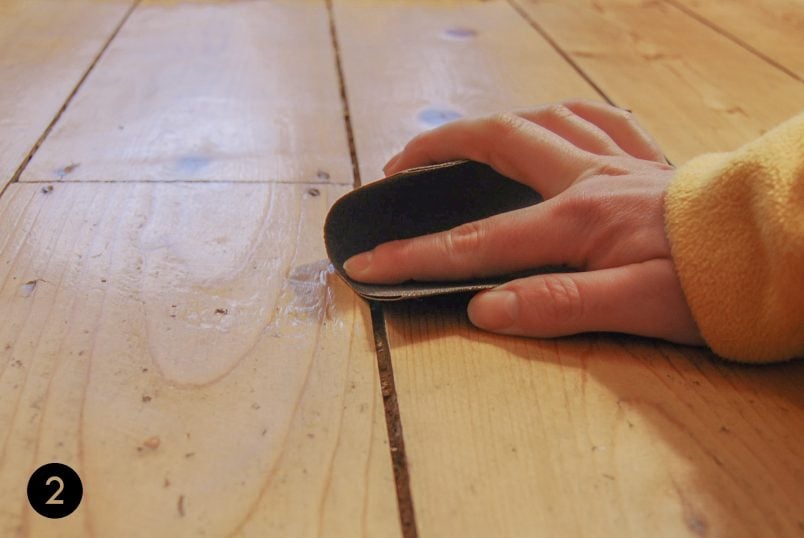
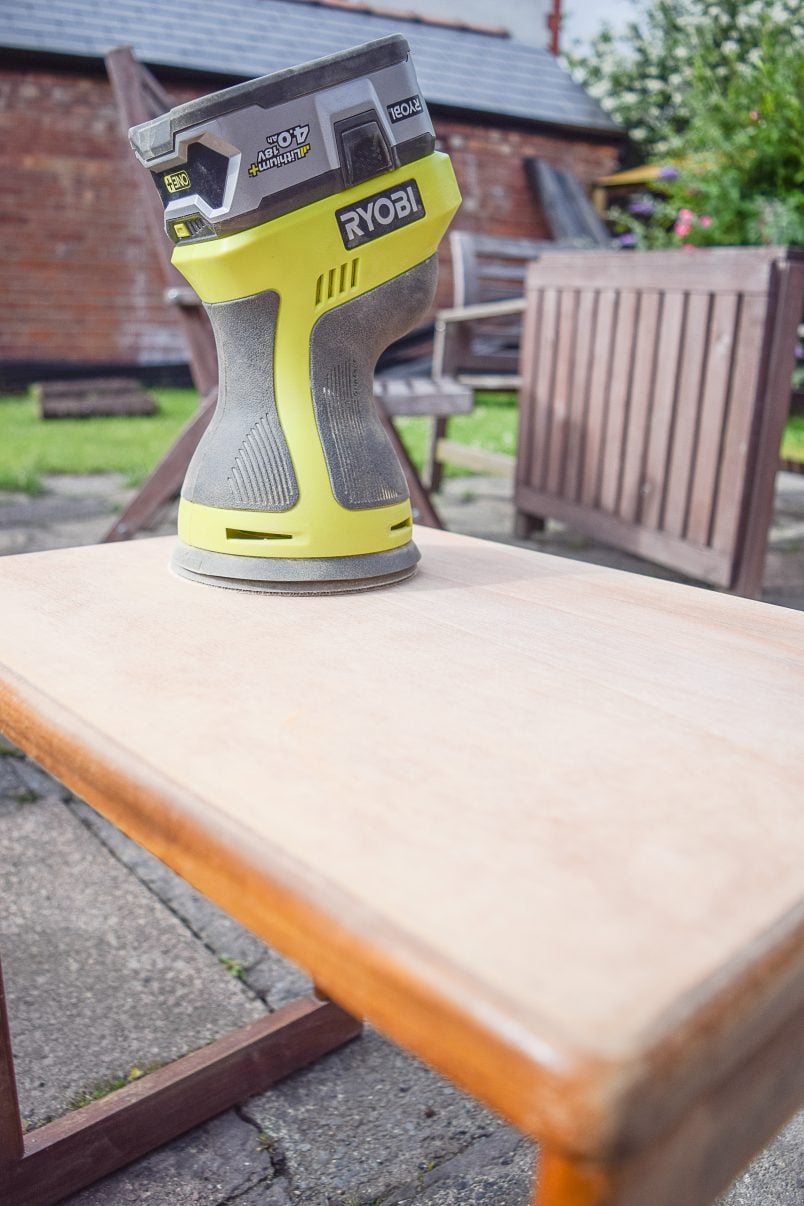
How To Remove Dents In Wood | Step 1 | Little House On The Corner

2. Sand The Floor

In order to allow the wood to return to its original shape, you will have to remove any layers of paint or varnish and then slightly roughen up the surface with some fine sandpaper.

How To Remove Dents In Wood | Step 2 | Little House On The Corner

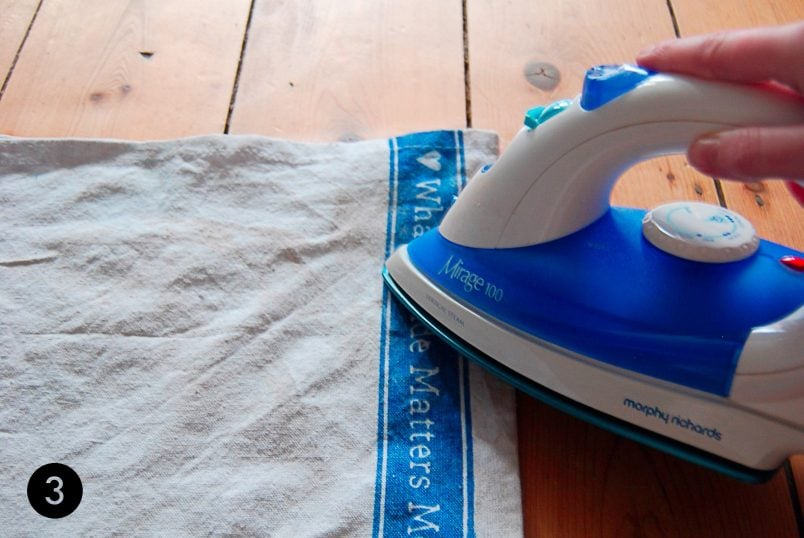
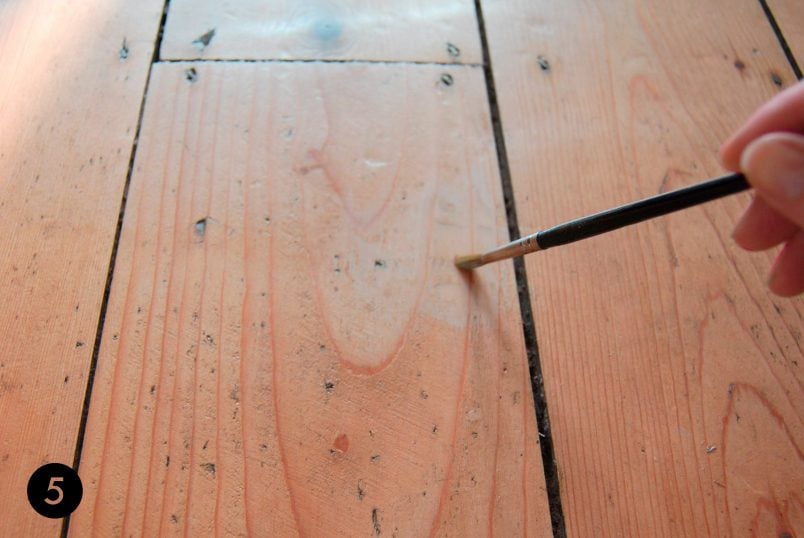
3. Iron The Floor To Remove The Dents

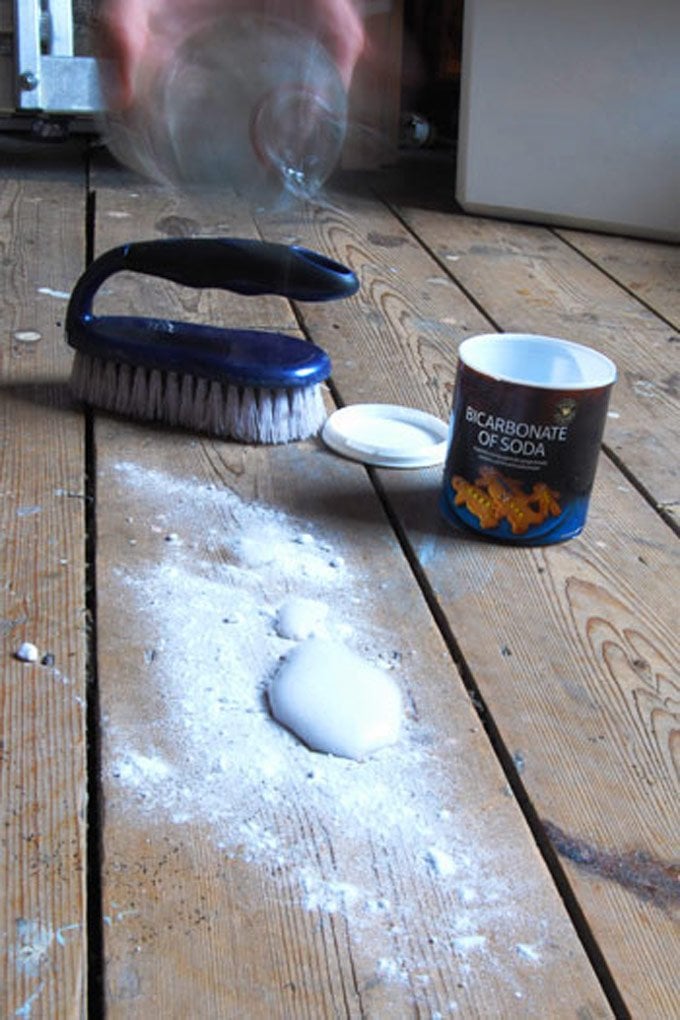
Turn on the iron and wait until it has warmed up completely meanwhile soak a tea towel in some water until it is wet, but not dripping. Then place the towel onto the area with the dents. Make sure the towel is flat and has no folds in it.

With the hot iron, carefully rub over the area of the towel under which the dent you want to remove is. Only do this for a second or two at a time and make sure that the towel is always damp so that enough steam can develop to penetrate the wood.

Keep checking the area and repeat the process as necessary until the wood grain has risen.

How To Remove Dents In Wood | Step 3 | Little House On The Corner

4. Let The Floor Dry

You will now have to let the area you’ve been working on dry thoroughly. You can see that the darker area is wet where the steam has penetrated the wood. The lighter area hasn’t been sanded and therefore the steam can’t penetrate the varnish.

When it’s completely dry, give it another quick sand (always in direction of the grain) with some fine sandpaper.

How To Remove Dents In Wood | Step 4 | Little House On The Corner

5. Reseal The Floor

The last step is to reseal the surface. In our case, the floor was covered in clear varnish which now just needs touching up.

How To Remove Dents In Wood | Step 5 | Little House On The Corner

And here’s the result:

How To Remove Dents In Wood | Little House On The Corner

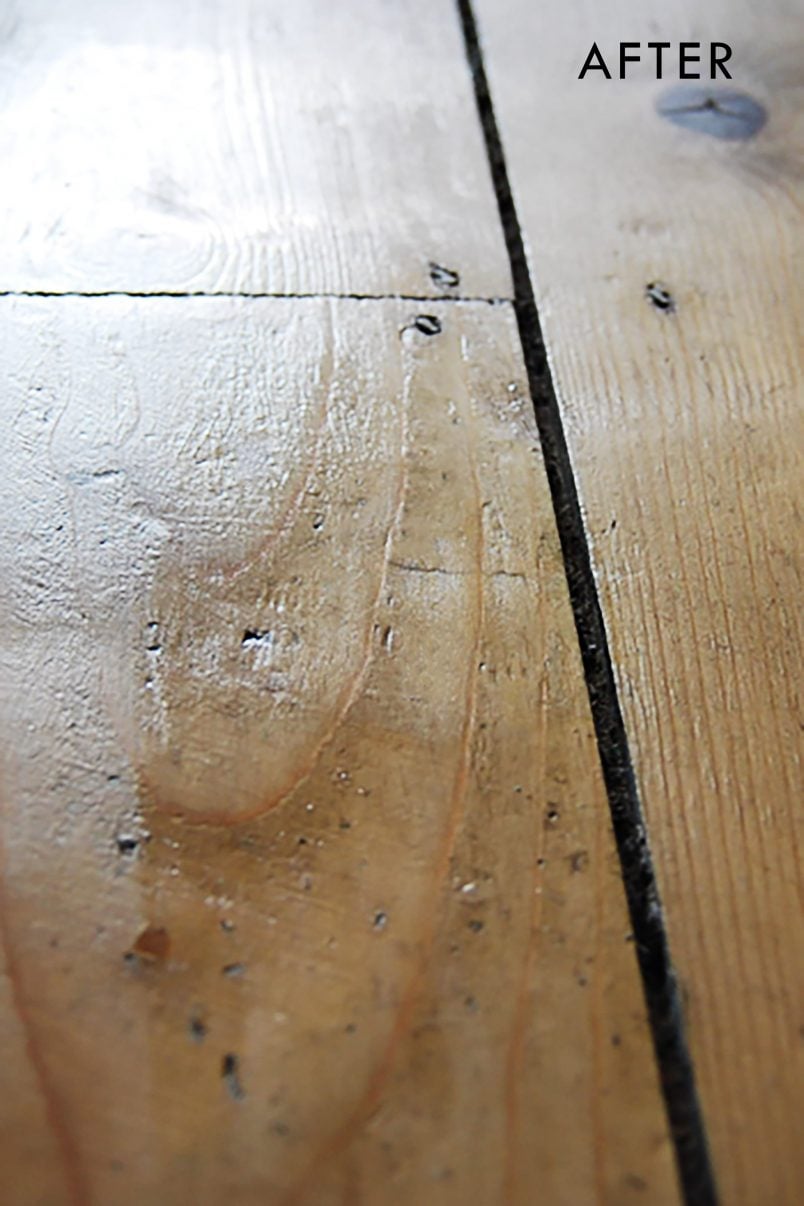
You’d hardly know that there was ever a dint there! I can’t emphasize enough how easy and effective this method is. It will only work on normal wood surfaces and not on compressed wood or varnished surfaces.

Do you have any damaged furniture or floorboards? If you try this method, let us know how you get on!

If you found this post helpful, you’ll love these ones, too!

How To Remove Watermarks From Wooden Furniture - Ironing | Little House On The Corner
How To Remove Watermarks From Wooden Furniture
How To Restore Wooden Furniture
How To Refresh Wooden Furniture
Sanding Wooden Furniture
7 Steps To Painting Wooden Furniture & Achieve A Perfect Finish
How To Remove The Smell Of Urine From Wooden Floors

  • Facebook
  • Twitter

Christine 16 Comments

the PAST
the FUTURE

Subscribe To Our Newsletter

Sign up with your email address for secret projects, DIY advice & lots of fun!

Privacy Policy

Leave a Reply Cancel reply

Your email address will not be published. Required fields are marked *

This site uses Akismet to reduce spam. Learn how your comment data is processed.

Comments

  1. Lilly says

    16/04/2020 at 23:04

    Our swivel chair has put dents onto the floorboards, probably about 1m2 area is pushed down and bumpy and now looking to find a way to fix it. Any suggestions?

    Reply
    • Christine says

      19/04/2020 at 10:00

      In general, I think that the method we shared here could work, it’s just a really large area to cover. Obviously, the best way to completely remove any dents would be to sand the whole floor and start again from scratch. Unless the dents really bother you though, I’d be tempted to leave them. Ultimately, it’s part of the character of your floor and removing them would be a lot of work.
      Cx

      Reply
  2. Pavel Jakubů says

    04/12/2018 at 17:46

    I want to thank you very much for this tip. It helped me to repaire a small wooden stool. I am sorry for my English – I am from the Czech Republic and I have to note that it works here as well :-)

    Reply
    • Christine says

      04/12/2018 at 20:49

      So glad it worked for you, Pavel! Thanks for the feedback!
      Cx

      PS. Your English is great – nothing to worry about!

      Reply
  3. Vanessa says

    23/08/2017 at 03:20

    I have never seen this done before, so thanks! Let’s hope I remember it when I need to fix a dent in the future.

    Reply
    • Christine says

      23/08/2017 at 06:42

      It’s a trick I learned at a joinery, Vanessa. I love how sometimes little tricks can make a big difference!
      Cx

      Reply
  4. Mandy ryan says

    23/11/2015 at 20:36

    hi, if I have large gaps inbetween my floorboards, what do you suggest using as a filler? Many thanks, Mandy

    Reply
    • Christine says

      24/11/2015 at 12:24

      That’s not an easy question to answer Mandy! We had large gaps between our floorboards in our master bedroom, so we took up all floorboards and pushed them closer together (make sure they don’t touch though). Alternatively you can fill the gaps with a mixture of sawdust and woodglue, but this isn’t an overly durable solution. There are also special products to seal the gaps – they’re essentially V-shaped strips of plastic that you squash into the joint. (something like this: . It really all depends on how big the gap is, but I’d say the two real options are move your floorboards closer together or live with the gaps.
      Cx

      Reply
  5. Countingstarsbackwards says

    23/08/2015 at 04:41

    An old trick for fixing dents in frame restoration would work in a similar way, especially if you don’t want to deal with sanding/fixing the finish. Take a sewing pin and pepper the surface of the dent with tiny holes. Take a small bit of toilet tissue, wet it, and ball it into the dent. Leave it until it’s dry and the dent should be fixed when you take it off.

    Reply
    • Christine says

      23/08/2015 at 08:39

      That’s a great tip! If we ever have any more dents to repair we’ll definitely give it a try – thanks for sharing.
      Cx

      Reply
    • Izzy says

      19/12/2016 at 22:33

      Thanks so much for this tip!!! I have a stained and sealed floor, so I couldn’t do the sanding back step, but this has worked a treat! :)

      Reply
      • Christine says

        20/12/2016 at 12:42

        I’m so happy to hear that it worked for you, Izzy! Thank you so much for the feedback – we love hearing when things have worked out!
        Cx

        Reply
  6. Jesse says

    17/01/2013 at 07:40

    Great to see this in action! I’ve read about this before, but I somehow didn’t believe it would really work. We have dents all over our floors, but I’m determined to tackle them now.

    Reply
    • Christine says

      17/01/2013 at 08:58

      Thanks Jesse! I still can’t get over how easy and effective it was. You should definitely give it a try, it’s so worth it!

      Reply
  7. Magali@TheLittleWhiteHouse says

    16/01/2013 at 12:21

    Wow! Amazing! It’s like there never was any problem on that part of the wood!

    Reply
    • Christine says

      16/01/2013 at 13:28

      I know! I could hardly believe how well it worked. I almost wish I had some dents in my furniture to repair!
      Cx

      Reply
Painting Checklist

Our Favourite Tools

*Contains Affiliate Links*

Things To Know

ABOUT US

CONTACT US

DISCLAIMER

Privacy Policy

Shop Our Home!

OUR FAVOURITE TOOLS

SHOP OUR HOME

Disclaimer

As an Amazon Associate I earn from qualifying purchases.

Please read our full disclaimer here!

Let’s Be Friends!

Keep Up To Date!

Subscribe for exclusive content and tutorials!

Thank you!

Copyright © 2023 · Little House On The Corner · This Website is powered by Cloudways and the Genesis Framework