MENUMENU
  • Home
  • About Us
  • Work With Us
  • Our Favourite Tools

Little House On The Corner

DIY & Home Improvement

MENUMENU
  • Blog
  • Projects
    • Our Favourite Projects
          • DIY Outdoor Daybed with Canopy
          • DIY Outdoor Daybed With Canopy

          • DIY Epoxy Resin Dining Table
          • DIY Epoxy Resin Dining Table

          • 5 Floor Sanding Mistakes And How To Avoid Them | Little House On The Corner
          • What No One Will Tell You About Sanding Your Floors

    • Home Improvement & DIY
          • Hallway with Paean Black Front Door After Editing With Interior Presets for Lightroom by Little House On The Corner
          • How To Create A Home Renovation Budget

          • Floorsanding In Progress
          • What No One Will Tell You About Sanding Your Floors (& How We Did It)

          • How To Plan & Install Panelling | Little House On The Corner
          • How To Plan & Install Panelling

    • Painting & Decorating
          • painted wardrobe in Soumak by paint & paper library
          • How To Paint A Wardrobe

          • Dark Blue and Grey Painted Kitchen Cabinets
          • How To Paint Kitchen Cabinets + Tips For A Professional & Long Lasting Finish

          • What To Do When You've Chosen The Wrong Paint Colour?
          • What To Do When You’ve Chosen The Wrong Paint Colour & How To Fix It!

    • Furniture Upgrades
          • DIY Slatted Radiator Cover
          • DIY Slatted Radiator Cover

          • Beat Floor Lamp and Bar Cart
          • DIY Bar Cart

          • DIY Dining Room Bench | Little House On The Corner
          • DIY Dining Room Bench

    • Outside & Garden
          • DIY Logstore
          • DIY Log Store

          • DIY Slatted Garden Fence | Little House On The Corner
          • DIY Slatted Garden Fence

          • How To Lay A Gravel Driveway
          • How To Lay A Gravel Driveway

    • Free Printables
          • Cleaning Checklist - Free Printable
          • The Best House Cleaning Checklist

          • Free Printable Paper Houses for Advent Calendar
          • DIY Printable Advent Calendar Village

          • The Easy and Free Way To Organise Screws and Nails
          • The Easiest Way To Organise Screws And Nails

    • Craft & Art
          • DIY Pegboard
          • DIY Pegboard

          • DIY Modern Geometric Serving Tray
          • DIY Modern Geometric Serving Tray

          • DIY Guess Who Game - Setting Out Board | Little House On The Corner
          • DIY Guess Who Game

    • Cleaning & Organizing
          • Cleaning Checklist - Free Printable
          • The Only Cleaning Checklist You’ll Ever Need

          • DIY Floating Spice Rack | Little House On The Corner
          • DIY Floating Spice Rack

          • 30 Day Spring Clean Checklist - Little House On The Corner
          • 30 Day Spring Clean Challenge

    • Holidays & Festivities
          • DIY Giant Star and Snowflake Light | Little House On The Corner
          • DIY Giant Star and Snowflake Light

          • Free Halloween Printable Book Covers
          • Halloween Book Covers (Free Printable!)

          • Gingerbread style paper advent calendar village - Little House On The Corner
          • DIY Printable Advent Calendar Village

  • House Tour
        • Our Edwardian House
        • Our Edwardian House (1st Home)
        • Our Berlin City Centre Apartment
        • Our Berlin City Centre Apartment (2nd Home)
        • Take The Tour | Our Art Nouveau Apartment | Little House On The Corner
        • Our Berlin Art Nouveau Apartment (3rd Home)
        • berlin riverside apartment house tour
        • Our Berlin Riverside Apartment (4th Home)
  • Shop
    • The Little Corner Shop
    • Shop Our First Home
    • Shop Our Current Home
    • Our Favourite Amazon Finds

DIY Concrete Advent Stars

  • Facebook
  • Twitter

It’s been a crazy few weeks around here and there’s so much going on that my head feels like it may explode if things don’t start to calm down very soon. With so many changes happening I’ve almost completely been ignoring the fact that Christmas is now only 30 days away (not sure what happened to the rest of 2016!).

Now that the advent weeks are fast approaching we thought it would be fun to make an advent wreath. Here in Germany, everyone has one so making one seemed like a perfect addition to our Christmas decorations.

DIY Concrete Advent Wreath - Prepare Your Moulds | Little House On The Corner

Traditionally they’re fir wreaths with four candles and decorations such as berries and dried fruit but we decided to take a much more modern approach and made four concrete advent stars instead.

DIY Concrete Advent Stars | Little House On The Corner

This is what you’ll need if you’d like to make your own DIY concrete advent stars

DIY Concrete Advent Wreath - Supplies | Little House On The Corner

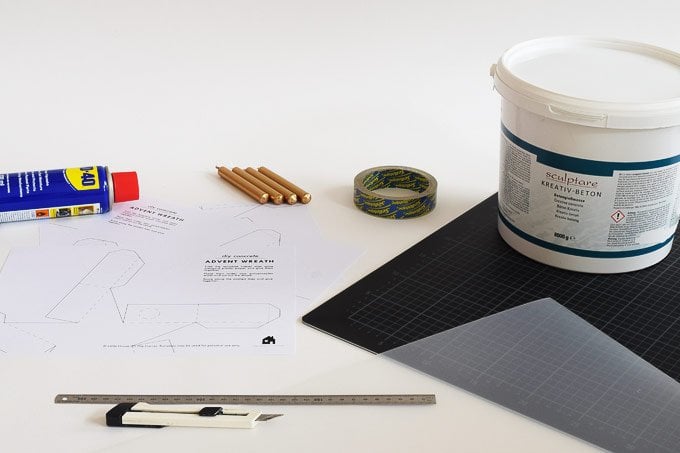
  • Concrete – (ready mixed craft concrete or you could mix your own)
  • Candles (we’d recommend using thin ones – these are the ones that we used)
  • Star moulds – you can download the free printables to make them here
  • Sellotape
  • Polypropylene sheet – ideally around 0.5mm thick (basically a sheet of clear plastic)
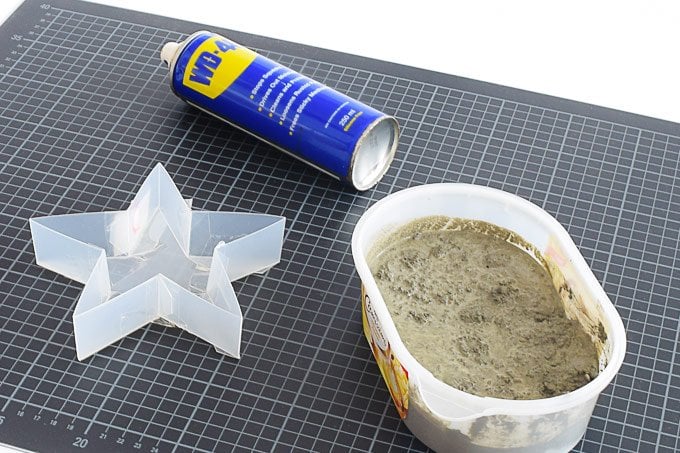
  • WD-40 (optional)
  • A bowl & something to mix the concrete with
  • Scales
  • Craft knife
  • Printer & paper

This is how to make the concrete advent stars

Make your star moulds.

#1 To make your moulds download the templates and print them onto some standard paper. Like most people, we only have an A4 printer which is why we set out the templates so they can easily be printed and glued together.

DIY Concrete Advent Wreath - Prepare Your Moulds | Little House On The Corner

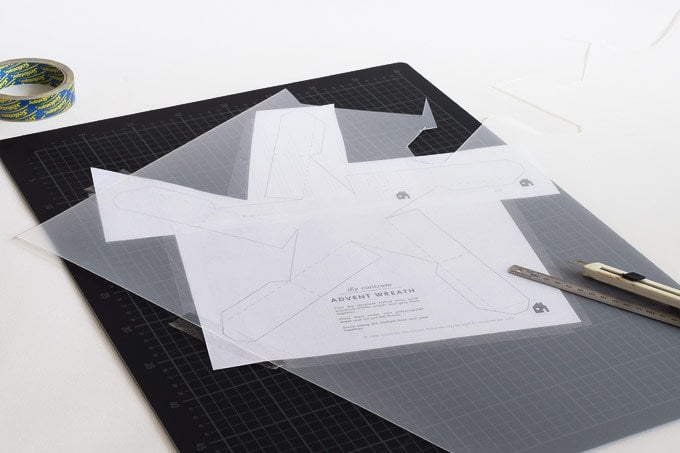
#2 When you’ve prepared your four star templates place them under the polypropylene sheet and secure them with some sellotape.

#3 Next cut out the four star templates – the solid lines are where you have to cut right through the polypropylene and the dashed lines are where you just need to lightly score it to enable a cleaner fold. Don’t forget to cut out a hole for your candle. We’ve added a dashed circle on the template which is where your hole should be but the exact size will depend on the candles you’re using (we’d recommend using slim ones).

DIY Concrete Advent Wreath - Prepare Your Moulds | Little House On The Corner

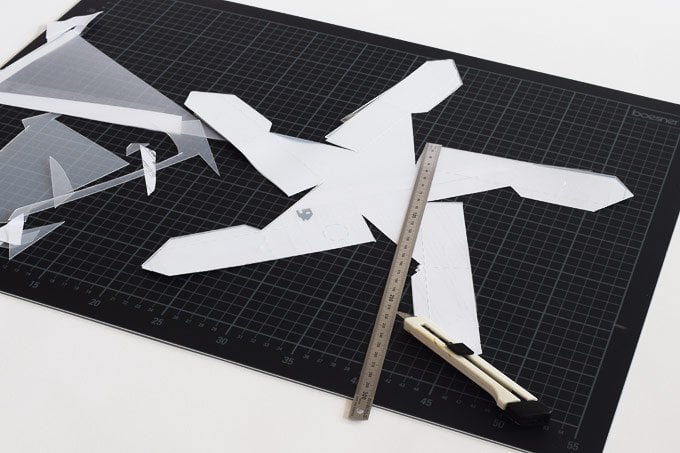
#4 When you’ve cut out the stars it’s time to fold them. The polypropylene is really easy to fold if you’ve scored it beforehand. Then glue the shape together with some sellotape. Make sure that the tabs are glued to the outside of the star – you want the inside where you’ll be pouring the concrete to be as smooth and clean as possible.

DIY Concrete Advent Wreath - Prepare Your Moulds | Little House On The Corner

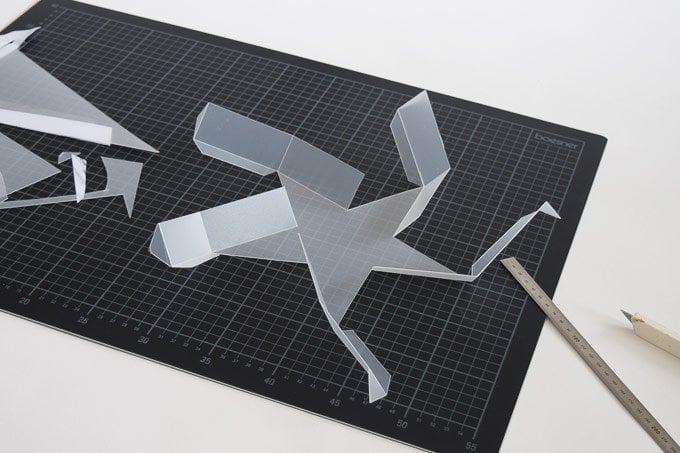
We also added a piece of sellotape to the inside corners of the star where there were any joins. It probably wasn’t necessary but we wanted to make certain that none of the concrete could leak.

DIY Concrete Advent Wreath - Prepare Your Moulds | Little House On The Corner

Prepare & add your concrete.

#5 When you’ve prepared all of your star moulds it’s time to mix your concrete. Because we wanted to try something new we used a ready mixed craft concrete for this project but for all previous concrete projects we mixed our concrete ourselves (you can see our concrete recipe here). Both concrete methods worked well but mixing your own is a lot cheaper!

#6 Before you add your ready mixed concrete to the star moulds give them a quick spray with WD-40. It’s probably optional as the polypropylene is smooth but it should still make it easier to remove the concrete from the mould once everything has dried.

#7 Stick some tape over the opening you made for your candle and pour in the concrete. Make sure that the corners of the star are completely filled, too.
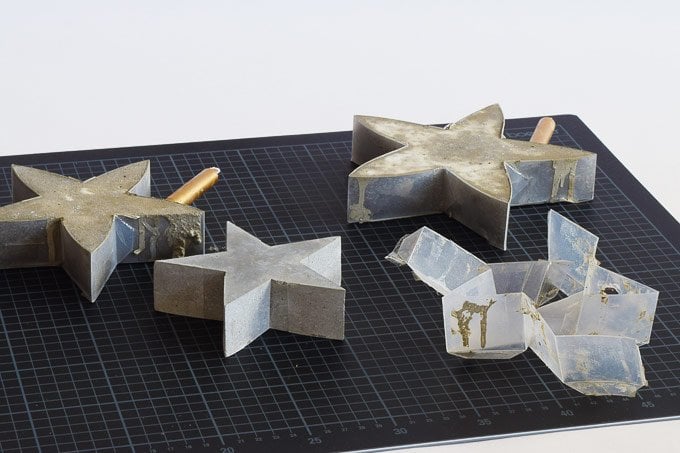
DIY Concrete Advent Wreath - Mixing Concrete | Little House On The Corner

Add the candle.

#8 Remove the piece of tape that covered the hole in the side of the mould and insert the candle about 1cm deep into the concrete star. You might have to support the candle so that it stays straight while the concrete sets. You can remove the candle when the concrete has set but you have to insert it now in order to make the hole to place your candles in.

Tip: Don’t worry if one of your candles gets stuck in the dried concrete. We sprayed the end of the candle with WD-40 before pushing it into the concrete but one of ours still got stuck so we just lit it and let it burn completely down before removing the last bit of wax that got stuck in the hole.

Wait.

#9 For me this is always the most difficult part of any project. You should wait at least 2-3 days before even thinking about removing the concrete from the mould. It probably still won’t be completely dry so it’s a good idea to give it a couple more days to thoroughly harden.

DIY Concrete Advent Wreath | Little House On The Corner

Decorate, light & enjoy.

#10 Decorating your concrete stars is, of course, totally optional. We really like the concrete finish so just left them as they are but you could get as creative as you’d like.

DIY Concrete Advent Wreath - Prepare Your Moulds | Little House On The Corner

#11 All that’s left to do is insert a candle and enjoy your new concrete advent stars!

Although it seems like there are loads of steps to this project it’s actually really easy. Making the star moulds is the fiddliest and most time-consuming part but then it’s almost just a matter of mixing concrete and waiting.

DIY Concrete Advent Wreath - Prepare Your Moulds | Little House On The Corner

I love how these turned out and how modern and clean they look. I really enjoy using concrete and whilst I know it’s not the most festive of materials I actually really like the modern take on an advent wreath.

DIY Concrete Advent Wreath - Prepare Your Moulds | Little House On The Corner

Do you decorate your home for Christmas? Do you usually have an advent wreath? Have you ever made anything with concrete?

PS. We love to see if you make anything we share here so why not take a picture and share your projects with us over on Instagram? Use the hashtag #makecreatelove so that we can see what fun things you’ve made!

  • Facebook
  • Twitter

Jan Leave a Comment

the PAST
the FUTURE

Subscribe To Our Newsletter

Sign up with your email address for secret projects, DIY advice & lots of fun!

Privacy Policy

Leave a Reply Cancel reply

Your email address will not be published. Required fields are marked *

This site uses Akismet to reduce spam. Learn how your comment data is processed.

Painting Checklist

Our Favourite Tools

*Contains Affiliate Links*

Things To Know

ABOUT US

CONTACT US

DISCLAIMER

Privacy Policy

Shop Our Home!

OUR FAVOURITE TOOLS

SHOP OUR HOME

Disclaimer

As an Amazon Associate I earn from qualifying purchases.

Please read our full disclaimer here!

Let’s Be Friends!

Keep Up To Date!

Subscribe for exclusive content and tutorials!

Thank you!

Copyright © 2023 · Little House On The Corner · This Website is powered by Cloudways and the Genesis Framework