* If you prefer the look of thinner floating shelves, we built some of them, too! You can see our DIY guide on how to build super thin floating shelves here!*
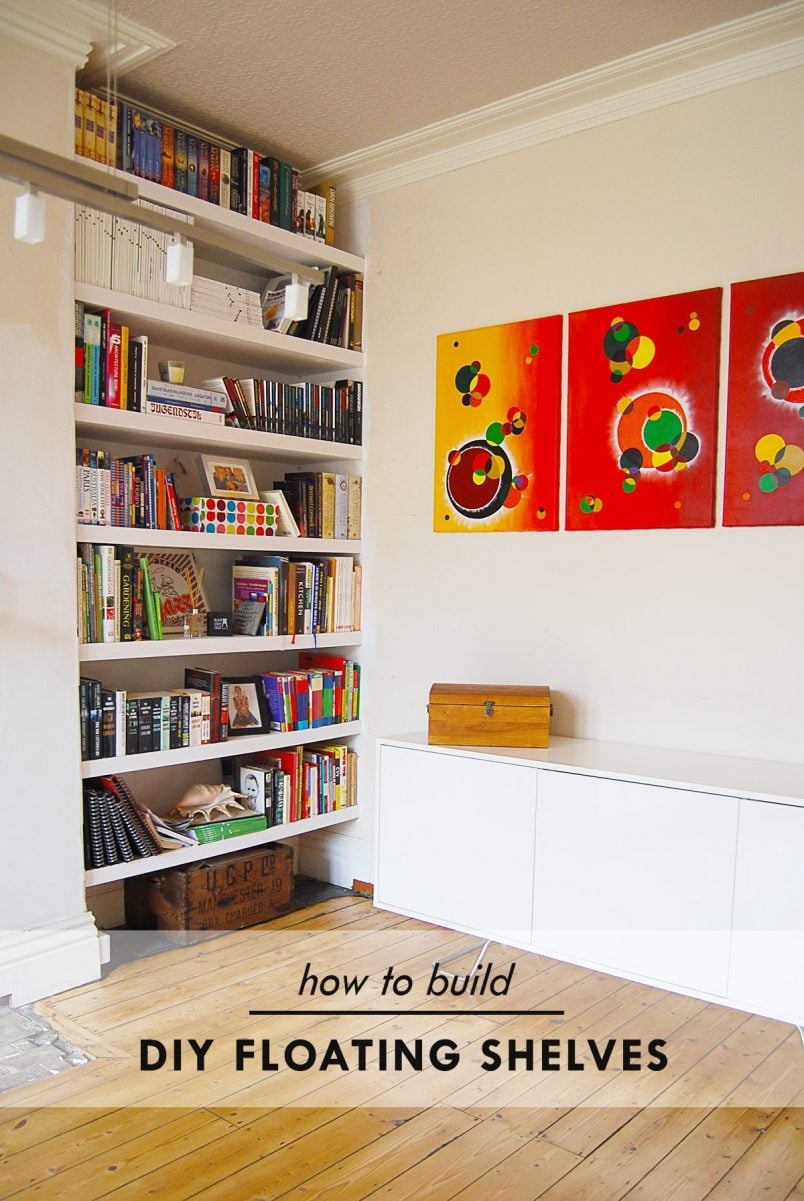
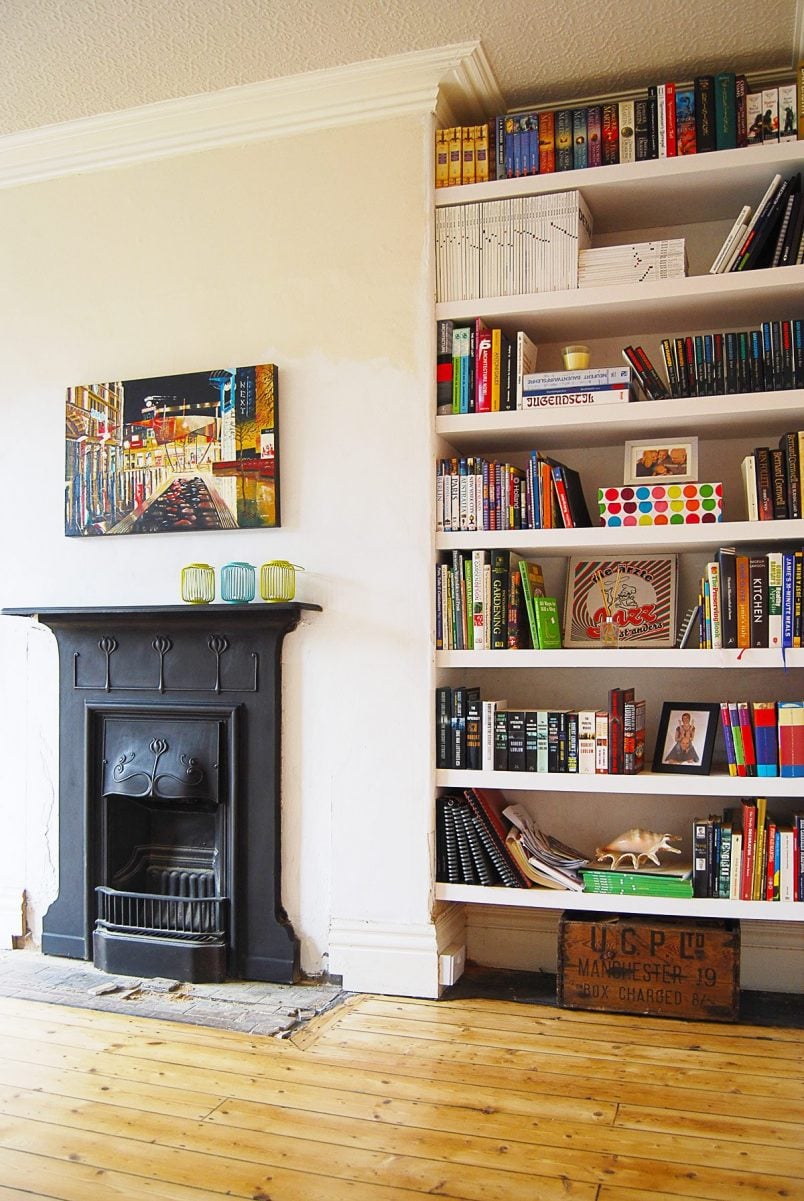
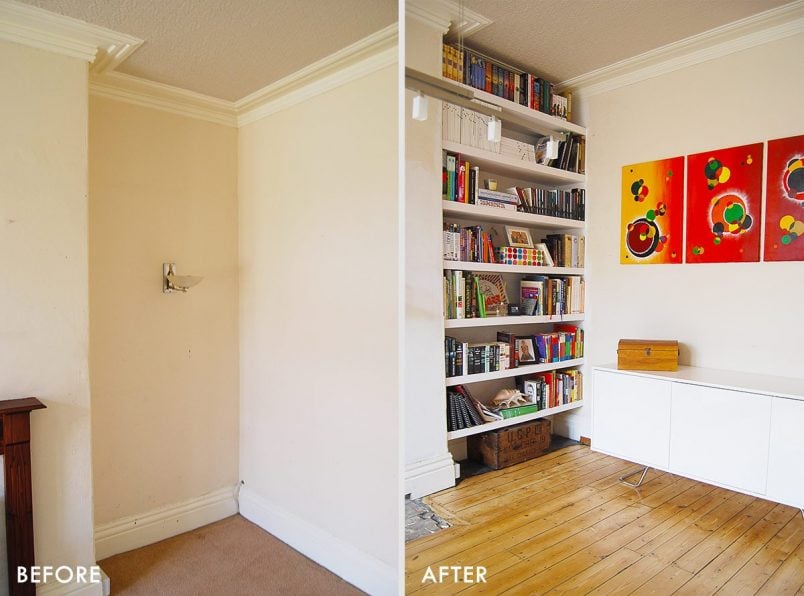
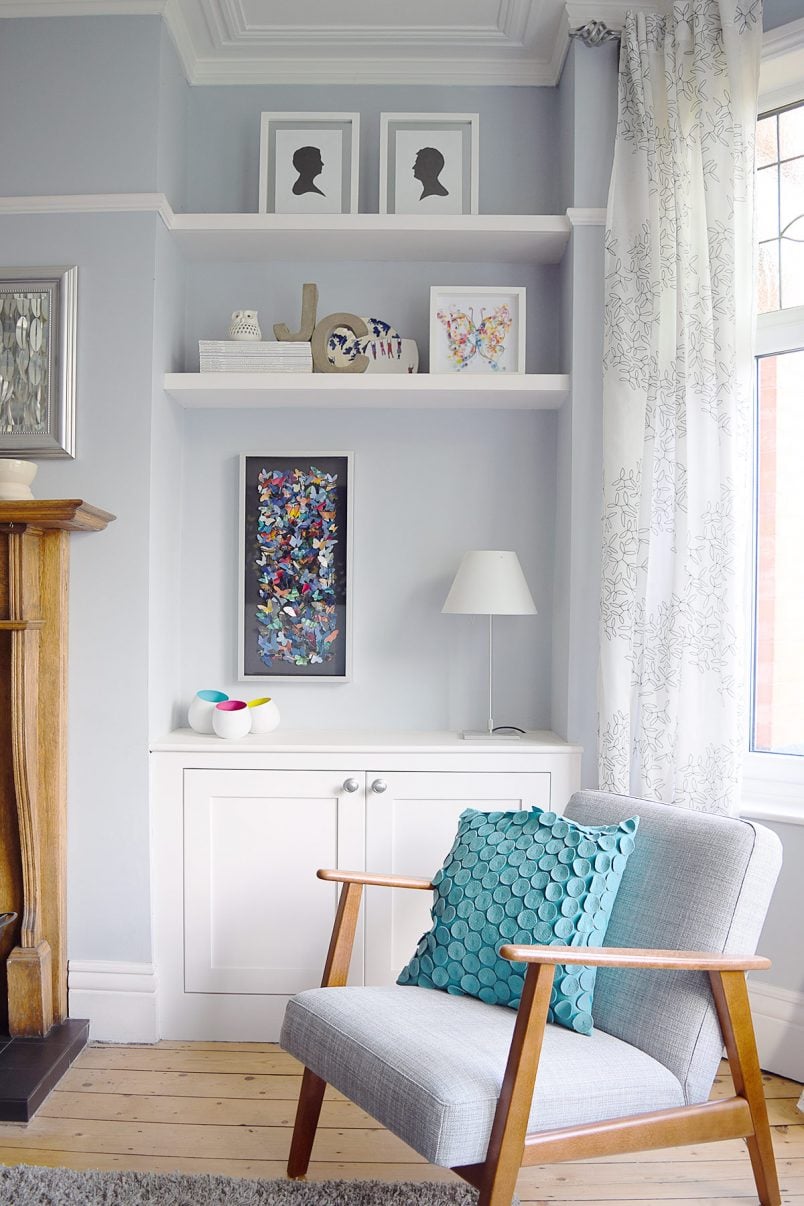
One of the first things we built-in our home – even before sorting some major issues like heating and security – are our floating shelves in the dining room.
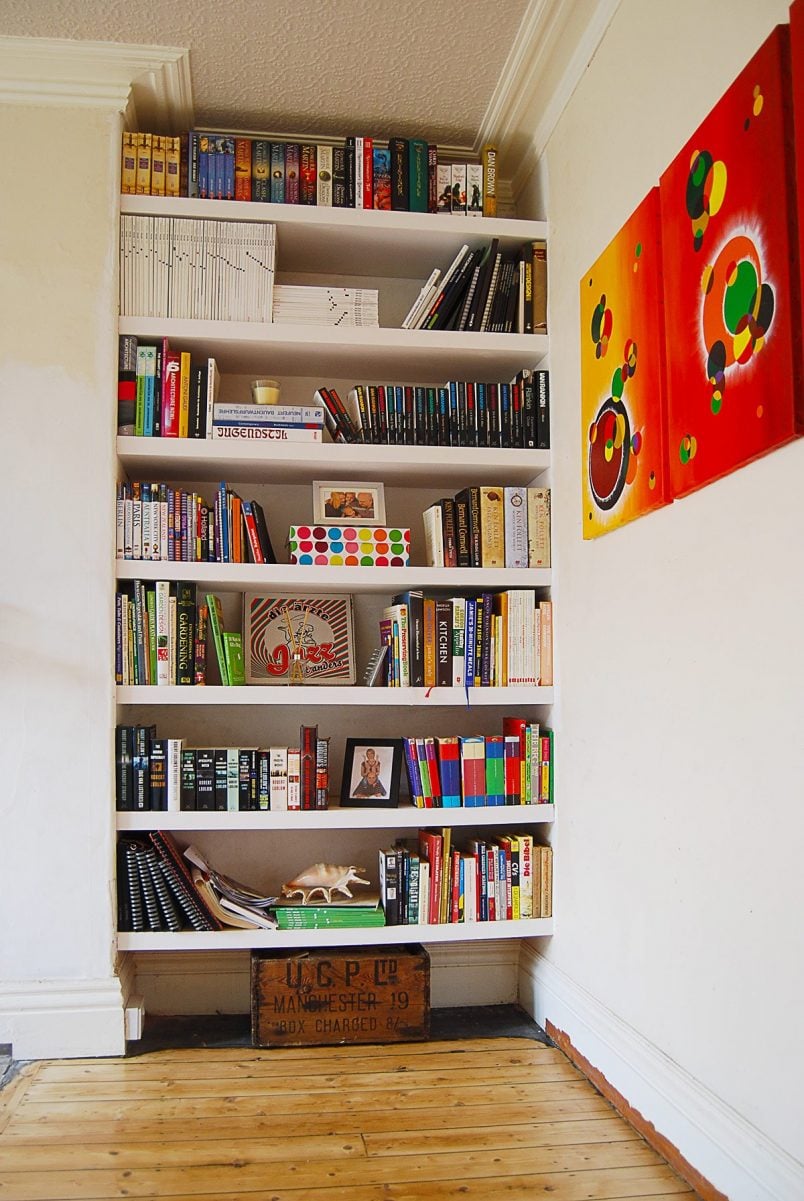
We love them. They offer great storage and were fairly quick, easy & cheap to build.
Having been asked about our built-in shelves more than a few times, it’s probably well overdue that we share how we built them with you.
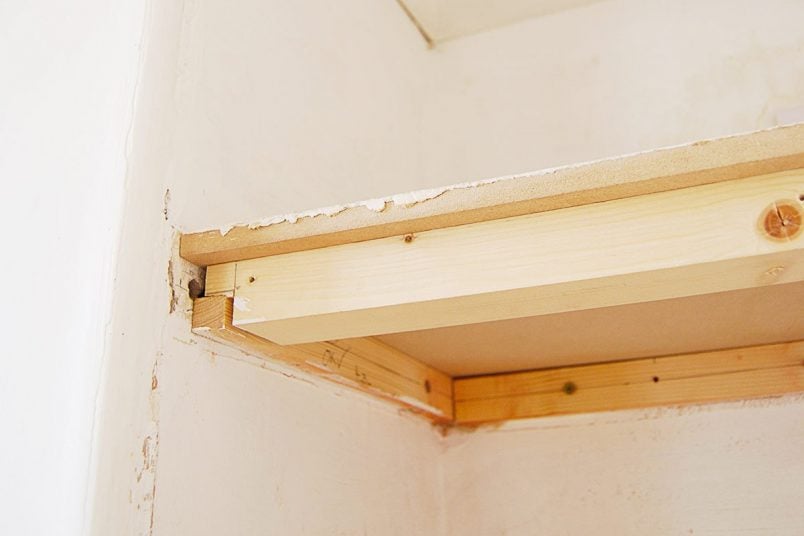
Building DIY floating shelves is really straightforward. Ours consisted of a hidden timber frame that’s screwed to the wall, which is then covered in MDF.
If you were to cut through our shelves, this is what you’d see.
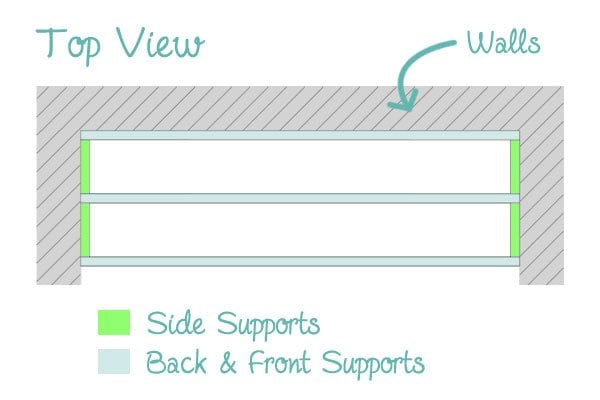
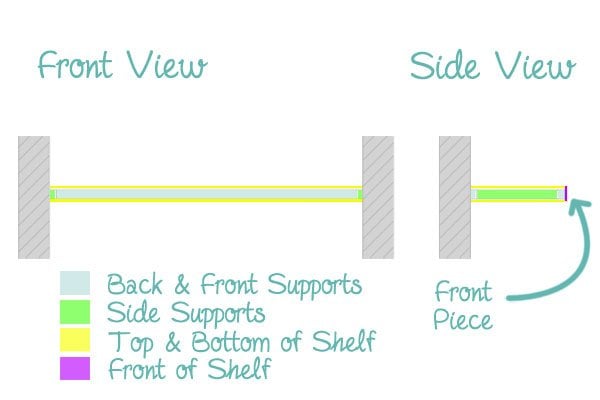
As you can see, in addition to the 3 pieces of frame that are screwed to the wall, we also added an additional support at the front of the shelf and for extra strength (just in case of a load of heavy books) a central support, too.
If you want to build your own floating shelves, this is what you will need
This post contains affiliate links. We only recommend products we love and think that you will, too! Read our full disclaimer here.
- Hammer drill – You probably won’t want to attempt this with a little cordless drill. You will need proper power to drill into the brick.
- Cordless Drill & Countersink drill bit
- Wallplugs and screws
- Screwdriver
- Timber for support structure (we used 38x25mm kiln dried wood)
- MDF for cladding the shelves – we’re painting ours, but choose some sheet timber if you want to see the grain (we used 12mm MDF for the top of the shelf and 8mm MDF for the front and bottom of the shelf)
- Wood filler
- Paint
- Sandpaper
- Tape measure
- Spirit level
This is how to build floating shelves
#1 Start by measuring where you want your shelves to be and mark the top line of each finished shelf using a spirit level.
Then measure and calculate the materials you need. For each shelf, you will need 2x support timber the length of the shelf, 2x support timber the width of the shelf (+1x extra piece the length of the shelf if you are adding an additional support as we did), 1x piece of MDF for the top of shelf, 1x piece of MDF for the bottom of the shelf and finally 1x last piece of MDF for the front of your shelf.
#2 Once you’ve gathered all of your supplies, start by cutting your supporting timber pieces to length. For each shelf, you will need four pieces – one for each side (and an extra fifth piece if you are installing the extra central support).
#3 Then it’s time to start attaching your shelf support structure. Make sure that the top of your support finishes below the top line of your finished shelf level. In our case, it had to finish 12mm lower which is the thickness of the MDF board that will form the top of the shelf.

#4 To make sure that the centre and front supports are really strong, we cut an angle into the two front and side intersecting pieces. That way the front piece is supported by the wood and not just by a few screws.
#5 That was almost it. Now that you’ve attached the support of your shelves it’s time to fit the shelf cladding.
When buying sheet materials, most DIY shops will cut the timber to size for you for free – and that’s exactly what we did. Start by screwing the bottom cover of the shelf to your structure.
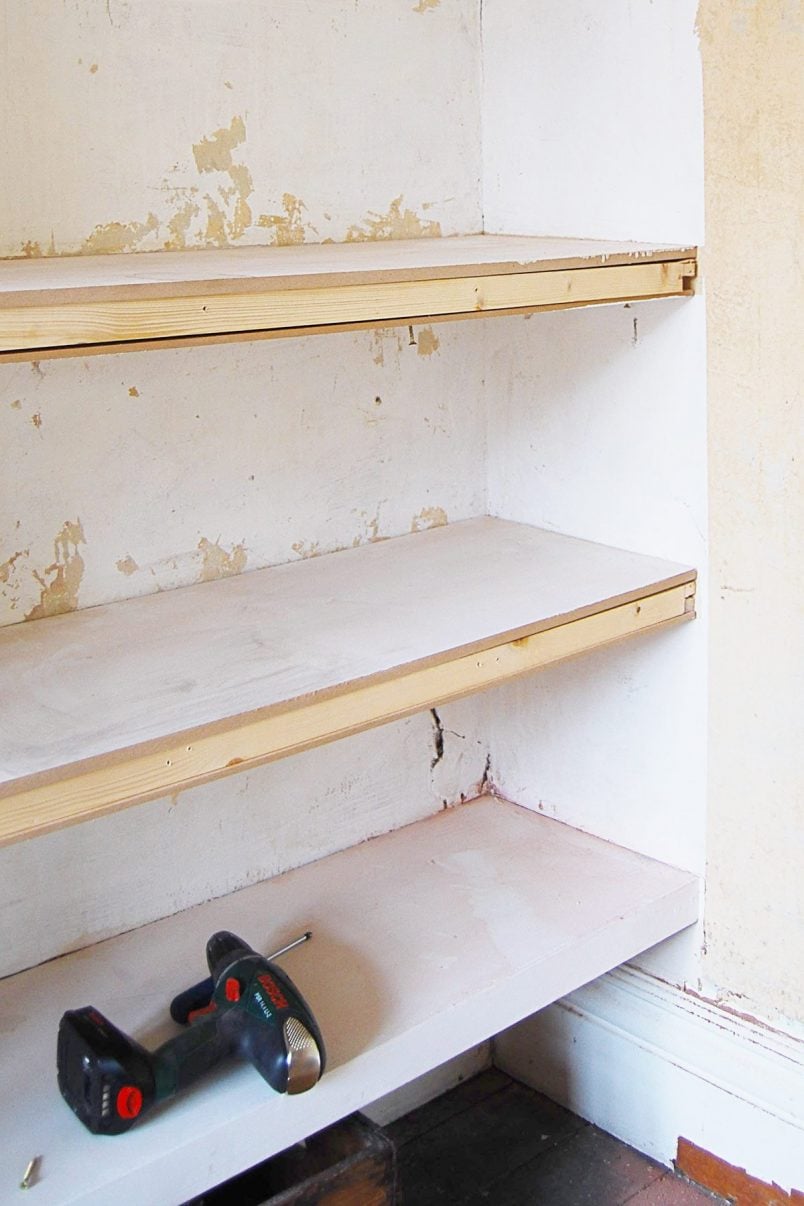
#6 Then you can place the top on top – no need to screw it in place as it will stay there on its own. Finally, screw (or glue or nail) the front panel onto the shelf.
#7 All that’s left to do now is fill any holes and give everything a coat of paint. That’s all there is to it. Told you it was simple.
Have you built anything for your home? Have you ever built shelves? Are you also surprised at how simple things sometimes are once you know how?

Liv says
Hi guys, I love your shelves!
I also love the detailed, clear tutorial. Thank you so much!
I am wondering how much space there is between each shelf? I love it that they are in equal space. It really pleases the eyes.
Thanks so much,
Livia
Christine says
Thank you, Livia! So glad you found it helpful. There’s a 31cm gap between each shelf. When designing them, I measured the room height and divided it by the number of shelves I wanted. The total measurements in our space are 283cm room height, each shelf is 5 cm thick and that leaves a 31cm gap between each shelf.
Hope that helps!
Cx
Zub says
Hey. Just what I was looking for. Love the idea of the half lap joint on the front piece. Have the shelves stood the test of time? Any bowing/sinking? I am about to embark on a similar project but am scared the shelves won’t handle the weight of my books. My alcoves are 150cm wide and 50cm deep.
Christine says
Yes, the shelves help up great! Having said that, our alcove wasn’t as wide as yours so I’d definitely add a couple of additional supports to avoid any bowing.
Hope that helps!
Cx
Zub says
That’s great thanks. I’ll add two support arms every 50cm and join them using pocket holes.
Christine says
That sounds like a plan, Zub! We’d love to see a picture when you’re finished!
Cx
Sam says
Hello, great project! Could I ask what size screws you used?
Jan says
Hi Sam,
we did this a really long time ago, so can’t remember exactly what we used. But with the timber being 25mm, you will want screws that are longer than 60mm, maybe up to 70mm and 5mm thick. The wall plugs were 8mm ones I believe.
Hope that helps.
Jan
Andrew says
Hi, this is just the sort of article I was looking for! I just have a question regarding adding the central support. Looking at the top view diagram, are you using 4 x the smaller side panels as opposed to two or are you building the structure outside of the alcove before putting it in?
Thanks :)
Christine says
We used 2 smaller side panels which we attached to the walls (along with one long one for the back wall). The reason it looks like there are four panels is because the long central piece of timber rests on top of the side supports the same way as the front support does which you can see in the pictures. (although, ultimately we didn’t actually build the central support as our shelves weren’t very deep and we didn’t think we’d need it – I should probably update the drawing ?)
Cx
George Foster says
Hello – great project!
How did you overcome uneven/wobbly walls? Did you have to scribe the shelves to fit perfectly at all?
Thanks
George
Christine says
Thanks, George! We were lucky that our walls were fairly straight. We did cut some of the boards at a slight angle so that they’d fit better and any small gaps were just filled with some caulk before painting.
Cx
Brook says
Hi Christine – great tutorial thank you for sharing. Just wondering if the front support piece of timber is a thicker piece – in the photos looks much thicker than your side and back supports? Thanks! b
Christine says
You’re welcome! The support at the front is the same size as the ones around the edges. They’re all fairly chunky because we knew we wanted to fill the shelves with lots of heavy books.
Hope that helps!
Cx
Jonathan Smith says
Hi Christine
Looking at the pics especially the pic above the #5 set of text…the front piece of wood is definitely bigger than the side bits. it looks like the front it is the same thickness and height potentially 2X2? where as the side bits are the 25x38mm you are referring to?
Would I be right and if so would the middle extra support bit be better off being a piece of 2×2 too?
Christine says
You’re completely right, Jonathan – not sure how I missed that! Yes, both the front and middle supports we used were larger and that’s what I’d recommend, too!
Thanks for pointing out the mistake! I’ll get the post updated asap.
Cx
Barry Gardner says
Hi
Thanks for the tutorial (love the site). The wood for the frame arrived a few mins ago and before I get started I though I’d better check over the tutorial again. Looking at the pics, under point no 5, there appear to be some holes drilled in the front face of the frame. What are these for?
thanks again
Barry
Christine says
How exciting – there’s nothing quite like starting a new project!
You can ignore the holes (you’re very observant!). Because I wrote the tutorial after building our shelves I took one to pieces again to show the steps. The holes are just from where we screwed the front of the shelves on later (no need to predrill if you use wood screws). If you can, I’d recommend nailing instead of screwing the front piece on later purely because you’ll have a smaller hole to fill.
Good luck with your shelves!
Cx
addam says
what size screws and wall plugs did you use. the timber battons im using are 25mmx30mm.
Christine says
I’m not exactly sure because it’s a while ago that we built them, Addam. I would assume we used 8mm wallplugs and screws accordingly. Depending on your walls you could possibly get away with 6mm but ours were a bit too brittle and we wanted to be on the safe side.
Cx
Gavin says
Hey,
Great job with the site it is full of really handy guides. Thank you!
How did you get on painting the MDF? Did you use a primer and what sort of paint did you initially use? I understand painting mdf can be tricky as it can soak up paint leaving it not looking great.
Many thanks
Gavin
Christine says
Thanks for the compliment, Gavin!
We had no problems painting the MDF. I gave it a coat of primer (I think it was this one from Wickes and then gave everything a sand between coats of paint/varnish. The sanding with fine paper helps remove any air bubbles or imperfection. The cut edges of the MDF can be a bit temperamental but again the sanding between coats of paint did the trick for us.
Hope that helps! We’d love to see pics of your finished shelves if you decide to build some!
Cx
PS. We recently shared a tutorial on how to build super slim floating shelves. It depends on the look you’re going for but just in case you’d like some thinner ones you can see how we built ours here
Gavin says
Thanks Christine that’s really helpful, I appreciate you replying!
I will try to upload pics when done!
Gavin says
Hi guys, I’m finding the little notches (on the front supporting beam) to be quite difficult to get accurate; they either seem to big to lock into the side supports. Any tips for cutting these out?
Christine says
Cutting the notches can be a bit tricky, Gavin. For us, it involved a lot of tiny cuts and sanding (use some very coarse sandpaper), too. If they are a bit too big you can always add a nail or screw to secure the pieces to each other.
I know that’s not much help (sorry!) but once that bits done you’re almost there!
Cx
Polly Burton says
Thanks for responding so quickly Christine. Really looking forward to seeing how you get on with the shelves. I love what you have done with your home, I think we have similar tastes. I also like to use bold colours as accents and mix old and new. Happy shelf making. Polly
Polly Burton says
Thanks for this really useful tutorial. I am going to use your method but when I went to purchase the wood using the same materials you quote above, I thought the shelf would look too thick and bulky when I held them together and I didn’t end up buying them. In the picture yours don’t look bulky at all. I’d really appreciate any advice you can offer. With thanks Polly ?
Christine says
Wow, it’s like you can read minds, Polly! We spent all weekend building some super slim floating shelves which are a great alternative to the method we shared here. The floating shelves we’re building at the moment are just 19mm thick but are still super sturdy!
We busy adding the finishing touches to them and hope to share the DIY guide on how to build them next week. (if you can’t wait that long get in touch and I’ll try to walk you through how to build them).
Cx
Rod Baldwin says
Whst do you think the largest span you could do this way?
Christine says
The longer the shelves are the more supports you’ll need. It’s difficult to tell and it will come down to the thickness of the timber you’re using for the structure as well as how heavy the items are which you want to place on the shelf. I’d say you’d probably be fine up to around 2.4m but I would recommend using slightly thicker timber to build the frame.
Cx
Will says
Hi Christine,
Thanks for sharing this post, looks amazing. I’m just about to head to B&Q to pick up the tools but then two problems occurred:
1. The wall within the alcove is not brick or concrete, it’s plaster board or similar. Will this hold the floating bookshelf?
2. How do you attach the brackets to the wall?
Thanks
Will
Christine says
You’ll have to make sure to find the studs in the wall as the plasterboard won’t be strong enough to hold the shelves. There are stud detectors you can use to find out where exactly yours are located. Hope that helps!
Cx
Cassie says
Thank you for this tutorial! I officially built my first shelf last weekend and am going to do another two this weekend, the pictures were a huge help.
Christine says
You’re welcome, Cassie! Good luck with the rest of your shelves – we would love to see a picture of your project when you’ve finished!
Cx
Sara says
Hi, great tutorial & shelves look great! Do you know how wide your alcove space is! Mine looks much wider and I’m wondering if it would end up bowing in the middle.
Christine says
Thank you, Sara! I totally understand your concern about the bowing. Our alcove space is 1.2m wide and we only had a very slight bow one one of the shelves with all of the heaviest books (it was so slight that you can’t tell in the pictures but I know it’s there ;)).
If your alcove is wider I’d definitely recommend adding additional supports.
Cx
seef says
hello! happily stumbled across this as I was doing some research! Looks like a great method to make the alcove shelving that I want. Just a quick question about the front strip. What did you use across there? And how did you make the edge so seamless, as if the whole shelf was one piece? Does the join of the front and top not show once painted? thanks in advance! :)
Christine says
I just used a thin strip of MDF (the same as we used for the underside of the shelves). We filled and sanded any gaps at the top and bottom so that a join is almost not visible. Our shelves are now also painted dark which means that you can’t see any imperfections.
Hope that helps!
Cx
kaorin says
Your blog is packed with so many relevent information! I live in a UK victorian terraced house and you’ve covered all the issues and puzzles I’ve had how other people manage to achive these by themselves.
Anyway, I have a question: as I was thinking to tackle this floating shelves exactly like the way you have done next to the fireplace, how long did it take from measureing to fixing in all the timers and MDF and filling?
I’m not sure how much time I should allow to do this on my own (or with a help from my partner).
Thanks.
Christine says
Thank you Kaorin! It’s difficult to say how long exactly it took to build the shelves as I did it spread out over a few days. I would say that you could probably build the shelves in a (very full) day, but it will depend on things like how even your walls are, how good the tools are that you use, etc. Wonky walls will definitely add some time to the project because you’ll have to adjust the boards to fit. I would say allow 2-3 days to be on the safe side (including all measuring, shopping, cutting and building).
Hope that helps!
Cx
Paul Wilson says
Really great looking shelves. Thanks for a really useful tutorial. I’ve just started out building some myself based on the instructions here. However I have a problem that you don’t mention. The alcove I am building shelves in is out of square. What’s more, the back wall bows outward away from the shelf. I can perhaps measure and cut the MDF to shape anyhow to account for the lack of square, but what to do about the bowing? Just use filler? I currently have a gap of somewhere between 5 and 10mm – seems rather large to fill.
Christine says
Thanks you Paul! Our alcove wasn’t completely square either, but we just trimmed the shelves slightly to make them fit. We didn’t have any problems with bowing walls – maybe you could cut the mdf to allow for the bow, too? It’s more work, but will probably be worth it for a better result. I agree that a gap of 5-10mm is a lot to fill. We only had very small gaps around the shelves, so just used caulk to fill them. I’d suggest trying to get the gap as small as possible to make filling it easier.
Hope that helps!
Cx
Julian says
I have a question – how did you cut the groove for the centre support?
Thanks
Christine says
We used a jigsaw, but if you don’t have one you could use a chisel and hammer. They work as well, it would just be a bit more work.
Cx
Christine says
You could also use a multi-cutter tool. We didn’t have one when we built the shelves, but it would be ideal to cut out the notches.
Cx
Jessica says
Thank you so much for this tutorial – shelves look great! I know this is an older post, but I just had a quick question, if that’s okay? We’re starting to make some ourselves :) On step #5, it looks like on the rough edge of the mdf of the top of the shelf that there is a glue / filler or levelling at the top? Do you remember what that is? thank you so much!
Christine says
We’re always happy to help (doesn’t matter how old a post is)! I totally see what you mean, but there’s no filler or anything to level them. We made the shelves before we wrote this tutorial and had to take one shelf to pieces to take some step by step pictures at a later date. Basically what you can see is just some of the paint (that the shelves were painted in when finished) that has slightly run down the gap between the top board and the front panel (which we’d taken off to take the picture). You shouldn’t need any glue or filler (except to fill any screw holes).
Hope that makes sense! Good luck with your shelves Jessica!
Cx
Sarah Villaflor says
I adore how you were able to make an empty corner of a usable and very attractive floating shelf. I really want to do this also, first thing first is now is the time to have my own tools for carpentry. I am starting to do my own projects at home. Thanks a lot for sharing the tutorial.
Christine says
Thanks, Sarah! The shelves are really practical, not sure what we’d do without them!
Have fun building your own!
Cx
Camilla Mummys Own says
Love it!! Thank you so much! I absolutely love built in shelves!! So happy I found your blog today! So much inspiration! Yes, I am constantly building things for our home, maybe not as much building as DIY-ing..I love doing up old furniture, alternate furniture, decorating and constantly moving things around;). Take care x
Christine says
So happy that you found your way over to us, Camilla & thank you for the compliments! Glad to hear that we’re not the only ones that can’t stop doing up things!
Cx