If you’ve ever asked yourself if it’s possible to extend a Pax wardrobe so you don’t waste the space over it or if you’ve wondered about the easiest way to turn your IKEA Pax wardrobes into custom built-ins you’re in the right place!
We have the best IKEA wardrobe hack coming up for you! Oh, and did I mention that this Pax wardrobe hack is 100% renter-friendly, too?!
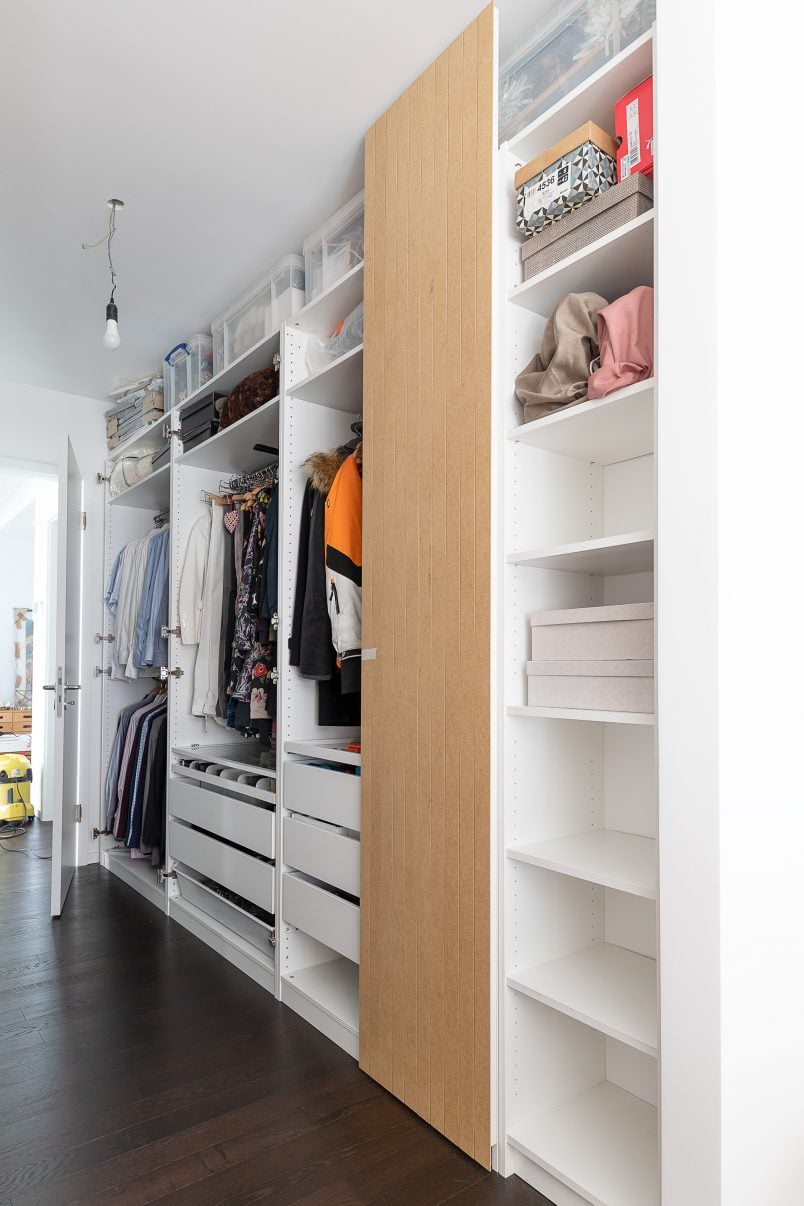
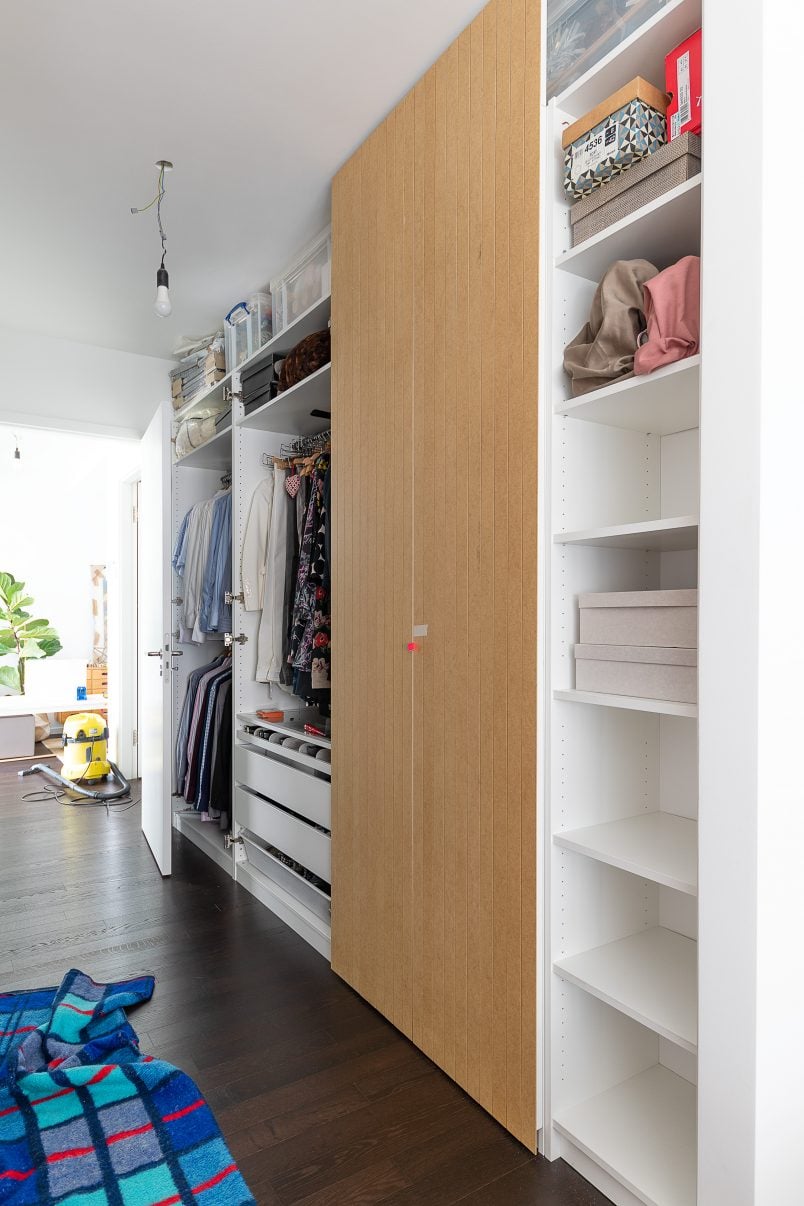
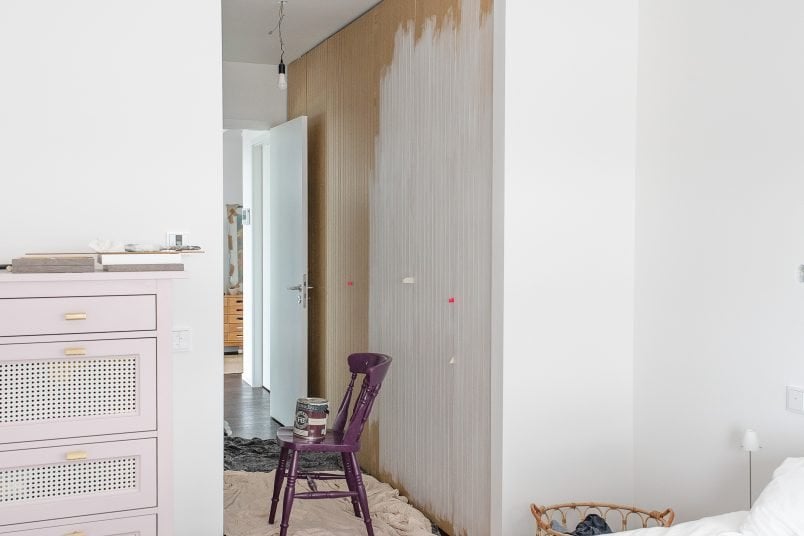
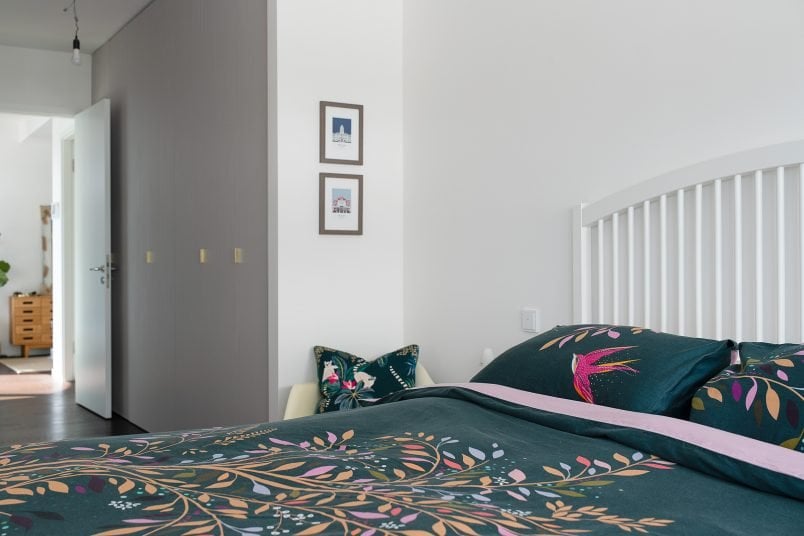
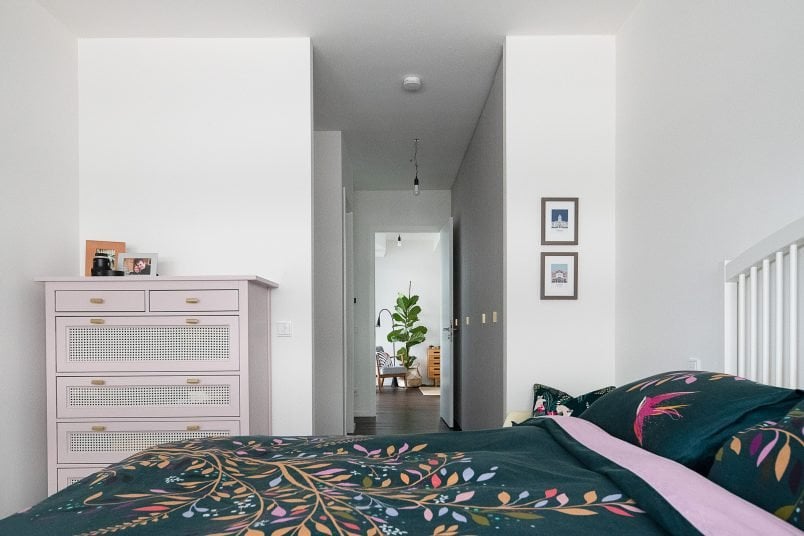
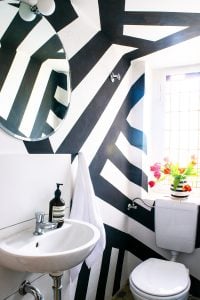
This is what our Pax wardrobes looked like for the first few months after assembling them.
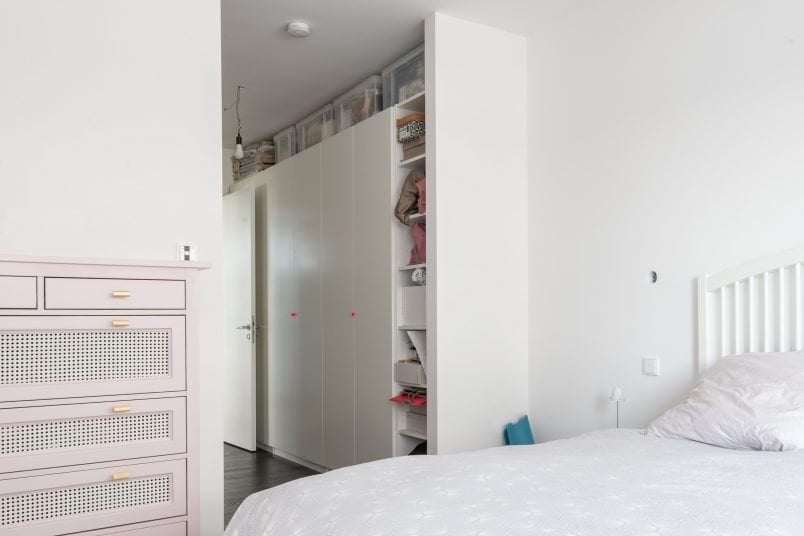
They were full of stuff, the doors were wonky and even the top of the wardrobes was crammed full of boxes and other things we rarely use.
But after just a few hours of work – yes, that’s all it takes – our ugly wardrobes (and all of the junk) have disappeared!
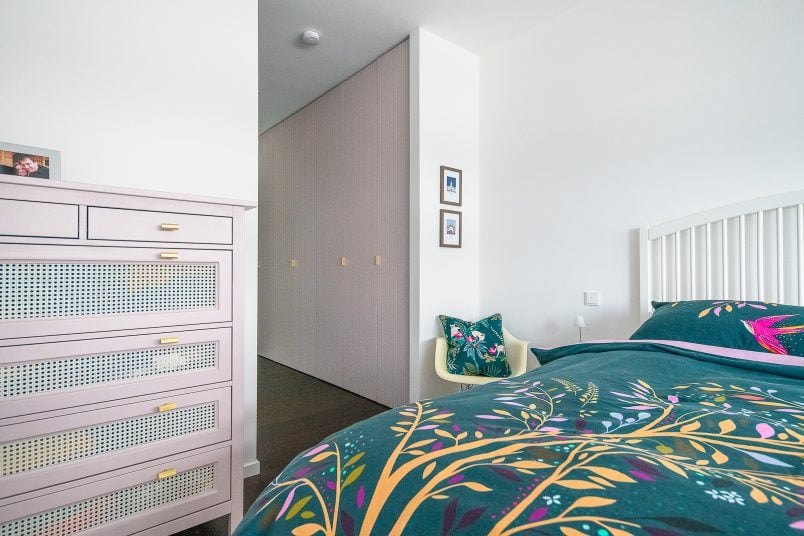
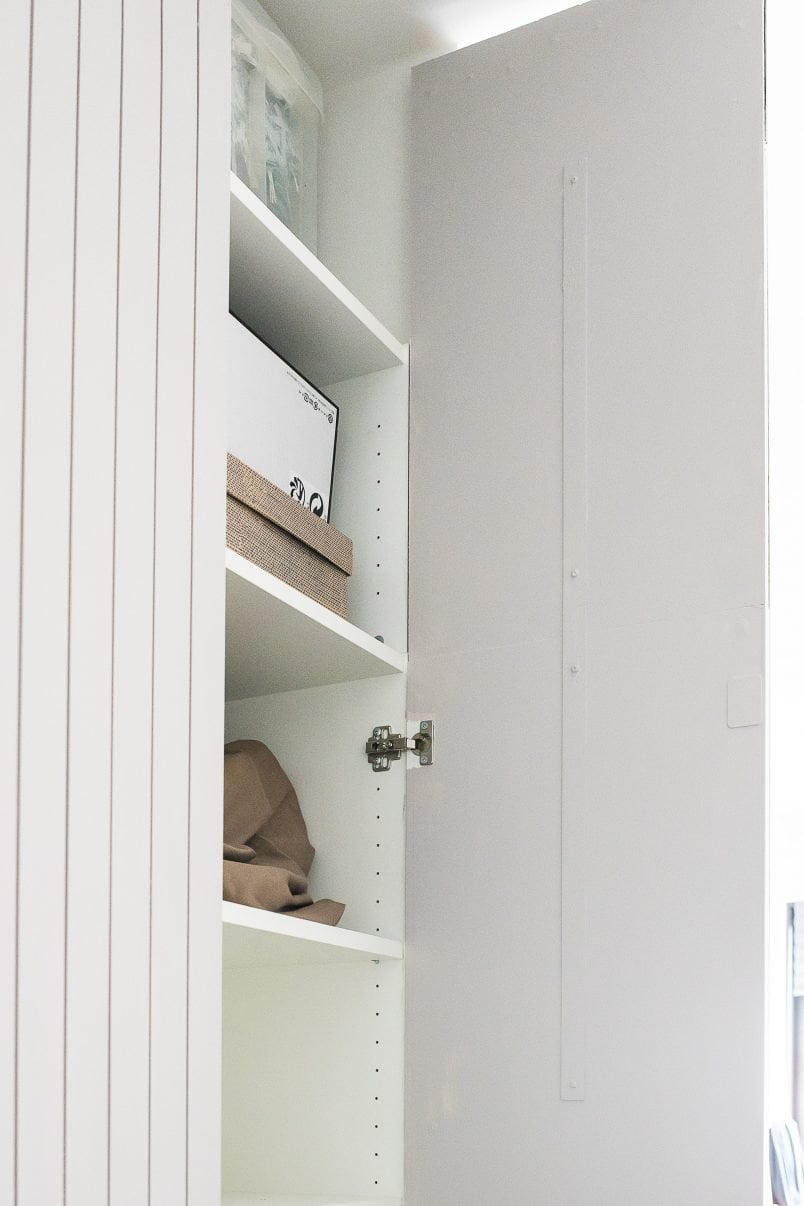
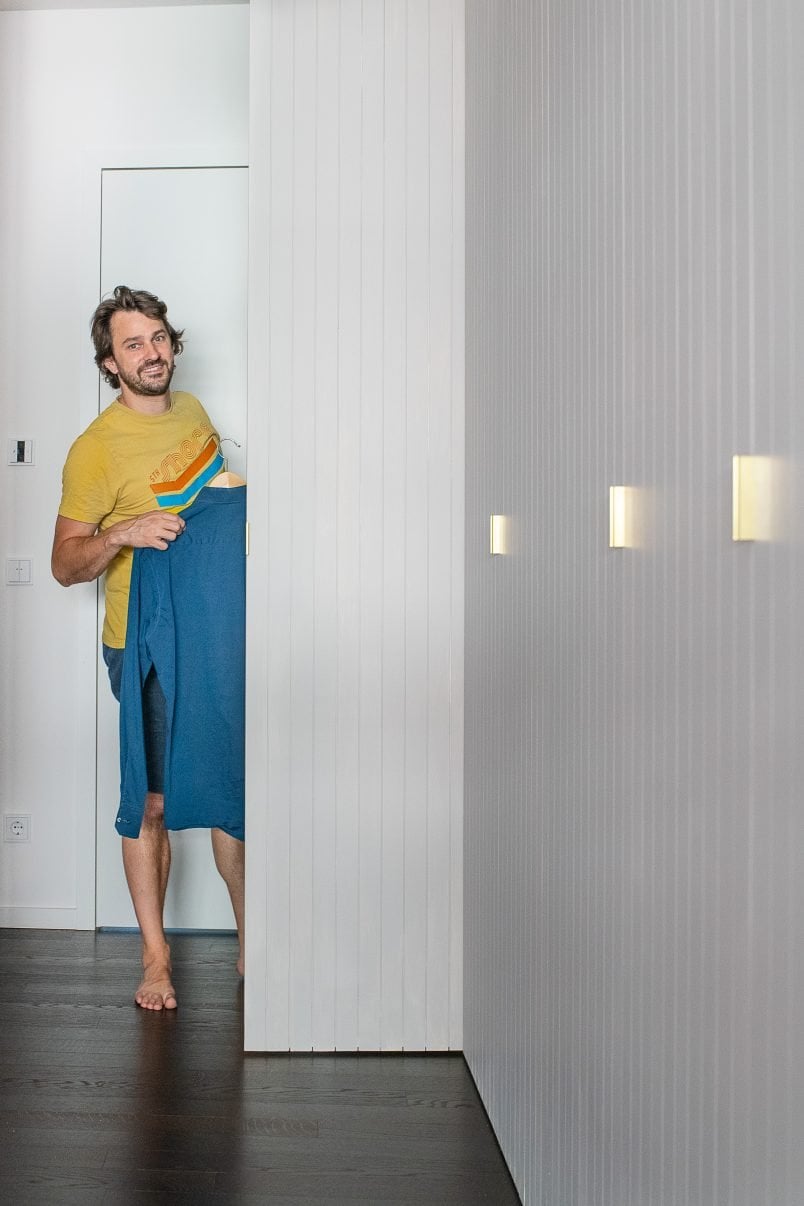
Okay, so none of the junk has actually vanished and everything is still just as full and messy as it was before but now everything is completely hidden behind our custom Pax doors.
The best thing about this hack is that no part of the wardrobe actually touches the walls making a super renter-friendly project, too.
There’s no complicated carpentry involved, nothing is drilled to the walls and you don’t have to have any mad DIY skills to completely turn an IKEA Pax into a fitted wardrobe.
And, this is a super budget-friendly project, too! We’ll share a full cost breakdown at the end of the post.
If you have high ceilings and don’t want to waste the space over your Pax wardrobes, this is the perfect IKEA hack for you!
So, how do you extend a Pax wardrobe and make it look built in?
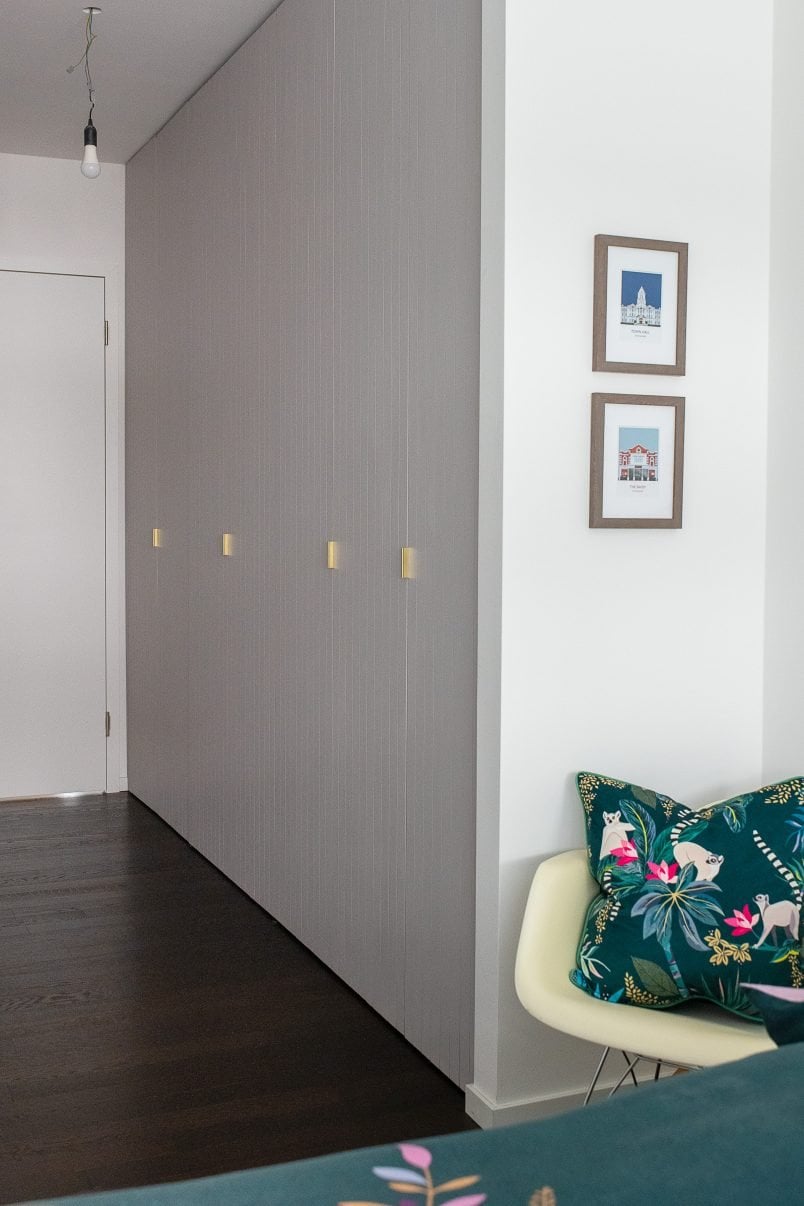
The secret to this IKEA Pax hack lies in the cladding of the doors. The actual Pax wardrobes aren’t actually extended, just the doors are!
The doors are covered in cladding which not only allows you to extend them but enables you to combine them with other IKEA cupboards (one part of our wardrobe is a Billy cupboard) and create a completely seamless and custom built-in piece of furniture.
This is also why none of the wardrobes actually touch the walls – the doors just extend upwards, downwards and sideways (more on that later) and don’t touch any part of the surrounding walls making it possible to completely remove this built-in (looking) wardrobe without leaving a trace.
Don’t worry if this sounds complicated – it really isn’t difficult and we’re sharing the exact step by step guide on how to extend a Pax wardrobe and make it look completely built-in!
This is what you will need to extend an IKEA Pax wardrobe:
This post contains affiliate links. We only recommend products we love and think that you will, too! Read our full disclaimer here.
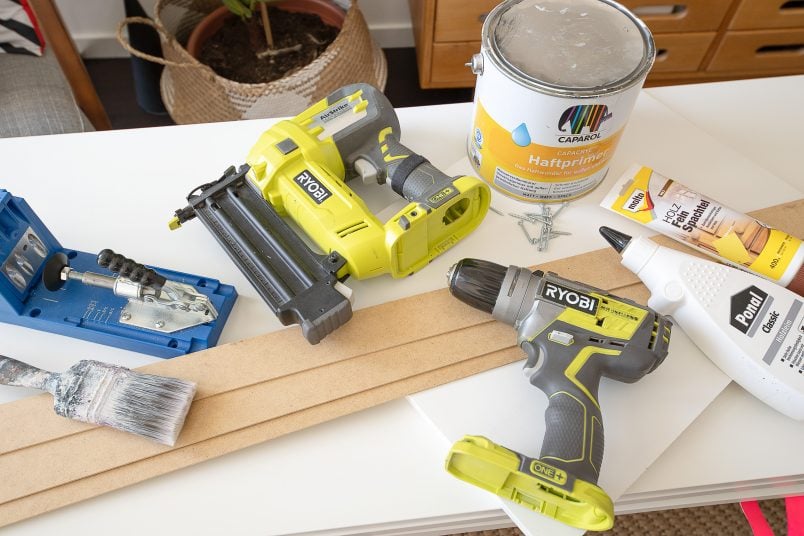
Supplies:
- Pax wardrobes with doors – If you’re buying a new wardrobe just opt for the cheapest doors available which is exactly what we did.
- 1 x additional door (make sure it’s a solid one and not honeycomb as it won’t work otherwise! More on why you will need an additional door later in the tutorial)
- Wood glue – This is our favourite wood glue. You’ll need quite a lot of it!
- 3mm thick HDF or MDF panels – We recommend getting the panels cut for you as it’s extremely important that the panels are exactly the same size
- Screws & Nails
- Wood Filler
- Sandpaper
- Primer – Any wood primer will do but this is our favourite primer
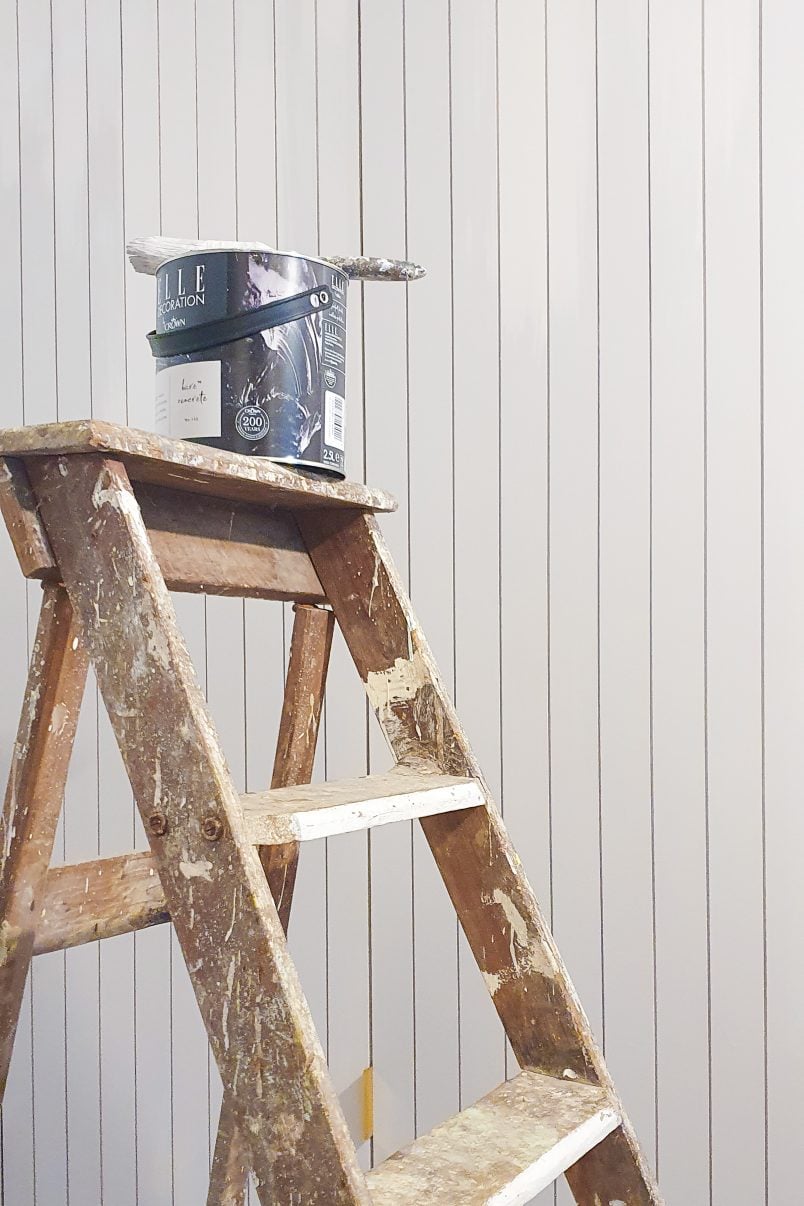
- Paint – We used this absolutely gorgeous Bare Concrete paint by Crown Paints.
- A couple of offcuts of wood (you’ll only need these if you are extending to the sides, too)
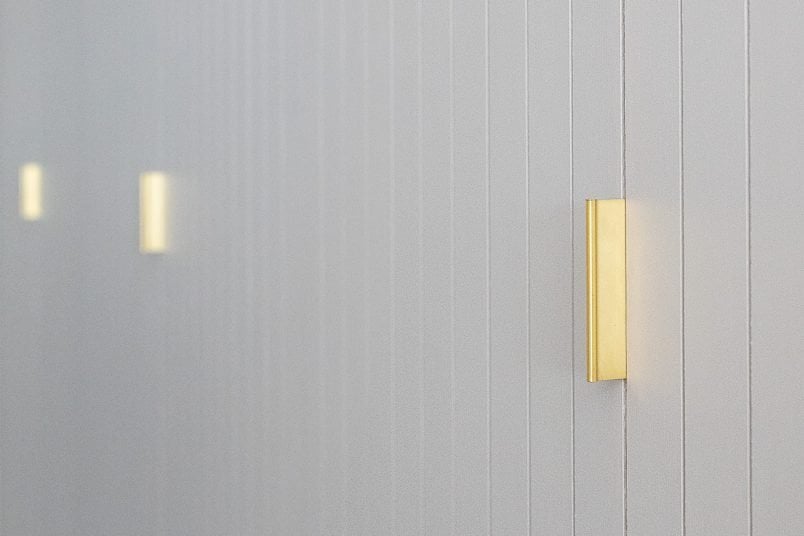
- Handles – We used these brushed gold handles.
Tools:
- Cordless Drill & Drill Bits
- Kreg Jig – This is our newest tool and I can’t believe how we ever DIYed without it! It makes connecting pieces of timber so easy! Definitely an investment worth making but, as always, hire any tools that you think will only use once!
- Stanley Knife
- Nailer – This is optional as you could just use wood glue but it will make the project quicker and easier if you have one. This is the nailer that we have, love and use for all of our projects.
- Circular saw or Plunge Saw
- Paintbrush – We’ve been using the same set of paintbrushes for almost 10 years! We absolutely love them and still use them for every painting project! Good quality brushes are the secret to getting a perfect paint finish!
- Clamps – We use these quick-grip clamps for all of our projects.
- Tape measure & Pencil
How To Extend Your Pax Wardrobe & Make Them Built-In:
This guide is fairly long as we’ve gone into a lot of detail so that you know everything about how to extend your Pax wardrobe. Don’t worry though, it is an easy project and there are only 3 steps to make your Pax wardrobe look built-in.
First, you have to extend the doors, then cover them in cladding and finally, there’s a bit of priming and painting to do.
1. Planning The Wardrobe Transformation
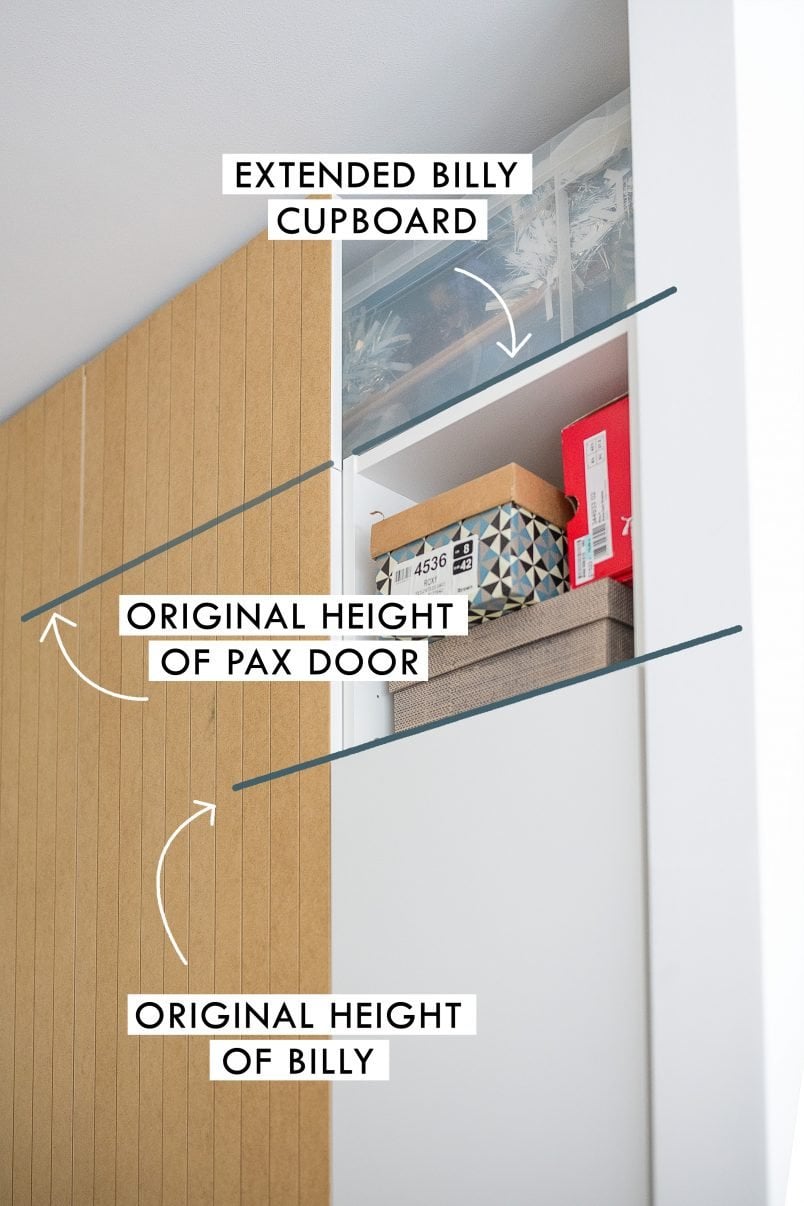
Off the peg wardrobes generally come in 50 cm sections so can be tricky to get them to perfectly fit along your wall or in an alcove.
In our case, the recess for the wardrobe is 3.4 metres wide which means we’d only be able to fit three 1 metre wardrobes into the space and would waste a whopping 40 centimetres if we didn’t opt for a custom-built solution.
Not wanting to spend a fortune on custom cabinetry, we had to get creative to make the most of the limited storage space we have and came up with a solution that not only looks great but utilises every last centimetre of usable space.
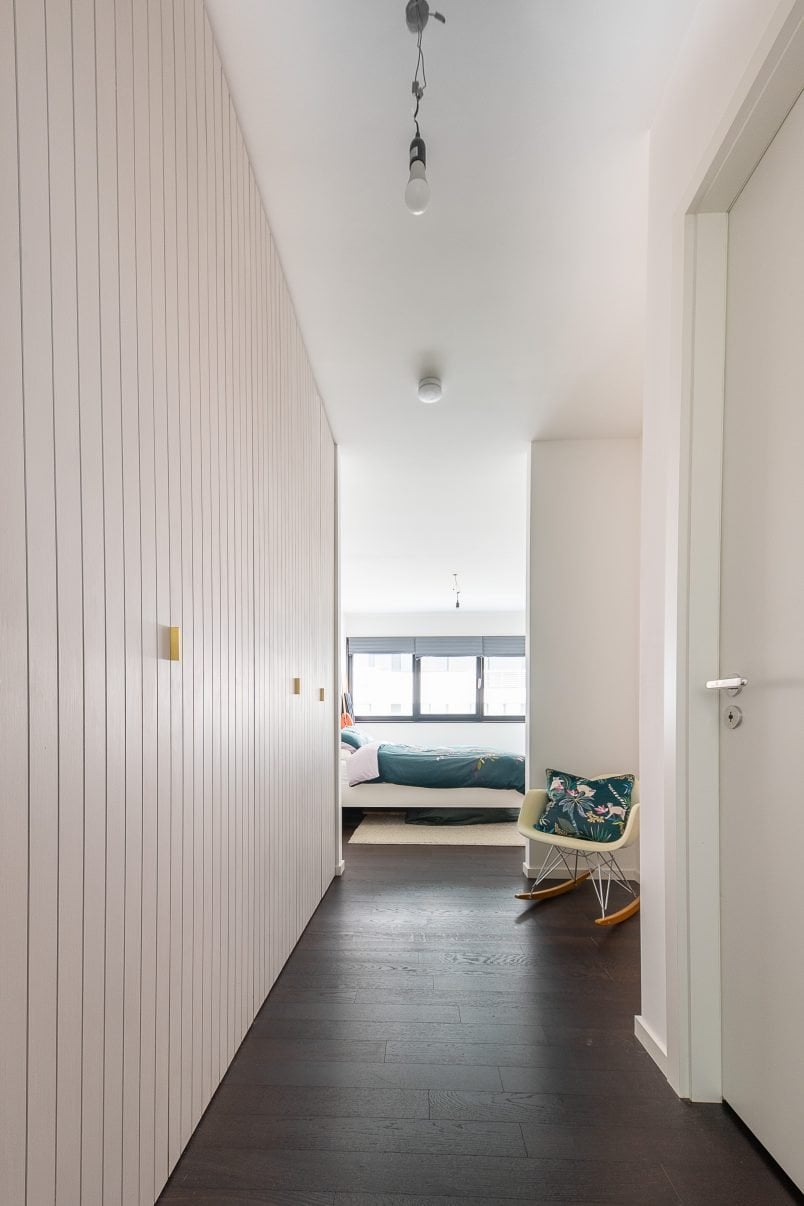
That’s why we combined our three IKEA Pax wardrobes with a Billy cupboard.
I know that a combination of Pax and Billy seems a bit mad as both cupboards are completely different sizes, but this IKEA hack completely hides the cupboards and allows you to combine different furniture models to create a wardrobe that’s a perfect fit for your home.
The doors are all cladded to look the same so you’ll end up with a wardrobe that looks completely bespoke without having to break the bank.
You can combine any IKEA furniture for this wardrobe hack as long as it has a door. I would recommend trying to use cupboards that are roughly the same height (like Pax + Billy or Pax + a tall Method cupboard) though as it will make the process easier.
The length of the strips of timber will depend on how tall your room is. It is extremely important to leave a gap at the ceiling and floor though so that you can easily open your doors.
We recommend leaving at least 15mm clearance at the bottom and 25mm clearance at the top. Definitely measure a couple of times to make sure your measurements are correct.
If you live in an older property where the ceilings and floor aren’t level, leave a bit more of a gap to make up for any wonkiness.
2. Extending The Wardrobe Doors
Depending on how much you’re extending your doors by, you’ll also have to extend the door itself.
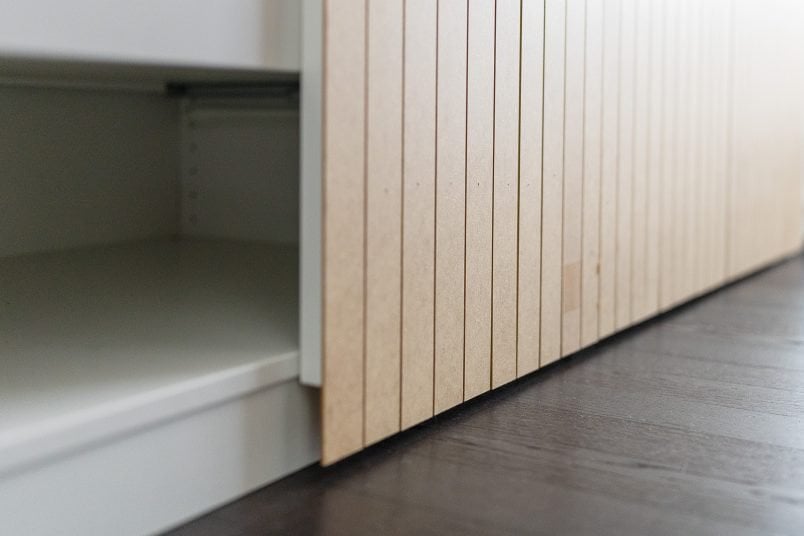
The cladding strips are really thin and would be strong enough if you’re only extending the door by about 10cm but, if they extend over the edge of the door by any more than that, the cladding will be too wobbly and bendy.

How to extend Pax wardrobe doors
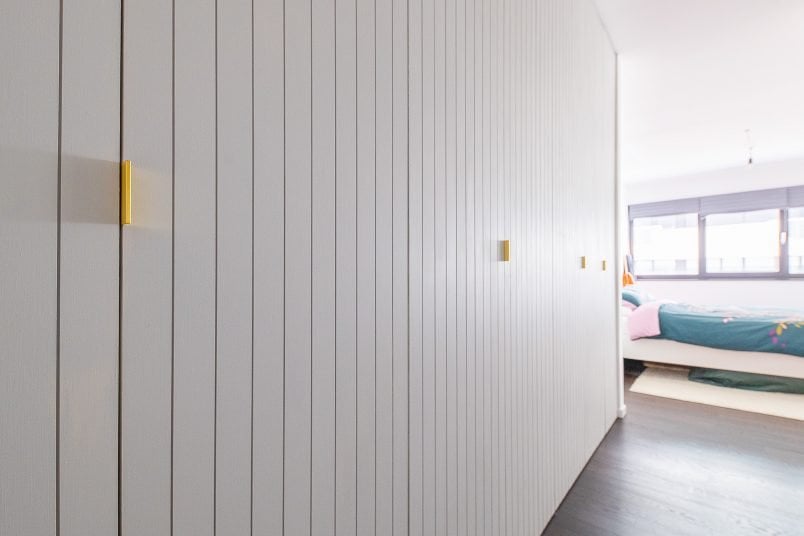
We purchased the cheapest doors that are available for the Pax wardrobes which are called Forsand. Pax doors are just under 50cm wide and to cover them you’ll need 10 x 47mm wide strips with a 3mm gap between them.
As we extended our Pax wardrobes by about 40cm, we had to lengthen the door slightly to be able to have something to stick the cladding to. This is where you will need the additional Pax door.
The additional door is already the perfect width that you need, so you just have to cut it into pieces to be able to attach it to the other doors. In our case, all pieces are 38cm long which meant that we were able to cut 6 extension pieces out of one door.
As you are cutting the additional door into pieces, it’s really important to get a door that doesn’t have a honeycomb middle. The Forsand doors we used are fine to use as the main wardrobe door, but you will need to use a different Pax door for the extension piece. Tip: Check out the As-Is area at IKEA to find a door you can use.
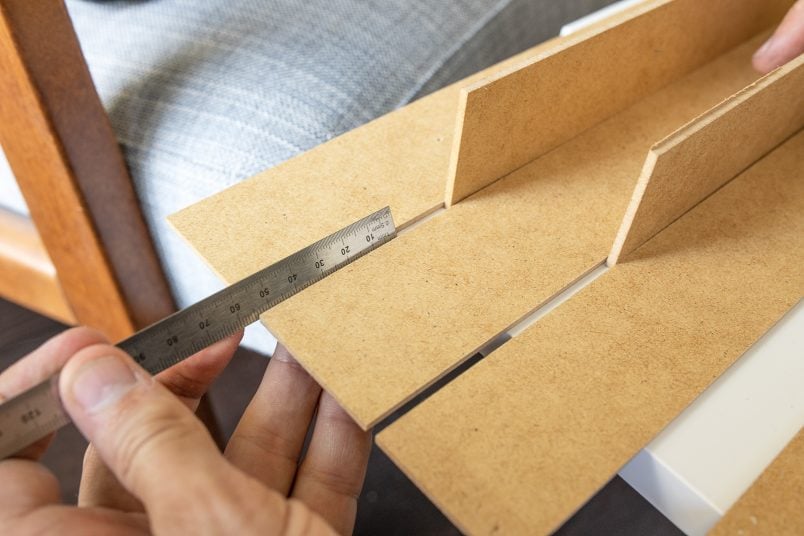
Just chop it into pieces with a circular saw making sure to cut as straight as possible (we clamped a steel ruler in place to cut along).
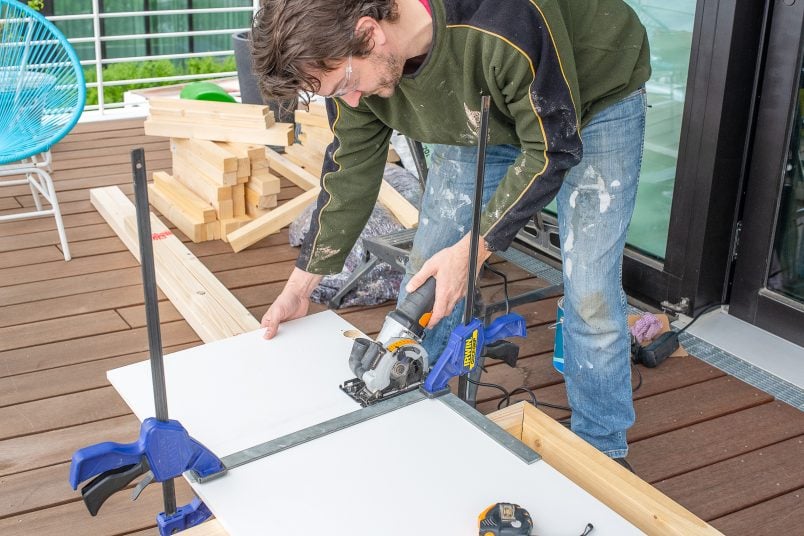
Obviously, the measurements for this additional piece will vary depending on the height of your room.

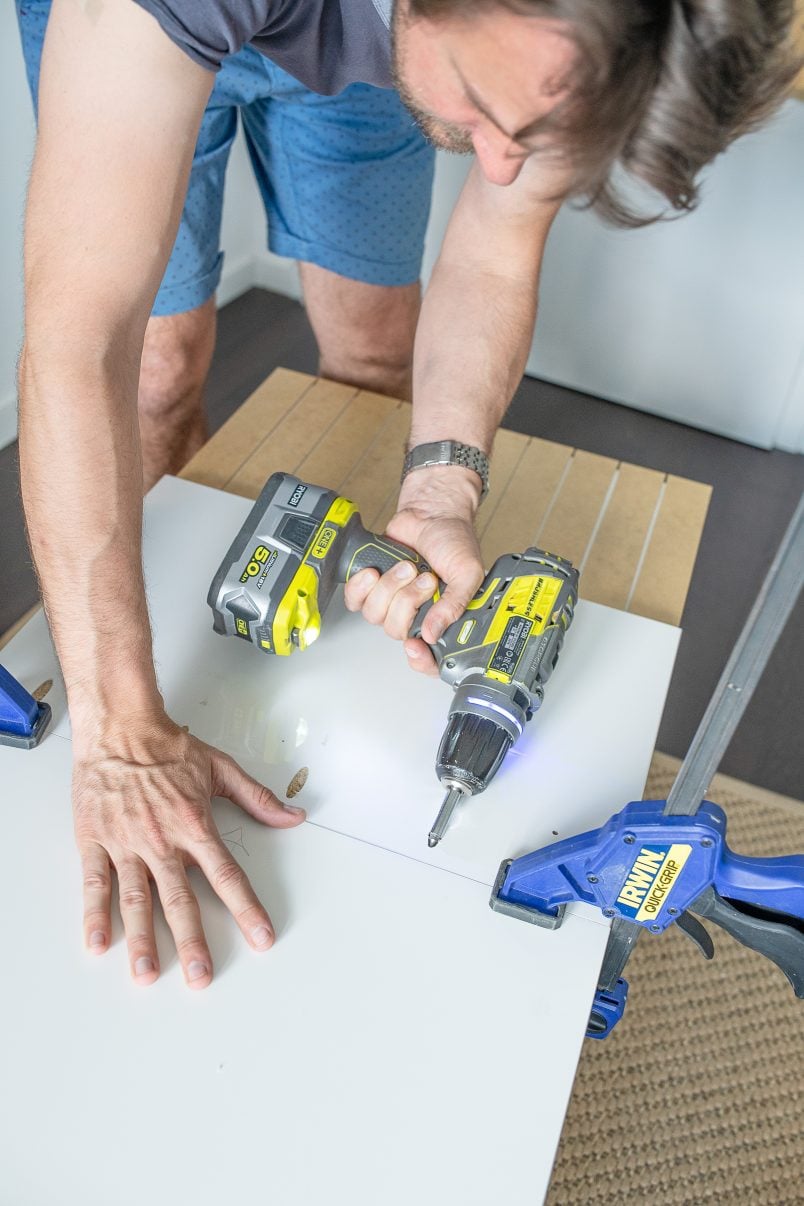
Once you’ve cut the pieces, drill some pocket holes along one side of the extension piece with a Kreg Jig.
It doesn’t matter exactly where the holes are but we’d recommend adding about 5 holes spaced out equally across the width of the door.
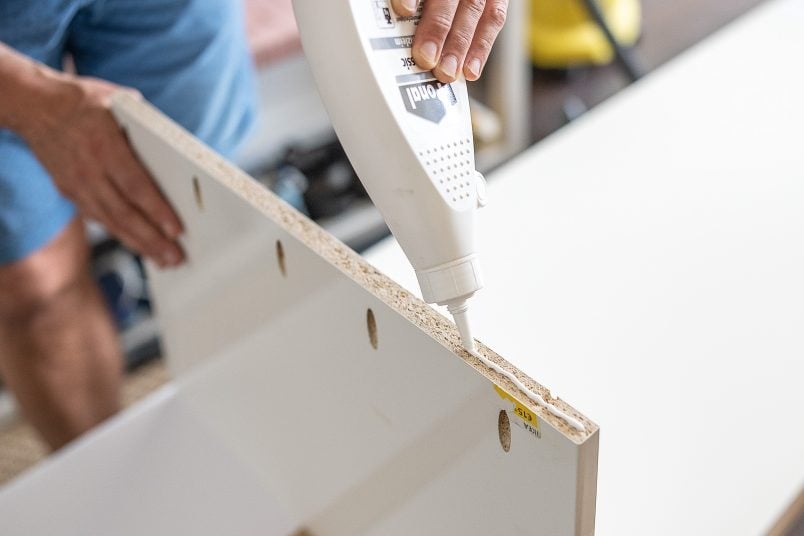
Then, apply some wood glue to the edge, position the extension piece and clamp it into place before adding the screws to attach the full-length Pax door and the extension piece to each other.
How to extend Billy doors:
Billy doors are 40cm wide. To cover them you’ll need 8 x 47mm wide strips with just under a 3mm gap between them (we just eyeballed the distance between the slats when attaching them).
To extend the Billy door we used the same method as for the Pax door. We used a piece of timber that was roughly the size we needed in the IKEA bargain corner and just had to shorten it slightly so it was the right length to extend the Billy door.
The only difference with the Billy extension is that it’s much higher as Billy cupboards aren’t as tall as Pax (we have the 236cm version).
This means that the extension is about 80cm long. We were worried that the long extended piece could snap off so decided to give it some additional support by screwing a flat piece of steel to the back of the cupboard.
It’s not the prettiest of things and I’m not even sure it’s totally necessary but it gives me peace of mind and is on the inside of the door so no one will actually ever see it.
3. Assembly
Once you’ve extended your doors, the fun assembly of the project can begin!
Add The Cladding
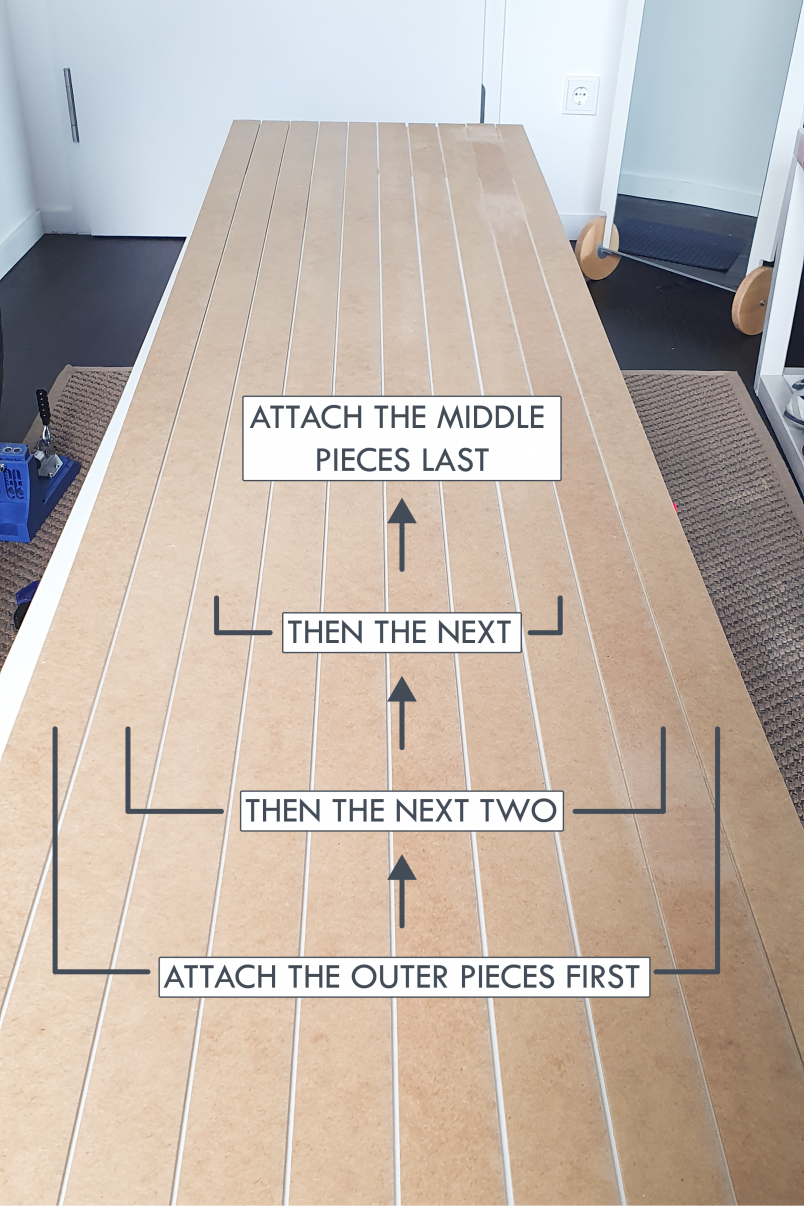
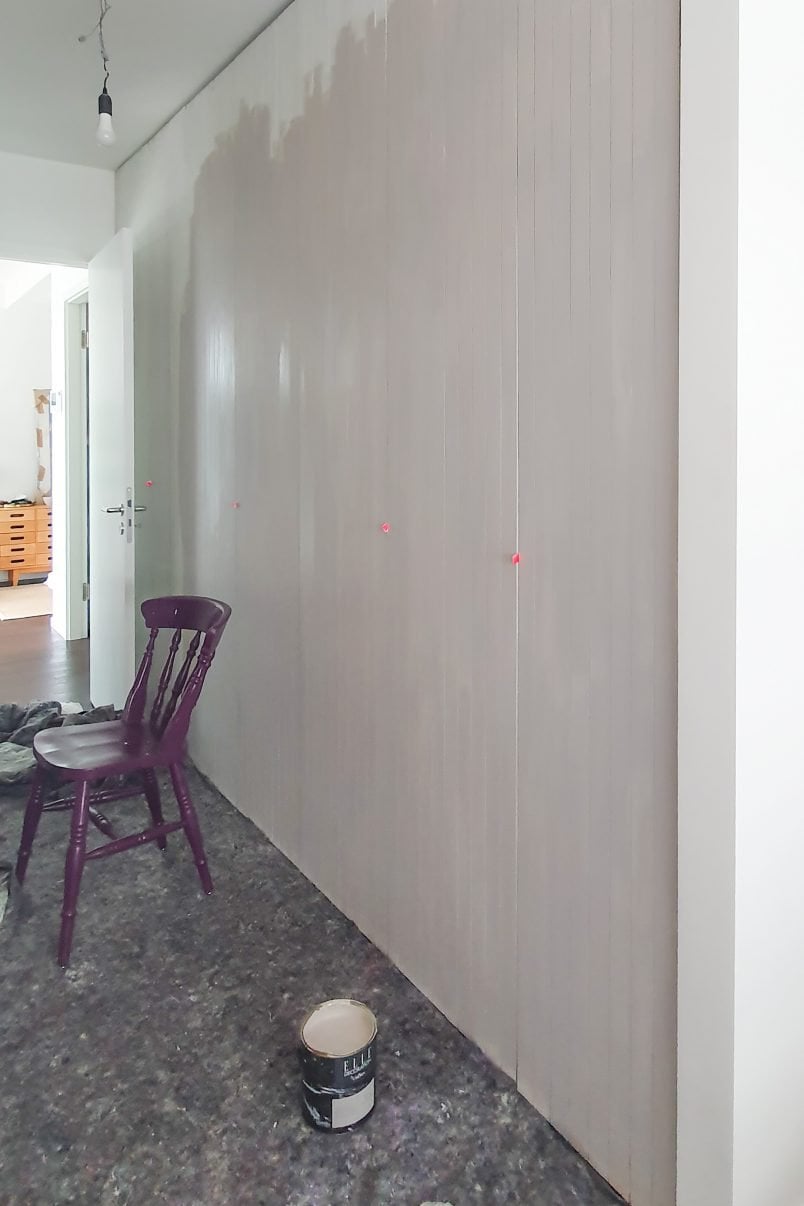
Lay your door on a flat surface and make sure that it’s dust free and clean. Then start to attach the timber strips one at a time making sure to use a spacer to keep an equal distance between each of them.
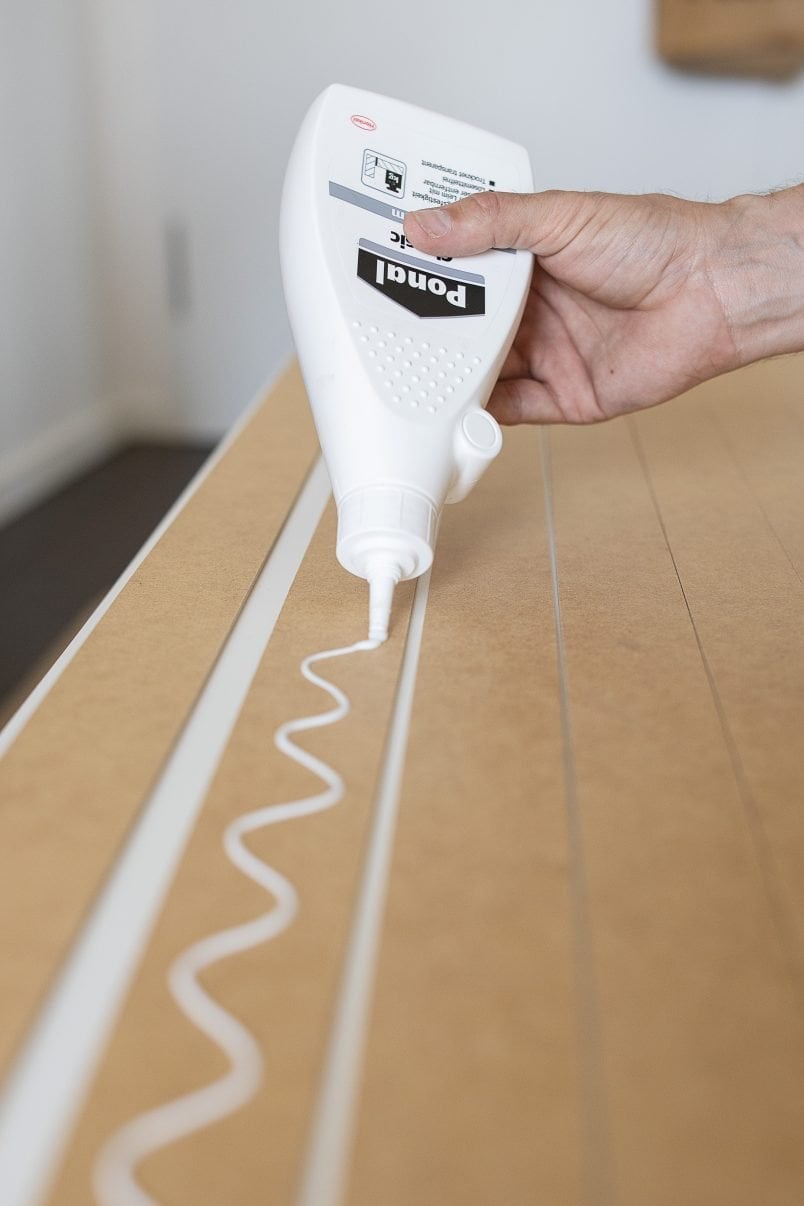
For the Pax door, you’ll need 10 strips of timber. Because the gap between each panel on the Pax doors is 3mm, you can use one of the timber strips as a spacer to give you the perfect sized gap. Just wedge it between two timber strips while the glue dries which makes this step surprisingly easy and quick.
The only thing you have to measure is the overhang of cladding at the bottom of the door which should be about 5.5cm. Definitely make the overhang less if you have wonky floors or a carpet though!
We also nailed a couple of nails (one at the top, one in the middle and one at the bottom) into each strip of timber with our nailer to make sure the strips couldn’t move around while the glue dries and to make sure they are firmly attached.
Our nailer is our favourite ever tool and we always recommend it and use it much more than we ever thought possible.
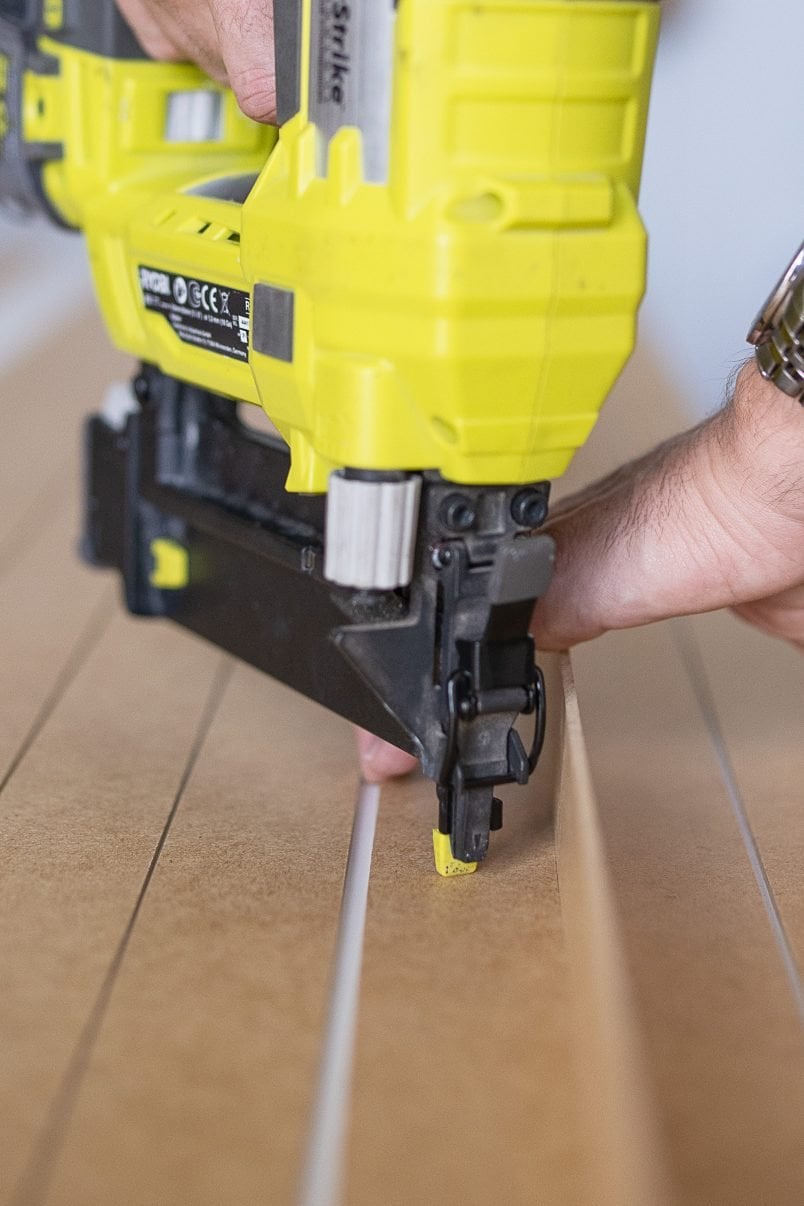
We’ve used it for dozens of projects ranging from building our slatted garden fence and building a log store right through to adding panelling to our walls and building our outdoor daybed.
Having said that, it is expensive so you could just glue them in place with some good quality wood glue which I think should be strong enough to hold them in place. It’ll just take a bit longer to assemble the doors as you’ll have to wait for the glue to dry after attaching each strip.
When attaching the strips, it’s best to work from the outer edge inwards. When you get to the middle strips you can then make any slight adjustments to the gap between the strips just in case the gaps aren’t perfect.
We had a couple of doors where we couldn’t get the gap to be exactly 3mm so just eyeballed the distance between the last two strips and you honestly can’t notice a difference.
When attaching the strips to the Billy door, the gaps will be ever so slightly smaller which is why you won’t be able to use another panel as a spacer.
To be able to create equal gaps we glued the two outer pieces of cladding in place first and then just added the other cladding and guestimated the distances between each strip of timber.
You can’t tell a difference at all between the distances on the Pax doors and the gap on the Billy door.
Fill The Bottom Overhang
The bottom of the cladding hangs over the bottom end of the door by 5.5cm, giving you a 1,5cm gap at the bottom. (You may want to adjust this measurement to give you more clearance if you have a carpet or wonky floors).
Because there’s 3mm space between each panel, there are gaps where they hang over the edge of the door.
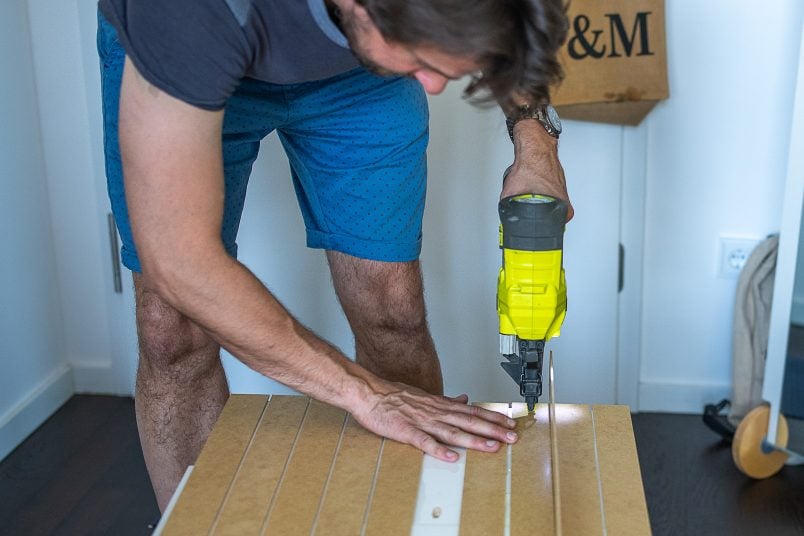
To fill these gaps just cut one of the additional pieces of cladding you ordered into roughly 45cm long pieces (less if you’re working on a Billy cupboard). You can easily do this by scoring the wood with a Stanley knife and snapping the wood as it’s so thin.
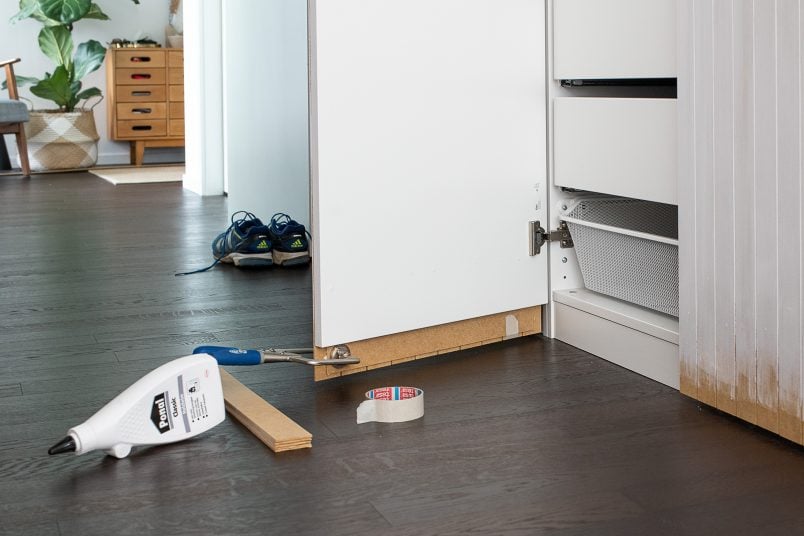
Then glue it over the inside of the overhanging cladding and clamp it in place.
DIY TIP
As you can see, we did this after we’d already reattached the doors but I’d definitely recommend doing this step before you put the doors back!
Fill The Gaps To The Walls
You may be lucky and your Pax fits perfectly into your alcove or along the wall but if like us you are left with little gaps you will have to fill these to make your IKEA Pax wardrobes built-in and look like part of the wall.
Usually, we would attach the timber to the wall, but we wanted this to be a renter-friendly hack we attached to the wardrobe instead.
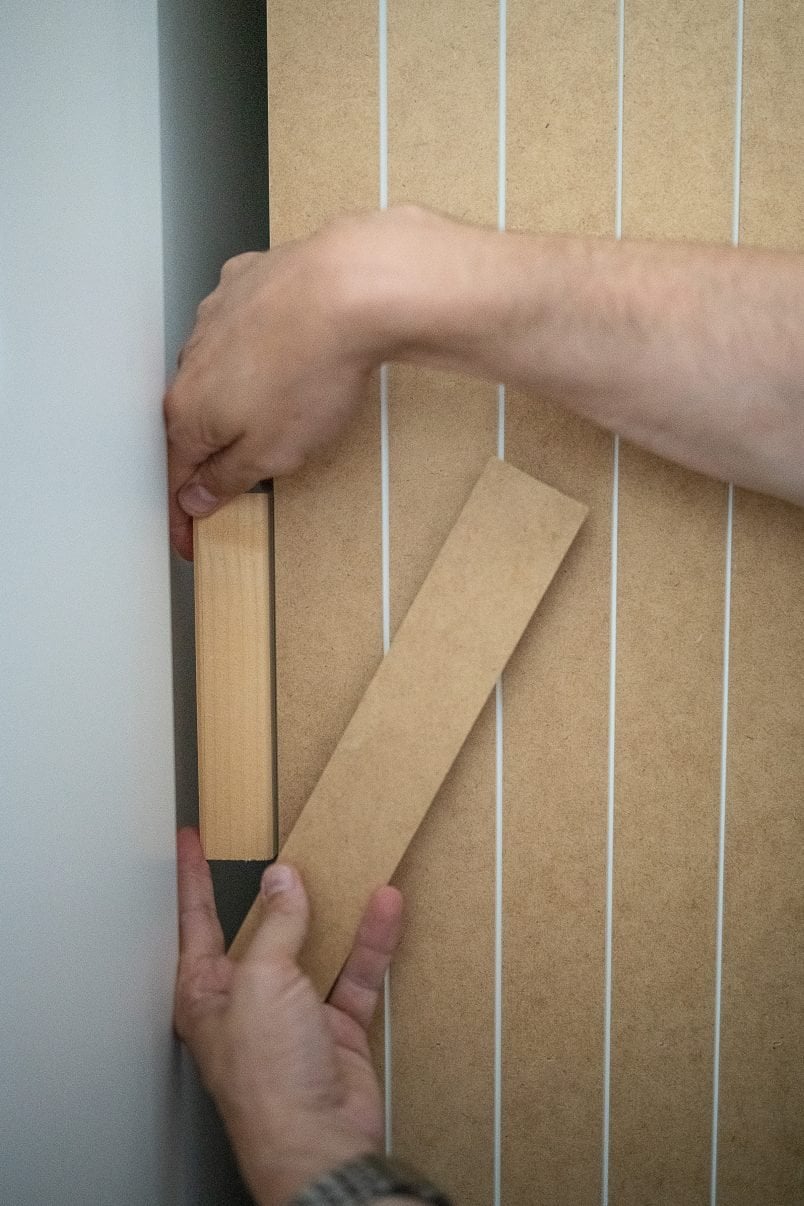
To do this, screw or nail a batten to the side of your Pax wardrobe. The piece of timber you use has to be wide enough for you to be able to glue the additional strips of cladding you’re using but also deep enough so that you can easily nail it to the side of Pax.
We’d recommend using some timber that’s at least 48mm deep to give you enough space to be able to screw into the timber.

This bit of the project is definitely a two-person job as you have to hold the timber you’re screwing (or nailing) to the side of the wardrobe at the right level so that the cladding will be flush with the rest of the doors.
As you can see, we used an offcut of the cladding so that I was able to hold the timber at exactly the same level while Jan nailed it in place.
I’m not going to lie, this is super pfaffy, especially as you can’t open the wardrobe door while you are working. There was definitely a lot of cursing involved and attaching this one piece took longer than assembling a whole door.
As you can see, we also had to cut out a small piece of the cladding so that it would fit around the skirting. As the wood is so thin, I just used a Stanley knife to cut it out.
4. Prime & Paint
Fill any small holes from the nails with some wood filler, wait until it’s dried and then sand everything smooth with some 120 grit sandpaper (ideally followed by 180 grit sandpaper to make it extra smooth).
DIY TIP
I would definitely recommend painting the doors before you attach them because it will make it so much easier to paint the edges of the doors which is almost impossible when they are attached to the wardrobes. If you’ve ever attached Pax doors before, you’ll know why I was too lazy to take them off again!
Next, give everything a coat of primer. I just used a paintbrush for this but you could use a roller if you prefer. The reason I prefer to use a paintbrush over a roller is because it’s easier to achieve a smooth finish and I find that roller often leaves a slightly stippled surface.
The secret to a super smooth finish and no visible brush strokes is to use a quality paintbrush and to sand between every coat of primer and every coat of paint.
I’ve been recommending the same paintbrushes ever since sharing our DIY adventures here. We love them so much and still have the exact same paintbrushes we bought over 10 years ago and still use them for all projects. I honestly can’t recommend them highly enough!
The second secret to a super smooth finish (which I also bang on about any chance I get) is not to skip sanding!
Sanding between coats of paint (obviously wait for them to dry first) is the only way you’ll end up with a durable and professional finish. Sanding removes imperfections and the odd brush stroke but, most importantly, it removes any raised grain making the surface super smooth. This step only has to take a couple of minutes but will make all of the difference!
When the primer has dried, all that’s left to do is give your wardrobes a coat of paint. We tried the Elle Decoration range by Crown paints for the first time and loved it. The paint itself is lovely to work with. It’s really smooth, thick and covers amazingly well.
5. Finishing Touches
The last thing to do is attach and adjust the Pax doors and add some handles.
When attaching the door to the wardrobe, we recommend attaching the hinge to the door and then attaching the door to the wardrobe. We tried it the other way around and it just didn’t work.
If you’ve ever attached Pax doors, you’ll know that it’s a bit of a pain to get them to line up and hang perfectly. I’m not going to lie, the panelling you’ve added doesn’t make this step any easier!
You have to make sure there’s a gap between the wardrobe doors so that you can open them without the edges catching.
This inevitably means that there’ll be a lot of adjusting necessary to get the doors to hang perfectly. It’s nothing difficult to do, but it does take a bit of time to get the Pax doors perfectly aligned.
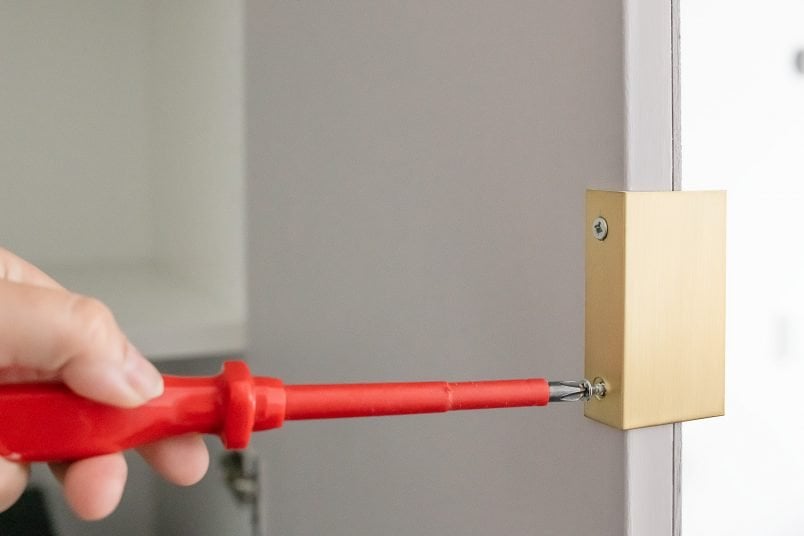
The last thing to do is attach the handles. We opted for these slim brushed gold Britta handles by Pretty Pegs which is also where we bought the feet for our upholstered ottoman.
Choosing handles that slot between the doors probably didn’t make adjusting the doors any easier as we needed to leave a gap for the handles as well as between the individual doors. It worked but I’d recommend choosing handles that you attach to the front of the wardrobes to give you more flexibility when adjusting the doors.
How much does it cost to extend a Pax wardrobe?
I know it’s always important to see how much it costs to do these projects, especially as things have a way of adding up quickly. I honestly think this project is a total bargain though as there’s absolutely no way you’d be able to achieve custom built-in wardrobes for so little money otherwise.
Cost Breakdown for 6 doors + 1 Billy cupboard (doesn’t include the cost of the actual wardrobes):
Top Tips When Extending Pax Wardrobes
- Don’t attempt this Pax hack with wood that’s thicker than 3mm max! You won’t be able to open your doors!
- Leave at least a 1.5cm gap at the bottom and 2.5cm gap at the top of the doors.
We live in a building that’s brand new and even then the floors and ceiling weren’t 100% level. If you live in an older property you may have to leave more of a gap to allow for wonkiness. - Don’t forget about your ceiling! If your cupboard doors go (almost) all the way up to the top of your room will you still be able to open them? Are there any light fittings or other things like smoke detectors in the way?
- Check the bargain corner for the additional door you need. We picked ours up there for much less and it doesn’t matter what it looks like as you’ll be cutting it up and covering it anyway! Just try to get the same door as the ones you already have as there are slight differences in the thickness.
- Order a couple of additional strips of timber cladding to cover any gaps at the side and the overhang at the bottom of the wardrobe.
- Choose doors that are all the same. You’d be surprised at how much the different designs vary in thickness which will make it more difficult to join the piece together or get a flat look when adjusting the doors later on!
Pros and Cons of Extending a Pax Wardrobe
Pros
- It’s a super affordable upgrade and much cheaper than any other built-in option
- It’s an easy and completely beginner-friendly project
- It’s fairly quick to do
- It’s totally bespoke and you can make something that fits in your home perfectly
- It’s ideal if you have wonky walls as nothing is actually attached to them
- Great way to make the most of the space above your wardrobes
- It’s perfect for renters as it’s not attached to the wall
Cons
- You can only extend the wardrobe by about 40 cm before it becomes wobbly
- Billy doors are slightly thinner than Pax doors and you can see nail bumps on the back of the Billy door if you use a nailer to attach the cladding (you obviously won’t have this problem if you don’t use a nailer).
- Adjusting Pax wardrobe doors is a pain and the cladding doesn’t make the process any easier. It takes a long time to get the doors to hang perfectly.
- Watch your toes! If you extend downwards you will reduce the clearance so risk squashing your toes when you open the doors. Obviously, you don’t have to extend downwards and if you’re accident prone you may not want to. (I’m speaking from experience – or rather one of my toes is!).
[twenty20 img1=”33716″ img2=”35962″ width=”100%” offset=”0.5″]
FAQs
It is possible to combine different types of IKEA furniture using this hack. It doesn’t matter if you’re combining Pax and Billy or Pax and Method. Just make sure to use pieces of furniture that have doors that you can attach the cladding to.
None! That’s the beauty of this project. You just extend the doors and don’t have to worry about building any complicated structure or buying additional cupboards. All you have to do is extend your doors!
Our IKEA Pax wardrobes are all about 38cm taller. We wouldn’t recommend making them taller than that as they will start to wobble and the connections can become less secure.
Upgrading each door took about 30 minutes in total. Priming and painting took about another 3 hours and adjusting the doors about another hour. So, in total, it took about 7.5 hours to completely transform our Pax into built-in wardrobes.
If you’ve ever wondered about how to extend your Pax wardrobes or how to combine Pax and Billy (or other IKEA furniture) I honestly can’t recommend this Pax built-in wardrobe hack highly enough!
Although these wardrobes are totally bespoke and look super high-end, you need almost no tools (you can just glue the cladding if you don’t have a nailer) and almost no DIY skills.
This IKEA Pax wardrobe hack gives you a gorgeous custom built-in cupboard without the need for expensive tools and just the most basic DIY skills!
Is the top of your wardrobe also filled with boxes of junk and clutter? Have you ever attempted an IKEA hack? Do you find adjusting hinges as frustrating as we do? Let us know what you think of this Pax hack in the comments below. We can’t wait to hear what you think!
S says
This is genius! Would it also work with one 50 cm wide piece for each door if we don’t want the stripes look but a more plain door cladding instead? Or will the solid piece be to awkward? Thanks for sharing such an excellent tutorial!
Christine says
Thank you so much – glad you found our tutorial helpful! I think it will work, and it’s basically what we did just that we added the slats on top as well. I’m just not sure how well you’ll be able to fill and hide the join. I’d suggest adding a couple more pocket holes when you join the pieces of wood together so that there’s no chance of movement and then using a really good filler (maybe something like RepairCare 4) that won’t crack if there is a tiny bit of movement where the pieces join.
Hope that makes sense! :)
Cx
Blandine says
Hello,
Congrats on a beautiful project! Thank you for your detailed explanations, especially the tips, as an accident-prone person, I appreciated the toe safety advice! We are thinking of following your example to adjust a PAX wardrobe vertically to our 2.77cm ceilling, so we were thinking of placing a billy on top of our Pax, so slightly different and I’d like to pick your brains about the height.
On the ikea Pax designer, they say to plan to have at least one centimeter between the ceiling and the wardrobe. If we use the tallest Pax (236cm) plus a Billy (40cm), we are ending up with only one centimeter left. In your experience, is that fine or would you not risk it? But looking at your example, I might just put boxes on top of the PAX, extend the doors as you did and not worry about the billy. Thank you very much for your thoughts,
Christine says
Thank you so much for the compliment, Blandine. So glad you like our project.
In regards to your Pax wardrobes, I think that one cm could be enough but it’s very tight, especially as your floor and ceiling may not be 100% level. I just found this account on Instagram that extended their Pax wardrobes with another cut up Pax (it’s documented in the highlights). Maybe this is something that could work for you?
Hope that helps & good luck with your Pax hack!
Cx
Jonathan Risco Aguero says
Hi! This is so helpful and looks stunning! I wanted to ask what type of pax door you used for the extension piece as you mentioned that forsand may have a honeycomb middle? We just want simple straight doors with no pattern.
Thanks!!!
Christine says
Thank you so much, Jonathan! We found a door in the bargain corner and it ultimately doesn’t matter what door you use as long as it’s flat and isn’t made of honeycomb. Having said that, I think the door we used is called Fardal which according to the IKEA website is made of particleboard.
Hope that helps & have fun with your wardrobes.
Cx
Alicia says
It looks like you had to allow for moulding behind the unit – was this an issue? What keeps this solution from being wobbly/tipping? We live in a rental and I want to be certain. Finally, we are in a loft apartment, with very high ceilings. Do you think this hack would look as nice with 122cm of wall above? (We can hang art in that space?)
Christine says
If you’re referring to the skirting, it wasn’t a problem at all as the Pax wardrobes have a cutout at the bottom. You should always attach your wardrobes to the wall with the safety hook that comes with it. I admit that we didn’t do this but our pax wardrobes we’re slotted into the alcove and fairly secure (this is not what we recommend though!).
I’m not sure extending the wardrobes would make sense for you if you can’t go all the way up but there is an alternative solution that I think could work for you.
Check out the IKEA Platsa cabinets. I recently came accross this reel on Instagram where they stacked Platsa cabinets on top of each other. Maybe that’s a better solution for you?
Betty says
Thank you so much for this very detailed and inspiring post. I absolutely love it and making it my summer project. Love how it turned out.
Christine says
Thank you so much, Betty. So happy to hear that you like the wardobe. We’d love to see a picture if you build it!
Cx
Liselotte de Wit says
Tank you so much for this inspirational diy project? Would this work with with just plain mdf panels of 2400x500x3 mm per door?
Christine says
If you’d like your doors to be completely flat, I totally think that that should work, too, Liselotte. As with this project, the only difficult bit is adjusting the doors so that they open correctly but how many panels you put on them (one big one or lots of small ones) shouldn’t make a difference.
Hope that helps & we’d love to see a picture of your wardrobes if you decide to cover them!
Cx
Robert says
I’m about to edit our PAX wardrobe as well, inspired by your post. I have two questions for you, and I would appreciate your feedback and experience.
Why didn’t you sand the PAX doors before applying the panels and primer? Will primer and paint adhere to the coating? I use a darker paint and I am afraid of white flashing.
We could only get 3.2 mm thick HDF panels. Plus primer and paint. And I assume that the outer panels of each door are flush with the door edge (could not see that from the pictures). Do you think we will still be able to open and close the doors or would I have to sand down 0.2 mm to be safe? At this point it should be said that our door handles will be mounted on the front.
I look forward to hearing from you guys.
And thanks again for the inspiring post
Christine says
Always happy to help, Robert! The only reason that we didn’t sand the doors before is that the gaps were so small afterwards and because we used an adhesion-promoting primer. Usually, we always recommend sanding but figured we could get away with skipping it in this case.
Yes, the outer panels are flush with the door edge. If you are installing 2 x 1m Pax wardrobes I don’t think you’ll have a problem as you can adjust the doors so that the ones on the right wardrobe are a bit further to the right and the ones on the left wardrobe are further to the left. This will give you a slightly larger gap in the middle where the two wardrobes meet. If you are using more Pax wardrobes I think that the 3.2mm thick HDF will still work. I would suggest attaching one of the HDF strips to the edge of the doors where the hinges are to see if you have any problems when opening them. You can always sand just the edge panel if it catches.
The most difficult bit of this whole project is adjusting the doors so that the gaps are equal and they don’t catch each other when opening them.
I hope that makes sense but let us know if you have any other questions!
Cx
Bec says
I love this project and the finish you achieved looks great! I am thinking of doing the same, but would have to extend the doors quite a bit to reach the ceiling. I’m weighing up the pros and cons of this, versus just making my own doors out of plywood. Can you think of any reasons I would want to avoid making my own doors?
Thanks! Bec.
Christine says
Thank you so much, Bec! There’s no reason you can’t make new doors yourself. We opted for this version as it worked out slightly cheaper and (probably) easier but making your own doors would definitely be a great option, too! We’d love to see a pic if you decide to make the doors!
Cx
Billie says
Such a beautiful project! Shame I didn’t come across it sooner. Any clever ideas on how this can be compatible with a pax sliding door? We have 75cm Pax (hinged door), 50cm Pax (hinged door) next to it and a 150 Pax sliding door next to that. So 275cm width of wardrobes. Seeing your project very keen to do the same, but not sure what to do with the sliding door section (other than take it down and replace with hinged doors!). Any tips and suggestions most welcome.
Thank you!
B
Christine says
Thank you so much, Billie. I’m not sure how the sliding doors at Ikea work so I’m not sure if the cladding would be in the way when you try to open them. I will check next time I’m at Ikea and will try to work out if cladding the sliding doors would work, too. I’ll keep you updated!
Cx
Diandra says
Hi Christine, about to begin my pax wardrobe journey, thank you for the details steps for do’s and dont’s. Did you find if this would work with the sliding doors? Thanks
Christine says
Thank you for taking the time to comment, Diandra! I just had a look at the sliding doors on the IKEA website and from the pictures I don’t think it will work. It looks like the second door slides on the first one so there would be nowhere for the door to slide if you added panelling which would block it. I will definitely check it out next time I’m at IKEA though. It’s difficult to tell on the pictures and if I see the doors in real life I might be able to come up with a solution that will work.
Cx
Titus Lee says
Hi,
What would you do if the side walls did not exist in this room?
Christine says
That’s a great question, Titus. I would basically do the same as I did with the doors and stick panelling over the side so that the whole wardrobe has the same panelled look all around. You would have to build and install the wardrobe first, then (if you need a height extension) use some small steel angles to screw an extension piece of wood to the top side of the wardrobe. You won’t be able to use the method we used for the doors as the top of the actual cupboard sits on top of the side panel so using small angles will allow you to add a side extension piece that’s flush with the outer edge of the side of the cupboard. Then just stick all of the panelling to the side of the cupboard as you would for the doors.
Hope that makes sense!
Cx
Sara says
I know this is old but, I’m thinking of doing this for a cabinet that would only be against one wall. Can you give more detail about using steel angle to extend one side? I’m not sure I follow. Thanks!
Christine says
I’m not exactly sure what you mean, Sara. I assume you’re talking about extending the side piece of the Pax wardrobe? If so, I would screw a couple of steel angles (or a very thick timber batten) to the top of the wardrobe, giving you a surface to screw the side extension panel to.
Hope that makes sense but let me know if you still have questions.
Cx
Stacey says
HI and happy new year! Thank you for taking the time to explain this project. What is your ceiling height in this space please? I’m not sure I can get panels long enough so I’m just curious how long yours were. Thanks much!
Christine says
Happy New Year to you, too, Stacey! That’s a really good point – our ceilings were 2,8m high and you shouldn’t have any problems getting panels that are that long. If you need longer panels you could always join them. Hope that helps but let us know if you have any other questions.
Cx
Charlotte says
I need to look at doing this in our master bedroom! We’ve got built ins that need replacing but are such an awkward shape, I think an extended Pax would be ideal!
Christine says
It was such an easy project, Charlotte. It sounds like it would be ideal for your awkwardly shaped room. Would love to hear how you get on if you give it a try!
Cx