[AD – This post is in collaboration with Farrow & Ball and contains affiliate links. As always, we only recommend products we love and think that you will, too! Read our full disclaimer here.]
We’ve finished our kitchen makeover, and I’m so so so excited to share the result with you!
It may have taken us over two months, along with a few fairly major hiccups, to get everything finished, but our kitchen now looks like this!
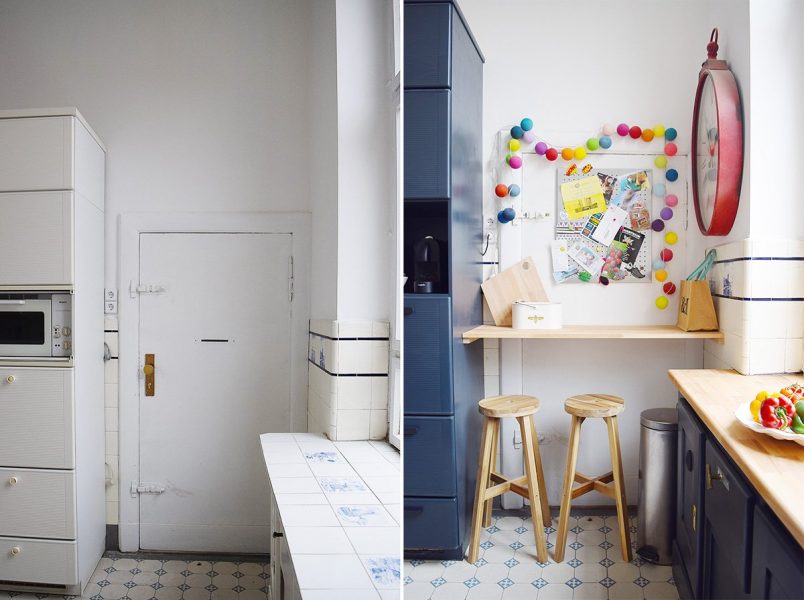
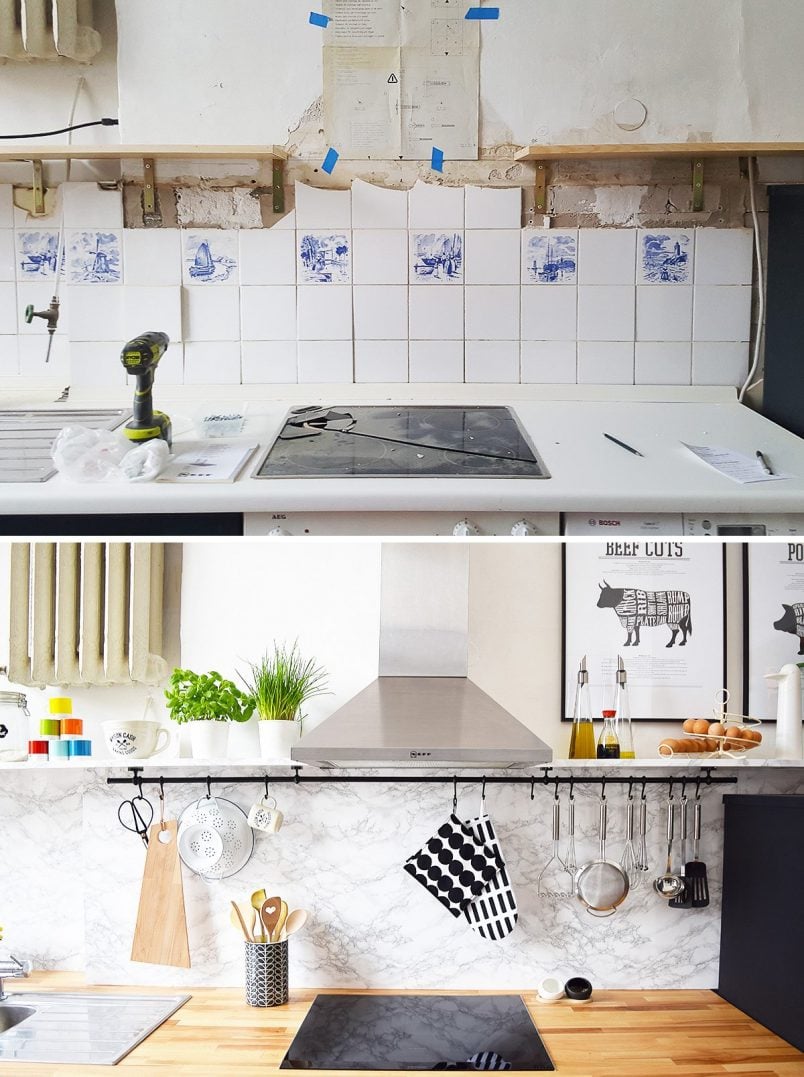
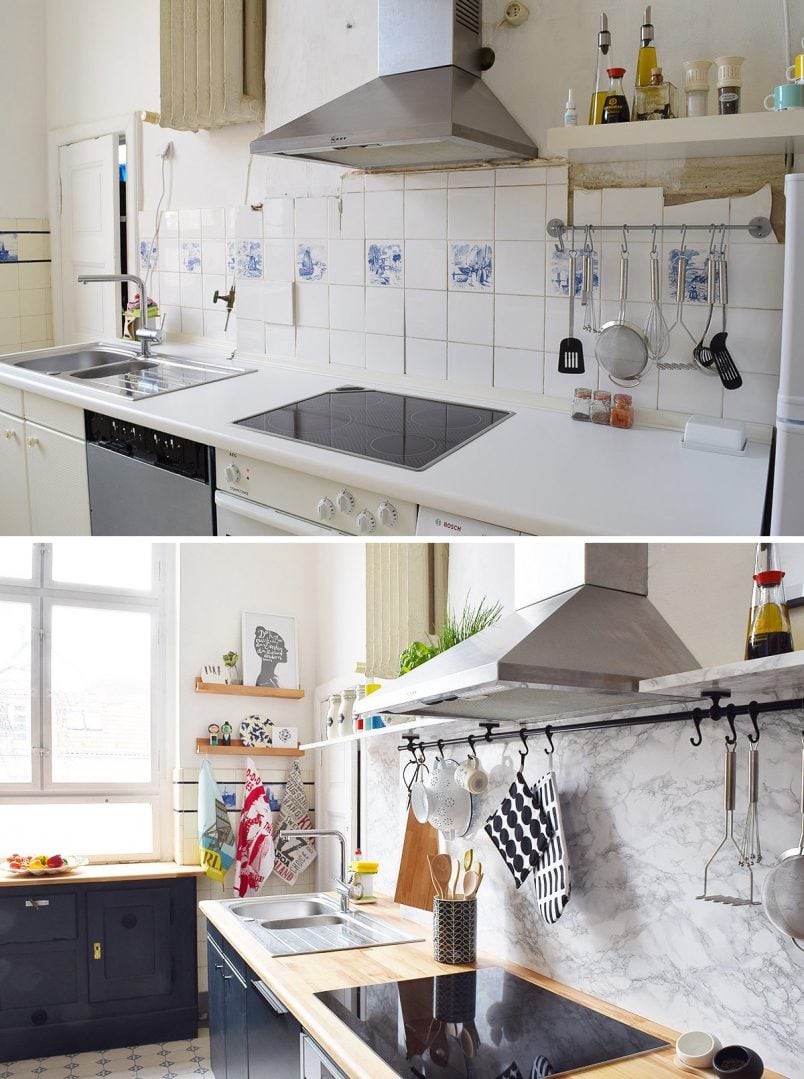
I still can’t quite believe it’s the same room! Just as a reminder, this is what it looked like when we moved in…
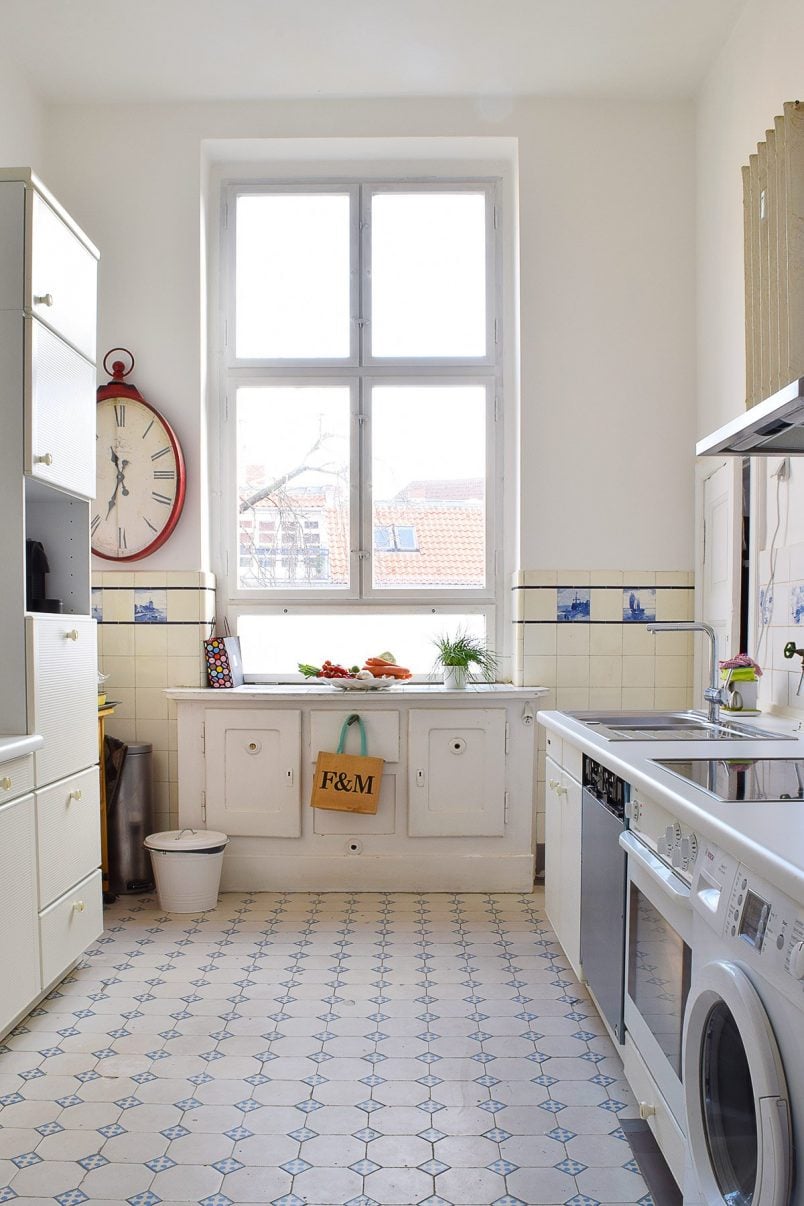
Now you can see why we’re so excited! It’s hard to believe it’s even the same kitchen!
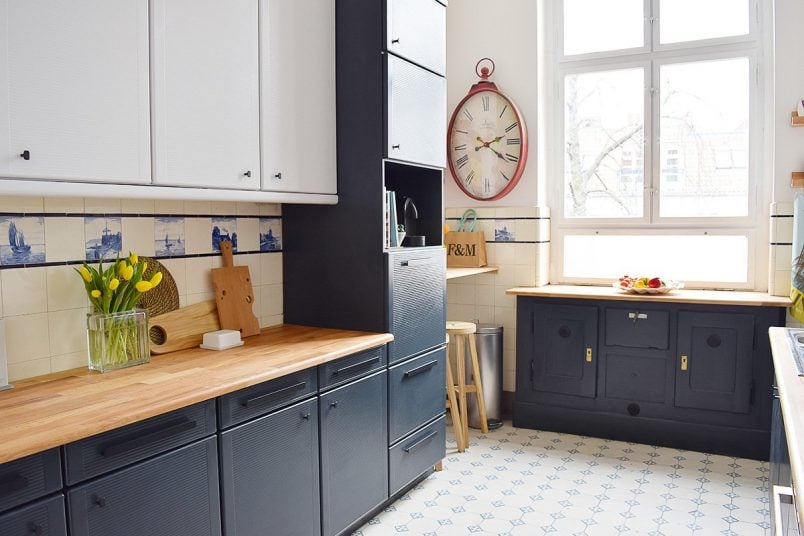
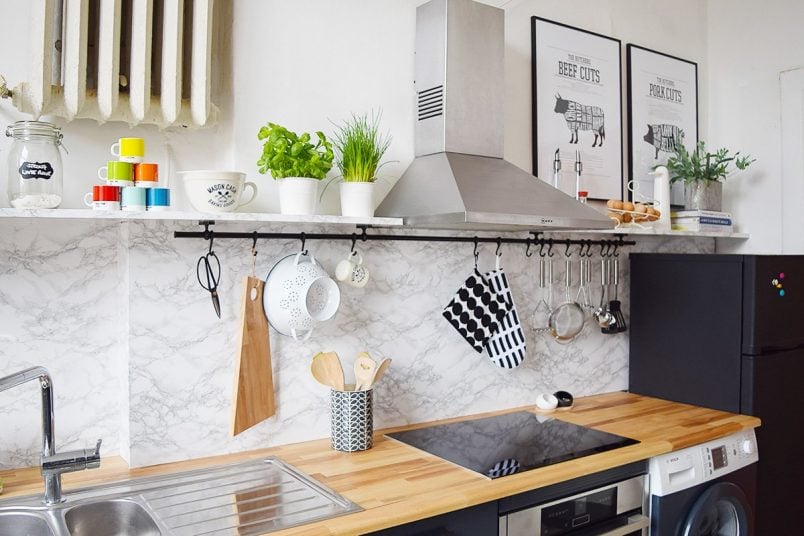
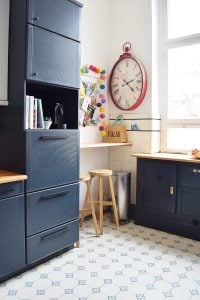
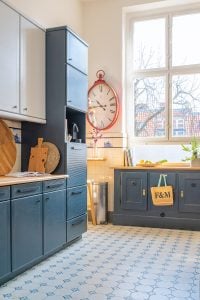
As you can see, it’s gone through a pretty radical transformation. Originally, we’d planned on just painting the cupboards, but once we started the makeover, we got a bit carried away and couldn’t stop ourselves.
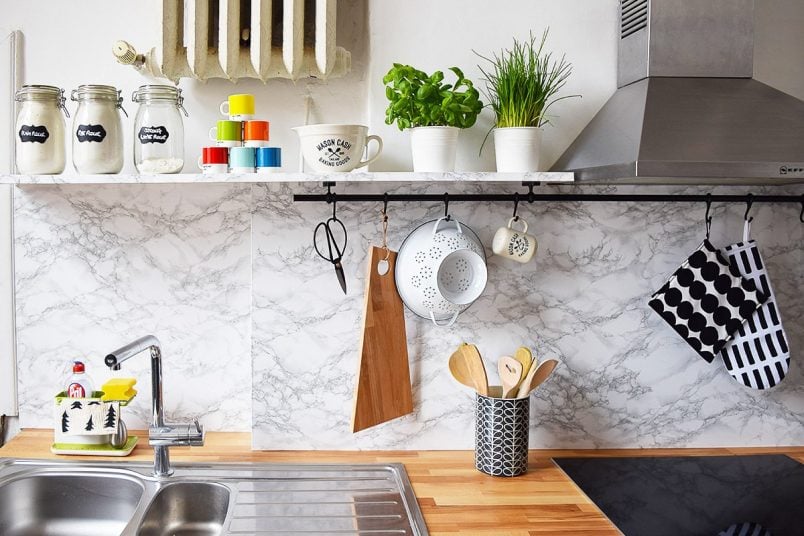
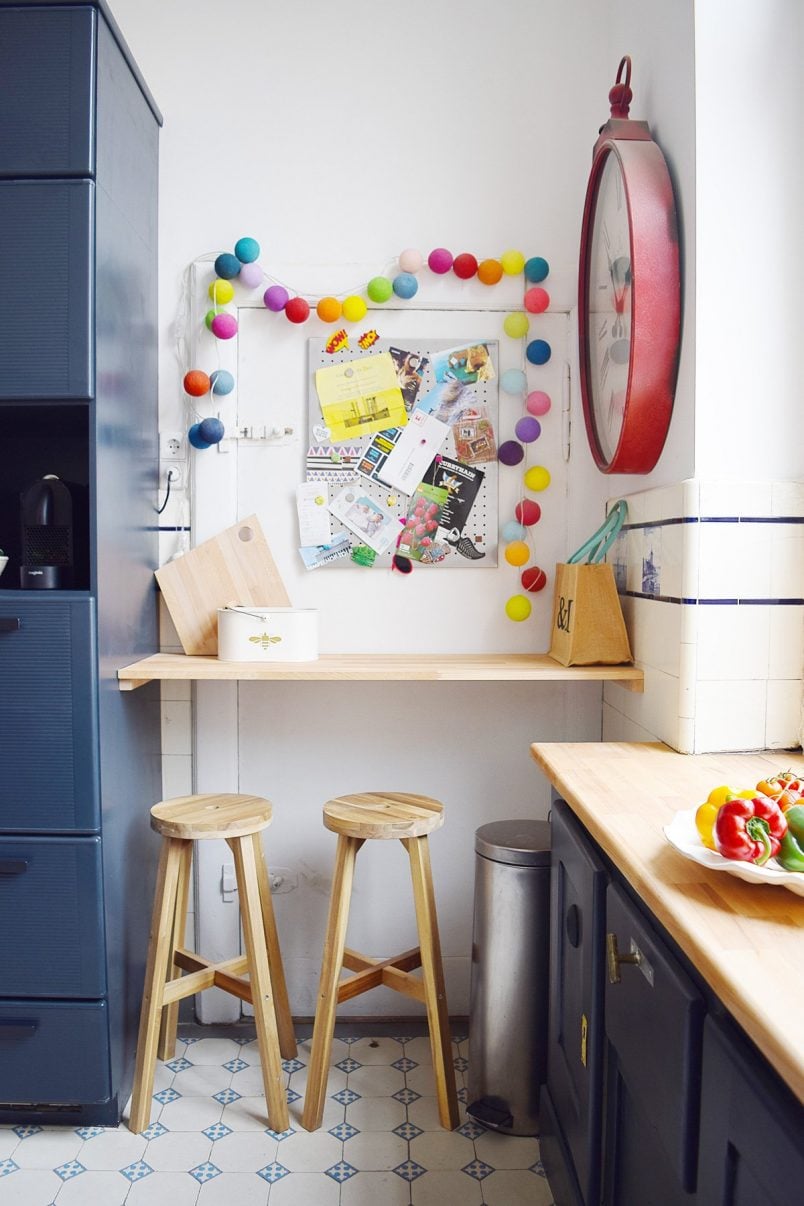
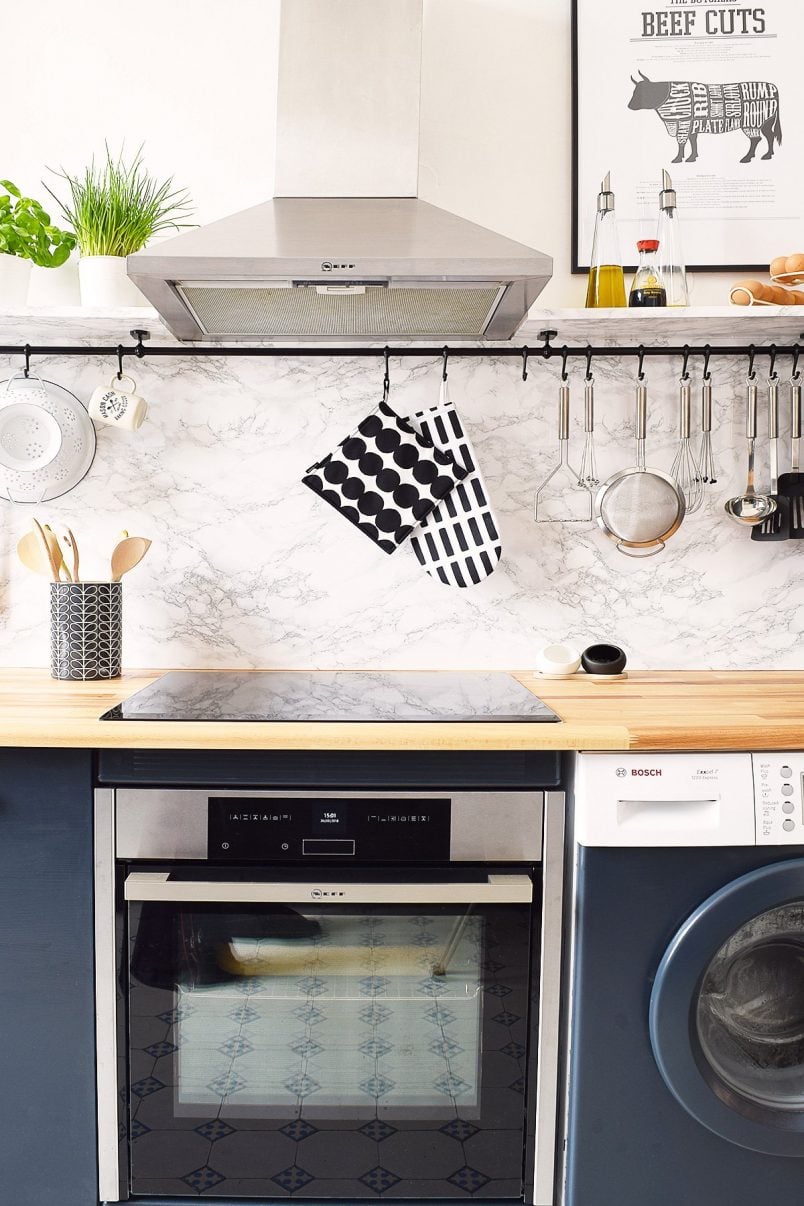
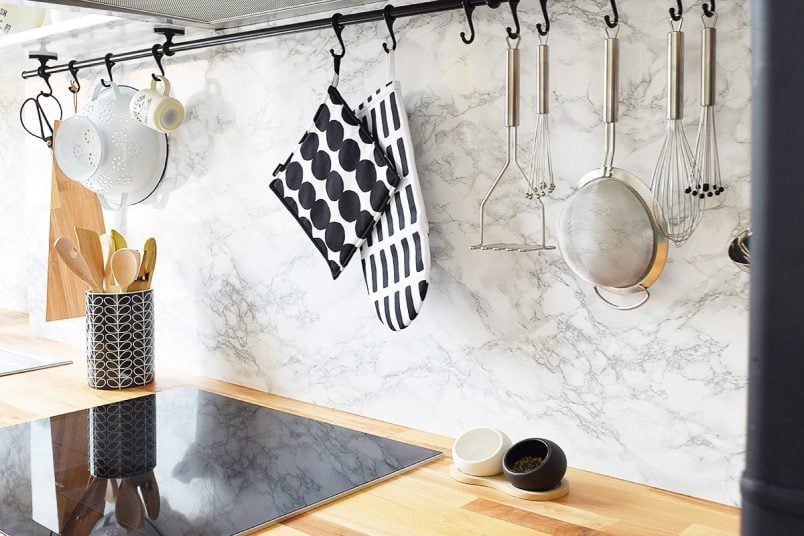
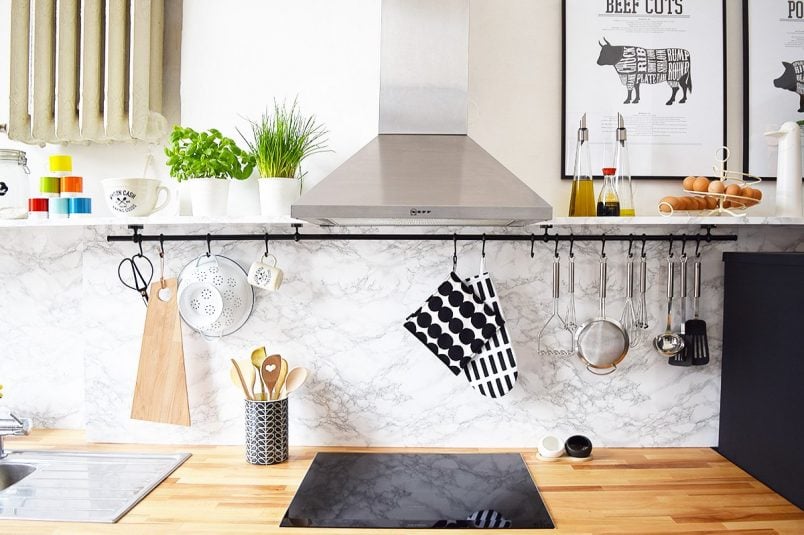
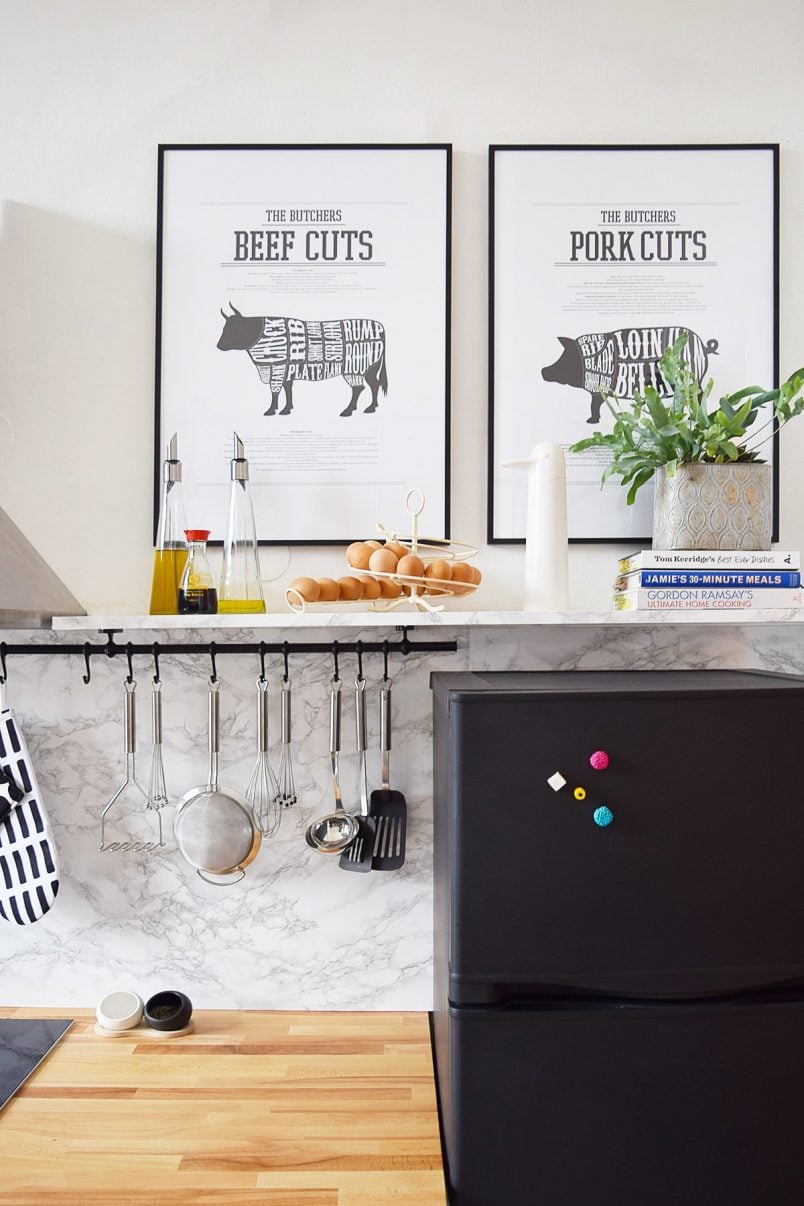
We patched the walls, had a little electrical update (which was very unplanned), now have a new oven and an amazing new induction hob (which also weren’t planned), built super slim floating shelves, installed a faux marble splashback, a new worktop and installed some under cabinet lighting, too.
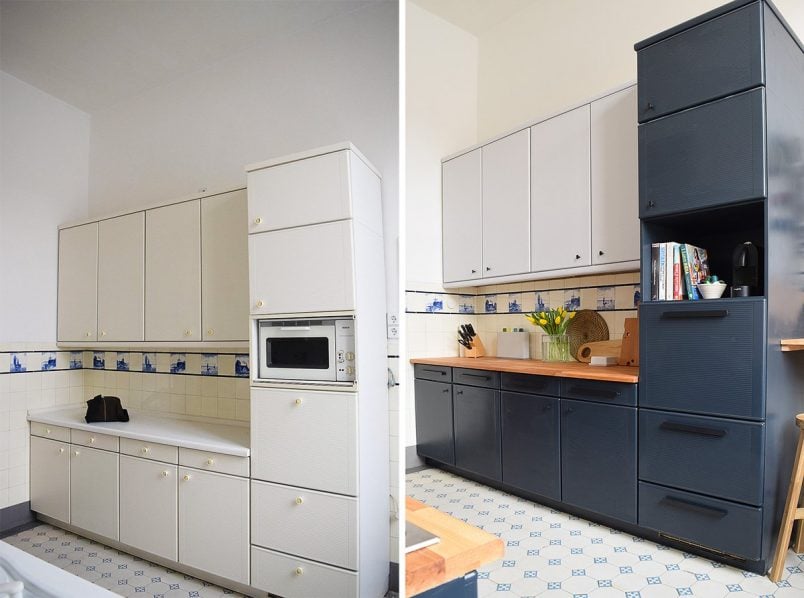
I love everything about our “new” kitchen, but my favourite part of the makeover is the now gorgeous two-tone cabinets. I’m always amazed at the difference a bit of paint can make, and this project is definitely up there when it comes to transformations.
I admit that I get bored quickly when tackling DIY projects (which is probably why there are usually dozens of unfinished ones everywhere).
This project, however, was so much fun to do – partly because I love the gorgeous colours but also because it has such a big impact. Oh, and it was super easy to do, too!
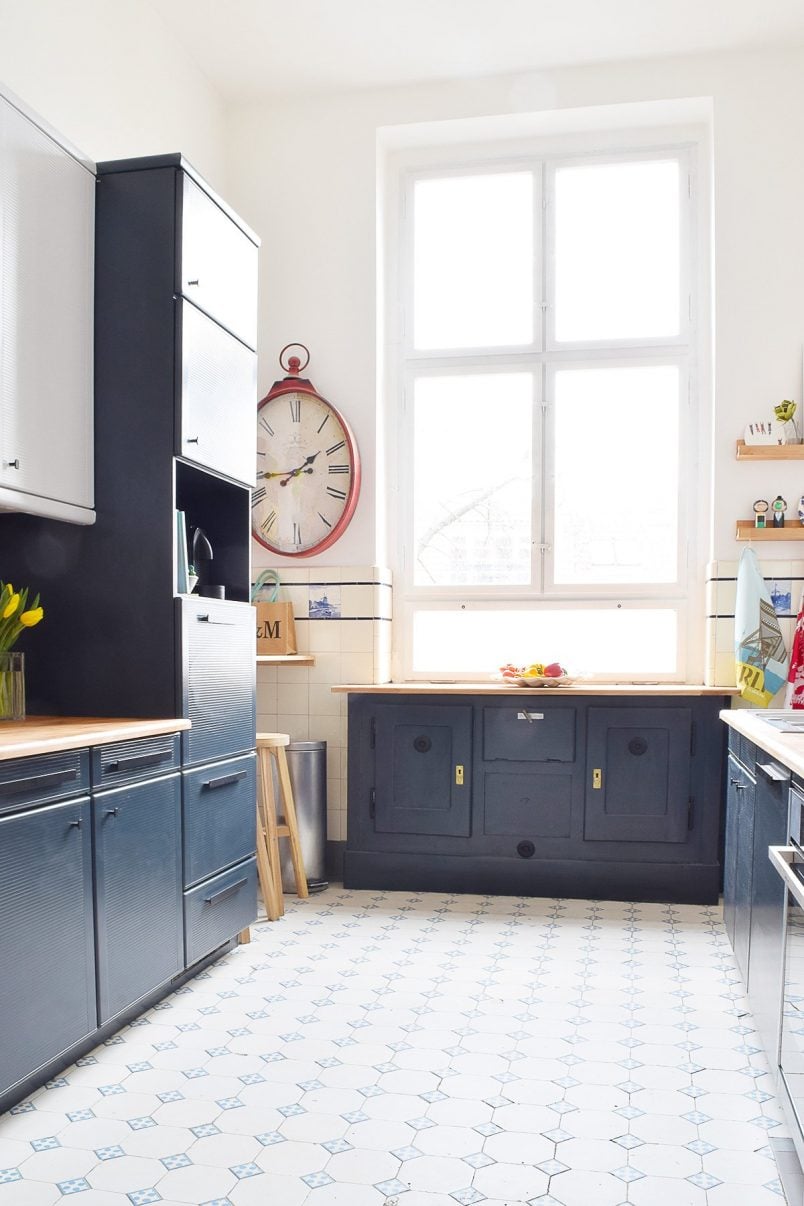
The dark bottom cabinets (which are painted in Railings by Farrow & Ball) work so well with the soft light grey (it’s Dimpse by Farrow & Ball) top ones. But we didn’t choose the colours – you did!
If you remember, way back in April 2017, we put our kitchen makeover to the vote. You may have thought we’d lost our minds, but you guys didn’t let us down, and the option you voted for is the two-tone version we now have!
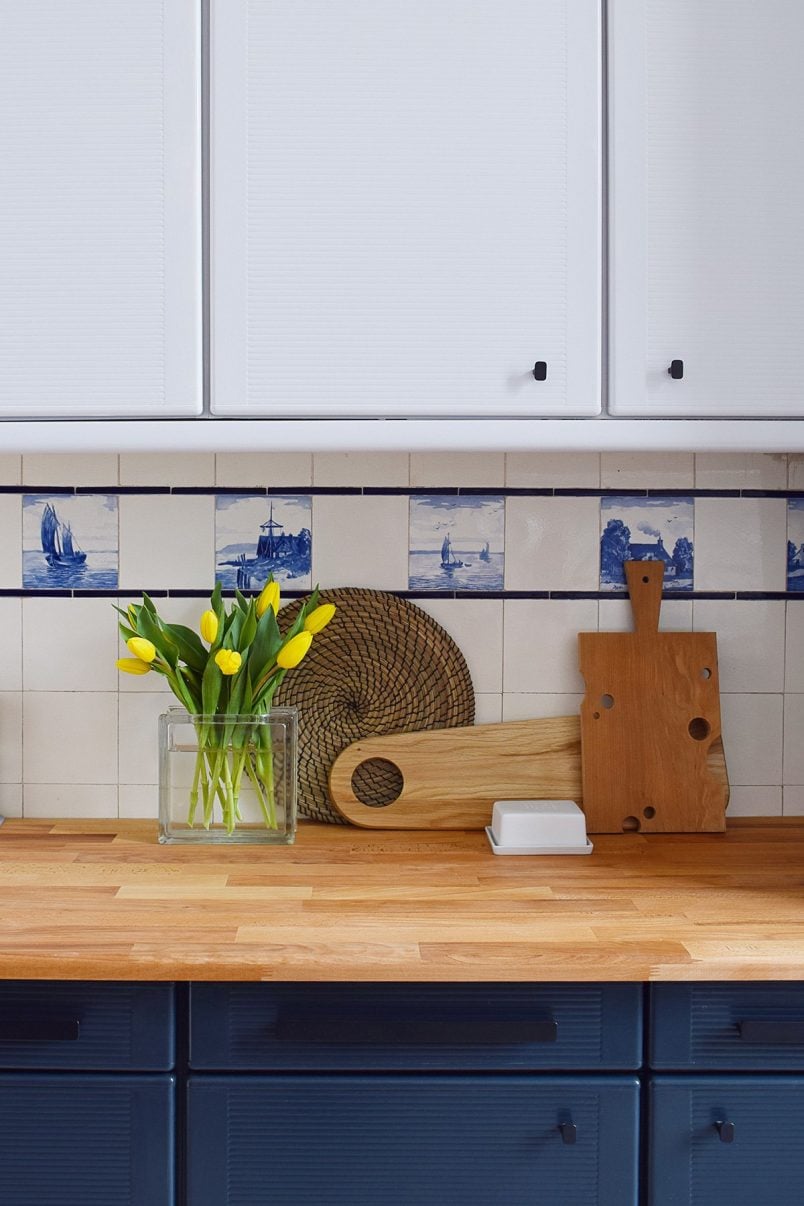
Something else that makes a huge difference is the new beech counter. The previous white ones were perfectly fine, but they were a bit worn, and I hated the chunky plastic, which just made everything look cheap.
Removing the worktop also had an unexpected bonus, as we discovered when it (and we assume the kitchen with it) was originally installed. It’s a whopping 32 years old! Given its age, it’s pretty amazing how well the kitchen has held up.
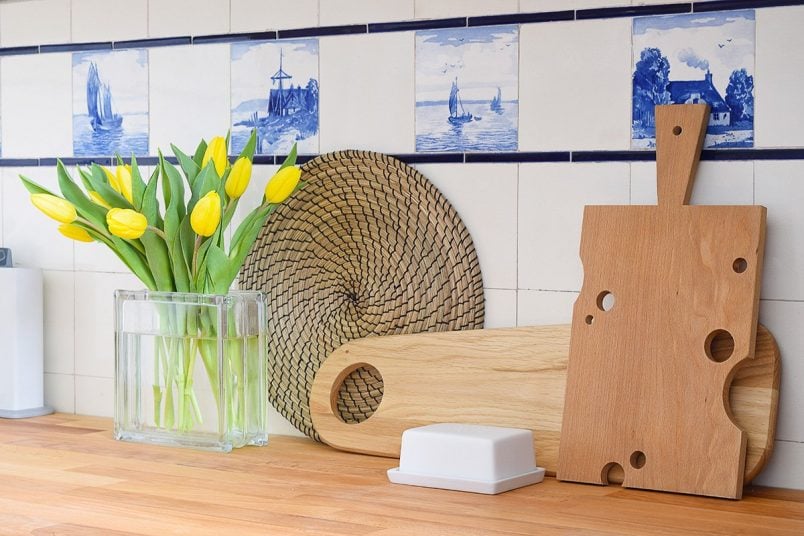
On the kitchen mood board, we shared a while ago, we’d planned on installing new solid oak counters, but the beech ones we eventually opted for turned out to be quite a bit cheaper and are also gorgeous.
Saving money where you can on DIY projects is always a good idea, and in our case, it turned out to be especially sensible as we had a rather expensive accident, which made this makeover a bit more elaborate than we’d planned.
At 2.30 in the morning, I woke up to an enormous bang that was so loud that it probably woke up everyone in the building (except for Jan, who didn’t budge and stayed snoring next to me).
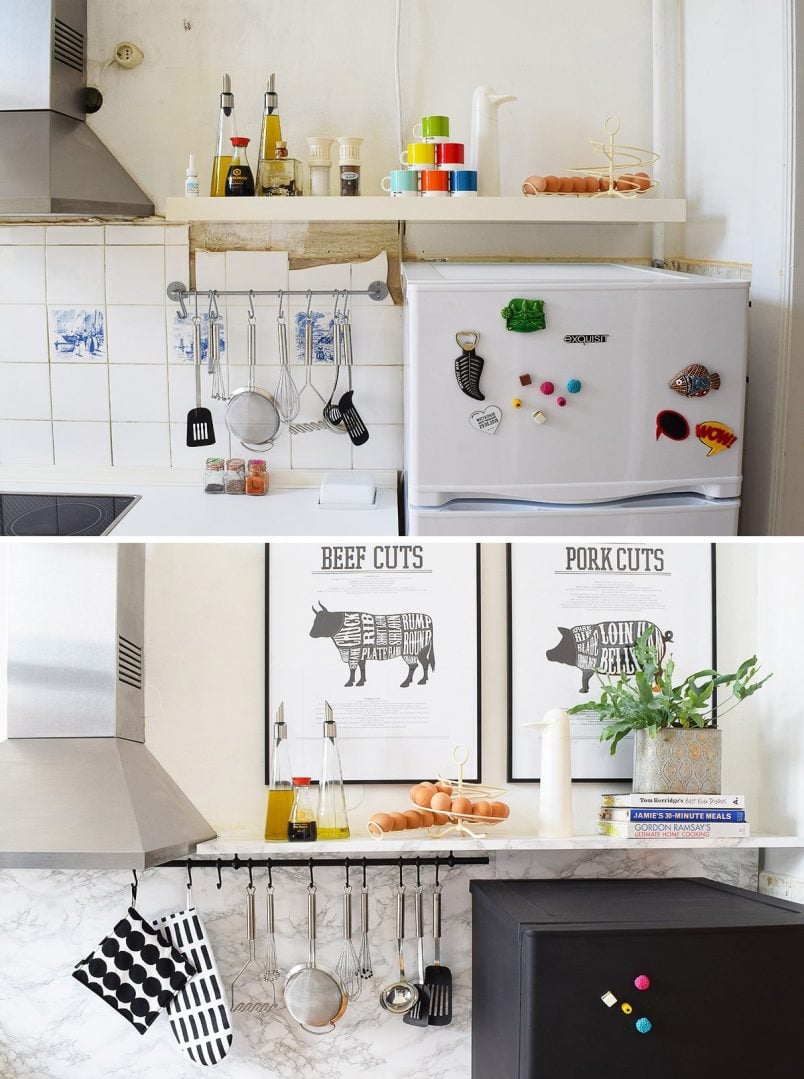
I’m really not exaggerating – it sounded like something had just exploded! So, in a bit of a daze and panic, I ran around the apartment to see where the sound had come from and found this…
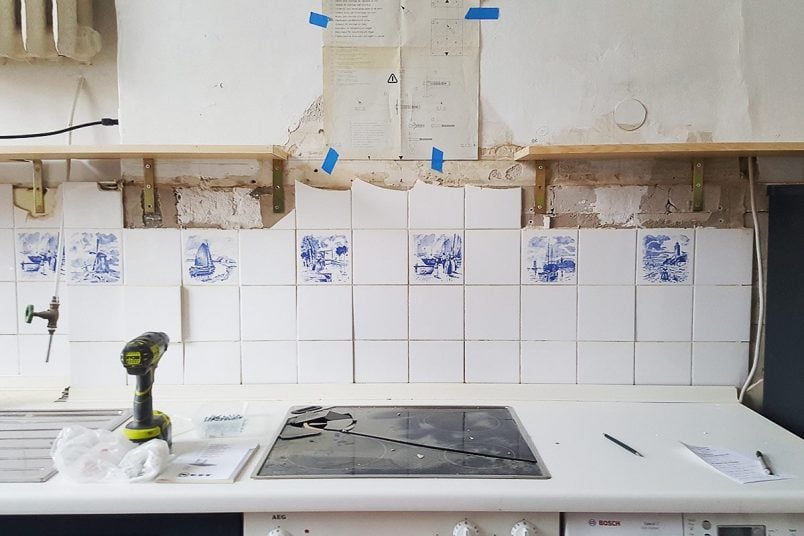
Our extractor fan had fallen off the wall, and the corner of it had completely smashed our hob! (we obviously removed the extractor fan before taking this picture)
We’re still not sure how it actually happened. We had been building the floating shelves that day, but the extractor had been up for a while, so we still don’t know how it could literally fall off the wall.
Luckily, we had been playing with the idea of replacing both the oven and hob. They were both probably as old as the kitchen and in need of an update, but this was a rather drastic way of making a decision.
Although we could definitely have done without the additional expense of replacing the appliances I have to admit that I’m so happy that we did.
Both appliances we chose are really good quality, and we’re planning on keeping them when we finally do replace the whole kitchen. The new induction hob is amazing, and even I enjoy cooking on it (which is definitely saying something!).
Our new oven is great, too. I‘m never going to be someone who can get excited about kitchen appliances, but I love the way the oven door disappears out of the way.

So, after a lot of painting, a few splurges, and one extremely noisy extractor mishap, our kitchen makeover is finally complete.
We’re so pleased with how the kitchen makeover turned out, and it’s definitely a project we’d recommend doing if you want to refresh your kitchen – although we’d recommend skipping the bit where you smash up your hob!
Here’s our budget breakdown:
Painting (Here’s where you can read our full guide on how to paint laminate kitchen cabinets):
Primer: Caparol Capacryl Haftprimer – Adhesion promoting primer | 57€
Sugar soap | 4.50€
Paint: Upper Cabinets – Farrow & Ball Dimpse 48€, Bottom Cabinets – Farrow & Ball Railings 121€, Farrow & Ball Dark Undertones Primer 53€ (both gifted by Farrow & Ball)
Total Paint: 284€
DIY Slim Floating Shelves:
Steel Brackets: 13€
Timber: 3,50€ Front Pieces | 12,50€ Top | 7€ Bottom
Marble effect vinyl foil: 21€
Total Floating Shelves: 57€
Worktops:
Beech worktops: 180€
Worktop oil | 15€
Van hire to get them home: 15€
Total Worktops: 210€
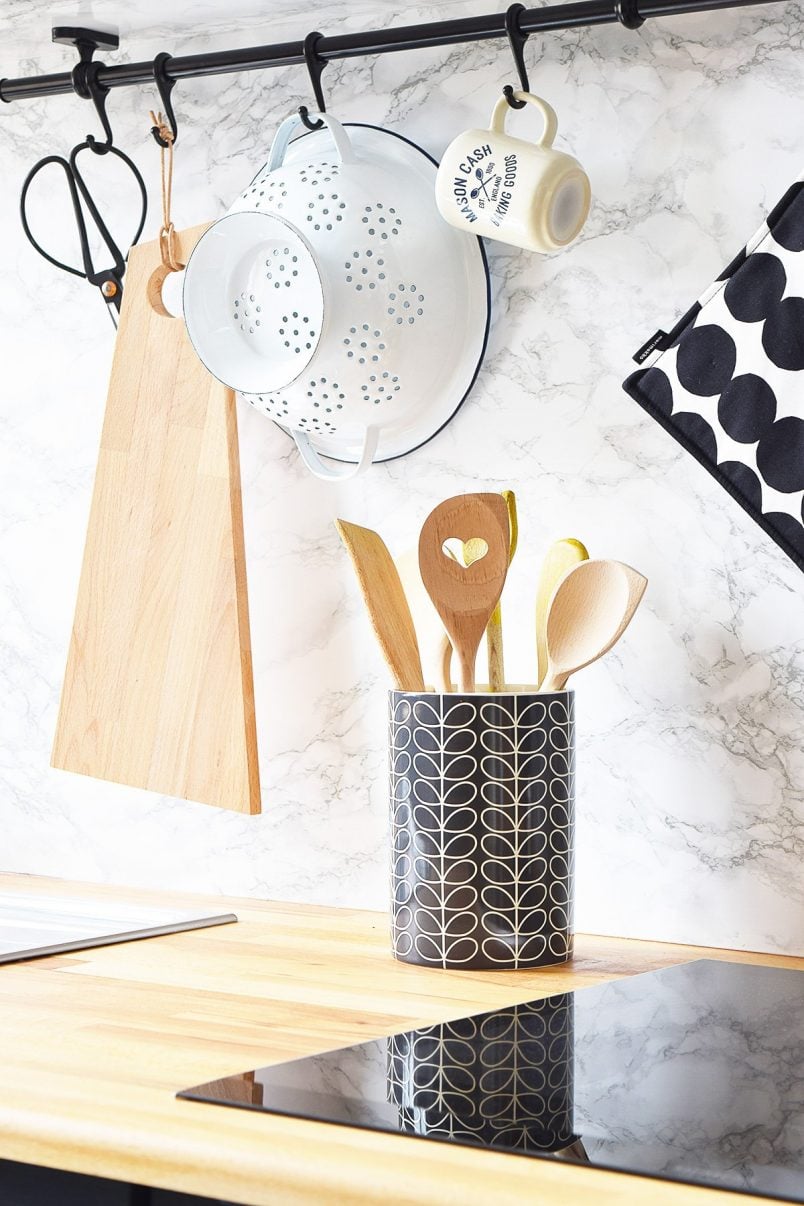
Kitchen Utensil Rail (all from Ikea):
Fintorp Rail | 23€
Fintorp Hooks | 15€
Total Utensil Rail: 38€
DIY Faux Marble Backsplash:
Timber backing: 9€
Marble vinyl foil: 14€
Total Backsplash: 23€
Handles (all from Ikea):
Hackås 6 x knobs + 4x handles
Total Handles: 55€
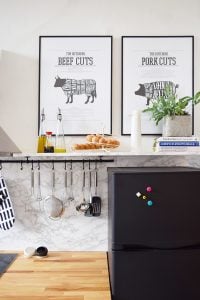
DIY Matt Black Fridge:
Chalkboard paint: 13,50€
Total Fridge: 13,50€
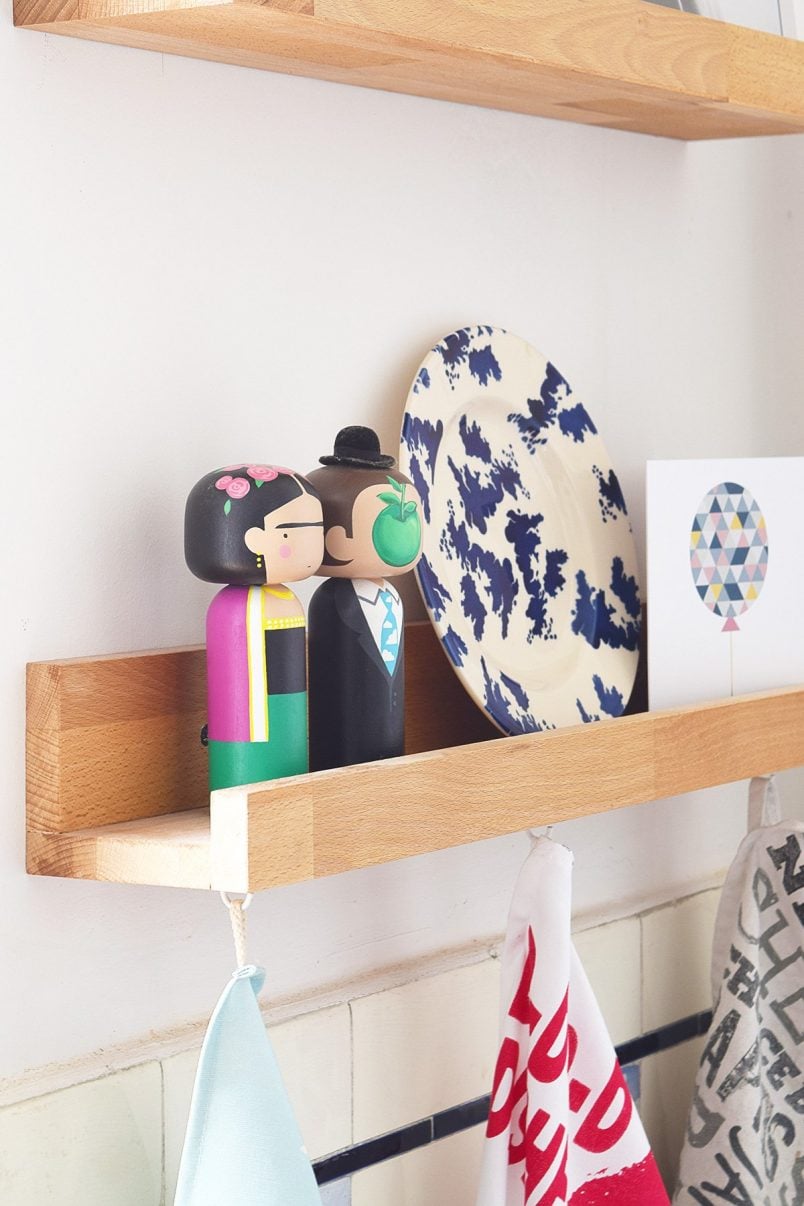
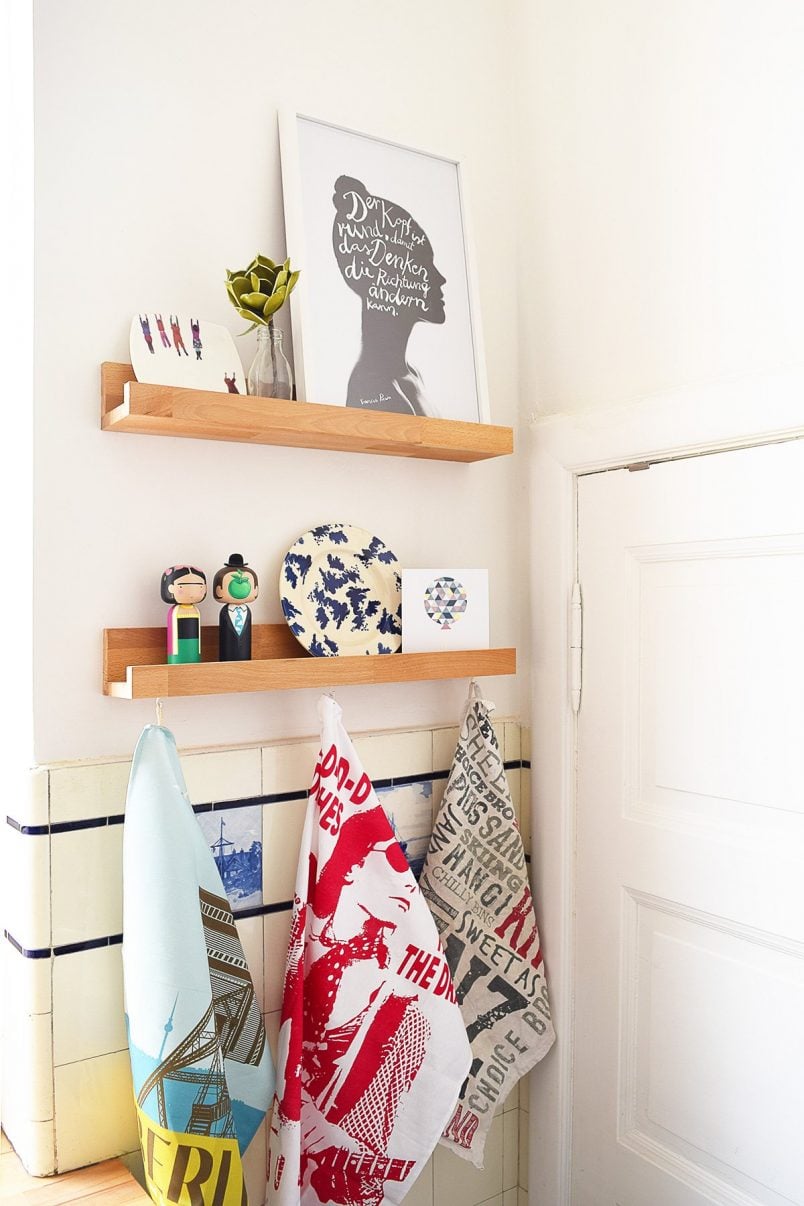
DIY Picture Shelves:
Beechwood: 5,15€
Total Picture Shelves: 5,15€
Lighting (all from Ikea):
Ansulta remote | 15€
Omlopp LED Lamps 2x 80 cm + 1 x 40cm | 115€
Ansluta transformer | 25€
Total Lighting: 155€
Oven & Hob:
Oven: Neff Slide and Hide | 899€
Telescope pull out for Oven 100€
Induction Hob: Siemens Studioline 899€ – you can read a full review of our induction hob here
Total Appliance: 1898€
Electrical work:
New connection for the oven (called in a favour): 50€
Total Cost of Kitchen Makeover: 891€
Including new appliances & electrical upgrade: 2789€
We already had all of the tools we used, as well as things like sandpaper, screws, wall plugs, glue, etc, so I’ve not included them in the costing.
As you can see, this wasn’t exactly a cheap makeover. We like to do things properly, and this is meant to be a makeover that lasts, so it felt right to invest in quality products like the new oven and hob, which really help make the kitchen work for us.
If you do want to give your kitchen a quick and cheap makeover, I can recommend painting it, though.
Painting the cupboards and changing the handles has made such a huge difference to the way the whole space feels. It really feels like a new kitchen!
We’ll be sharing the project details, including our DIY chalkboard fridge, how we built the DIY picture shelves and a full tour of our fabulous antique fridge over the next few weeks.
I’m also really excited about sharing how we built our super-slim floating shelves. I love how thin and elegant but still really sturdy they are!
For now, though, we’ll be enjoying some well-earned time in our new kitchen! And you never know – maybe I’ll even start to enjoy cooking! (Admittedly, it’s not very likely!)
In case you’d like to know where we got some of our kitchen accessories, here’s a list!
Source List:
Index Chopping Boards | Joseph Joseph
Espresso Cups | Pantone
Long Wooden Serving Board | Jamie Oliver
Cheese Board | Design Im Dorf
Asymmetric Chopping Boards | DIY
Salt & Pepper Pinch Pots | Rosendahl
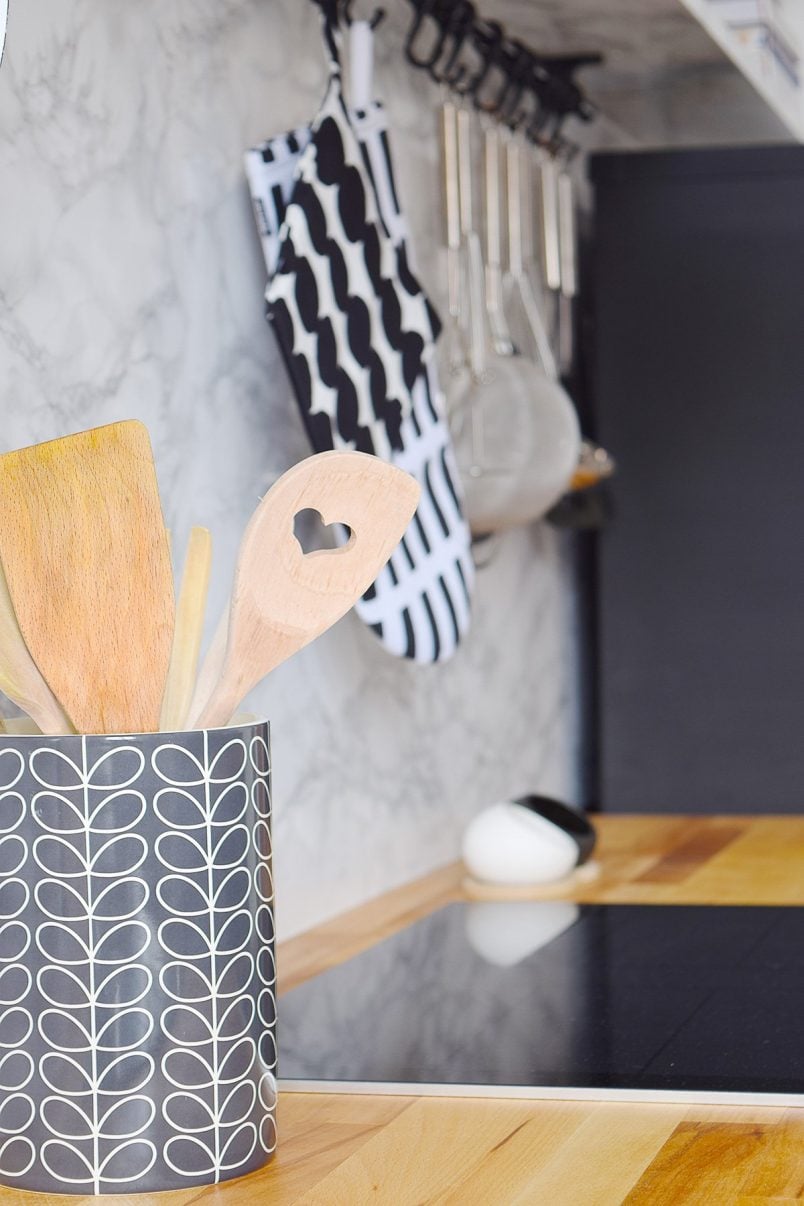
Utensil Holder | Orla Kiely
Oven Mit | Artek
Textile Pot Holder | Marimekko
Oil Carafes | Rosendahl
Kokeshi Dolls | Sketch Inc.
Skogsta Barstools | Ikea
Kitchen scissors | Hay
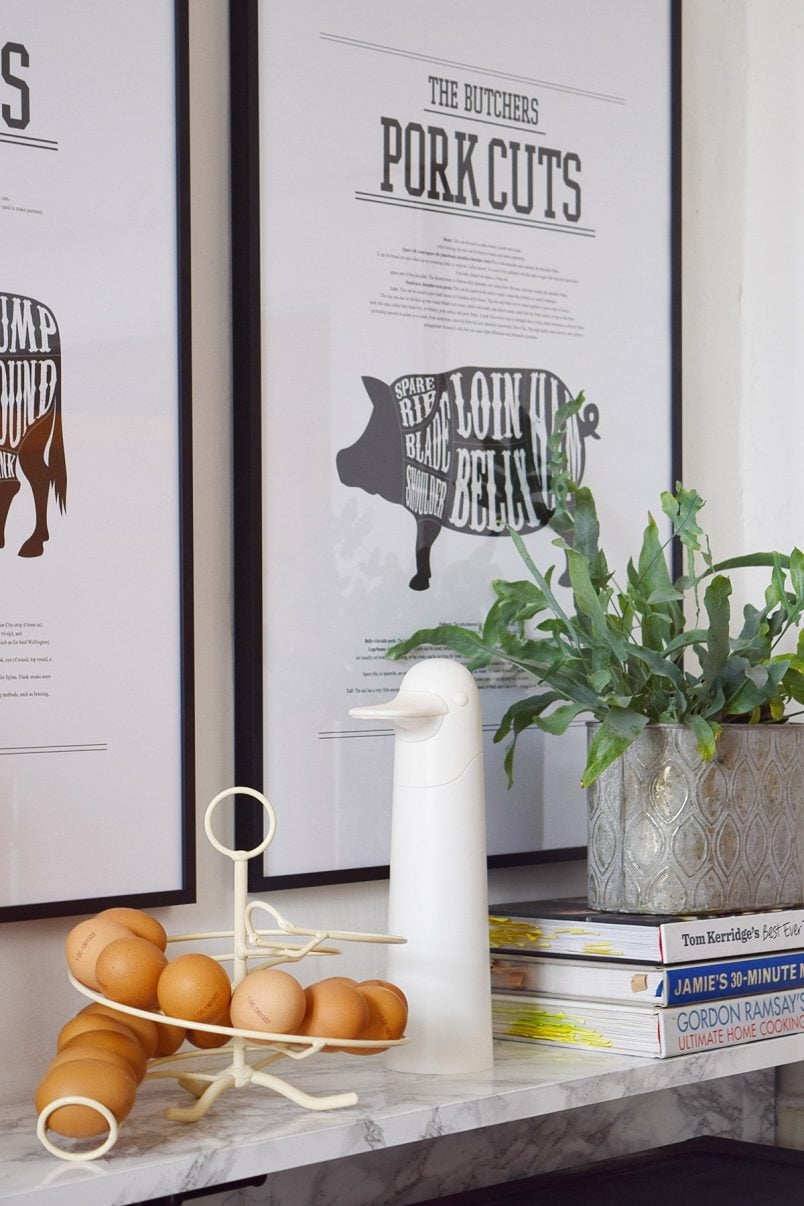
Pork & Beef Art | Desenio
Phoenix Fire Extinguisher | Jalo Helsinki
Egg Skelter | Egg Skelter
Have you ever considered painting your kitchen? What’s the weirdest thing you’ve ever painted? Do you have a favourite type of DIY project? Mine is obviously painting! What do you think of our two-tone kitchen? If you could change anything about your kitchen, what would it be?

Margaret says
Hi, I really really like navy color of the cabinets!
Christine says
Thank you, Margaret! It makes such a difference, doesn’t it?!
Cx
Emily says
I love this makeover! Thanks for so much detail, I’ll be looking at your tutorial in detail when I start making over the kitchen in the buy to let house I just bought! How did you go about doing your marble effect splashback? Any tips? Was it more cost effective than tiling? Is it hard-wearing? Thanks! :)
Christine says
Thank you, Emily! Yes, it turned out to be surprisingly durable and was easy to keep clean. The foil only cost about 20€ so it’s a lot cheaper than tiling but it’s obviously not as long-lasting as a tiled surface. You can see a bit more of how we applied the foil here (we stuck it to a wooden board which we then stuck to the wall).
Cx
Grace says
Hi, your kitchen makeover is amazing! I’ve re-read all your posts so many times now over the years – so glad to hear they’ve lasted the test of time. Just a few questions, 1) how long did the process of painting your cupboards take? & 2) how many litres of paint did you buy? Do you have a cheaper recommendation for the Farrow & Ball paint? Thanks, and well done again!
Christine says
Thank you so much, Grace! I updated the kitchen over the course of a couple of weeks so it’s difficult to say exactly how long it took. I’d guess maybe an hour per door (plus drying time in between). As a very rough estimate, we used about two-thirds a 2.5l tin for all of the cabinets (plus primer). I know that Farrow & Ball paint is expensive and you can ultimately choose whatever wood paint you like. I would recommend opting for high-quality paint though as you’ll find that it’s more likely to give you a more durable finish.
Hope that helps but let us know if you have any more questions!
Cx
Maaike says
Love love love it!! So happy for you :) Enjoy!
Christine says
Thank you so much, Maaike! We’re soooo pleased with it! It’s weird how much difference the changes make not only to the kitchen but also to the way we use the room.
Cx
Claire says
Gorgeous job! Was there much prep to do to the cupboard doors before painting? We may be attempting a similar job soon…
Christine says
Thank you, Claire! Painting the cupboards was fairly straightforward and not difficult at all. I’ll be sharing a full post about how we painted our in the next week or so but basically it’s a bit of sanding, priming and then painting. Always sand between coats and use the correct primer for your cupboards to ensure a long-lasting finish.
We painted most of the cupboards around Christmas (it was the first thing we did as part of the makeover) and there’s not a chip or mark in sight.
Cx
Kerrie says
Looks amazing, the blue colour on the cabinets is fabulous. Can I ask about the radiator up high on the wall? I’ve never seen that before. Is this useful heating wise? I imagine you may be considering overall kitchen heating options or maybe the whole apartment, in the future
Great to see you making this apartment your own. Cheers
Christine says
Thank you, Kerrie! We’re so pleased with the makeover, too.
Yep, the radiator is just weird and you’re right, we are planning an overhaul of the heating. Our hallway and small guest bathroom currently have no heating and, although the radiator in the kitchen helps to take the edge off, it’s not exactly effective. The biggest issue, however, is that there are plans to renew the pipes throughout the whole building. It’s extensive and we don’t yet know exactly how much building work it will involve in our home. Ultimately, we’re still thinking about moving the kitchen to the room where I currently have my study and possibly turning this room into a bedroom or bathroom. There are so many options but we just can’t decide on anything until we know what’s going to happen with the rest of the building.
Cx
Deedublin says
Lovely job as always!
Christine says
Thank you, Dee! We’re really pleased with it, too!
Cx
LizKMtl says
So much to see here – The paint! The backsplash! The egg skelter! OMG THE FIRE EXTINGUISHER!! (I had to go through the pictures to find it, I thought there’s no extinguisher here, then clicked through the product link… and died. That’s amazing!)
Also: the door to Narnia behind the worktop in the corner – was that storage? A panic room? I missed what that was in previous tours.
Congrats on a gorgeous makeover – I want to paint my awful chipped cupboards now! Looking forward to the how-to tutorials. Well done!
Christine says
Awww, thank you for your kind comment, Liz! It was definitely a full-on makeover. The fire extinguisher is amazing, isn’t it?
The door in the corner leads to the servants’ staircase! It’s permanently closed and we’ll ultimately completely block it. Needless to say, it’s a staircase that doesn’t get used much! I can’t help wonder what the apartment and building were like when they were first built. I’m guessing it must have been a fancy place to live!
I’d totally recommend painting kitchen cabinets to anyone. It’s such an easy way to update a kitchen you may not be happy with and we’re over the moon with how ours turned out.
Cx
Eina says
That fire extinguisher is brilliant!!! I think I need to order it in black (yes, our kitchen has very dark walls with warm wood and we love it)
Re:servants entrance, ever since I was in a top floor Altbau years ago and there was a fire downstairs, I would recommend not to permanently block that second exit.
Christine says
Sounds like you have a beautiful kitchen! We love the fire extinguisher, too.
The servants’ staircase is already partially blocked so it’s not much use at the moment. The thought of a fire downstairs is really scary, though!
Cx
Eina says
Lovely transformation! Everything harmonizes so beautifully now, especially with Railings bringing depth and focus to the blue tiles and the wood bringing warmth. I love how you incorporated the old freezer and the emergency egress/servant’s entrance has a dual use now.
I just noticed that the tile over the old freezer and behind the sink were added later. They didn’t look good at all compared to the original walls and floor. Your approach is so much better.
The amount of light you have and the sky view are such a bonus. It must be easy to grow your own herbs indoors. Does the bottom window panel open too for an outdoor planter (I loved mine in Paris).
(and thank you for all the DIY details you share!)
Christine says
Thank you, Eina! I love how the colour of the cupboards works with the tiles, too.
You’re right about the newer tiles on the side where the fridge and oven are. They’ve actually been tiled over the original ones and although we tried to remove them to reveal the ones beneath it was pretty much impossible to do. We always try to keep everything original but the messy and broken 80s tiles had to go!
The light in the whole apartment is amazing and it’s one of the reasons we fell in love with it. I’m actually thinking about installing some kind of vertical garden or a kind of plant hanging system in front of the window because like you, I think it would be a great place to grow herbs.
You’re right about the bottom panel of the window, too. It does open (we had to actually take it out when we were working on the fridge – more on that, soon) and I like the idea of a planter. In the long term, we might be adding a balcony leading off the kitchen – it’s not yet confirmed but watch this space.
Thank you so much for taking the time to comment!
Cx
Stacey @ Dohiy.com says
That’s terrific! I would love to go induction, but I don’t have an extractor fan that’s willing to sacrifice itself yet. :-(
Christine says
Thanks & we love the induction hob, Stacey! Totally worth smashing up the old one for! ;)
Cx
Lucy says
Oh wow what a transformation!! The two tone cabinets have turned out so well and I love the warmth the new worktops bring. I’m definitely in your camp of investing in good appliances that will last (although I can appreciate they may not have been in the original plan!). I look forward to seeing your post about the picture shelves as I’m envisaging something very similar for our back bedroom :)
Christine says
Thank you, Lucy! We’re really pleased with the result – even if we could have done without the odd hiccup. I guess it’s just all part of the DIY fun.
The picture rails were so easy and cheap to make – a 10 min project at the most!
Cx
Lizzie says
Looks amazing!!! Would love more detail on the floating shelves and the fake-marble splash-back. Such a good idea
Christine says
Thank you, Lizzie! I’m writing posts about everything we did (including the shelves and splashback) as we speak! Will, of course, share all of the details!
Cx