MENUMENU
  • Home
  • About Us
  • Our Favourite Tools
  • Get In Touch

Little House On The Corner

DIY & Home Improvement

MENUMENU
  • Blog
  • Projects
    • Our Favourite Projects
          • Favourite Projects
          • DIY Slatted Garden Fence | Little House On The Corner
          • DIY Slatted Garden Fence

          • Floorsanding In Progress - 16 Grit Paper | Little House On The Corner
          • What No One Will Tell You About Sanding Your Floors (+ How We Did It!)

          • How To Plan And Install Panelling | Ultimate DIY Guide On How To Install Panelling Yourself | Little House On The Corner
          • How To Plan & Install Panelling

    • Home Improvement & DIY
          • Home Improvement Projects
          • DIY Thin Floating Shelves | Little House On The Corner
          • How To Build Super Thin Floating Shelves

          • DIY Log Store | DIY Guide: How To Build A Log Store | Little House On The Corner
          • How To Build A Log Store

          • HOW TO LAY A PLYWOOD FLOOR

    • Craft & Art
          • Art & Craft Projects
          • DIY Pegboard
          • DIY Pegboard

          • DIY Framed Instagram Photo Display | Little House On The Corner
          • DIY Frames Instagram Photo Display

          • DIY Guess Who Game - Setting Out Board | Little House On The Corner
          • DIY Guess Who Game

    • Painting & Decorating
          • Painting & Decorating Projects
          • What To Do When You've Chosen The Wrong Paint Colour (& How To Fix It!) | Little House On The Corner
          • What to do when you’ve chosen the wrong paint colour (& how to fix it!)

          • Kitchen Makeover | Little House On The Corner
          • How To Paint Laminate Kitchen Cabinets

          • DIY Geometric Painted Walls | Little House On The Corner
          • DIY Geometric Painted Wall

    • Free Printables
          • Free Printables
          • House Cleaning Checklist | Free Printable | Little House On The Corner
          • Cleaning Checklist – Free Printable

          • Halloween Book Covers - F0ree Printable | Little House On The Corner
          • Halloween Book Covers – Free Printable

          • DIY Halloween Treat Boxes | Free Printable | Little House On The Corner
          • Halloween Treat Boxes – Free Printable

    • Furniture Upgrades
          • Furniture Projects
          • DIY Herringbone Desk | Little House On The Corner
          • DIY Herringbone Desk

          • DIY Wooden Bench
          • DIY Wooden Hallway Bench

          • DIY Copper Towel Ladder | Little House On The Corner
          • DIY Copper Ladder

    • Outdoor & Garden
          • Outdoor & Garden
          • DIY Slatted Garden Fence | Little House On The Corner
          • How To Build A Slatted Fence

          • How To Lay A Gravel Driveway

          • DIY Logstore
          • How To Build A Log Store

    • Cleaning & Organizing
          • Cleaning
          • Cleaning Checklist - Free Printable
          • Cleaning Checklist + A Free Printable!

          • Ultimate Guide: How To Clean Brass - Ketchup | Little House On The Corner
          • How To Clean Brass

          • DIY Floating Spice Rack | Little House On The Corner
          • DIY Floating Spice Rack

    • Holidays & Festivities
          • Holidays
          • The best mulled wine! (click through for the recipe)
          • The Best Mulled Wine Recipe Ever!

          • DIY Christmas Napkin Rings - Free Printable | Little House On The Corner
          • DIY Christmas Napkin Rings

          • DIY Dowel Tree Advent Calendar | Little House On The Corner
          • DIY Wooden Dowel Advent Calendar

    • Travel
          • Travel Posts
          • Szechenyi Bridge
          • A Weekend In Budapest

          • Riesenrad im Prater Wien | Little House On The Corner
          • A Long Weekend In Vienna

          • Lake Bled
          • 72 Hours In Ljubljana

  • House Tour
        • Our Edwardian House
        • Our Edwardian House (1st Home)
        • Our Berlin City Centre Apartment
        • Our Berlin City Centre Apartment (2nd Home)
        • Take The Tour | Our Art Nouveau Apartment | Little House On The Corner
        • Our Berlin Art Nouveau Apartment (3rd Home)
        • berlin riverside apartment house tour
        • Our Berlin Riverside Apartment (4th Home)
  • Shop
    • The Little Corner Shop
    • Shop Our First Home
    • Shop Our Current Home

Sanding Edwardian Floorboards In Our Living Room

  • Facebook
  • Twitter

It’s been done for a while now, so it’s high time that we share the details of our living room floor restoration with you. It’s one of our favourite makeovers so far and made an unbelievable difference to the whole room.

One of the first things we did when moving in was to remove the smelly, dirty and dog pee-stained carpet. It was too disgusting for words!

Edwardian Living Room Before Home Improvements

Straight away we knew that we’d like to keep the original exposed floorboards and luckily the condition of them, if even dirty and stained, was actually quite good.

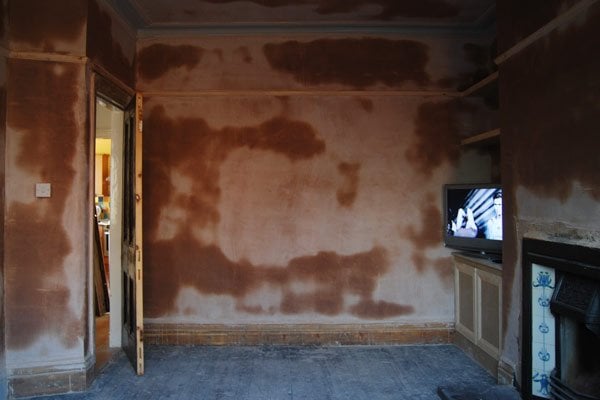
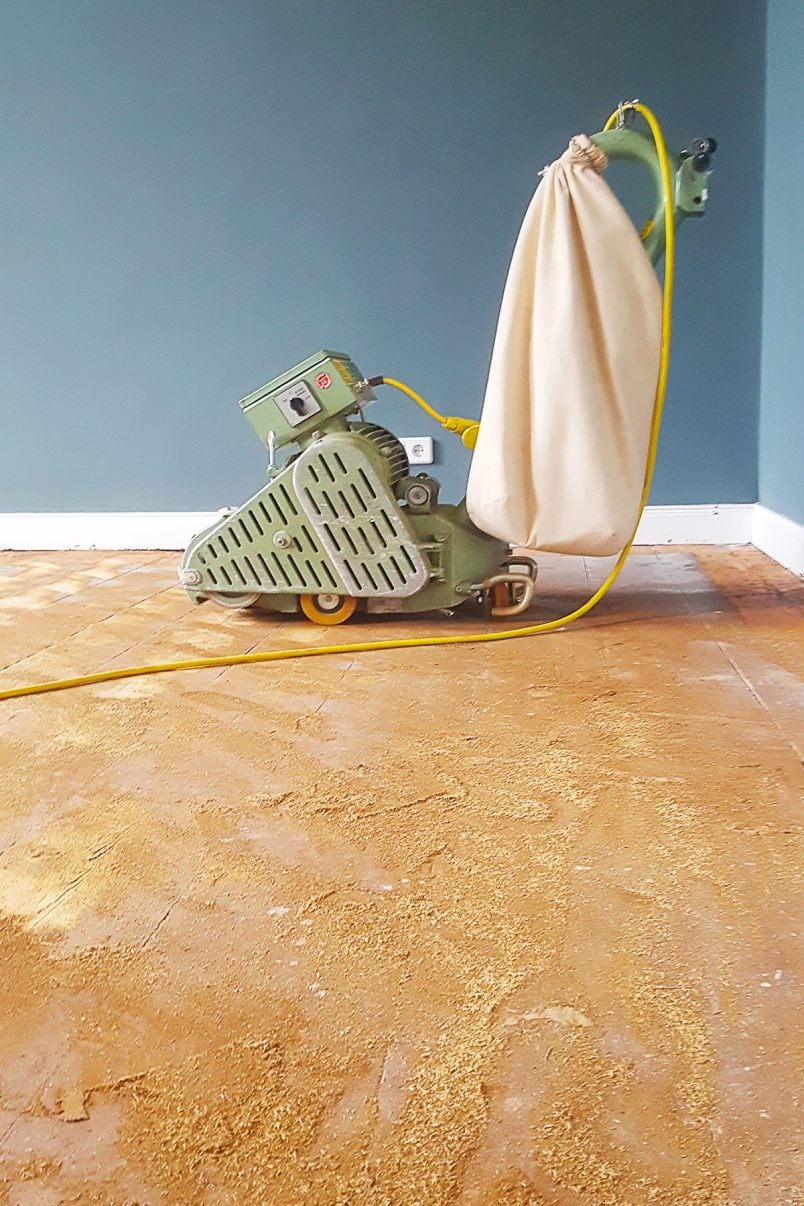
Before we could even think about sanding the floor, we had to get some of the major building work out of the way – we had the electrics sorted, the radiator replaced, a new fireplace fitted and, as you can see in the picture, the whole room replastered.

Sanding Floorboards

Then we could finally tackle the floor. As you all know we like to tackle as many projects as possible ourselves, this is one of the few ones we decided to pay to have done.

We could have probably done it ourselves, but after working out the costs and getting some quotes from a few local floor sanding companies, we were really surprised to find that paying someone to sand the floor was only slightly more expensive than doing it ourselves.

In the end, the company we chose did a great job and it was amazing to watch the quick transformation. After just a few minutes of work, this is what our floor already looked like

Sanding Wooden Floorboards - Little House On The Corner

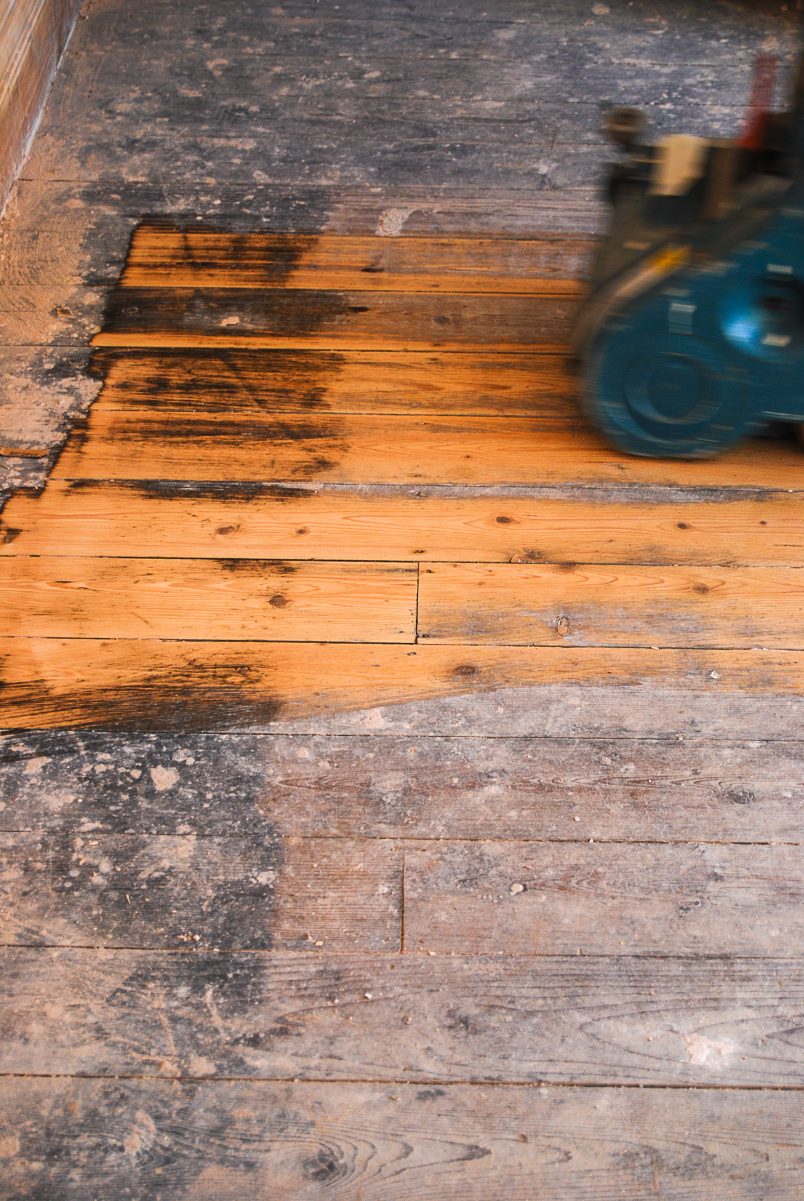
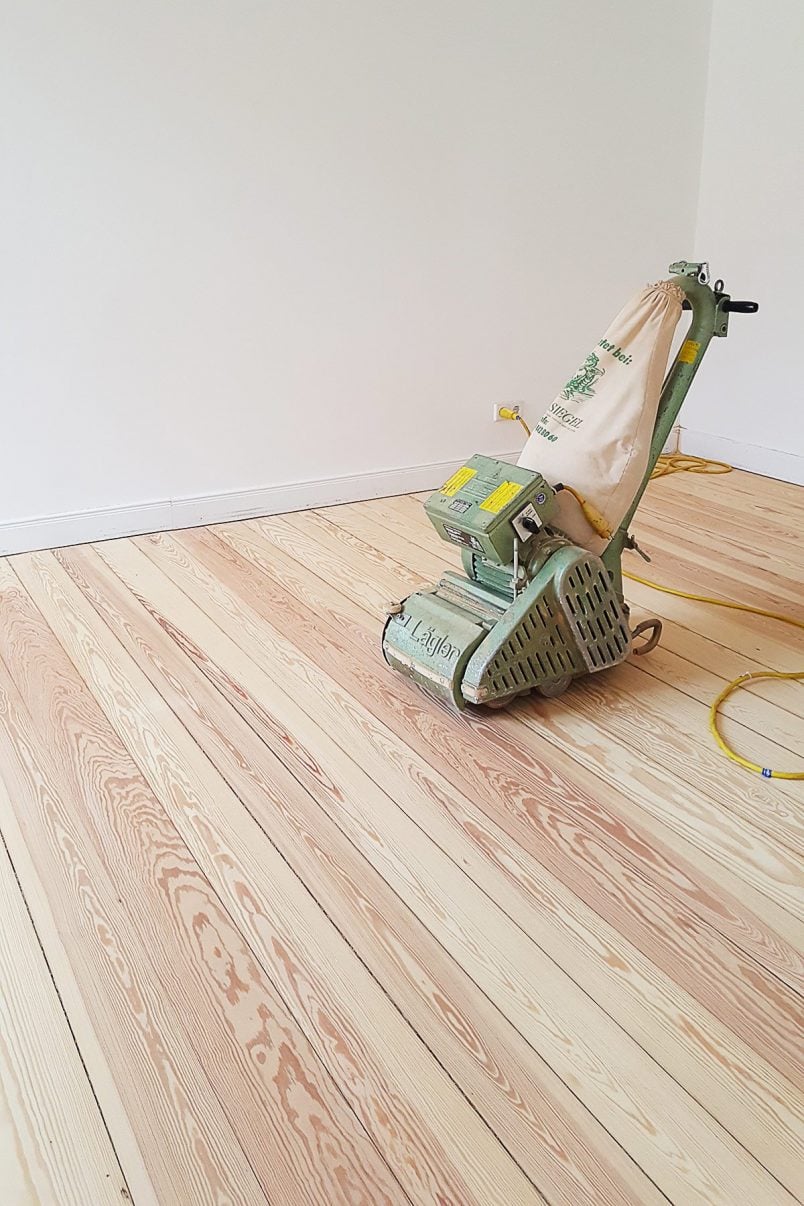
What a difference sanding Edwardian floorboards can make! It probably would have taken us a whole weekend to do the work ourselves but our contractor finished the job in just a few hours.

Sanding Floorboards

The difference is amazing. It’s hard to believe that it’s the same floor!

Sanding Floorboards

All in all, it cost about £15/m² including all sanding and varnishing. If we’d wanted to have the floor stained, it would have worked out slightly more expensive. In general, the costs will obviously depend on the condition of your floor and also on the area where you live.

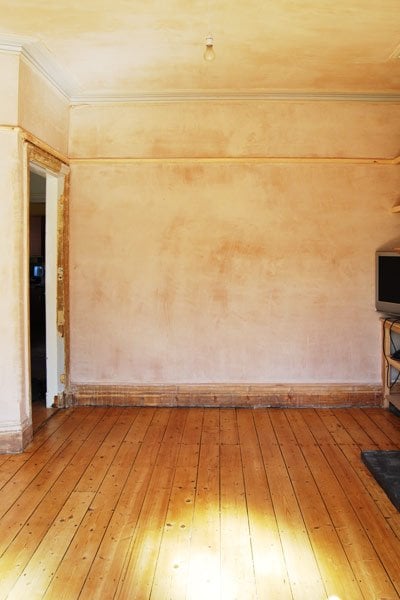
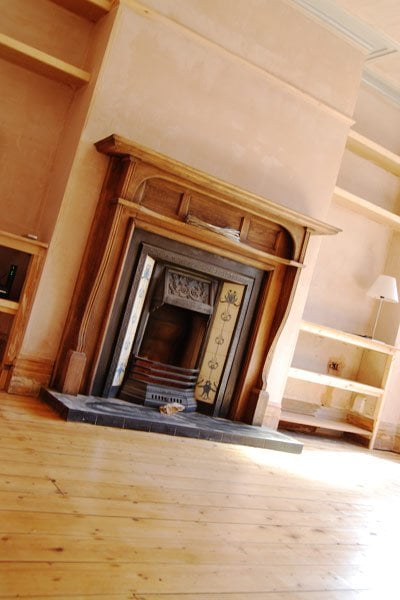
This is what our living room is like now.

Edwardian Living Room Blue Grey Walls

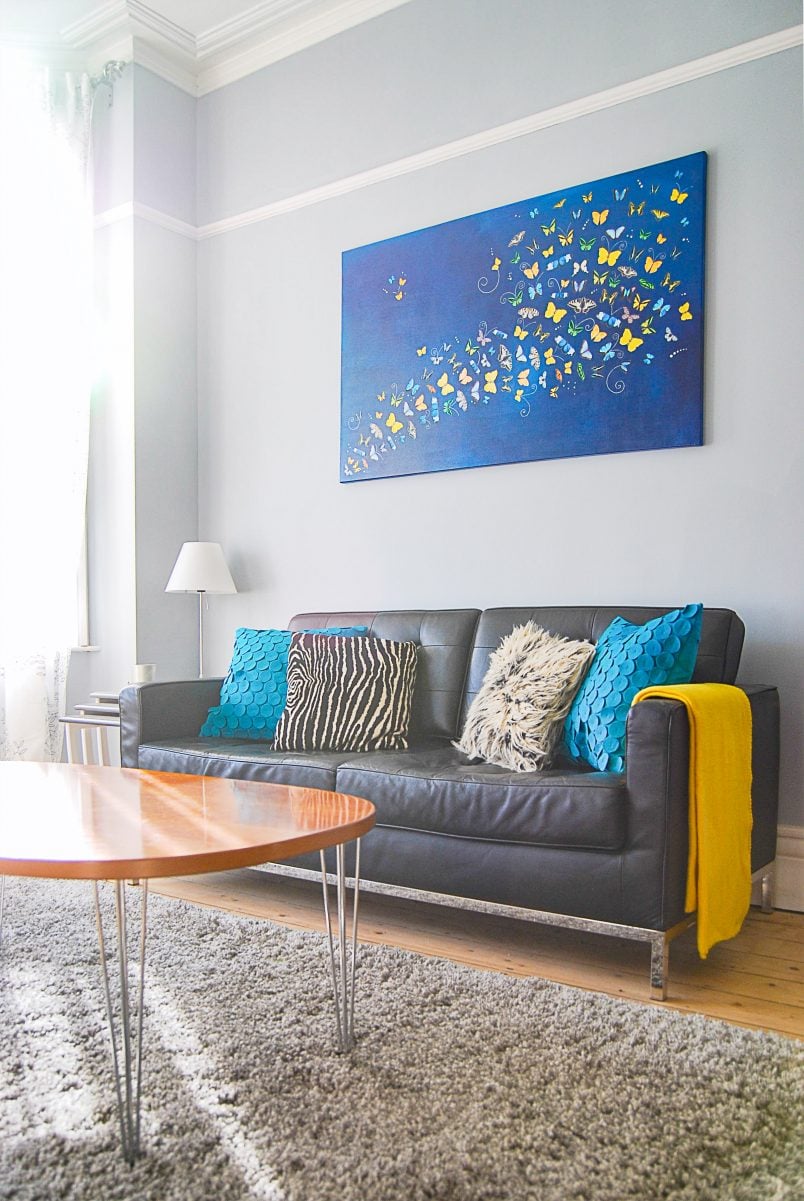
We love the floor and it’s holding up really well. There are a few little marks and dents here and there, but nothing major. We also found an amazing way to remove dents in the wood.

Since paying for this floor to be sanded, we have attempted the job ourselves. It’s actually easier than you probably expect and we’ve shared a full guide on exactly how to sand your floors and achieve a professional finish that you can read here!

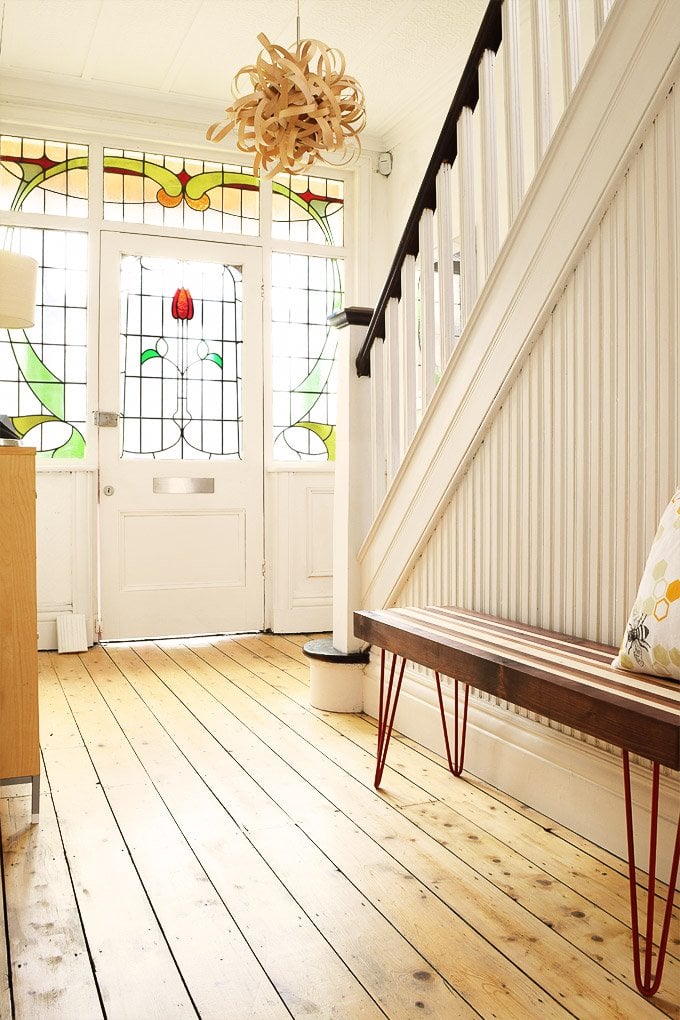
We’d like to eventually sand all the floors in the house. Do you also have wooden floors? Should we have the exposed wooden floors everywhere or should we have carpet in some of the rooms? Did you realise that sanding Edwardian floorboards could be so quick?

If you like this project, you will love these ones, too!

Floorsanding In Progress - 16 Grit Paper | Little House On The Corner
Everything You Need To Know About Sanding Floors and Floorboards
5 Floor Sanding Mistakes And How To Avoid Them | Little House On The Corner
5 Floor Sanding Mistakes And How To Avoid Them
Hallway After
The Truth Behind Sanding Floors + Top Tips For Yours
Sanding Wooden Furniture
How To Sand Wood + A Free Cheatsheet

Christine 7 Comments

the PAST
the FUTURE

Subscribe To Our Newsletter

Sign up with your email address for secret projects, DIY advice & lots of fun!

Privacy Policy

Leave a Reply Cancel reply

Your email address will not be published. Required fields are marked *

This site uses Akismet to reduce spam. Learn how your comment data is processed.

Comments

  1. Yash says

    22/04/2021 at 10:31

    Hi , We are in tge process of buying a house and I plan to expose the wood in the house so, it is economical.
    Can you please let me know the company you went for.
    We live in UK
    Thanks in advance.
    Yash

    Reply
    • Christine says

      22/04/2021 at 12:16

      The company we used for the floor no longer exists but we sanded almost all floors by ourselves. It’s not difficult to do but it is hard work! You might find this post helpful where we’ve listed lots of resources! https://www.littlehouseonthecorner.com/everything-youll-ever-need-to-know-about-sanding-floors-floorboards/
      Have fun in your new home!
      Cx

      Reply
  2. rosie says

    03/07/2013 at 12:49

    Hi, I found your blog whilst researching how easily we can strip the floorboards in our house. I wondered if you have any problems with draught / cold? Is the downstairs cold from the ground cavity? Are your upstairs rooms colder than before? I doubt we have insulation beneath the floorboards. We have horrid carpets at the moment and can’t afford to carpet every room!

    Thanks for writing an amazing blog and I’ll be sure to check in for more tips :)

    Reply
    • Christine says

      03/07/2013 at 14:08

      Hi Rosie! Let’s start at the beginning ;-). First of all, it’s fairly easy to sand floorboards, but it is really hard work! You can see our budget breakdown and how we did it here: https://www.littlehouseonthecorner.com/how-to-sand-floorboards/. Our upstairs rooms aren’t colder than before, but downstairs is a different matter. We’ve insulated under our floors and also sealed the gaps between the skirting and floor. It’s something that you will definitely have to do, as it will be too cold otherwise. All in all it’s actually better now than it was before. The insulation is definitely way more effective than the horrible carpet we had before. Don’t use caulk to fill the gap between your skirting and floor – it’ll crack and look awful after just a short while. This is how we did it: https://www.littlehouseonthecorner.com/gap-between-skirting-and-floor/

      Hope that’s some help! Good luck, we’d love to know how you get on!
      Cx

      Reply
  3. Magali@TheLittleWhiteHouse says

    13/03/2013 at 13:39

    I love wooden floor. I have some upstairs under layers and layers of linoleum and plywood… It’s my dream one day to allow them to see the day light! I wood uncover every wooden floor possible if I were you. They look so lovely in your living-room.

    Reply
    • Christine says

      13/03/2013 at 15:25

      Thanks Magali! I love the wooden floors, you should definitely try to restore yours, too! The original floorboard are under the laminate flooring in the hallway, too – I can’t tell you how tempted I am to just rip up the laminate and start restoring the floor!
      Cx

      Reply
Painting Checklist

Our Favourite Tools

*Contains Affiliate Links*

Things To Know

ABOUT US

CONTACT US

DISCLAIMER

Privacy Policy

Shop Our Home!

OUR FAVOURITE TOOLS

SHOP OUR HOME

Disclaimer

As an Amazon Associate I earn from qualifying purchases.

Please read our full disclaimer here!

Let’s Be Friends!

Keep Up To Date!

Subscribe for exclusive content and tutorials!

Thank you!

Copyright © 2022 · Little House On The Corner · This Website is powered by Cloudways and the Genesis Framework