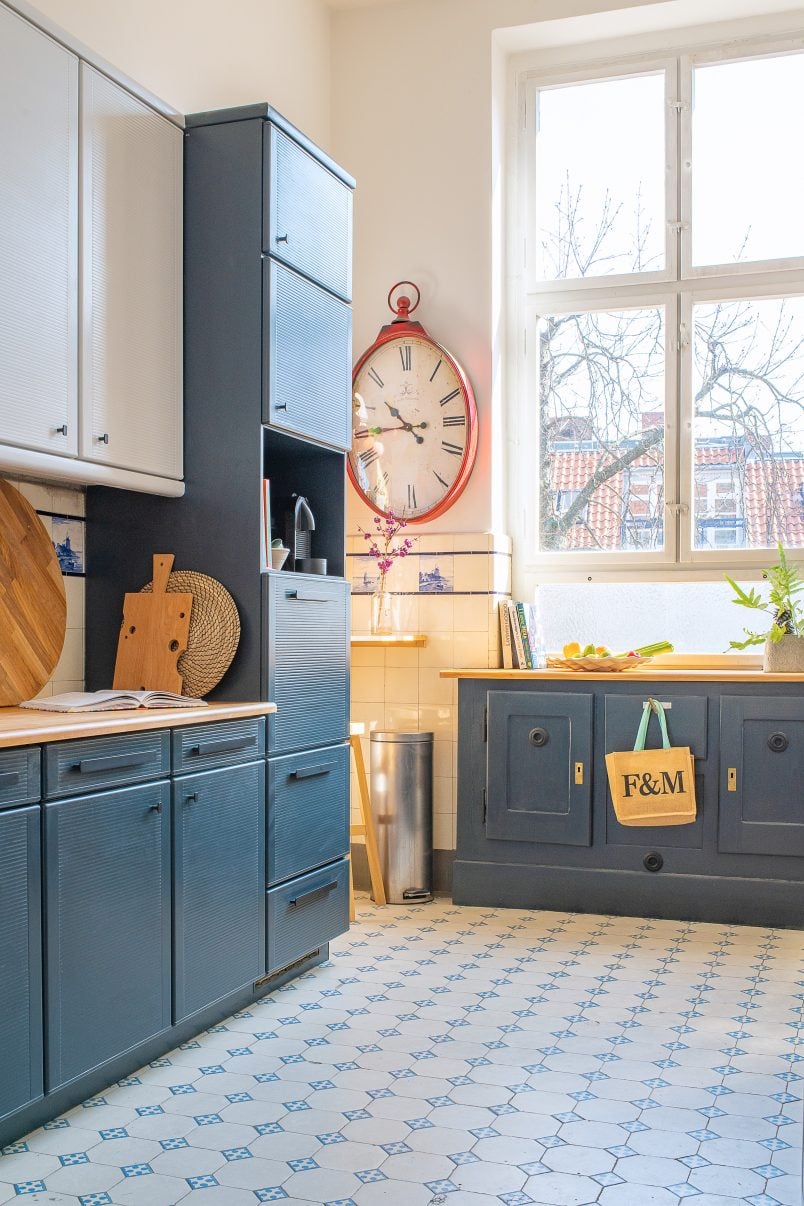
We painted our kitchen cabinets over 4 years ago and they still look just as perfect as they did when we first painted them. Painting cabinets is easy but, there are a few things to look out for and we’re sharing the biggest mistakes to avoid when painting kitchen cabinets so that you don’t ruin all of your hard work.

Nobody wants to spend hours and hours painting their cabinets only to end up with a finish that’s not durable and ends up covered in scratches and chips or, even worse, kitchen cabinet paint peeling off after just a couple of weeks.
If you’re thinking of painting your kitchen cabinets, check out our step-by-step tutorial where we share all of our kitchen cabinet painting secrets.
Don’t make these big kitchen cabinet painting mistakes!
This post contains affiliate links. We only recommend products we love and think that you will, too! Read our full disclaimer here.
Mistake 1
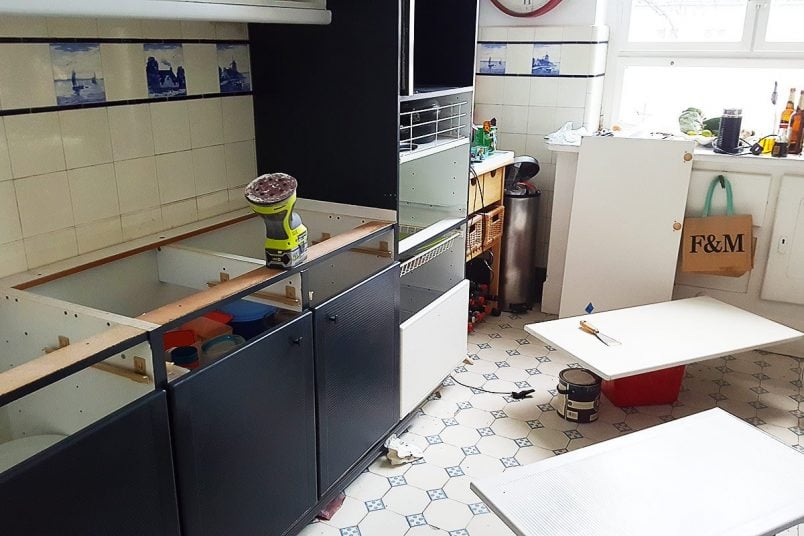
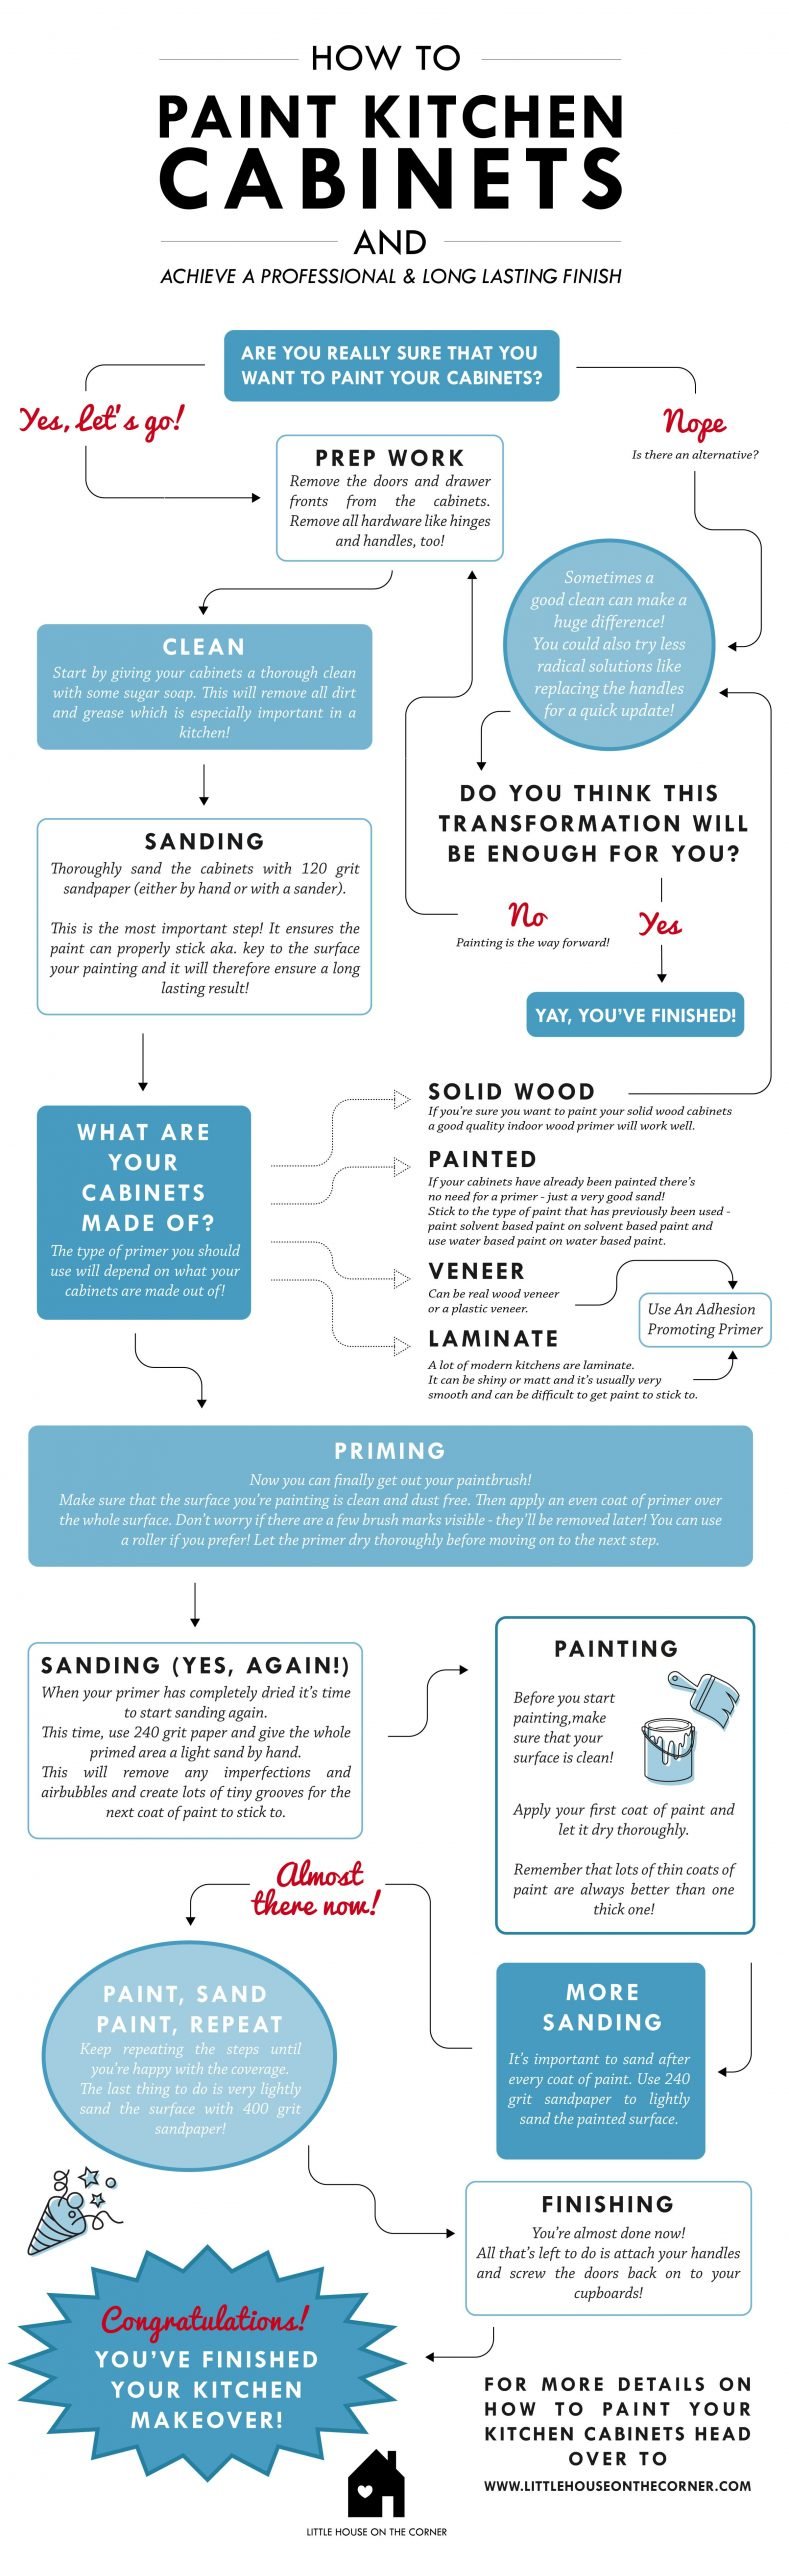
Not Preparing The Cabinets For Painting
Skipping the prep work is by far the biggest mistake you can make when painting kitchen cabinets (or anything else you want to paint).
Before you can even think about painting your kitchen cabinets, give them a very thorough clean with sugar soap to remove any dirt and grease.
We love using sugar soap as it removes every last bit of dirt and doesn’t leave a residue making it perfect for preparing your cupboards for painting.
After cleaning your kitchen cabinets, you will also have to sand them.
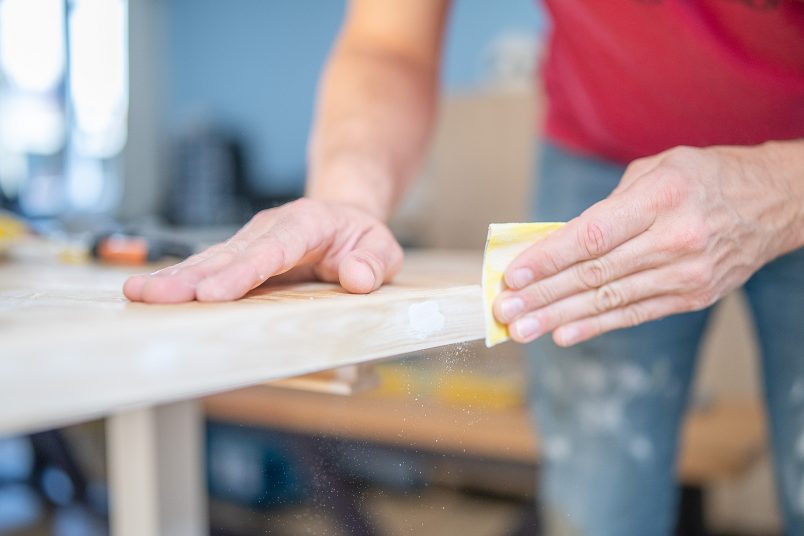
Don’t trust any tutorials that say you can skip sanding. Sanding in preparation for painting only takes a couple of minutes and is the key to a long-lasting finish.
Sanding is so important as it creates thousands of tiny scratches on the surface that the paint can stick to.
Sand the doors lightly with 120 grit sandpaper. You can easily sand the cabinets by hand or (if you’re lazy like we are) use an electric sander to sand the surface of your cabinet. When you’ve finished sanding, remove any dust and wipe the cabinets with a tack cloth to remove any last traces of dust.
Even if you are painting already painted kitchen cabinets don’t skip this step.
For more details on how to prep kitchen cabinets for painting, check out this post, where we share everything you need to know about painting kitchen cabinets.
Mistake 2
Not Using A Primer
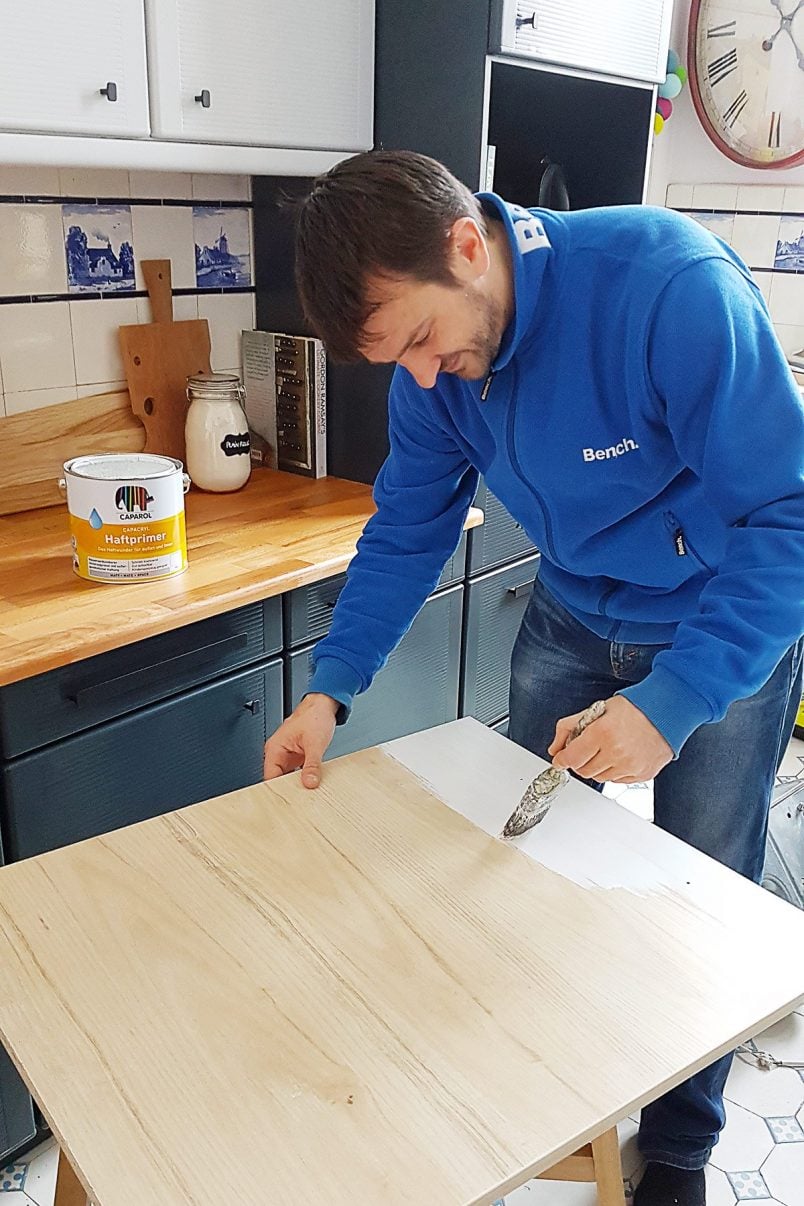
No matter what your cabinets are made of, you will have to use a primer to make the paint finish extra durable.
The type of primer you use will depend on what your kitchen cabinets are made of. If you are painting laminate kitchen cabinets or high-gloss cabinets that are both super smooth, you will have to use an adhesion-promoting primer like Zinsser BIN or Caparol Haftprimer.
If you are painting real wooden cabinets, a high-quality wood primer will be sufficient.
Mistake 3
Using Chalk Paint
I admit that I’m not a big fan of chalk paint but when it comes to painting kitchen cabinets using chalk paint is not a good idea.
Even though chalk paint sticks to almost any surface, it’s just not durable enough for kitchen cabinets that get a lot of wear and tear.
It’s difficult to apply chalk paint and achieve a super smooth finish, and because a chalk paint finish isn’t 100% smooth, it won’t give you a finish that’s as durable as satin or eggshell paint even if you add a protective coat of varnish over the chalk paint.
Mistake 4
Not Sanding Between Coats Of Paint
As just mentioned, a smooth finish is important to create a cabinet paint finish that’s durable. And lumps, bumps and imperfections will quickly rub away during day-to-day use and leave you with an imperfect finish.
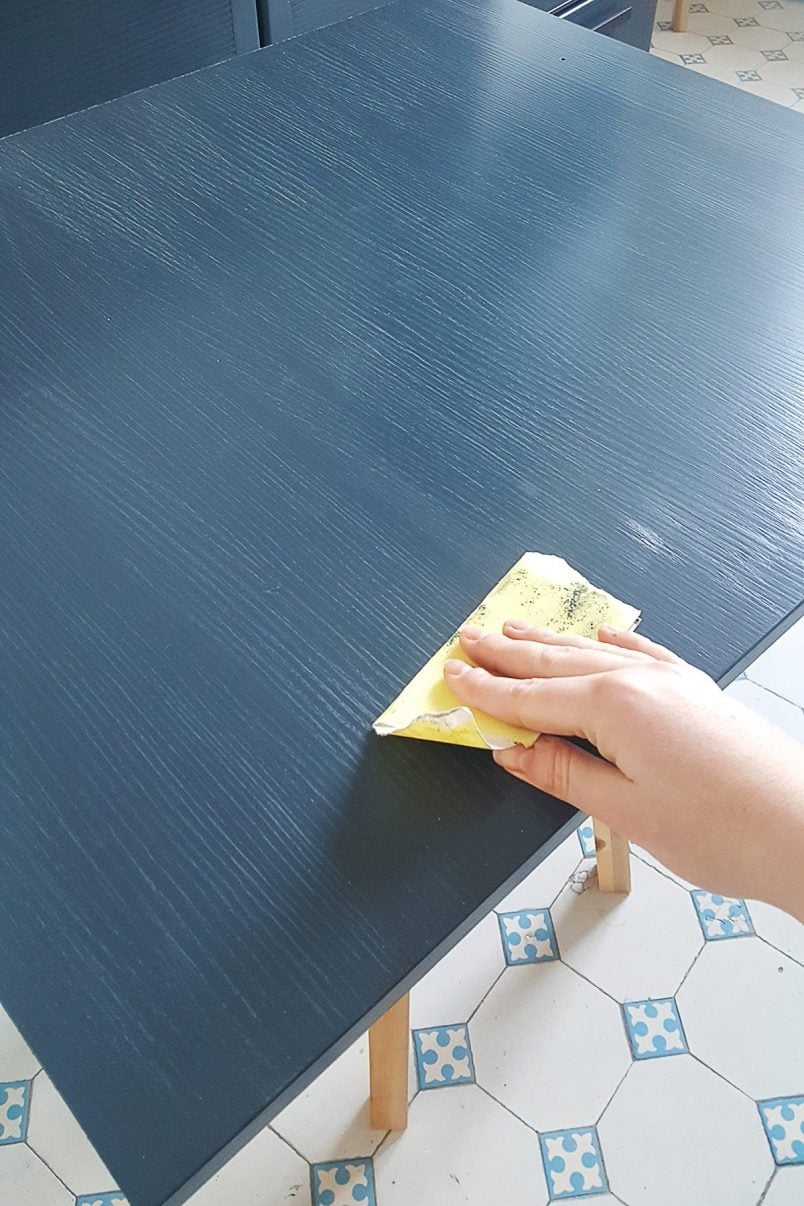
That’s why sanding between every coat of paint is so important, too. Sanding between coats of paint removes imperfections and air bubbles and gives you a super-smooth surface to apply the next coat of paint.
Very lightly rub over the surface with 240-grit to 400-grit sandpaper to remove any imperfections and clean the surface before applying the next coat of paint.
DIY TIP
Read our full guide on how to sand wood here. It includes everything you need to know about sanding before painting and during painting. It includes a helpful cheat sheet so you know exactly which sandpaper to use for which project.
Step 5
Painting Kitchen Cabinets Without Removing Doors (& Drawers)
There’s almost no way of painting the doors and frames properly without taking off the cabinet doors. You’ll never be able to reach around the corners and get the paint where it needs to be without creating a gloopy mess.
Just don’t forget to label all of the doors and drawers so that you know which cabinet they belong to when you put them back.
Mistake 6
Not Removing Hardware
One of the most common mistakes you can make when painting kitchen cabinets is not removing the handles and knobs. Ultimately taking off the hardware will make the whole painting process quicker as you don’t have to paint around handles and cupboard knobs.
Just unscrew the cabinet hardware before you start cleaning and painting the kitchen cabinets to give you a nice and flat surface that will make it so much easier to get a perfect paint finish, too.
Mistake 7
Using The Wrong Tools & Paint
It doesn’t matter if you’re painting kitchen cabinets white, blue or any other colour. It’s the type of paint you use that is important.
The best paint for painting kitchen cabinets is high-quality wood paint like Farrow & Ball Modern Eggshell which is super durable and perfect for painting things like kitchen cabinets, skirting boards and furniture.
The type of paint you use to paint kitchen cabinets is important, but using the right primer is vital, too. As we mentioned above, the type of primer will depend on the material of your cabinets.
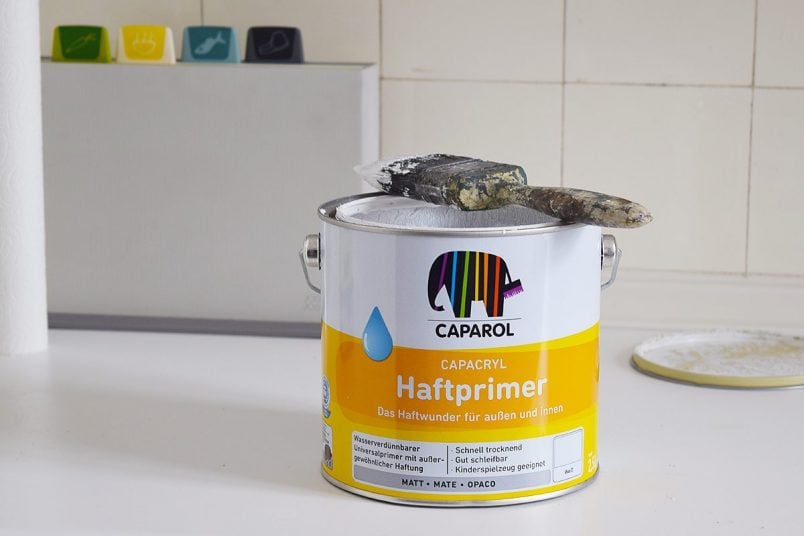
For laminate, high-gloss or any other very smooth surface, we recommend priming the cabinets with Zinsser BIN or Caparol Haftprimer.
For any other wooden cabinets, we recommend using a high-quality wood primer like the Farrow & Ball Wood Primer & Undercoat we used to paint our cabinets.
You can see the full list of tools and products we used and recommend for painting kitchen cabinets here.
Mistake 8
Trying To Cover The Cabinets In Just One Coat Of Paint
There are lots of reasons not to try to cover your cabinets with just one coat of paint. First of all, you’ll never get a good finish if you try to apply one thick coat of paint.
Applying lots of thin coats of paint will not only make it easier to get a smooth finish but it will also make the finish much more durable because you sand between every coat of paint ensuring a good key between all of the layers of paint.

Mistake 9
Not Letting The Paint Cure
Not letting the paint dry completely is one of the biggest mistakes you can make when painting kitchen cabinets.
Painted cabinets are durable when the paint has completely cured, but until then, the finish is susceptible to scratches, chips and scuffs.
The drying time of the paint will only be a couple of hours, but the time it takes to fully harden is much longer. Be very careful for the first few weeks until the paint has cured and is tough enough to withstand day-to-day wear and tear.
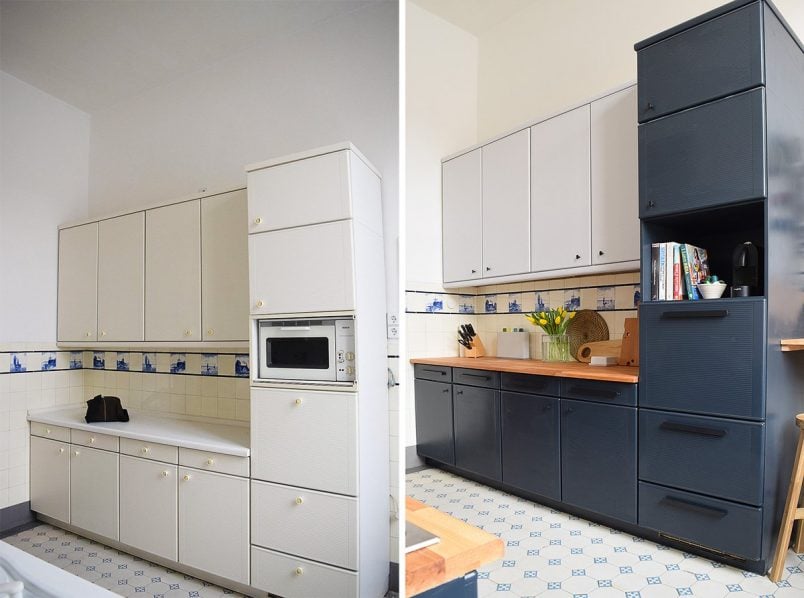
Painting your kitchen cabinets is one of the most impactful home improvement projects you can do. It doesn’t matter if you’re painting cheap cabinets as a temporary makeover while you’re saving for your dream kitchen or a longer-term project because you’d just like to change the look of your kitchen.
Don’t forget to check out our full tutorial where we share the best way to paint cabinets including lots of pictures of our kitchen cabinets before and after painting and even a free checklist to make painting your cabinets super easy.
We’re here to help! Let us know if you have any questions about painting your kitchen cabinets!
Tess says
Read your kitchen makeover project with great interest back during lockdown! Decided Stiffkey was the colour for me , fortunately I was too lazy to get started! A few years on… am now ready, but it will have been worth the wait as I have monitored the impact of light on every cabinet in every season. The navy colour would have resulted in a quite dreary nearly black effect! I have now settled on Hardwick White, also F&B, as a North East facing kitchen doesn’t really get a lot of light, the window is a good 5m away from the bank of units.with a small East facing side window adjacent to them. I used an emulsion tester pot to paint some lining paper that I coud ‘tack’ up on the doors to see how the colour changed versus the light. I have 19 doors to do and a 2m peninsula….you see why I struggled with laziness, especially as the kitchen is my least favourite place – I could easily live with just a kettle, toaster and microwave! If YOU haven’t ever considered Hardwick White as a choice… give it look! Following on from your advice re prep and sanding which was always my mum’s mantra , she always ‘sanded’ the very last coat with a crumpled soft brown paperbag, the type greengrocers use , works a treat on varnish too, has to be the very soft type though!
Christine says
Hardwick White is a great colour – I’m sure your kitchen will look fantastic, Tess!
Also, don’t be so hard on yourself. 19 doors is a huge amount of work, and we’re no different. We’ve been in our new house for over 2 years and still only have a temporary kitchen setup! :)
I totally agree with your mum about sanding the last coat of paint. I’ve never tried a paper bag, though, so will have to add that to my list of things to try.
Hope you have fun painting your kitchen, and I’d love to see a picture when you’re finished!
Cx