** This was the first fireplace that we restored. Since then we have also restored another Edwardian fireplace using a slightly different and so much more effective method. You can read about it here. You can also check out our complete guide to Restoring, Maintaining and Running a period fireplace here!*
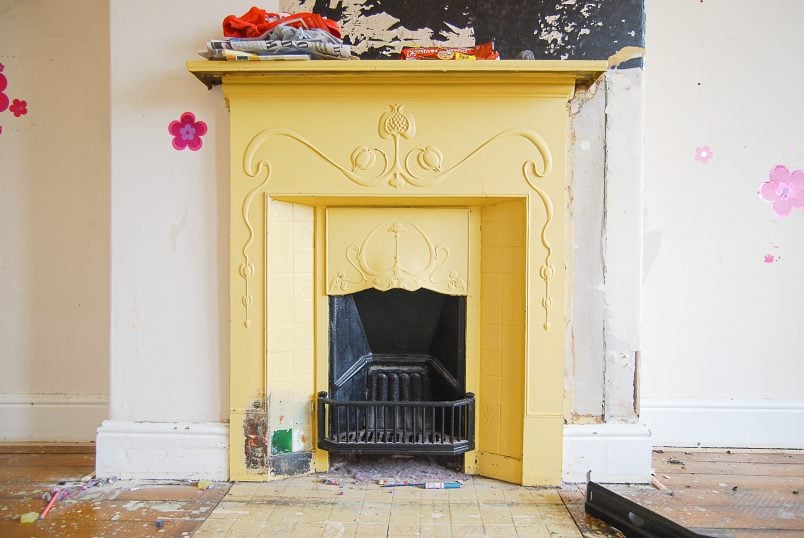
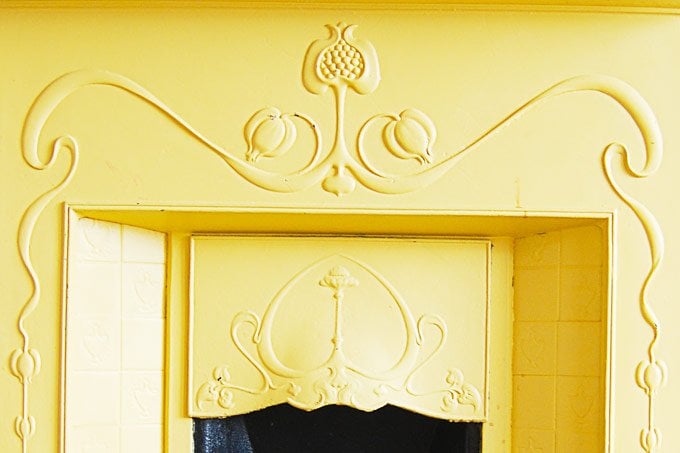
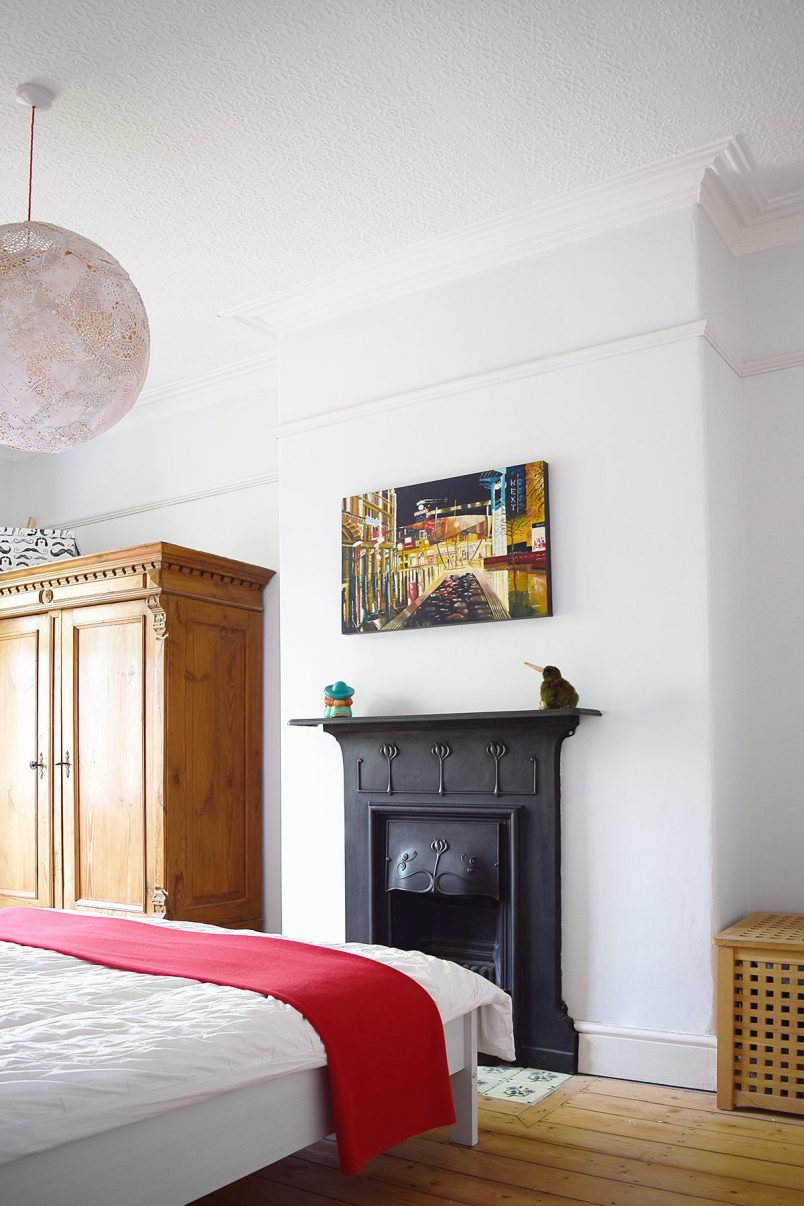
One of the only original features we still have in the house is the cast iron Edwardian fireplace in the master bedroom. When we moved in, it was completely covered in yellowish paint.
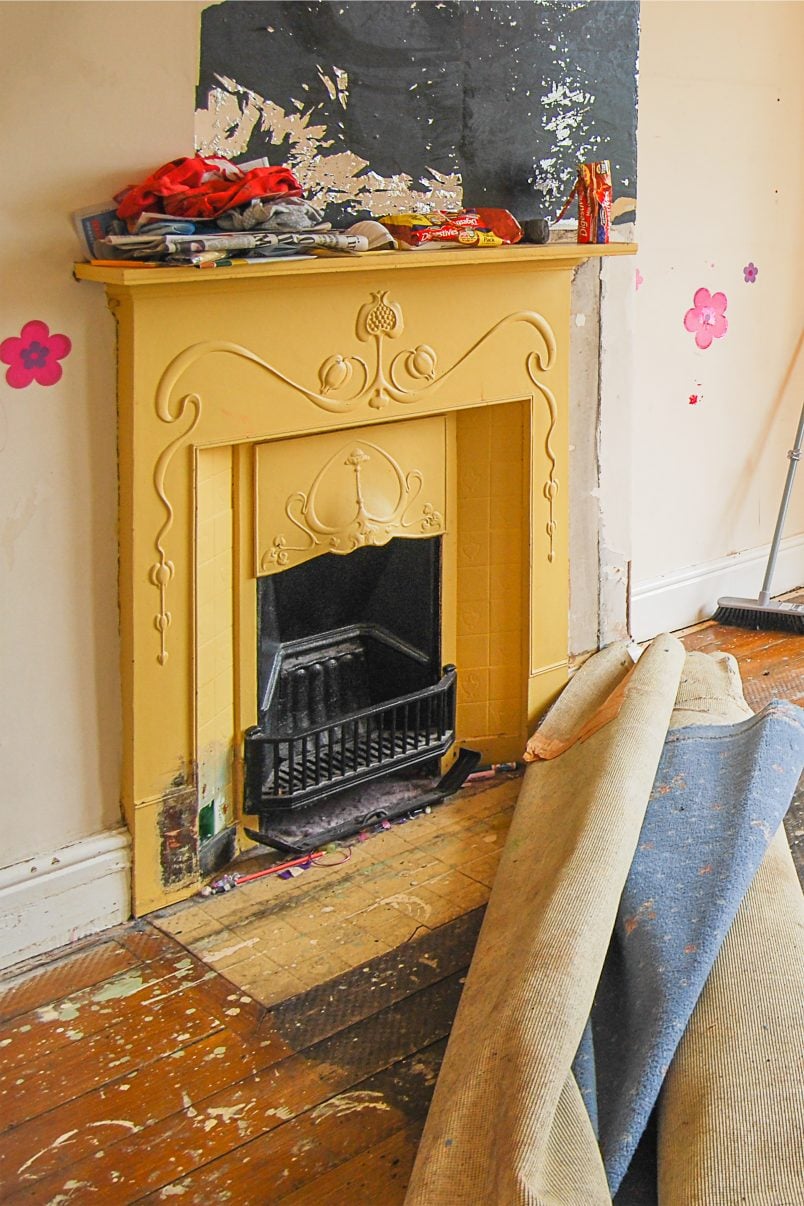
Although it would have been easier and quicker to have the fireplace sandblasted, we decided to undertake the restoration work ourselves. After a bit of research, I found out that you can’t use a heat gun on cast iron, as the sudden difference in temperature can cause the iron to crack, so we opted for a chemical paint stripper.
This post contains affiliate links. We only recommend products we love and think that you will, too! Read our full disclaimer here.
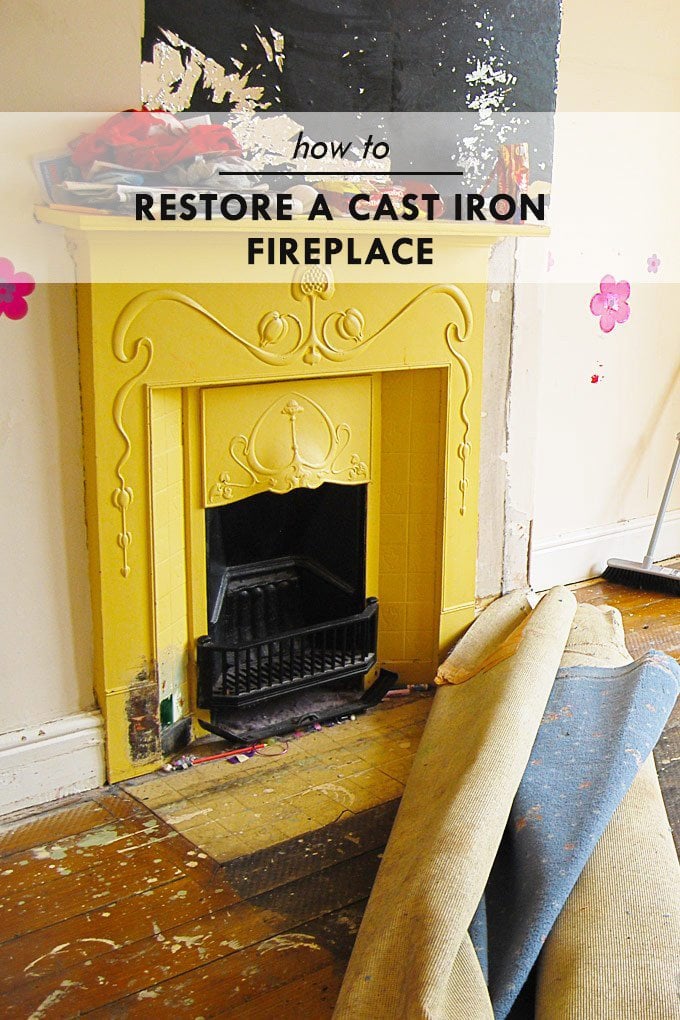
Here’s how to restore a cast iron fireplace:
First, I applied the paint stripper according to the instructions on the packet (make sure to use the necessary safety equipment). I left it in place as long as possible, being careful not to let it dry completely.
Then, after it had dissolved the paint, I wiped off most of the residue with a plastic stripping knife and kitchen paper. It is important not to wipe down the cast iron with water, as it will cause it to rust.
The best and, by far, the easiest way to remove the remaining bits of sticky dissolved paint and stripper is to use white spirit. It seems to neutralise the paint stripper which makes it really easy to just wipe off. For any stubborn paint areas, I found that dipping some steel wool in white spirit and scrubbing the area works really well.
This method is also good for areas where the cast iron surround is more patterned, and the sticky paint residue would otherwise get stuck in the details.
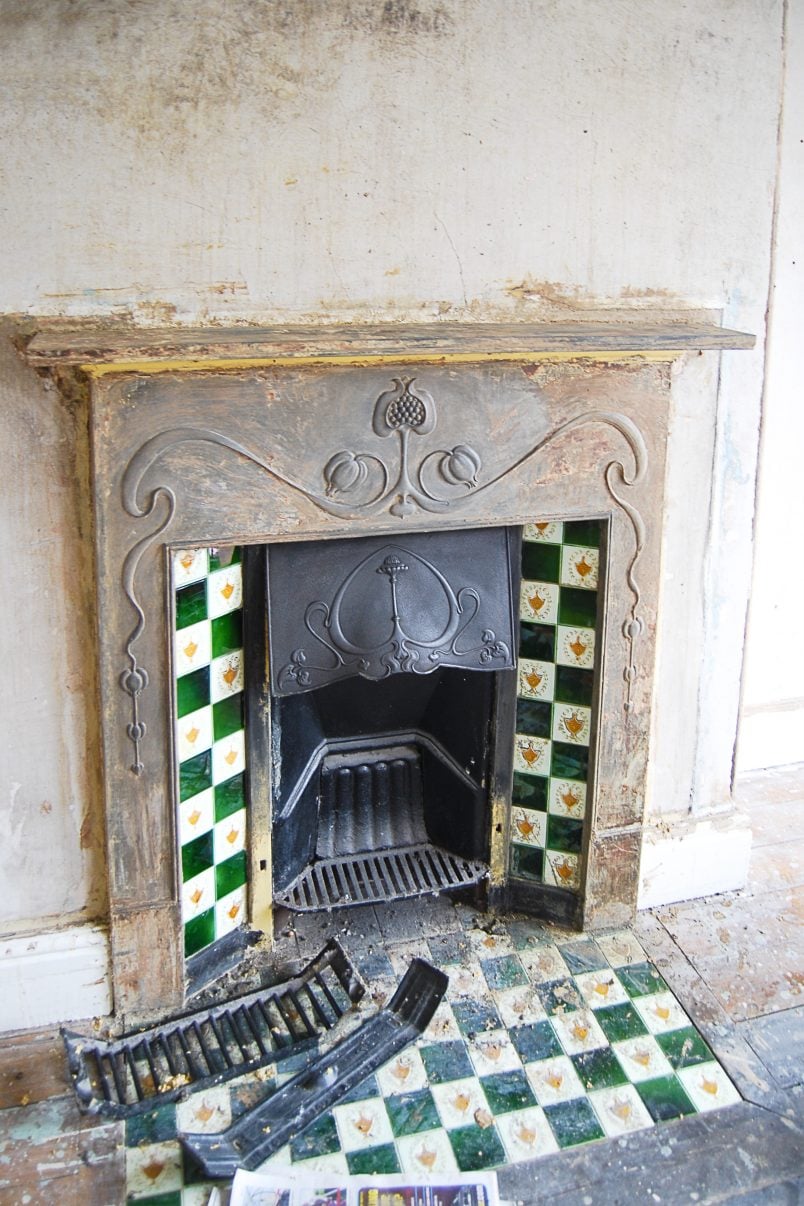
There were at least seven layers of paint on our fireplace that had to be removed, and although the chemical stripper worked well, it didn’t penetrate all of them in one go, so it took a few more applications to remove all of the paint.
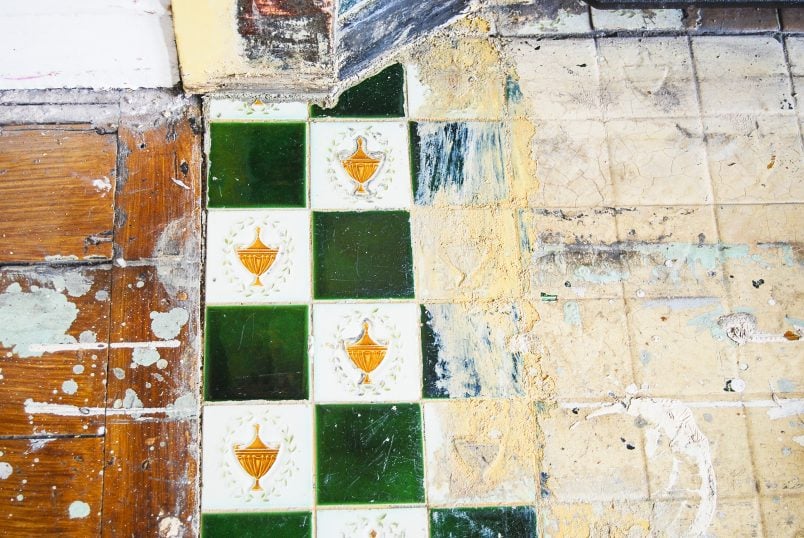
We used the same method to strip the original encaustic tiles but made sure to use a plastic scraper in order not to scratch the tiles.
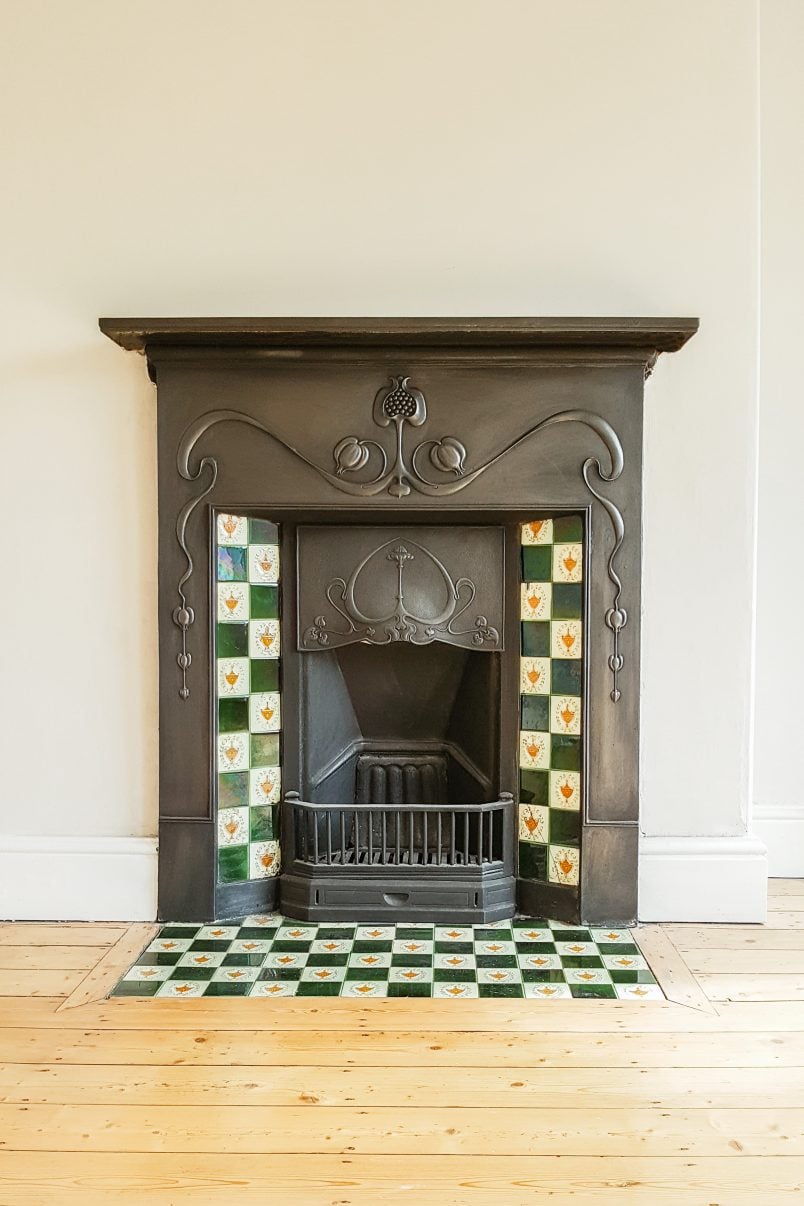
After a quick sand with steel wool and a final wipe down with white spirit, we applied black grate polish. When the grate polish was completely dry, I used an old cloth to wipe off the excess and give the surface a polish.

Here are our top 5 tips on how to restore a cast iron fireplace
- Let the chemical paint stripper (this is the only paint stripper we recommend) work as long as possible.
- Remove the dissolved paint with a stripping knife and kitchen paper.
- Use lots of white spirit to remove the remaining paint residue until the surface is completely clean. Use steel wool to sand if necessary.
- Apply black grate polish and leave to dry. Then buff to the required finish.
- For maintenance, use WD-40 to clean the fireplace. Never use water.
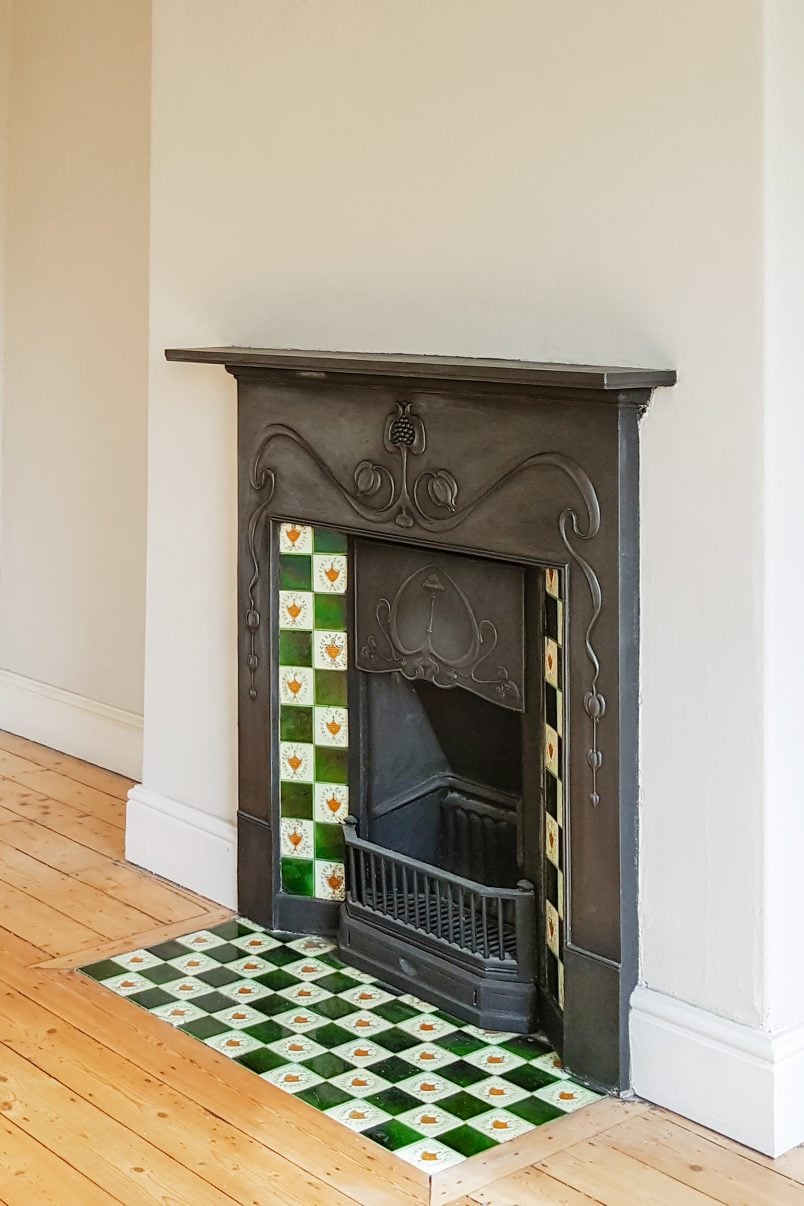
And here are the before and after pictures for you:
Fireplace FAQs
Cast iron fireplaces rust very quickly if they come in contact with water. Use some fine steel wool to rub away any rust and wipe the surface with some white spirit to clean it. Depending on how much you’ve rubbed the surface, you may need to reapply the grate polish.
If your fireplace is decorative, just regular dusting is more than enough to keep it looking good.
If you use the fireplace to burn wood or coals, the best way to clean a cast iron fireplace is with WD-40. Start by sweeping up any ashes (after they’re completely cooled) with a dustpan and brush, and remove as much dirt as possible. Then, use some WD-40 and a soft rag to wipe away any remaining dust and polish the fireplace.
Whatever you do, don’t use water to clean your cast iron fireplace, as it will cause it to rust.
Spay some WD-40 directly onto the cast iron fireplace and use a soft cloth to rub it all over the surface. WD40 is an excellent metal polish for cast iron fireplaces. The more you buff the surface, the shinier it will get.
Make sure the cast iron fireplace is clean and free of any bits of paint or dirt. Then, apply some grate polish with a soft rag.
A secret tip is to mix the grate polish with a tiny bit of white spirit before applying it to the cast iron. This will loosen the iron paste slightly and make it much easier to apply evenly.
You can paint almost anything if you use the right paint, and a cast iron fireplace can also be painted. Make sure to use paint that’s suitable for metal. We’d also recommend using an oil-based paint as water-based paints can cause the cast iron to rust.
If you want a black fireplace, we recommend using grate polish over black paint for your cast iron fireplace, as it’ll give you a lovely traditional and hard-wearing finish.
Restoring a cast iron fireplace is affordable, but it does take a bit of time. We paint about £60 to restore our cast iron fireplace. This includes all supplies like the paint stripper and grate polish as well as the plastic scraper, steel wool and white spirit that we used.


SHOP OUR DIY ESSENTIALS

Jo Healy says
Thank you for the tips on stripping a cast iron fireplace. I am stripping layers of paint from a cast iron fireplace which I brought second hand, I am hoping that it is cast iron as I have stripped one half of it but it just looks like old metal 😱
Christine says
I’m sure it will look great when you’ve finished, Jo. I’d be surprised if it wasn’t cast iron and once you get the grate polish on it’ll look completely different.
Cx
Linda Smith says
I’ve made the mistake of using water and the metal on my fireplace has turned green! How can I get this off?
Christine says
That’s super annoying but shouldn’t be too much of a problem, Linda! Just give it a rub with some fine steel wool to remove the green colour and, if necessary, reapply some grate polish. I’ve never come across a fireplace turning green before (I assume it’s cast iron) so be careful and maybe try scrubbing it in an area that you won’t see before scrubbing the whole fireplace.
Cx
Howard says
what paintstripper did you use?
Christine says
We used Nitromors for this fireplace but always recommend Peel Away which is what we used to strip our second fireplace. You can read about how we restored our other fireplace along with a list of the supplies we used here
Cx
Vicky says
Hi, I love what you did with your fireplace. I’m trying it with mine. It’s in a 1920s semi, so I’m assuming it’s cast iron. I’m just patch testing the peelaway 1 at the moment. I’m slightly concerned as where some of the paint has chipped away at the rest of the fireplace, the metal looks slightly green. I’m not sure what this means or if you have any tips.
Christine says
Hmm, that sounds interesting, Vicky. It’s not something we’ve ever come across but feel free to send over a picture (general at littlehouseonthecorner dot com) and I’ll take a look to see if we can work out what it is!
Cx
Marianne says
Well done, looks amazing. Just about to start mine which is just a small bedroom fireplace without tiles, thank goodness.
Thanks for your very useful advice.
Christine says
Thank you so much, Marianne! It took some time to get all of the old layers of paint stripped but it was definitely worth it! Don’t forget to check out this post where we tried a different paint stripping method that worked much better than the paint stripper we used to strip this fireplace. We’d love to see a picture when you’ve finished!
Cx
Steve says
I’m restoring a pair of old fireplaces in our house and following your guide (thank you!), Although I’m using bio strip which seems to work pretty well too to remove the horrid, plasticky green metallic paint some goon put on there in the last. However I’m curious: all the stove polishes I’ve seen say they cure properly after heating. These fireplaces are no longer in use and nor could I use them. Will the polish just rub off on anything that touches the fireplaces? Should I try and carefully heat it with a blow torch (difficult given carpets, skirting boards and so on). Or will it dry and not come off of its own accord?
Christine says
Isn’t it weird what people decided to paint their fireplaces in, isn’t it? We didn’t use both of the fireplaces in the bedrooms and covered them both in the same grate polish. We gave it a thorough rub and buff which really helped to seal the polish and nothing really rubbed off much unless you have it a propper rub with your fingers. Our walls all stayed clean ;) I really wouldn’t bother trying to heat it, as I don’t think it’ll be worth the effort.
Cx
Ell says
After finding this article, I bought Peelaway 1 and restored a Victorian fireplace.I left it on for around 36 hours. I applied it REALLY thick and it came off a treat! So easy. The sides didn’t go so well.. Maybe because the air got to it and it wasn’t thick enough on the very edge.. I live in UK. Great stuff!
Christine says
I’m so happy that it worked for you, too! Peel Away is amazing stuff, isn’t it?
Thank you so much for taking the time to comment!
Cx
James says
Hi there – wonderful work! I came across your blog when I was trying to find information on my own cast iron fireplace – we have the exact same design (although mine was in much worse shape unfortunately :( ). Do you have any background on where it would have been made and when?
Christine says
I’ve seen a couple of people with the same fireplace, too, James! You’ll usually find that original fireplaces were made around the same time as the buildings they are in were built. In our case, the fireplace is Edwardian with definite art nouveau influences. Other than that, I’m afraid I don’t know more. A great source for this kind of information (as well as supplies if you do need to carry out any repairs) are your local antique reclamation yards or fireplace shops. They deal with these kinds of fireplaces all of the time and have loads of local knowledge so I’m sure that they’ll be able to tell you more!
Cx
Eiln says
HI there
Do you know if peelaway can be used on wood? thanks a mill
Christine says
Yes, it can, Eiln! We’ve used it on wood lots of times and it’s worked great. Most recently we stripped our front door with it.
Cx
mario galdes says
Great project! I am doing mine at the moment. just to confirm you didn’t paint it black, after stripping you only used black grate polish to get the lovely sliver effect..
Thanks
Christine says
Thank you, Mario. You’re right – we didn’t paint it. It’s just the black polish applied straight to the cast iron. The more you polish it, the shinier it’ll become.
Cx
mario says
Thank you Christine for your reply…much appreciated and good luck with all your future projects…
Debbie says
Hi you inspired me to tackle my old Victorian fireplace in my daughters bedroom, which had been painted over by previous owners.
I used the peelaway 1 which was really good, I have rubbed down with white spirit and steel wool, still got quite a bit of residue on the cast iron. I am going to use the stove polish but my question I am going to get the bedroom skimmed over next week, do I put the stove paint on first to try and protect it. After all my hard work I don’t want the fireplace to go rusty with the dampness from the plaIstering.
I cant remove the fireplace but I would be heart broke if went rusty. Any tips you could give me would be really helpful.
Regards
Debbie
Christine says
We’re always so flattered to hear that we inspired someone to tackle their own DIY projects! You have a couple of options. You can wait until the plastering is done and then give the fireplace a clean with some steel wool before applying the grate polish. To avoid getting any polish on the walls I’d tape it with masking tape. The second is to apply the polish before the plastering and then clean up any spots of dirt that will probably occur.
I wouldn’t worry too much about any plaster getting on the fireplace. It probably will (although you can cover it while the work takes place) but it’s easy to clean. And if you do end up with a spot of rust you can just polish it away with some steel wool and apply some more grate polish. All in all, the cast iron is pretty hard wearing.
Hope that helps but do let me know if you have any other questions and we’ll be happy to help if we can!
Cx
Joy Broomhead -hughes says
hi I’m restoring s cast iron tiled fire place it’s rusty on which seams to be sliver pattern around the edges and fire hood if you rub the rust off is the what it should be or should it all be black grate colour lol I love the bronze look ok the rust just wondering which any to go with it really I have a fire back it new by the look of it which I’ll not be using if any one needs one thanks … joy
Christine says
A lot of old fireplaces have a gunmetal finish which I think is what you’re describing on your fireplace. It’s perfectly fine, just make sure that you remove all of the rust and polish the areas (with WD40) you’d like to accentuate more.
Cx
Aisha says
Hi…
I know this is an old thread but here goes.
I’ve been trying to restore a cast iron fire place (in my bedroom and don’t be used). I’ve followed your advice (And other stuff) but no matter who hard I polish it still looks black. I really want the silvery gun metal grey look….
Can anyone please advise…
Karin says
Hi there, I have three fireplaces I would like to restore, but what I can’t seem to fins out is how I repair or replace the firebox (if that’s what it’s called) the inside of two are broken and need to be rebuilt. The other fireplace is just a cavity. Any ideas about whether it’s even possible. They are prob 100 years old.
Christine says
I think that pretty much most parts of original fireplaces can be replaced. I’d recommend visiting a reclamation yard to see if you can find the necessary parts. You may have to remove the existing fireplace to be able to install a new firebox (which could end up messy) but in general, I do think it should be possible.
I’d totally recommend trying to find replacement pieces before you start taking anything to pieces though!
Cx
Kerry Carter says
Your fireplace looks beautiful ? I’m restoring mine at the moment – just a small bedroom fireplace. There were several layers of paint on it – most have come off, but the backplate of the fire is proving very difficult. I think the rough, pitted area caused by the fire being used has sucked in the paint and isn’t letting go! I’ve tried numerous applications nitromors, steel wool and an awful lot of scrubbing (my poor hands are so calloused now!!)but it refuses to shift.
I think I’m going to try the grate polish and hope I can work it into the cracks. It’s not as detailed as yours, but it is very faint and sweet!
Christine says
Thank you, Kerry! It sounds like you’ve got the worst of it done. It is surprising how much hard work it can be! It sounds like it’s a good idea to try the grate polish. We didn’t manage to remove every last bit of paint either but found that the grate polish hid a few little imperfections. If that doesn’t work there are also cast iron spray paints available. I wouldn’t usually recommend them but if it’s just for the backplate it might be worth considering.
Cx
Bernie says
I have a fireplace very similar and it’s missing the hood. Any ideas where I can get 2 and what era they are? Thanks
Christine says
It’s definitely worth checking out your local fireplace stores. Anywhere that sells original fireplaces will probably be able to help you out with any parts you may need. Our fireplace is Edwardian.
Cx
Roddy Scott says
Hello Christine,
I have just finished restoring one of two 1870 Victorian Rococo fireplace surrounds in our new home with help from your article.
Thank you for all of the pointers in the right direction!
One thing I discovered after having 6 layers of paint removed by Nitromors and shot blasting was that there was still layers of paint stuck in the fine detail that none of the two methods would remove. I got around this by using a cheap powered engraving tool from LIDL with a tungsten cardide tip that ‘chiseled’ it all off including the crud underneath. Took me 4 hours but the end result after polishing certainly made it worth while.
Pity I cannot post a picture of my efforts to show you the before and after states.
Thanks again for your article!
Roddy
PS. Roddy was kind enough to send us some pictures of his restored fireplace. You can see the amazing transformation in the links below!
Before and After
Christine says
You’re very welcome, Roddy! Glad that all of your hard work paid off!
Cx
Stuart says
Hi, love your fireplaces!
I am about to restore one, it is painted white and I want it back to its natural glory. It seems to only have one coat of paint, do you think the Nitromors would be best to use? Then use the grate polish?
I am leaving it on the wall to strip it- is that ok?
Thanks!
Christine says
Thank you Stuart!
We’ve used a lot of different paint strippers over the last few years and the one we like best and recommend is PeelAway1. It’s by far the most effective stripper we’ve used. (There’s a link to it in the sidebar.)
The basic order of work is strip the fireplace, clean it with some white spirit and then apply the grate polish (mixing it with a bit of white spirit makes it easier to apply).
If your leave your fireplace on the wall, I’d recommend covering the wall as best as possible with masking tape and newspaper. Both stripping and applying grate polish is a messy business.
Good Luck!
Cx
Susie New says
Hello, a fascinating blog, thank you! I’m about to restore two fireplaces I bought on eBay. I have bought some rust treatment and Strip Away (equivalent to Peelaway 1) and I’m pretty sure I know what to do. Both pieces have rusted backs and I’m wondering how much elbow grease I should put into the backs, considering they’re going into the wall. I plan to wire brush them down, rub them with white spirit and then give them a coat of gloss to give some protection. Do people generally pay that much attention to the backs? I have layers of paint to remove from the fronts so I will be pretty busy!
Christine says
Sounds like you have your work cut out Susie! I think your plan for the back sounds more than adequate. You’re never going to see the back of them again, so a quick clean and tidy should be more than enough.
Would love to know how you get on!
Cx
Andy says
Hi,
Amazing job!!
The house we want to buy has a very similar fireplace to yours. Is the hood easily removable? The hood in the house we want to buy is very damaged, are these easy to remove/replace?
Christine says
Thank you so much Andy!
I think that you can remove the hood, although I’m not sure how easy it is to find a replacement. I’d recommend chatting with one of your local fireplace reclamation shops. We have one nearish us (where we bought our living room fireplace) and they we’re super helpful. If you find a shop near you, they could probably help you source the parts you need.
Good luck with your new house!
Cx
Julie says
Wow – what an amazing job you did. It looks stunning, just stunning!!
And I don’t know if it’s just me or not, but that fireplace looks even HAPPY :)
Christine says
Thank you so much for your kind comment Julie! The fireplace definitely received a lot of love and attention for a while so it should be happy ;)
Cx
jerri says
Hi,Yeah you did a great job restoring your fireplaces! I have a small bedroom fireplace in the bedroom but there are no hearth tiles. Do you know whether bedroom fireplaces would originally have had 4″ Sq tiles or 6″ sq? Thanks.
Christine says
Thanks Jerri! We still have hearth tiles in 3 of the bedrooms and they are all 6″ sq.
Hope that’s some help.
Cx
Elle says
Hi,
I have a Georgian fireplace. The mantle piece is made of some sort of stone, although painted with white gloss paint. Do you have any idea if Peel Away can be used on stone? I suppose it will all be pitted underneath. Any ideas? You’ve done a great job on your fireplaces.
Christine says
Thanks for the compliement, Elle! I’m sure it can be used on stone, but I’d check out the Peel Away website (http://www.peelaway.co.uk/) to double check if it’s right for you. They do offer tester pot sizes so that you can choose the product that’s right for you.
Cx
Andrew says
Hi,
Amazing results. I have a similar fire place, which was originally coated with a brown varnish to give a wood effect, then after 50 years of coal fires it was covered with white gloss. I followed your instructions with the Nitromors, which gave the gloss paint a fright but didn’t have any effect on the varnish. Also, the nooks and crannies were nigh impossible to clean. A friend advised a car grit blaster, which cost about £60 and I used 3 bags of grit. This has taken the fireplace back to original metal, including all the inaccessible corners, and I would thoroughly recommend this route.
A couple of tips though!
1. The grit is re-useable, but creates more and more dust so construct a shelter around your work area to contain the mess (don’t use polythene!!!!)
2. Duct tape on the tiles to prevent scratching (although I did this a small corner lifted but fortunately it’s not too obvious,
3. Make sure to use a filter mask and eye protection. Also protect ears from grit as it’s tricky to wash out.
The finish is like new, and after a wipe down with WD40 I’ll apply a coat of stove polish.
Christine says
Those are some great tips, thanks Andrew! We stripped our second fireplace issuing PeelAway which worked amazingly well! Your method sounds amazing, definitely something we’ll look into if we have something too strip in the future!
Thanks for the tips!
Cx
Pat Crabtree says
I own the century old family farm and live in the house my grandparents built when my great grandparents home burned to the ground in 1950. The coal burning fireplace insert has never been painted but is really rough looking and the surrounding “tile” is ugly red brick. The mantle and insert style are beautiful. I have no idea how to restore the insert, but would love to maintain it rather than replace it if I could find someone to do it for me. Would I have to take it out? Can they clean it up and replace the tile without destroying the floor, carpet, newly painted walls, etc? I wish I had thought of this part beforehand, but it’s too late now. I was looking at gas or electric inserts and when I saw yours I realized how beautiful it could be if we replaced the tile and refurbished the cast iron insert. I work full time and care for elderly parents, so I cannot do the work myself. Any suggestions would be greatly appreciated. I Love what you have done with yours! Thank you – Pat
Christine says
That’s not an easy question to answer, Pat! There are definitely lots of fireplace restoration companies around and I would assume that they could restore your fireplace without removing it. I have to admit, that I would be worried about your already finished carpet and walls! It’s really not a clean job. Most fireplace can be removed and then stripped or even sandblasted away from your finished room, but it would depend on how easily your fireplace can be removed. I’d get a few fireplace restoration people to come round, have a look and give you a quote for the work. It won’t (or at least it shouldn’t) cost anything and will give you a better idea of what’s involved and how much it will cost to put right.
Good luck!
Cx
vanessa says
Hi Christine,
I just wanted to let you know that the fixative spray worked so well! Its perfect thank you so much for helping me here – my little girl is not frightened of the fireplace now :-) On another note..oh no you must think…well, I lifted up the carpet in the other bedroom and took a look at the hearth. It is a concrete slab (no tiles all have been removed) but is about a good 1cm up from the wooden floorboards. I thought that the hearths sit at least 1cm down as that is where the tiles once were and it would lay flush with the floorboards. We are looking to re-tile the hearths but if I place tiles over the current concrete slab there’s going to be a horrid step of about 2-3cms from the floorboards. In your experience were your hearths steeped down or were they flush with the floorboards. I don’t know if this is original hearth or if someone has concreted over the existing hearth?? I appreciate your wisdom! Kind est regards Vanessa xx
Christine says
I’m so glad the fixative spray worked, Vanessa! Might give it a go myself! ;) In our home, the hearth tiles were always flush with the floorboards (and therefore the concrete is always a bit lower than the floor). Newer regulations state that the hearth has to be higher than the rest of the floor, so I’m not sure if thats why someone may have built up the one in your home. If you’re fireplace is purely decorative, it won’t matter though. What are the other hearths in your home like? Are they all higher than the floor? Is this hearth the odd one out? Do your neighbours have a hearth in the same position – and is theirs higher than the floor, too? If all of the others are flush with the floor, I’d assume that it isn’t original concrete. It’s really hard to guess, but if it’s just decorative, I’d just do what you feel is right for the room.
Cx
PS. Had to laugh so hard about “my wisdom” that I nearly chocked on my breakfast. ;)
Vanessa says
Hi Christine, :-)
I had a look at all the other hearths and they all sit up higher than the floorboards? Am wondering if they had a surround around them – I’m just not sure…boo hoo! I wanted to do this myself but now will have to get a tiller in to see what he thinks and if it would be better to just re-tile over the top of the concrete hearth. In an ideal world I’d like to knock it out so that it drops back down but hubby is not allowing the extra work…oh well…thanks for your reply xx
Christine says
Boo – that’s really annoying. I does sound like that’s the way your hearths just are. Knocking it out sounds like a big job and probably isn’t worth the effort. I’m sure there’s a good design solution out there… just finding it is always the problem!
Cx
Jeny Houston says
I had the same problem and bought an old brass fender which covers the edge between the hearth and floor and disguises the join. I guess it would work whether your hearth was lower or higher than the floor
tommie says
This is such a wonderful and helpful post – thank you so much! I’m going through some similar updates at my house at the moment, and I wondered if I could ask your advice on something if you don’t mind? My fireplace hearth tiles are all intact (and look lovely now I’ve cleaned them up a bit!), but my problem is they are laid onto the original floor boards, just as yours are in the picture above, which I think is going to make it tricky for me when I lay my new floor (I’m replacing original floorboards with new hard wood floor in the next couple of weeks)… The depth of the new floor will be substantially greater than the current boards, and I’m wondering if you had any ideas or suggestions for how I would raise the hearth tiles so that they lay on top of the new floor and/or flush with the new floor? The option my flooring man has given me is to put a skirting board around the tiles and have them sunken, with the new floor at a higher level, but I would really like to avoid this if possible as the tiles are so beautiful and I’m scared this would detract from them somewhat. If you have any ideas at all I’d be really interested… Thank you again! T x
Christine says
So glad that our post was able to help you out, Tommie!
Our tiles (and I assume yours will be, too) are actually on a small concrete foundation and not tiled to the floorboards. I completely understand that you’d like the tiles flush with your new floor, but I think that the option your floor guy has suggested is probably the only way forward. We’ve actually tried to remove some of our hearth tiles and it’s pretty much impossible to get the up in one piece. As you’re lucky that yours are in a good condition, I’d be too worried about causing unnecessary damage.
I know that’s not what you wanted to hear, but I really can’t think of an option to remove them safely.
Cx
Cheryl says
Hi Christine,
I just wanted to say you’ve done a lovely job on your fireplace amp; I’m really proud of my one now too, all thanks to your helpful tips! It was a lot harder work than I thought amp; a lot of elbow grease was needed but was well worth the effort! I wanted to post before amp; after pictures on here but can’t seem to attach them.
Thanks again,
Cheryl
Christine says
Thanks Cheryl, that’s so kind! Congratulations on restoring your fireplace, we’re so happy that we were able to give you a few tips. We’d love to see some of your before and after pictures – it would be great if you could email us some (general at littlehouseonthecorner dot com)!
Cx
Christina Thomas says
Hi there
I just wanted to say a massive thank you for this excellent post. We’re 15 months into a full renovation of a 4 bed house and it seems never ending! I thought I’d try and tackle the cast iron fireplace in our bedroom and it seemed overwhelming even though it was just really dirty and rusty. I spent hours sanding the fireplace and it didn’t seem to make much difference. I googled renovating a fireplace and found your website suggesting grate polish. Luckily my local little hardware shop stocks it and it’s just fantastic! It’s so quick and easy to use and the fireplace looks amazing!
I think I’ll take a look through your other projects now!
Thanks again! and keep up the great work!
Christina
Christine says
Thank you so much for your kind comment, Christina! Our renovation seems like a never ending job, too, but it’s all worth it when you finish something as wonderful as an original fireplace. So glad that our experience with the grate polish was able to help you!
Now that you’ve found your way over to us, we hope you pop back for a visit again soon!
Cx
Paula says
Hi I’ve used wd40 to remove rust but what do I do once I’ve scrubbed it with the oil
Please help haha
Christine says
It sounds like you’ve done all of the hard work, Paula! Assuming your fireplace is free of paint and dirt and is clean, all that’s left to do it apply the grate polish. You can read more about what kind of polish we used and how we applied it here.
Cx
Jane says
H Christine, we are attempting to restore a similar fireplace in our bedroom, sadly someone at some point tiled over the original tiles with really ugly tiles – so I am going to buy some reclaimed one – we have removed the old tiles and there were the original tiles underneath but these are beyond repair. So we now have a gap for the new tiles to go in – and it looks like they will slip into the surround. I can see how it will be easy to get the first ones in but not how to get the last ones in? Do you have any advise?
Thanks
Jane
Christine says
Hi Jane! It’s so sad that people remove or destroy original features. Like you’ve already said, the tiles slot in the back of the fireplace, but that’s pretty much all we know, too. The shop where you are buying the tiles will probably be able to advise you on how they can be fitted.
Good luck!
Cx
vanessa isaia says
Hi Christine, I am very much enjoying your blogs especially on your fireplaces! I am about to attempt this is my little girls room. I am a bot worried about the grate polish. I have found some on ebay item no. 160962921740 its the Zip product but it says lead in the title. Am worried that it will give out poisonous fumes. I am not going to use the fireplace but was just worried for my little girl. Am I being paranoid here.. is this the product you used?
Thank for your time!
Vanessa
Christine says
Hi Vanessa, glad you like our fireplaces!
I’ve just checked the ebay item and the image shows exactly the same paste as we used. I’ve just checked the packaging of ours and there is no mention of lead at all, so I assume it’ll be fine. I’m not even sure they’d be allowed to sell something that contains lead these days.
Here’s the link to ZIP, just in case you’d like to see if they have any more information: http://www.zipfires.com.
If it makes you feel better, we bought our paste at a fireplace restoration company that uses that exact paste for restoring all of theirs.
Oh, I know I’ve mentioned it before, but you should definitely mix the paste with a bit of white spirit when applying it – it’ll make it much easier to apply and you’ll have to use much less of it, too.
Hope that’s some help!
Cx
Vanessa Isaia says
Thanks so much Christine! I think you guys are great at what you are doing and giving this information out…Thank you so much its a real help. Vanessa xx
Christine says
You’re welcome Vanessa! Good luck!
Cx
vanessa says
Hi Christine,
Its me again…lol :-P Okay, so I have just finished applying the grate polish and then I gave it a light buff. Its come up a lovely dark grey. This is the fire for my little girls room but i’m worried about the touch appeal. When I touch it it does come off on my hand. I don’t want to buff it anymore as it gets more grey and more shiny. Do you know if there is something I can spray over it to seal it in to stop the grate polish rubbing off? Or do I have to accept this is the way it is? Thanks as always
Vanessa xxx
Christine says
You certainly don’t ask any easy questions Vanessa! ;)
We had exactly the same issue with the fireplace in our guest bedroom. We love that it isn’t shiny, but it does wear of much more easily than if it’s buffed more. We aren’t too bothered about ours, as the room isn’t used too much. I just ran upstairs (which is easier said than done, as I went to the gym today and am suffering) and gave ours a rub to see if it has become more touch resistant over time – it hasn’t.
I’m not aware of anything to seal the it with, but I wonder if spraying it with hairspray – like you would as a fixative for pastel drawings – would do the trick. Having said that there are propper products available to seal pastel and coal drawings, so I’m wondering if one of those would do work. If you try one of those options, I’d definitely try it out on a small test area first! We’d love to know how you get on!
Always happy to help (if we can)!
Cx
PS. Congratulations on finishing your fireplace!
vanessa says
…ok, I will try and find some from an art shop…I did see that you mentioned using WD-40 and that seals the grate polish? Did you do this on your very buffed fireplace? Could I used wd40 over it all? Just don’t want to mess it up…thanks for your help!
Vanessa xx
Christine says
I completely understand that you’re scared of messing up the fireplace after all of your hard work!
I use WD-40 to clean the fireplace that we use in our living room. It’s much, much more shiny than the others without WD-40. You could of course use WD-40 over your complete fireplace (it’s what the professional fireplace restorers do to seal everything), it will make everything more shiny though. Again it will depend on how much you buff it though!
Good luck!
Cx
PS. I’m not sure that sealing it with hairspray or any other art fixative will work – it’s just a guess! I’d definitely try it on a test area first!
Angela says
Hi Christine, happy to have discovered your blog.
We replaced the flue liners in our fireplaces that hadn’t been used for over 25 years. The service threw-in stripping the iron summer doors that had been painted in oil many times over. They came out really nice but were sitting in the basement while other renovations were going on and they got rusty again. I first cleaned with vinegar and wet cloth then used the black polish you recommended (different brand) and it came out well. I thought I had heard of an oil to put on it to protect it but I will try WD-40.
The fireplace was mantal marble–we used Lead Out which is similar to Peel Away and did it ourselves: http://brownstonecyclone.com/2012/06/14/stripping-paint-off-a-fireplace-mantel/
Christine says
Thanks Angela, so glad you found your way over to us!
WD-40 works great for us (and it was recommended by our fireplace people), it also has about a million other uses, so is always handy to have around – even if you do decide you’d like to oil your doors at some point.
I love your fireplace mantel! It’s turned out amazingly well – wish we had something as fancy in our house!
Cx
Danielle Marcos says
Hi! Great job restoring your original cast iron fireplace. We have two in our house and you have inspired me to try it. I had a couple questions:
1) You mentioned ongoing maintenance with WD-40. How often does that need to be done? Do you ever need to reapply the black grate polish? Is any other maintenance required?
2) We will soon have two small kids (one is two, the other is due to be born in late November). Does the black polish transfer easily onto clothes and skin if you touch it? Will I have to keep the kids off the fireplace at all times?
Thanks!
Danielle
Christine says
Hi Danielle, first of all thanks for your kind comment.
To start with, I should say that we treat our fireplaces differently. The working one in the living room is polished and slightly shiny, the one that we’ve just installed in our guest bedroom (that used to be in the dining room) isn’t in use and has a matt finish and the one in our master bedroom is polished but not in use. The shiny and smooth finished is achieved by polishing everything with WD-40, the matt finish is not polished at all.
Cleaning: On the working fireplace in the living room we use WD-40 to clean the hearth and give the fireplace (you shouldn’t use water on the cast iron) an odd polish. Basically I give the whole thing a quick wipe down when I clean the fireplace after using it. We’re not taking a proper clean, just a quick dust. The guest bedroom fireplace on the other hand doesn’t really get dirty, so I just use a standard duster to wipe it down every now and then (mainly before guests come to stay). Every now and then, I’ll give the working fireplace a proper clean and polish with WD-40. Three years down the line, we’re still on the first medium sized can of WD-40.
Grate Polish: When we recently moved the fireplace from our dining room into our guest bedroom, we reapplied some grate polish for the first time. Even then it wasn’t really necessary. We’ve had the fireplace in the living room (which we use a lot in the winter) for 3 years and have never reapplied the grate polish. It still looks just as it did when we first got it.
Maintenance: Except for general cleaning and dusting, and the odd polish with WD-40, we don’t do any other maintenance.
Durability: On the fireplaces that we’ve treated with WD-40 hardly any of the black polish wears off. It almost seems like WD-40 seals the grate polish. The matt finished fireplace in our guest bedroom in the other hand wears of a lot more. On the rare occasion that we’ve accidentally got some of the grate polish onto our clothes, it has washed out (but we did wash them as soon as possible). In either case (polished or not) some of the polish will wear off if you touch it – it’s just a lot less if polished.
Restoring the fire: After using two different methods to strip the fireplace, we found that the stripper called Peel Away worked best. You should never use a heat gun on cast iron as the sudden heat difference can cause the cast iron to crack. When applying the grate polish mix it a bit with white spirit. It’s much easier to apply and also goes much further.
I hope that’s some help! Let us know if you have any other questions.
Good luck for November!
Cx
R raj says
Hi – was so glad to come across your article. Just bought a property with five fireplaces to restore! A couple of questions, how much peel away did you use and how long did it take ie could you do a fireplace in a day working 12 hours? Thanks so much. Feel a little daunted but can’t wait to see the final result!
Christine says
Wow, 5 fireplaces! I think the time it’ll take will depend on the amount of layers of paint you’ll have to strip. We let our peel away work for about 24 hours before removing it. Really it depends on your situation. A test area might be a good idea… Peel away is absolutely amazing compared to other products we tried. Hope that’s some help!
Cx
Christine says
Oh, we probably used a bit less than half a tub of Peel Away for one fireplace.
Cx
Rhian rajaratnam says
Thanks so much for the reply – just bought some peelaway so I’ll let you know how we get on!
Christine says
You’re welcome! It was by far the best stripper we’ve tried – good luck! Can’t wait to hear how you get on!
Cx
Ryan says
Just found your post, amazing job on the fireplaces!
I’m currently renovating an old cast iron clawfoot bathtub which is how I found your page. Do you think the zip stove polish will work on the exterior of the bath (which I’ve taken back to bare metal)? I love the finish you have, but concerned it may require the heat from a fire to work, or may not stand up to damp bathroom conditions.
Any advice gratefully received.
Christine says
Thanks Ryan! We don’t actually use both of the fireplaces that we restored, so there definitely wouldn’t be any heat issues using the zip paste. Having said that, when you wipe over the polish, a tiny bit of it always rubs off, so I’m not sure how durable it would be in a bathroom where there is more moisture and cleaning (vs. occasional dusting). I’m also wondering if some sort of primer and painted finish would be needed to stop the bathtub from rusting over time. I personally think that a painted tub would be more durable – maybe spray paint is worth considering, as it should still give you a very smooth and even finish.
Hope that’s some help!
Cx
Ryan says
Thanks so much for getting back to me Christine. I think we’ll go for spray paints as you suggested.
Best of luck with your ongoing renovations!
Ryan
Emeline says
Hi the fireplace looks amazing. I am just trying to do the same. Was wandering with the black grate polish will this make it go black? Only asking as I would like the gunmetal colour which the fireplace in the picture looks like it may be?
Thank you
Christine says
Hi Emeline! Glad you like the fireplace, we’re so happy with it, too. The black grate polish will make your fireplace go black. To achieve the gunmetal look you’d like, you still use the same polish but have to rub and polish it – a lot! When applying the paste, mix it with a bit of white spirit – it’ll make applying it much easier and more consistent. Your best bet would probably be to to try it out on a small area first and see if you can achieve the result you are looking for. Let us know how you get on and good luck!
Cx
jacky Holliman says
Really love the fireplace. You have given me inspiration for mine and your tips are so much more helpful than the professional sites. I have been polishing the black grate polish with a buffer on the electric drill for ages, and although looks polished, I still don’t have that metal look of yours that I like. Should I keep going?
Christine says
Thanks Jacky! So glad that we could help!
We actually didn’t polish the fireplace very long, it just kind of worked out that way. Having said that, I know that the professionals use WD40 for cleaning and polishing cast iron. Definitely try it on a test area, but I think that a quick spray of WD40 should to the trick. Hope that helps – we’d love to know how you get on!
Cx
Lauren says
What’s the name of the chemical paint stripper you used on this fireplace and your other one (where you show the tape that absorbs the paint layers). These fireplaces turned out beautifully!!! Love your home and the care you’ve put into restoring it.
Christine says
Thanks Lauren! The chemical stripper we used on the yellow bedroom fireplace is Nitromors. It worked well and my best tip for removing after its done its work is to use lots and lots of white spirit – it seems to neutralize it.
The stripper we used for the dining room fireplace was absolutely amazing! It’s called PeelAway. There are two different kinds available (Peelaway 1 and Peelaway 7), which one you use would depend on the application – we used Peel Away 1 which was amazing.
Good luck!
Cx
Treasa says
Hi Jan – the fireplaces look great. I’m about to do the same project but can only find 10kg batches of Peel Away. How much Peel Away did you use in the end ? I’ve got two fireplaces so wondering if I should just buy the large amount ?
Thanks, Treasa
Christine says
Looking at the available sizes of Peel Away, I would guess that we used the 4kg tub. It was enough to strip the fireplace and a few areas around our front door windows. The amount you will need will depend on how many layers of paint you have to strip. If there are lots of layers, you will probably have to apply more than one coat to strip everything so will use a lot more stripper.
Hope that’s some help, Treasa!
Cx
James says
Hi,
I know this is an old post but just going through the same job myself.
Far harder work than I had expected :)
Just wondering do you have to remove every last piece of paint and residue before applying the polish. I have red residues left in some areas and wondering does that all have to come off.
Will the finish be poor if I don’t get everything off or does the polish cover some minor remains?
Christine says
Hi James! I really underestimated how long it would take to do, too. On the bedroom fireplace I pretty much removed all paint and dirt, but I also restored our dining room fireplace (you can read about it here). There is one picture there, where I have already applied the grate polish on one half of the fireplace and the other side is still just stripped cast iron. You can see that the half without the grate polish still has some residue left, but that later completely disappears under the polish. Having said that, I also had one small area where I’d missed some actual paint which the polish didn’t cover well at all. Any lumps and bumps on the surface will probably show though the polish, too. I guess what I’m trying to say is – if there is actual paint left, you will probably have to remove it, but if there is just some smooth residue, you will probably be fine. You could always test a small area to see if the polish covers any imperfections. When applying the grate polish, try thinning it down slightly with some white spirit – makes applying it so much more even and easier. Hope that’s some help. Let us know how you get on!
Cx
Charlie says
Yes clean it all, preparation makes perfect
jen @ Tatertots & Jello says
Wow – what an amazing fireplace. I love it!!! You did an awesome job exposing the metal. It looks so great!!
xoxoxox
Christine says
Thank you! It was loads of work, but it was worth it. We couldn’t be happier with the result! x