MENUMENU
  • Home
  • About Us
  • Our Favourite Tools
  • Get In Touch

Little House On The Corner

DIY & Home Improvement

MENUMENU
  • Blog
  • Projects
    • Our Favourite Projects
          • Favourite Projects
          • DIY Slatted Garden Fence | Little House On The Corner
          • DIY Slatted Garden Fence

          • Floorsanding In Progress - 16 Grit Paper | Little House On The Corner
          • What No One Will Tell You About Sanding Your Floors (+ How We Did It!)

          • How To Plan And Install Panelling | Ultimate DIY Guide On How To Install Panelling Yourself | Little House On The Corner
          • How To Plan & Install Panelling

    • Home Improvement & DIY
          • Home Improvement Projects
          • DIY Thin Floating Shelves | Little House On The Corner
          • How To Build Super Thin Floating Shelves

          • DIY Log Store | DIY Guide: How To Build A Log Store | Little House On The Corner
          • How To Build A Log Store

          • HOW TO LAY A PLYWOOD FLOOR

    • Craft & Art
          • Art & Craft Projects
          • DIY Pegboard
          • DIY Pegboard

          • DIY Framed Instagram Photo Display | Little House On The Corner
          • DIY Frames Instagram Photo Display

          • DIY Guess Who Game - Setting Out Board | Little House On The Corner
          • DIY Guess Who Game

    • Painting & Decorating
          • Painting & Decorating Projects
          • What To Do When You've Chosen The Wrong Paint Colour (& How To Fix It!) | Little House On The Corner
          • What to do when you’ve chosen the wrong paint colour (& how to fix it!)

          • Kitchen Makeover | Little House On The Corner
          • How To Paint Laminate Kitchen Cabinets

          • DIY Geometric Painted Walls | Little House On The Corner
          • DIY Geometric Painted Wall

    • Free Printables
          • Free Printables
          • House Cleaning Checklist | Free Printable | Little House On The Corner
          • Cleaning Checklist – Free Printable

          • Halloween Book Covers - F0ree Printable | Little House On The Corner
          • Halloween Book Covers – Free Printable

          • DIY Halloween Treat Boxes | Free Printable | Little House On The Corner
          • Halloween Treat Boxes – Free Printable

    • Furniture Upgrades
          • Furniture Projects
          • DIY Herringbone Desk | Little House On The Corner
          • DIY Herringbone Desk

          • DIY Wooden Bench
          • DIY Wooden Hallway Bench

          • DIY Copper Towel Ladder | Little House On The Corner
          • DIY Copper Ladder

    • Outdoor & Garden
          • Outdoor & Garden
          • DIY Slatted Garden Fence | Little House On The Corner
          • How To Build A Slatted Fence

          • How To Lay A Gravel Driveway

          • DIY Logstore
          • How To Build A Log Store

    • Cleaning & Organizing
          • Cleaning
          • Cleaning Checklist - Free Printable
          • Cleaning Checklist + A Free Printable!

          • Ultimate Guide: How To Clean Brass - Ketchup | Little House On The Corner
          • How To Clean Brass

          • DIY Floating Spice Rack | Little House On The Corner
          • DIY Floating Spice Rack

    • Holidays & Festivities
          • Holidays
          • The best mulled wine! (click through for the recipe)
          • The Best Mulled Wine Recipe Ever!

          • DIY Christmas Napkin Rings - Free Printable | Little House On The Corner
          • DIY Christmas Napkin Rings

          • DIY Dowel Tree Advent Calendar | Little House On The Corner
          • DIY Wooden Dowel Advent Calendar

    • Travel
          • Travel Posts
          • Szechenyi Bridge
          • A Weekend In Budapest

          • Riesenrad im Prater Wien | Little House On The Corner
          • A Long Weekend In Vienna

          • Lake Bled
          • 72 Hours In Ljubljana

  • House Tour
        • Our Edwardian House
        • Our Edwardian House (1st Home)
        • Our Berlin City Centre Apartment
        • Our Berlin City Centre Apartment (2nd Home)
        • Take The Tour | Our Art Nouveau Apartment | Little House On The Corner
        • Our Berlin Art Nouveau Apartment (3rd Home)
        • berlin riverside apartment house tour
        • Our Berlin Riverside Apartment (4th Home)
  • Shop
    • The Little Corner Shop
    • Shop Our First Home
    • Shop Our Current Home

How To Match Original Period Tiles

  • Facebook
  • Twitter

Last summer we started restoring our guest bedroom and after one of the first steps – removing our laminate flooring – we were lucky to find some original period hearth tiles. As with everything in this house, they were covered in layers of gunky paint, but after a bit of stripping, we were amazed to find these lovely tiles!

Original Edwardian Tiles

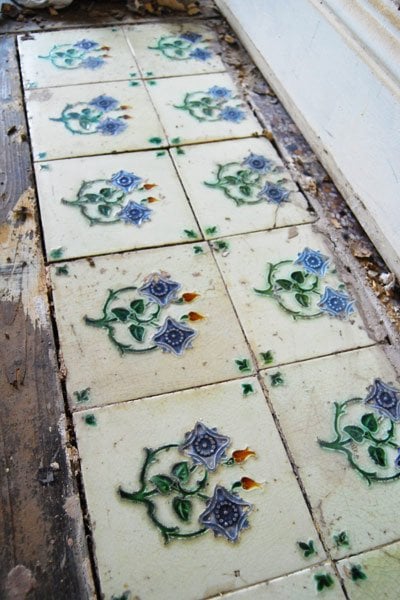
Whilst they are lovely, some of them are sadly in a bad condition. We’ve of course been scouring our local antique and reclamation centres, but with thousands of different designs, it’s pretty much impossible to find the exact missing ones.

Period Tile Replacement

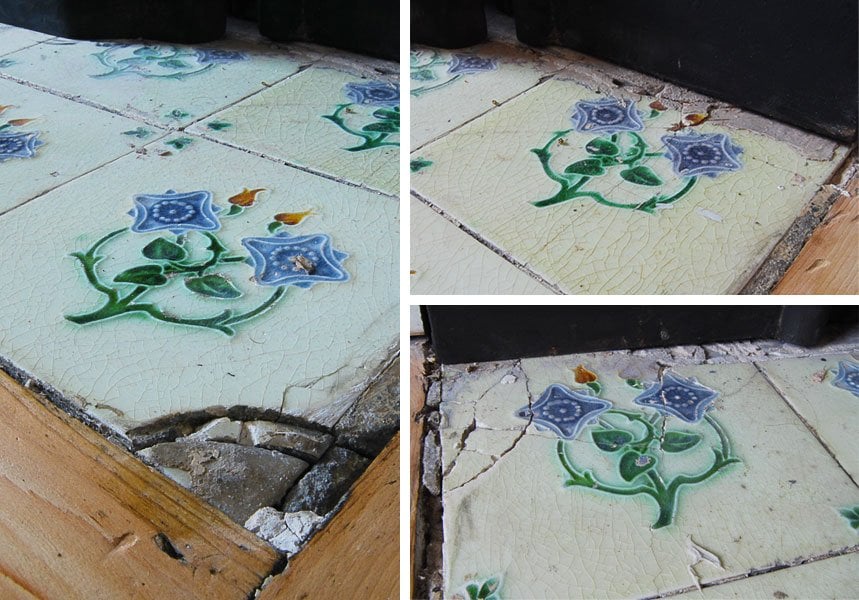
Not one to give up lightly, we eventually managed to find a solution and managed to find a company that prints onto tiles. Here’s the result.

Period Tile Replacement

Obviously, as the image is only printed onto the tile there isn’t any texture to it like on the original, but other than that it’s a pretty good match!

We thought replacing the tiles would be fairly straightforward, but as usual, when we think a project will be quick and easy it turns out to be the opposite.

Period Tile Replacement

Luckily the broken tiles were easy to remove just with a hammer and chisel, but at some point, a thick stone slab had been added to the back of the insert so that the new tiles wouldn’t fit into the opening as easily as imagined.

Being too scared to cut the new tiles (they were too expensive to mess up), we decided that cutting the stone slab would be a better option.

Period Tile Replacement

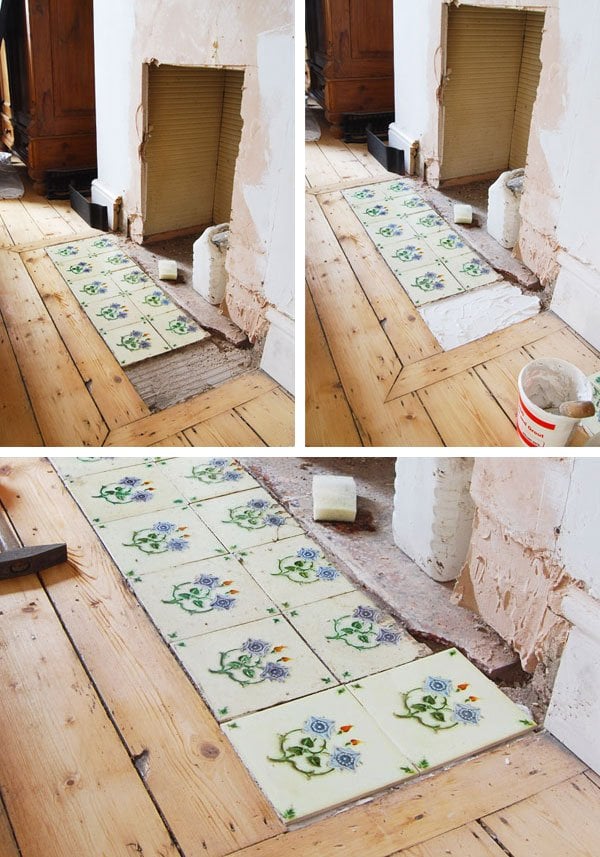
After chiselling away the corners of the slab the rest was straightforward. First of all, we gave the existing tiles a good clean (by covering them in a stripping solution to remove any last bits of dirt and paint) and then just glued down the tiles and grouted between them.

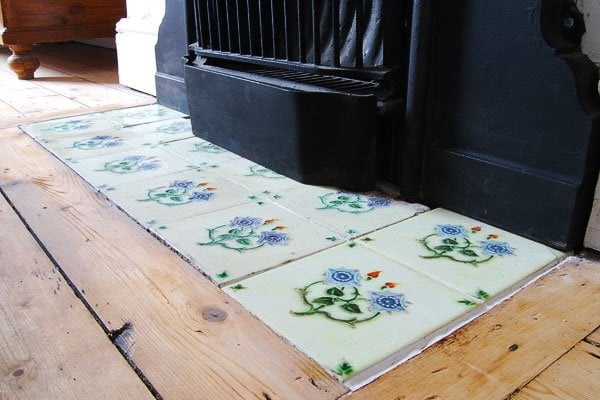
And this is what it looks like now.

Period Tile Replacement

If you look closely, you can of course tell the difference between the new and old tiles – mainly because the new ones are cleaner and shinier – but from a distance, you’d almost never know.

Have you ever discovered any hidden period features in your home? Have you ever replaced any tiles?

Christine 10 Comments

the PAST
the FUTURE

Subscribe To Our Newsletter

Sign up with your email address for secret projects, DIY advice & lots of fun!

Privacy Policy

Leave a Reply Cancel reply

Your email address will not be published. Required fields are marked *

This site uses Akismet to reduce spam. Learn how your comment data is processed.

Comments

  1. Vanessa says

    30/08/2017 at 18:58

    Another thing I have never seen done. Very interesting!

    Reply
    • Christine says

      30/08/2017 at 19:50

      It wasn’t perfect but considering it would have been impossible to ever find the same tiles we were really pleased with the result!
      Cx

      Reply
  2. emma watson says

    29/01/2014 at 17:49

    Hi,
    Wow the tiles look great, I am in the same situation, trying to find old ones to match, could you tell me the name of the company you used? And also where did you take your doors to be stripped? Mine were boxed in like yours too.

    Great work, Emma x Where abouts are you in Manchester?

    Reply
    • Christine says

      29/01/2014 at 18:20

      Thanks, Emma! The company we used is called Wisdom Fireplaces in Levenshulme. It was £15 per tile, plus a one of fee of £30 if they have to do any work to the template file (in our case the scanned image was okay).
      It’ such a shame that people boxed up the original doors, removing all of the covers was one of the first things we did in the house. We took our doors to be stripped at Kwick Strip at the Antiques Village in Levenshulme. It took a week (although it can be done quicker) and was £15 per door.
      Good luck!
      Cx

      Reply
  3. Magali@TheLittleWhiteHouse says

    29/01/2014 at 12:06

    It looks aboslutely amazing!

    Reply
    • Christine says

      29/01/2014 at 13:08

      Thanks Magali! It’s such an improvement!
      Cx

      Reply
  4. Jessica@CapeofDreams says

    29/01/2014 at 02:17

    What a great solution! I am glad that you did not get rid of the original tile as so many people would. How much did the tiles cost to have printed, if you don’t mind me asking?

    Reply
    • Christine says

      29/01/2014 at 08:52

      The tiles were £15 each. Whilst it’s not cheap for a tile, it’s actually less than buying original ones!
      Cx

      Reply
  5. Antonia Ludden says

    28/01/2014 at 16:34

    Great job, you would never know looking at the photos, and what a lovely find! We tried to match up some taupe tiles on our 1930s fireplace that were missing and broken when we moved in. We couldn’t get the same colour, so opted for some darker brown ones as a contrast and it has worked pretty well. In fact most people assume the fireplace was always like that! You can see our fireplace here

    Reply
    • Christine says

      29/01/2014 at 08:57

      Thanks Antonia! Your fireplace really looks like it was meant to be that way! I actually really like the contrast that the darker tiles add. More importantly though – I love your door handles!
      Cx

      Reply
Painting Checklist

Our Favourite Tools

*Contains Affiliate Links*

Things To Know

ABOUT US

CONTACT US

DISCLAIMER

Privacy Policy

Shop Our Home!

OUR FAVOURITE TOOLS

SHOP OUR HOME

Disclaimer

As an Amazon Associate I earn from qualifying purchases.

Please read our full disclaimer here!

Let’s Be Friends!

Keep Up To Date!

Subscribe for exclusive content and tutorials!

Thank you!

Copyright © 2022 · Little House On The Corner · This Website is powered by Cloudways and the Genesis Framework