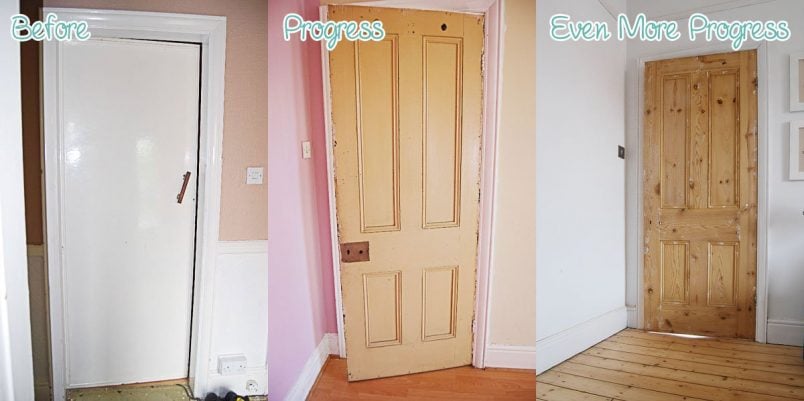
After sharing our fancy, newly repainted door frames with you at the beginning of the week, we have another door related update to share with you today.
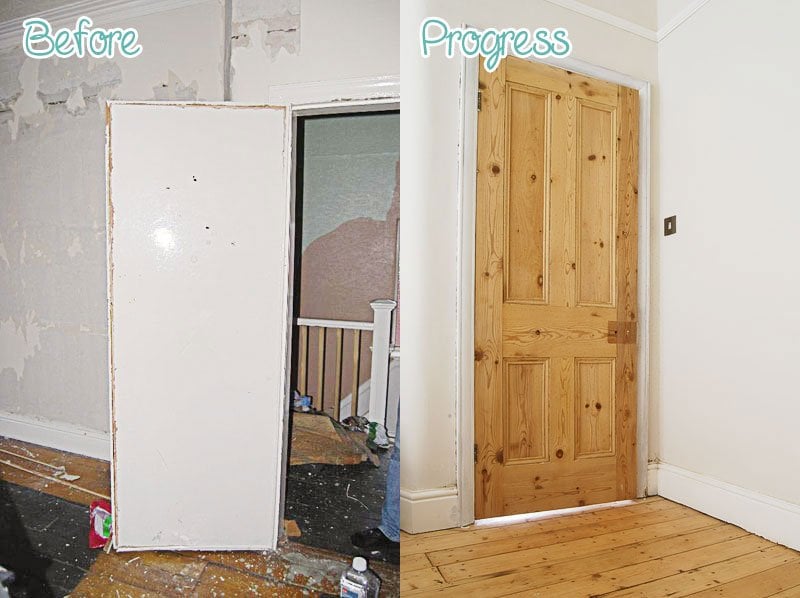
As you all know, our doors are – at least for the most part – in a pretty poor condition. When we first moved in, they were all boarded up and all of the period detailing was hidden. After removing the panels they didn’t look much better either.
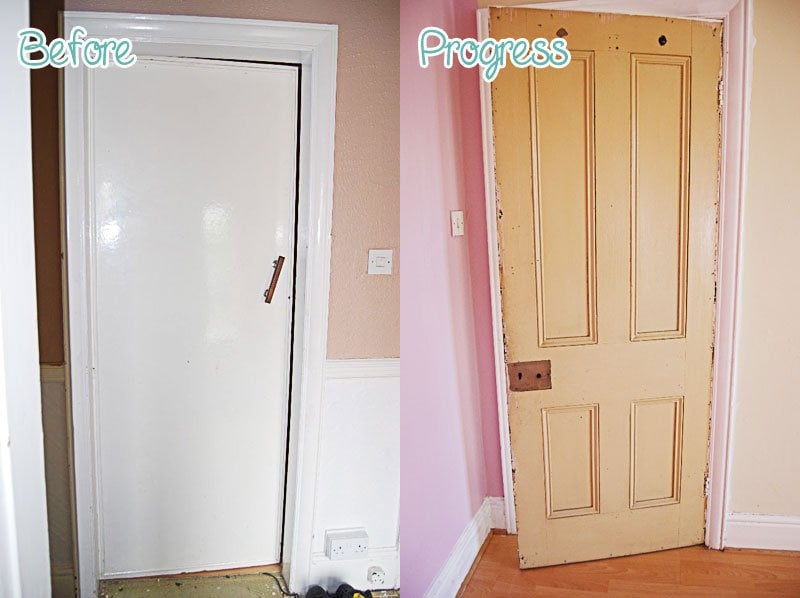
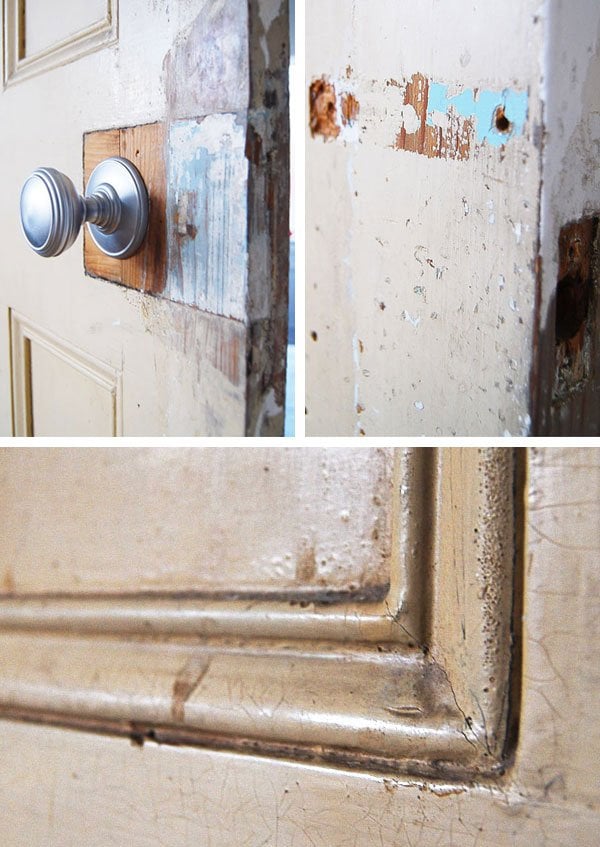
There were hundreds of little holes from where the boards had been nailed to the doors, loads of chips and dents and like all other woodwork in the house, everything had been covered in layers and layers of paint.
Because of all of the stripping and sanding that we’ve been doing to our upstairs door frames, we really couldn’t leave the doors in their current state for much longer. It just seemed a shame to put so much work into the frames and then still keep the ugly doors.
So, we’ve been working on them, too!
As you can probably guess, we didn’t actually strip all of the doors ourselves. It would have taken us weeks to remove all the sticky paint of them all, so we decided to take them to be chemically stripped. As the old paint contains lead, it’s really the only sensible choice, too. At £15 a door it was certainly a great investment and saved us days of stripping away the old paintwork.
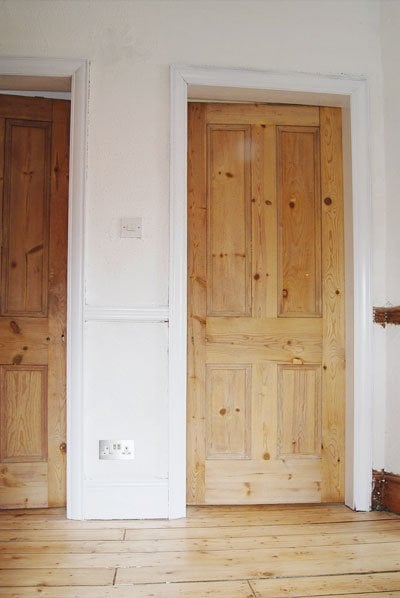
A few little bits of old paint still need to be removed and of course they’ll need sanding, but compared to if we’d stripped them ourselves, the work is minimal. It really does feel like magic!
It’s hard to believe someone boarded up these lovely original period doors.
Now all we need to do is sand and paint four doors…this may take a while.
Have you ever discovered any hidden period features? Have you ever had any doors stripped? Do you have any door painting tips?
Maria says
They look great! Could I ask who you used to strip your doors please, as we are about to start our refurbishment of our 1850’s Victorian villa but are struggling to find a repetable company to use in Liverpool area
Rachael says
I love your blog – our house is an Edwardian mid-terrace in Liverpool and we’re doing/want to do just about everything on here! Just finishing restoring the fireplace in the master bedroom, what a bugger of a job but it already looks fantastic, thank you so much for the tips. These internal doors are just like ours were, but ours were so damaged we had to replace throughout – no draughts at least! I’ve not pulled up any carpet/laminate here yet but I would be delighted if the floorboards are in good nick like yours and hearths are in situ. Good luck with the rest of your projects, I will be reading and trying to gain some wisdom!
Christine says
Thank you, Rachel! That’s so kind. Restoring an old house is so much work, but it’s also so rewarding and worth while. If you ever get fed up, just take a look at your finished fireplace and you’ll remember why you’re doing it!
Happy renovating!
Cx
Dawn says
I’ve read so many horror stories about doors falling apart after being dip stripped. I take it you were happy with the condition they came back in? Tentatively considering getting ours done.
Christine says
Glad we didn’t read those stories, Dawn! We’re really happy with the result. There are still a few small spots of paint that’ll need removing and everything will need sanding, but all in all it had saved us so much work and time. They’ve also come up much cleaner than the ones we stripped with the heat gun.
Cx
Daisy says
Hi. Love your blog. Its given me hope, as we’re doing up a house of similar age in bristol. If you don’t mind me asking, where did the door stripping for £15 per door? Ive been quoted 50 qiid per door! We were delighted to discover under 60s boards and beads we had original doora like yours! We have 8 to strip though.
Thanks x
Christine says
Thanks Daisy! We took our doors to be stripped at Kwick Strip at the Antiques Village in Levenshulme. It took a week (although it can be done quicker) and was worth every penny!
Cx
Daisy says
Hey there. Thanks for the tip. Ive found somewhere local that will do non glass panel doors for £15!
Do you know of any other blogs like yours, about UK specific interiors and restoration? Have just about devoured all your brilliant posts! (Perhaps I should just get on with my own house lol)
All the best x
Christine says
Always happy to help if we can! There are some great UK blog out there. I particularly love https://welliguessthisisgrowingup.co.uk/, https://1910housetohome.wordpress.com/ and https://www.swoonworthy.co.uk/.
Happy reading!
Cx
Michael says
They look really good! May I ask, where did you get the silver door knob from. Keep up the good work!
Christine says
Thanks, Michael! The door knobs are Delamain Plain knobs in satin with concealed fixings. There are loads of suppliers (can’t remember where we got ours) but if you search on Google, you’ll definitely find them.
Cx
caitlin says
Wow. Worth every penny, er, I mean pence. -Caitlin
Christine says
Definitely! It would have taken days – if not weeks – to strip them by hand.
Cx
cherie says
Hello! I found your blog while searching for renovation tips. very inspiring work! You’ve done a great job on the house so far. The doors look lovely stripped, especially next to the floors – personal preference is unpainted as they look so nice as they are!
Christine says
Glad you found your way over to us, Cherie! I’m tempted to leave them as they are, too. But if you look at them close up, they are really quite dinted and marked. For a while at least we’ll leave them as they are…
Cx
Magali@TheLittleWhiteHouse says
They look amazing! You are so lucky to still have the original doors! I only had one upstairs and I couldn’t keep it: people had cut it to make it shorter right in the middle of the bottom moulding!
Christine says
When we first viewed the house I was already so tempted to remove one of the door panels, just to see if the original doors were still underneath! We’re so lucky, I know!
Cx
Ian says
The doors look so great I’d be tempted just to oil/wax them instead of painting :-)
Christine says
Thanks, Ian! I’m still really undecided on what to do with them, but I am tempted to leave them unpainted!
Cx
Cindy says
I agree. My Vet would NEVER let me paint them. They are so pretty, and I love the look of wood against the crisp white.
Christine says
Ohhh, it’s such a difficult decision! Originally they would have been painted and we already painted our living room and bathroom doors a while ago… I guess we’re going to have to sleep on this one for a while.
Cx
Jude says
I can’t believe your doors were boarded over. Crazy!! Our doors were all (badly) varnished so sanding was easier and they’ve come up really nicely now painted in eggshell. Some were original and others, we think, are 50s/60s.
Tips for painting doors? Cling on to your sanity!! We did 12 internal doors in total at the same time as the frames, skirting, chair rail etc I honestly thought the woodwork would never end. I was looking for drips in my sleep.
Yours are looking ace – good work!! x
Christine says
Haha, looks like I’ll have my work cut out! At least I only have 5 doors to do!
Cx
none says
You’re getting there! Keep up the good work.
Christine says
Thanks. Doesn’t always feel like it though…
Cx