After a fairly long and very well earned break from stripping, sanding and painting we’re back at it again! Having spent around 250 hours stripping and sanding our staircase, restoring our bathroom and living room door as well as a load of skirting boards throughout the house, stripping and sanding has turned into one of our most hated DIY jobs.
One of the only things that keeps us motivated is looking at our before and after pictures. So let’s start right at the beginning… this is what our upstairs hallway looked like when we moved in.

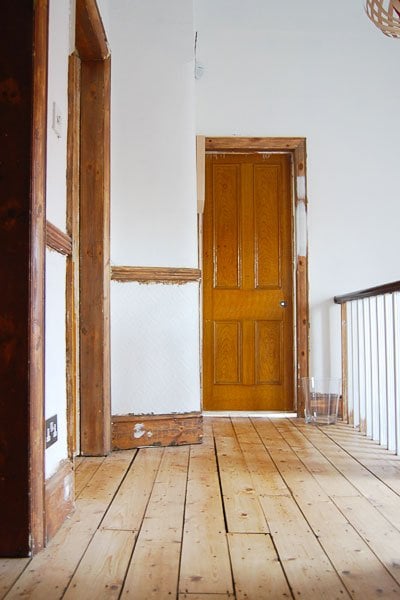
Not a pretty sight, is it? After a coat of white paint, removing the carpet, sanding & varnishing our floorboards it already looks a lot better.
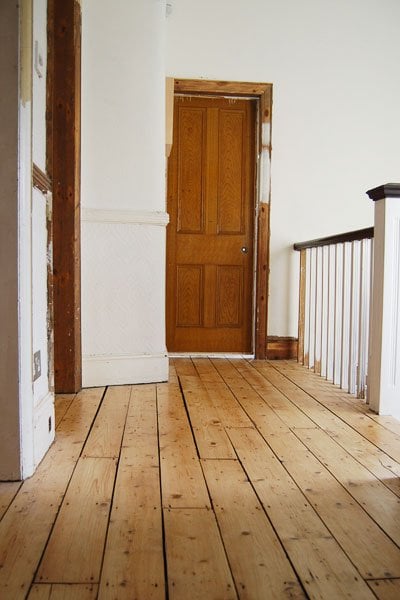
There are obviously a lot of things that still need sorting, but from a distance, most things don’t look too bad. But pictures in Blogland can be deceptive and as you get up close it’s a completely different story!
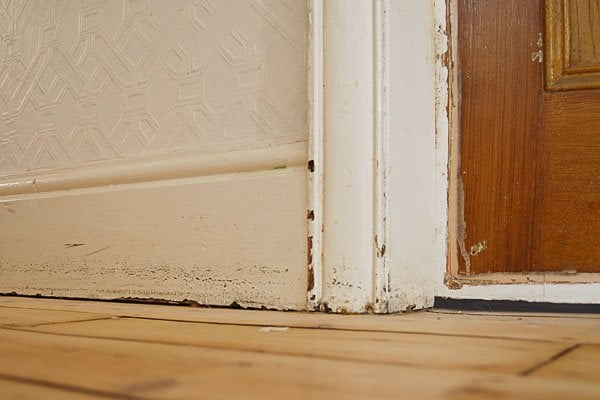
One of the things that we’ve been putting off sorting is our skirting boards.
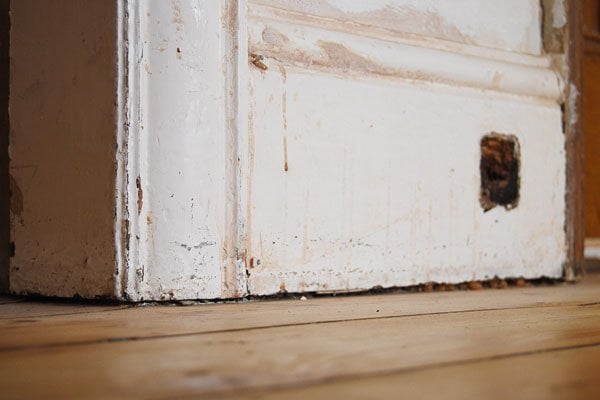
Having removed what felt like tones of paint when stripping everything else, getting out our heat gun again is not a job that I’ve been looking forward to. After living here for over 3 years, the messy paintwork is admittedly something that just sort of blends into the background and we don’t notice anymore.
Now, I know that a lot of people tend to just paint over skirting boards and wonder why we go to the effort of all stripping and sanding, but for us, it’s the only real option. Stripping away the old layers of paint really does make a difference and gives a far superior finish to the finished surface.
We’re not just patching up and going for a quick makeover here. As much as we’d love to be able to just get out a can of paint and share amazing before and after images with you every week, here in our Little House On The Corner things tend to take a bit longer.
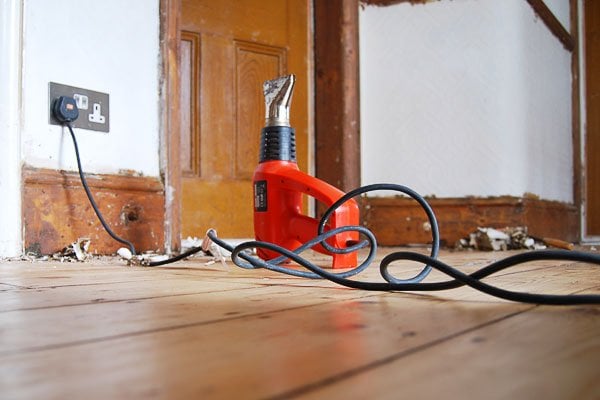
It’s taken about 2 days (on and off) to strip 1 door frame (we’d already done some of the other ones), skirting and dado rail on the hallway side.
Everything still needs sanding, which will probably take another day or so.

Then we can move on to stripping and sanding the doors. It’s just never-ending stripping fun around here.
As gunky as the hallways still is, it’s already a huge improvement on the chipped and yellowed layers of paint.
Stripping paint is definitely my most hated DIY job. Do you have a home improvement job that you dislike? Or do you have a job around the house that you really enjoy doing? Do you hate stripping paint as much as we do? We’re thinking of purchasing a paint spray gun to paint all of the doors. Do you have any recommendations?
Phil says
Hi guys
I certainly sympathise with you on the stripping, sanding and painting – today I am half way through my lounge skirts and picture rails. I am having to do every single bit of woodwork in the neglected victorian house I am renovating – it’s difficult to keep going sometimes isn’t it as it just seems like an endless list of jobs!
Love the site though, some fantastic ideas and tips and great inspiration to keep going!
Cheers
Phil
Christine says
Keeping motivated is definitely the hardest part about DIY! Especially when stripping and sanding stuff. I really know what you’re going through – spent the whole of today sanding our dining room door. Just remember that it’ll be worth it in the end.
Cx
Sharon says
Hi
Came across your website yesterday can’t remember how but am so glad l did, I have enjoyed reading and looking at all the projects you have taken on. You guys have done an amazing job! I have to say although stripping wood is a pain and a very time consuming job, l do actually enjoy it, i find it very therapeutic. We live in a edwardian house in west London and l have been on and off striping the staircase, doors, door frame, picture rails for over 10 years. In between l have had three children, moved abroad for two years then came back (thats why its taken so long). Like you sometimes l feel l have so much still to do but when l look back at my pics l can see l have done so much. Keep up the great work, love your website.
Sharon
Christine says
Thanks you so much Sharon! I have to admit, that I didn’t mind stripping the first frame or two – now it’s just tedious. I know it’ll be worth it in the end and we’re always happy to hear that we’re not the only ones that have to remove layers and layers of paint.
If you ever fancy stripping another door frame you’re welcome to pop round! ;)
Cx
Sarah says
I’m right there with you when it comes to stripping and sanding — I hate it! But it’s a necessary step when you’re dealing with 10+ layers of paint. It took me weeks just to do 3 doors recently, because I had to keep walking away from the project in order to keep my sanity. Just keep telling yourself, “It’ll be worth it, it’ll be worth it, it’ll be worth it…”
Christine says
Don’t remind me! We’ve got 5 doors to do yet! You’re right – the only way to get through it, is yelling yourself how much better it’ll be.
Cx
Louise says
You are real heroes. But it really does get a lot better when you put in the time to strip the paint properly. Around here I think it was pretty ok paintjobs until the previous owner. 2-3 original thin layers of linseedoil-paint in dark green and dark red, then one thin coat of 50-ies almost-white paint, and then previous owners “quick fix” with modern waterbased icky-paint. Brush-strokes everywhere and the profiling (dont know the english word) all filled up… Repainting them with linseed oil is a joy for all senses, the wood heals up so nicely when it gets new oil. Quite magic. Also this type of paint is so thin it can be repainted again and again without the need for stripping…
Christine says
It’s really weird what some people think looks good and is a good idea!
I totally agree with you – linseed oil is amazing! But more importantly I didn’t know linseed paint existed! Will definitely be checking it out!
Thanks!
Cx
Louise says
That is a surprise, I always pictured brits to be very concerned about heritage buildings and preservation, and just assumed that included materials as well. Interesting. The paint was used for everything (indoors, outdoors, wood, metal, plaster) until the 30’s when synthetic paint kicked in. Synthetic dries faster and is easier for industrial production. Linseed paint requires a level of craftmanship to mix. It is just linseed oil and pigments, minerals mostly. You paint it thinly, 2-3 coats, 1-2 days between each coat,. For large scale construction I think the waiting period is too long, for us regular mortal joes one paint job a day is quite sufficient…. It gives a real matte, perfect finish, where you still experience the woods structure. This is my favorite paint maker: you will find it used just about everywhere on swedish renovating old house blogs, http://villanagorlunda.blogspot.se/ It works in new houses as well i guess, but there time is such an issue. If you are the kind of person who spends a zillion hours scraping paint you are likely to enjoy watching paint dry.
Louise says
totally spammin you, but found this!
http://www.countrylife.co.uk/property/article/530880/Linseed-Oil-Paint-The-future-of-paint.html
Christine says
Thanks for all of the info! I so with I’d known about this before I painted everything! I can’t wait to try the paint out on our next project!
Cx
mary says
I’m ready to pull old flooring, too, and would love it if I can pick your brains a little…
Are those boards you sanded and refinished (lovely job, by the way) really subfloor? Or is it finish flooring? Are there gaps between some of the boards? How do you clean? Did you put down a line of clear caulk to keep gunk out? I am 99% sure my subfloor is going to be 80 year old pine, which should be able to be finished as flooring… but I worry about the gaps. (If there are any, that is… pulling flooring, who knows what the hell I’ll find under there!)
Christine says
Yes, the floorboards are subfloor and there are gaps between some of them – that’s the way things used to be built here in the UK. There isn’t much dirt in the gaps and cleaning isn’t a problem – just vacuum and wipe as you would any other wooden floor. We haven’t sealed the gaps, as we have insulated under the floor so aren’t concerned about draughts. There are special strips available to seal the gaps if you are concerned though. Whatever you do – don’t caulk between them! The caulk won’t hold up to the movement and will not only get dirty and messy, but also fall through the gap anyway.
You never quite know what you’re going to find when you take up anything in old houses – that’s kind of part of the fun! The one thing that you shouldn’t ignore though is your insulation! Depending on where you live, things could get very cold if you don’t do something!
Good Luck!
Cx
PS. You can check out how we sanded our floor here.
Magali@TheLittleWhiteHouse says
I hate stripping as well, but you are so right to do it. I had part of my ceiling painted by a profesional when I broke rib: he didn’t sand enough of the old paint and it shows! But I’m not redoing it!
Christine says
Glad we’re not the only ones! Isn’t it weird how sometimes doing a job yourself gets a better result than when (some) professionals do it! Your ceiling looks great, Magali – I’m pretty sure you’re the only one that notices any imperfections!
Cx
Jude says
I guess we were lucky that all our woodwork (on the whole) was varnished and not painted. So we ‘just’ had to sand. Unfortunately the varnish was icky browny red gunk that mashed our sander and the dust got EVERYWHERE.
Like you though, we could have just slapped paint on top and lots of people questioned why we didn’t. But – we really did achieve a great finish in the end (pretty much exclusively used F&B eggshell, marvellous stuff!) so it was totally worth it.
Sanding was certainly my most hated job, without a doubt. Painting woodwork was then incredibly monotonous yet strangely satisfying.
You have my full sympathy and total admiration. And a spray gun for doors is a genius idea that I wish I’d have thought of 6 months ago!
Jude (who is still painfully jealous of your lovely floorboards).
x
Christine says
Yep, it’s one of those things – if you want the finish, you’ve just got to put in the work! Glad we’re not the only ones going to so much effort though! Whenever we’re stripping something, I so look forward to the painting part, but after a day or so of painting, I end up sick of that, too!
Cx (who admittedly still loves her floorboards!)
Jessica@CapeofDreams says
Too bad no one sticks euros in your belt when you do this kind of stripping. I’m sure the cash could be useful.
Christine says
Now that’s what I call a good idea, Jessica! That would make stripping almost bearable!
Cx