I’m giving away my interior photography secrets and you may be surprised at how we really create the light and bright images you see here on the blog and over on Instagram.
After over 9 years of blogging it’s safe to say that we’ve learned a lot about how to improve our interior photography and if we look back at the photos we shared when we first started on our DIY adventures, I can’t help cringe at how bad they were.
If you think I’m exaggerating, just take a look at this picture of our living room that we shared way back in 2012 …
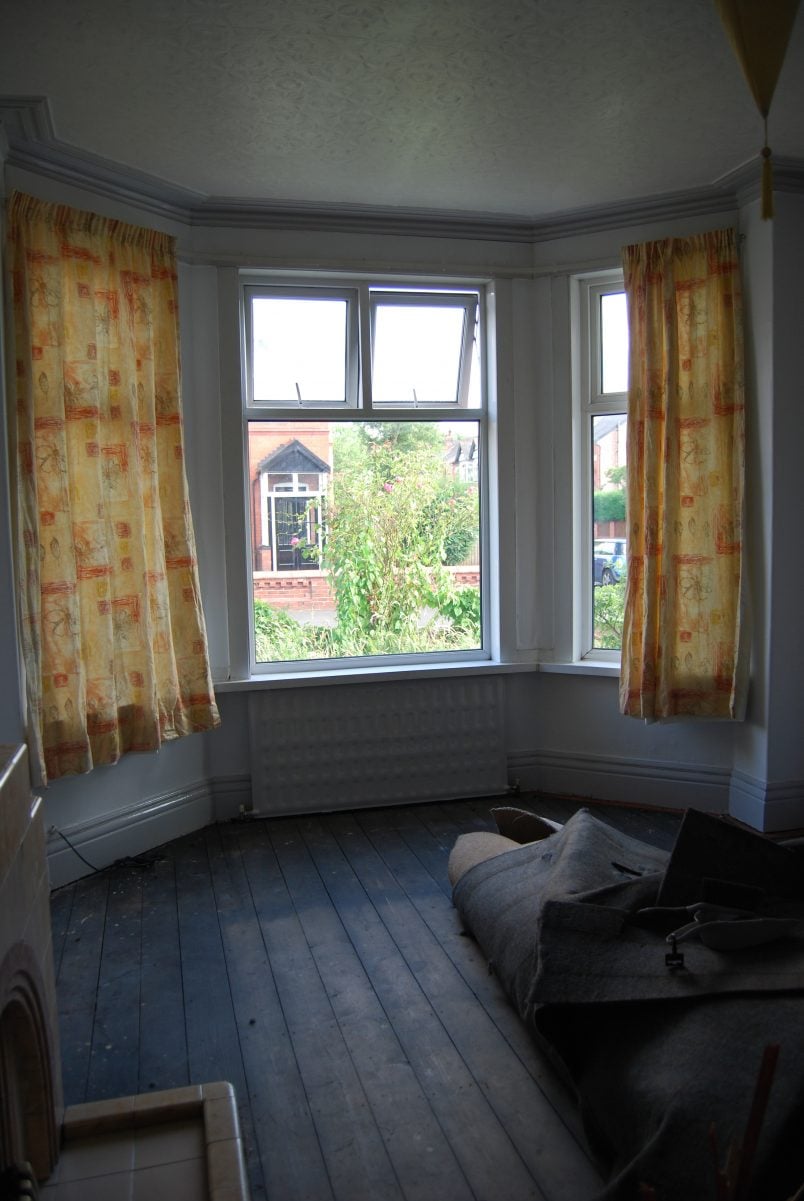
I honestly can’t believe how bad our interior photography used to be! We’ve come a long way since then and have even had our interior photos featured in magazines!
Whether you’re sharing pictures of your home on the internet, on Instagram or you just want to be able to take nice pictures of your home, these interior photography tips will help you quickly and easily improve your photos!
Of course, it’s always good to practice and learn how to use your camera, what angles work best and constantly work on improving your photography skills but there are a couple of quick fixes that you can implement immediately to instantly improve your interior photography for free!
Here are our top tips on how to improve your interior photography skills:
Best camera settings for interior photos
What settings you use will completely depend on the look you are trying to achieve. Do you want a super sharp and crisp photo or would you like it to be softer with a blurry background? Are you in a dark space or in a super bright room with lots of natural light?
All of these things will dictate what settings you have to use on your camera to get the best results. Here are some tips to get the right camera settings for interior photos.
Shoot in RAW
Almost every camera will allow you to shoot in either RAW or JPEG format. Think of RAW format as a traditional negative and a JPEG to an actual physical photograph.
The RAW file saves all data that the sensor of your camera records. Unlike a JPEG, RAW files also aren’t compressed. This means that the image quality is higher and you have more flexibility when it comes to editing your photos, too.
You don’t necessarily need an expensive camera to shoot raw! Check your mobile phone as most newer phones are capable of shooting in raw, too!
Don’t Shoot In Manual Mode
Yes, I know this is a highly controversial thing to say and honestly, yes, if you can you should definitely shoot in manual mode but there is an alternative! The next best thing to shooting your interior photos in manual mode is using aperture mode.
We did this for years (and often still do) as it gives you all of the control over how the picture looks without having to worry about the correct exposure.
The aperture will give you the most creative control over your images. If you use a small aperture (around f8 to f16) you will achieve completely crisp images that are sharp and in focus throughout).
The larger the aperture, the more depth you’ll create in your images. This is also how you create a blurry background known as bokeh.
When shooting in aperture mode, you are basically telling your camera which aperture you want to use and it will automatically calculate everything else for the correct exposure.
Both images above were shot using exactly the same settings (f1.4, 1/8000 sec & ISO 320). By just moving the point of focus from the foreground to the background you can create a completely different feel and accentuate different parts of your image.
Shoot In Manual Mode
If you have a bit more time to invest, it’s a good idea to learn how to shoot in manual mode. Don’t panic! Shooting in manual mode is not as scary or difficult as it sounds and it will give you the most creative control over your images.
[twenty20 img1=”35035″ img2=”35037″ width=”100%” offset=”0.5″]
So, how do you step up your camera to shoot interiors in manual mode?
As a rough guide to get you started, set your ISO to about 100, set your aperture to get the look you’re after (more on that in a moment) and then it’s just a matter of adjusting the shutter speed until your image is correctly exposed.
ISO
It’s always good practice to try to keep your ISO as low as possible as this will avoid your finished image becoming grainy. We recommend using a setting between ISO 100 and no higher than ISO 640 for the best results (although this will also depend on your camera).
Aperture
As I mentioned above, the aperture will give control over the depth of field your image has. Want a blurry background or foreground? Then adjust your aperture to open as large as possible (the lower the f-number the larger the aperture).
Shutter Speed
Adjust the shutter speed so that your image is correctly exposed. The small screens on cameras can make it difficult to see if you’ve exposed your image correctly so use the histogram to double-check that you’ve not over or underexposed anything.
Histogram
The left side of the histogram represents the dark areas and the right side represents the light areas of your image. The middle is everything in between (the mid-tones).
If the histogram is too far in either direction or if there are huge spikes on either side of the histogram your image is almost certainly not correctly exposed. If the spikes fill the whole side of the screen it also means that you’ve over or underexposed (depending on which side the spikes are on) the image so much that the information has been lost and can’t be recovered.
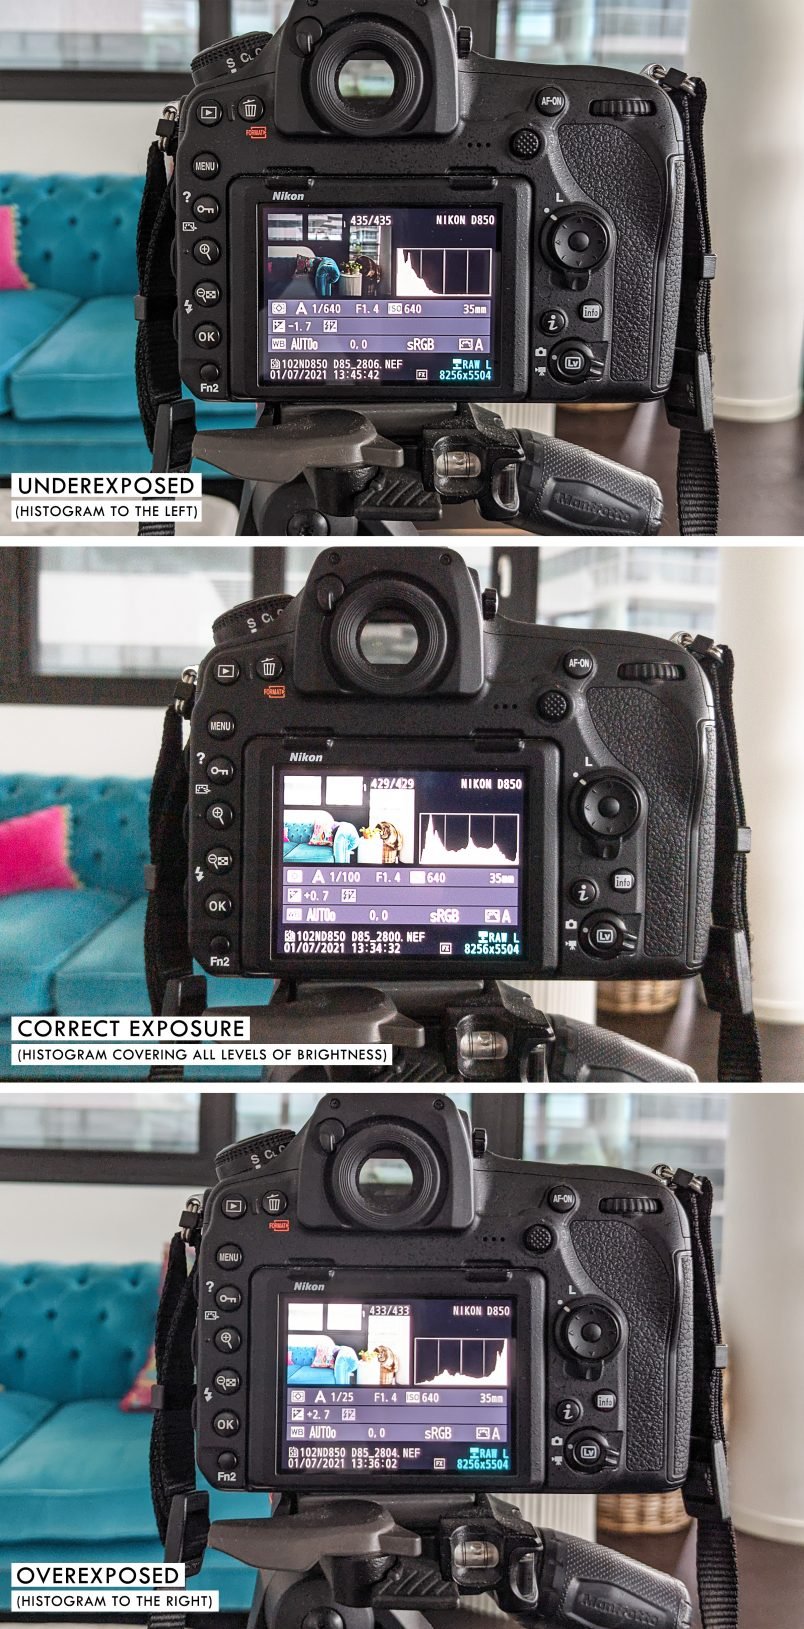
You can fix a lot of issues in the editing process later on but if you have areas of the image that are completely white or completely black there just won’t be enough information there to retrieve.
Tip: I often slightly underexpose my images if I’m unsure if my exposure is right as it’s easier to recover information from the shadows than from the highlights.
Lighting
Use natural light
Let as much light in as possible to give you light and bright rooms to work with. You don’t want too much light, though! Cloudy days are your friend when it comes to photographing interiors. As much as everything looks prettier in the sunshine, for interior photography, the softer light on cloudy days is easier to cope with as you don’t end up with harsh shadows and very bright (potentially overexposed areas).
This post contains affiliate links. We only recommend products we love and think that you will, too! Read our full disclaimer here.
Use A Tripod
A tripod is essential and will make it so much easier to get the perfect image.
Lighting in interiors can often be tricky and you may have to expose your image for a fairly long time which, if you’re shooting by hand, will mostly result in a blurry image. You could, of course, turn up the ISO so that you can lower your shutter speed but then your image may turn grainy – it’s always a balancing act!
A tripod will not only help you take sharp photos it also makes composing the image easier as you can take your time and adjust it to the perfect angle for your shot. It will also help you get all of your lines straight and parallel (more on that later).
Another reason for using a tripod is to be able to take multiple shots of the same image at different exposure levels. This is particularly helpful when it comes to taking pictures with different levels of brightness.
You take one picture for the highlights, one for the mid-tones and one for the shadows.
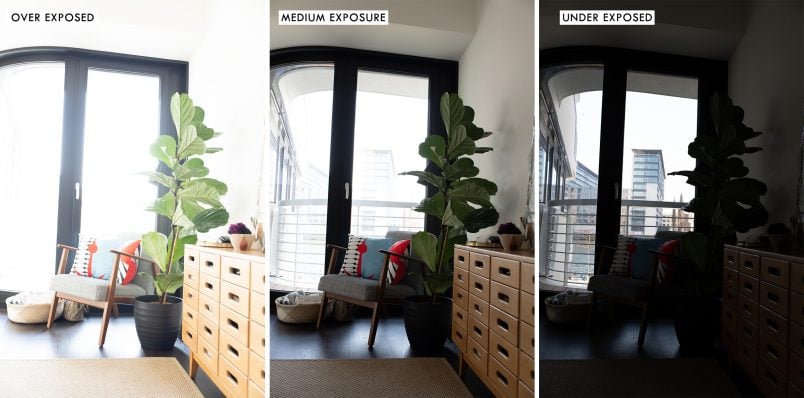
Then you blend these 3 images together (just select the images you want, right-click and select “merge to HDR” in Lightroom) to give you a lot more dynamic range to work with. After merging the 3 images into one HDR image you can edit your photo as you would any other picture.
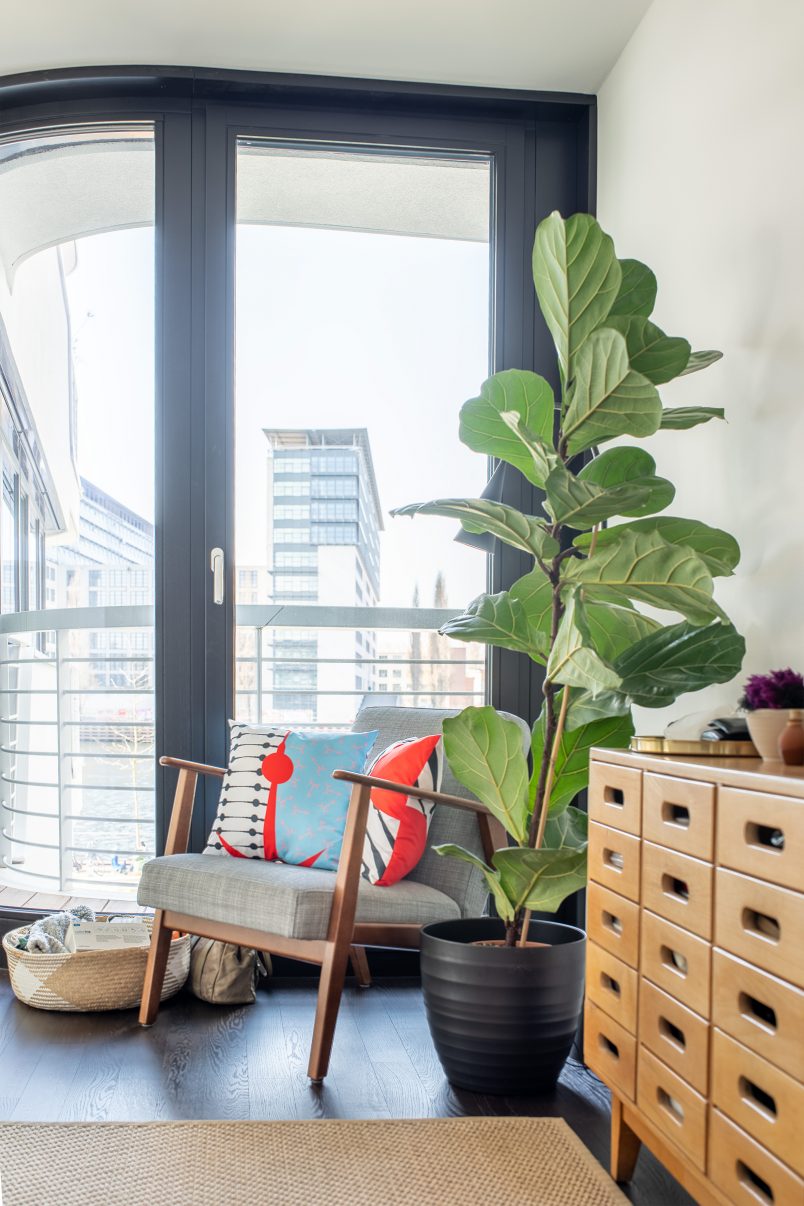
Here’s what the picture looks like when you merge all three together.
I wouldn’t be able to take pictures of our current home if I didn’t use this method as there are so many windows!
Adjust The White balance
If you shoot in RAW, you can adjust the colour temperature later on in post-production but anything you can get right while you are shooting will help you save time in the editing process. Just choose the setting that’s right for your lighting situation and, if in doubt, just leave it on the auto setting which generally does a good job!
How To Take Interior Photos
This post is more about how to edit interior photographs and what technical settings are best to take interior photos. We’re still not very good at the styling aspect of photography but there are a few things you can do to make your interior photographs look better even without spending hours perfectly styling your room with a tonne of flowers and random accessories.
Straight Lines
Always make sure that the lines in your photo are horizontal and vertical. Tilting lines are not pretty and will instantly give your photograph an amateur look. Take your time to compose the image so that your lines are straight (a tripod will help with this, too).
Sometimes it can be impossible to get the angle you want, especially when photographing interiors where you often don’t have enough space to take a step back. Obviously, it’s best to get your lines as straight as possible when taking the picture, but you can tweak them when editing your photos in Lightroom, too.
Mix It Up
Take wide full-room shots as well as close up photos that show more of the details add personality and make a home a home.
Shoot lower than you think
Don’t hold your camera too high when taking interior photos. About chest height is perfect – you generally don’t want to show too much ceiling or too much floor. There are obviously exceptions though! If you want to show off an ornate ceiling or tiled floor play around with the angles and see what works best.
Add Foreground Interest
Add more interest to your photos by creating a feeling of depth. The layered look will focus your attention and guide you to other parts of the picture.
This doesn’t mean that you have to place vases of flowers in the front of every picture though. Creating depth can just as easily be created by photography through a doorway or having a piece of furniture in the foreground.
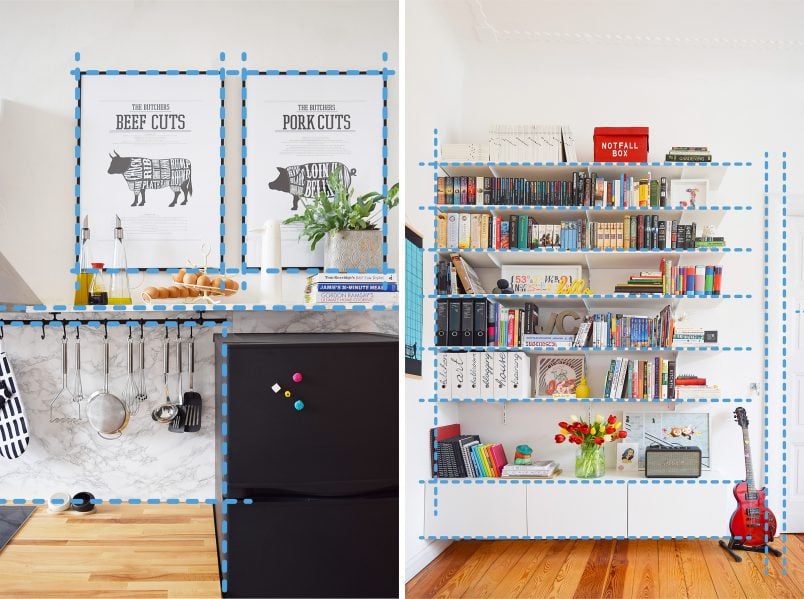
Golden Ratio
This is a rule that you can find everywhere – not just in the art world. It’s a proportion that naturally occurs in nature, too. Very roughly, it’s the ratio of ⅓ to ⅔. Almost every camera (including your phone) will allow you to set it up so that you can see lines on your screen representing this ratio.
So, how can the golden ratio improve your interior photography?
Use the lines on your camera screen and place items of importance on these lines or, even better, where the lines cross. This will create an image that’s more pleasing to the eye.
Editing
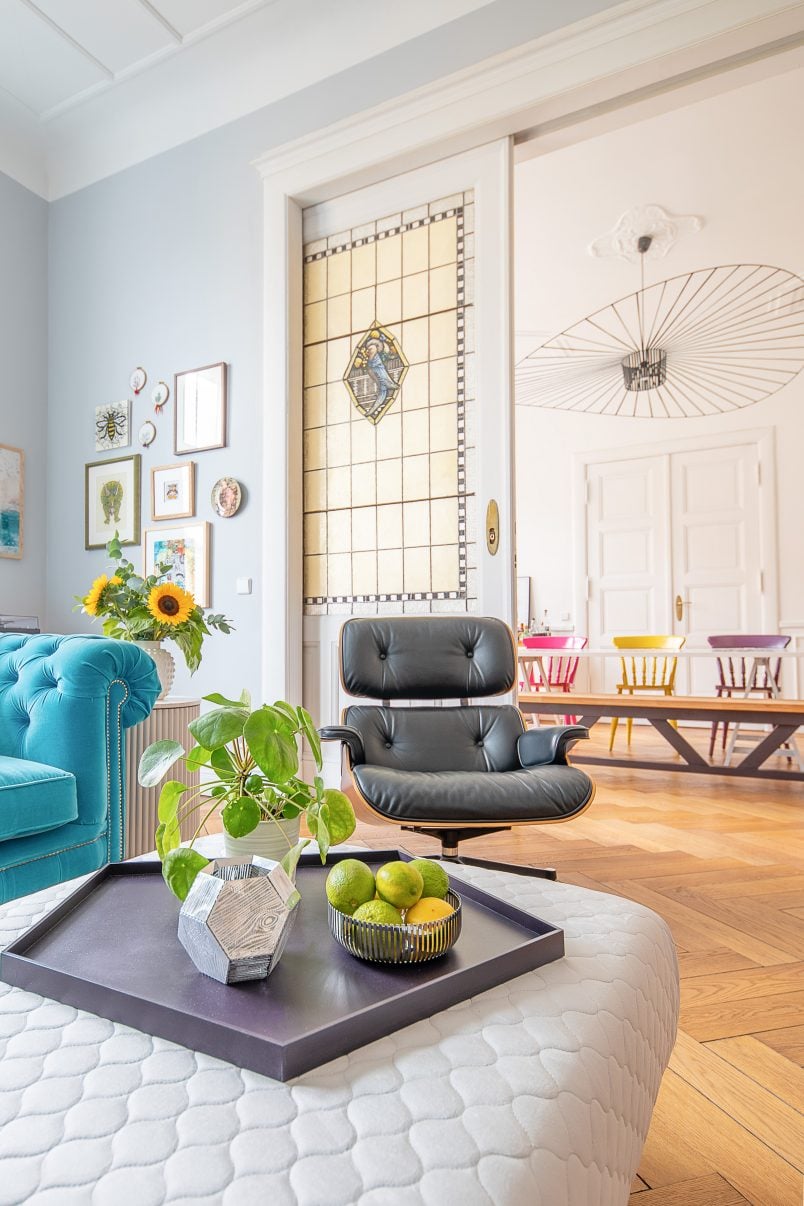
This is where we get into our real secret when it comes to good interior photography as a beginner. I’ve lost count of how many times we’ve been asked how we take our photos and how we get our interior shots to look so bright and light.
Honestly, it’s almost always down to the editing!
We use Lightroom to edit all of our photos both on the blog and on Instagram and it’s a complete gamechanger! It’s easy to use and will allow you to quickly make lots of adjustments to completely transform your photos. Best of all, it’s free to use on your mobile!
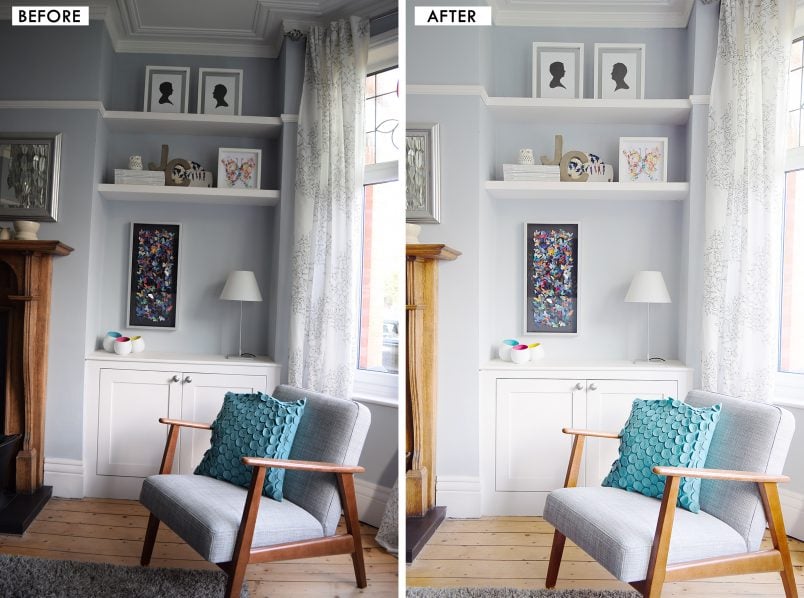
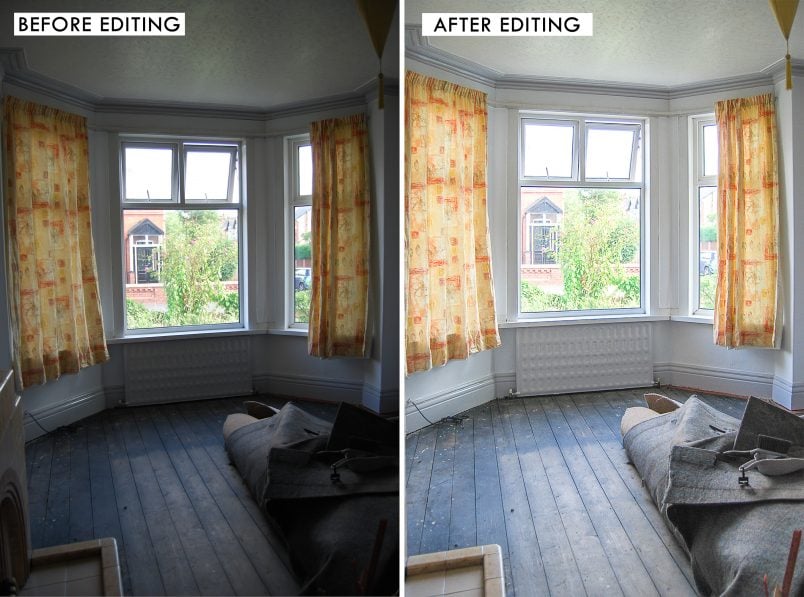
Don’t believe us? Then take a look at this picture of our living room!
[twenty20 img1=”34977″ img2=”34978″ width=”100%” offset=”0.5″]
You may think you have a bunch of pictures that can’t be saved but you’d be surprised at how much you can improve a picture with just a bit of editing.
How about the first images of our house in Manchester I shared? You’d think that it’s so bad that it couldn’t possibly be improved but take a look at what a bit of editing can do!
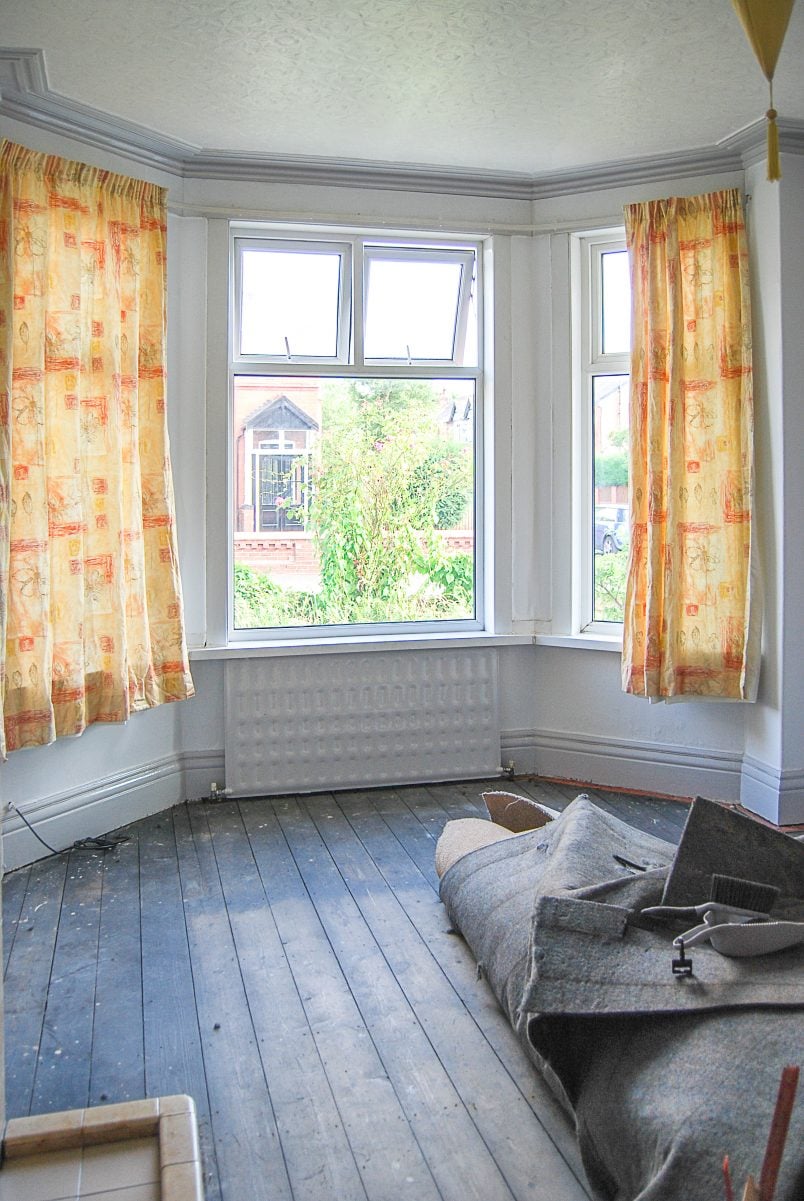
Okay, so the room is still awful but at least you can see what I’m actually showing you! (You can take the full tour of our Edwardian house and finished living room here). And, although it’s an old photo that was badly composed and badly lit, it’s amazing what a bit of straightening and running a preset over it can do!
To make the editing process even faster, we’ve set up presets in Lightroom that transforms our photographs with a click of a button.
It is so easy to use and even pictures that you think can’t be salvaged turn out great!
For the first time ever, we’re sharing our interior Lightroom presets with you! Yep, the exact ones we use to edit all of our photos!
[twenty20 img1=”34986″ img2=”34985″ width=”100%” offset=”0.5″]
So, what’s included in our brand new Lightroom Interior Presets Pack?
There are 8 presets that you can download to use on both your mobile and desktop to quickly edit all of your photos (not just interior ones)! Each filter is designed to enhance your photographs and create stunning and professional-looking photos.
It would be impossible to take pictures of our current home if we didn’t use Lightroom and our presets. There are windows everywhere making it almost impossible to get the exposure right. Lightroom allows us to fix all of those problems!
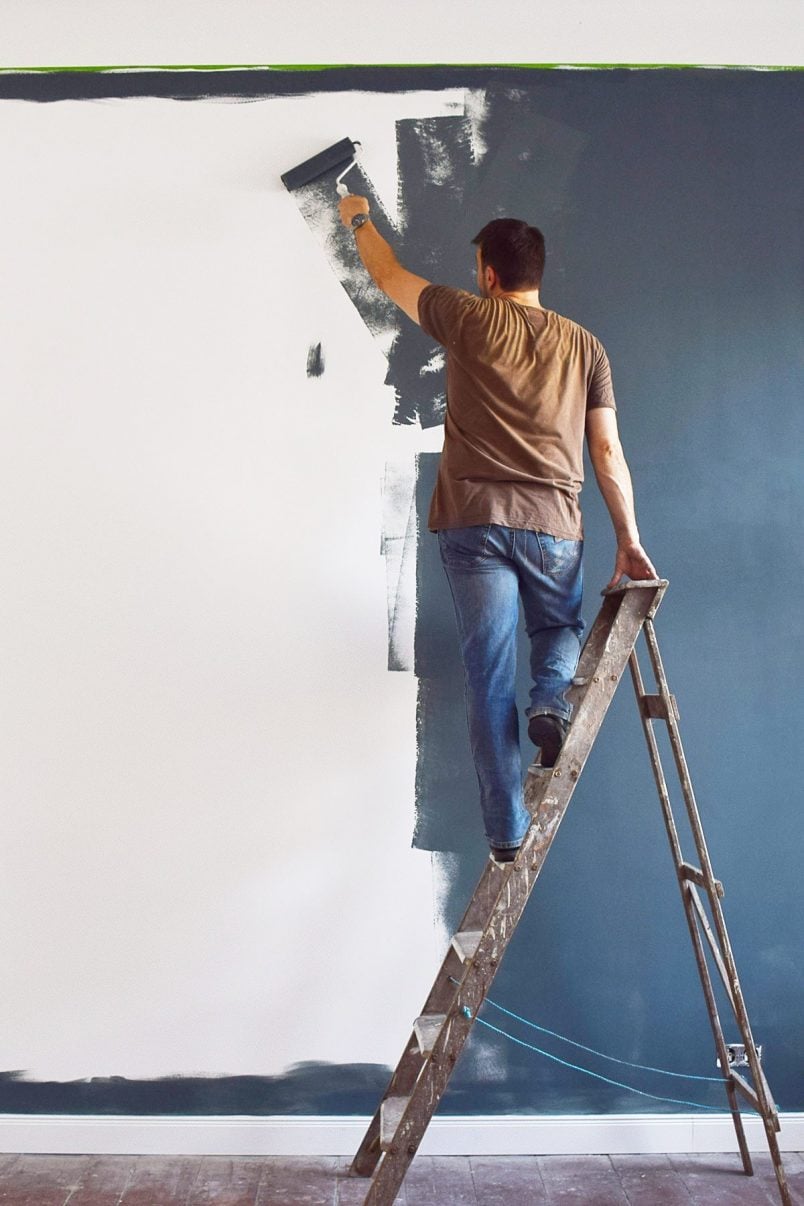
Get The Right Gear
There’s no need to go out and spend thousands on a fancy new camera and loads of photography gear but there’s no getting around the fact that it will make it a bit easier. The most important thing is to learn how to use your camera. Whether you’re using a DSLR or just your iPhone.
#D8BCBAPhotography equipment is expensive and we’ve very slowly been adding to our collection over a lot of years. Don’t feel like you have to spend a huge amount of money to get great results.
Even a basic picture taken with your phone can look amazing with the right editing!
[twenty20 img1=”35013″ img2=”35012″ width=”100%” offset=”0.5″]
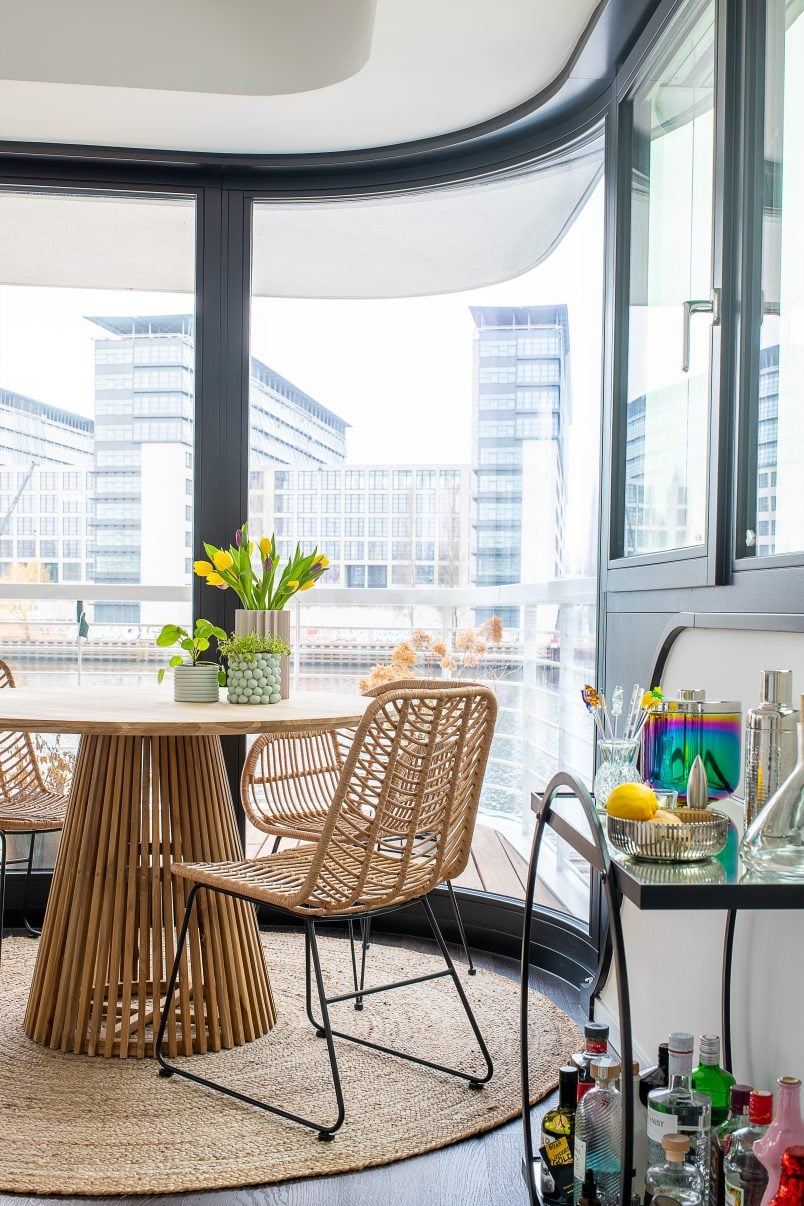
Having said all of that, if you do want to invest in a good camera, something that we think is important to look out for is the dynamic range, especially if you’re a beginner as it will help you if you don’t have the perfect exposure. The dynamic range is the ratio between the maximum and minimum measurable light. Basically, the better the dynamic range of the camera, the more information it will capture, especially in the lighter and darker areas of your shot.
Here’s a quick rundown of our absolute favourite photography gear (remember that it’s not just about the gear!) Although we have a lot more equipment, this is what we love and use every day:

Our Camera
I love this camera and we use it for almost every photo you’ll see on the blog and on Instagram. It has an amazing dynamic range which gives you lots of flexibility when editing.
Our Gorilla Pod
This is a great little flexible tripod that is practical when you are working in tight spaces. It’s flexible and allows you to wrap it around furniture or get shots that are really low.
Our Favourite Tripod
This is our go-to tripod that’s super lightweight but still sturdy. When it’s folded together it’s compact and doesn’t take up much space, too.
Our Favourite Go-To Lens
This is by far my favourite lens – EVER! It has an f1.4 which means that you can take photos with a blurry (bokeh) background. It’s 35mm which means that it’s great for wider shots as well as close-ups, too!
Our Wide-Angle Lens
A wide-angle lense is a great addition to your camera bag, especially if you shoot in tight spaces. It’s great for capturing full rooms but it can sometimes distort the shot a bit (but can easily be repaired in Lightroom).

Lightroom
We love sharing light, bright and vibrant photos and we use Lightroom to edit EVERY photo you see here. It’s surprisingly easy to use and makes editing photos quick and fun.
Keep Learning
Be patient and don’t be too hard on yourself. The more pictures you take the better you’ll get.
Over time, you’ll start to get to know your camera better, you’ll understand lighting situations and will be able to quickly adjust things to take the photos you want.
Break the rules and try new things. This is how you will develop your own personal style and learn fun new things!
The aim should always be to do as little editing as possible but as a beginner that can sometimes be easier said than done, especially if you are photographing interiors where lighting can be tricky.
Having said that, editing your pictures is a legit way to improve them and it’s something that every professional photographer does, too! Do what you want to create a photo that you are happy with!
Would you like to improve your interior photography skills? Do you edit your photos?

Leave a Reply