For months and months now, we have been restoring our staircase, bannisters and handrail. I have to confess – it’s taking forever and starting to drive me slightly mad. Although we’ve spent countless hours stripping and sanding, it’s still a long way off being completed.
This is what the hallway and staircase looked like when we moved in. The whole room was painted in brown and green and the original balusters were boarded up.

On the first floor landing, it looked like this.
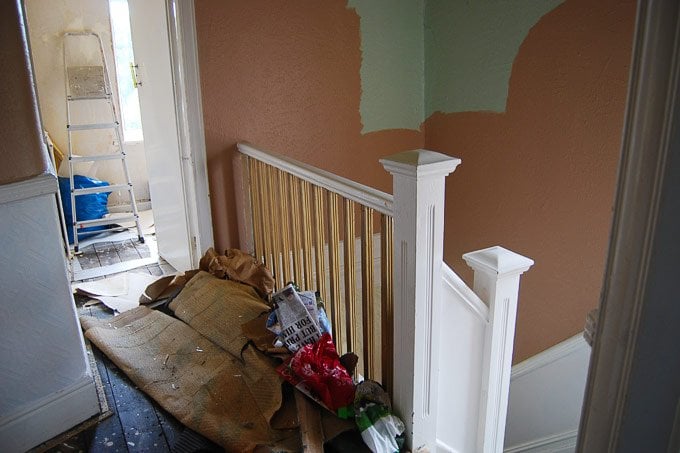
As usual, I was ever so slightly ridiculously impatient and removed the board that was covering the balusters before taking the picture. Just ignore the carpet and mess; I might have also been slightly impatient about that, too. Don’t you just love the green and brown paintwork? The people who used to live here must have just painted as far as they could reach from the landing. It’s definitely a unique style!
As with all the woodwork in the house, we are going to be painting the staircase with pure brilliant white paint. It may seem bizarre to go to all the effort of stripping and sanding the woodwork only to paint it again, but because of the number of layers of paint lots of the detail in the wood has been lost.
You can see that the fibre boards that were used to cover the balusters have also left a pattern in the paint.
The existing paint is also chipped everywhere, so if we just painted over it, we wouldn’t achieve the smooth finish we would like.
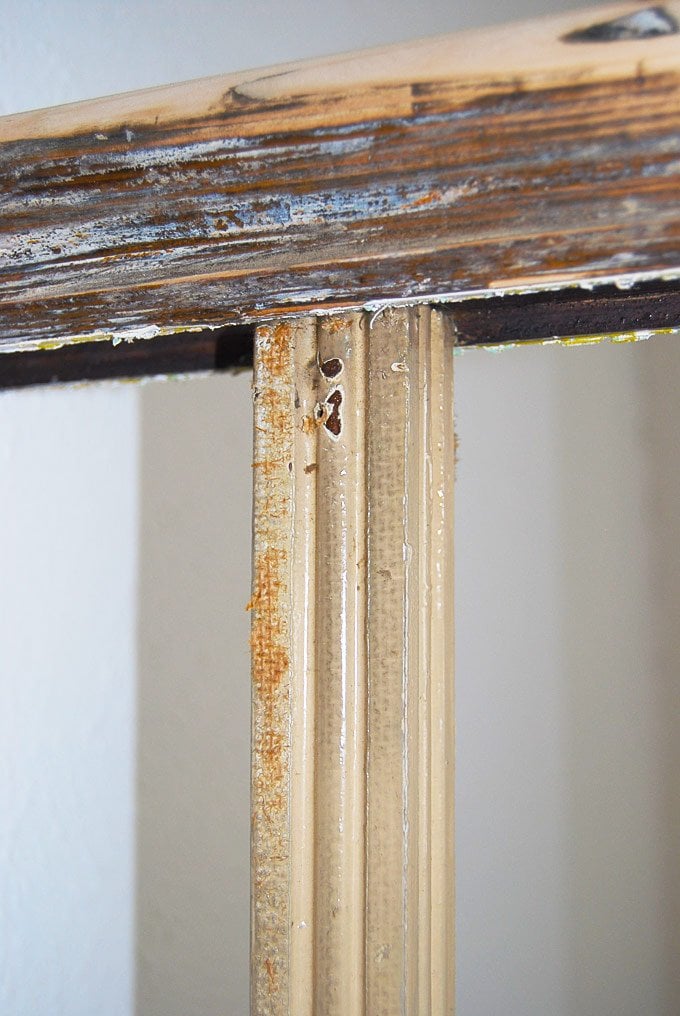
One of the layers of paint is different to the others. Most of the paint just seems to soften and peel away, but the layer that’s causing problems goes really gooey and just gets stuck all over the tools. It’s such a pain to remove, especially as it stays stuck in the decorative grooves of the woodwork.
This is what the surface looks like after stripping with the heat gun.

You can see that quite a bit of gunk stays on the wood so a lot of extra work is necessary.
After a lot of sanding, scraping and cursing it looks like this.

It’s really smooth and almost ready to receive its paint finish. Just in case you are wondering – we use 120 grit sandpaper to prepare any wooden surface that we are going to paint. Sometimes, depending on the condition of the wood, we might use coarser sandpaper to start with, but we always finish with the 120 grit paper.
Even after all of this work hallway still looks like this.

It may not seem much of an improvement, but you will just have to believe us, that it’s been a huge amount of work even to get to this stage.
All in all, I suppose our staircase restoration project is getting there. It’s taking much longer than we anticipated; I’m covered in nicks and cuts, and I seem to have not only sanded away bits of paint, but also my fingernails, I think I might have a slight case of tendonitis, but most of all I’m starting to get very fed up of sanding for hours on end without seeing much result. I’m sure our perseverance will be worth it in the end.
What do you think? Should we just have painted the woodwork without bothering to strip and sand every tiny bit of surface for hours? Do you think we could have taken a shortcut somewhere along the way? We’re still not there, so let us know if you can think of anything that will save us some time!
Anona Arthur says
Did you consider the lead paint and protect yourselves?
Christine says
Yes, of course, Anona. It’s always important to check for lead paint in older houses. We actually shared a full post about what to do if you find lead paint that you can read here.
Cx
Carolyne Milbourn says
Hi Christine. I’ve come across your post and it’s given me huge relief to read about your stair restoration and that it’s worth the hard graft in the end. Our staircase was covered in many coats of dark varnish and as we’ve been restoring our entire house, we wanted to get rid of the dark red/brown varnish, take it back to bare wood and paint it white. We have used paint stripper solution (soooo messy) and I’m now using a hand tool called a small wood scraper which is proving to be really effective but it’s going to take hours. Thanks for giving me the motivation to preserve with your story and beautiful end result
Christine says
Thank you so much, Carolyne! I have to admit that I hated restoring the staircase (I hate anything that involves stripping paint!) but I totally agree with you that it was worth it in the end. I know that you’ll definitely go through phases where you question why you ever started the project (we definitely did!) but just remember that all of your hard work will pay off.
Good luck with the rest of your staircase!
Cx
PS. You can see our finished hallway in the House Tour section on the blog!
Michael Riddle says
Can’t believe you wanted to paint over that beautiful brown coating, that’s where I’m restoring my hall to, I’ve already been disappointed to discover the dado rail was stripped back to bare wood before being painted white.
Iendded up here hoping to find a modern equivalent of the brown coating!
Christine says
I’m not exactly sure what you mean, Michael but if you’re referring to the brown stain under the layers of paint it would have physically been impossible to remove the layers of paint without in part removing the stain. I guess everything is down to personal preference.
Cx
Mary says
Totally agree Christine – it was a long process at the time but the end result was lovely. So good luck.
Unsure if I can post a picture or would send you one of my finished painted rails.
But I didn’t paint over my stairs but left the natural?
Christine says
Thanks for sharing, Mary! The only way you can share images is by linking to them (from something like Dropbox, Flickr or Google Drive) but if you send me the images (general at littlehouseonthecorner dot com) I’ll try to upload them.
Cx
Mary says
Hi I actually went through this process 20 years ago in my Edwardian home and my stairs panels and banisters etc were exactly like Christine’s. The one difference is that my landing upstairs is larger so the banisters are longer. Also I did this at a time when there was no knowledge on the dangers of lead paint , which I had?
I used a hot air gun to soften and the scraped to remove the paint and nitro morse and scraper to remove what was left , but is was a long slow process . The end part was wire wool and nitro morse. The result has been great.
However after 20 years I have become tired of all the wood and have recently painted it all white with a striking grey handrail – it had lifted my hall and light floods in?.however for 20 years I never had to repaint the stairs etc which was so easy.
So good luck all – very slow process , messy but the end result is great – 20 years enough for me.
Christine says
Thank you for sharing your experience, Mary! It just goes to show that things tend to last and look good for much longer if you do something properly!
Cx
Karen says
Hi Christine,
We are about to embark on a similar process which I’m both excited and terrified about (there seem to be many paint layers!) I was just wondering if you discovered lead paint at all, and if so what precautions you took?
Thanks, Karen
Christine says
We actually just wrote a post about how to deal with lead paint – you can read it here. If your existing paintwork is in a good condition, the general recommendation seems to be don’t touch it and paint over it. If you do have to strip it chemical strippers are best because they bind the particles, but they can be expensive (especially if you buy ones that actually work!).
Hope that helps, but do let us know if you have any other questions!
Cx
Leigh says
Hiya
We are in the same process at the moment along with restoring the rest of the house – how did u realise the original balustrades were hidden away???
Christine says
As our house is Edwardian, we knew that it would originally have some nicer balustrades, but we didn’t actually know if they were still there. I guess it was just luck that they hadn’t been removed!
Good luck restoring your house!
Cx
Pippa says
Hi Christine,
We are in a similar process at the moment trying to remove years of overpainting to reveal some lovely woodwork underneath, I have given up cleaning properly until all the sanding is done! I would be interested to see how you got on after this?
Pippa
Christine says
It’s such an awful job to do, Pippa – we certainly don’t envy you. I promise it’ll be so worth it in the end though! Our house is always dusty as we always seem to be sanding something, so I guess we’ve kind of gotten used to it!
Our staircase turned out great and was well worth the hard work – you can check out the results here.
Good luck with your woodwork!
Cx