At the end of last week, we shared some 5 of our most recent home updates with you. One of them was our newly waxed bathroom door.
But that wasn’t the only door we’ve been busy working on – we’ve actually completed every door in the house!
But let’s start right back at the beginning.
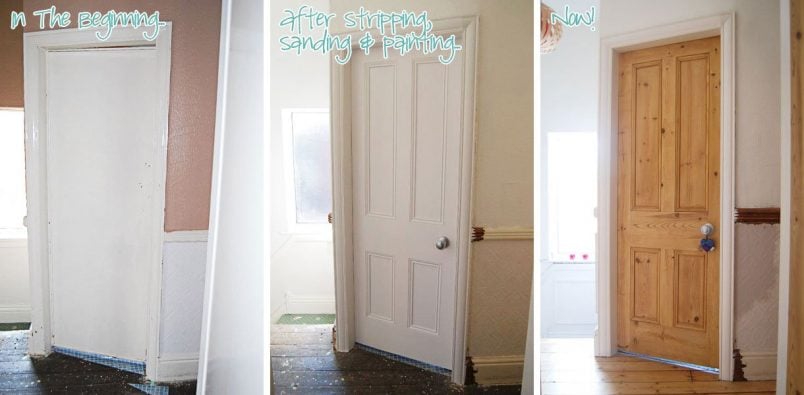
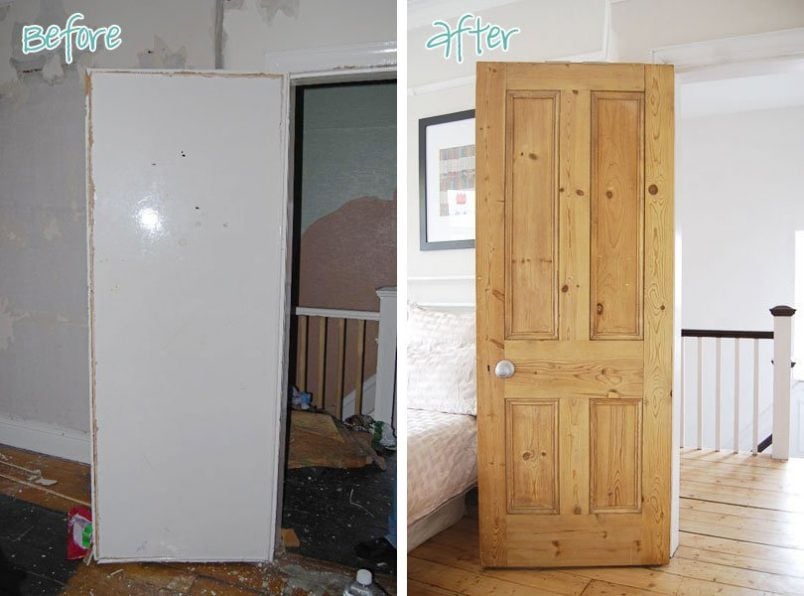
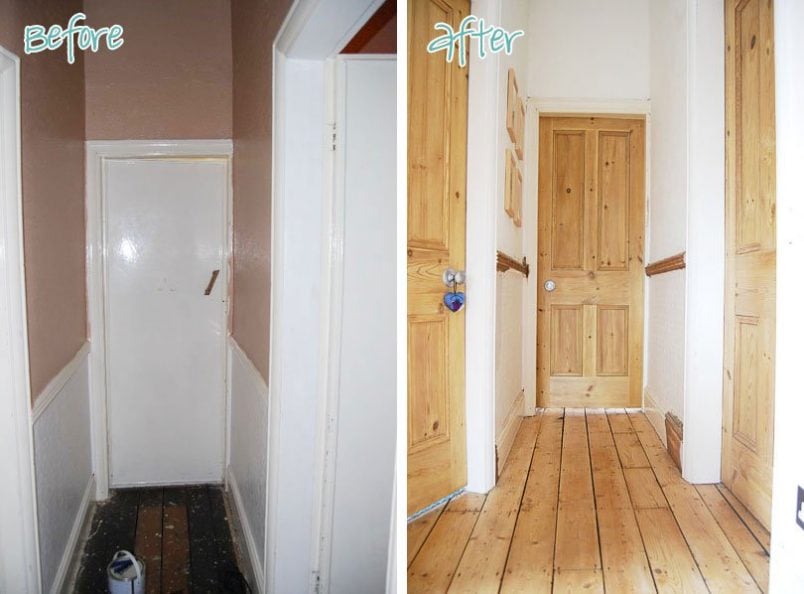
When we first moved in, all of our doors looked like this:
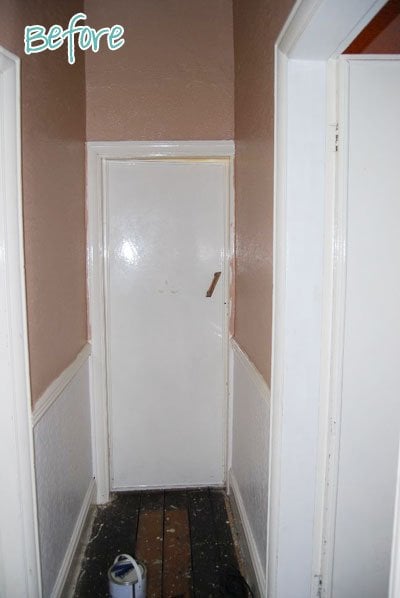
They’d been boarded up with fibre boards and covered in more layers of chipped glossy paint that we could even count.
We weren’t even sure if the original doors were still hidden under the panels, so one of the very first things we did in the house (after removing the pee-soaked carpet) was rip off all of the boards covering the doors so see what we’d find.
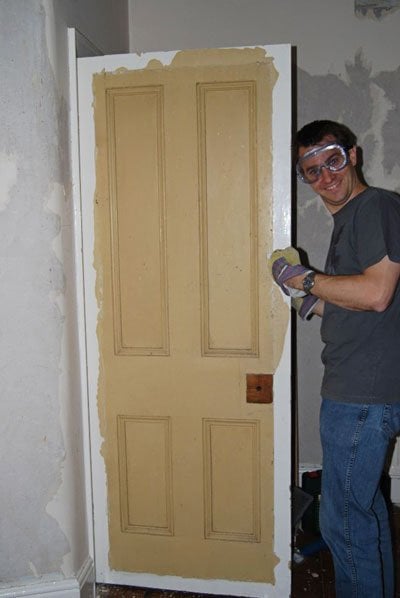
The boards had been attached with enough nails to hold up the whole house, but removing them – and finding the original Edwardian doors beneath – was so much fun. Although removing the boards was one of the very first things we did in the house, until recently it was pretty much the only thing we’d done to them.
Back in January, having finally had enough of the messy situation, we decided to have all of our doors dipped and stripped.
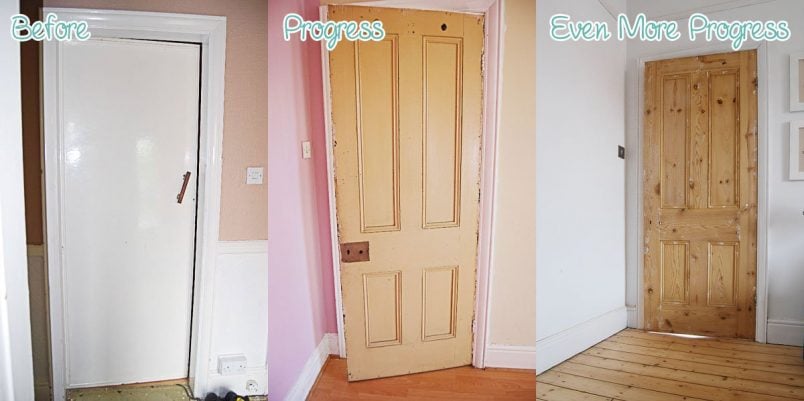
The transformation was absolutely amazing, but then – like with so many projects – we couldn’t make up our minds what to do with them and ended up leaving them for a few weeks until deciding to wax them.
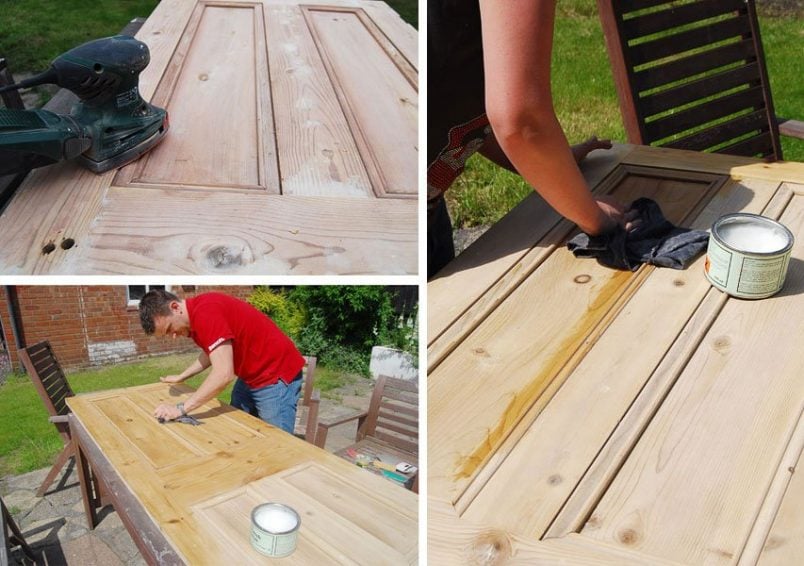
Waxing the doors was definitely the right choice for us. It was so quick and easy to do and almost instantly (yep, of course there was a bit of sanding required, too) transforms the door. (You can read more on how to wax a door here.)
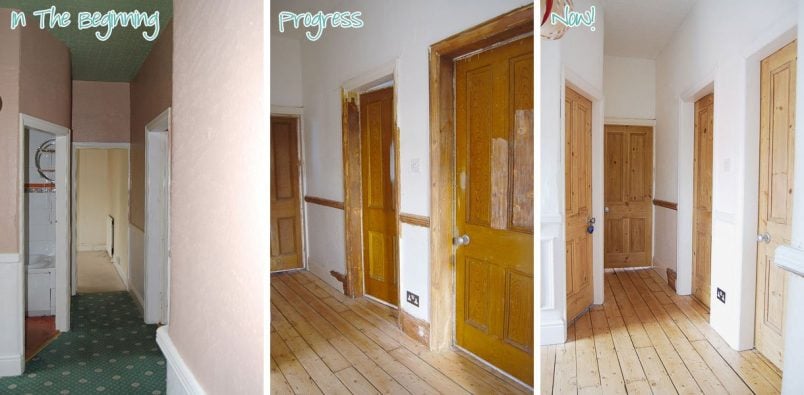
So, having already sanded and waxed a few of our doors, it was well overdue that we finished off the remaining doors. Now, just four short years later, we’ve completely finished all doors and this is what our hallway looks like now.
It’s hard to believe that someone would cover up original doors, but I guess we’re lucky that they were still there and hadn’t been replaced at some point.
Whenever we’re lacking motivation to start – or even finish – projects, I find that looking through old photos and seeing how far we’ve come helps give us new drive to carry on.

Looking at what our doors used to look like and seeing how far we’ve come is definitely an easy way to motivate us!
We even have door knobs on every single door! For most people it may seem a bit weird to get excited about door knobs, but after four years without having any, it really feels like a bit of a luxury.
Have you ever restored a door? Do you get excited about little changes to your home that most people take for granted?
Amy says
Can I ask how you removed the panels without damaging the original doors please :) we’ve just moved in and our doors have about 50 layers of gloss on the panels.
Hoping to get them dipped :)
Christine says
It really wasn’t difficult to remove them, Amy. Just wedge a paint scraper or something else that’s fairly thin under the edge of one panel and wiggle and lift it until one corner is more or less loose. The first corner is the most difficult, especially when there are dozens of layers of paint on top (ours had been painted countless times, too), but when the first corner is loose and you can get your fingers under the edge of the panel it’s just a matter of pulling it away. The nails will probably stay in the door (we had hundreds in our doors) but you can easily pull them out with some pliers.
Getting them dipped is the way forward – it’s by far the best, and I think most cost-efficient method! I’d recommend testing it on one door first though as the old glue can sometimes dissolve.
Good luck with the doors – it’ll definitely be worth all of your hard work in the end!
Cx
Sophie Williams says
Hi!
We’d love to do this to our doors! I’m a complete beginner though.. could you please tell me how to removed the panel from the door? What tools did you use tans how did you minimise damage?
Thanks!
Christine says
It was really easy to do, Sophie! Just wiggle a filling knife under one edge of the board and wiggle it loose a bit. Then you should be easily able to lift it away from your door. The nails will all start to pop out, so remove them as you go. That all there was to it. The hardest bit is getting the first corner free, after that, it just takes a couple of minutes to remove the panel.
Cx
Em says
I have searched high and low on the internet on how to get the panels off internal doors. Do you have any tips? I have started one and the panel is glued on and pretty much sticking to the original door.
I
Christine says
Ours were just attached with nails so it was just a matter of wedging something under a corner of the panel and pulling it away. We did have a few bits of the board that stayed stuck to the door but that all came off when the paint was removed. Sorry, I can’t be more help!
Cx
AliDM says
How did you remove the panels? Any advice ours are same but don’t want to damage door by removing
Christine says
We just pulled them off – there really wasn’t anything complicated about it. Try to find a corner where you can push something between the panel and door to lift it away from the door slightly. I should point out, that our panels were just nailed to the door, if they are glued in place it might be slightly more difficult to get them off. Your door will also probably need a lot of TLC before it looks great again anyway, so I wouldn’t worry too much…
Cx
Conall says
Hi guys,
We’ve just bought a 1930’s red brick semi in need of some major restoration. Our doors are similar to your’s as above, already stripped. Some have cracks in the panels. Have you any recommendations in how to fix these? Thanks in advance
Christine says
It really depends on how big the cracks are, Conall. If they’re not too bad I’d suggest either leaving them or if you really don’t like them, possibly filling them with wood filler. If they’re larger cracks you could replace the panels. I don’t think it would be too difficult to do, but it will depend on how you door is constructed. To match the wood, I’d probably visit a reclamation yard and try to find some original timber.
Cx
mark says
Hi Guys
All the doors in my new house 1870’s look exactly as yours did and when I realised the were just covered in hardboard could not believe it not as much as I could believe the amount of nails holding it on
did you fill the holes or just leave them any recommedations asi am going to get them all dippedand then wax them
thanks for any advice
cheers
mark
Christine says
Great to hear that you still have your original doors. I still don’t quite get why there was a time when everyone thought that the panelling would be better off hidden under hardboard, but I suppose we’re lucky that that’s all they did and didn’t replace the doors.
Our doors had dozens of nails holding each board on, too and we decided to fill all of the holes. You can read another post we wrote about it here. We matched the colour of our filler to the unwaxed door, but as it darkens quite a bit when you apply the wax, I’d recommend going a bit darker.
Overall the little filled holes are hardly visible though.
Hope that’s some help & good luck with your doors!
Cx
PS. There’s a link in the sidebar to our favourite wax. It’s the best we’ve used so far.