Yay, we’ve ticked the first box on this years’ to-do list! We’ve officially finished the installation of our new water mains. (You can read more about our other plans for the year here.)
We still have the original lead water supply pipe leading into our house. Our water pressure is terrible – practically none existent. As part of our loft conversion, we have decided to get the lead piping leading into the house replaced. There probably wouldn’t be enough pressure to supply the loft with water otherwise.
We’ve been getting quotes for the job, but it’s really expensive – around £600, especially as it’s only a few meters of pipe that need replacing.
Well, we’ve decided to tackle the job ourselves! This is one of the scariest jobs we’ve undertaken so far!
Here’s our ultimate guide to replacing a water main yourself. (Don’t forget to check the rules and regulations where you live before attempting anything like this!)
This is what you will need if you want to replace your water main:
This post contains affiliate links. We only recommend products we love and think that you will, too! Read our full disclaimer here.
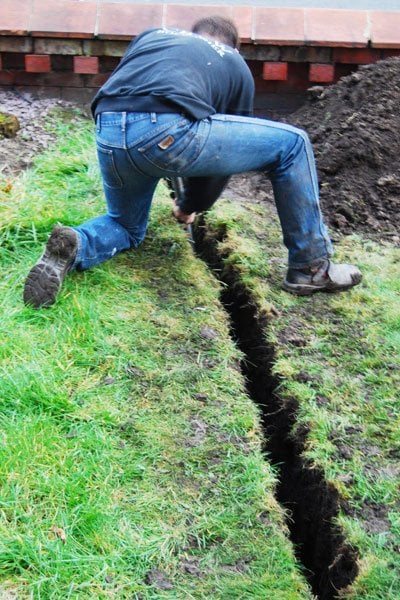
A spade – Ideally a graft spade. No idea what that is? We didn’t either until very recently. Basically, it’s a spade that is very slim (about half the width of a normal spade) and long.

It just means that you can save time and energy – which you will also need a lot of – by digging a narrower trench. We borrowed the one we used from our builder, but a normal spade would work just as well.
25mm Blue Plastic Pipe – Which is the kind of pipe that is used for normal ground conditions. We got ours from a local DIY store.
Stop tap – In theory, we could have reused our existing stop tap, but as it was really old and leaky and needed a replacing. To go with the new plastic pipe, we’ve opted for a plastic stop tap, too.
Ducting – Where your new water pipe enters or runs underneath the building, it needs to be located in the duct. We used some old ducting that we had lying around, anything with a 100mm diameter should do.
Sealant for both ends of the duct – We used an expanding foam filler around the duct and some bubble wrap on the inside of the duct.
Insulation – Just any normal pipe insulation will be fine.
Builders Sand for lining the trench
Decent weather would also be really helpful, as you really don’t want your newly dug trench to fill up with water.
Connectors – 25mm to 15mm adaptor to connect your new plastic pipe to the existing 15mm copper piping in your house and possibly also some pipe sleeves, too
Our Experience
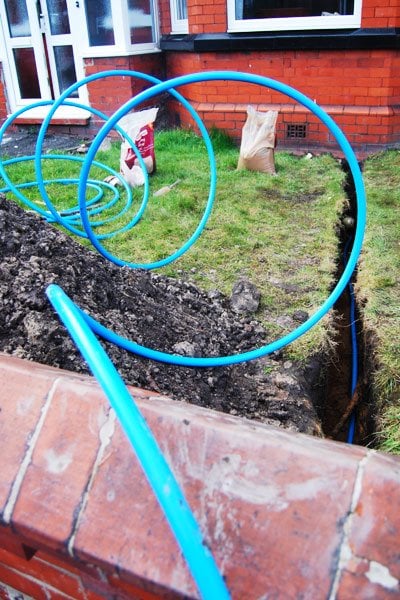
We started by digging the narrow trench from the front of the house to the garden wall. The trench has to be a minimum of 750mm deep to protect the pipe from frost.
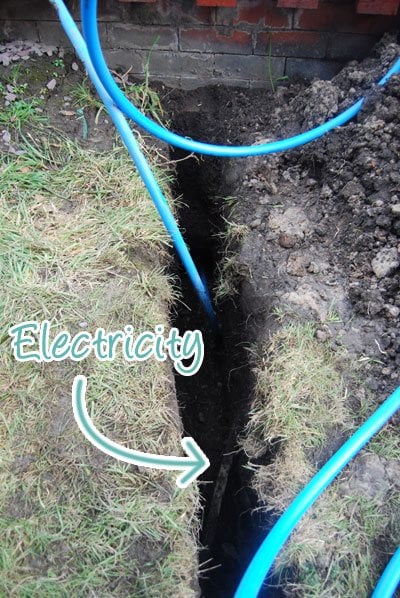
Remember to be beware of any services like your existing water supply pipe, gas, electricity, TV, etc. If you can, try to locate them first.
We came across our mains electricity about halfway down the trench. Your new pipe has to be a minimum of 350mm away from any services.
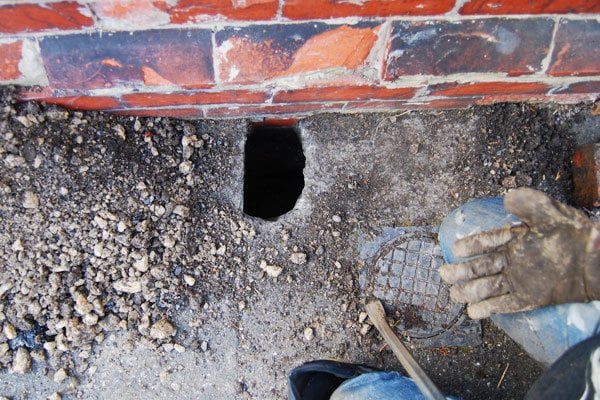
Then, after digging the outside trench, we could start digging on the inside of the house. In our case there was already a brick missing in the wall where the existing lead water supply pipe enters the house, so we could just make the existing hole a bit larger.
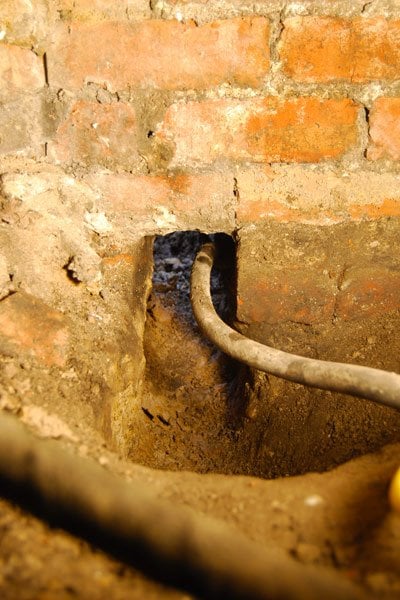
Then we just pushed the ducting through the opening, leaving the existing supply pipe next to it.
You have to then fill the gaps around the ducting. We used a normal expanding foam filler on the outside and inside of the wall. Be careful not to get any filler in the duct – that has to be sealed separately.

You have to lay the new supply pipe up to the edge of your property boundary. In our case, this meant that we had to lay it up to the outer side of our garden wall.
At this point, we should mention that you are not allowed to dig open any part of the pavement yourself, but as we we’re only making a tiny hole which would later be filled and tarmacked over by our water company, we thought we’d just do it anyway.
Jan started by chopping away the tarmac with a hammer and chisel. The layer was really thin, so it was quick and easy to do.
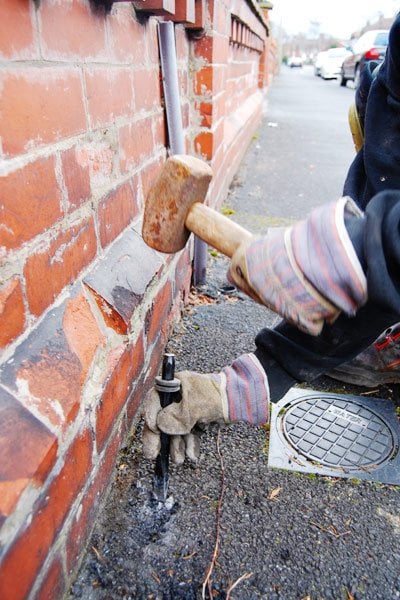
Then, trying to keep the hole as small as possible, he removed the rubble and earth with a small spade.
Before laying your new pipe, you have to line the bottom of the trench with some sand.
The sand will provide a soft base for your pipe as well as cover any sharp stones that could damage it.
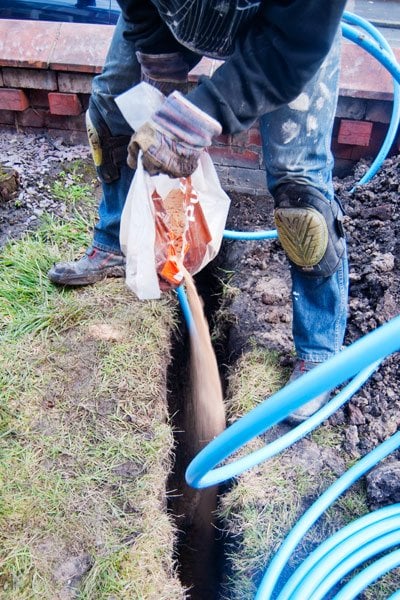
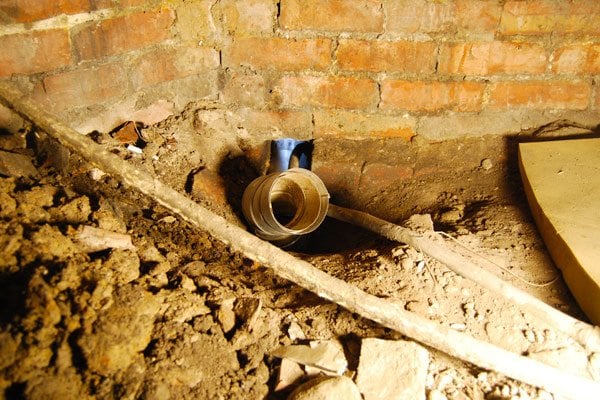
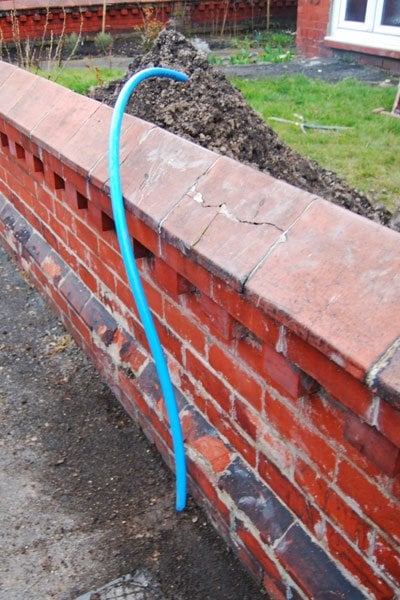
Then we could finally lay the pipe. We started on the pavement and pushed the pipe through the hole under the wall.
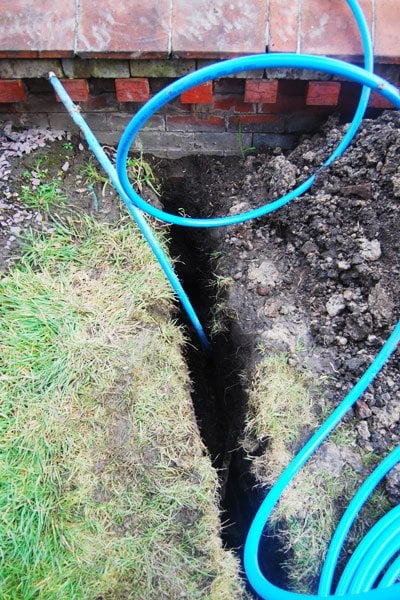
Getting the pipe through the hole and under the wall was a bit fiddly, but after that, it was really easy to push the pipe through the trench.
Make sure that you have sealed both ends of the pipe as you don’t want any dirt to get into it. Our pipe came with little stoppers which we covered with tape to make sure they couldn’t budge.
From where the pipe enters the building you will have to insulate it. We used standard pipe insulation to cover the pipe both in the duct and cellar. Then all that’s left to do is seal the opening around the new pipe. We just used some bubble wrap that we squashed into the duct.
Of course, we also filled the hole we’d made on the pavement, too. You have to leave a long piece – about 1m – of the pipe at the edge of your property boundary so that it can be connected to the mains supply.
After preparing everything, we then had to wait for the work we’d done to be signed off by the utility company. About a week later the inspector came around and checked everything – and was happy with what we’d done!
Needless to say, we were very relieved and really happy that we could finally fill in the trench running through our front garden.
Then came the wait… skip forward by about four weeks…
In the morning we turned the water off at the road. Then our lovely plumber (thanks Steve) came and removed the old pipe and connected the new stop tap and pipe. The utility company then dug up the pavement and connected our pipe to the main water supply.
Here’s a sneaky picture I managed to snap for you.
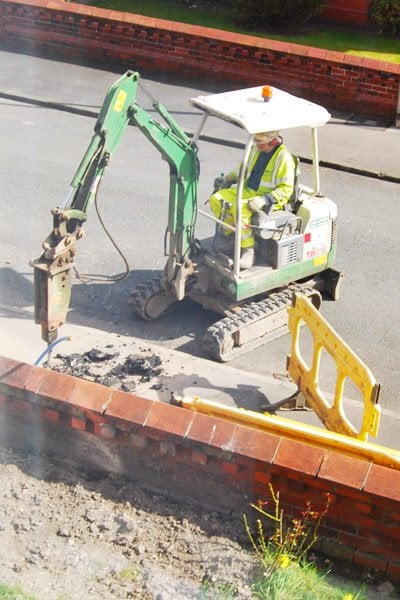
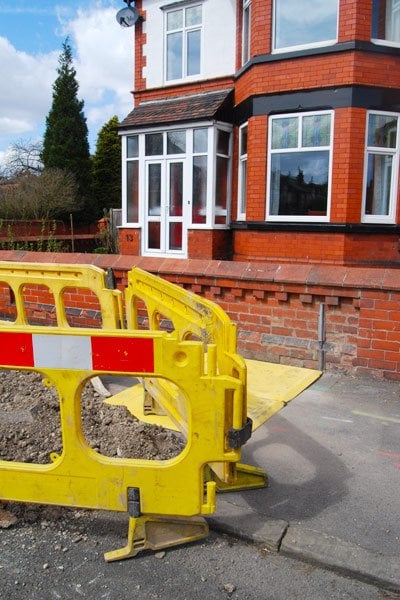
A day after our new supply pipe had been connected, the company came back to fill in the hole, a day later, they came back again and tarmacked the pavement and another day later they came and picked up their barriers. It all seemed a bit bizarre.
Our utility company offers a lead replacement scheme. They will connect and replace the lead pipe for free if you replace the lead pipes up to your property boundary. Basically digging a hole has saved us about £500.
As we’d mentioned before, we were really daunted by doing this job ourselves. It actually turned out to be so much easier than we’d expected and we wish we’d done it sooner. Not only is the water supply much healthier, but the water pressure has also dramatically improved!
Are there any jobs you’ve been worried about doing yourself? Where do you draw the line between trying to do something yourself and paying someone to do the work for you? Have you attempted replacing a water main yourself?
It’s important to check rules and regulations where you are. We did this work after speaking to and in close cooperation with our utility company who checked all of our work. You will only be allowed to work on your property! If you’re unsure of anything get professional help!


Andy says
Great article – I think it has given me the confidence to do similar at my house as we have old galvanised pipe that keeps springing leaks. Will wait till the spring/summer weather before I start.
Christine says
Thanks, Andy! Sounds like a new pipe will be a huge improvement!
Cx
PS. Don’t forget to check rules & regulations where you live and discuss your plans with your local utilities company – ours was surprisingly helpful!
Alex says
Thanks for the informative article, and for replying on this so many years later.
I’m interested in why you were so confident a full new pipe would improve the water flow? And indeed, did it work noticeably? Especially when so many other components play a part, e.g. existing 15mm copper pipes elsewhere inside, flow rate from the mains, etc.
Do you think it is common to just be able to feed a new pipe through the ‘inside’, i.e. underneath, the house. It is daunting to think about the time, cost and disruption of ripping out floorboards, tiling kitchen units, etc and re-doing all of that to otherwise get to where the old pipe is and new one needs to go.
Christine says
Old pipes will clog up with limescale over time. If you cut through a really old pipe you’ll sometimes find there is only a tiny hole left for the water to flow through. In our case, there was a dramatic difference in the water pressure which improved a lot.
I’m not sure why you would have to run the pipe through the inside of the house. We ran ours alongside the original pipe as it was easiest but you can run it outside of the house and enter at the closest point to the water metre and stopcock.
As always, check with your utility company. They’re the best people to advise in your area and can also advise on what’s best in your particular circumstance.
Cx
Chris hill says
Normally you ultility company will send some one out to survey the job. Our main was only 650mm so it had to above 750 mm. you can buy something made insu duct which is a insulating jacket for the main which is approved by most water companies. That will allow you to bring the main closer to surface. We had to install one to rise it the surface as the only other way was to go throtgh the surface. If you google insu duct they have a whole range of products. To help you. Bes.co.uk seems to be the cheapest retailer
Christine says
Thanks for sharing your experience, Chris!
Cx
Graham says
Hi
I’m doing this job now, one question I have is about the ‘750mm distance from the outer face of wall’ before rising to the internal stop.
Did you have to stick strictly to this, I see it mentioned in the regs but it seems unnecessary and a friendly builder didn’t think it necessary.
What was your experience with this?
Jan says
Hi Graham,
best is to ask your utility company to see exactly which requirements they have. They are the best people to advise you on how it has to be done in your area. And ultimately, they are the people to sign it off.
Cheers
Jan
James says
Hi there
Congratulations on having the confidence to tackle such a large project. Could you possibly elaborate more with regards to the insulation that you installed here: “From where the pipe enters the building you will have to insulate it. We used standard pipe insulation to cover the pipe both in the duct and cellar”
Did you put insulation around the alkathene pipe and then put it into the protective sleeve or did you wrap it around the protective sleeve with the blue alkathene pipe inside that?
Christine says
Thanks, James! It’s a project that seems larger than it is, though – it’s really just digging a hole and letting the utility company do the rest!
The insulation is on the outside of the pipe. We just used something similar to this pipe insulation that we wrapped around the pipes so that they don’t freeze. It’s really nothing spectacular.
As always, if you’re unsure of anything, consult your utility company. Ours was super helpful and not only walked us through all steps, they checked that everything was right, too.
Cx
Chris Hill says
Hi Great Article
I am have almost completed restoring a 1930 house in Kent, we have always suffered low flow around 6 litres per minute, I have always wanted to replace the main. We came to a point when we after having the bathroom re done, and just ahead of the hall and kitchen flooring being replaced along with the drive we could do this.
I telephoned my water supplier, the where non to helpful and advised a £550 reconnection charge would be applicable, after reading your article I realised I might be entitled to this for free as I had a lead main. After a few calls they agreed to this.
They raised a job, we dug the trench, we decided to use a Insu Duct Ground breaker as going through the footings would prove very difficult and we wanted to maintain the supply whilst this was being done. After digging the trench and laying the pipe, the inspector came out a week later, a week later the dug the hole their side and connected it and hey presto 16 litres of flow.
Digging the trench was hard graft as the ground was pretty much clay, the biggest issues I found was the supplier they seem to very anti this, my guess is I live in area where 70 percent of the properties had a lead com pipe so my guess if everyone did this they would have to heavily invest in the infrastructure.
Thank you for article it has been an inspiration. It’s certainly worth doing
Christine says
I’m so happy to hear that we were able to help (in a very small way) you save some money and get your mains replaced, Chris!
Digging the trench was the most difficult part of the project for us, too but I’m so happy that we did it ourselves. Hope your water pressure has improved!
Cx
Siobhan says
Hi Christine, we’re about to undertake this project ourselves and I was wondering how long the entire process took? We have a significant leak in the lead pipe and so have turned our water supply off in the meantime.
Christine says
We had to register for the replacement and then wait for approval which took a long time. Then we had to dig the hole and lay the pipe ready for the utility company to inspect everything was okay. Then about a week later they came out to connect everything. From start to finish the whole process took weeks (probably not much help for you).
Cx
Sue says
Thanks for sharing. It was really helpful.
Found out so much. I’m in the process of changing steel pipes and a bit of lead pipe. Plumber did something funny, so is coming back today. He ran some pex pipe backwards to fit pipe on the thread on a piece of existing steel pipe. But the plan was to take out all the steel pipe. He tells me it’s easier to fit jointd on to existing threads on pipes. But surely today’s day and age you can find lots of Transitional fittings can I also ask? Why did you need ducting? I was told no ducting required just insulation is ok. Thanks
Christine says
We used the standard blue MDPE pipe and fittings. Everything else was done by the utility company. The ducting was also a requirement of the utility company.
It’s always important to follow the guides, rules & regulations where you are.
Cx
G says
Hi Christine , did your water supplier company charge anything at all to connect YOUR new pipe to the water meter? Did you have to pay anything at all to the water supplier? any fee at all? and how was your experience dealing with them? We do have lead front our front door untill our meter which is located on the road near the boudaries of our property very similar to yours. We did a lead test with the utility company which turns out to be in accpetable levels but i would like to have it replaced anyways. No sure our water supplier will encorage us to have it replaced as they say water lead levels are acceptable whether this is true or not. I am slightly confused about that free lead replacement program becouse as I understand the water supplier will replace for free any lead found between the water mains and your water meter which is the communications pipe, this means that is the pipe after your meter towards the mains of the road. Why would the water supplier replace for free inside your property boundaries? Do they connect your new pipe for free if you dig or pay a private contractor to do it for you? many thanks
Christine says
Dealing with our supplier was really straight forward and we paid no fees at all. We just prepared the pipe and they connected it to the water meter at the same time as they changed the lead pipe. Our water meter was on the pavement outside of our property boundary, so I don’t know if that made a difference.
Cx
Karina Konopecka says
After reading your blog decided to get a tradesman to do it(i was under the impression that if I went anywhere near mains water pipe own by the water company I would be prosecuted.
Christine says
You can only touch the part of the pipe that belongs to you and up to your property boundary, Karina. You will never be allowed to work on anything that you don’t own. It’s always important to check the rules and regulations where you are, though!
CX
Simon Blenkinship says
Thanks for your diary of events. It was interesting to see how the job panned out and also some of the conversations listed here that give extra information and raise other points.
I have been quoted £600 to £1,200 for a company to do this job. So finding your site is a Godsend.
I am now going to look into the legalities of doing this myself.
Happy New Year
Christine says
Happy New Year to you, too!
We’re glad we did our replacement ourselves but our connection was a particularly easy case. It’s always important to check out rules and regulations for where you are. We worked closely with our utility company and they were super helpful and advised us on every step.
Good luck!
Cx
Owen says
Insulation on the pipe needs to be a certain thickness – I got picked up on this when I did mine.
The spade also goes by the name drain spade / trenching shovel or similar.
Christine says
Thanks for sharing, Owen. It’s always important to check regulations before you start any project. We checked everything with our utility company before we started the project.
Cx
Sinead says
Hi! I’ve loved reading your posts. We’re in the middle of replacing our lead pipes too. One quick question for you – when you went under the house, did you have to dig 750mm down there too? We have suspended wooden floors and were hoping the run the pipe along under the floors without digging down. The earth is about 450mm below the floorboards. Thanks for your help!
Christine says
Thank you, Sinead! We dug down 750mm under the house, too. Once you’re inside the house I think you should be able to run the pipe where you want but it’s important to keep the pipe deep enough in the ground so that it can’t freeze when it’s cold. I’d definitely recommend speaking to your utility company. Rules and regulations seem to differ from area to area and they can advise you on what’s best to do in your particular situation.
Cx
Andrew says
Thanks for this explanation, I’m going to have to do the same to my new house as it also has lead pipes and this has been really helpful. Just one question, when you covered the new plastic pipe in your garden did you just cover it with the soil you’d dug out or did you cover it over with sand that you lined the trench with or some sort of capping or something else?
Thanks in advance
Christine says
We made sure that there was a thick layer of sand in the trench under the pipe but only covered it with the soil we’d removed beforehand. The sand is there to make sure that there are no sharp or pointy bits that could damage the pipe, so just make sure that your soil is reasonably soft and “clean” when shovelling it back.
It’s always worth checking with your local utility company, too. Different areas can have different rules and our utility company was really helpful – there was even a rough guide that you could download on their website.
Cx
Caro says
Hello,
Thank you for this very informative post. We are looking to replace the supply to our property as well due to low flow and were a little confused about the order in which everything needs to be done.
The water company is replacing the portion of the pipe to our boundary free of charge due to low flow. However, we were told that we would need to pay a £500 reconnection charge if we were to replace the piping on our side of the boundary too just for them to come and check that the connection at the boundary is done right! Does this sound righ to you? Can we avoid this by the order in which we do things?
Thanks,
Caro
Christine says
Our utility company had a lead replacement scheme which is why they came out and connected the new pipe for free. I guess it varies from area to area. The quotes we had to do the whole job (by approved companies) was around £500, so it sounds like you could be better off just paying someone to do it all for you.
Cx
Manni says
How did you seal the area in the duct? with expanding foam again
Christine says
If I remember correctly it was a mixture of bubble wrap and expanding foam. I’d speak to your utility company as they’ll be able to give you suggestions. Ultimately they’re the ones that have to sign things off, so they’ll be able to let you know what’s best to do.
Cx
Meagan Dixon says
How much did yall saving by doing it yourself? My water company trying to charger me 659 dollars to do ours. Where did yall buy the main water mater at
Christine says
Overall we saved £500 by digging the hole. The water meter and actual connection were still done by the water company and were free of charge because they have a lead replacement scheme. I’m pretty sure that the actual water meter will have to be done by your utility company no matter where you are though.
Cx
Gaynor Pellowe says
WOW, I am so impressed, it was the digging I was dreading though you make it look so simple. I think i’ll get myself a spade and get digging :)
Christine says
It’s hard work, but the digging a hole has got to be the easiest way ever to save money! Just remember to watch out for any cables and pipes that could be in the ground!
Cx
James says
Great article. Many thanks. I don’t suppose you came across the issue of an earthed lead pipe. Many older houses used the lead pipe to earth the electric system. Obviously if you swap lead for plastic, you no longer connect the earth to it, but you have to connect the earth to something.
Christine says
Thanks for the feedback James!
No, our lead pipe wasn’t earthed. All of our electrics (and earthing) is up to date as we had it sorted just after moving in. Sorry we can’t be more help on this!
Cx
Gareth says
What did you use for ducting? Would narrow plastic drainpipng do the job or is there a special ducting material.?
Also sealing ducting – you used bubble wrap – was it inspected and passed?
Thanks,
Gareth
Christine says
We used some metal ducting. I’m not sure if a drainpipe would be large enough and would recommend getting in touch with your utility company to find out what it is that they would approve at it varies from area to area. We sealed the duct with expanding foam filler – the bubble wrap is just on the inside to fill any gaps. All was passed and wasn’t a problem at all, but I’d recommend checking out the rules and regulations for where you live.
Cx
Gareth says
Many Thanks!
Gareth
Daniel says
It is really painstaking work! You amazed me by this! I guess I will have never done something like this by myself! You are really very great guys! You used plastic pipes as I see, I want to ask you – if it possible to use metal and will it be better or worse. I looked for new pipes in stores – but it costs pretty penny – and at home i have some obbo pipes ), I am afraid that metal can extension in winter..What can you advise me?
Christine says
Thanks Daniel! The plastic piping we used is the approved MDPE Blue Pipe, I don’t think that you can use anything else. We always recommend contacting your utility company for professional advice.
Cx
Tony says
I replaced my lead water supply (or rather almost all of it) last month on my own apart from help connecting the new pipe. Reading this webpage beforehand gave me confidence to do the job, which was a little different from yours because I own a semi with a shared supply.
An important point to note is that the minimum depth for a replacement pipe of 2’6″ / 750 mm is *not* a legal requirement. If you own your house, you own the water pipes on your property and they can be buried where you want and as deep as you like (preferably at least 18″).
However, if the local water company is involved and replaces their pipes up to your boundary they can insist that you follow their regulations. Thankfully that did not happen in my case as the trench I had to dig was sixty feet long! The depth I chose was about 18″ (full depth of a 16″ Newcastle Drainer spade plus some scooping out with a mattock). An extra foot down would have been much harder work.
Having a shared supply complicates matters considerably, not least because I have a legal responsibility to maintain the water supply to my neighbour (the pipe divides somewhere under my kitchen floor). New shared supplies are not allowed and replacing all of my lead pipe with poly would have meant doing the same next door.
My local water company was extremely helpful. An inspector visited and suggested the best option was to replace the lead from just inside my front gate to just outside my kitchen wall as getting rid of almost 60′ of old pipe would lower lead levels a lot.
The result of the first water quality test I requested was so close to the current limit of 10 microgrammes per litre that the water company agreed to replace their pipes from the stop-tap in the pavement 6″ outside my gate to the water main. The two workmen replaced this tap with a new brass one and installed a short length of poly pipe under the gate into my property and connected it the slightly truncated lead pipe. They even gave me a free poly-poly connector for here and a universal coupler for the kitchen end!
All I had to do was buy some poly pipe and connect it, which I did without a plumber. Total cost of the job was £23 for the spade and £20 for the pipe. I recouped nearly £40 for the lead and would have broken even almost if the price of lead had not dropped 10%. (It was 82.5p per kilo on the day but 91p a couple of weeks earlier). Anyway, enough rambling on. Thanks for helping to give me the confidence to tackle this job.
Christine says
The 750mm may or may not be a legal requirement by building regs, but it is important to follow the regulations of the water company in your area and in our case that is what they required.The depth of 750mm is mainly to ensure that the pipe won’t freeze in winter.
My advice would always be to follow the guidelines of your utility company and any building regulations that apply.
Well done for replacing the pipe yourself.
Cx
Phil says
Hi
How did you know where the trench should be? Especially where to exit the house and where to cross your front wall?
Thanks
Phil
Christine says
Essentially the trench is dug so that it’s the shortest distance possible. In our case our water meter is on the road, so that’s how we knew where the water connection to our house starts. At the other end the trench finishes next to where the old lead pipe entered our house. We’d always recommend getting in touch with your local water authority. They should be able to tell you where you have to dig your trench and help you work out what’s needed to comply with regulations.
Cx
Phil says
Thanks for your quick reply.
Part of our front garden is a concrete path. Did you have any concrete to dig up?
Christine says
We had no concrete, just grass. We probably wouldn’t have done the job ourselves if we’d had something solid to dig up. If you pay a company to lay a new pipe, they will push it through the ground and not dig a trench – therefore minimising any disruption.
Cx
Phil says
Thanks again,
We’ll probably pay to get it done then. We’re almost bath and shower-less at the moment and need to get it done ASAP.
Kishor says
Hi Christine
Thank you for explaining the procedure to change the lead pipe to blue pipe.
Our son is having the work done by a builder to do an extension and loft conversion.
The builder has dug the trench but I believe it is not 750 mm.
He has filled the trench so I cannot be sure.
Is 750mm a legal requirement
Also the builder has not used ducting or insulation. To protect the blue pipe.
Again is this a requirement?
I would appreciate any help you can give.
Many thanks
Kishor
Christine says
All regulations tend to vary from area to area, so it’s important to check what they are in the area you live in. I’d suggest getting in touch with your utility company. They’ll be able to help you and should be able to answer all of your questions and give you advice for your specific project. Sorry we can’t be more help Kishor!
Cx
John Sowerby says
Hi
I have built a small building off the garage to process milk, (we have goats) and I want to put a sink in for washing, the mains water comes into my house from the road, I have exposed the blue mains pipe in my garden can I joint into the pipe to feed the new dairy sink.
Thanks
Christine says
I don’t think that it would be allowed – definitely not if it’s before your watermeter. Having said that, I would check with your local water utility company as they should be able to advise you.
Cx
Lina says
I asked someone to dig the trench and half way the trench crosses the electricity cable, do you know what is the correct way of crossing the cable? (under or above the cable?).
Is there a minimum distance that the utilities should be apart?
thanks
Christine says
I think you can cross the cable, but there are definitely minimum distances that you’ll have to keep. I’d suggest checking with your utility company as they have the details and specifications for your area and should be able to help you. You have to have the trench and new pipe signed off by them anyway, so they’ll know what it has to be like.
Cx
Johnm7990 says
Hi Christine great piece of information.
I am going through the the same thing at the moment sort of….
I am wanting to move my mains supply and the stop cock in my house to other side of the kitchen. I have a concrete floor. Was wondering If you knew if it is possible to put the 25mm plastic pipe underneath the concrete base of my kitchen or does it all have to be outside down 750mm
Christine says
Thanks John! In general I don’t really see a problem in doing that (as soon as our pipe enters the house it actually runs at a higher level through the crawlspace under our living room), but I’d suggest getting in touch with your local utility company and see what they say. Different companies have different policies and rules and it’s always a good idea to get some advice for your own specific situation from the professionals.
Cx
Adrian Rowling says
I did the same job on our property BUT we had to use a machine to dig the 750mm trench as the distance is approx 30m from utility company isolation.
You need to mention that you get the utility company to inspect and “pass” the trench/entry point before installing pipework.
A problem we had was the 750mm deep trench that needs to be dug INSIDE your house. A simpler solution is to use an installation kit that complies with building regs from a company called “Groundbreaker” they provide a whole set of solutions that allow the entry point to be anywhere on the side of your house – even upto first/second floor flats if needed. We had heard of the system but didn’t know the company name – Groundbreaker
Just waiting for our (not so helpful) inspector to pass the new installation before connection and hoping to get a chunk of money from the lead when we take to scrap yard
Good blog though – well done
Peter Eveleigh says
Thanks very much for telling us about your experiences digging a water main. It has given me the confidence to do mine.
750mm is really deep, isn’t it! Almost makes me feel they set it that deep to deter people from doing it themselves. My trench is necessarily narrow, so I have to lie alongside it to scoop the bottom out.
I haven’t handled any of that pipe yet. I see you went in straight lines, but having gone through your wall I wonder if you can judge how tight an angle it can turn through?
Keep up the good work. It is great seeing people doing it themselves and saving. I did that with my gas main ditch, saving £500…and they even sent me a cheque for £200, which I hadn’t expected!!
all the best
Peter
Christine says
Thanks for your kind comment, Peter! It’s great to get some feedback and to know that we can be a bit of help to people with similar house issues.
Yep, 750mm is deep, but I think it has something to do with being deep enough so that it can’t freeze in winter. We also ended up lying on the floor to dig out the bottom of the trench!
You’re right, our trench is fairly straight. The pipe is fairly stiff, so I don’t think that you could achieve any tight angles. I’d be surprised if you could achieve an angle that’s tighter than 135°.
Good luck with the rest of your DIY work!
Cx
fazal says
Hello,
The problem we have is that our Mains water is shared with the neighbour, how do I go about havinh my own mains pipe?
Please HELP HELP and let me know
Fazal
Christine says
If I remember correctly, the utility company is completely responsible if it’s a shared water main. It’s probably worth getting in touch with your utility company and see what their terms are. You may be lucky and they’ll replace everything for you!
Cx
mike says
good job, but i would not recommend digging in footway has you have done, you can get a fine of over £1000 pounds if you have not got a road opening notice and all the correct qualifications and other utilitie prints,you had no idea what utilities were in that footway,i would remove that part just in case someone follows your thread and puts a chisel through a hv cable,,
Christine says
Thanks for the info, Mike. We checked with our utility company and with our builder before starting the work because we also thought there may be a problem, but we were advised that it would be okay to do as the hole we made was directly along our property boundry. We made sure that there was no possibility of any cables being there, too. The tarmac along the wall was also really thin (I’d say no more than 2cm) so we managed to dig out the tiny hole by hand and close it again within about 10 minutes.
Cx
Suzanne says
We are currently looking into doing this at our new house and came across your site…found this blog very informative and put me at ease as to what work was actually involved, great work!
Christine says
Glad you found us, Suzanne! It’s surprising how many things you can actually do yourself! We always thought that renewing our water mains connection would be impossible to do ourselves, but it was sooo easy and saved soo much money!
Have fun in you new home!
Cx
Magali@TheLittleWhiteHouse says
I’m really impressed! I would never have dared to do that by myself!
Christine says
We’d worried about doing it ourselves, too. Thinking about it, we actually didn’t do much except dig a hole. Everything was checked by the utility company and the most important bit – connecting the new pipe to the mains – was done by the utility company, too. It was all so much easier than expected!
Cx
wendy says
Well done I think I am going to have to do this very soon you made it look easy !
Christine says
It was easy, Wendy! Essentially we dug a hole and the utility company did almost everything else. Just remember to check with your utility company about the rules and regulations in your area first!
Cx
robert algar says
very helpful thanks
John says
Shouldn’t really use expanding foam. There’s a rubber bung to go each side of sleeve. And also neoprene pipe lagging should be used. Having said that. Good job. Well done for tackling the job your self’s.
Christine says
Thanks, John. The expanding foam was actually suggested to us by the utility company but it’s always good to know that there are other and better options in case we ever tackle a similar project again.
Cx