Progress in our spare bedroom is slow. Very slow. Last week we told you about starting to strip the wallpaper.
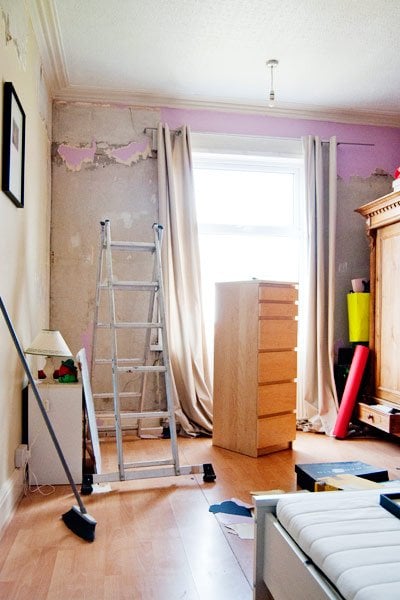
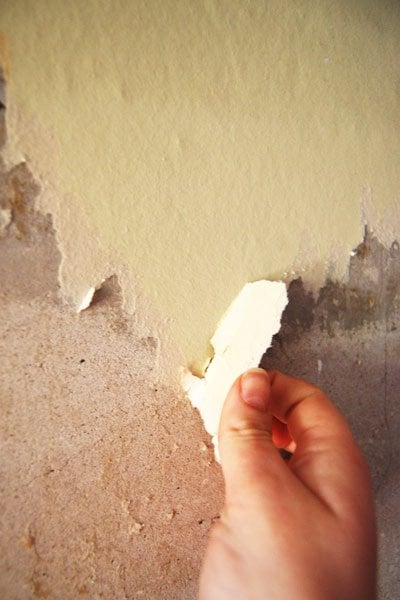
Stripping the paper started out really well and it came off in huge strips. Well, the paper must have heard us and decided to turn our lives into a sticky paper nightmare. It’s probably my own fault for boasting about it!
It honestly feels like it’s changed its mind and has decided to stick to the wall. Needless to say, progress has slowed down considerably as we are now tearing centimeter-sized pieces off the wall.
You can check out our tips on the most effective way to strip wallpaper here.
As we can’t get enough of stripping, we’ve also started stripping the skirting boards.
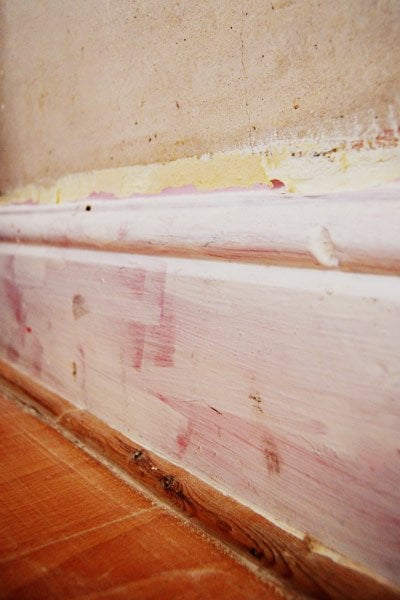
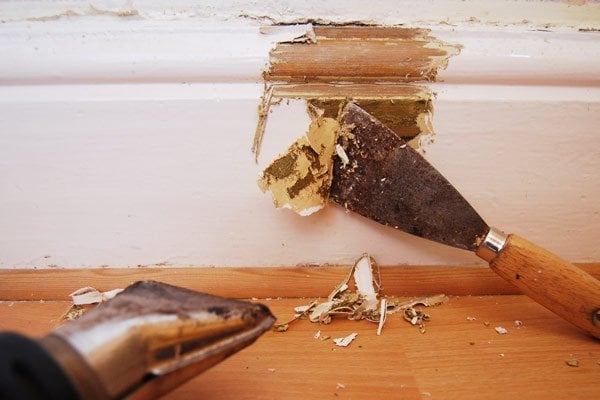
As with all wooden surfaces in our house, we’re using a heat gun to warm and soften the paint and then scrape it away with a spatula.
After finally stripping and restoring the staircase, I honestly never wanted to strip anything again in my life! Even peeling a banana just seemed like too much stripping!
I have to admit that for the first time, I’d even considered taking a shortcut and just painting the skirting board, but I just couldn’t bring myself to do it. I just know that we wouldn’t be happy with the finish and there’s no point doing a job if you’re not going to do it properly. At least we have lots of practice.
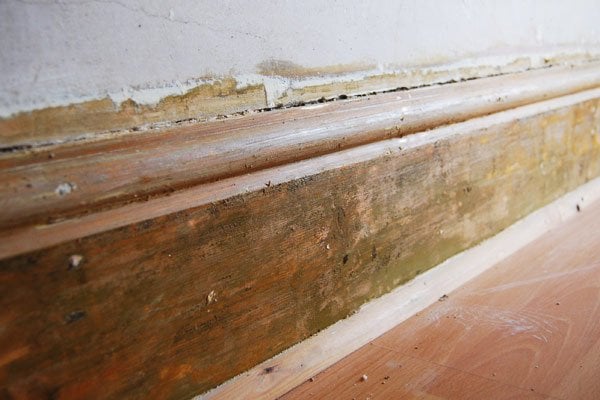
Luckily the skirting board isn’t too detailed which makes it fairly easy to strip as the gooey paint doesn’t get stuck in a load of grooves. The fumes are probably really unhealthy though. I have to have regular breaks otherwise I go really dizzy! Remember to always check your paint before undertaking work, especially in old houses, as it could contain lead!
I hate stripping paint, is there a DIY job that you like to avoid? Have you been stripping anything lately? Do you think we should have just painted over the skirting board?
Lizzie says
Hi There
I have just spent many hours stripping the skirting boards in my sons 150+ year old cottage, now the plan is to keep it wood and not paint it.
Do you have any advice on thebest method of finishing the wood…i.e. wax, oil, other?
I just dont know.
Also i supose the finish determins whether they can be painted in the future or not.
Were in the UK too.
Christine says
We’ve used a lot of different types of finishes over the years. The floorboards and parquet floor in our current home are oiled and it’s what I’d recommend for your skirting boards, too. Our floors are holding up really well and the oil provides a great and durable finish and, more importantly, is much easier and quicker to apply than wax.
If you are considering painting the skirting boards at a later date, I’d recommend using a clear varnish instead of wax or oil. Obviously, this will result in a less natural finish but it’s the easiest finish to paint over later. Painting over an oiled surface is possible, too – it’ll just involve a lot more work as you will have to remove the oil first.
Ultimately, the choice is up to you! Good luck finishing your skirting boards, Lizzie!
Cx
Peter says
Hi I’m in the middle of stripping all he skirting boards m, picture rails, door frames and doors in my house using the same method with heat guns. I’m now left with bare wood on parts and some with spots of undercoat. I’m now unsure what to do about re applying paint. I have light grey Matt egg shell paint for the wood. Will I need an undercoat or can I just apply straight to wood and complete multiple coats? Any help you can offer would be great.
Christine says
It depends on what kind of paint you’re using. Some paints already contain an undercoat (it’ll tell you on the tin) which means that you theoretically don’t need one. I’d always recommend applying an undercoat first (and don’t forget to cover any knots in the wood with knotting solution, too). The undercoat will ensure a more even coverage of your final grey finishing paint and probably also mean that you will have to use less coats of the finishing paint, too. Oh, and also don’t forget to ightly sand the skiritngboards after each coat of paint has dried. Lightly sanding removes any air bubbles or uneven patches and gives you a much better endresult!
We wrote a post on how we painted our skirting boards. You can read about it here. Hope that’s some help!
Cx
Andy says
I have stripped paint off doors, skirting boards, staircase spindles and the wooden panels below my staircase using the following method. First, use a heat gun to remove as much paint as possible. Then, instead of using expensive proprietary paint strippers to remove the remaining paint, I do the following.
Make up a very thick (very thick!) wallpaper paste in a plastic bucket. Then, making sure you are wearing gloves, eye goggles and long sleeves, add one carton of caustic soda to the paste – the chemical reaction is amazing….a lot of heat is created. Then, using a washing up brush (I think the bristles are nylon), apply the caustic soda paste to the wood. The paste keeps the caustic soda applied to the wood, and you can leave it on overnight. Next, use lots and lots (and lots) of water and another washing up brush to remove the dried on paste. You must rinse the wood thoroughly, as the caustic soda can reappear on the wood as crystals. I know it sounds tedious, but stripping paint off wood is. The results using this method are, however, quite amazing.
Christine says
Thanks for sharing your tip, Andy! It sounds amazing and is definitely something we can’t wait to try!
Cx
Donna says
I use oven cleaner.
It’s amazing to get off the shellac on old skirts especially.
Christine says
I’ve seen that new trend of using oven cleaner, Donna. With the amount of wood we have to strip it would probably cost a small fortune, though. I’m not sure how well it would work on the endless layers of paint we have but, as we have lots and lots of doors and wood to strip in our new home, I’ll give it a try! Stay tuned to see the results :)
Cx
Louise says
Hi, found your blog via magali little white house, and easily recognized the paintstripping pics, fun to see someone else doing it =) I read your wallpaper-stripping technique, but must say there is a less painstaking way to do it it if you have plastered walls. Wallpaper glue + plastic wrapping makes it come of with all that neck-killing scraping. I covered my experiment here http://jugendhuset.blogspot.com/2013/01/ta-bort-tapeter.html and here http://jugendhuset.blogspot.com/2013/01/ta-ner-tapeter-del-ii.html it is in swedish but i think the pics speak for themselves. It is labeled projekt tornrum if you get lost. Good luck woth the garden work, getting on nicely!
Christine says
Thanks Louise! Glad you found your way over to us!
I’d never heard about your wallpaper stripping method before, we’ve got plenty of other rooms that need doing, so we’ll definitively be giving it a try. Thanks for the tip!
Cx
caitlin says
Right on! You guys have been busy. Love to tune in to see the progress.
Christine says
Thanks Caitlin! We go through phases of just wanting things to be done and it would be amazing to have a finished spare room for our guests.
Cx
MarieRoxanne says
I feel sorry for you! I was wondering if it would have been too costly to take those ones off and put new ones in. This room will look and “cost” like a million bucks (in labor!) when it’s done!
I am looking at my own (We call them baseboards) and I am not stripping them, but painting them the color of the walls so there isn’t any taping to do except for the very bottom where they touch the floor, but even then, the paint bleeds through! I have to figure out what I am doing wrong. (unless it’s just a crooked floor so it’s not my fault!)
Christine says
We’re keeping the skirting boards, because they’re the original ones and are actually in a good condition (except for the layers of paint). If we removed the skirting, we probably wouldn’t be able to get new boards that are the same height, which would then mean, we’d need to replaster around them. All in all, it’s probably quicker and cheaper to just strip the existing ones.
Not sure what you’re doing wrong with your tape! All I can think of is make sure it’s really pressed down – pretty sure you would have already done that though!
Cx
Joyce says
Hi Christine and Jan. As you’re sticklers for a good finish, can I ask what white paint you use for woodwork? I can’t use oil-based as I can’t be bothered to re-do in 6 months when it turns yellow, but the paint I use shows brush marks terribly. (I’m in the UK too, btw.) Thanks for sharing your house progress!
Christine says
Hi Joyce! So glad to have a UK reader! When we first moved in to our house, we decided, that we were going to paint all woodwork white. Although the paint we used stated that it was non-yellowing, that’s exactly what happened! It was so annoying, especially as we’d painted huge amounts of stuff. We now use Dulux Pure Brilliant White Eggshell for painting all of our wood. They also had problems with their paint yellowing, but have apparently worked on a new formula so that it stays white. Up till now it’s holding up well, but none of the surfaces have been painted for more than a year, so it’s hard to tell what will happen in the future.
Our best tip for achieving a brush stroke free and smooth finish has to be always finish on an upward brush stroke. Not sure why, but it really works. Also always sand between applying the coats of paint. It’ll remove any imperfections and air bubbles. You will have to use an extremely fine sandpaper (minimum 240g grit, but even finer would be better).
Hope that’s some help!
Cx
Joyce says
Thanks for those tips! Much appreciated :)
Kerrie says
I really feel for you and tedious stripping. The largest rooms in my house had a vinyl wallpaper from the 1970s and it wouldn’t come off with a wallpaper steamer. I had to rough up the entire surface so the steam could get underneath, steam it all and then repair it all from the damage that all the stripping caused. I still can’t face the thought of ever putting up wallpaper. I’m sure all your efforts will look fantastic. Cheers
Christine says
Ohhh, that sounds awful! Luckily this paper isn’t too bad to remove. There’s nothing worse than scraping around on the same spot for ages! I’m sure all of your work was worth it… hopefully ours will be, too.
Cx