MENUMENU
  • Home
  • About Us
  • Our Favourite Tools
  • Get In Touch

Little House On The Corner

DIY & Home Improvement

MENUMENU
  • Blog
  • Projects
    • Our Favourite Projects
          • Favourite Projects
          • DIY Slatted Garden Fence | Little House On The Corner
          • DIY Slatted Garden Fence

          • Floorsanding In Progress - 16 Grit Paper | Little House On The Corner
          • What No One Will Tell You About Sanding Your Floors (+ How We Did It!)

          • How To Plan And Install Panelling | Ultimate DIY Guide On How To Install Panelling Yourself | Little House On The Corner
          • How To Plan & Install Panelling

    • Home Improvement & DIY
          • Home Improvement Projects
          • DIY Thin Floating Shelves | Little House On The Corner
          • How To Build Super Thin Floating Shelves

          • DIY Log Store | DIY Guide: How To Build A Log Store | Little House On The Corner
          • How To Build A Log Store

          • HOW TO LAY A PLYWOOD FLOOR

    • Craft & Art
          • Art & Craft Projects
          • DIY Pegboard
          • DIY Pegboard

          • DIY Framed Instagram Photo Display | Little House On The Corner
          • DIY Frames Instagram Photo Display

          • DIY Guess Who Game - Setting Out Board | Little House On The Corner
          • DIY Guess Who Game

    • Painting & Decorating
          • Painting & Decorating Projects
          • What To Do When You've Chosen The Wrong Paint Colour (& How To Fix It!) | Little House On The Corner
          • What to do when you’ve chosen the wrong paint colour (& how to fix it!)

          • Kitchen Makeover | Little House On The Corner
          • How To Paint Laminate Kitchen Cabinets

          • DIY Geometric Painted Walls | Little House On The Corner
          • DIY Geometric Painted Wall

    • Free Printables
          • Free Printables
          • House Cleaning Checklist | Free Printable | Little House On The Corner
          • Cleaning Checklist – Free Printable

          • Halloween Book Covers - F0ree Printable | Little House On The Corner
          • Halloween Book Covers – Free Printable

          • DIY Halloween Treat Boxes | Free Printable | Little House On The Corner
          • Halloween Treat Boxes – Free Printable

    • Furniture Upgrades
          • Furniture Projects
          • DIY Herringbone Desk | Little House On The Corner
          • DIY Herringbone Desk

          • DIY Wooden Bench
          • DIY Wooden Hallway Bench

          • DIY Copper Towel Ladder | Little House On The Corner
          • DIY Copper Ladder

    • Outdoor & Garden
          • Outdoor & Garden
          • DIY Slatted Garden Fence | Little House On The Corner
          • How To Build A Slatted Fence

          • How To Lay A Gravel Driveway

          • DIY Logstore
          • How To Build A Log Store

    • Cleaning & Organizing
          • Cleaning
          • Cleaning Checklist - Free Printable
          • Cleaning Checklist + A Free Printable!

          • Ultimate Guide: How To Clean Brass - Ketchup | Little House On The Corner
          • How To Clean Brass

          • DIY Floating Spice Rack | Little House On The Corner
          • DIY Floating Spice Rack

    • Holidays & Festivities
          • Holidays
          • The best mulled wine! (click through for the recipe)
          • The Best Mulled Wine Recipe Ever!

          • DIY Christmas Napkin Rings - Free Printable | Little House On The Corner
          • DIY Christmas Napkin Rings

          • DIY Dowel Tree Advent Calendar | Little House On The Corner
          • DIY Wooden Dowel Advent Calendar

    • Travel
          • Travel Posts
          • Szechenyi Bridge
          • A Weekend In Budapest

          • Riesenrad im Prater Wien | Little House On The Corner
          • A Long Weekend In Vienna

          • Lake Bled
          • 72 Hours In Ljubljana

  • House Tour
        • Our Edwardian House
        • Our Edwardian House (1st Home)
        • Our Berlin City Centre Apartment
        • Our Berlin City Centre Apartment (2nd Home)
        • Take The Tour | Our Art Nouveau Apartment | Little House On The Corner
        • Our Berlin Art Nouveau Apartment (3rd Home)
        • berlin riverside apartment house tour
        • Our Berlin Riverside Apartment (4th Home)
  • Shop
    • The Little Corner Shop
    • Shop Our First Home
    • Shop Our Current Home

How To Stain A Handrail

  • Facebook
  • Twitter

Two years ago our hallway was – what we can only describe as – brown. As you have already seen, we have painted everything white, restored the front door and replaced the missing stained glass panel. We have also started restoring the staircase, handrail and balustrades.

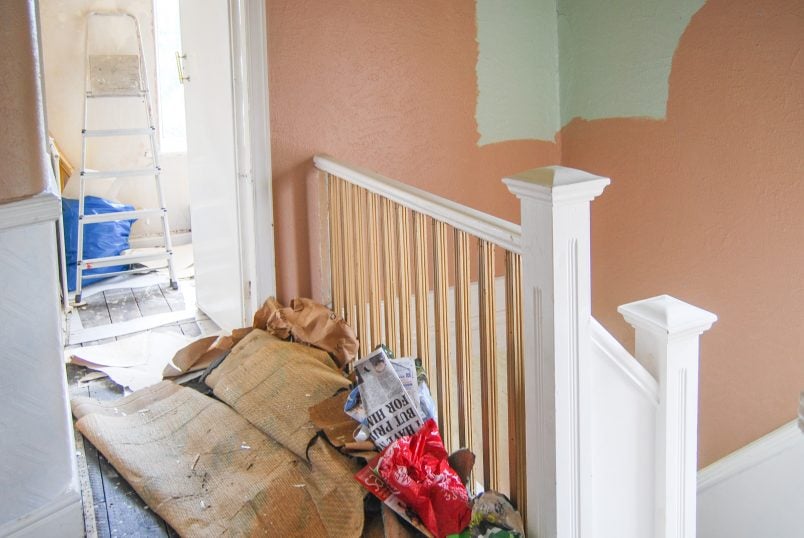
This was the upstairs landing when we viewed the house.

Upstairs Landing Before with Brown Walls

The first task was to remove the boards that were covering up the original balusters. (We removed the awful carpet in the hallway, too)

Edwardian Hallways with unrestored Banister and Handrail

Although we are painting all of the woodwork throughout the house, the existing paintwork on the balusters was in an awful state, so that we couldn’t just paint over it.

Original Baluster

The paint was chipped and some of the board that had been covering the balusters had stuck to the paintwork. We started stripping away the paint with a heat gun.

Baluster Semi Stripped

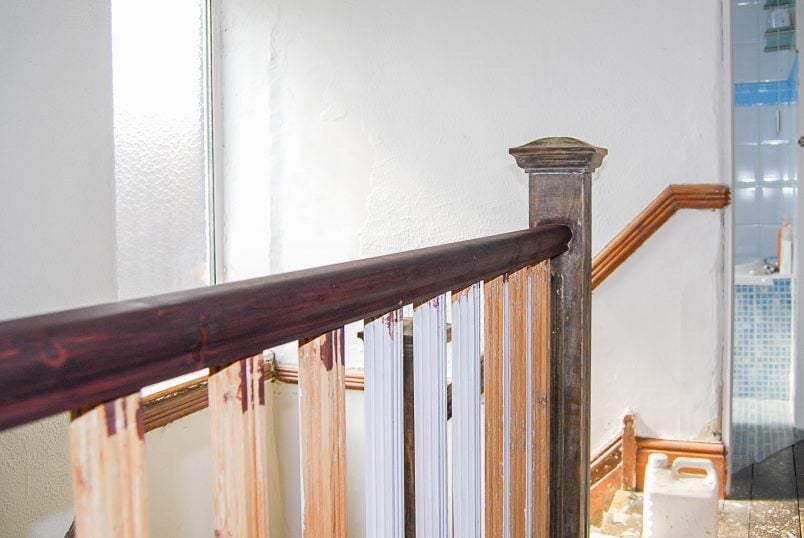
This took forever, as the paint was really gooey and got stuck in the decorative moulding. Then after hours of stripping paint, came hours of sanding everything. After about 40 hours if work, this is what it looked like.

How To Stain A Handrail - Completely Stripped Handrail

The handrail originally had a brown stain (that you can still see on the newel post), which we completely sanded away so that it wouldn’t affect the colour of the new stain.

To remove every last bit of dust, I wiped the surface with white spirit and let it dry. The general plan is to paint all vertical surfaces white and stain all horizontal surfaces a deep rich brown. After trying a few different stain colours and eventually decided on a rich mahogany colour.

The first coat of stain left the wood looking more purple than brown,  but after the second coat, it darkened considerably and looked more like I’d expected.

How To Stain A Handrail or Banister - Staining in Progress

I used an old cotton rag to apply the stain but made a fatal mistake…

How To Stain A Handrail - Wear Gloves

… I didn’t wear gloves. Other than that, the stain was really easy to apply and gave a very even finish.

Mahogany stained handrail

To finish off, I covered the handrail with two coats of wax and gave the whole area a really good polish. We used clear wax, but it still darkened the colour of the stain slightly.

Stained Handrail

The finish is amazing. It’s so smooth and shiny – we can’t stop touching it! You can see that we have also started painting the balusters, but we are still a very long way off completely finishing the whole staircase. As always, we will keep you updated on our progress.

Christine 5 Comments

the PAST
the FUTURE

Subscribe To Our Newsletter

Sign up with your email address for secret projects, DIY advice & lots of fun!

Privacy Policy

Leave a Reply Cancel reply

Your email address will not be published. Required fields are marked *

This site uses Akismet to reduce spam. Learn how your comment data is processed.

Comments

  1. Jim says

    04/10/2016 at 09:26

    Hi Christine,
    Love the website, so many inspiring projects, and it’s great to get advice on tips, tricks and pitfalls be aware about.
    I’m in the process of tackling the stairs in our 1930’s semi and have a quick question about staining the handrail… I think I can see from the pictures you stained the underside of the handrail. Did you mask of the balusters when applying the stain or will the paint cover any stain which you might inadvertently get on the balusters?
    Cheers
    Jim

    Reply
    • Christine says

      04/10/2016 at 11:14

      Thanks, Jim! Yes, we stained the underside of the handrail. We masked the balusters to avoid getting the stain on them but inevitably there were a few smudges and stains where there shouldn’t have been. I wouldn’t worry about it too much as the stain was easy to paint over (it took a few extra coats though). As always I’d recommend trying on one baluster first just to make sure that your paint covers the stain, too!
      Cx

      Reply
      • Jim says

        04/10/2016 at 15:32

        Thanks Christine,

        I’ll let you know how I get on (and I’ll remember gloves!) . Mind you, I’ve still got some of the stripping and all of the sanding to look forward to, so it might be a while before I get to stain anything!

        Cheers,
        Jim x

        Reply
  2. Jenny says

    05/12/2013 at 07:11

    I know this post is from awhile ago but I was wondering if you could tell me what makes of strain and wax you used? This is just the look we are going for, it looks great!

    Reply
    • Christine says

      05/12/2013 at 15:37

      Thanks for the compliment, Jenny! The stain we used is Fiddes Non Grain Raising Stain in mahogany (I think we applied 2 coats). We were really happy with the stain and it was really easy to apply. The wax is just a standard wax that we picked up at our local timber yard.
      Good luck!
      Cx

      Reply
Painting Checklist

Our Favourite Tools

*Contains Affiliate Links*

Things To Know

ABOUT US

CONTACT US

DISCLAIMER

Privacy Policy

Shop Our Home!

OUR FAVOURITE TOOLS

SHOP OUR HOME

Disclaimer

As an Amazon Associate I earn from qualifying purchases.

Please read our full disclaimer here!

Let’s Be Friends!

Keep Up To Date!

Subscribe for exclusive content and tutorials!

Thank you!

Copyright © 2022 · Little House On The Corner · This Website is powered by Cloudways and the Genesis Framework