I like things to work without seeing (or knowing) how it’s done. I like things to be tidy, neat and done in a particular way. Most importantly though, I like to hide things.
This is probably one of the reasons that I hate TVs and all gadgets that seem to go with them.
Not only do you end up having a big black box on the wall or stood on your side table, but you then also have a load of mostly ugly black boxes that end up going with it.
Not to mention the tangled mess of random cables and remotes that seem to take over the corner of your living room and whose sole purpose it seems to be to collect dust.
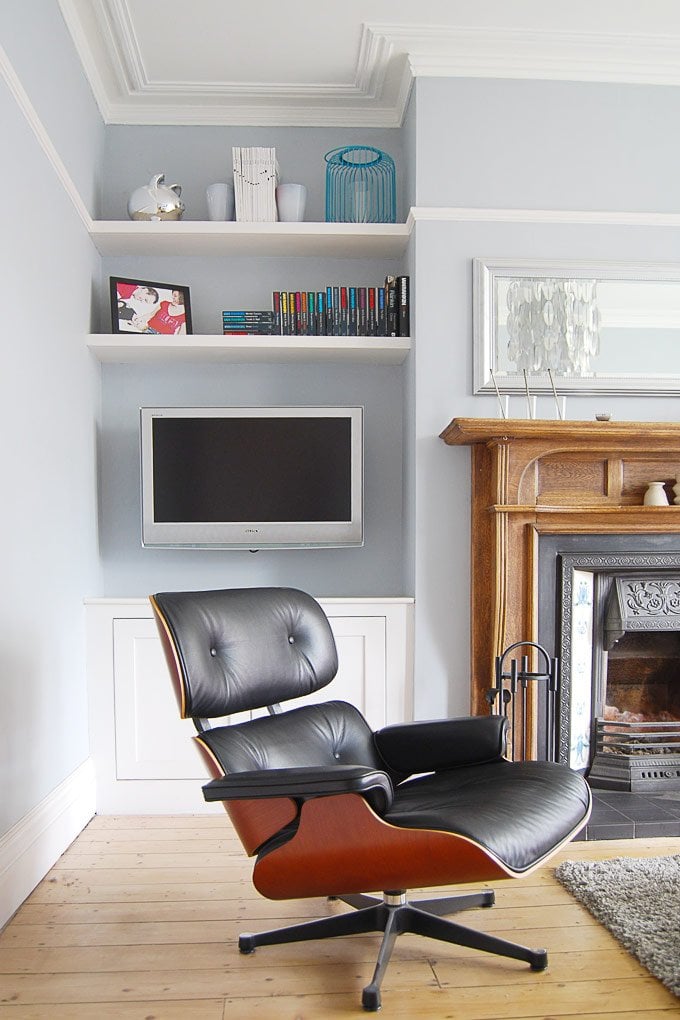
To combat my hatred of all things cable, one of the first decisions we made when we moved into our home was to have some sort of built-in storage on either side of the fireplace in our living room to be able to hide – well, let’s face it – everything!
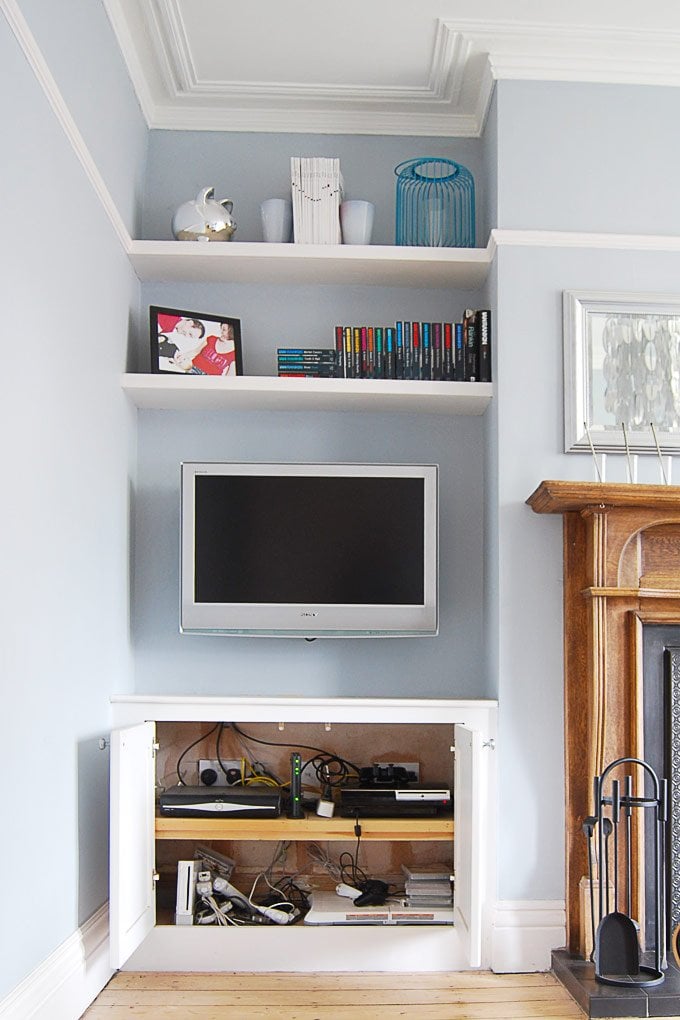
Taking my anti cable addiction to the next level, we not only built two cupboards to house all of our junk, but we also sunk some cable trunking into the wall so that we could have the TV wall mounted and still connect everything in the cupboard below and still not see any cables.
Now, if you’re wondering how we control our skybox when the cupboard door is closed and everything is out of sight – well, we don’t. Or at least we didn’t until now, as we’ve finally installed a sky eye!
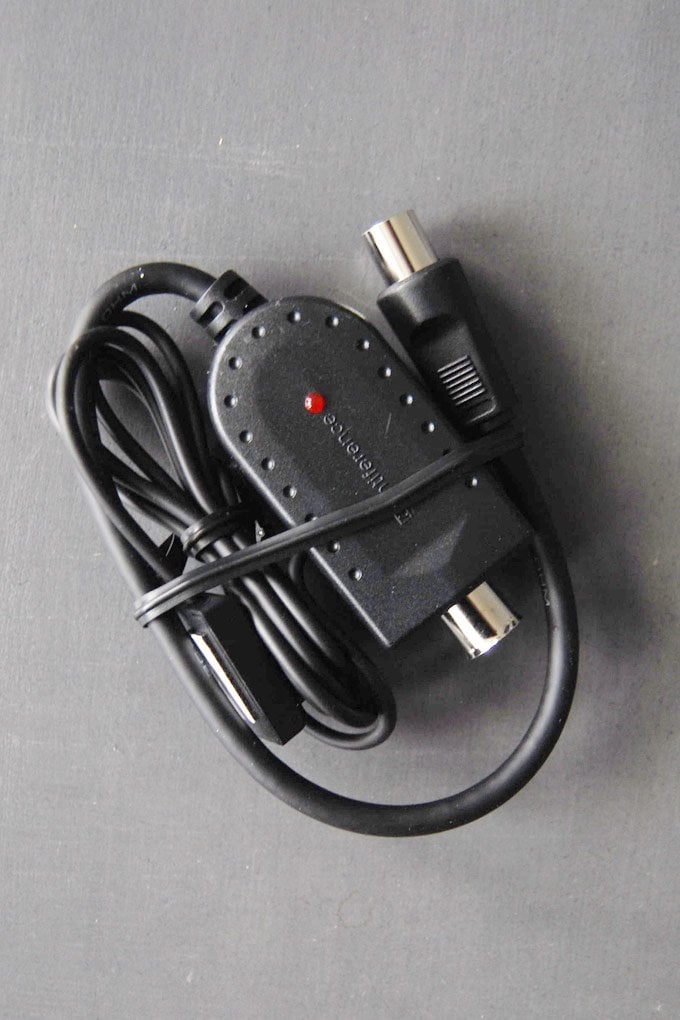
If you’ve not heard of this fantastic invention, it’s this little gadget.
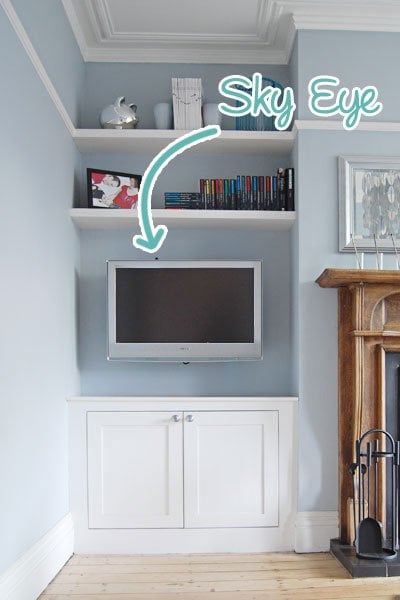
It connects to the back of your sky box and sits on top of your TV. You can then change channels no matter where your skybox is hidden – even in a different room! So simple, but so effective.
This is how to hide your Sky Box and this is what you’ll need:
This post contains affiliate links. As always, we only share products we love and think that you will, too!
- Sky Eye (We use this Sky Eye Sensor
)
- Coax Adapter – female to female (this is the adapter that we used)
- Coax Cable (We used this coax cable
)
This is how to install the Sky Eye:
- Connect the female-to-female coax adapter to the Sky Boxes’ RF2 output.
- Now connect the coax cable to the other end of the female-to-female coax adapter.
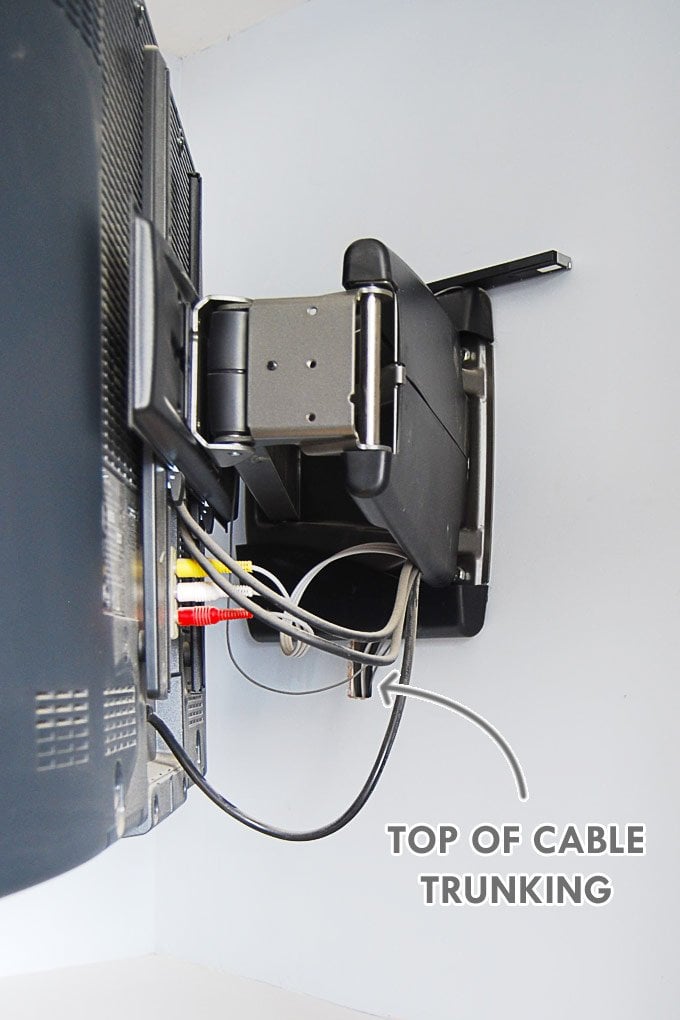
- The last thing to connect is the Sky Eye to the end of the coax cable. Try to hide the cable as much as possible (we have cable trunking in the wall that we run all cables through). The only part that has to be visible is the little Sky Eye itself.
- Now all that’s left to do is to actually set up the Sky Eye. The Sky Eye is powered by the RF output of the Sky Box. To activate it, you’ll need to go access the secret engineers’ menu of the Sky Box. To do this, press ‘Services’ on the Sky remote control, then type 4 0 1 and press ‘Select’. (If you have a Sky+ HD boxes, it’s ‘Services’ and press 0 0 1 and press ‘Select’). Now go to ‘RF Outlets’ and turn on the power to RF2. A little LED light on your Sky Eye should now light up showing you that it’s activated.
Oh, and in case you’re thinking it’s impossible to watch TV while it’s stuck in the recess – you’d be right!
That’s why our TV is mounted on an amazing TV bracket that allows you to swivel the TV out and rotate it 180°. This is a bracket similar to the one we have (we’ve had ours a while and the exact model isn’t available anymore). It’s pricey but we felt like it was a splurge worth making given that we didn’t want our TV to fall off the wall!
Has it ever taken you years to get around to doing or finishing a project? Do you hate cables as much as I do? Do you have any other tips on how to hide your sky box?
SHOP OUR DIY ESSENTIALS


Anj says
hi there
the skybox one of my clients uses only has a usb port free – is there a way I could use the system you are recommending but with a USB connector instead of coax?
Christine says
I’m not sure what solution would be best as our Sky Box was older and that’s what worked for us. Sorry, we don’t know more. Maybe someone reading your comment can help?
Cx
Eamonn says
Hi,
I seen someone commenting in 2017 and saying they were late to this thread and here is me coming in at the end of 2021.
This website is a gem.. only after discovering it and spent the last 5 hours on it.
Anyhow, to get to the question;
I have a 2 sky boxes. One in bedroom and one in the sitting room. I would like to be able to watch one from the kitchen but I do not want to either pay for another one or move the other 2. As you can imagine the bedroom one (you’ll never guess) is used at night time and I was thinking about installing one of these Magic Eyes in the Kitchen to operate the bedroom one. So (finally) the question.. Will I be able to change channels from the kitchen via the eye? Is it expensive?
I am guessing from the post, I will also have to run a cable from the bedroom which would be no problem. Is the cable the normal TV cable or is there specialised ‘Sky TV Cable’?.. possibly a dumb question!
Thanks a million in advance and keep up the good work.
Christine says
Thank you so much for your kind comment, Eamonn! I completely understand what you’re planning, I’m not sure if it will be possible though. A lot will depend on the type of skybox you have, as I’m not sure the sky eye will work on newer models. I’d love to be more help, but I’m afraid I don’t know what solution would work best for you.
Maybe someone else reading this thread as some advice?
Cx
Lily says
You need a receiver and transmitter that you plug into a wall socket. We bought one years ago from Argos. I presume you can still buy them.
Amazon has everything.
The transmitter is plugged in your bedroom and the receiver plugged in one of the rooms you wish to use the Sky box, pointing at the infrared receiver on your sky box. This won’t work with Sky Q. Only old boxes.
Sorry its a year late but might help someone else.
Diane says
Hello
Thanks for the info, I’ve set mine up but when I go to the settings it just gives me RF outlets on that page it says FR channel number and RF on or off, I pressed on but not working ? hope someone can help x
Christine says
I’m sorry but I’m afraid that I don’t know how to help. We don’t have a sky box anymore, so it’s difficult for us to check it for you. What kind of sky box do you have? Hopefully, someone else reading this can help!
Cx
D says
That cupboard is far too small for all that kit. At best you will reduce the life of your electronics, HDDs, etc. An at worst you will end up with a fire.
Christine says
We had ventilation in the cupboard so it wasn’t a problem. Of course, this is only a solution you can use if you’re careful about things like that.
Cx
Hannah says
Hi! I’m super late to this thread but found it really useful and have managed to hide my sky+ box so thank you. Hooray! As I’m not doing this to link it to another TV, one end of the magic eye has nothing to plug into (the short coax cable). The other end is connected to the separate coax 1M cable which is then connected to the back of the sky+ box. I’m just wondering if I should connect this to something or leave it as it is? It’s working fine without. Thanks in advance!
Hannah says
Forgot to add… I hope that makes sense!
Christine says
There’s no need to connect anything else to the other end, Hannah.
Cx
Hannah says
Thats great. Thank you x
Peter Hollis says
hi
I have what seems to be the same sky box as you and I have used the same eye as you, plugged into my RF2. I have secret engineered and powered it up and it allows me to use the sky remote to operate the sky box when the cupboard door is closed. My problem is that every time if change the shy channel the TV picture is zoomed. If I remove the eye from RF2 this stops (leaving the cupboard door open to use the sky remote as standard). Does anyone else have this problem and better still a solution ?
Christine says
We didn’t have any problems, Peter – hopefully, someone else can help you!
Cx
Roger says
Hi very interesting site my question would be does the eye work when I have a Sky Q box instead of older boxes mentioned in previous threads
Many Thanks
Roger
Christine says
As far as I know, the Sky Q box hasn’t got an R/F out socket so the Sky Eye won’t work. But apparently it has a Bluetooth remote control, so you can change channels through the closed cupboard door. Please double check as this though as we only had the old box.
Cx
Daniel says
Hi Christine, very helpful website and just what I need for redecorating. At present I have the tv on the wall connected with a HDMI cable fitted behind the wall. The sky box sits just below on a display unit. Ideally I want a new unit which hides the sky box. Following your instructions above all I need a sky magic eye connected to my sky box and I can hide the box?
Christine says
In theory, it should work but there are few things you may want to check first. Does your Sky Box have an Antenna Out socket (RF2) as that’s the one that powers the sky eye? Are you able to turn the power on in the settings in the secret engineer’s menu? To do to this, press ‘Services’ on the Sky remote control, then type 4 0 1 and press ‘Select’. (On most Sky+HD boxes, it’s ‘Services’ > 0 0 1 > ‘Select’). Then go to RF Outlets, and turn on the power to RF2.
If you haven’t got the RF2, then your box is a newer model and the sky eye may not work for you.
Hope that helps!
Cx
Daniel Pirie says
Hi again, that helped very much. I can chnage the settings and the box has rf1 and rf2. Rf2 is currently connected to my bedrooms magic eye. Can I just presumed that to when I get a new unit to hide my box, I leave rf2 plugged into my bedroom and with a new Sky eye for the livingroom plug into rf1?
Christine says
We never tried 2 magic eyes. But as RF2 is the only one that has power, I would think that a magic eye in RF1 wouldn’t work.
Hope that helps
Cx
Sean says
If you haven’t got rf output you need I/o lead for new sky boxes just worked it out just so you know
Christine says
Thanks for sharing, Sean!
Cx
Sean says
Quick question..How long is the cable that the actual eye is connected too?
Christine says
Sorry Sean, we’ve just moved and no longer have the sky box and I’m afraid that I can’t remember how long the cable was.
Cx
Sean says
Does this effect the picture quality? As I’m about to buy a new TV and hide the sky box basically behind a wall so only thing that’s on the wall is the new tv didn’t wanna jeopardise picture??
Jan says
Hi Sean,
we still use the HDMI cable for the picture and sound, the coax cable is only there to switch channels, so the picture quality is not impacted in our setup.
Hope that helps
Jan
Sean says
Cheers ordered the parts you listed. My sky box will be completely hidden now
Esther says
Fab idea! On a completely different note – love the colour you used on the walls! What is it? Am decorating and have already been through more tester pots than I care to mention!
Christine says
The colour is by Dulux. It’s called Steel Symphony 4.
Happy painting!
Cx
Jack Andrews says
Hi, I am looking at doing this on my new TV but I would also like to run the same thing on a TV upstairs in the bedroom do you know if its possible to have 2 sky eye’s running from 1 box? (Appreciate you can only watch the one channel).
Thanks
Jan says
Hi Jack,
our sky box had only 1 RF Output, if I remember correctly. So you can only connect 1 Sky Eye at a time. (even if it had 2 RF outputs, I don’t know if you can put a signal on both at the same time).
There are options to split an antenna or HDMI feed though, but I never used any of these, so cannot tell if they work. Might be worth looking into…
Hope that helps
Jan
Karli says
Hello, could you tell me what colour paint this is on the walls please? Lovely.
Christine says
Thank you, Karli! It’s Steel Symphony 4 by Dulux.
Cx
Natasha says
Hi, i just wondered if you could let me know where your chair is from? Thanks!
Christine says
It’s an Eames Lounge Chair – you can get it here from John Lewis.
Cx
Nikki Samuels says
Hi Christine,
Great forum, exactly what I’m looking for. I just received my TV Eye, however, I’m trying to figure out which socket I put it into. As I have to RF sockets at the back of my box, however my Eye won’t fit in neither of them. And is there a setting you have to change on your actual sky box?
Thank you
Jan says
Hi Nikki,
I think you will need an adapter or a cable with the ends that fit into the sky box and into the sky eye. If I remember correctly, the box and the sky eye have the same type of connector, so you need an adapter that both end go into. As we wanted to use the sky eye a bit further away, we used an old coax cable that had the right connections on it.
You will need to connect it to RF 2, as that is the one the can power the sky eye. Then you need to ensureY that the RF2 socket has the power turned on to it. This is a setting in the secret engineers menu.To get to this, press ‘Services’ on the Sky remote control, then type 4 0 1 and press ‘Select’. (On most Sky+HD boxes, it’s ‘Services’ > 0 0 1 > ‘Select’). Go to RF Outlets, and turn on the power to RF2. That should work, fingers crossed
J
Phil says
Hi there,
I’ve just bought one of these. Just wondering how old was the sky box? Mine doesn’t seem have an rf out :/
Cheers! Like the look of your site :)
Christine says
Oh no, how disappointing! Our Sky box is from roughly 2010. We’ll definitely have a look at a newer box and check if there’s another way around the problem.
Thanks for letting us know!
Cx
Leyla says
Hi, anyone have any luck with finding an eye for V+ box? We are in the process of putting our TV on the chimney breast and would love to be able to hide the cables!! Thanks in advance. Leyla
Christine says
We’ve actually just switched to Virgin, but haven’t updated the eye yet. We’ll try and get it done and keep you updated.
Regarding your cables, just remember that your TV is still connected to the box with cables, the eye just allows you to put the box somewhere hidden.
Cx
Owain says
Hi, sorry to ask on a 2 year old post but any luck on getting one of these for your virgin box?
Christine says
Always happy to help if we can. I don’t think this solution is possible on a Virgin box. What you can possibly do is connect your box via Ethernet to your router and use your smartphone and a Virgin app to control it.
Cx
Michael Campbell says
Hi,
Can you get a sky eye for the playstation? I only use mine to watch dvd’s so i’d like to be able to hide it away too.
Christine says
I don’t think that a sky eye would work, as it’s a differnt kind of sensor for the playstation. You’d be surprised at how well the Playstation controller works though – we tested ours and tried controlling the Playstation while standing in another room and it worked well. I’d recommend trying the same with yours and then you’ll know if you can move it to a more hidden place. Just remember that the Playstation gets very warm and needs lots of fresh air and shouldn’t be in a closed cupboard when it’s running. We always leave our cupboard open as wide as possible when the Playstation is on.
Hope that’s some help.
Cx
Michael Campbell says
thanks very much for your prompt response.
is there any type of magic eye you would recommend?
Christine says
This is the Magic Eye that we have and are happy with. It works great with our TV and Sky box.
Cx
Gavin says
Hi there
Great idea – I have a small question though – I don’t want to run another TV in a room with this. Like you – I just want to cover all the boxes up and just have a small receiver to use the remote. Where do you plug it in and do you need additional wires to power it. As said I only want to use this as a IR extension so the box can stay in the cupboard and we can still change channels on the loving room TV.
Sorry to waffle – hope you can answer!
:-)
Christine says
Hi,
the sky eye that we used is plugged in to the antenna output of the sky box. You can activate the antenna output to power the sky eye, so that no other power source is needed.
Hope that makes sense.
Jan
Gavin says
Thank you so much! Ordered one for our project too now!
All the very best!
Gavin
Christine says
You’re welcome!
Cx
Dave says
The output would not be HD. We’ve had one for years and that is my only gripe. Or am using it incorrectly??
Jan says
Hi Dave,
we connected the television through a HDMI cable and we only use the Sky Eye to change the channels on the Sky Box. Using a Magic Eye wont affect you watching HD.
Hope that makes sense
Jan
Lenny Hummel says
Thanks so much for you site, Moved to a new home and hate cable boxes and wires with a passion. Lucky for me existing built ins in the den has a seating box which is (76″L x 29″D x 18″H) and the recessed wall above is 76″ x 76″. A perfectly enclosed square. Placing a 78″ 4 K Ultra H D Samsung on that wall and really excited. Since the seating box is hollow I wanted to hide the wires and cable box inside but had no clue how to make the cable box change channels. NOW I DO!!! With sincere regards and great appreciation, Lenny from Lloyd Harbor, N.Y.
Christine says
Congratulations on your new home, Lenny! So glad to hear that we could be some help. Just remember, that (depending on the type) you may need some ventilation for your cable box.
Cx
Lenny says
We are all done 75″ 4k Ultra HD Samsung installed !!! No visible wires and bracket with arm allowed the TV to appear to be floating in air. Thanks again for your excellent site. Sincere regards, Lenny
Christine says
Thank you so much for your feedback Lenny! So happy to hear that we’re able to help (even if I’m slightly jealous of your new TV ;) )
Cx
Nadine says
What a fab gadget! I’m a bit of a luddite but hate trailing wires and cables. We have our tv on a horrible modern unit because it has an open front. Now I know we can use a cupboard instead I’m going to get it changed!
Thanks.
Christine says
I definitely think you can make an exception when it comes to cables, Nadine. Just remember that some electrical gadgets need ventilation – we still have to have the cupboard open when the Playstation is on…
Cx
Meic says
Thanks for such a fantastic website! So inspiring!
How did you sort out the lovely cupboards you have in your alcoves?
Lizzy says
Buying one now! I have to sit with the cupboard door open so that I can change the channel on my Virgin box – need to check it’s compatible, fingers crossed. Like you I hate all the boxes and cables that go with all the electricals we have these days! Glad I visited your blog today for an update!
Christine says
That’s exactly what we used to do, Lizzy! It’s amazing what a difference a little gadget for just a few pounds can make. Not sure if the eye we used is compatible with Virgin boxes, but there’ll definitely be one available that is.
Cx
Paul says
Does this work with the newest sky box
Christine says
As far as I know, the Sky Q box hasn’t got an R/F out socket so the Sky Eye won’t work. It may have a Bluetooth remote control, so you can possibly change channels through the closed cupboard door. Please double check this though as we only had the old box.
Cx
Ton Yee says
That’s genius. Was this process hard to achieve? I wouldn’t know where to begin.
Christine says
It was really easy! The cable trunking is just placed into a recess that we drilled into the wall and plastered over. Then we just fed the cables through the channel to the TV. As for using the sky box in the cupboard, we used this Magic Eye in combination with a coax cable. The cable is fed through the cable trunking and connected to the sky box, the magic eye is then connected to the other end of the cable and positioned on top of the TV. Really straight forward! Wish we’d done it ages ago!
Cx
VAIOWoman says
There is no longer any need to buy a magic eye ? if you have Sky HD with Wi-Fi. Installed mine in a chest of drawers in the bedroom. I just removed the top right hand twin drawer and the box just spotted in over the wooden drawer runners inside, then removed draw front panel and fixed in position so that it could be removed easily. Oh and drilled holes in rear of chest for additional air and any connection wires. Wires hidden behind chest as enough recess to neatly fix in place. The remote works perfectly with the drawer front on. “Sorted”..☺?
Christine says
That’s good to know for anyone with a new box. Thanks for sharing.
Cx