MENUMENU
  • Home
  • About Us
  • Work With Us
  • Our Favourite Tools

Little House On The Corner

DIY & Home Improvement

MENUMENU
  • Blog
  • Projects
    • Our Favourite Projects
          • DIY Outdoor Daybed with Canopy
          • DIY Outdoor Daybed With Canopy

          • DIY Epoxy Resin Dining Table
          • DIY Epoxy Resin Dining Table

          • 5 Floor Sanding Mistakes And How To Avoid Them | Little House On The Corner
          • What No One Will Tell You About Sanding Your Floors

    • Home Improvement & DIY
          • Hallway with Paean Black Front Door After Editing With Interior Presets for Lightroom by Little House On The Corner
          • How To Create A Home Renovation Budget

          • Floorsanding In Progress
          • What No One Will Tell You About Sanding Your Floors (& How We Did It)

          • How To Plan & Install Panelling | Little House On The Corner
          • How To Plan & Install Panelling

    • Painting & Decorating
          • painted wardrobe in Soumak by paint & paper library
          • How To Paint A Wardrobe

          • Dark Blue and Grey Painted Kitchen Cabinets
          • How To Paint Kitchen Cabinets + Tips For A Professional & Long Lasting Finish

          • What To Do When You've Chosen The Wrong Paint Colour?
          • What To Do When You’ve Chosen The Wrong Paint Colour & How To Fix It!

    • Furniture Upgrades
          • DIY Slatted Radiator Cover
          • DIY Slatted Radiator Cover

          • Beat Floor Lamp and Bar Cart
          • DIY Bar Cart

          • DIY Dining Room Bench | Little House On The Corner
          • DIY Dining Room Bench

    • Outside & Garden
          • DIY Logstore
          • DIY Log Store

          • DIY Slatted Garden Fence | Little House On The Corner
          • DIY Slatted Garden Fence

          • How To Lay A Gravel Driveway
          • How To Lay A Gravel Driveway

    • Free Printables
          • Cleaning Checklist - Free Printable
          • The Best House Cleaning Checklist

          • Free Printable Paper Houses for Advent Calendar
          • DIY Printable Advent Calendar Village

          • The Easy and Free Way To Organise Screws and Nails
          • The Easiest Way To Organise Screws And Nails

    • Craft & Art
          • DIY Pegboard
          • DIY Pegboard

          • DIY Modern Geometric Serving Tray
          • DIY Modern Geometric Serving Tray

          • DIY Guess Who Game - Setting Out Board | Little House On The Corner
          • DIY Guess Who Game

    • Cleaning & Organizing
          • Cleaning Checklist - Free Printable
          • The Only Cleaning Checklist You’ll Ever Need

          • DIY Floating Spice Rack | Little House On The Corner
          • DIY Floating Spice Rack

          • 30 Day Spring Clean Checklist - Little House On The Corner
          • 30 Day Spring Clean Challenge

    • Holidays & Festivities
          • DIY Giant Star and Snowflake Light | Little House On The Corner
          • DIY Giant Star and Snowflake Light

          • Free Halloween Printable Book Covers
          • Halloween Book Covers (Free Printable!)

          • Gingerbread style paper advent calendar village - Little House On The Corner
          • DIY Printable Advent Calendar Village

  • House Tour
        • Our Edwardian House
        • Our Edwardian House (1st Home)
        • Our Berlin City Centre Apartment
        • Our Berlin City Centre Apartment (2nd Home)
        • Take The Tour | Our Art Nouveau Apartment | Little House On The Corner
        • Our Berlin Art Nouveau Apartment (3rd Home)
        • berlin riverside apartment house tour
        • Our Berlin Riverside Apartment (4th Home)
  • Shop
    • The Little Corner Shop
    • Shop Our First Home
    • Shop Our Current Home
    • Our Favourite Amazon Finds

DIY Pop Art Magnets

  • Facebook
  • Twitter

I love magnets. I know it’s probably a weird thing to say but I think I like them so much because of my love of organising.

We have made a few magnets in the past (these DIY Concrete Letter Magnets and DIY Liquorice Allsorts Magnets) so thought it would be fun to make some more! After all, you can never have enough magnets!

DIY Pop Art Magnets - Make Your Own Magnets - Personalise With Chalkboard Paint

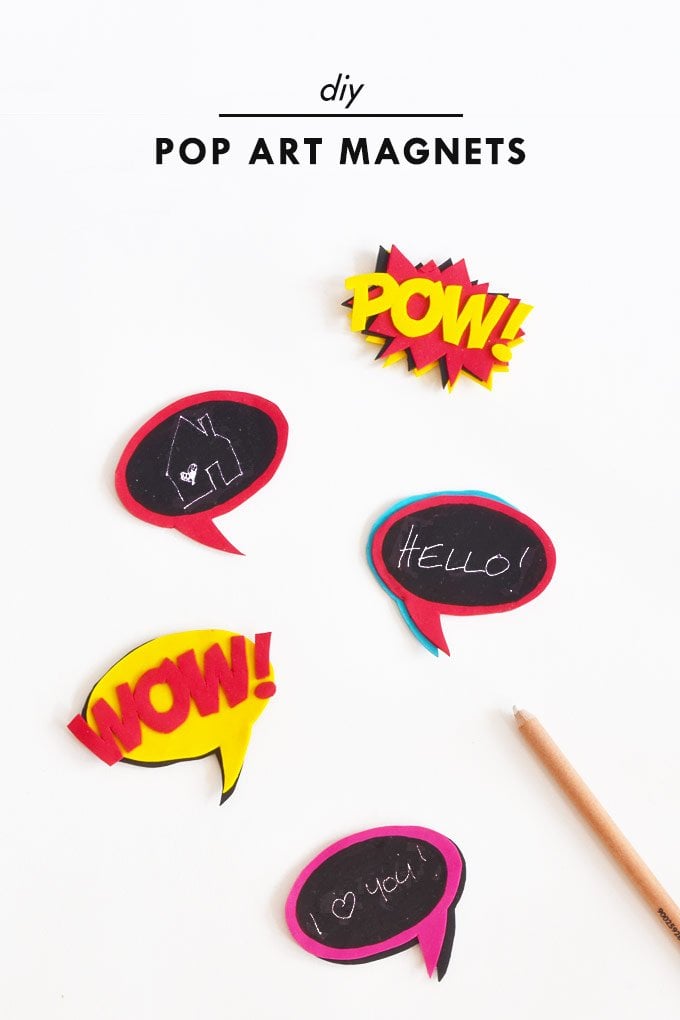
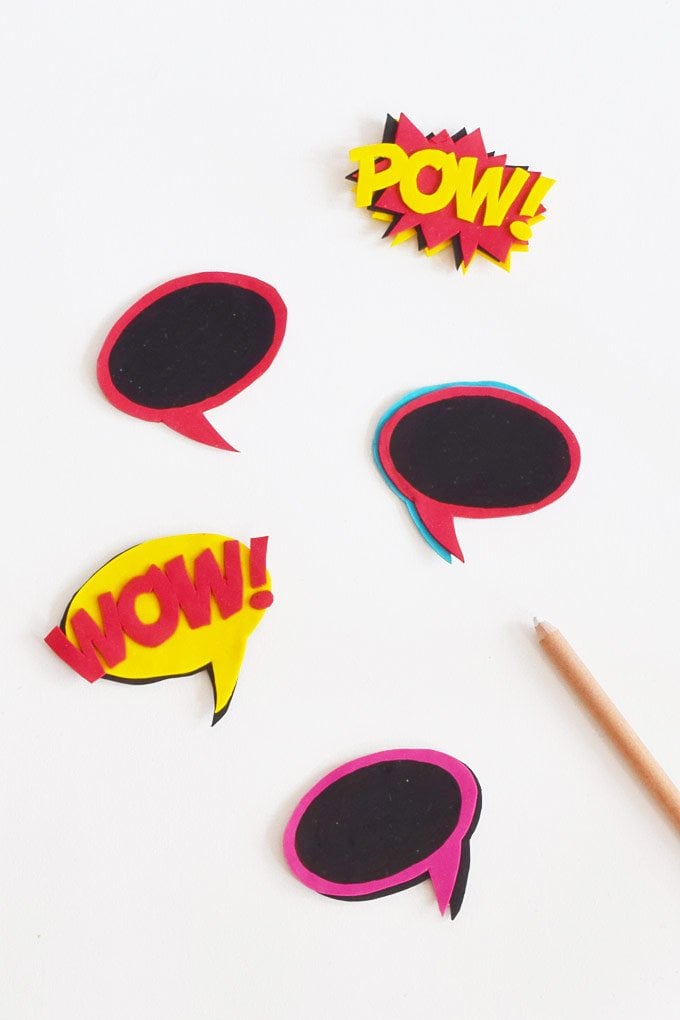
This time we’ve opted for some DIY Pop Art inspired magnets. They’re really fun and colourful and best of all you can add personalised messages to these ones, too!

DIY Pop Art Magnets

You only need a few supplies and even if they look a bit complicated to make it’s actually a really easy process.

This is what you will need to make your own DIY Pop Art Magnets:

DIY Pop Art Magnets

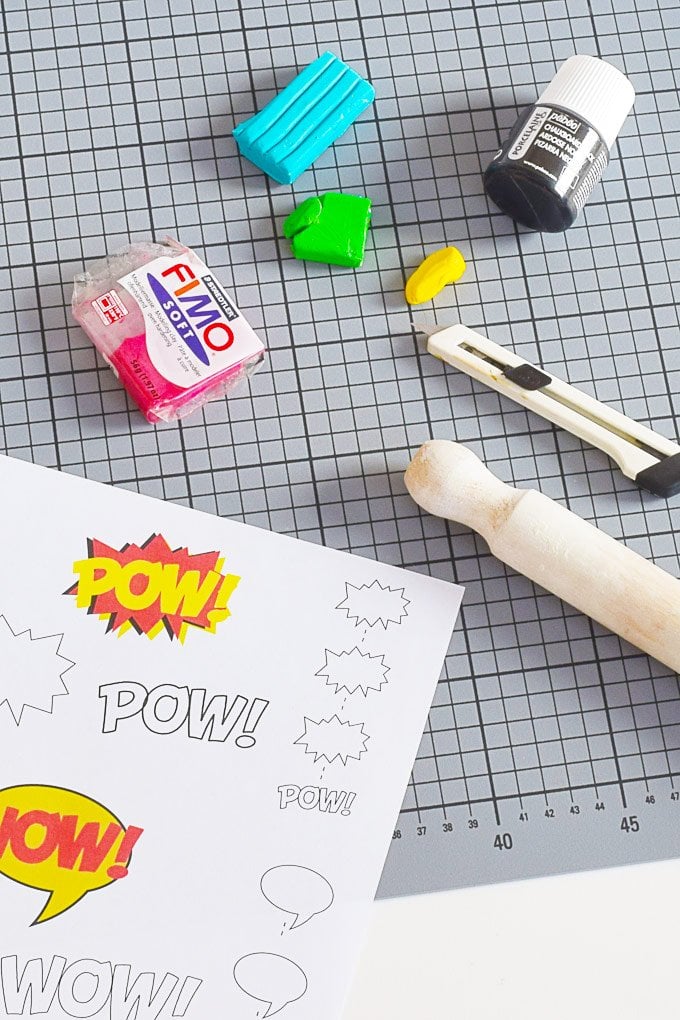
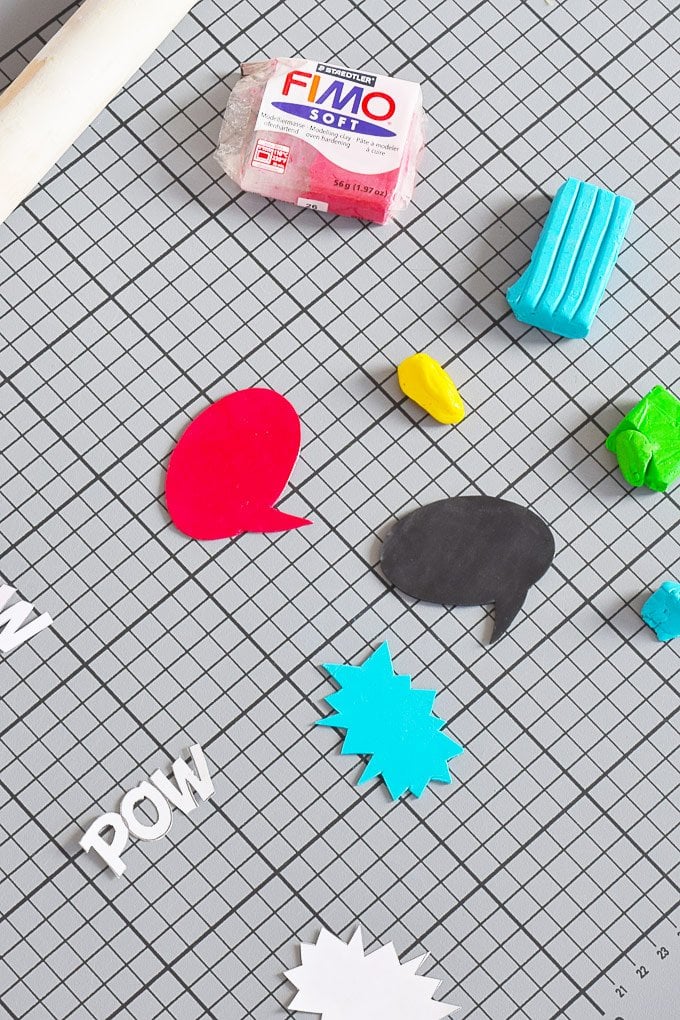
  • Polymer clay (and an oven to bake it in) I always use Fimo which is a great quality and comes in tonnes of different colours.
  • Rolling pin (use one specifically for the polymer clay)
  • Craft knife and cutting mat
  • Sheet magnets (these are the ones we have – they’re pricey but super strong. They’re the best we’ve ever used and once you’ve tried them you’ll never want to use another magnet!)
  • Template (you can download the template we made for ours for free here)

If you want to have a reusable message area, you’ll also need:

  • Chalkboard paint
  • Paintbrush
  • Chalk or chalk pencil

This is how to make the DIY Pop Art Magnets:

#1 Download the template, print it and cut out the different shapes. You can make the magnets any shape and size you want but we found it easiest to use the template as a guide.

#2 Choose the clay colours you want to use and roll each colour out to roughly the size of the template. Ideally, you want the clay to be about 1-2 mm thick. Every piece of clay will be a different layer of the magnet.

DIY Pop Art Magnets

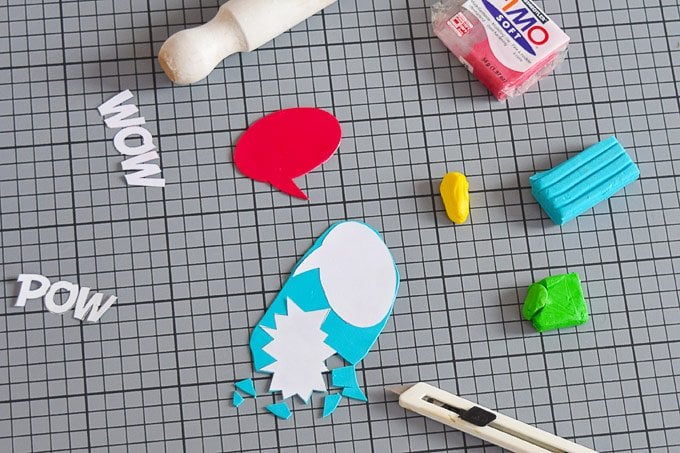
#3 Place your template onto the clay and cut around it with a craft knife. Polymer clay looks exactly the same when baked (fingerprints and all) so make sure to work as neatly as you can.

DIY Pop Art Magnets

#4 Layer your DIY pop art magnet by stacking the different pieces of clay that you’ve cut out and firmly press them together. Be careful not to squash it too much, though!

DIY Pop Art Magnets

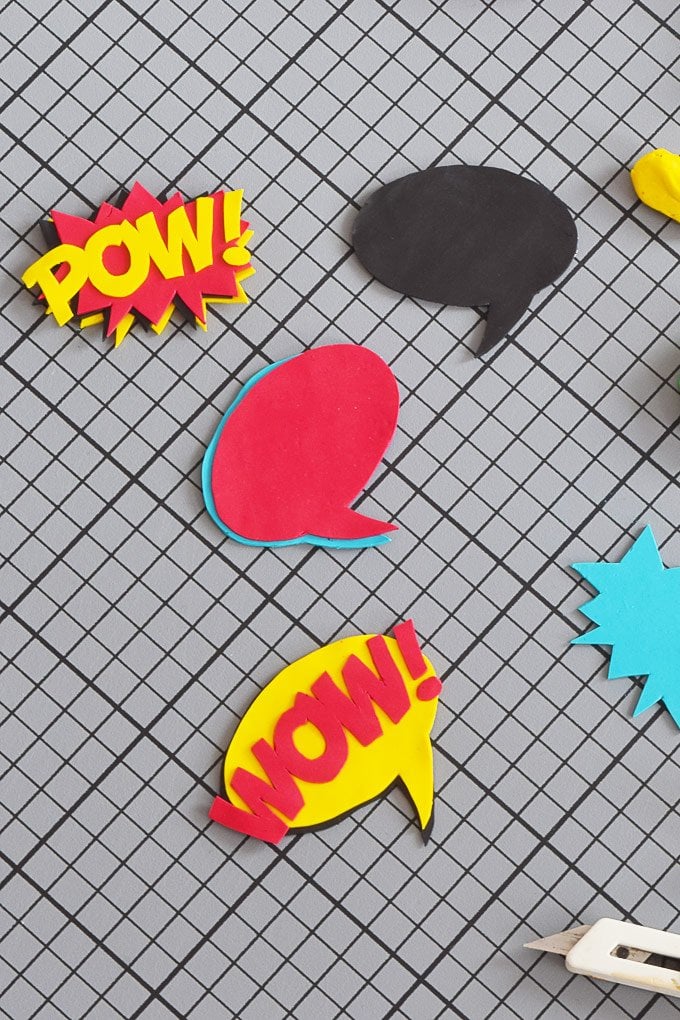
#5 Bake the shapes according to the instructions of the clay you’re using and let it cool down. If you find that your layers of clay didn’t stick together properly you can easily glue them back together with some craft glue.

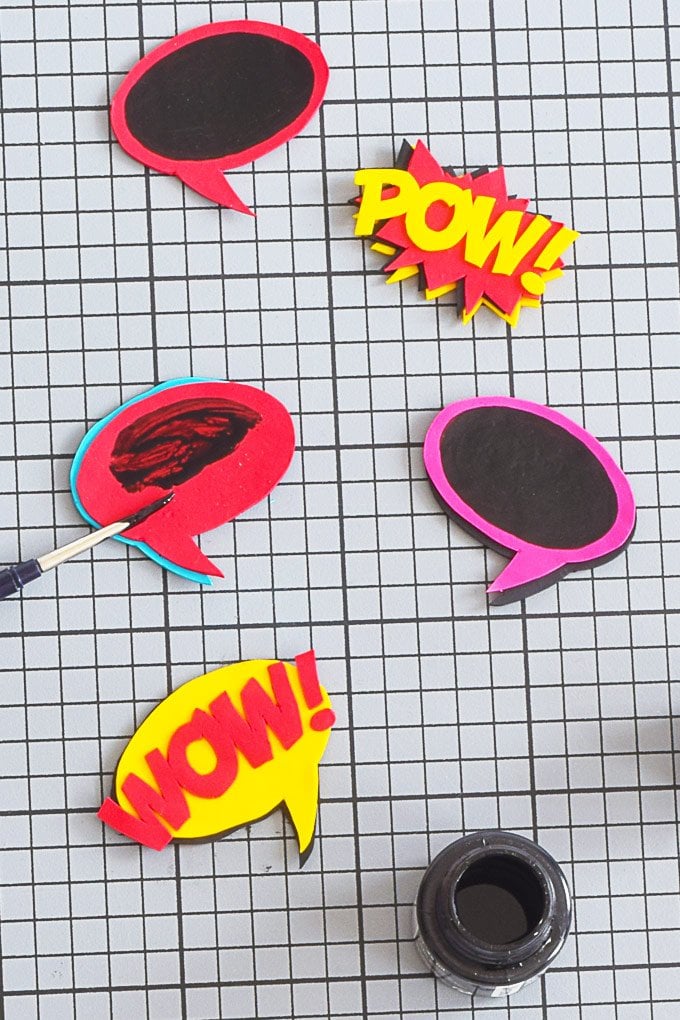
#6 To create a speech bubble area for messages wait till your polymer clay shapes have completely cooled down. Then paint some of the chalkboard paint onto the top layer of the magnet and let it completely dry. (We applied two coats.)

DIY Pop Art Magnets To Personalise

#7 All that’s left to do is add the magnet. We used neodymium sheet magnets which are ideal for this project. They’re super strong, can really easily be cut to size and already have an adhesive back so that you just need to peel back the foil and stick it to the clay.

DIY Pop Art Magnets

I’m really happy how these turned out and they definitely add a fun splash of colour to our note board. By adding messages (we used a soft chalk pencil to write them) you can really personalise them, too.

DIY Pop Art Magnets with Chalkboard Area To Personalise

Is it only me that has an obsession with magnets and staying organised?

Save

Save

Save

Save

Save

Save

Save

  • Facebook
  • Twitter

Christine Leave a Comment

the PAST
the FUTURE

Subscribe To Our Newsletter

Sign up with your email address for secret projects, DIY advice & lots of fun!

Privacy Policy

Leave a Reply Cancel reply

Your email address will not be published. Required fields are marked *

This site uses Akismet to reduce spam. Learn how your comment data is processed.

Painting Checklist

Our Favourite Tools

*Contains Affiliate Links*

Things To Know

ABOUT US

CONTACT US

DISCLAIMER

Privacy Policy

Shop Our Home!

OUR FAVOURITE TOOLS

SHOP OUR HOME

Disclaimer

As an Amazon Associate I earn from qualifying purchases.

Please read our full disclaimer here!

Let’s Be Friends!

Keep Up To Date!

Subscribe for exclusive content and tutorials!

Thank you!

Copyright © 2023 · Little House On The Corner · This Website is powered by Cloudways and the Genesis Framework