MENUMENU
  • Home
  • About Us
  • Work With Us
  • Our Favourite Tools

Little House On The Corner

DIY & Home Improvement

MENUMENU
  • Blog
  • Projects
    • Our Favourite Projects
          • DIY Outdoor Daybed with Canopy
          • DIY Outdoor Daybed With Canopy

          • DIY Epoxy Resin Dining Table
          • DIY Epoxy Resin Dining Table

          • 5 Floor Sanding Mistakes And How To Avoid Them | Little House On The Corner
          • What No One Will Tell You About Sanding Your Floors

    • Home Improvement & DIY
          • Hallway with Paean Black Front Door After Editing With Interior Presets for Lightroom by Little House On The Corner
          • How To Create A Home Renovation Budget

          • Floorsanding In Progress
          • What No One Will Tell You About Sanding Your Floors (& How We Did It)

          • How To Plan & Install Panelling | Little House On The Corner
          • How To Plan & Install Panelling

    • Painting & Decorating
          • painted wardrobe in Soumak by paint & paper library
          • How To Paint A Wardrobe

          • Dark Blue and Grey Painted Kitchen Cabinets
          • How To Paint Kitchen Cabinets + Tips For A Professional & Long Lasting Finish

          • What To Do When You've Chosen The Wrong Paint Colour?
          • What To Do When You’ve Chosen The Wrong Paint Colour & How To Fix It!

    • Furniture Upgrades
          • DIY Slatted Radiator Cover
          • DIY Slatted Radiator Cover

          • Beat Floor Lamp and Bar Cart
          • DIY Bar Cart

          • DIY Dining Room Bench | Little House On The Corner
          • DIY Dining Room Bench

    • Outside & Garden
          • DIY Logstore
          • DIY Log Store

          • DIY Slatted Garden Fence | Little House On The Corner
          • DIY Slatted Garden Fence

          • How To Lay A Gravel Driveway
          • How To Lay A Gravel Driveway

    • Free Printables
          • Cleaning Checklist - Free Printable
          • The Best House Cleaning Checklist

          • Free Printable Paper Houses for Advent Calendar
          • DIY Printable Advent Calendar Village

          • The Easy and Free Way To Organise Screws and Nails
          • The Easiest Way To Organise Screws And Nails

    • Craft & Art
          • DIY Pegboard
          • DIY Pegboard

          • DIY Modern Geometric Serving Tray
          • DIY Modern Geometric Serving Tray

          • DIY Guess Who Game - Setting Out Board | Little House On The Corner
          • DIY Guess Who Game

    • Cleaning & Organizing
          • Cleaning Checklist - Free Printable
          • The Only Cleaning Checklist You’ll Ever Need

          • DIY Floating Spice Rack | Little House On The Corner
          • DIY Floating Spice Rack

          • 30 Day Spring Clean Checklist - Little House On The Corner
          • 30 Day Spring Clean Challenge

    • Holidays & Festivities
          • DIY Giant Star and Snowflake Light | Little House On The Corner
          • DIY Giant Star and Snowflake Light

          • Free Halloween Printable Book Covers
          • Halloween Book Covers (Free Printable!)

          • Gingerbread style paper advent calendar village - Little House On The Corner
          • DIY Printable Advent Calendar Village

  • House Tour
        • Our Edwardian House
        • Our Edwardian House (1st Home)
        • Our Berlin City Centre Apartment
        • Our Berlin City Centre Apartment (2nd Home)
        • Take The Tour | Our Art Nouveau Apartment | Little House On The Corner
        • Our Berlin Art Nouveau Apartment (3rd Home)
        • berlin riverside apartment house tour
        • Our Berlin Riverside Apartment (4th Home)
  • Shop
    • The Little Corner Shop
    • Shop Our First Home
    • Shop Our Current Home
    • Our Favourite Amazon Finds

DIY Copper Towel Ladder

  • Facebook
  • Twitter

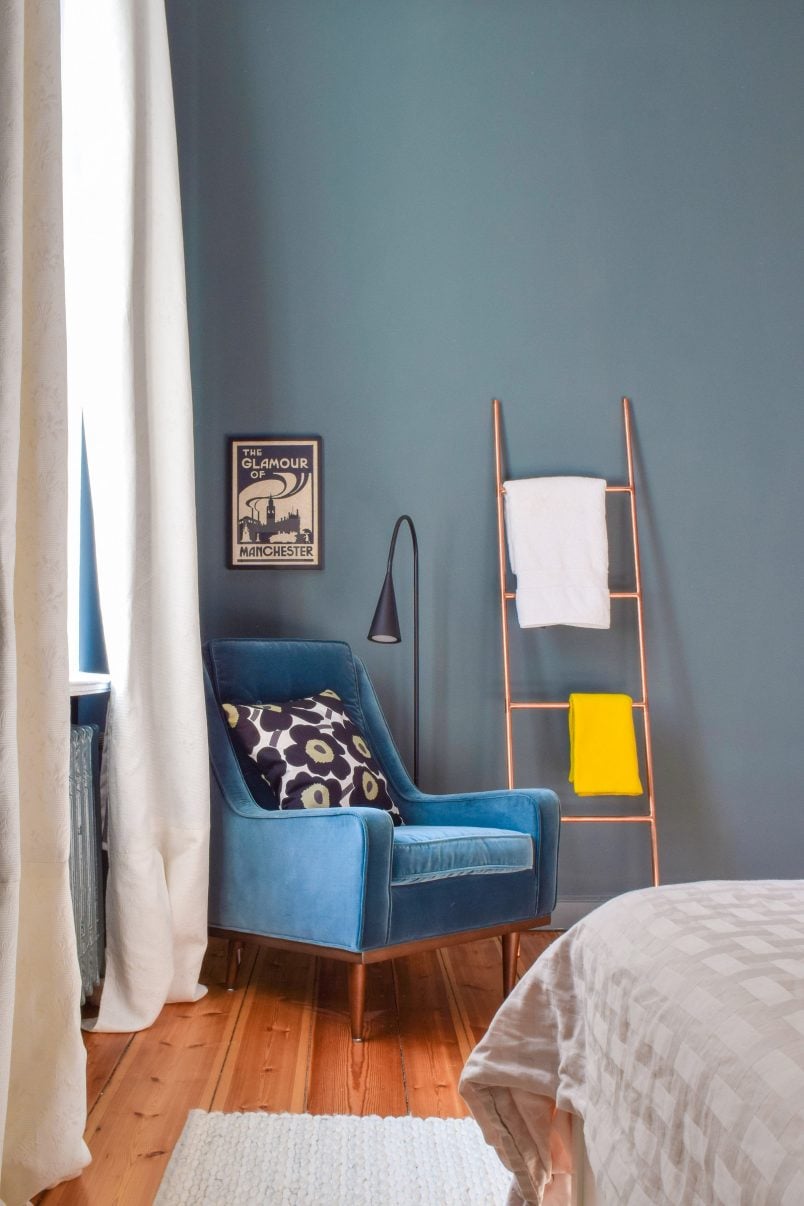
Did you see our master bedroom reveal that we shared last week?

Master Bedroom - Before and After | Little House On The Corner

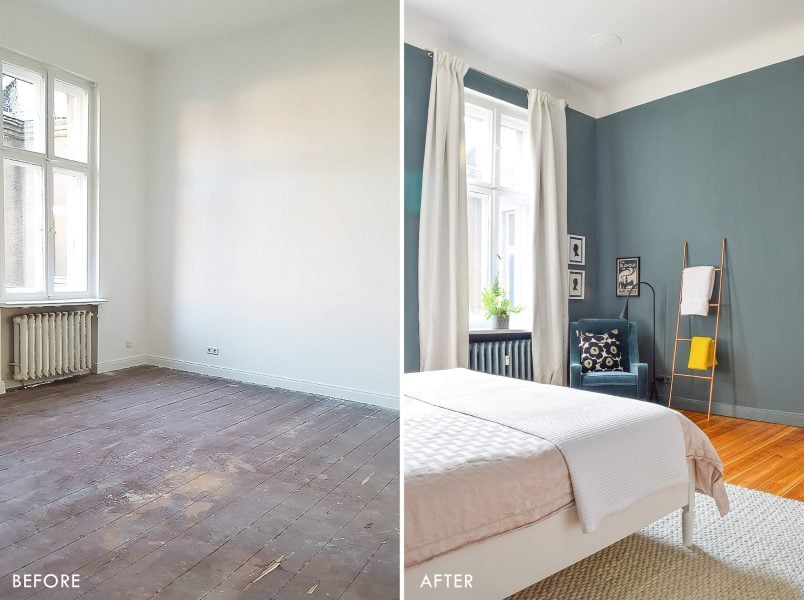
We love how well our sanded floors turned out and, given that we painted everything in it, we obviously love the colour, too. It changes from blue to green to greyish throughout the day and has a really warm yet calming feel about it.

DIY Copper Towel Ladder | Little House On The Corner

We still need to add more finishing touches and I’d like a new chest of drawer (you can never have enough storage, right?) but it’s definitely starting to come together.

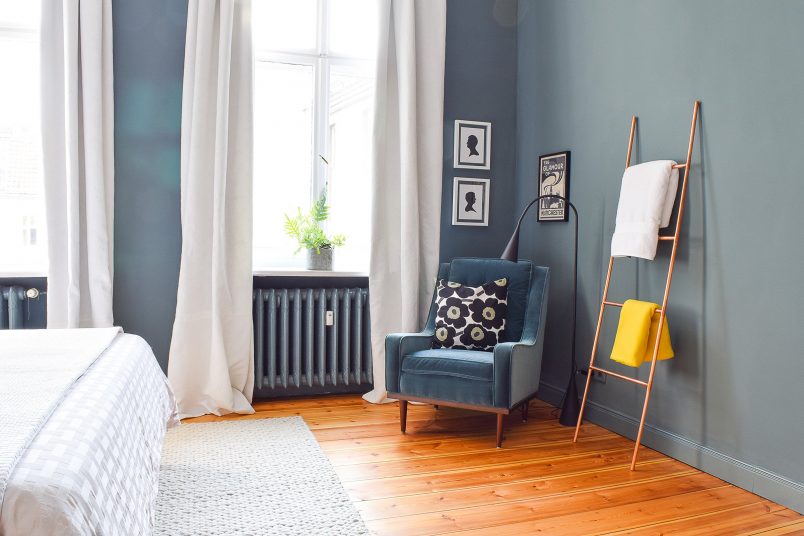
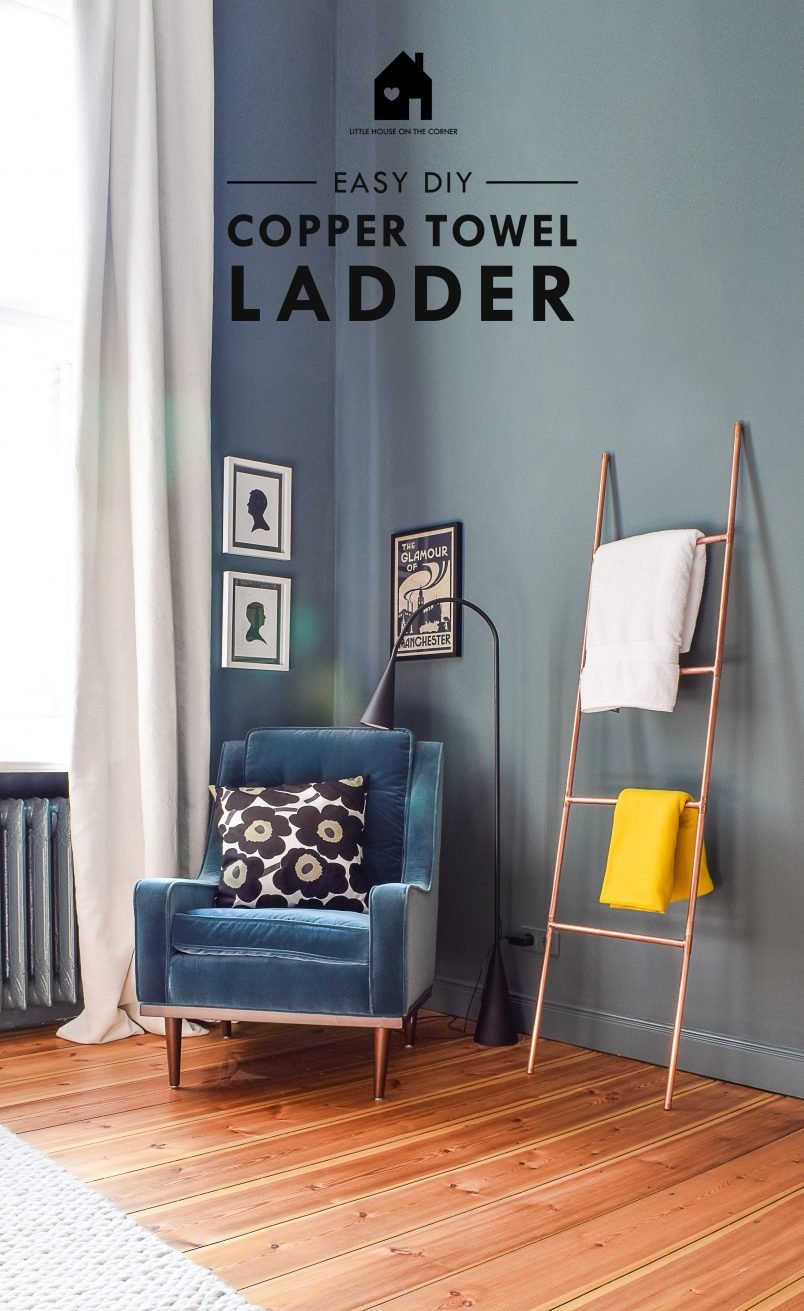
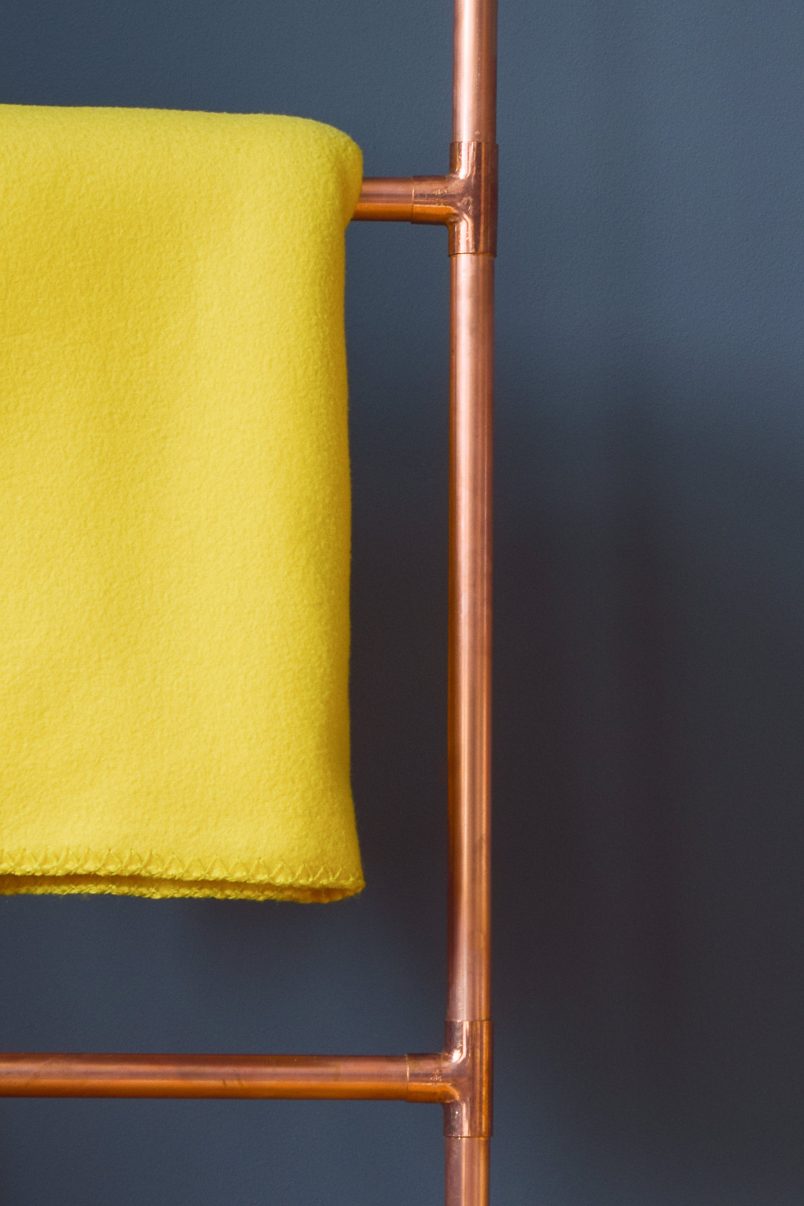
One of my favourite new additions is our new DIY copper towel ladder.

DIY Copper Towel Rail | Little House On The Corner

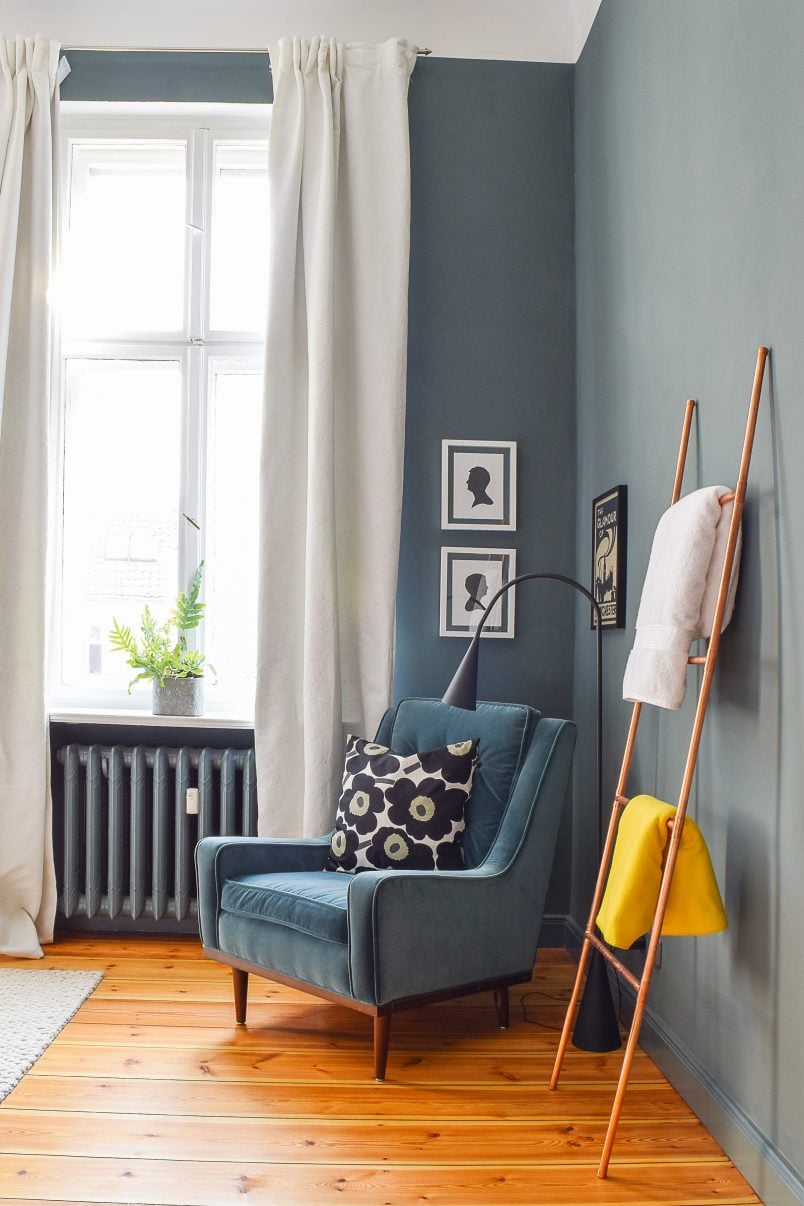
I admit that our bedroom usually isn’t this tidy and more often than not there are clothes strewn across the floor. Although we’ve not quite managed to conquer our bad habits just yet, our new DIY copper towel ladder definitely helps us keep the room tidier!

DIY Copper Towel Ladder | Little House On The Corner

I’d originally planned on buying a wooden ladder but they were surprisingly expensive so, as usual, I wondered if it would be possible to DIY instead.

I was trying to work out how to build it out of wood when I thought why not make it out of copper instead! So that’s exactly what I did!

DIY Copper Towel Ladder | Little House On The Corner

Building the ladder out of copper is actually really easy as there are countless copper connection parts available and it’s essentially just a matter of glueing some parts together!

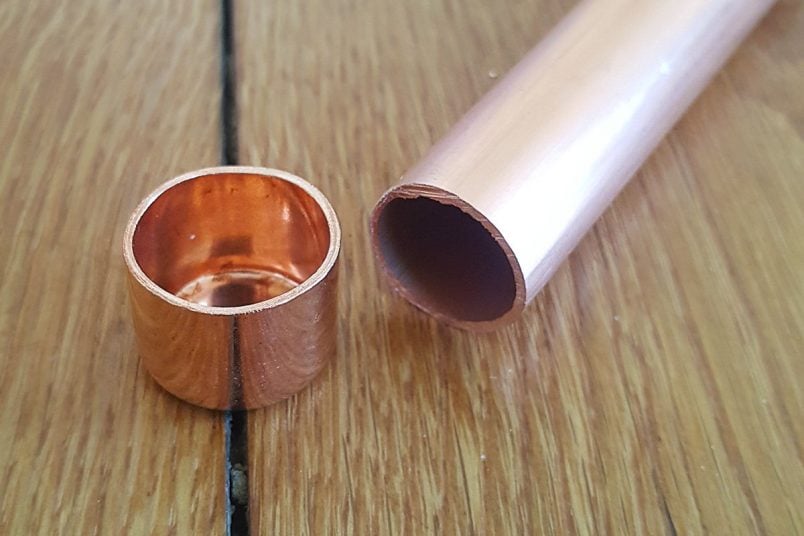
This is what you will need to build a DIY copper towel ladder:

DIY Copper Towel Ladder - Supplies | Little House On The Corner

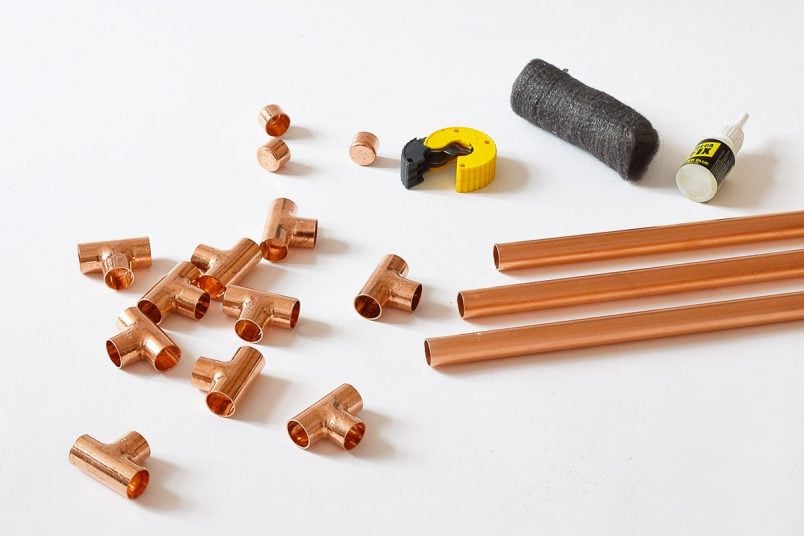
  • 3 x 18mm 2.4m Copper Pipes
  • 8 x 18mm Copper Equal Tee
  • 4 x 18mm End caps
  • Pipe Cutter (or a metal saw)
  • Fine Wire Wool
  • Superglue
  • Optional: Silicone

This is how to build the DIY copper towel ladder:

1. Cut.

Start by cutting the pipe into pieces. The easiest way to do this is with a pipe cutter but you could just as easily use a metal saw to cut them. If you cut them with a saw, you’ll probably have to sand the edges as they can be very sharp!

DIY Copper Towel Ladder - Supplies | Little House On The Corner

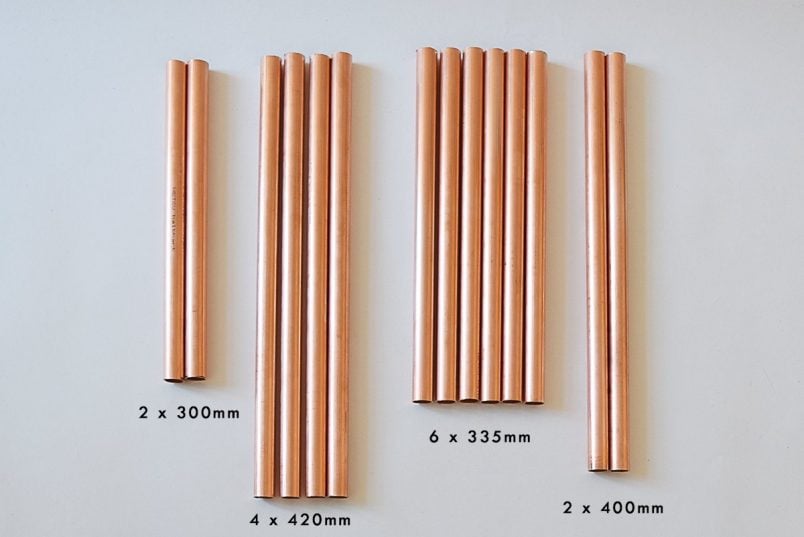
You’ll need to cut your pipe into lots of shorter pieces that you can slot together using the t-shaped connectors. To build a ladder that’s the same size as the one we built you will need 4 x 420 mm, 6 x 335 mm, 2 x 400 mm and 2 x 300 mm pieces.

We only have a pipe cutter for thinner pipes so cut our copper pipe with a mitre saw. A pipe cutter would be easier and quicker, though.
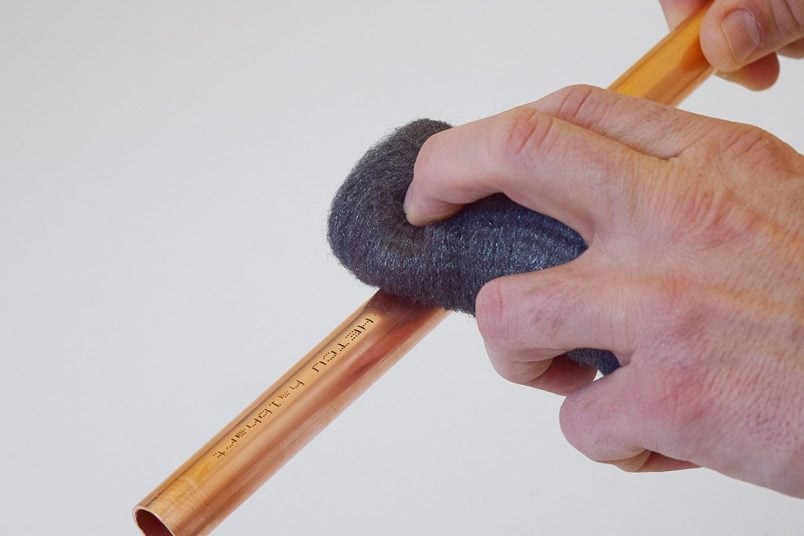
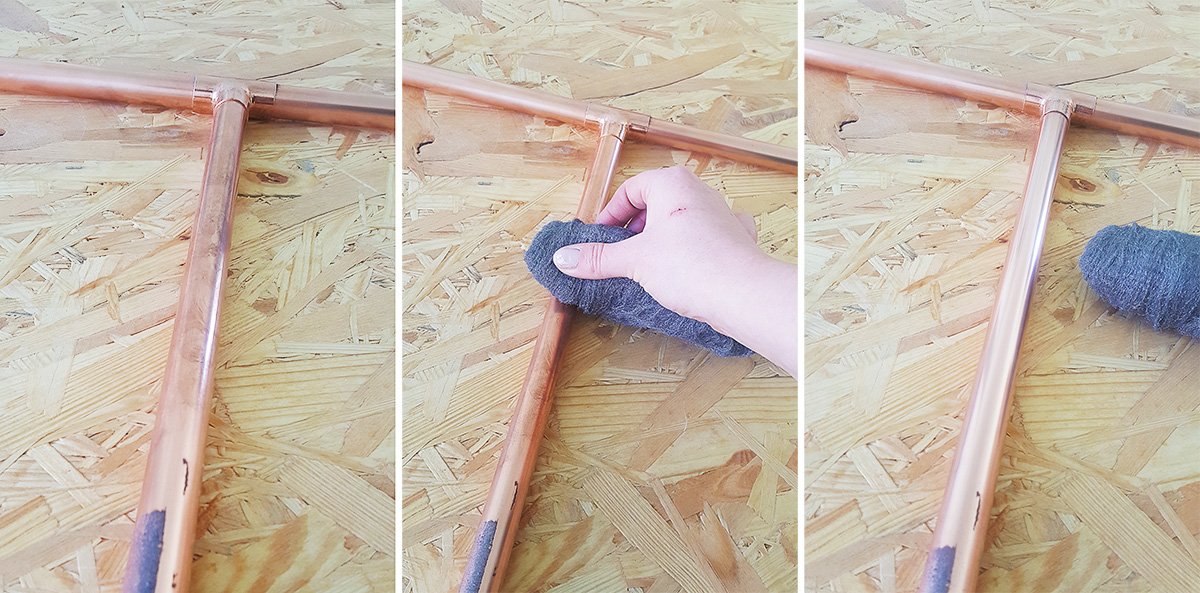
2. Polish.

When you’ve cut the pieces give each of them a polish with some fine wire wool. This will remove any dirt, any writing that may be printed onto the pipe and will leave the copper nice and shiny.
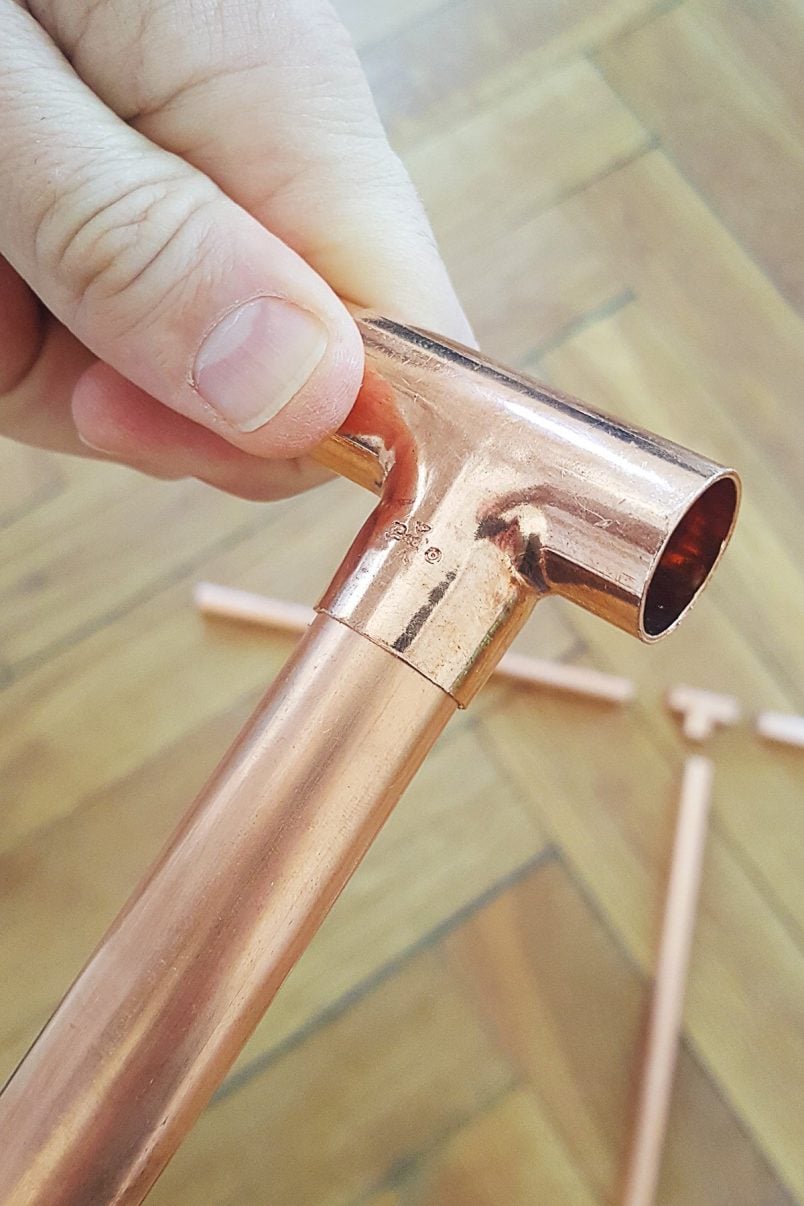
DIY Copper Towel Ladder - Polish | Little House On The Corner

DIY Copper Towel Ladder - Polish | Little House On The Corner

3. Connect.

Now you can start to actually build the ladder.

DIY Copper Towel Ladder - Connect | Little House On The Corner

Tip: It’s a good idea to test that everything will fit before glueing them together.

Just apply some super glue to the end of one of the pieces and slot it into a tee connector. Then add the next piece of pipe followed by another tee connector and so on until you’ve completed the first long side of the ladder.

We used the longer pieces of pipe (400 mm) at the bottom of the ladder and the shorter pieces (300 mm) at the top of the ladder.

DIY Copper Towel Ladder - Connect | Little House On The Corner

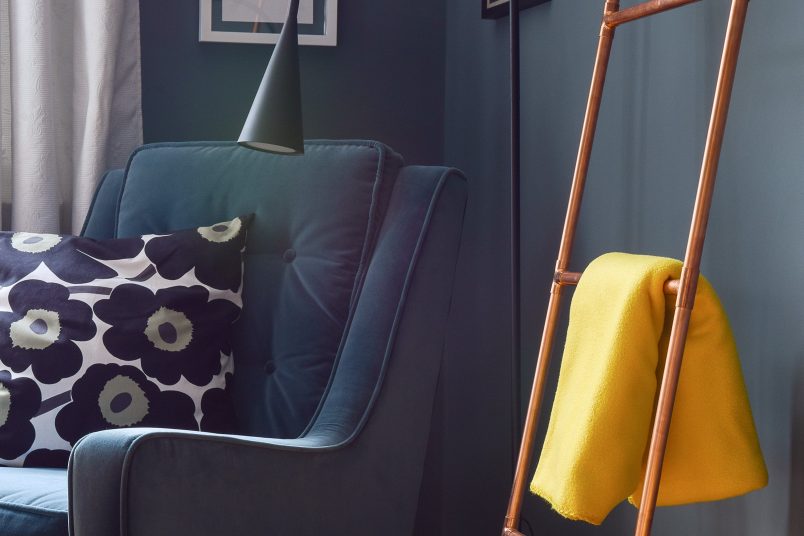
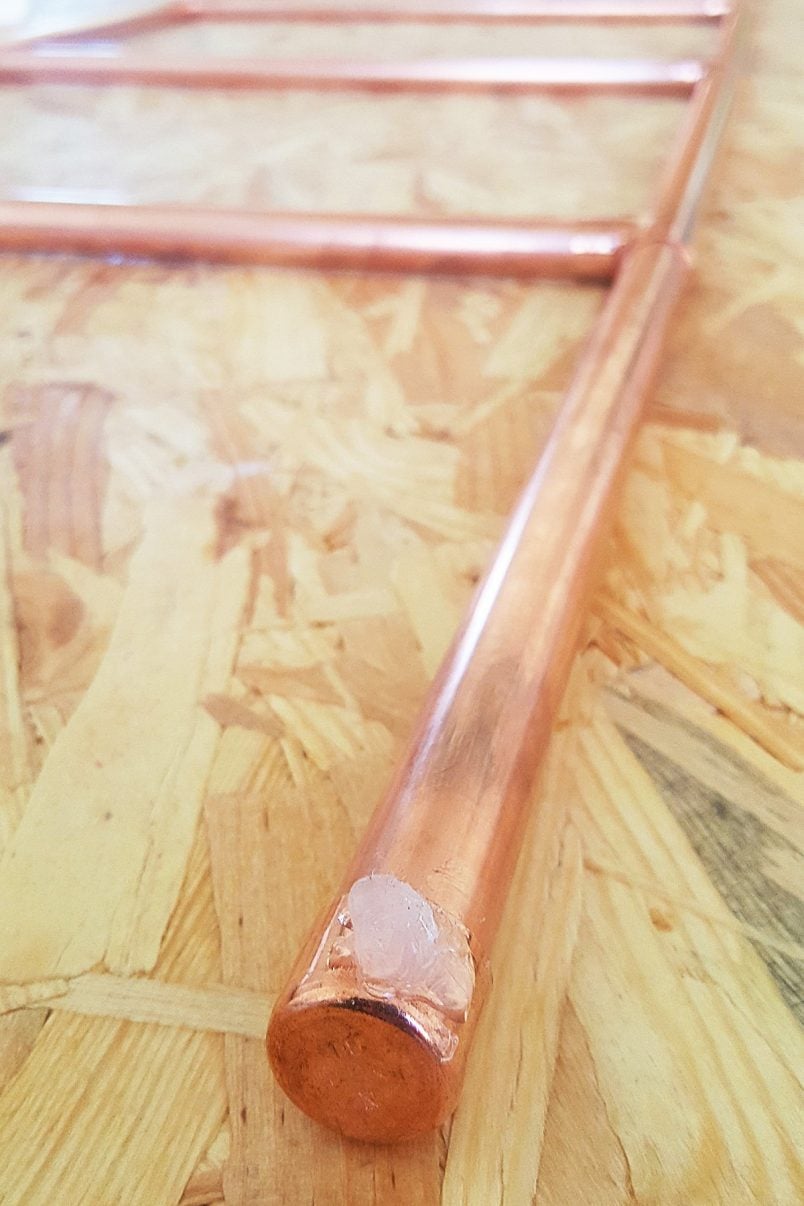
Just continue slotting and glueing everything together. It’s a good idea to lay the DIY copper ladder down on a flat surface every now and then to check that the ladder isn’t warped. The last step is to glue the little caps to each end of the ladder.

DIY Copper Towel Ladder - Connect | Little House On The Corner

As you can see, this is a super simple and quick project to complete and you can make it any size you want to suit your home!

4. Silicone

We were worried that the DIY copper towel ladder might scratch our wall or, because the copper is so smooth, slip on the floor or wall. That’s why we decided to add a couple of blobs of clear silicone to the ends of our ladder. The silicone is invisible when the ladder is up against the wall and it gives the ends a tiny bit of grip and stops the ladder slipping.

DIY Copper Towel Ladder - Silicone | Little House On The Corner

We used 18 mm copper pipe and I wouldn’t recommend using thinner pipes as I think the ladder might be too flimsy – especially if you decide to build a larger version than we did!

DIY Copper Towel Ladder | Little House On The Corner

DIY Copper Towel Ladder | Little House On The Corner

How do you keep your bedroom tidy? Do you always make your bed (I won’t tell anyone if you don’t)? Do all of your clothes end up in a big pile on the floor or do you fold them into tidy stacks?

  • Facebook
  • Twitter

Christine 10 Comments

the PAST
the FUTURE

Subscribe To Our Newsletter

Sign up with your email address for secret projects, DIY advice & lots of fun!

Privacy Policy

Leave a Reply Cancel reply

Your email address will not be published. Required fields are marked *

This site uses Akismet to reduce spam. Learn how your comment data is processed.

Comments

  1. Linda Crowther says

    06/05/2021 at 11:57

    Wow that looks lovely. You are s talented.

    Reply
    • Christine says

      06/05/2021 at 15:42

      Ahhh, thank you so much, Linda. It was a really easy project!
      Cx

      Reply
  2. Carey says

    17/12/2020 at 12:14

    This looks fantastic, you guys did great job!

    Reply
    • Christine says

      17/12/2020 at 13:00

      Thank you, Carey!
      Cx

      Reply
  3. Francesca says

    14/01/2019 at 20:53

    The copper ladder looks amazing, so original. items that are both functional and beautiful are a winner in the home and this towel ladder embodies both of those qualities. Love how simple the process seems too! Shows how far a quick polish can take you!

    Reply
    • Christine says

      15/01/2019 at 08:02

      Thank you, Francesca! It really was super easy and quick to make.
      Cx

      Reply
  4. Sarah says

    18/09/2018 at 14:19

    This is an amazing idea, that ladder looks so nice, and much easier to fix together than faffing about with wood/nails.

    Reply
    • Christine says

      19/09/2018 at 08:51

      Thank you, Sarah! It really was a super easy and quick thing to build!
      Cx

      Reply
  5. Lucy, Kent ~ England says

    03/09/2018 at 13:37

    Ladder looks great as does your bedroom reveal.
    This ladder idea could also be used on your balcony for climbers, just leave more space
    where bottom rung should be. Criss cross fishing line between rungs and your plants
    have invisible support to cling on to.
    Smaller/thinner pipes could do the same for your indoor houseplant collection.
    I’m desperately short of room in my kitchen and now working on ideas to turn your ladder
    into a grid system to put on wall and support pans (pans for one don’t weigh much), and
    anything else I can hang up.

    Reply
    • Christine says

      03/09/2018 at 14:34

      Thank you, Lucy! I love the idea of using the ladder for plants to climb up. The copper would be perfect outside, too as it would turn lovely and green over time.
      We’d thought about using a ladder in the kitchen for storage, too. I’d been thinking about hanging one horizontally from the ceiling and installing some kind of pulley system. Kind of like one of those old-fashioned clothes maidens but with a ladder. Our pans just aren’t pretty enough to display! ;)
      Cx

      Reply
Painting Checklist

Our Favourite Tools

*Contains Affiliate Links*

Things To Know

ABOUT US

CONTACT US

DISCLAIMER

Privacy Policy

Shop Our Home!

OUR FAVOURITE TOOLS

SHOP OUR HOME

Disclaimer

As an Amazon Associate I earn from qualifying purchases.

Please read our full disclaimer here!

Let’s Be Friends!

Keep Up To Date!

Subscribe for exclusive content and tutorials!

Thank you!

Copyright © 2023 · Little House On The Corner · This Website is powered by Cloudways and the Genesis Framework