[Ad – This post is in collaboration with Kohler | Gifted]
Did you see the reveal of our bathroom makeover? It used to be such a boring and bland room that we tried to spend as little time as possible in but now it’s completely transformed! (In case you missed it, you can see the full makeover reveal here!)
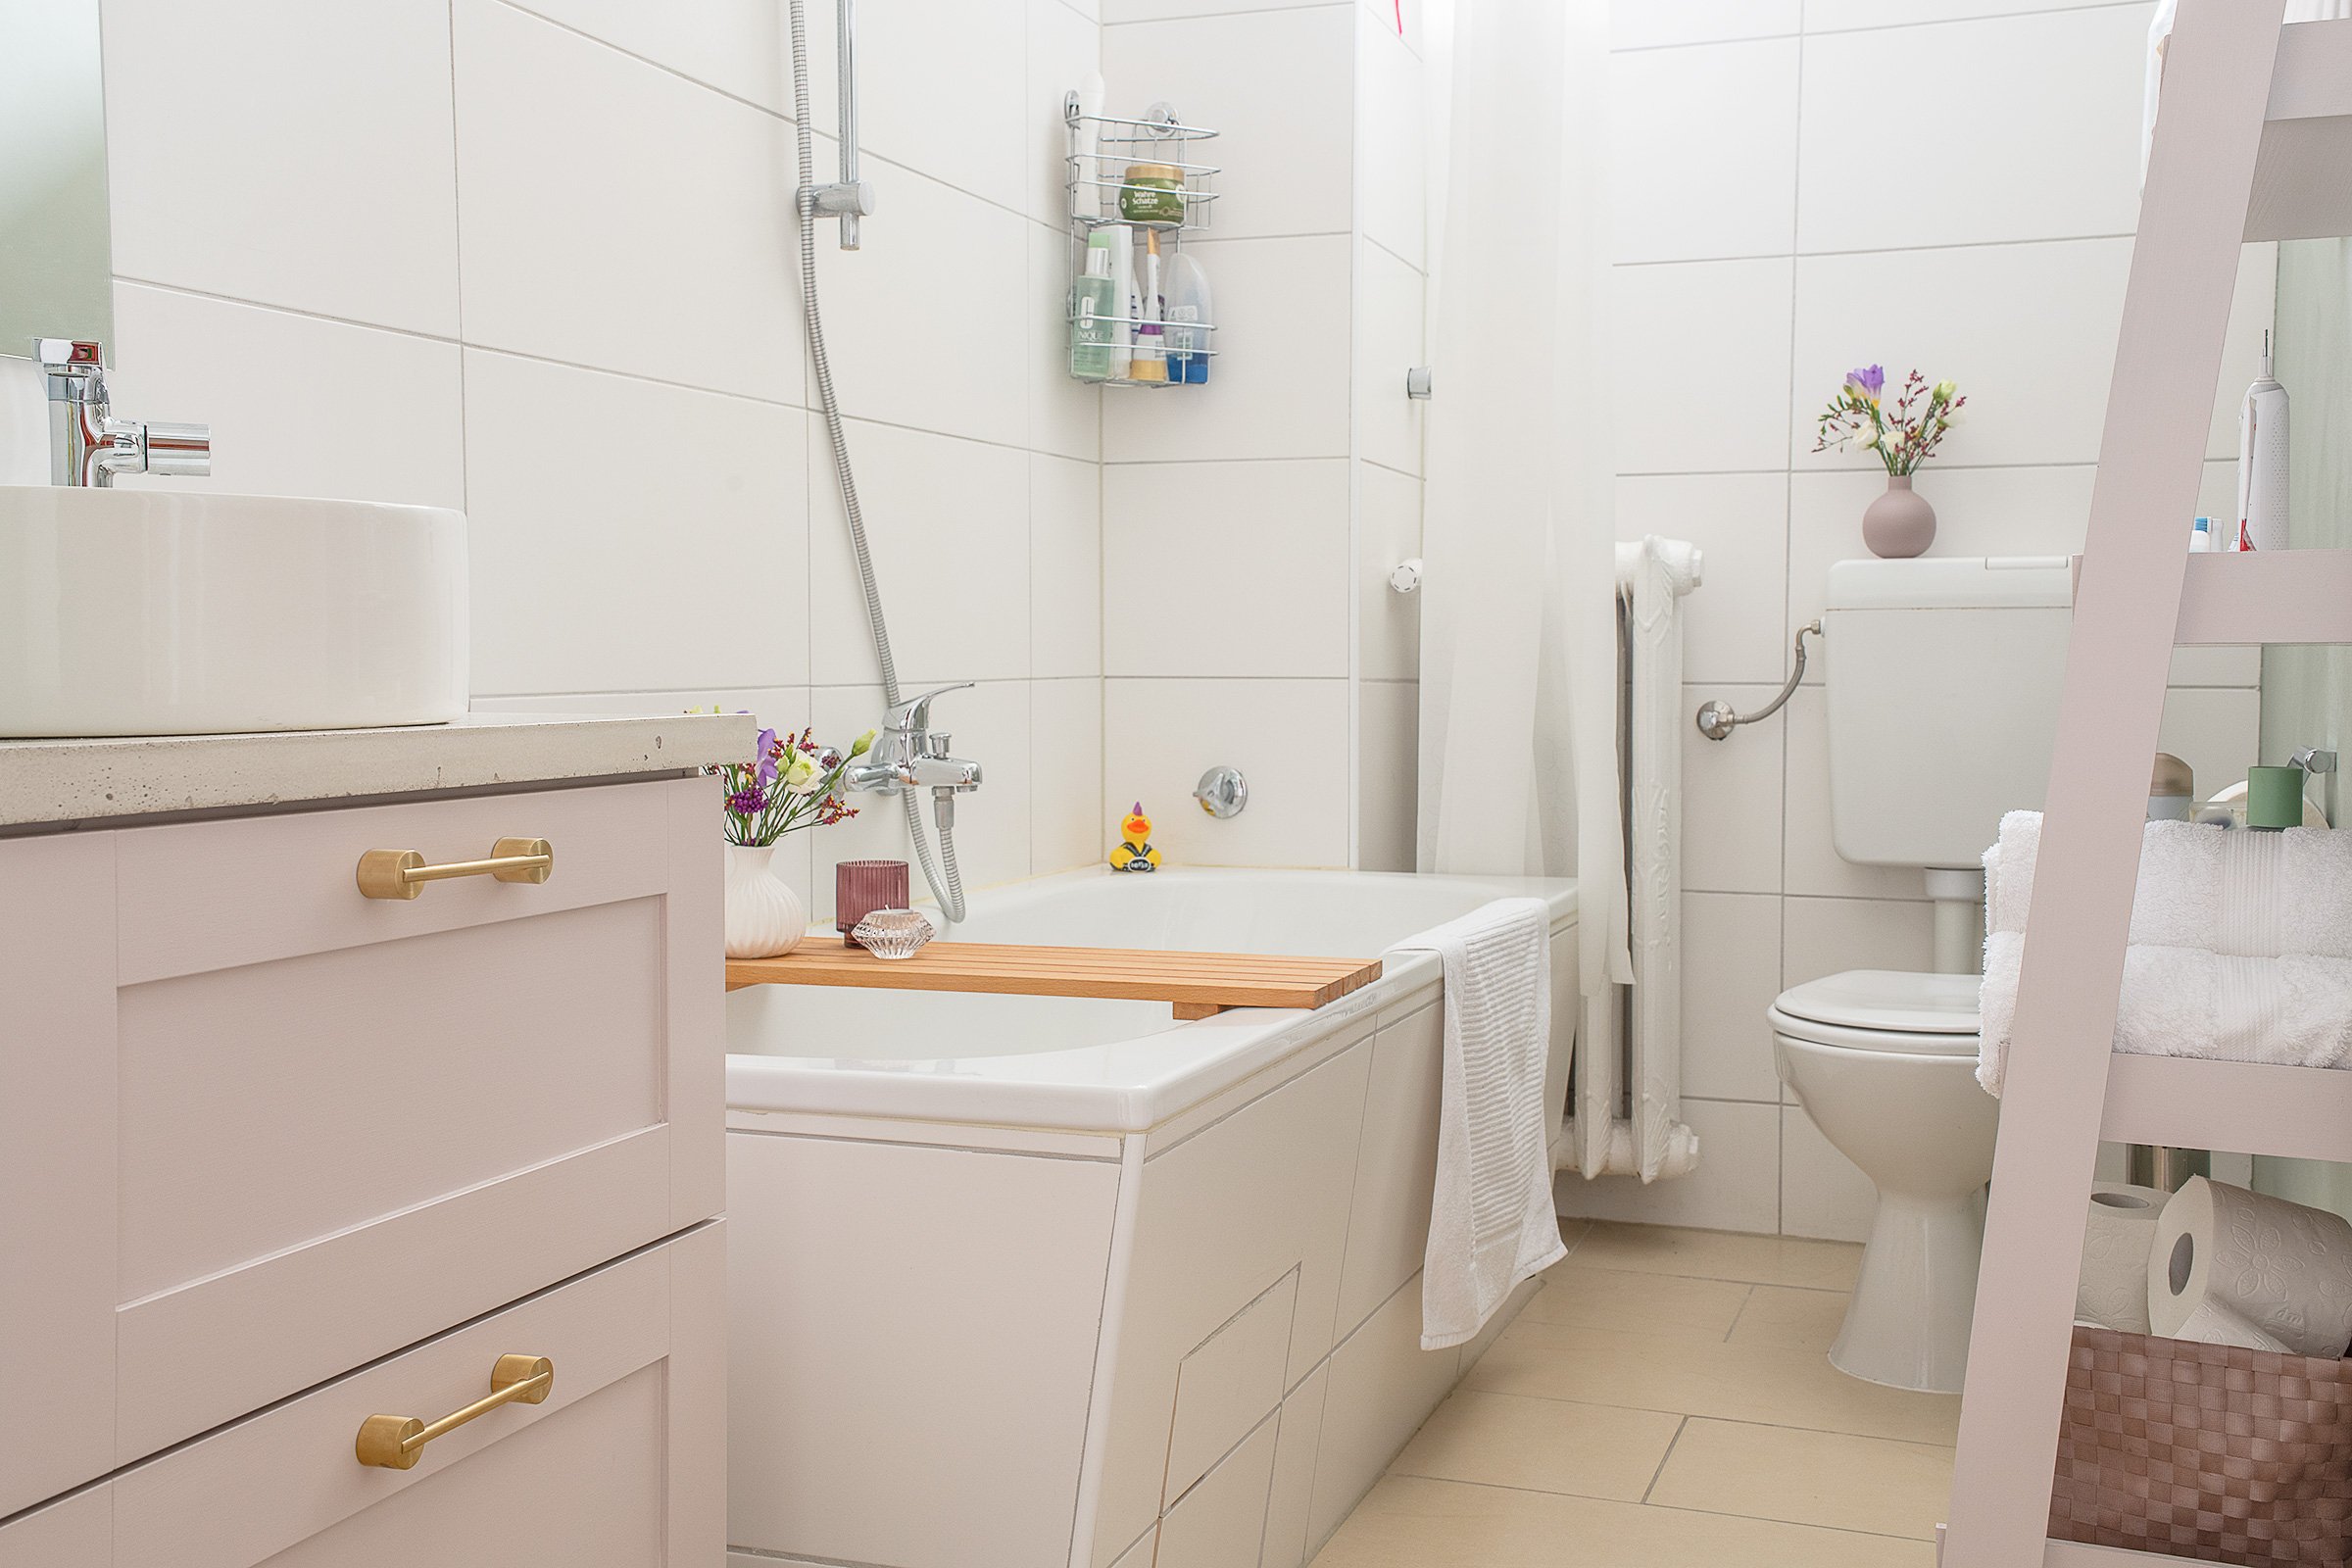
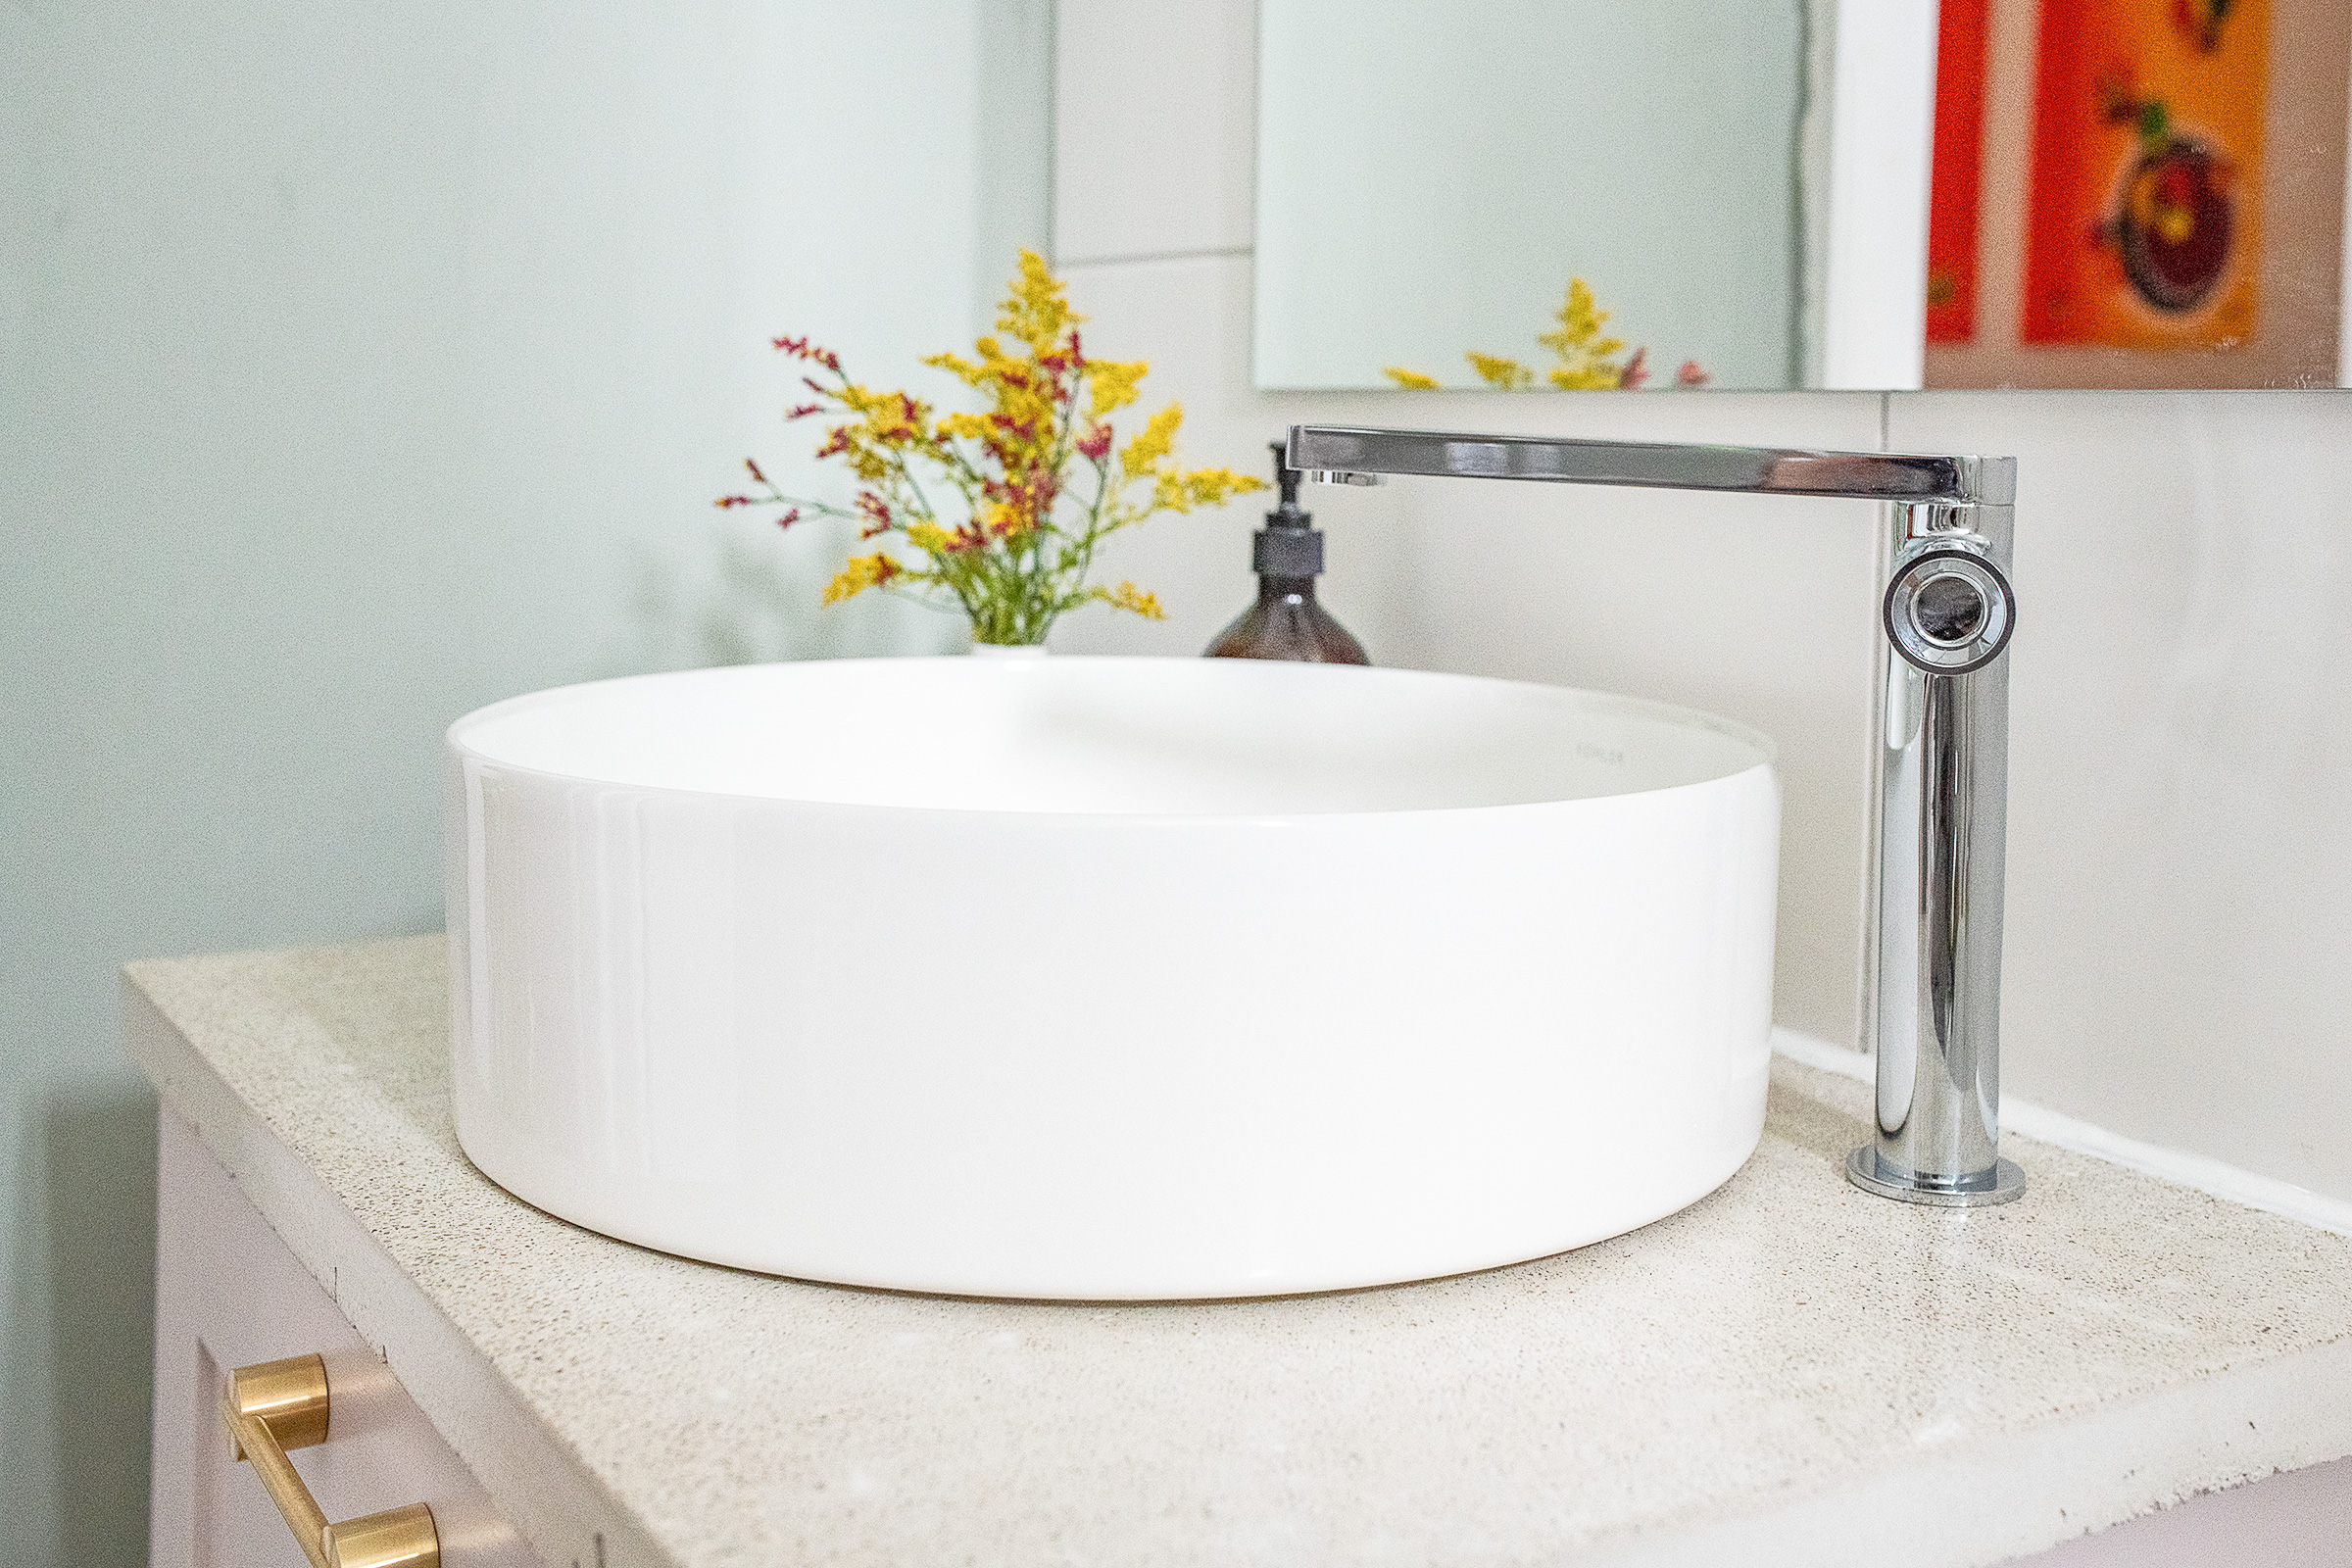
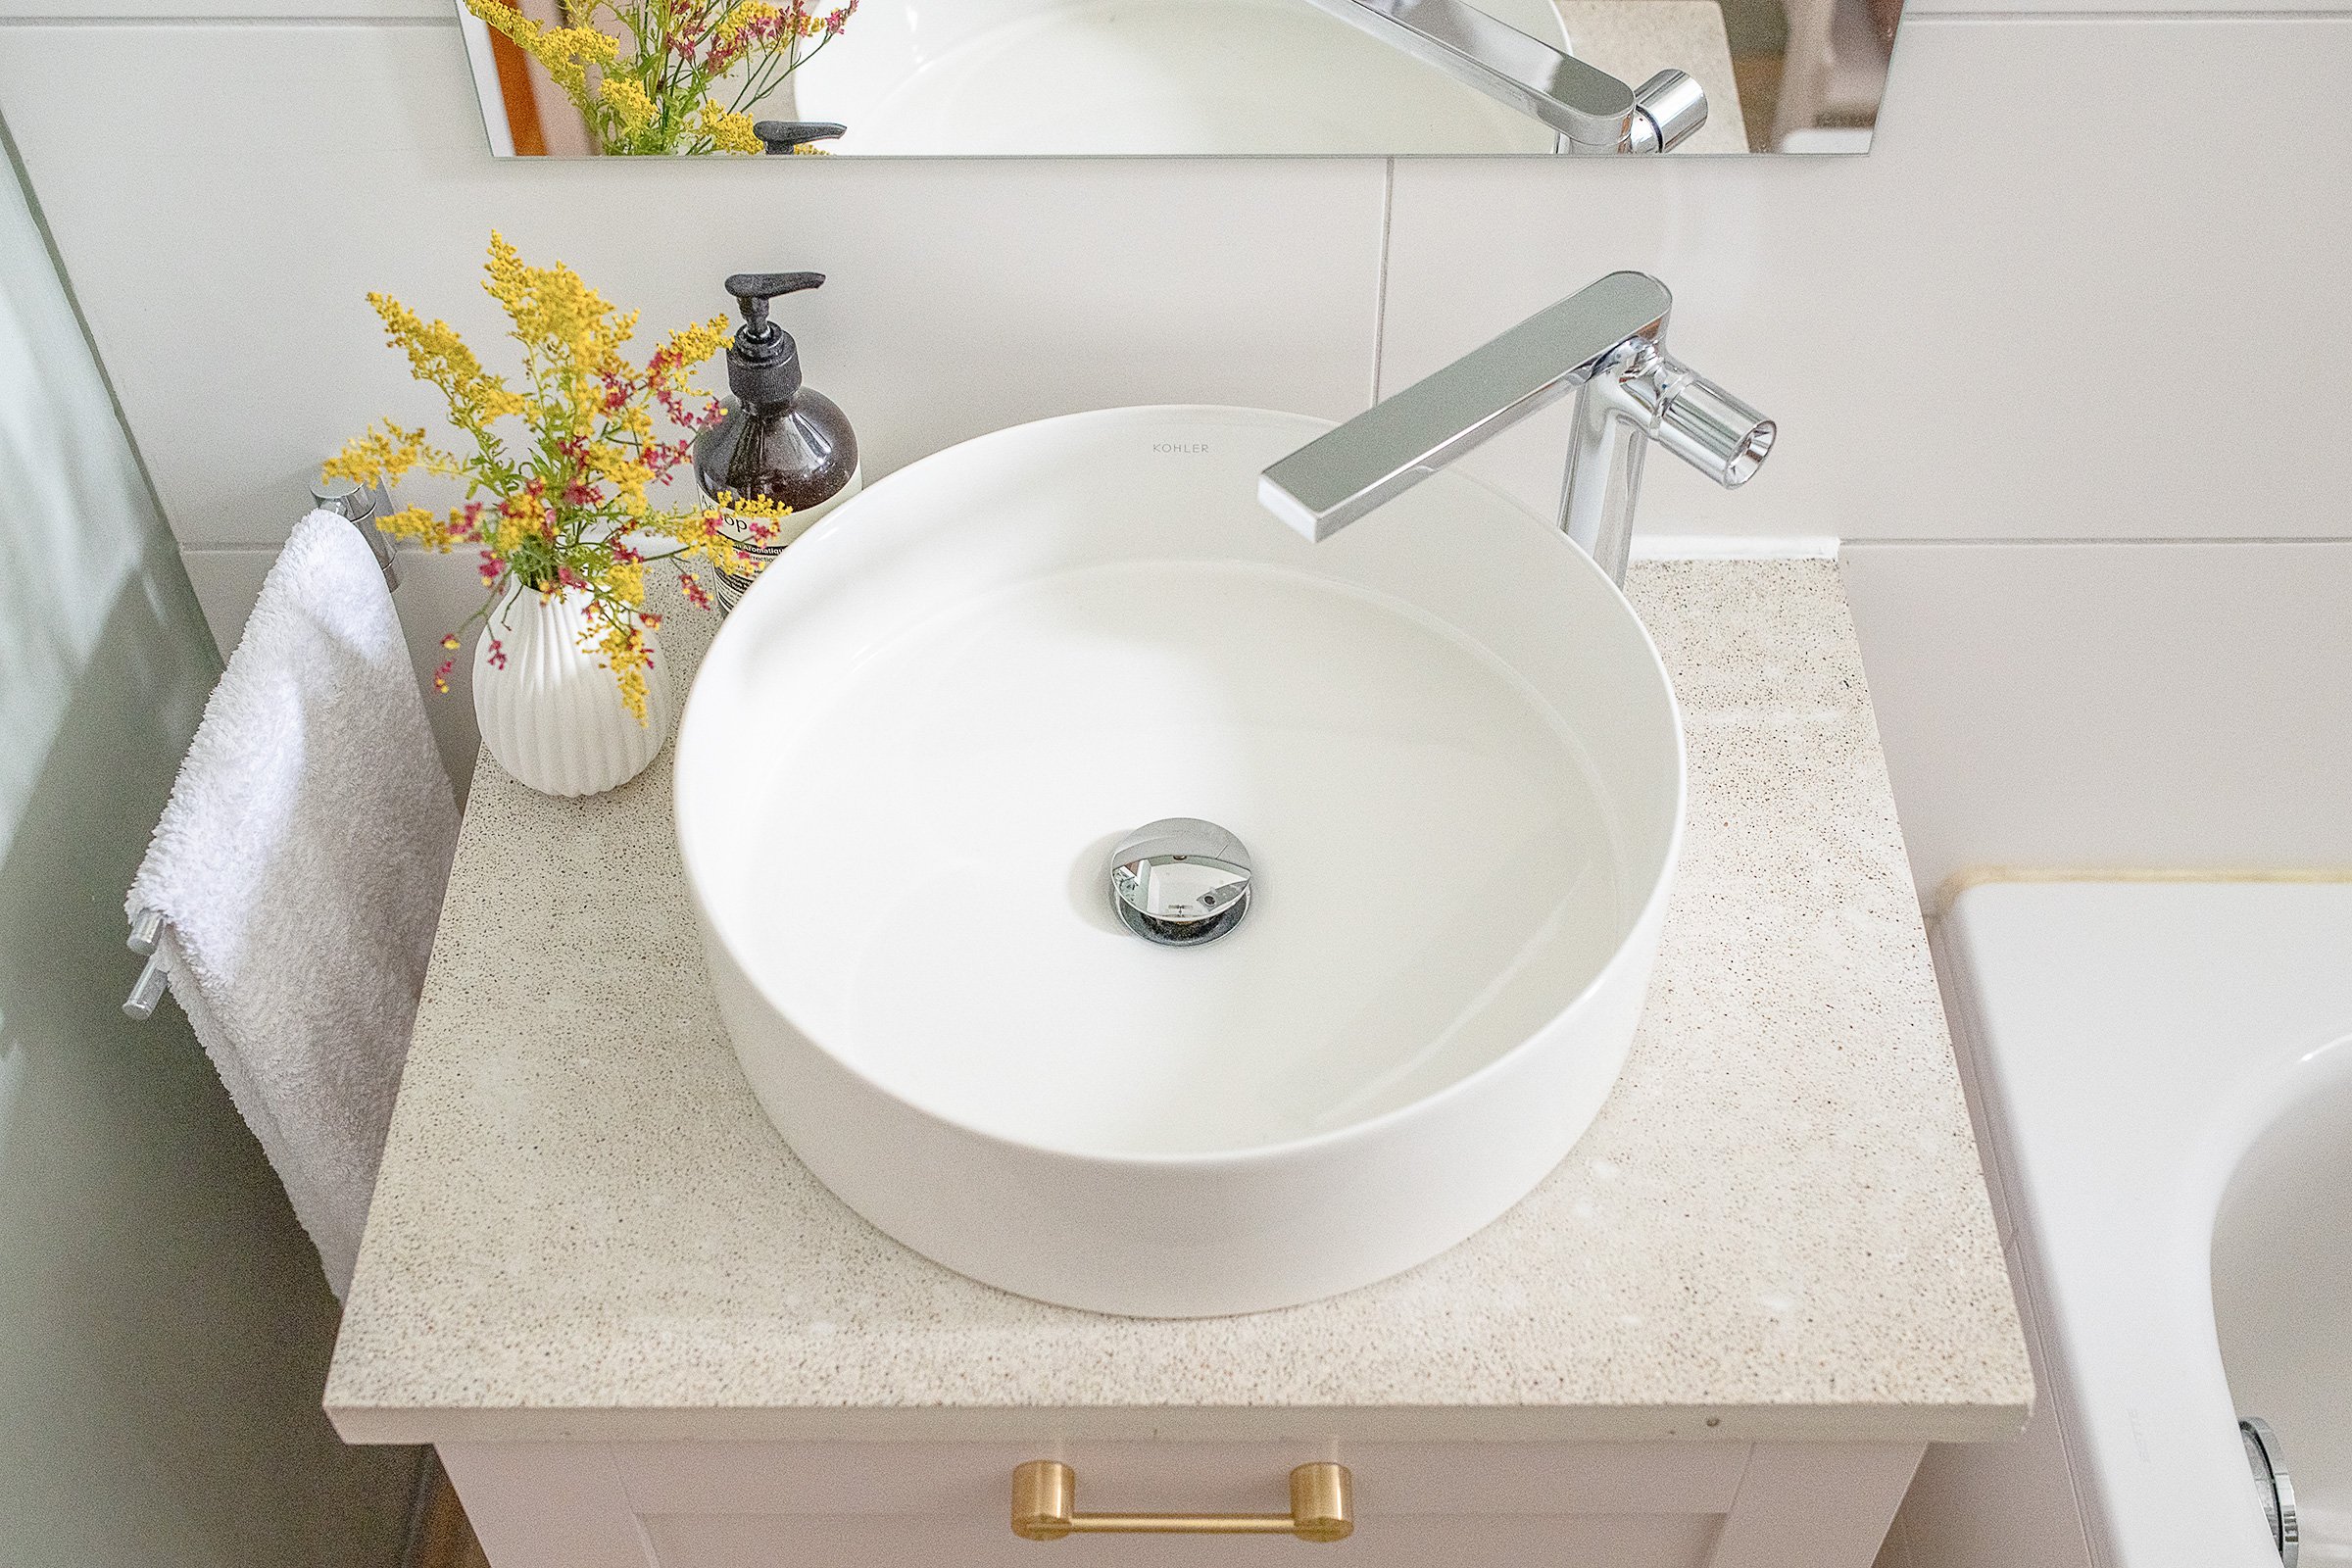
There are so many things I love about this room but one of my favourite projects (it’s actually one of my favourite ever projects!) is our new DIY concrete countertop on the vanity.
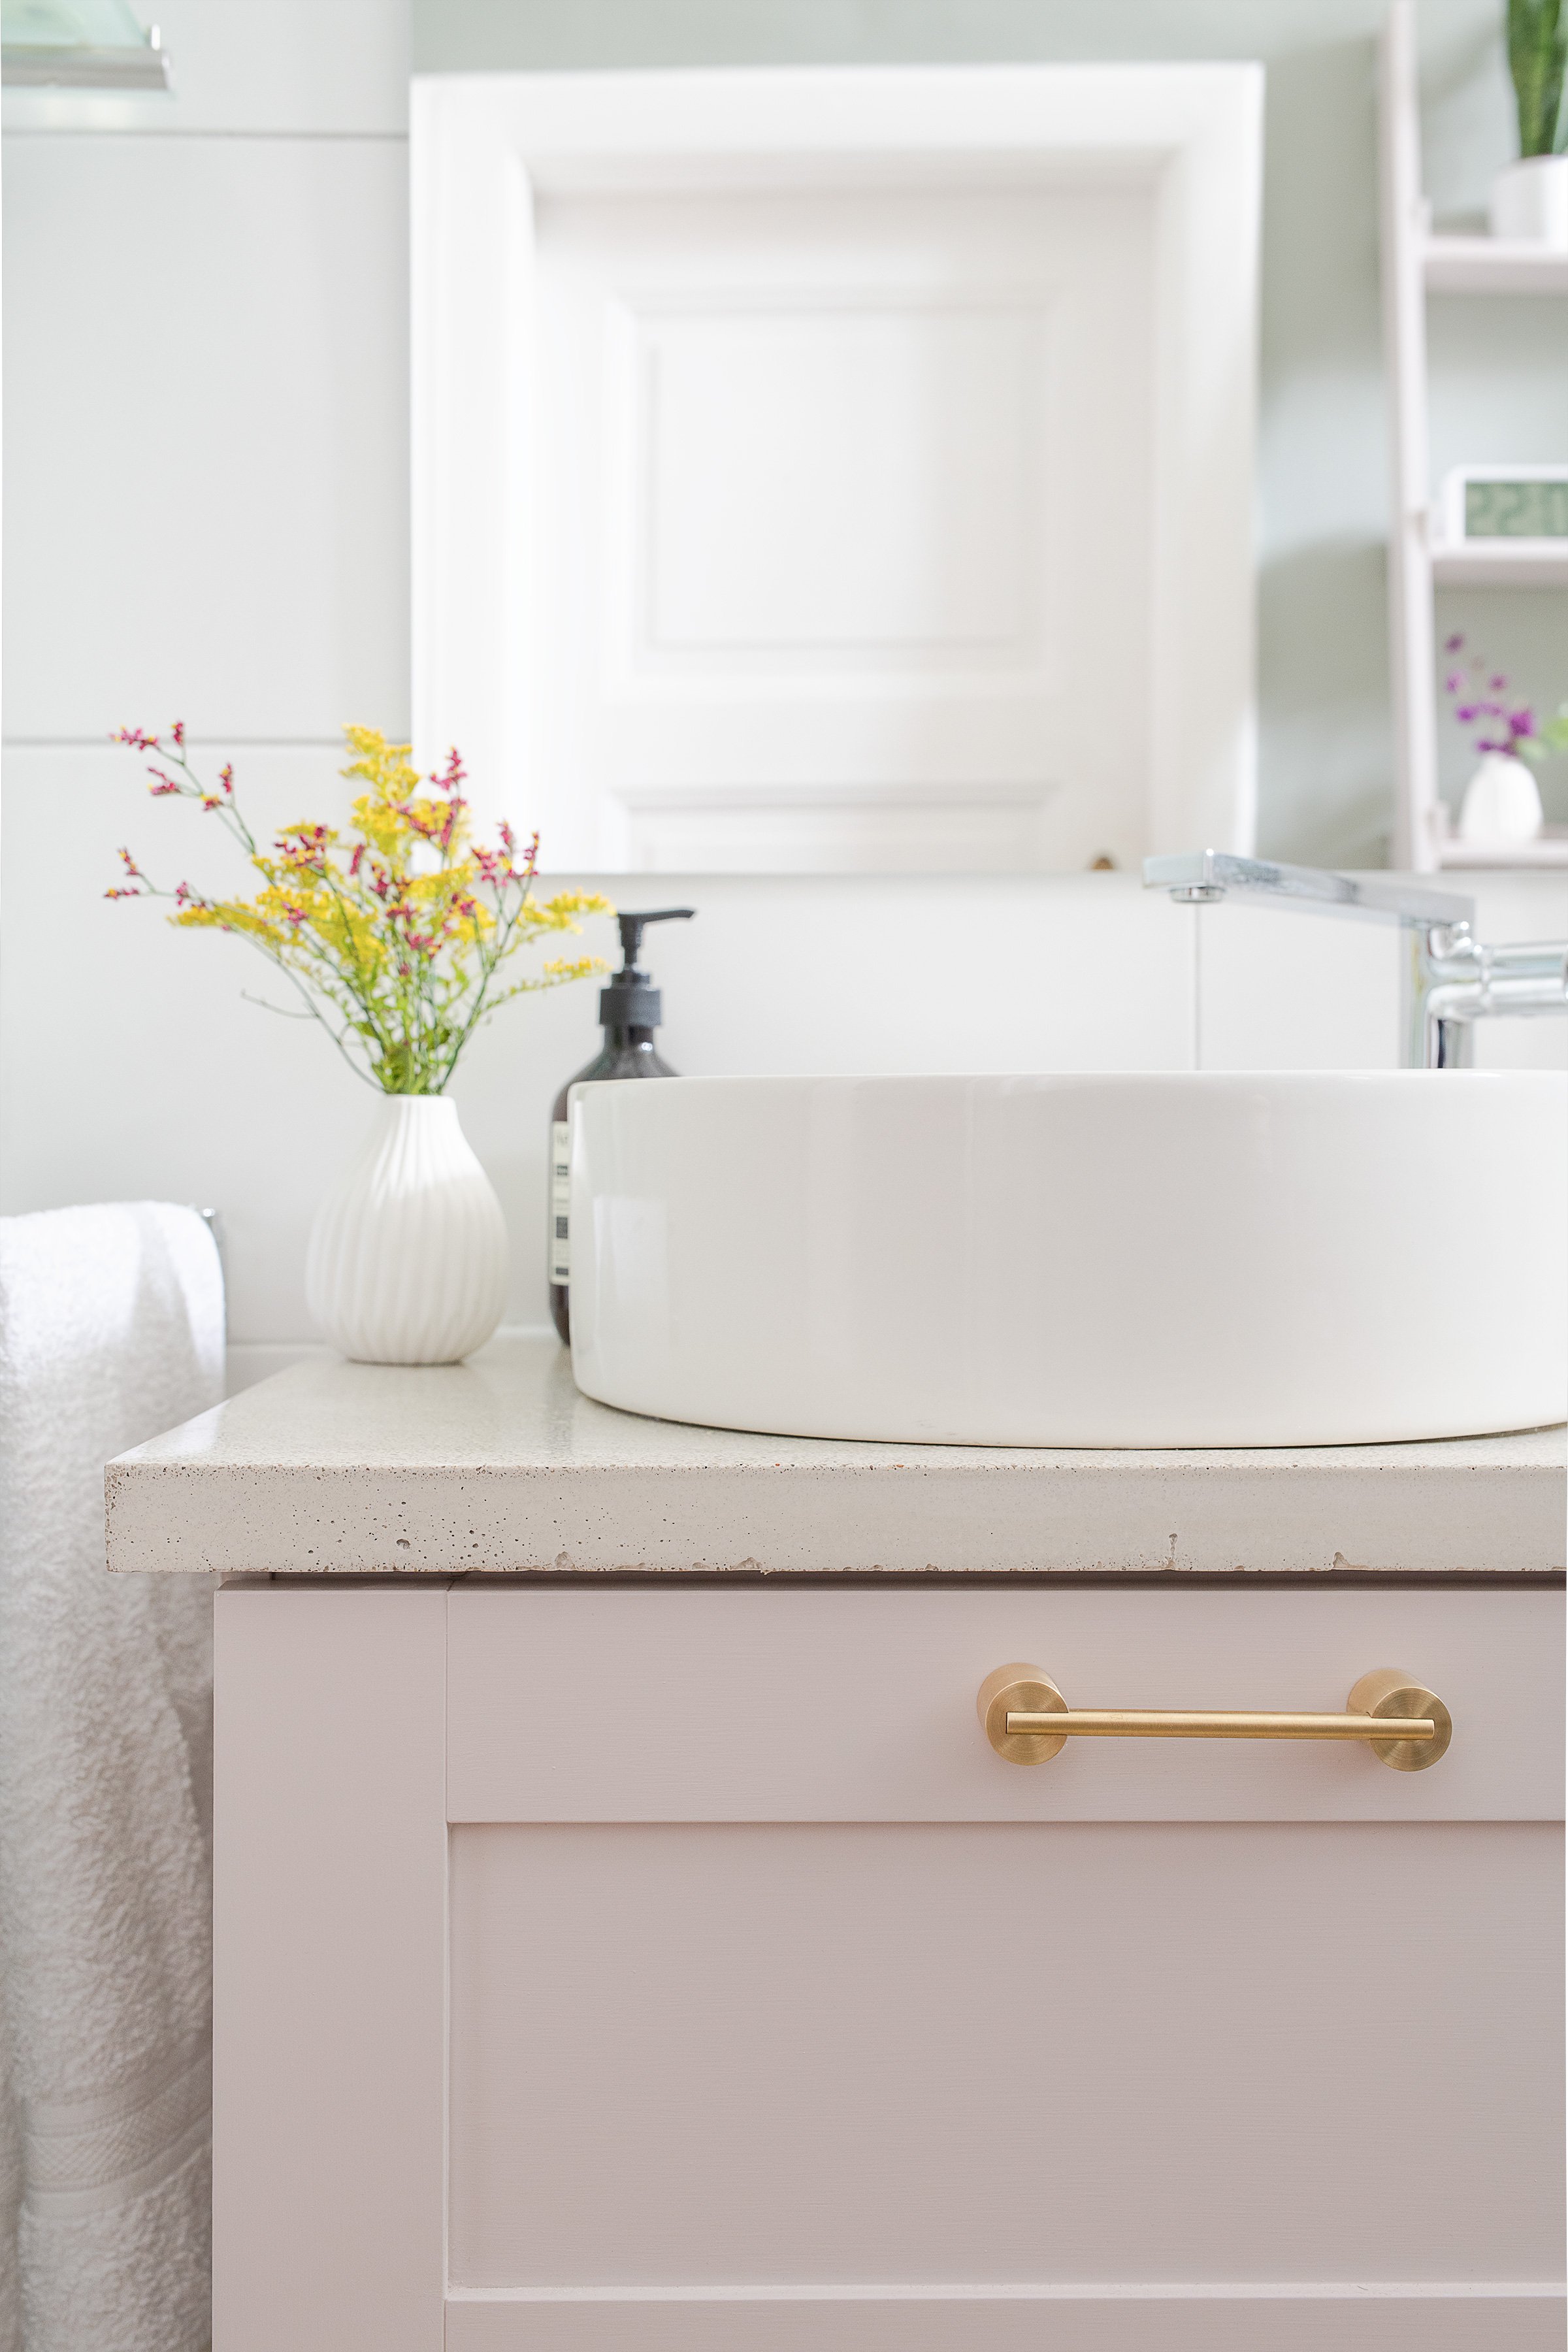
Isn’t it gorgeous?!
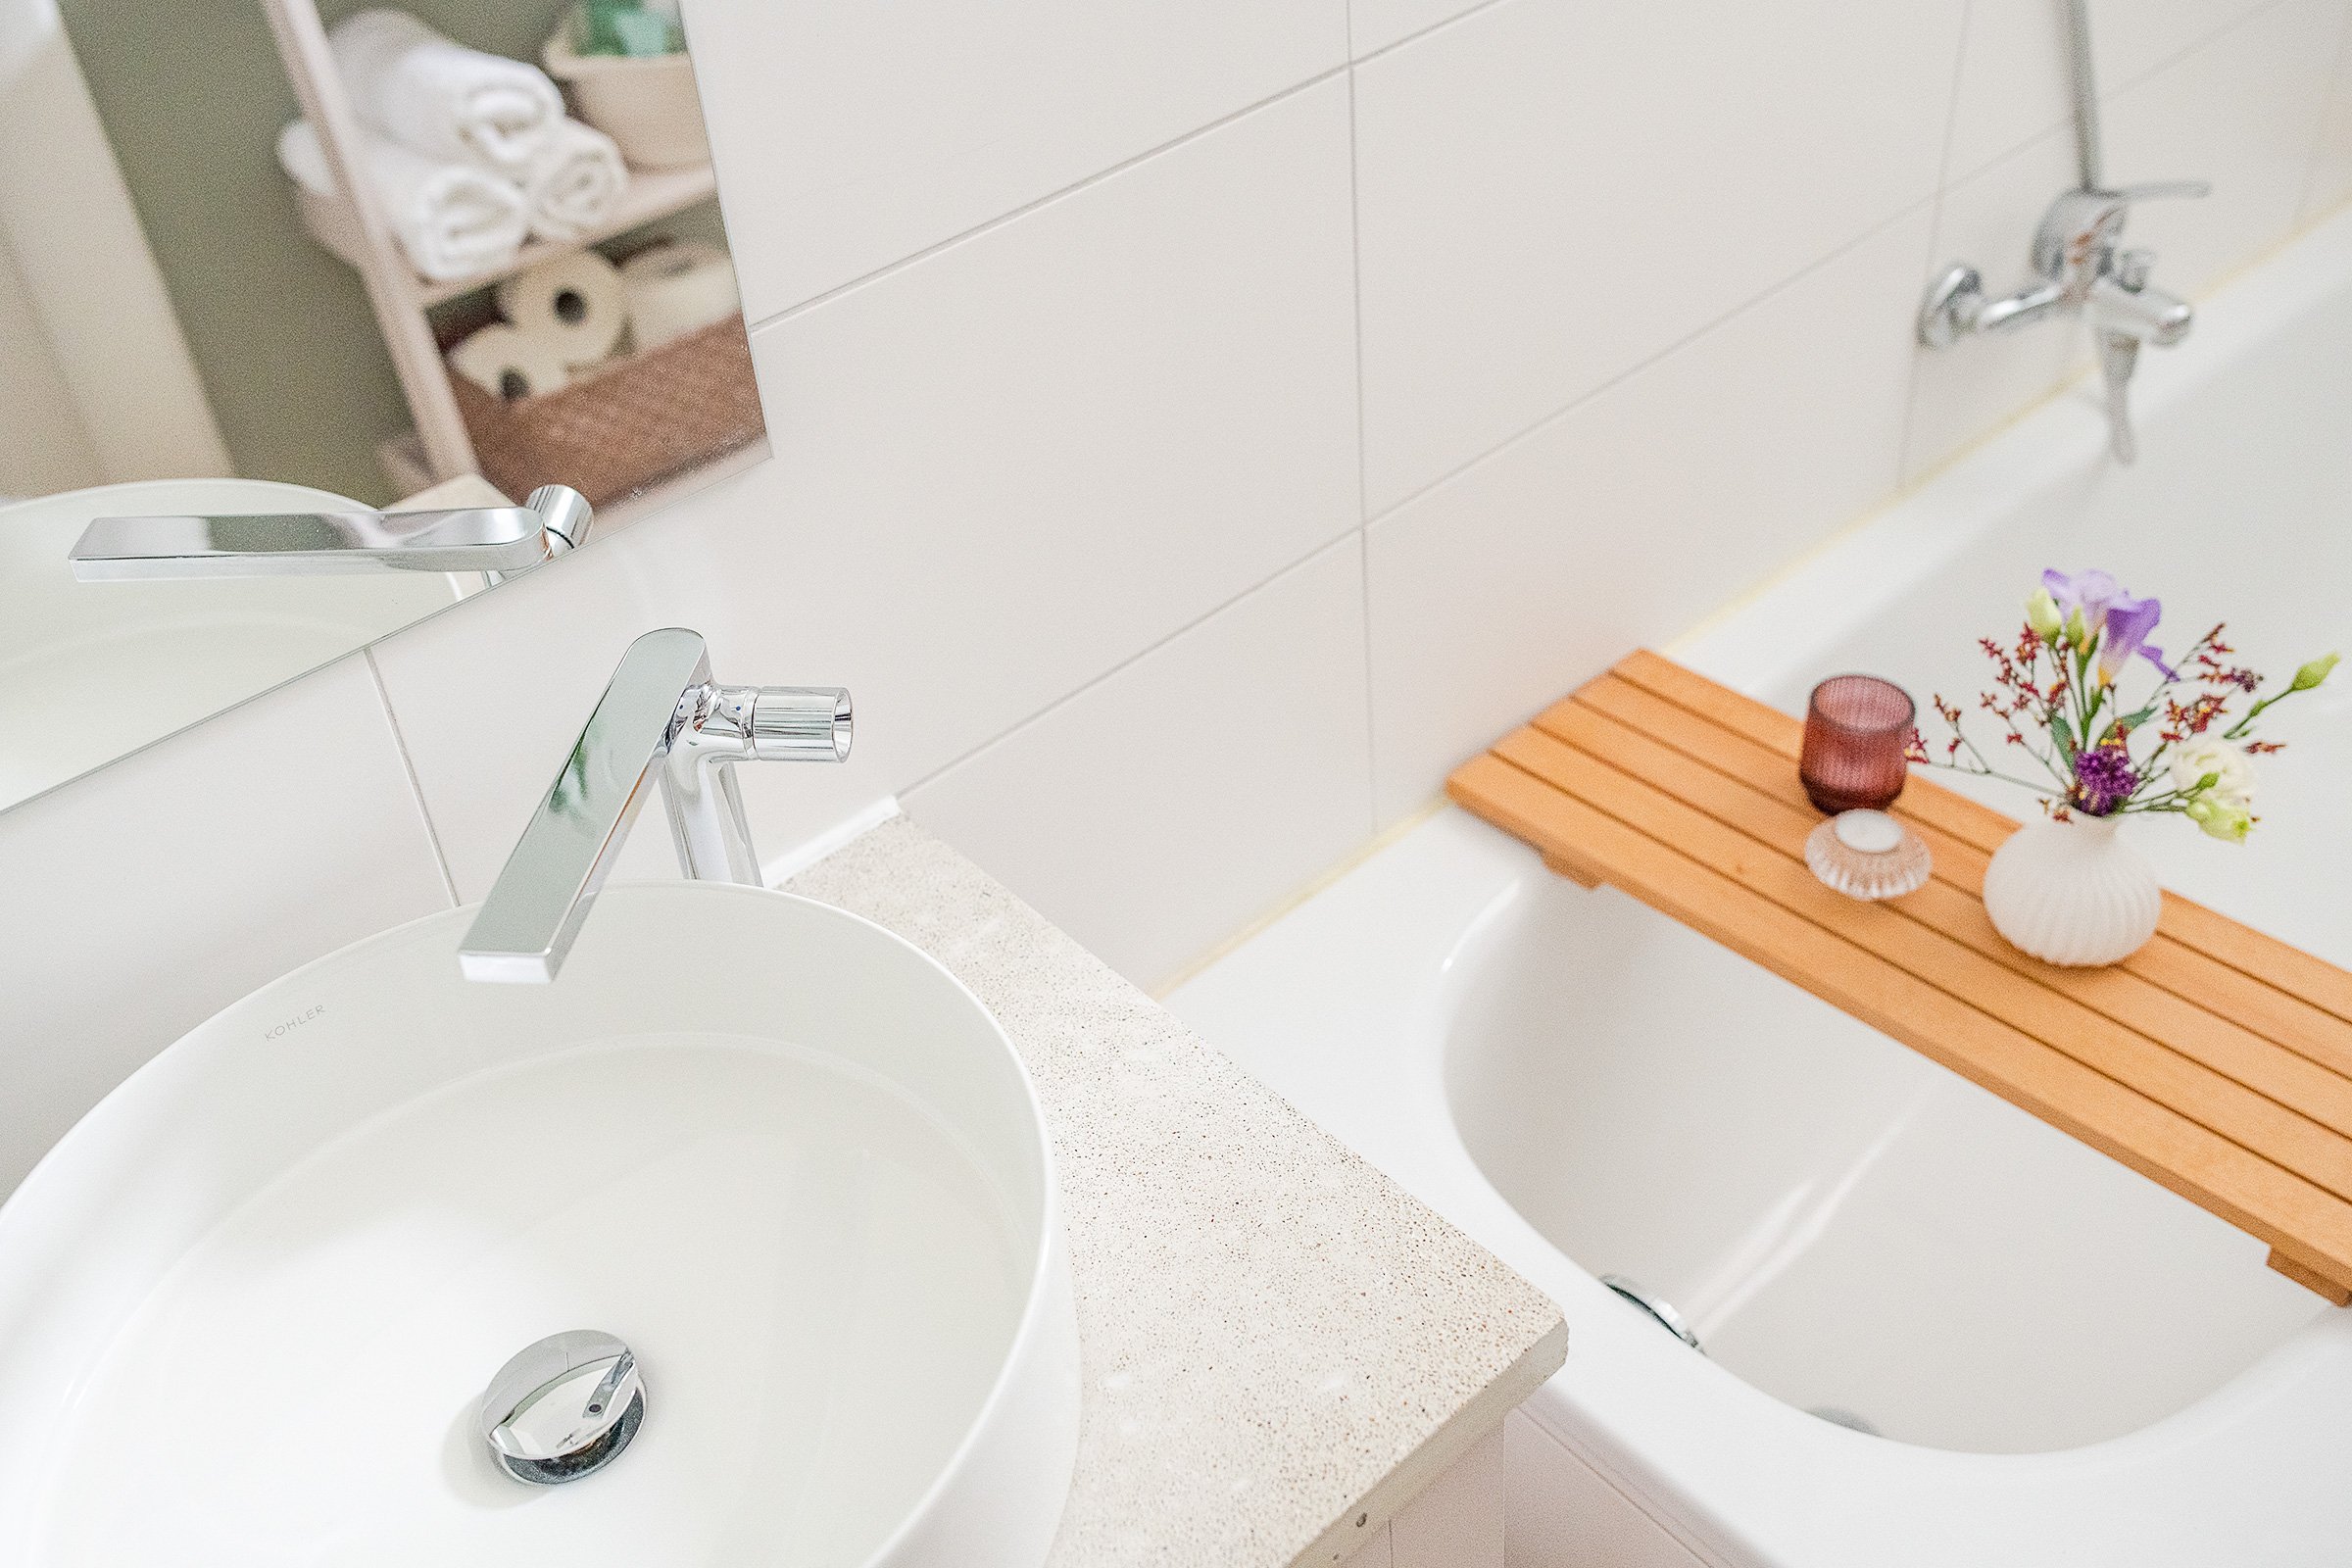
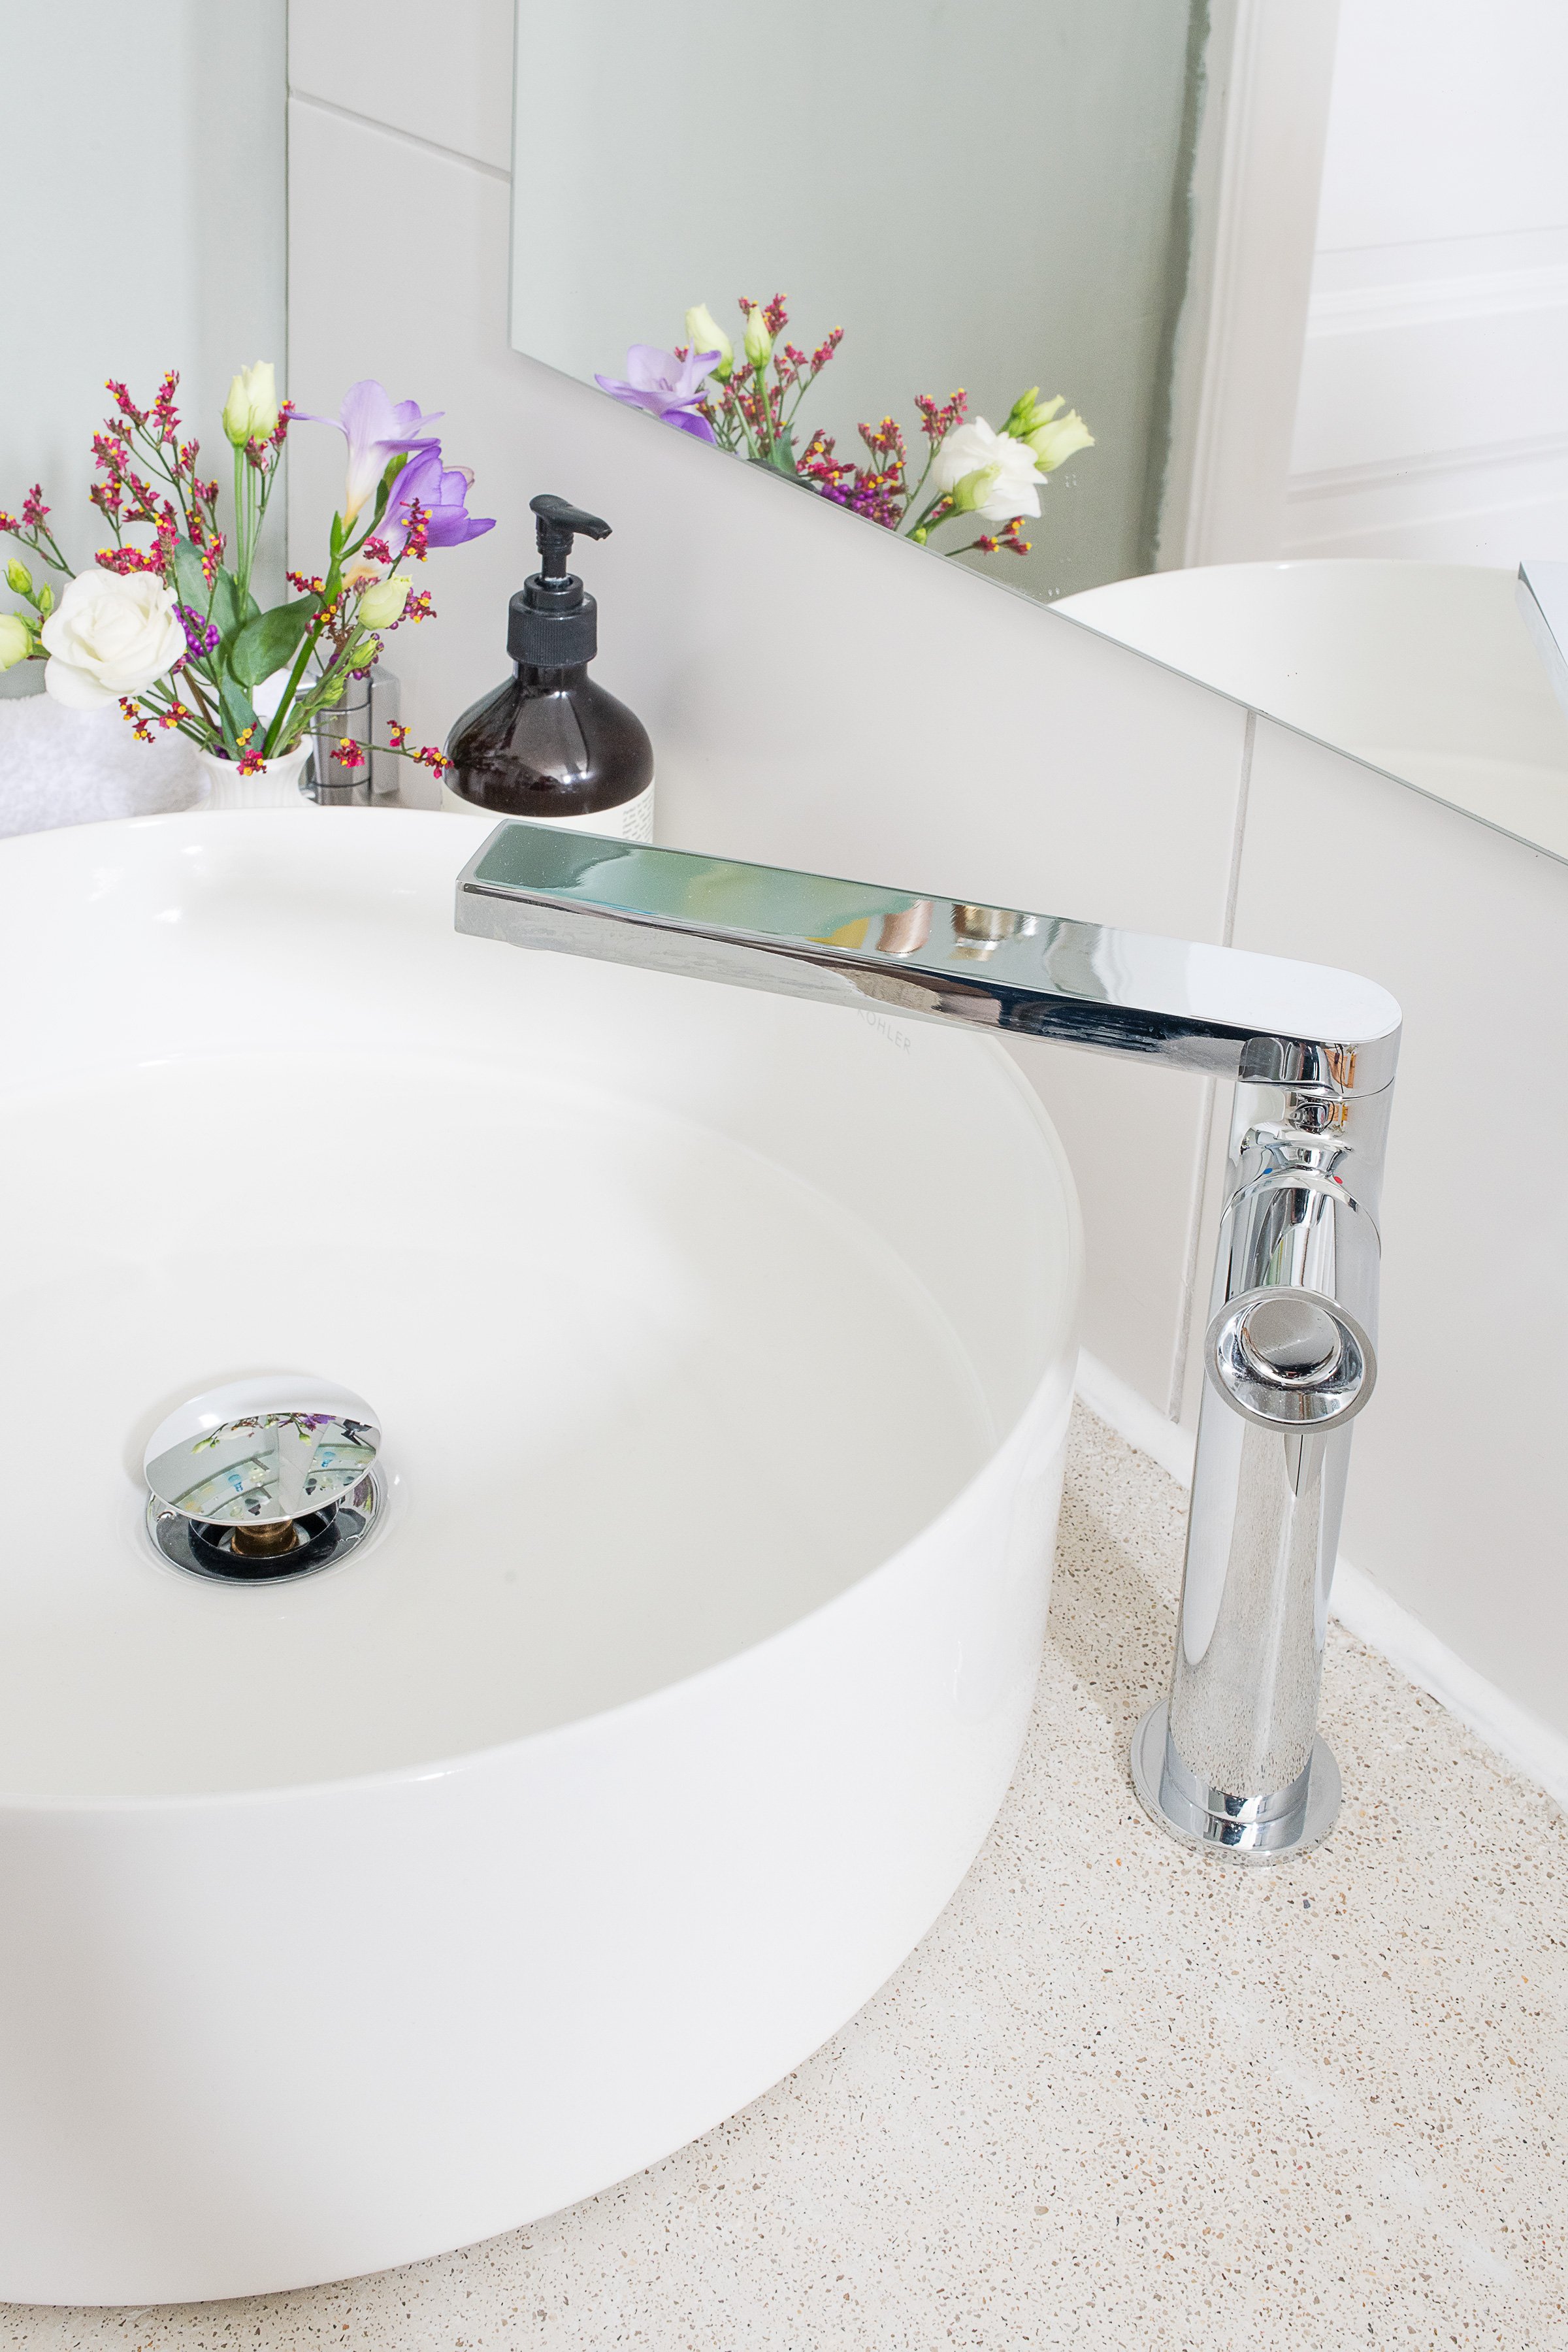
It really is the standout project of this makeover and (along with our new washbasin and tap which you can read about here) makes the bathroom feel so much more luxurious and high quality.
Best of all, it wasn’t difficult to build and we’re sharing exactly how we built it so that you can have a go at making your own DIY concrete countertop, too!
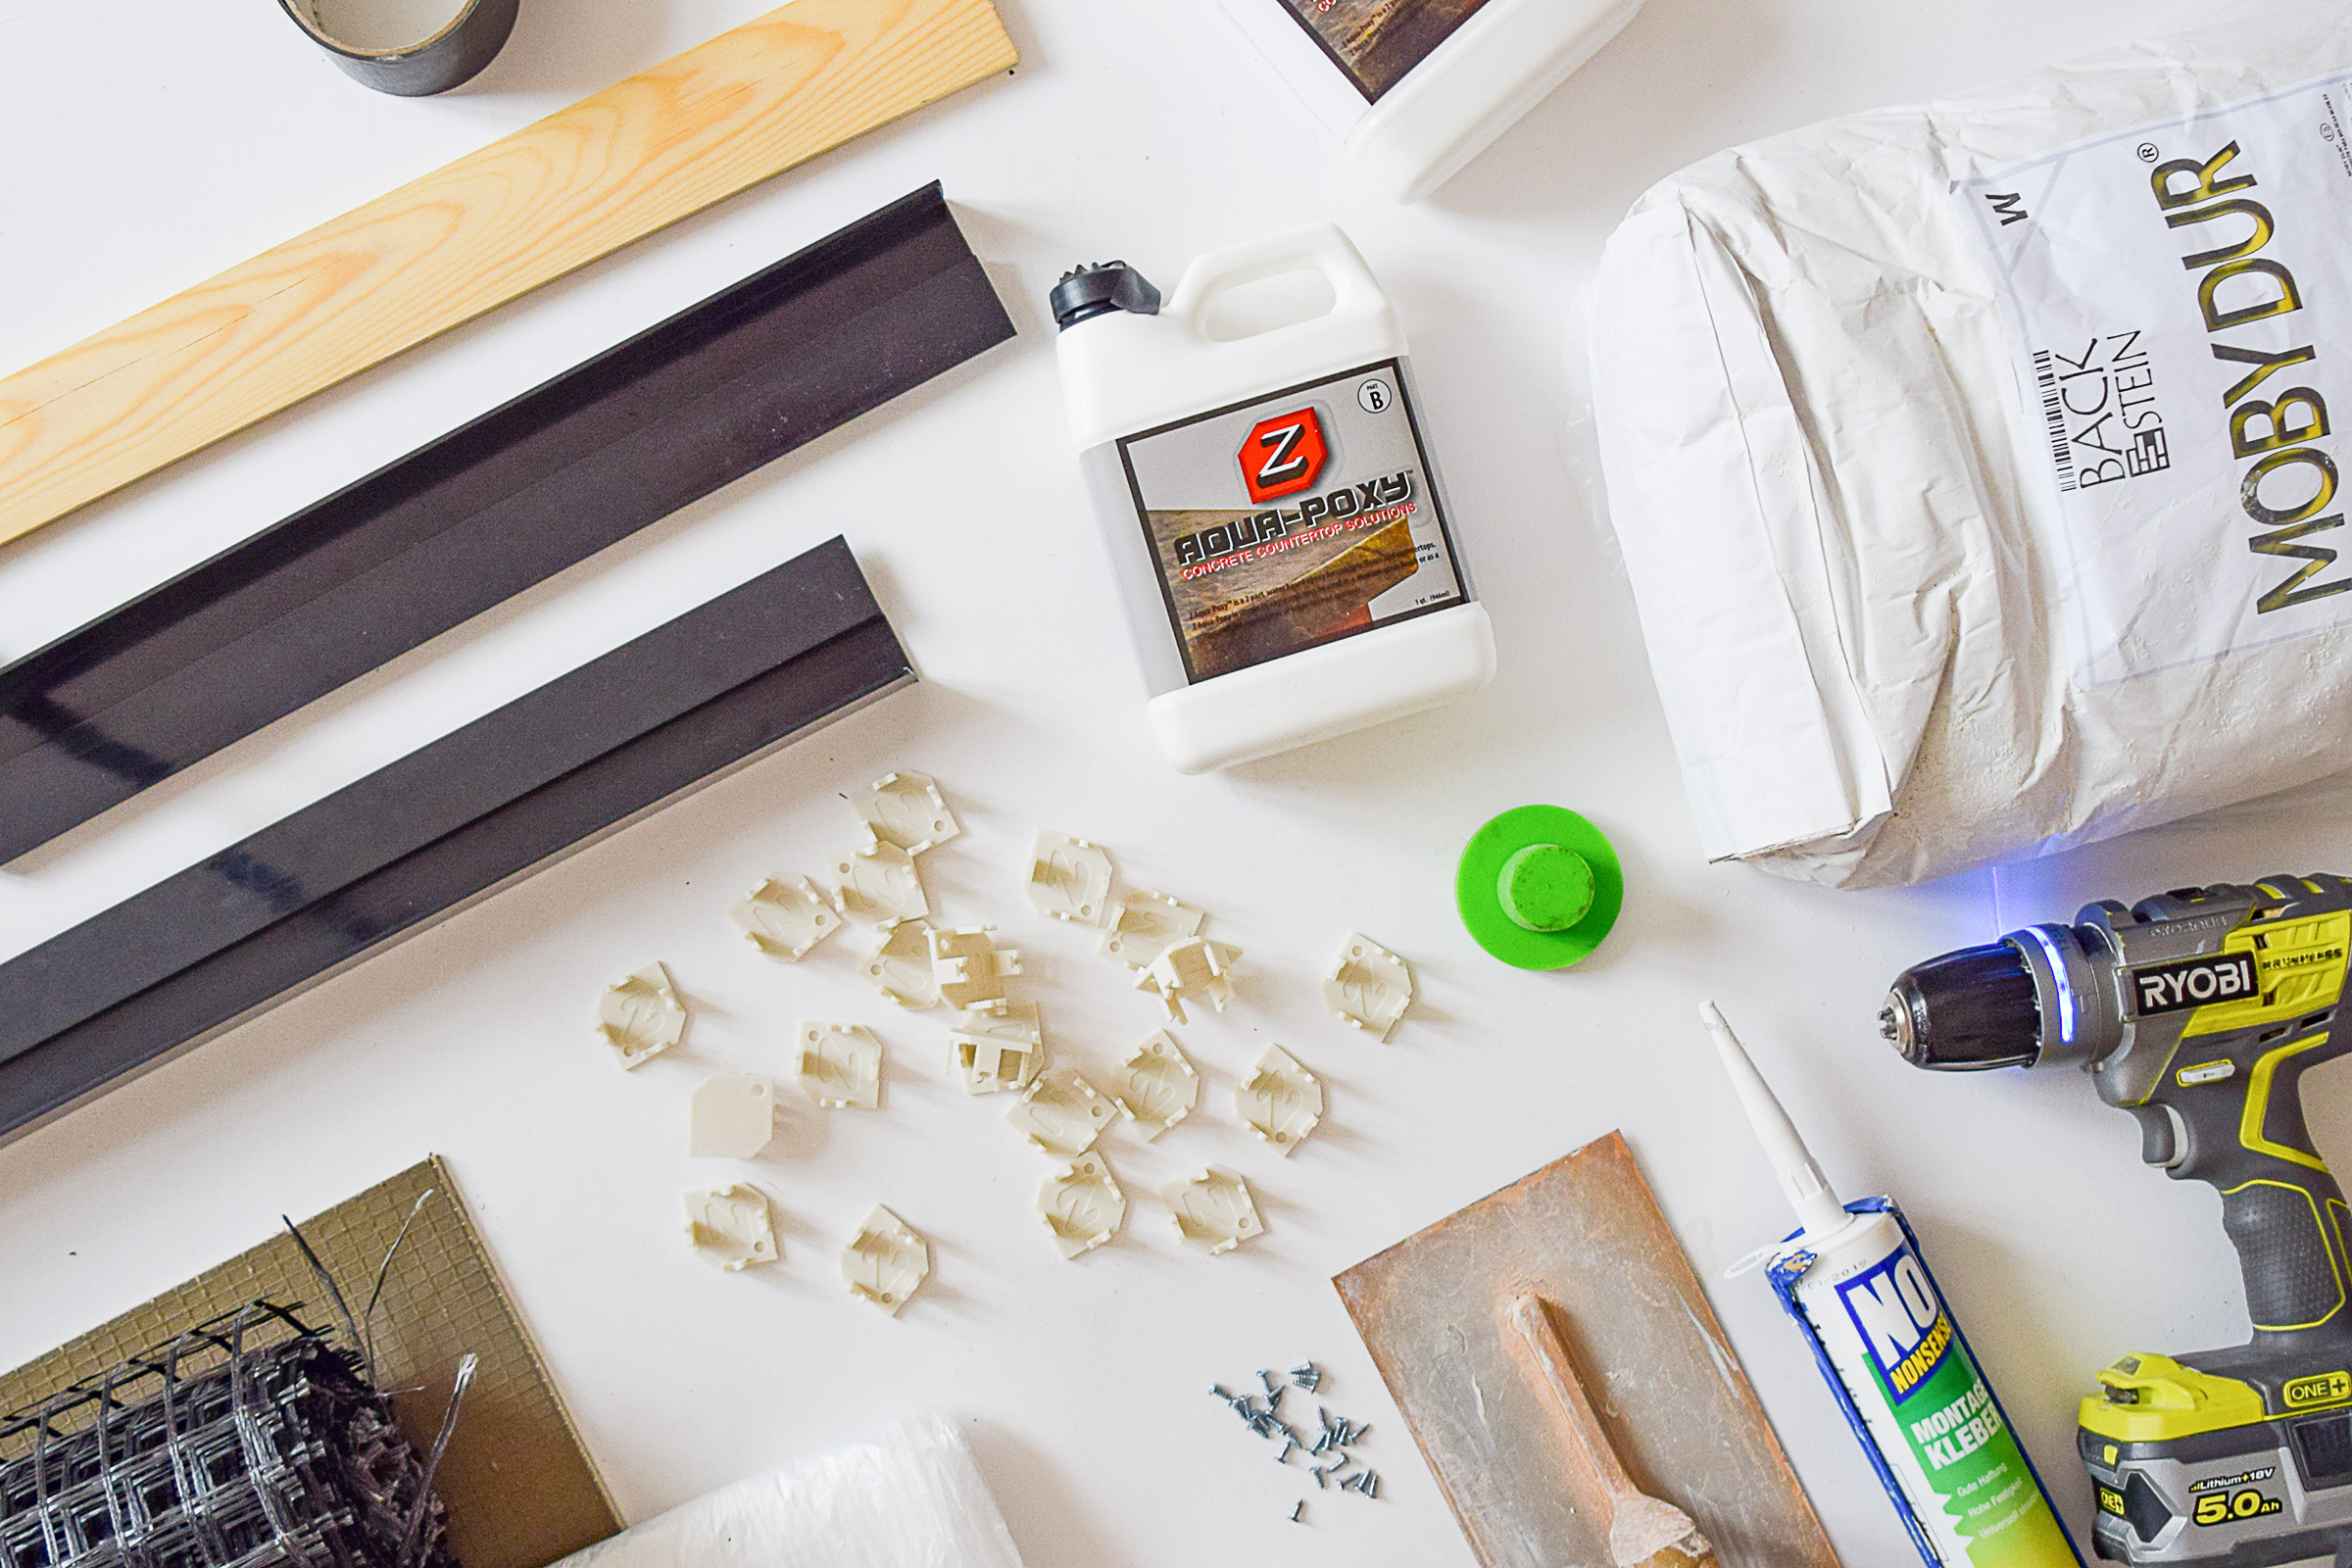
This is what you will need to make a DIY Concrete Countertop:
This post contains affiliate links. We only recommend products we love and think that you will, too! Read our full disclaimer here.
Supplies:
- Concrete – There are lots of options when it comes to concrete. We used this ready mixed concrete which worked fine but we would recommend using this concrete which is designed to be used with the mesh and edging strips if you can get hold of it.
- Cement Board
- Edging strips (there are lots of different profiles available – we used the Euro profile)
- Mesh & Clips
- Tap Knockout
- Dust Sheets (it will be messy)
- Duct Tape
- Silicone sealant
- Concrete Sealer
- No Nails Adhesive
- Small Screws
- 120g Grit Sandpaper
- Polystyrene
Tools:
- Trowel
- Brick trowel (or similar) to lift concrete out of the bucket
- Buckets (one to mix the concrete and one with water to keep your tools clean)
- Concrete mixer or plaster mixer (which is what we used)
- Scales & Measuring Jug (you have to be precise with your quantities)
- Mitre Saw (to cut any necessary holes into your backer board)
- Jigsaw
- Sealant Gun
- Cordless drill & bit to drill the hole for your tap
- Paintbrush, Roller & Painting Tray
- Hacksaw
- Screwdriver
- Knife
Optional:
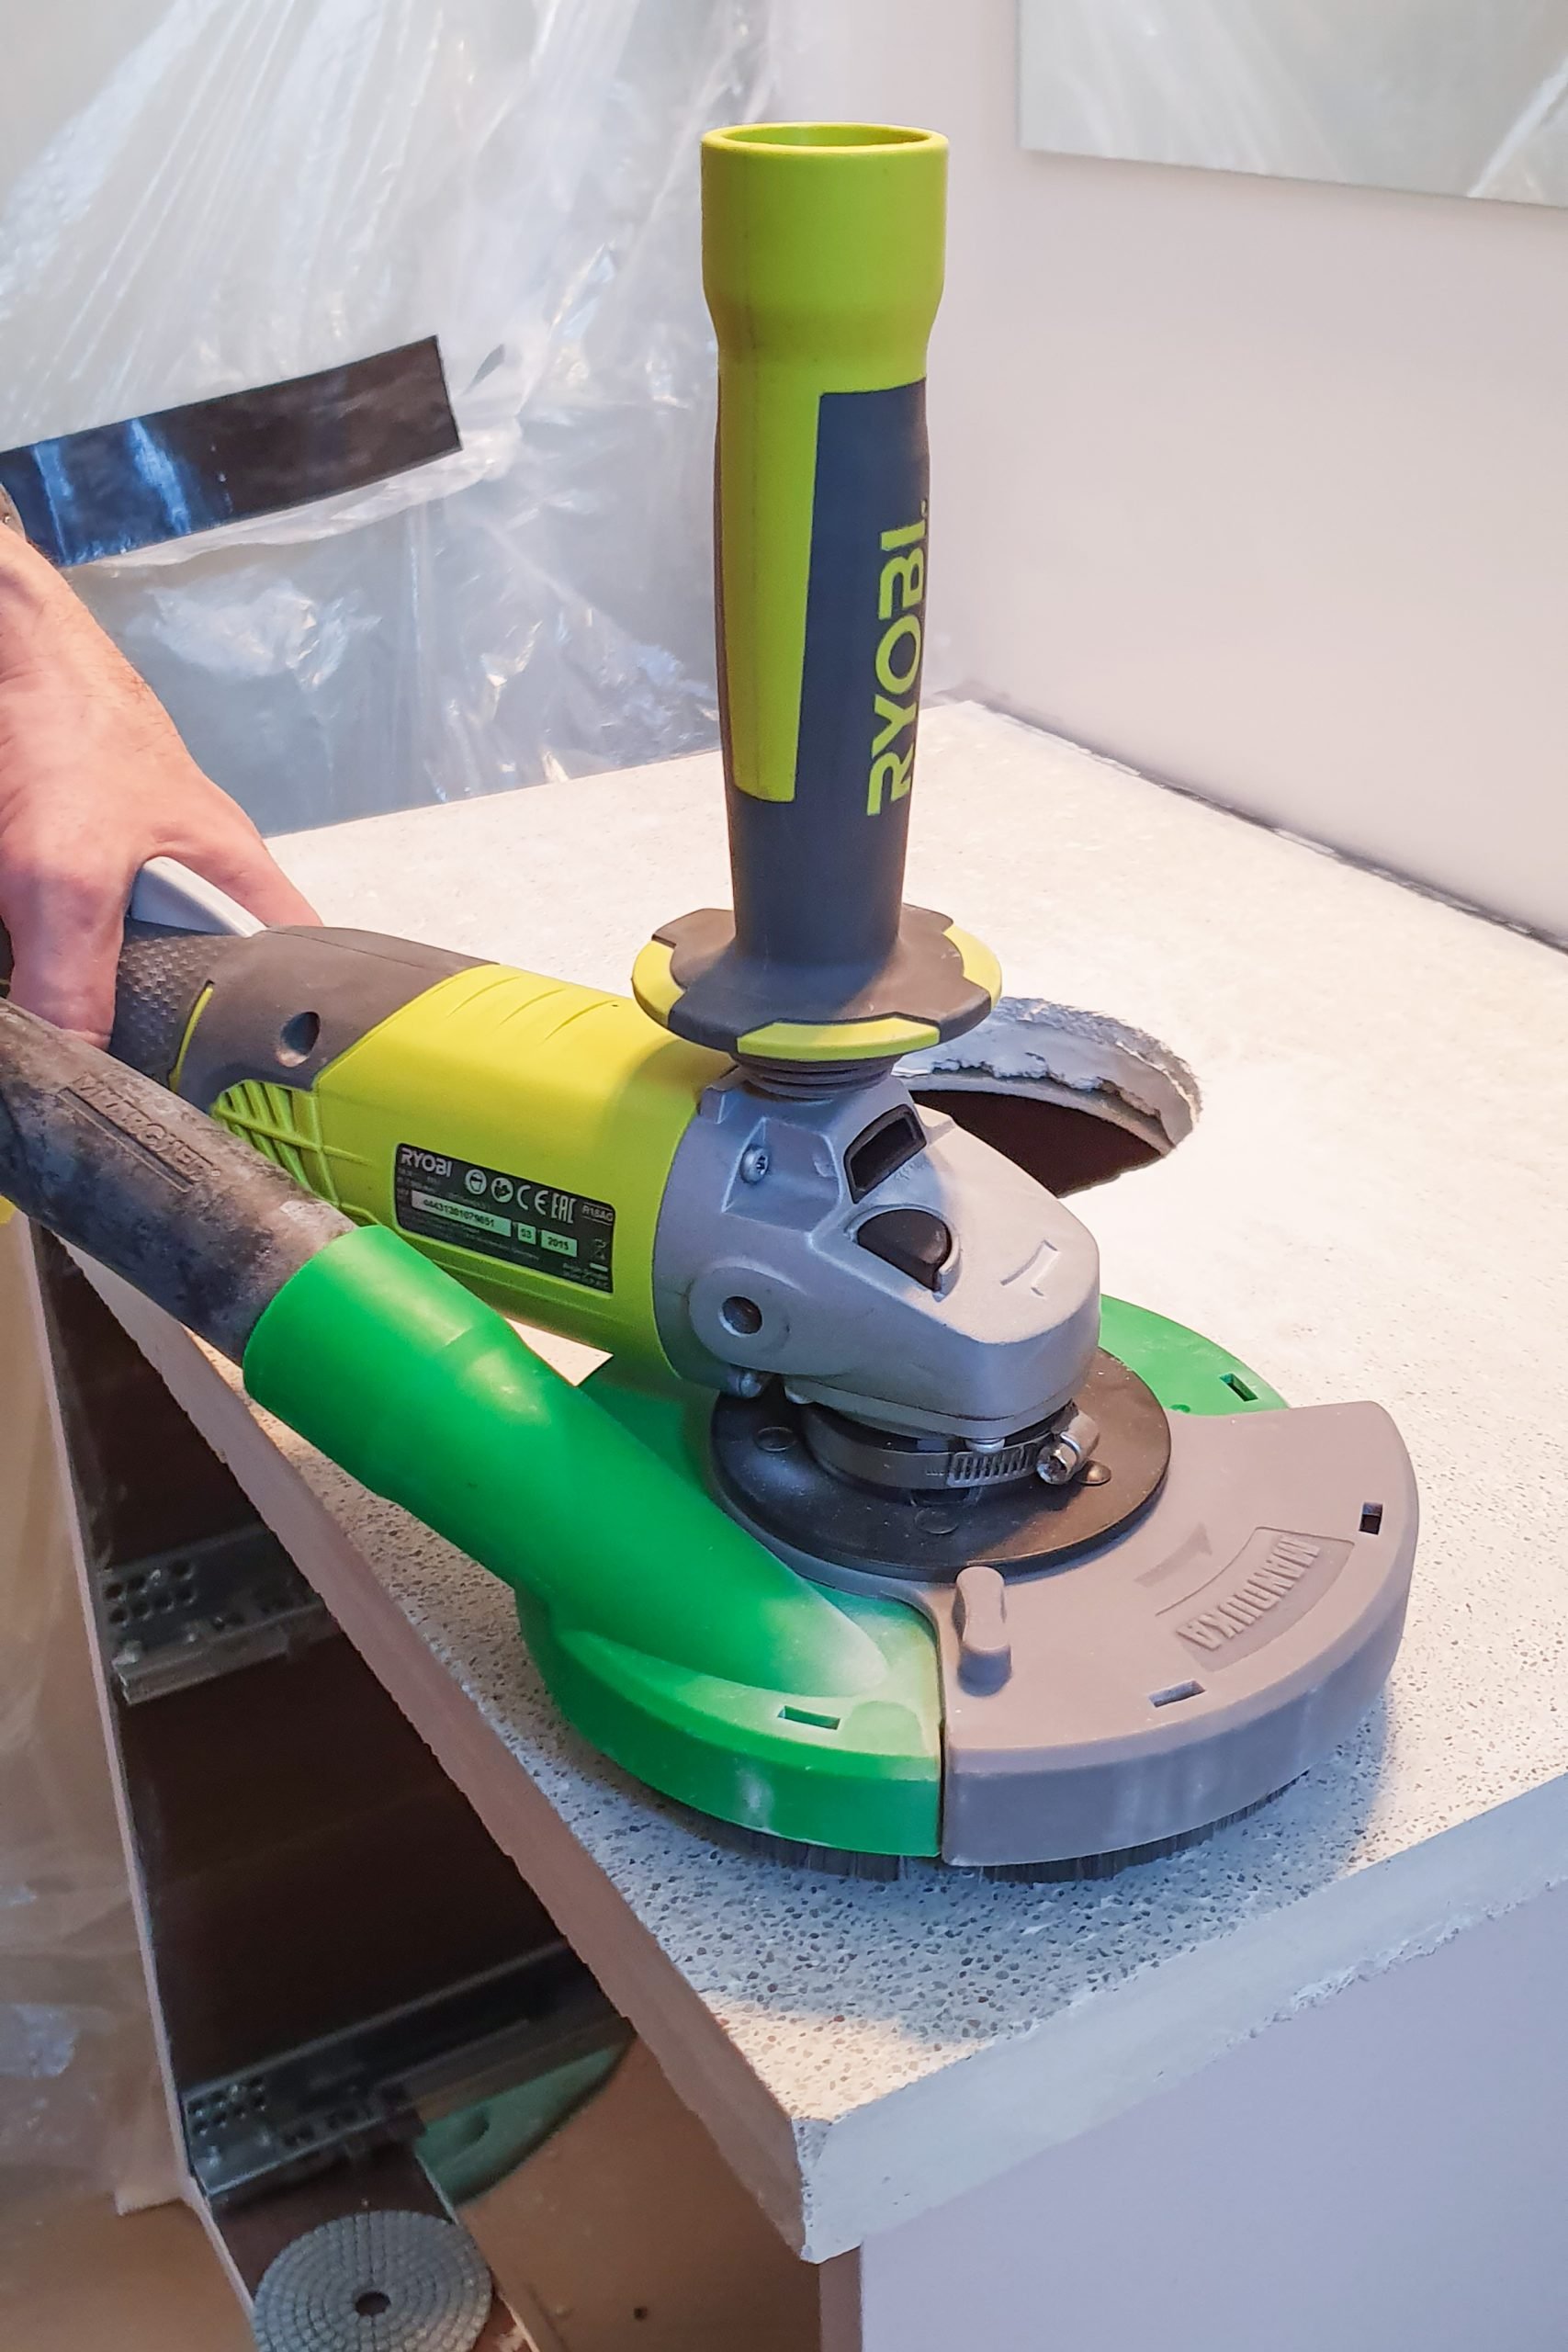
- Angle grinder (which is what we used) or concrete polishing machine
- Concrete polishing pads
- Surface Grinding Dust Shroud
- Vacuum Cleaner
- Dust Mask
- Goggles
As you can see from the list of supplies, this is a project that is a bit more involved but you will probably already have most of the things you’ll need to complete this project.
This is how to build a DIY Concrete Countertop:
PREPARATION
Install The Cementboard
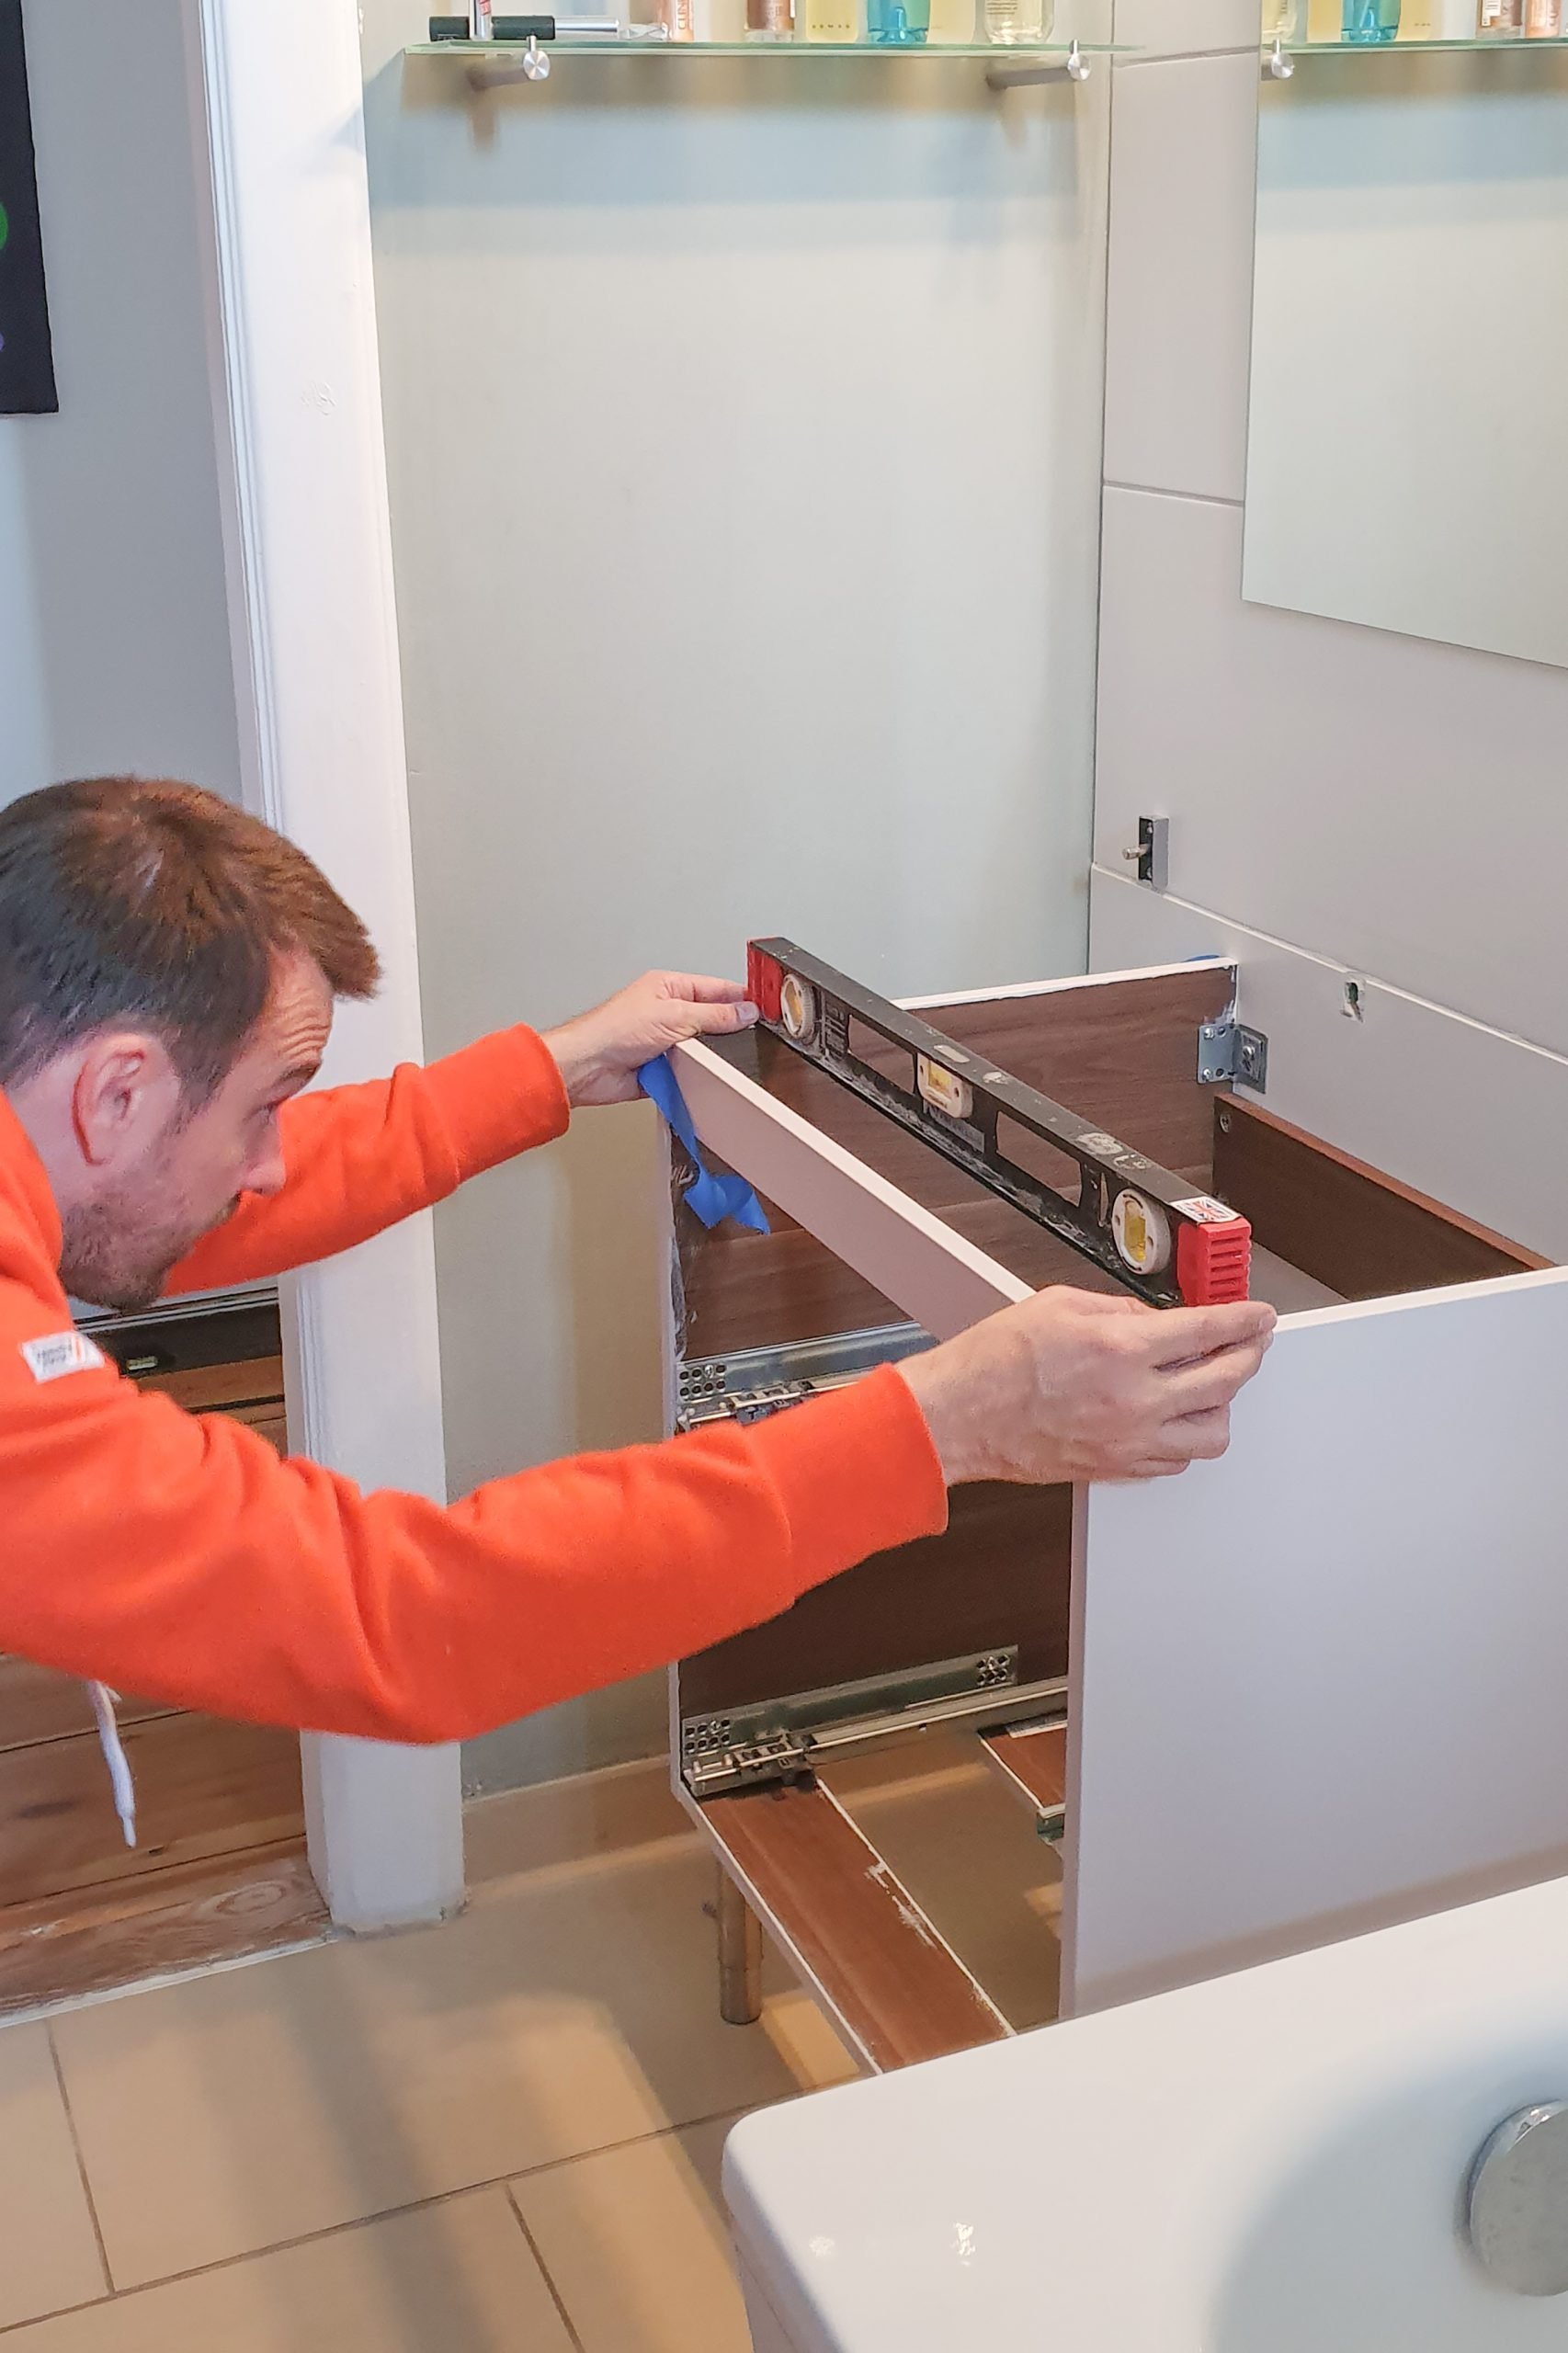
The first step is to prepare your vanity unit for your new concrete countertop.
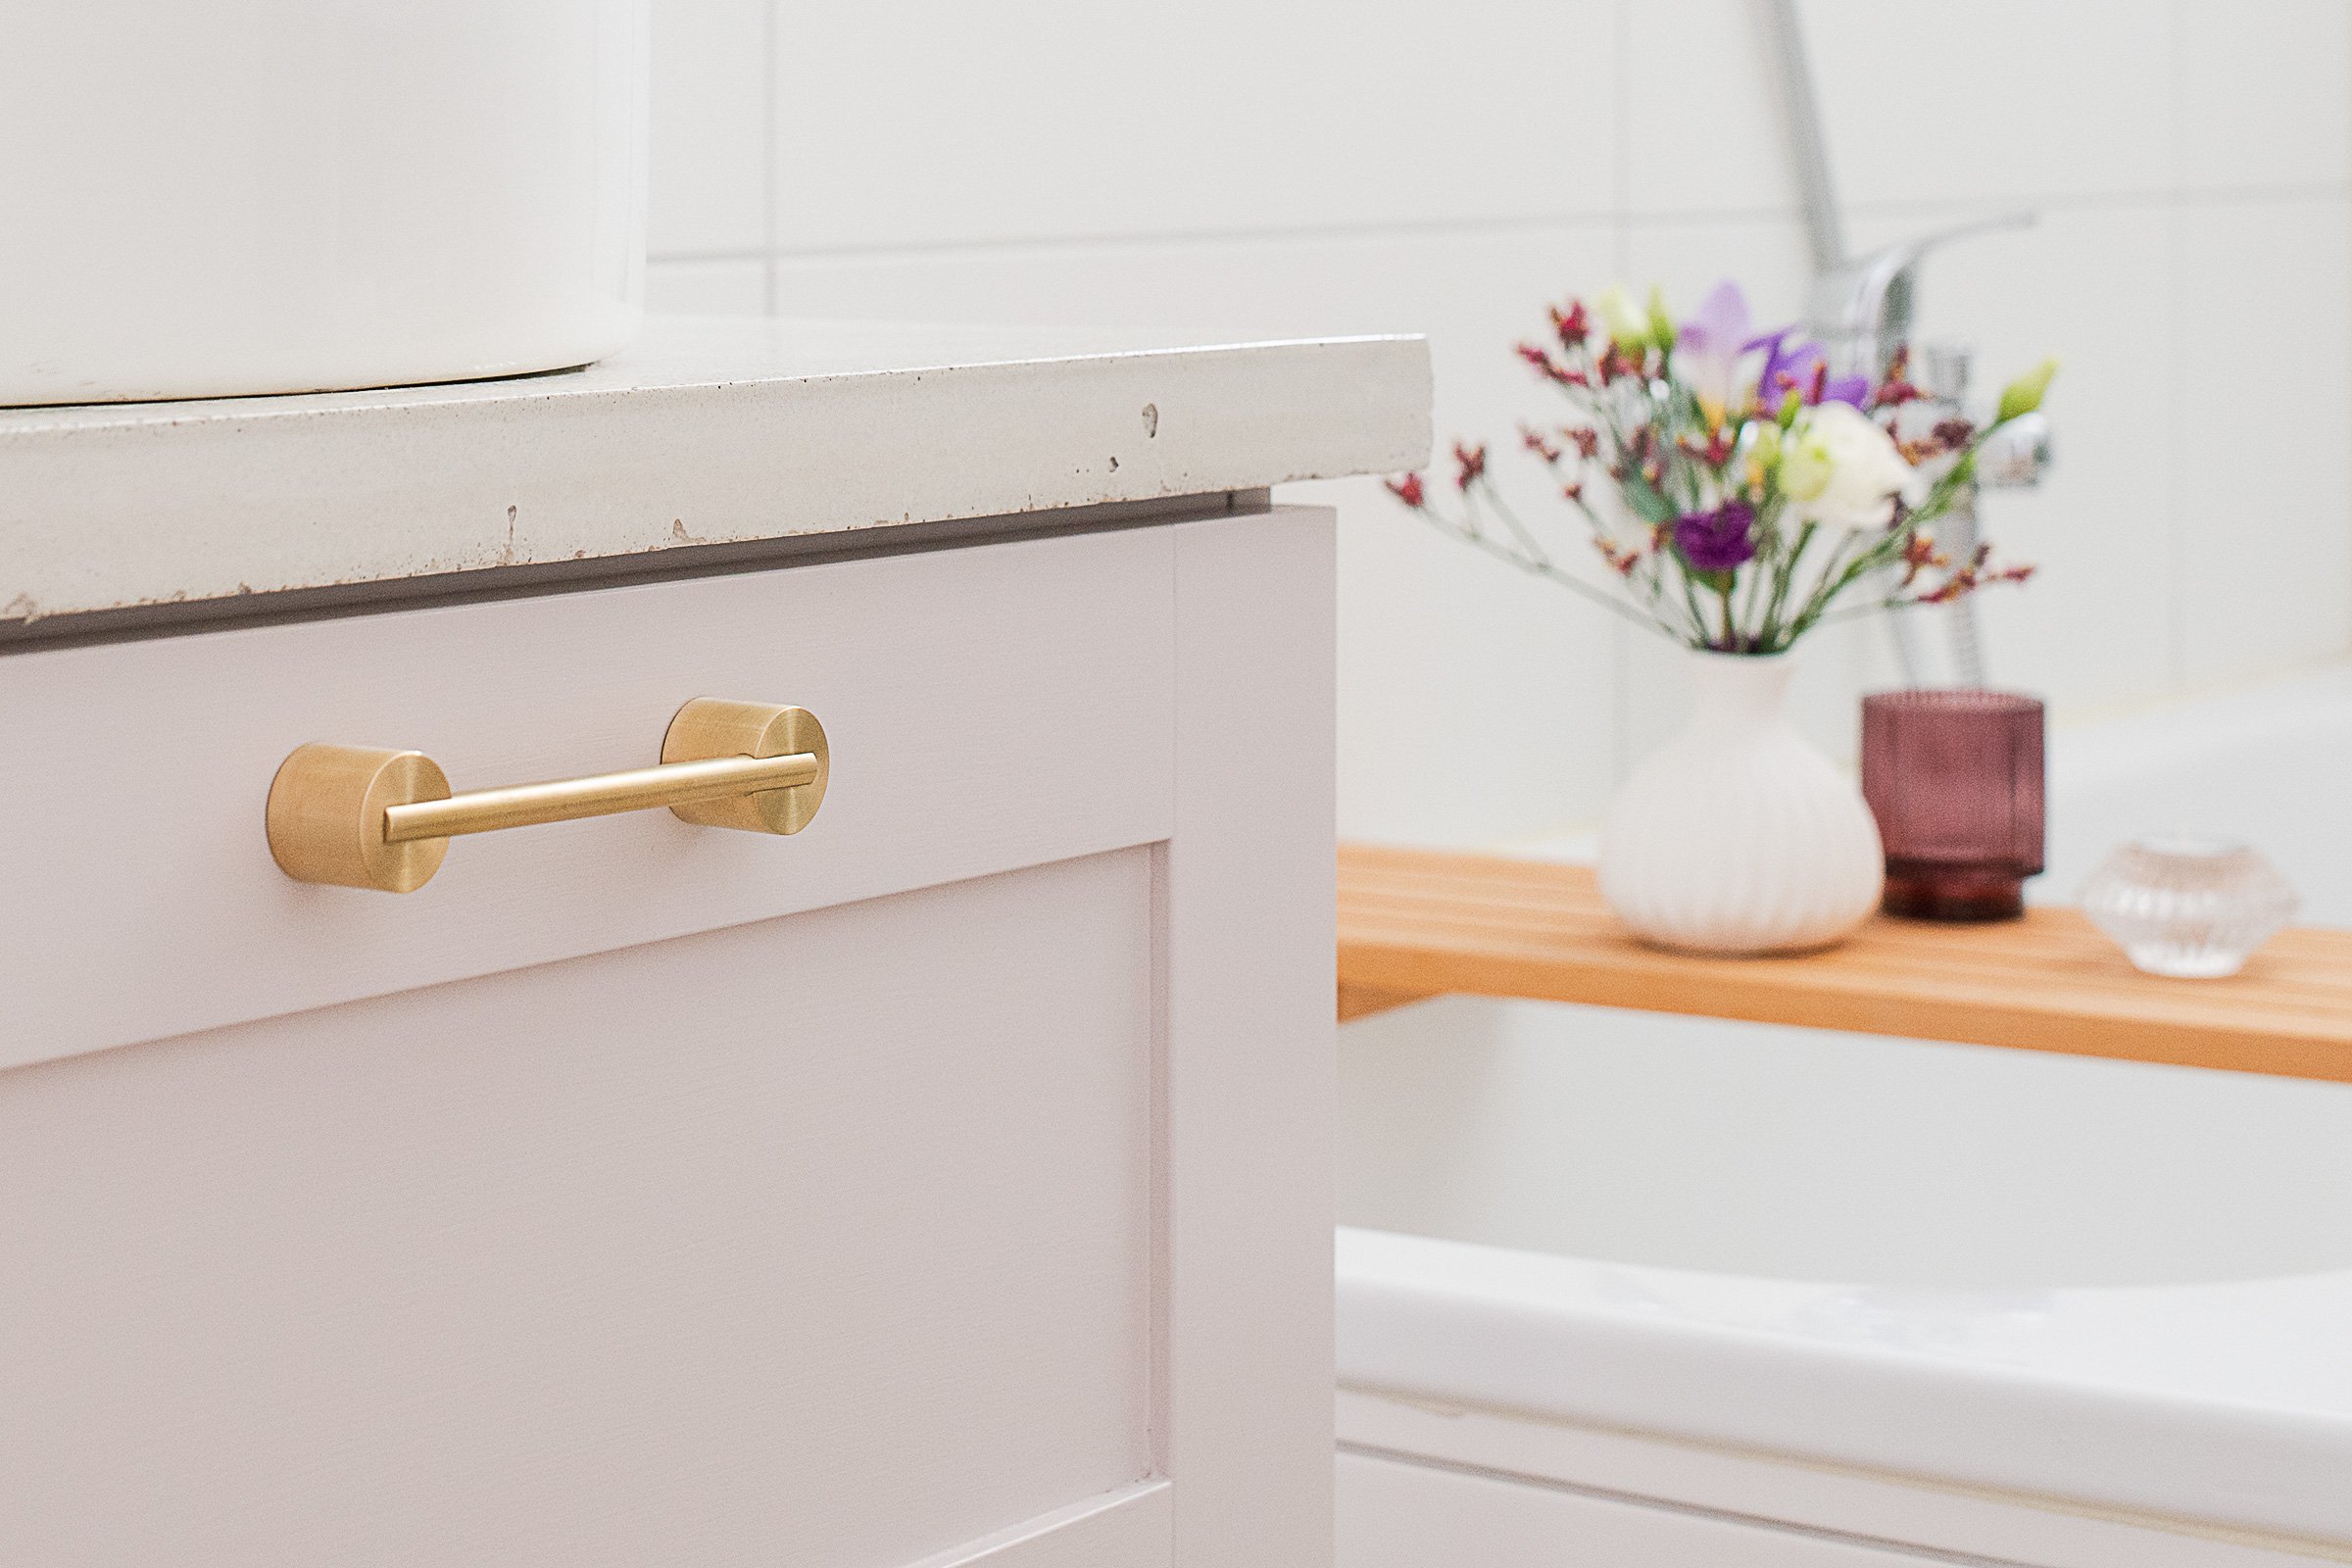
We installed a new pink vanity unit (it’s from Ikea and painted in Peignoir by Farrow & Ball) but you could easily add a concrete countertop to an existing cupboard!
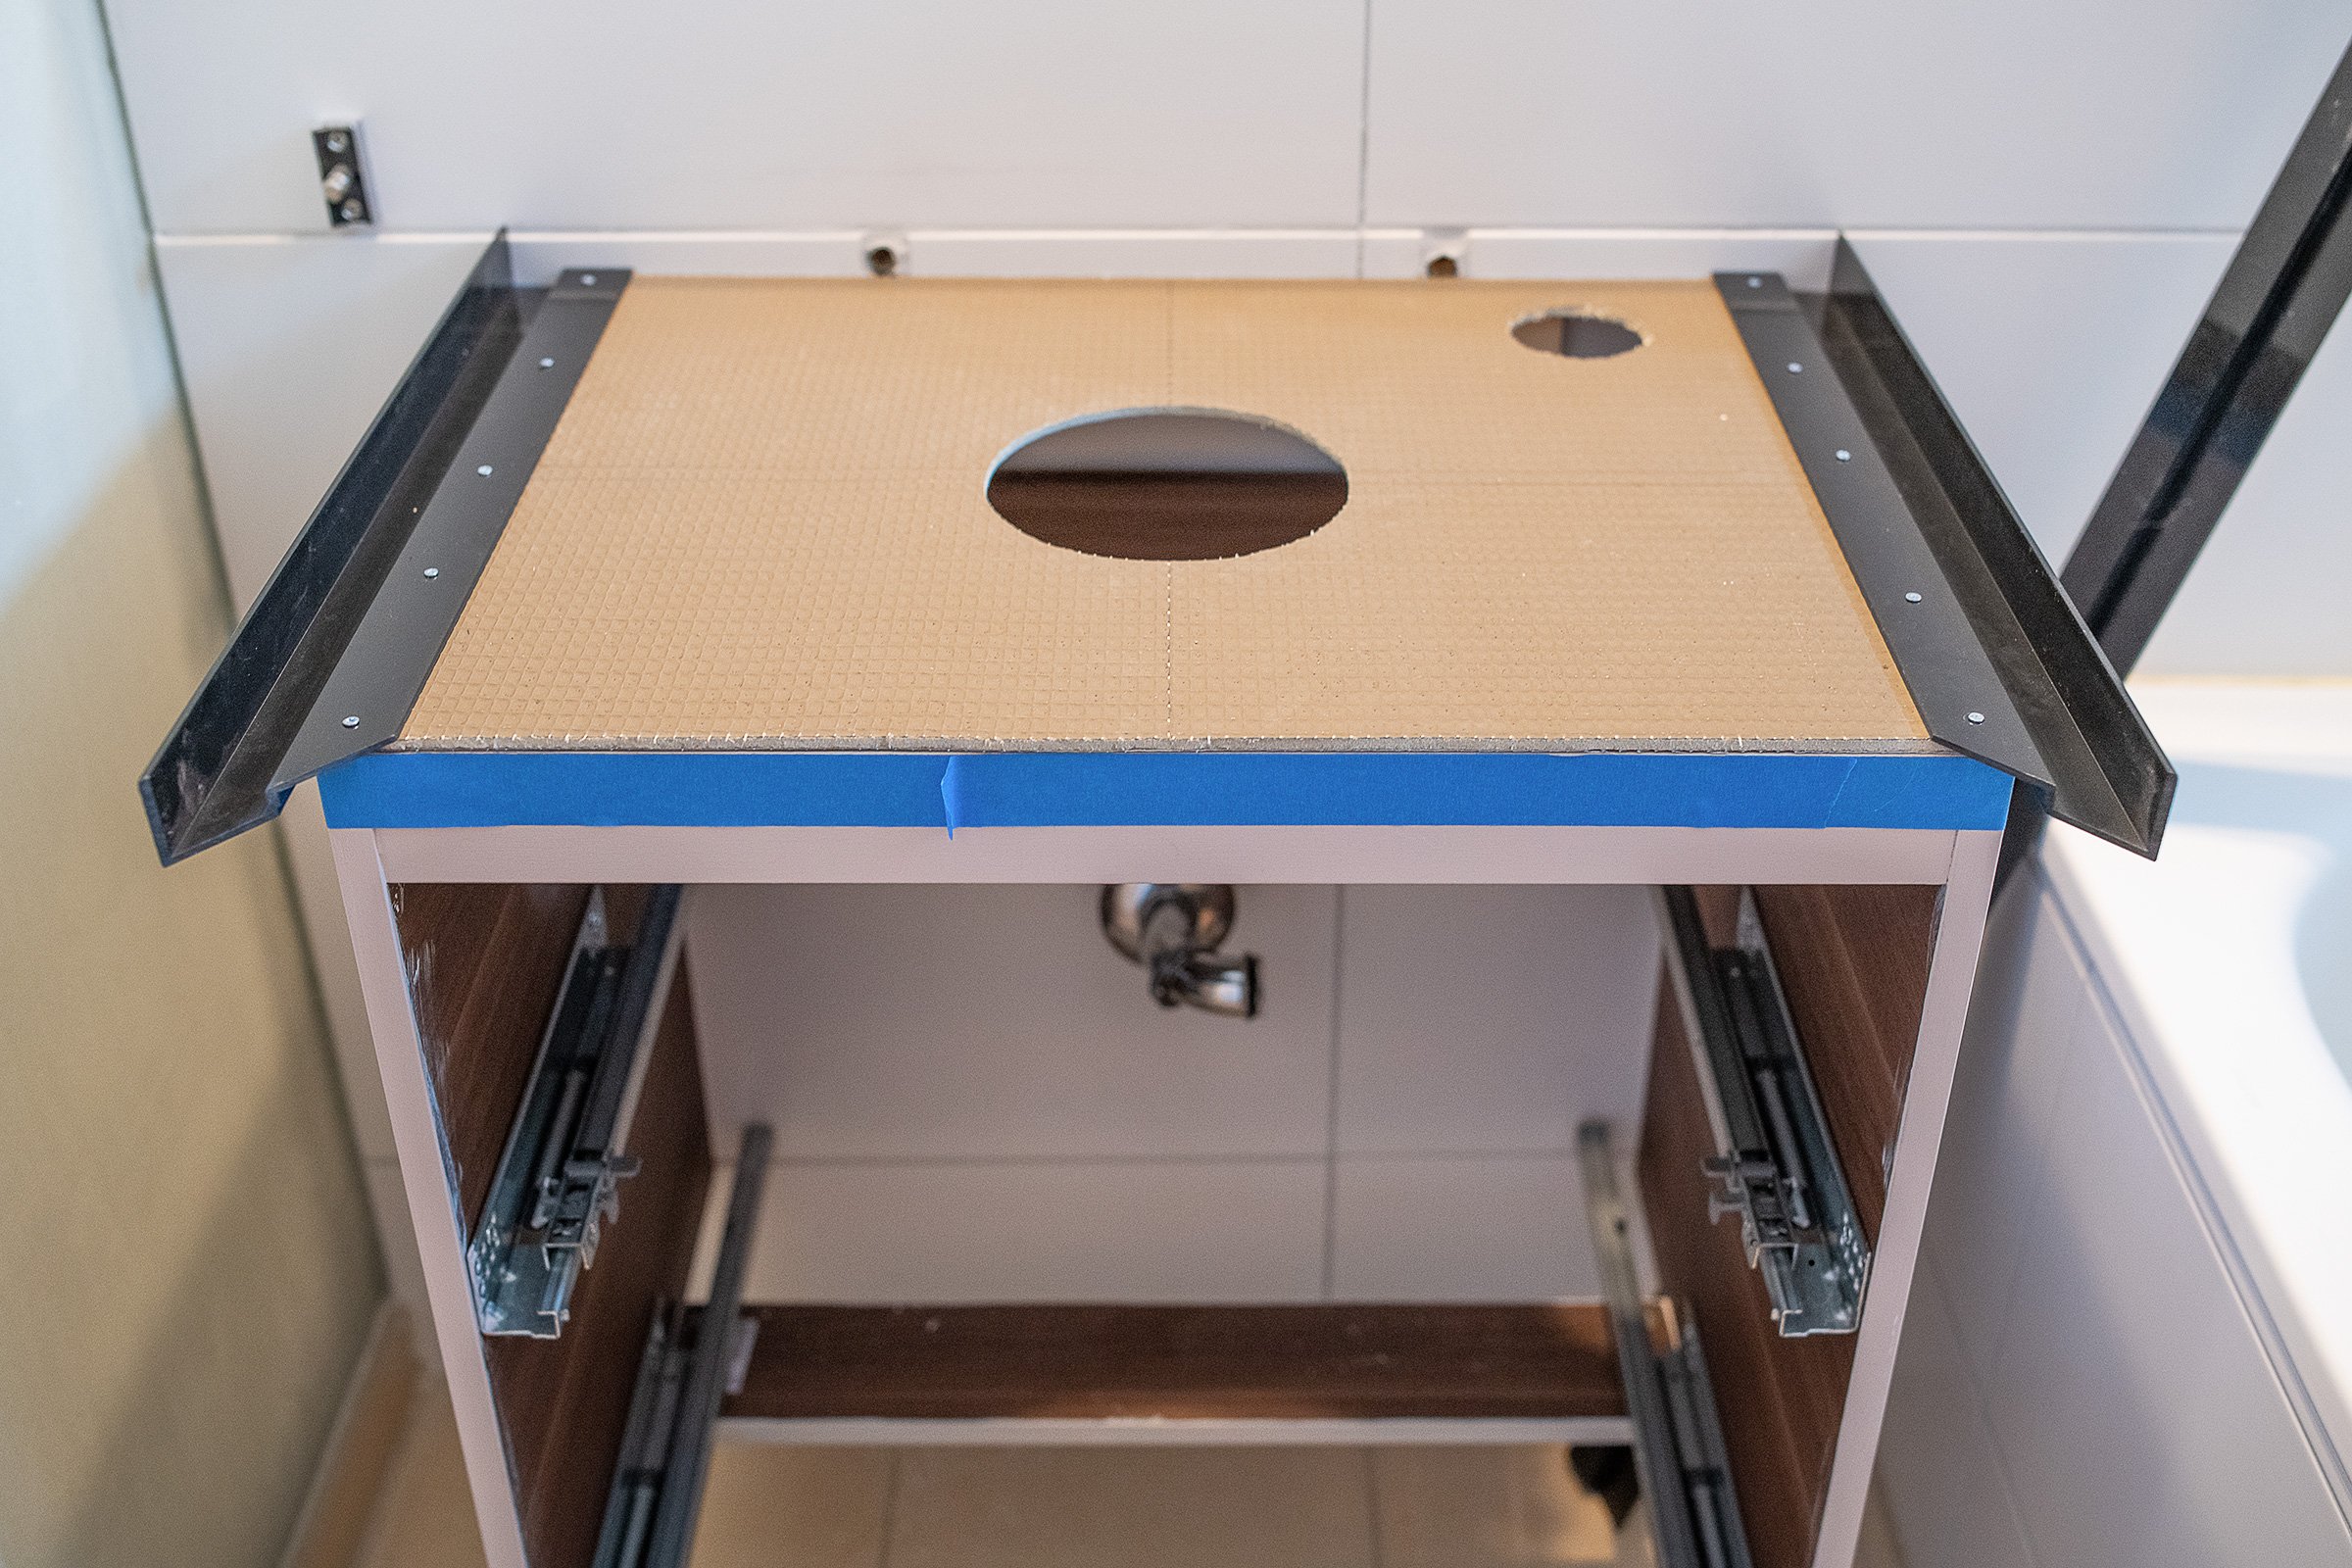
Start by cutting the cement board to the exact size as the top of your vanity unit before cutting out a hole for your tap and a hole for your washbasin connections.
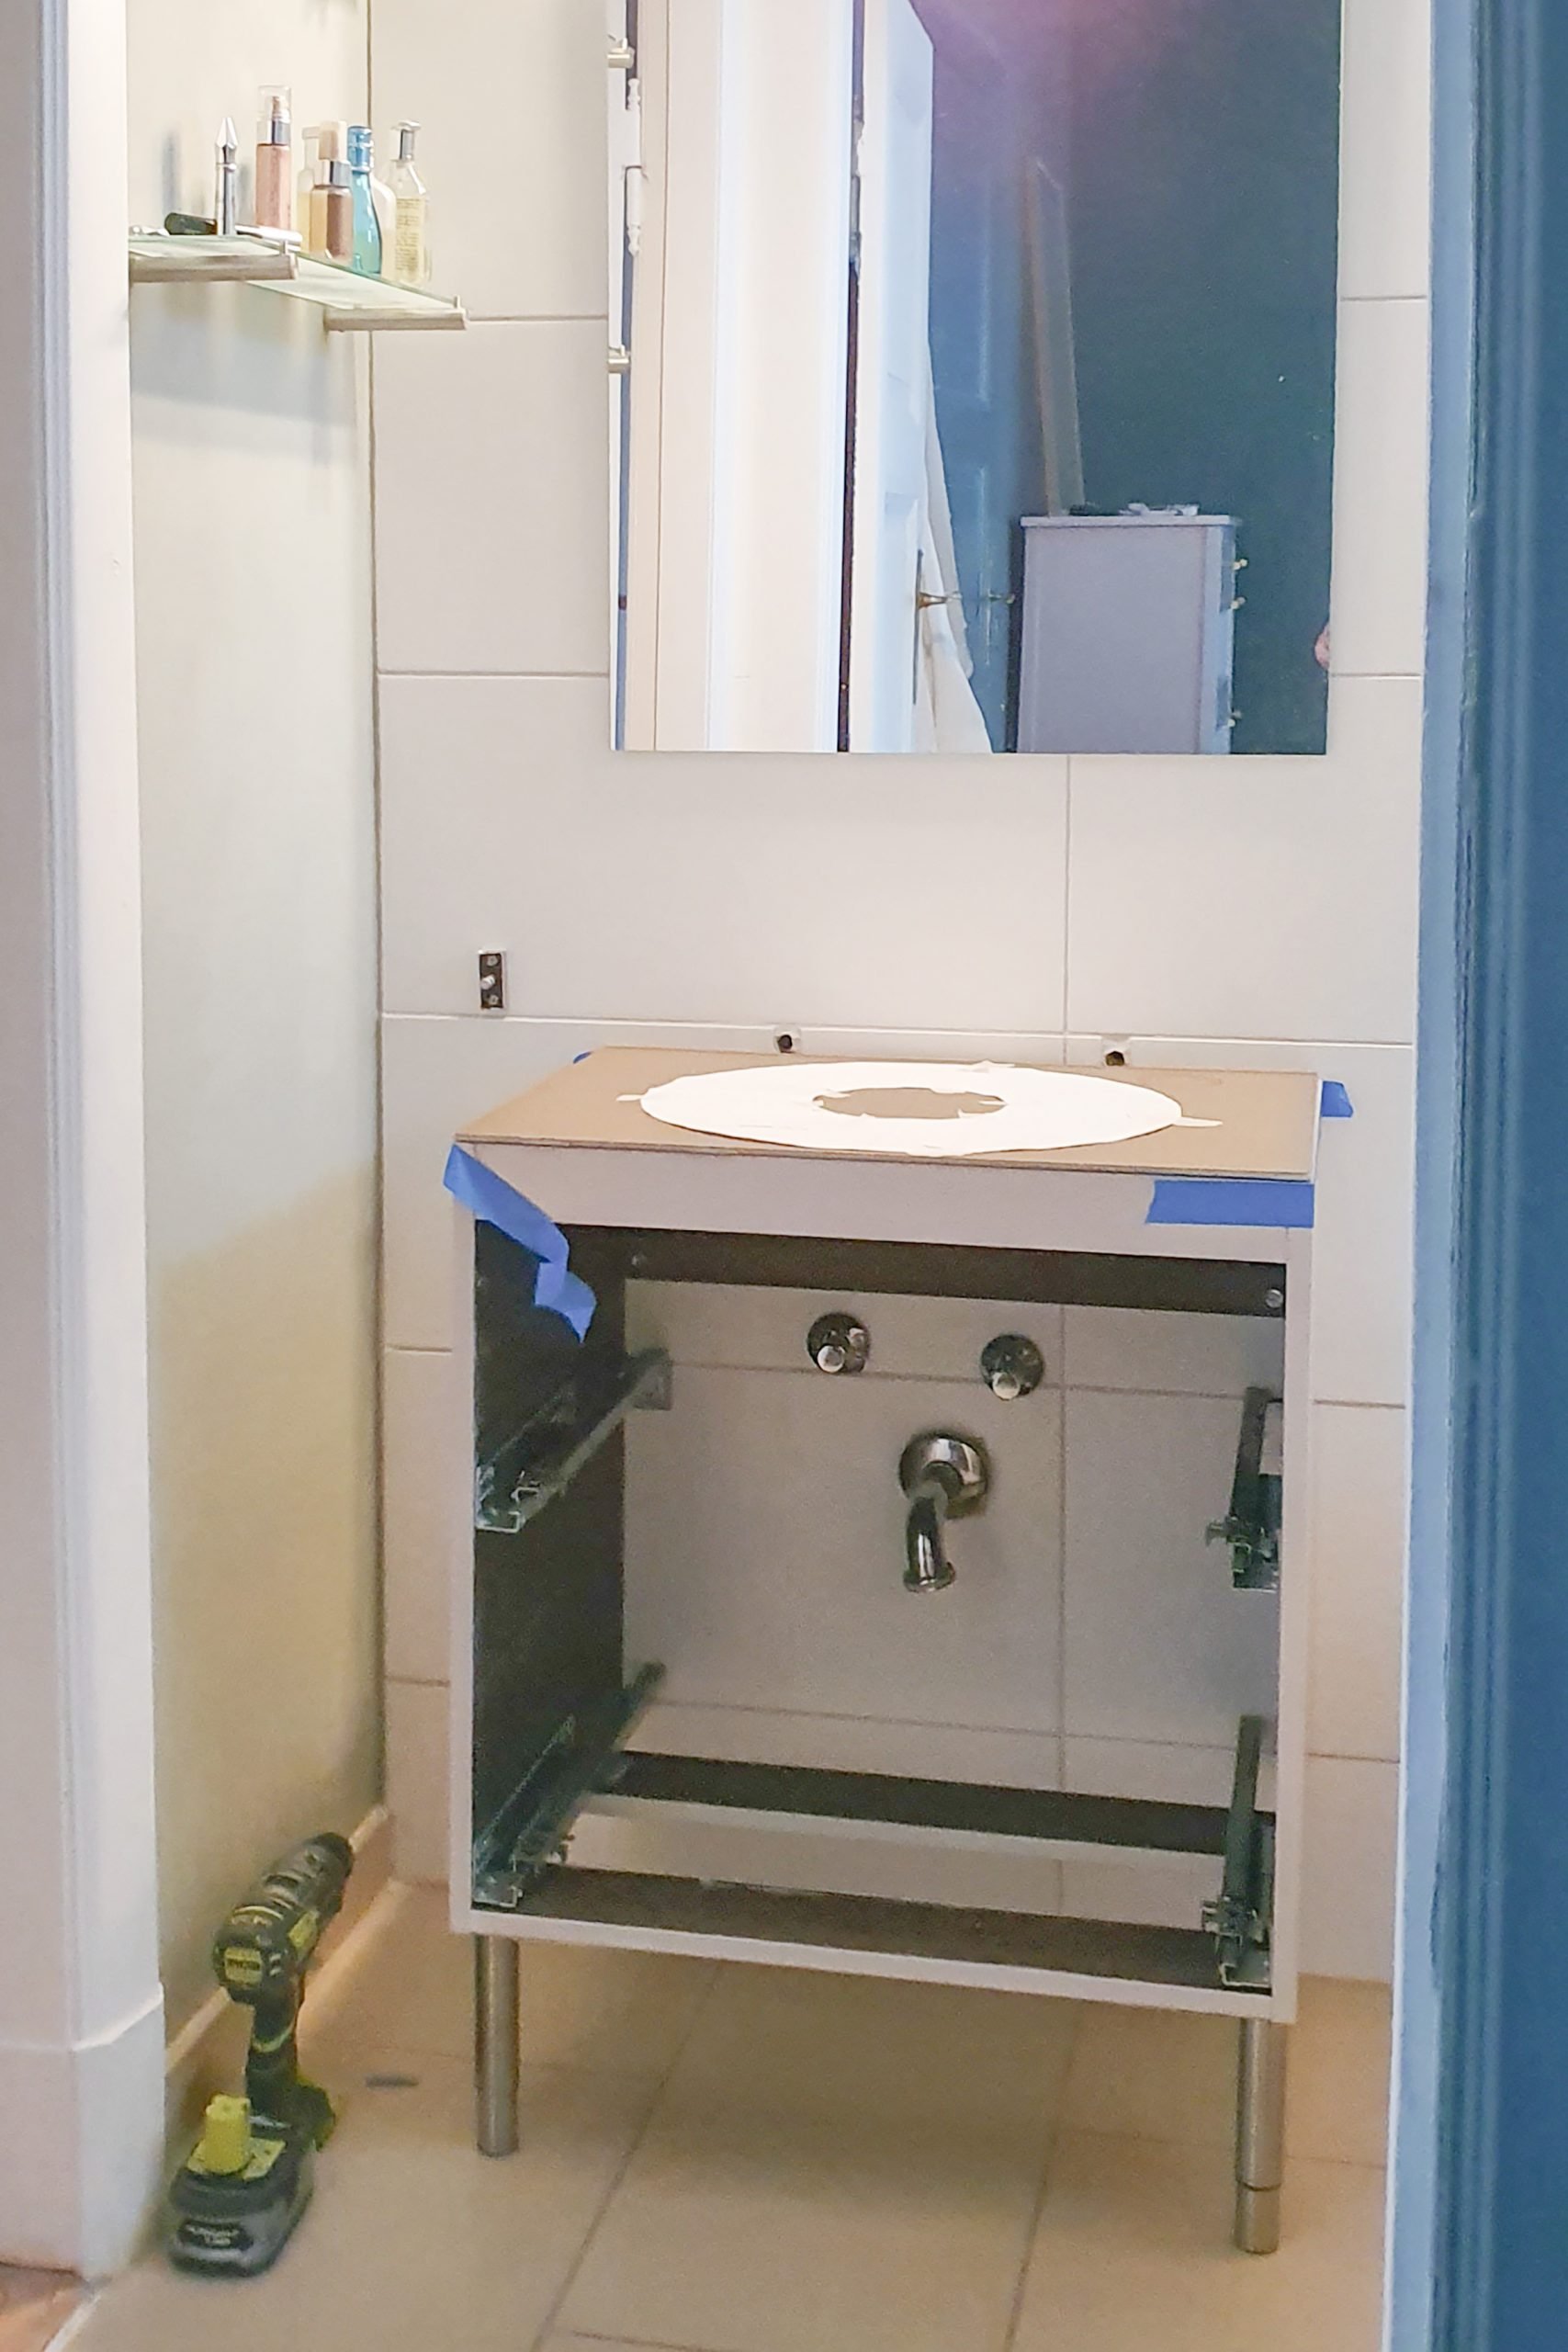
The sizes of the holes will depend on the type of washbasin you are installing. In our case, we had to cut a hole with a 15cm diameter out of the centre of the backer board.
Mounted washbasins like ours come with templates which made positioning and cutting out any necessary openings really easy.
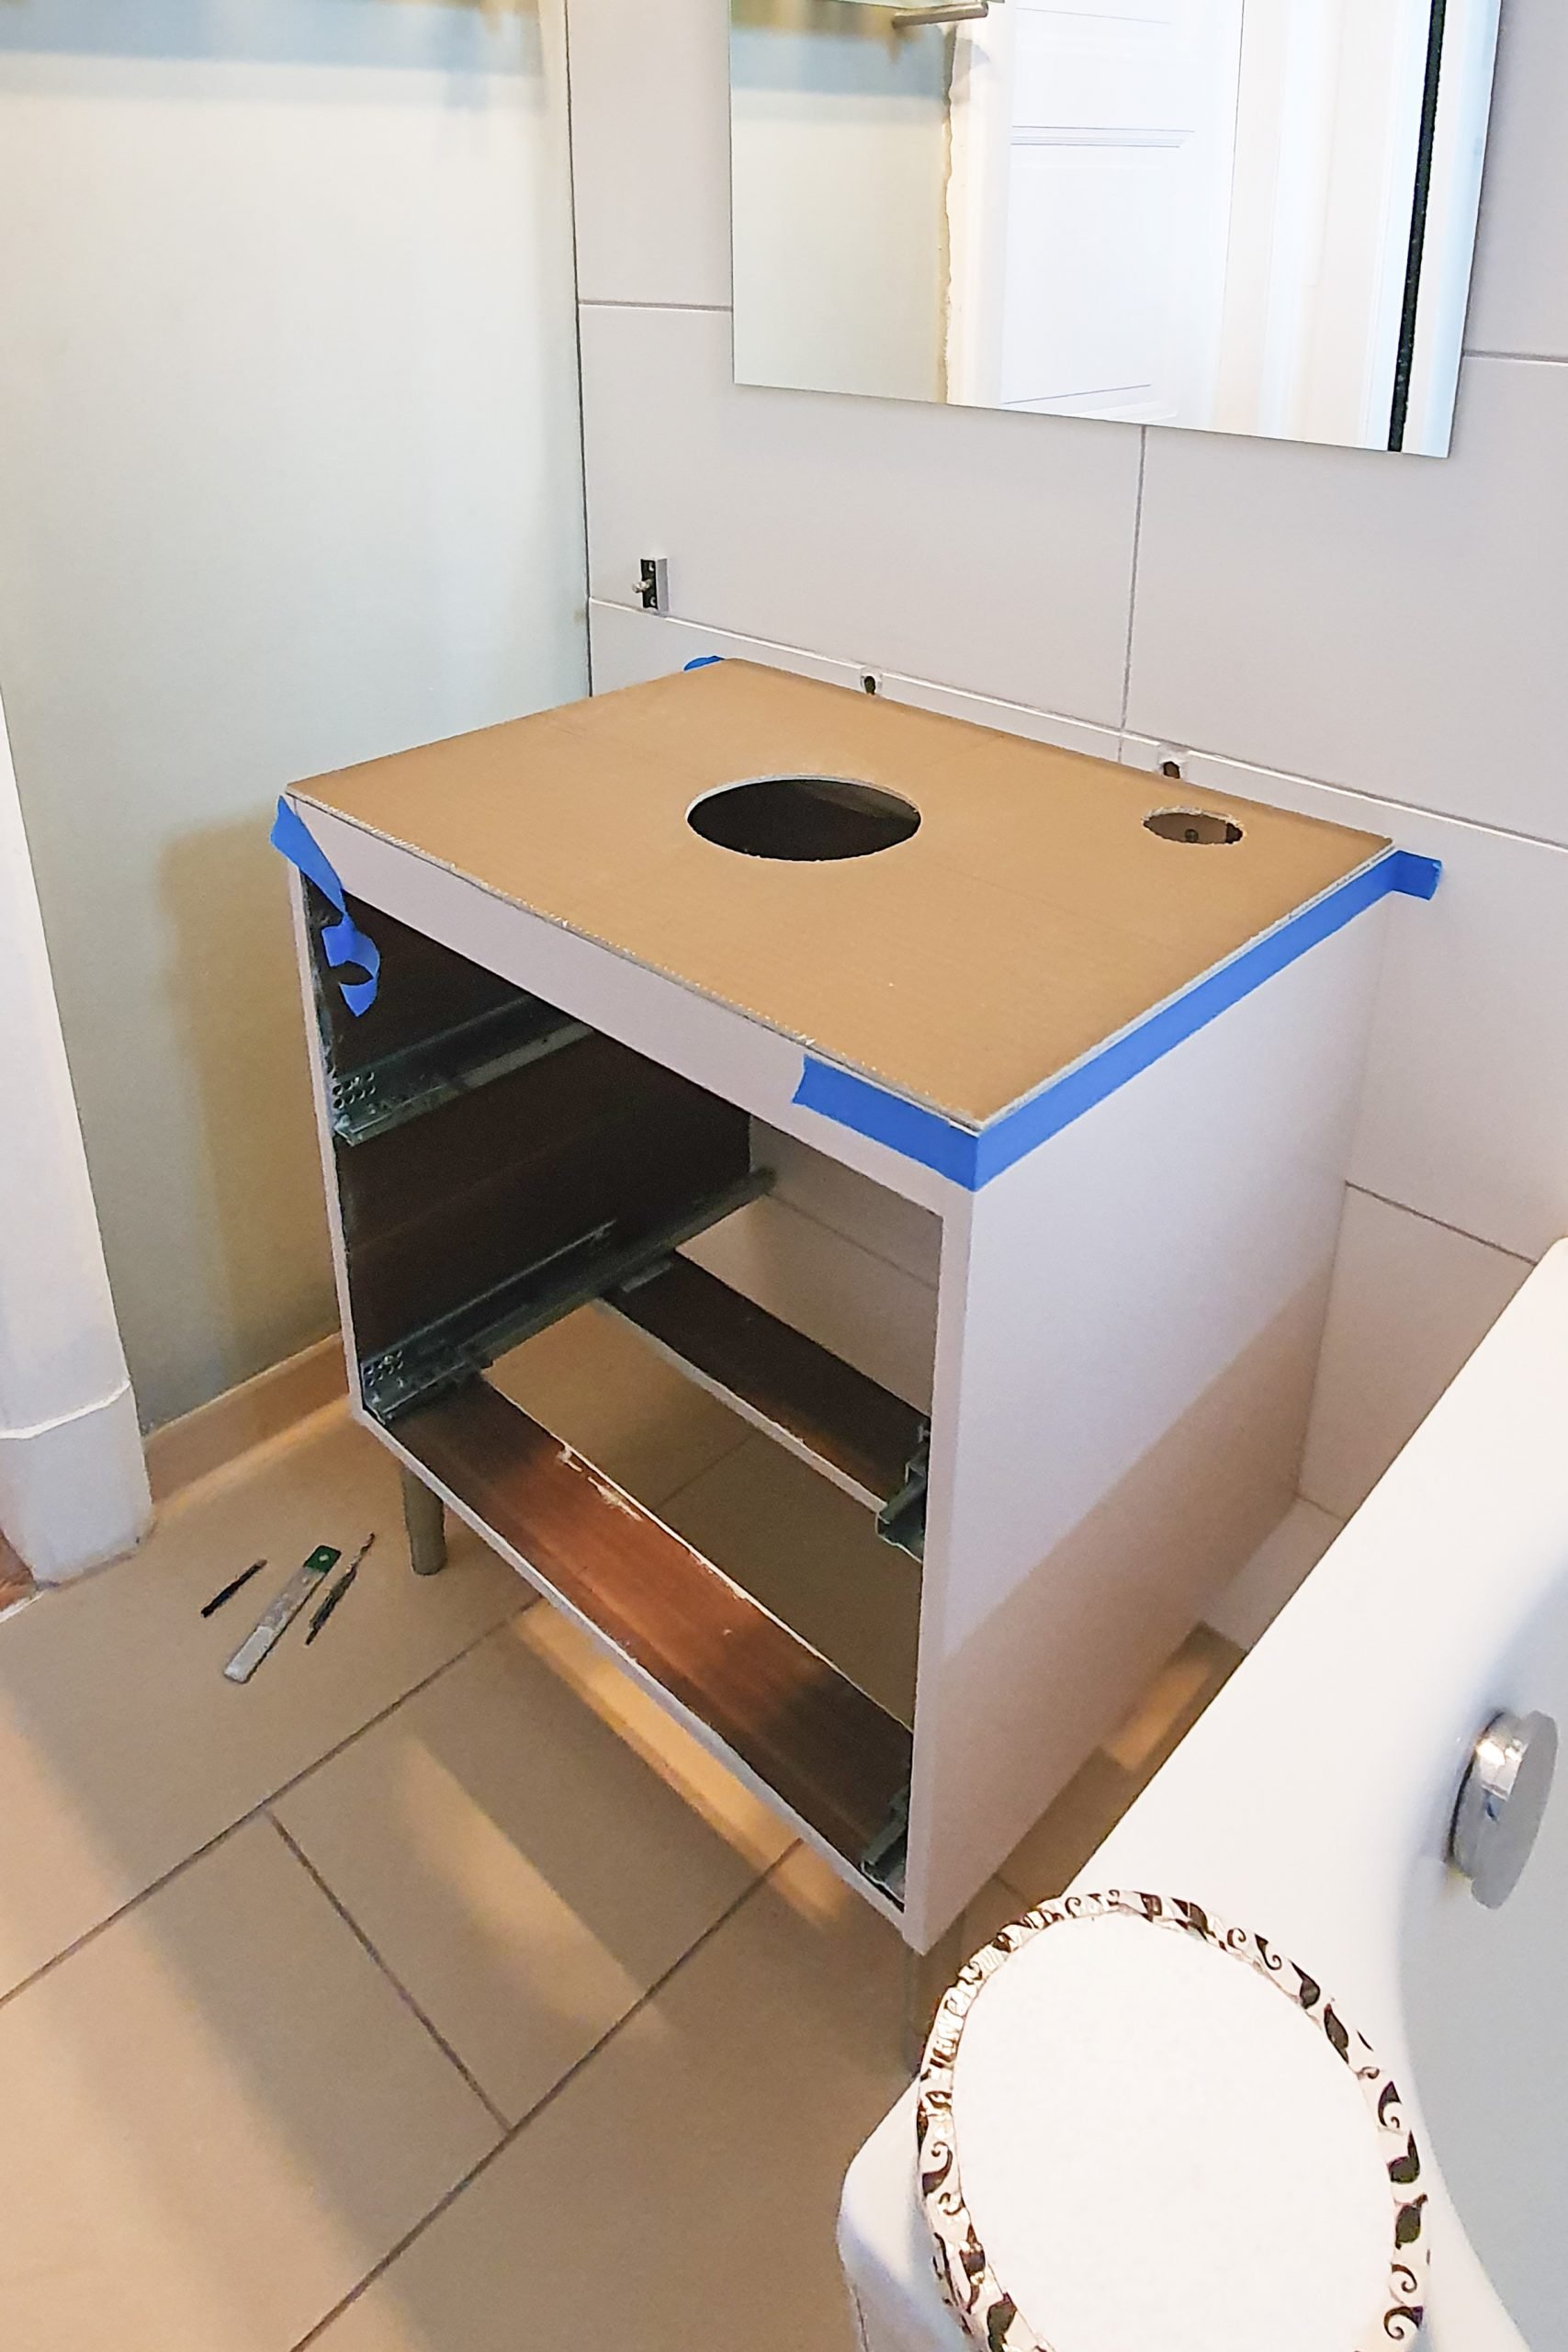
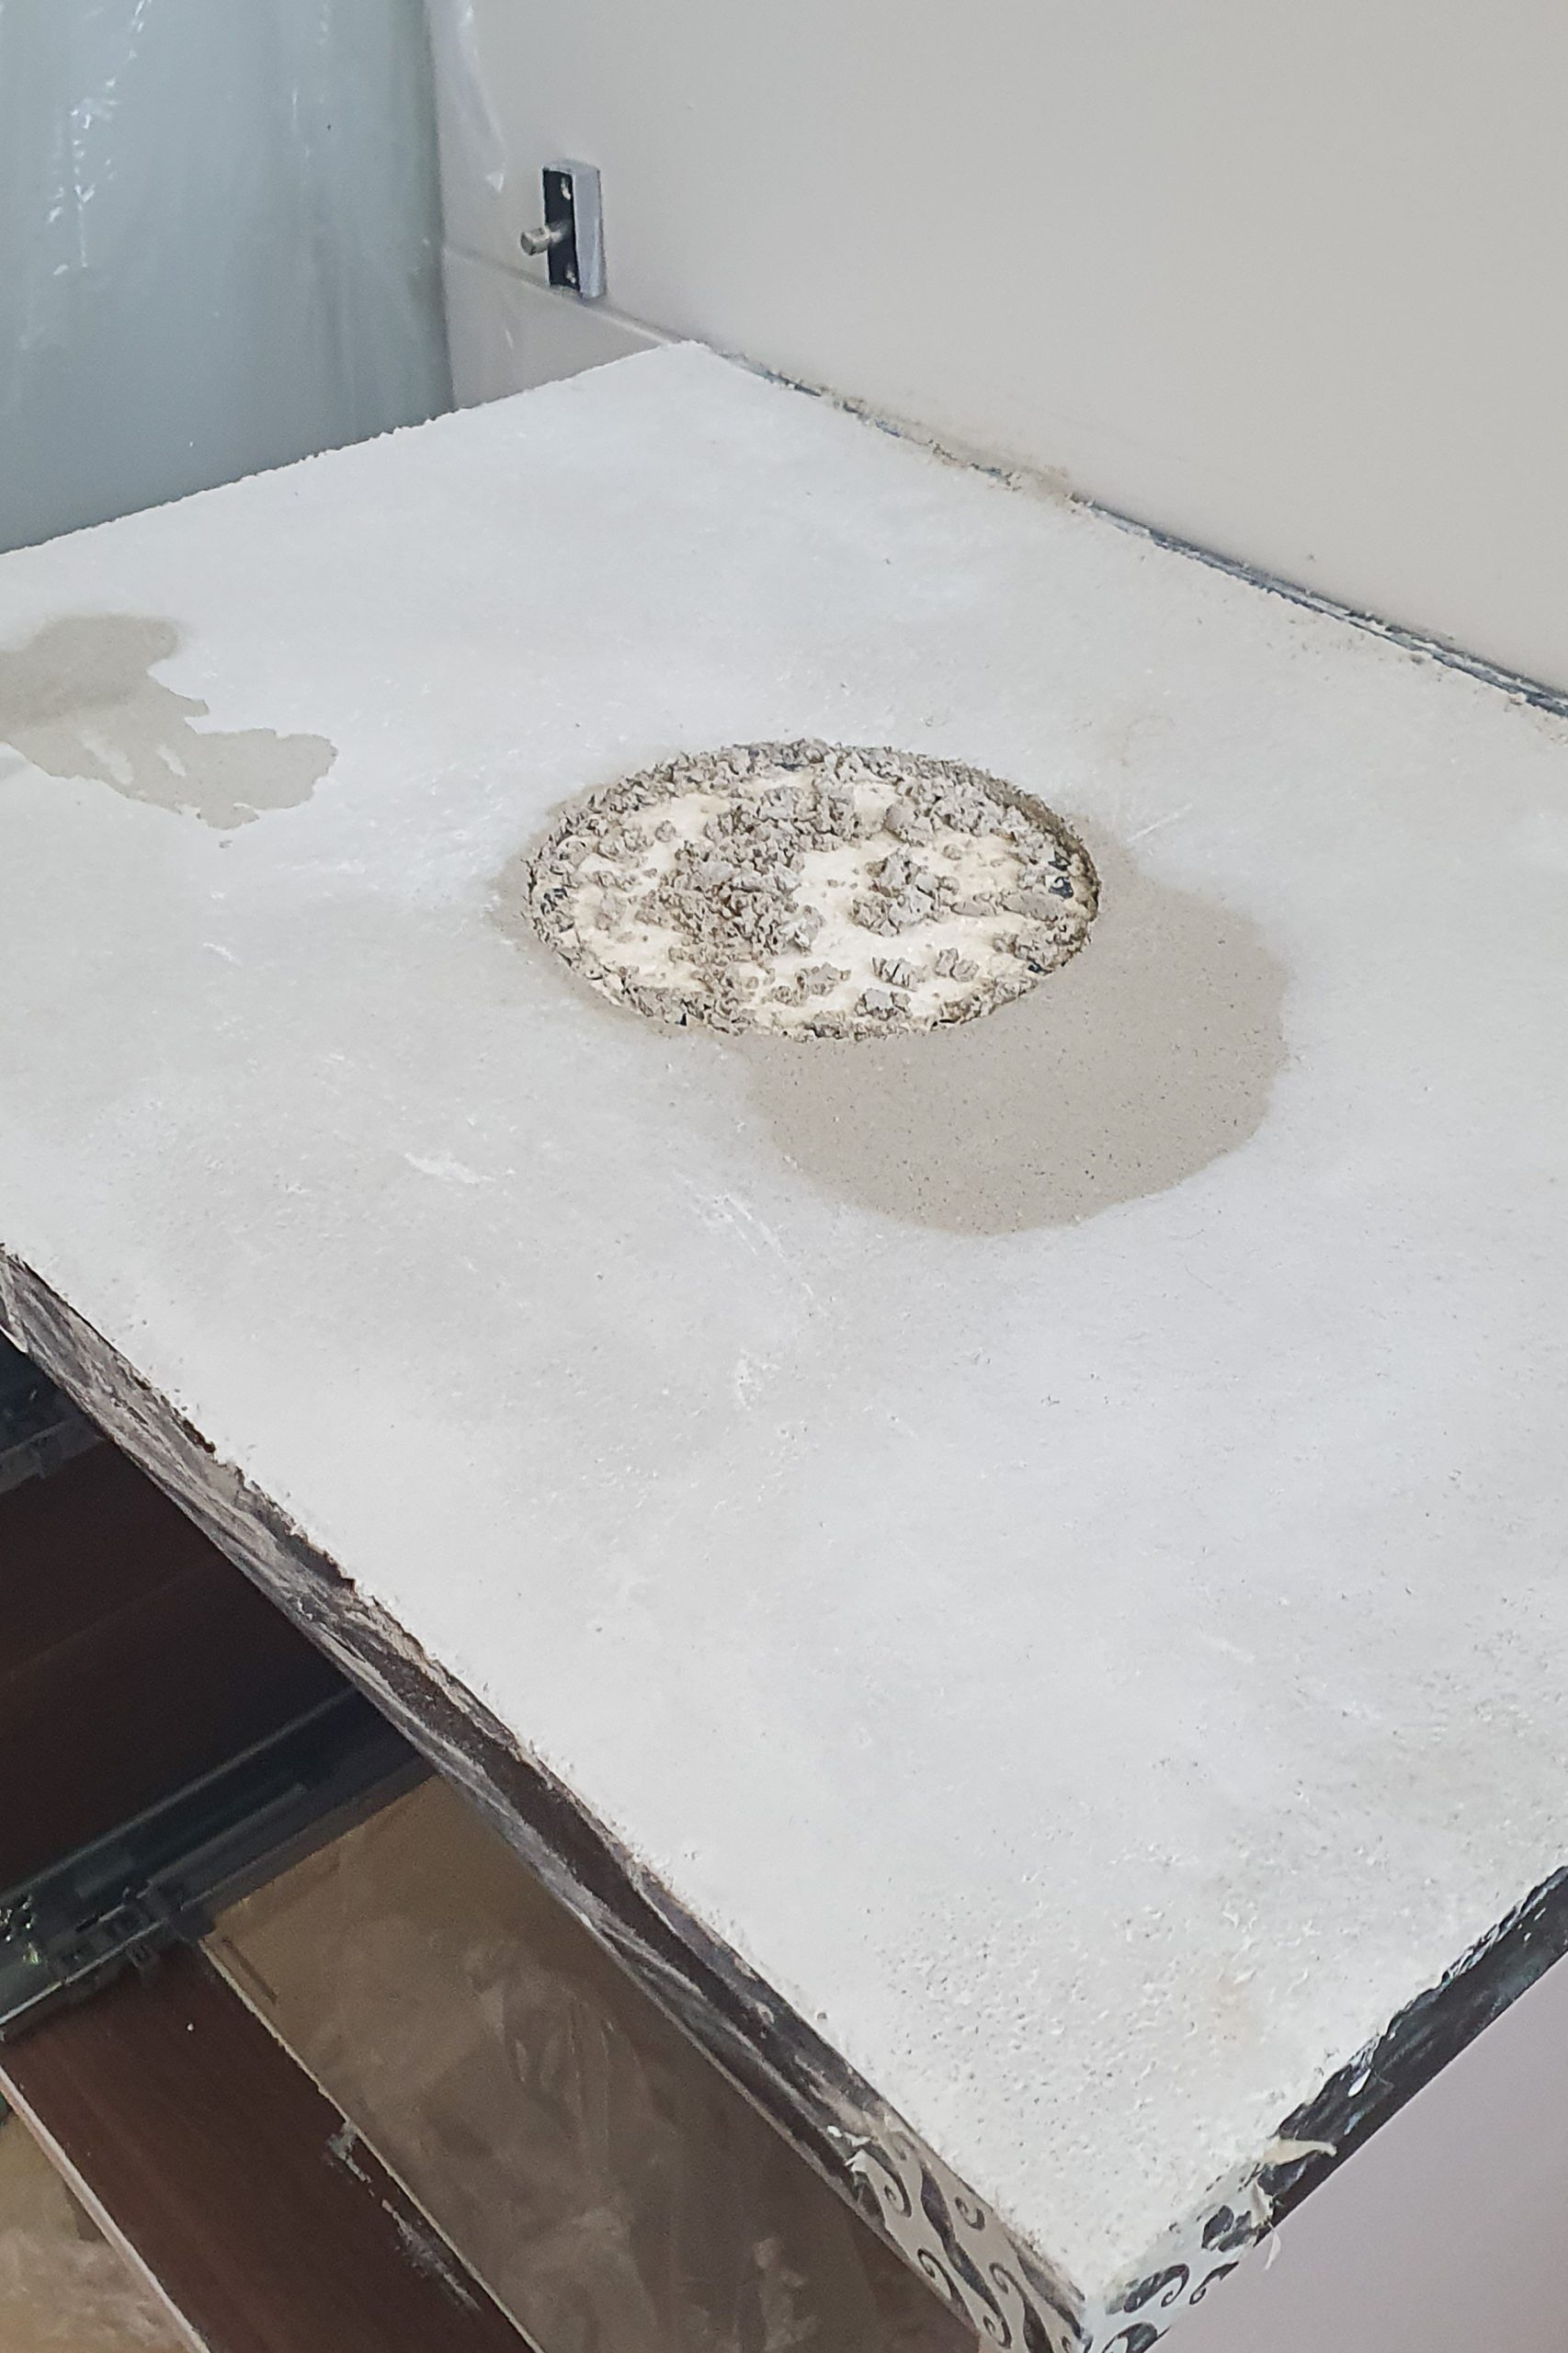
To stop the concrete going everywhere, you will have to temporarily fill the holes. We used a piece of polystyrene to fill the large hole in the centre of the board (I stuck duct tape around the edge so that it was completely smooth) and the Euro knockout for the tap cutout which will give you a perfect hole in the exact size it has to be for your tap.
Then, glue the whole backer board to the edge of your vanity unit with a thin layer of the No Nails adhesive before weighing it down and letting it dry (I stuck some masking tape around the edge of the vanity unit in case of any adhesive escaping and making a mess.)
Install The Edging Strips
Now the fun part of this project starts to begin.
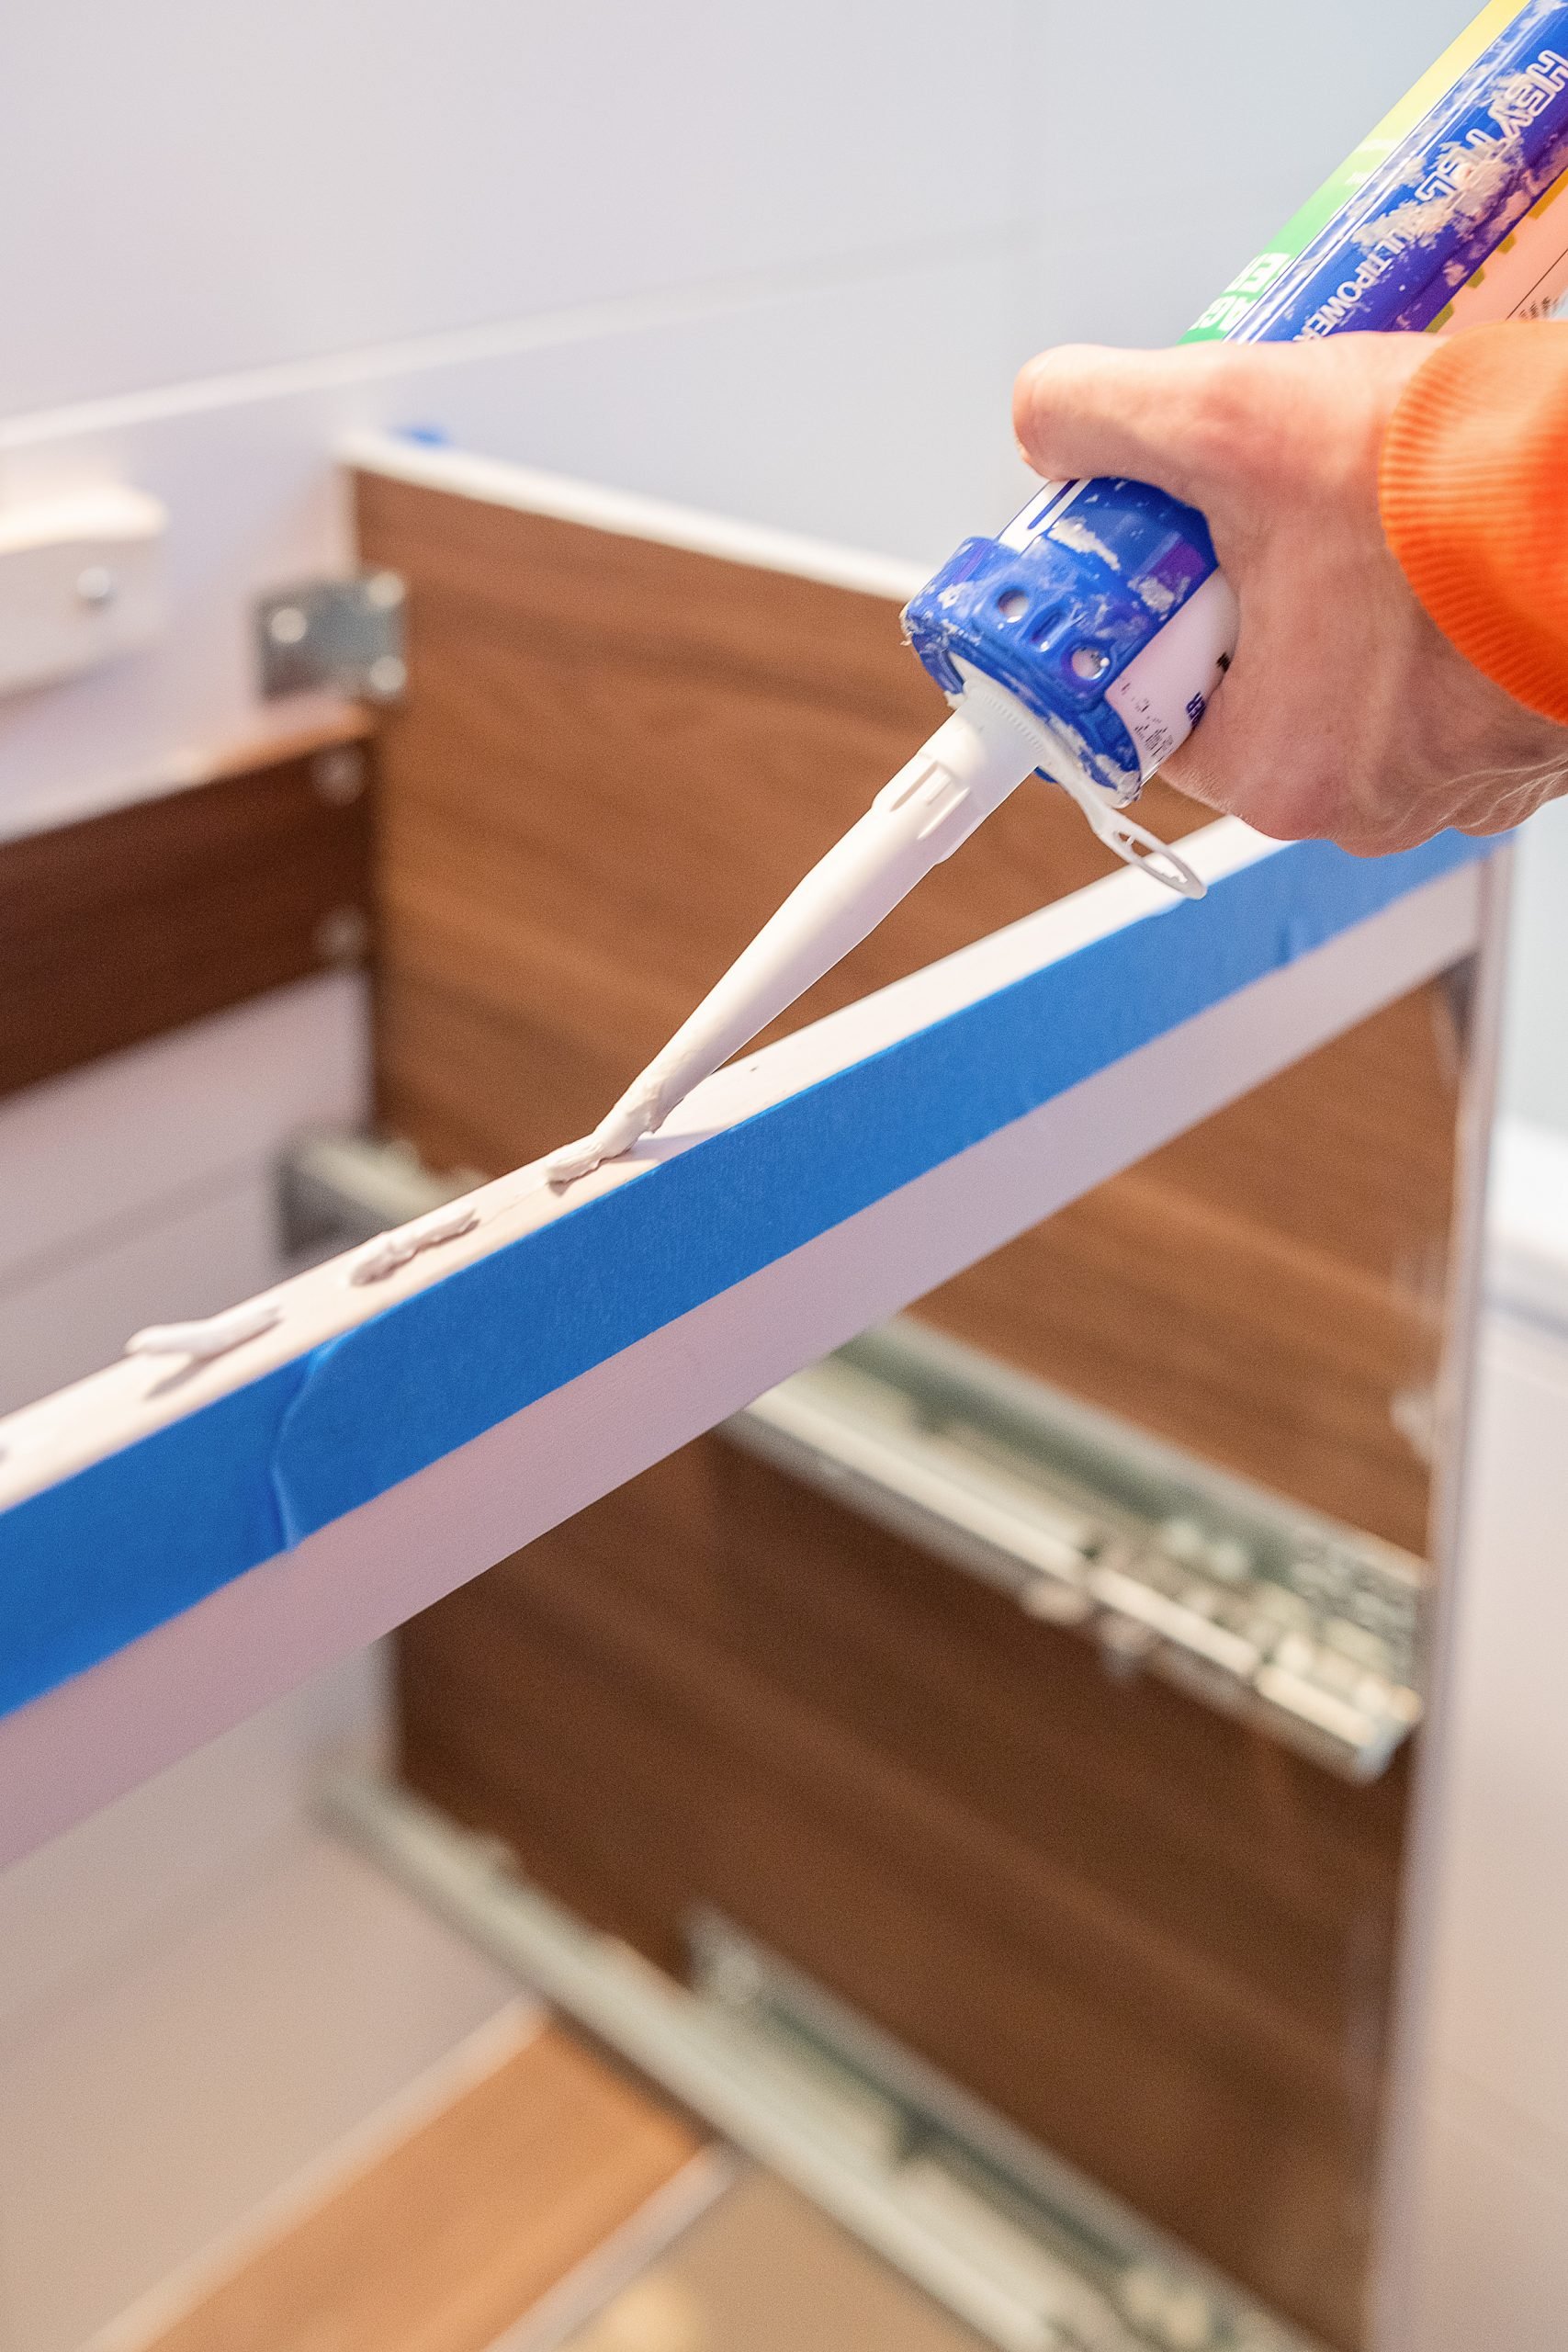
Cut the edging strips to the lengths you need with a mitre saw. There are two different types of edging strips – one that is installed around the edges at the front and sides and one edging strip that is designed to be installed against the wall.
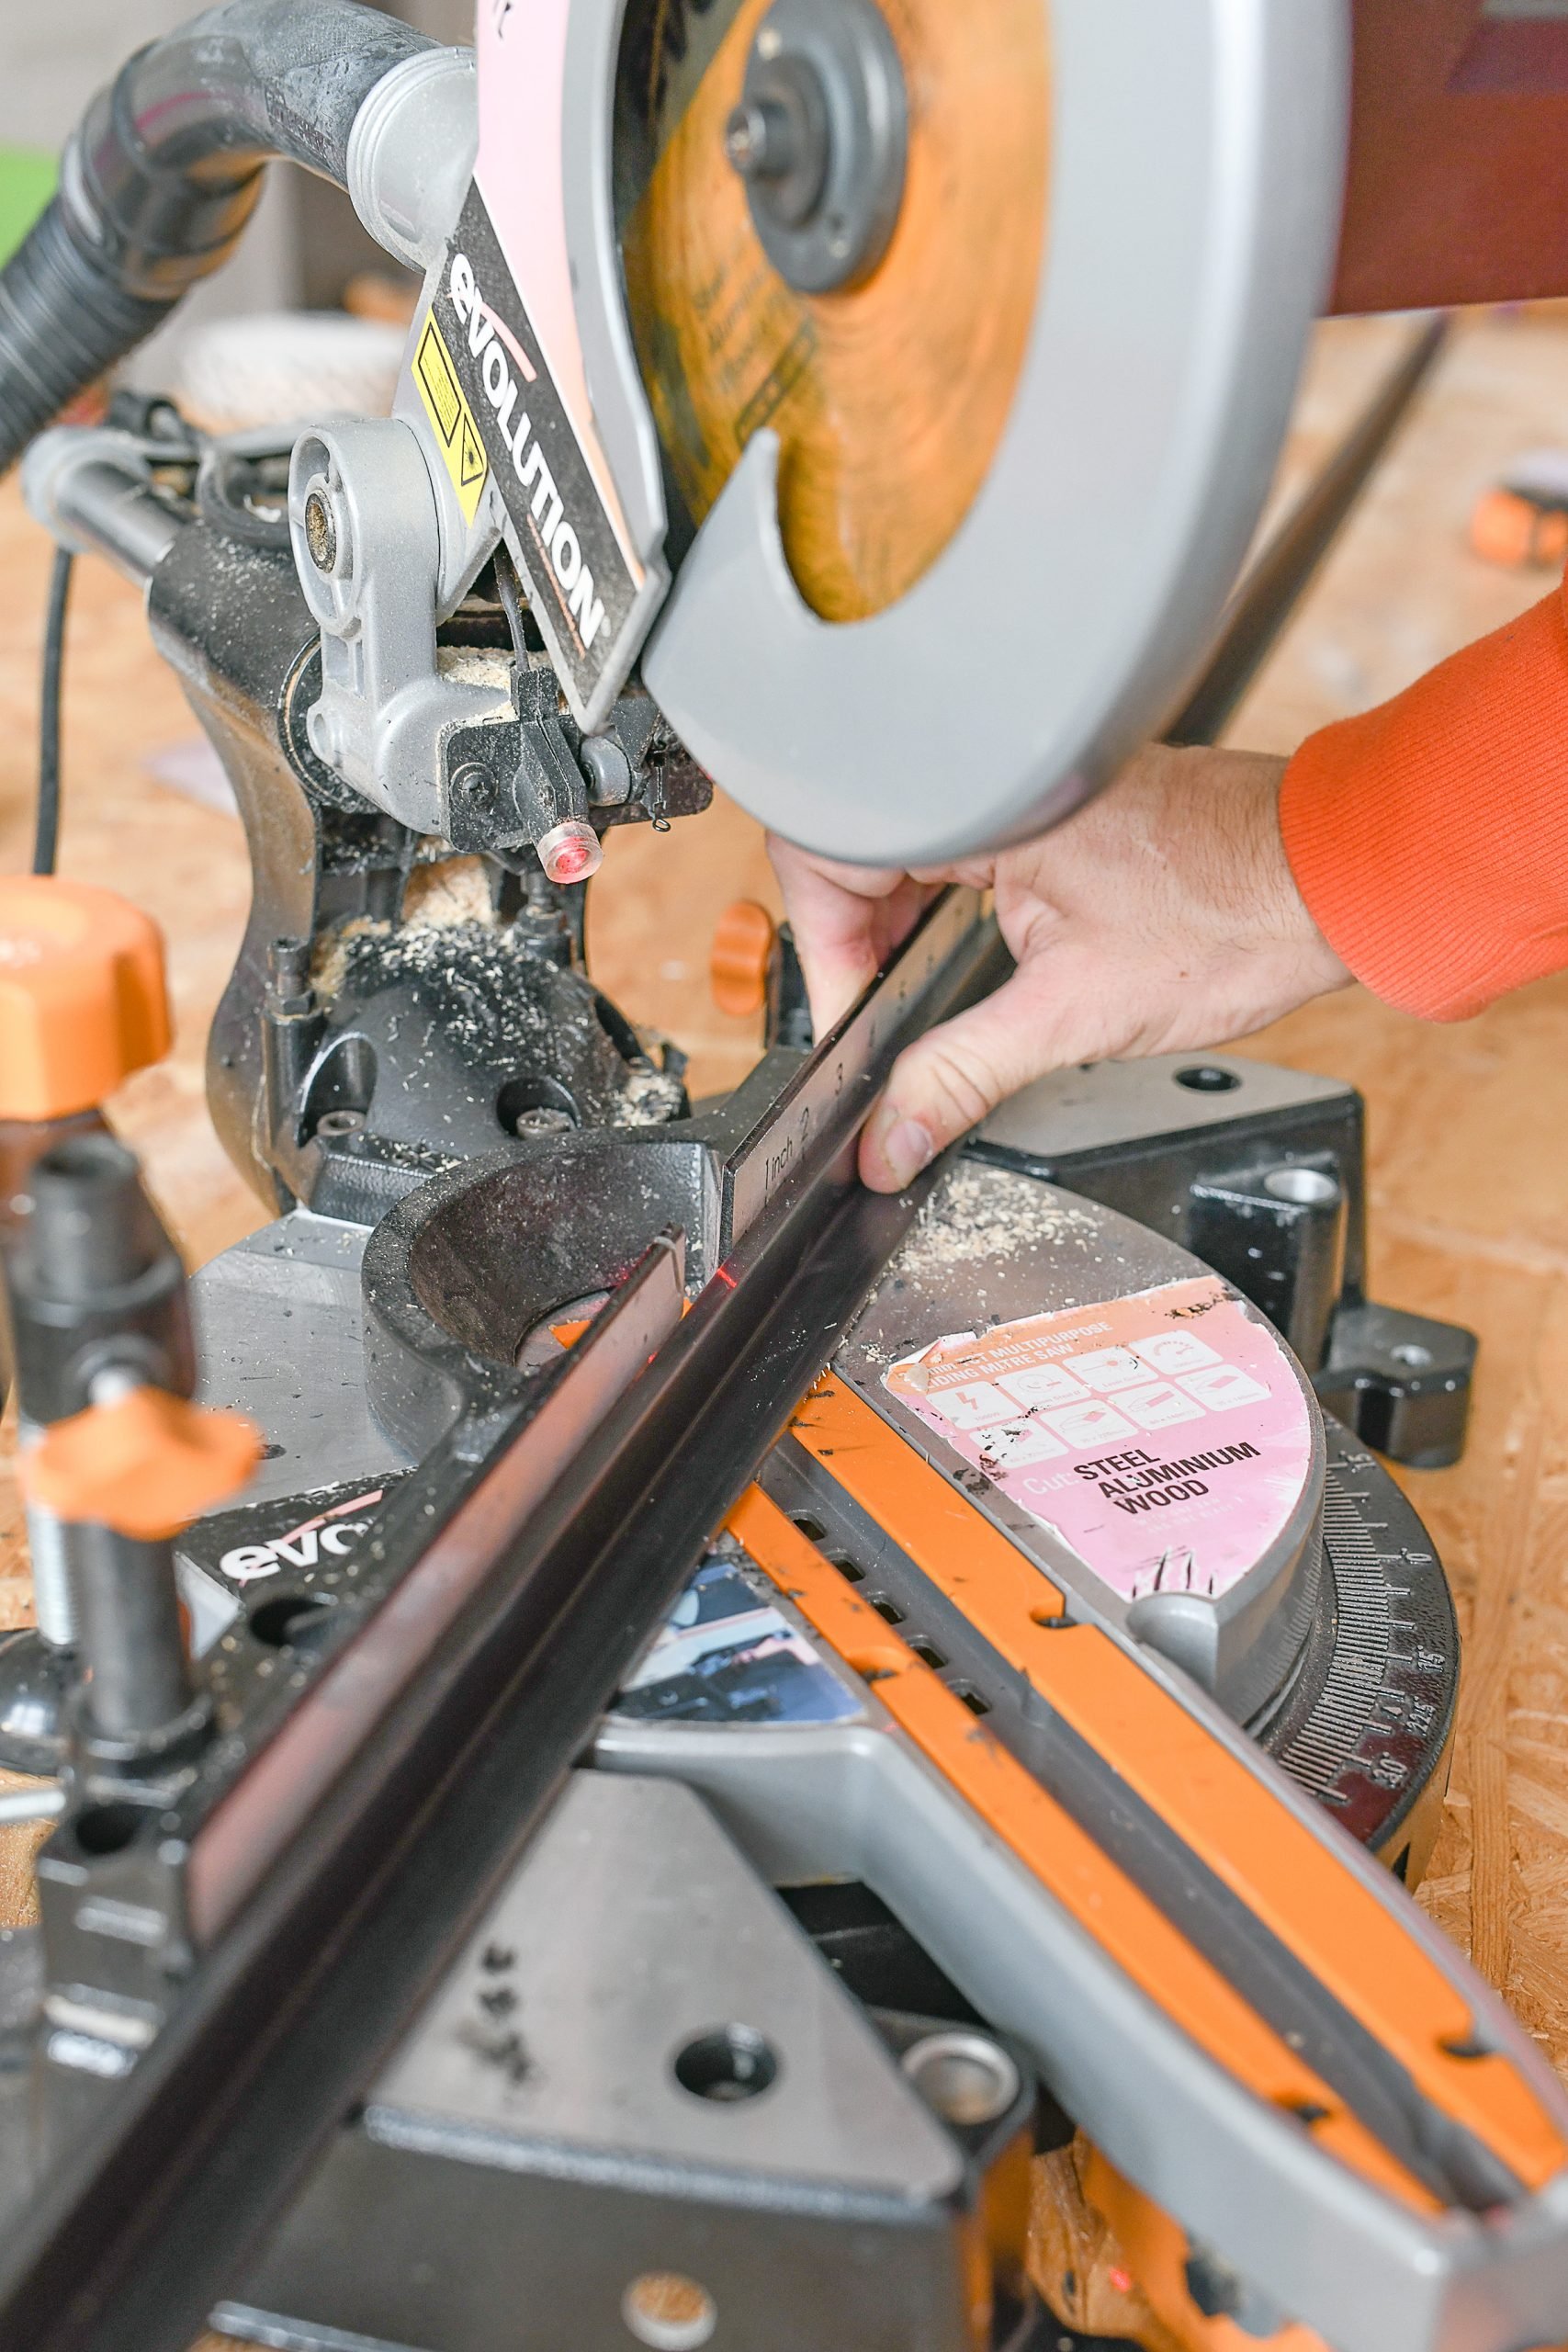
It’s really important to cut and install the edging strips as precisely as possible. They are what will give your countertop its shape so if they aren’t perfect now, your concrete countertop won’t be later either.
The edging strips are designed so that part of the strip will sit flat on your tile backer board and the other part will hang over the edge, meaning that it will hide your tile backer board and that your finished countertop will be a bit larger than the actual vanity. (Later, when everything has dried this is the bit that you’ll snap off leaving you with a hopefully perfect concrete edge.)
Start by installing the three outer edges of your DIY concrete vanity countertop. The two sides will have one straight edge (where it meets the wall) and one edge cut at a 45° angle and the front piece will have two 45° angles.
After cutting the pieces to the size you need, screw them to the backer board with some short screws. As the plastic is quite thick, it’s a good idea to pre-drill some holes into the edging strip first which will make it much easier to screw in place.
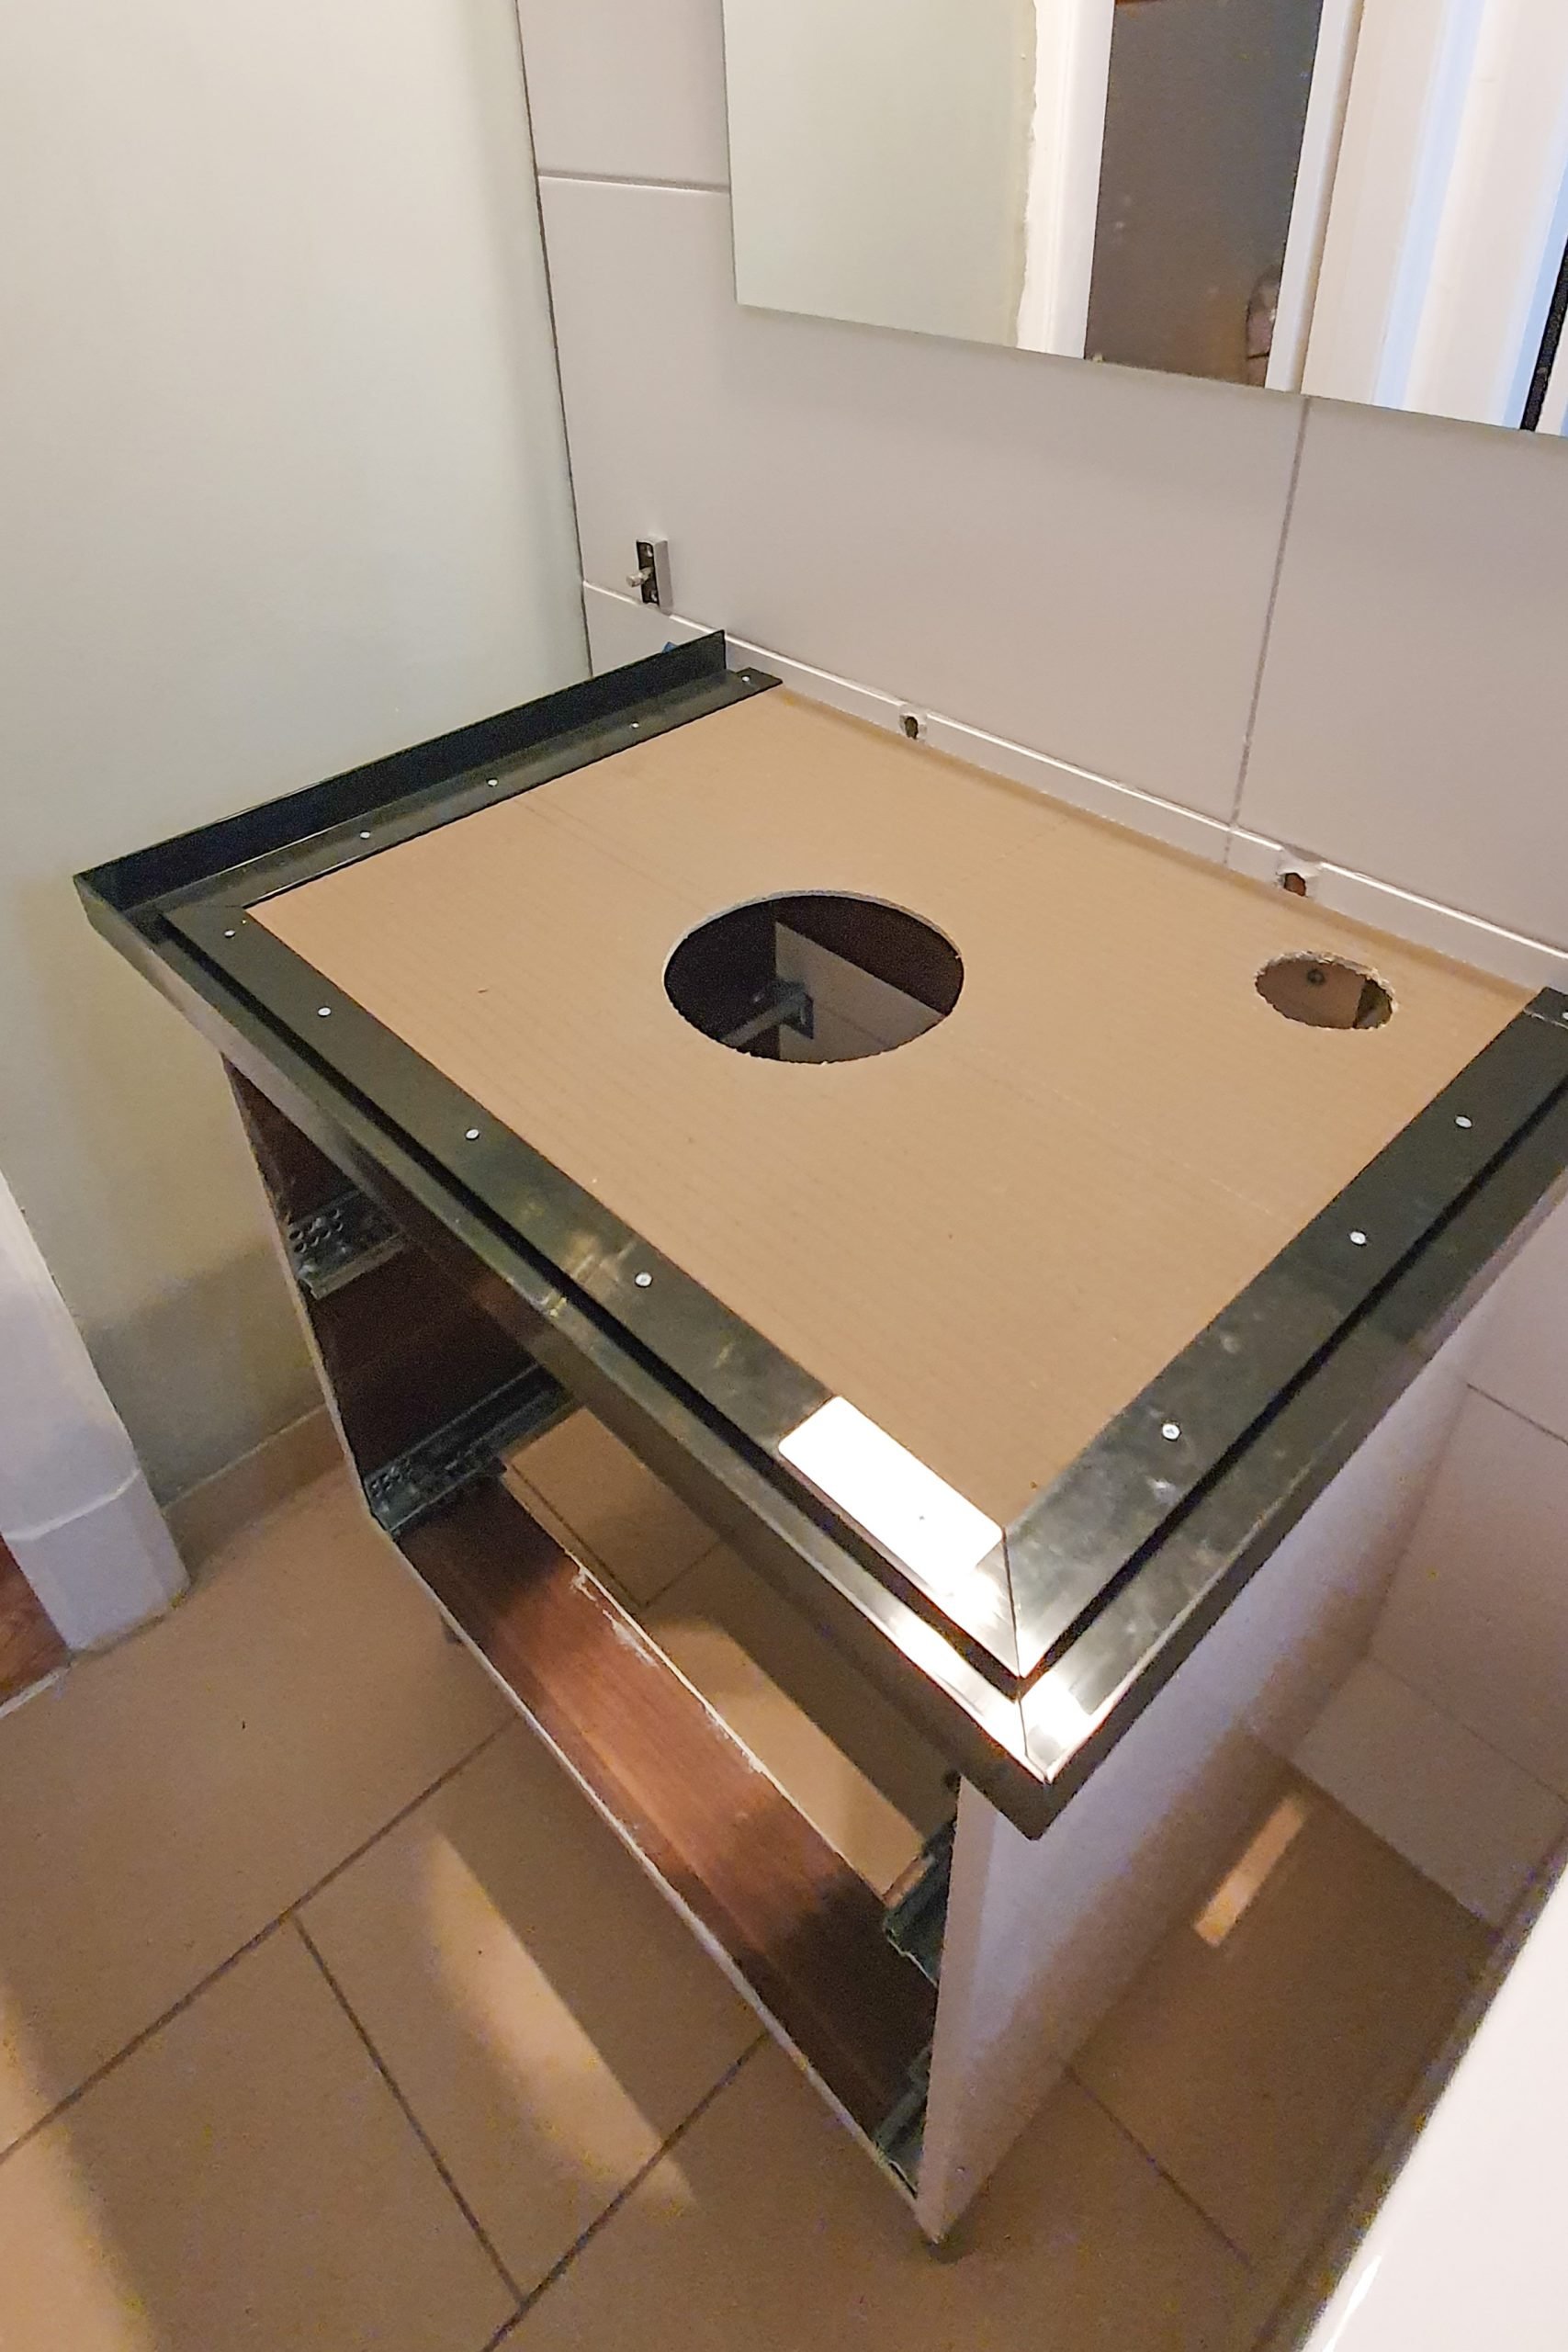
The back piece of edging is slightly different. It’s an L-shaped piece of plastic which sits flush against the wall. To be able to install it, you’ll have to cut out little pieces at each end so that it can slot in between the two other edging strips.

After adjusting it to fit into the gap, just screw the last edging piece into position in the same way as the others.
Install The Mesh
The last step in your preparation is to install the mesh that gives the concrete additional stability. Cut the mesh to the size of your countertop with some scissors and attach the little clips at roughly equal distances.
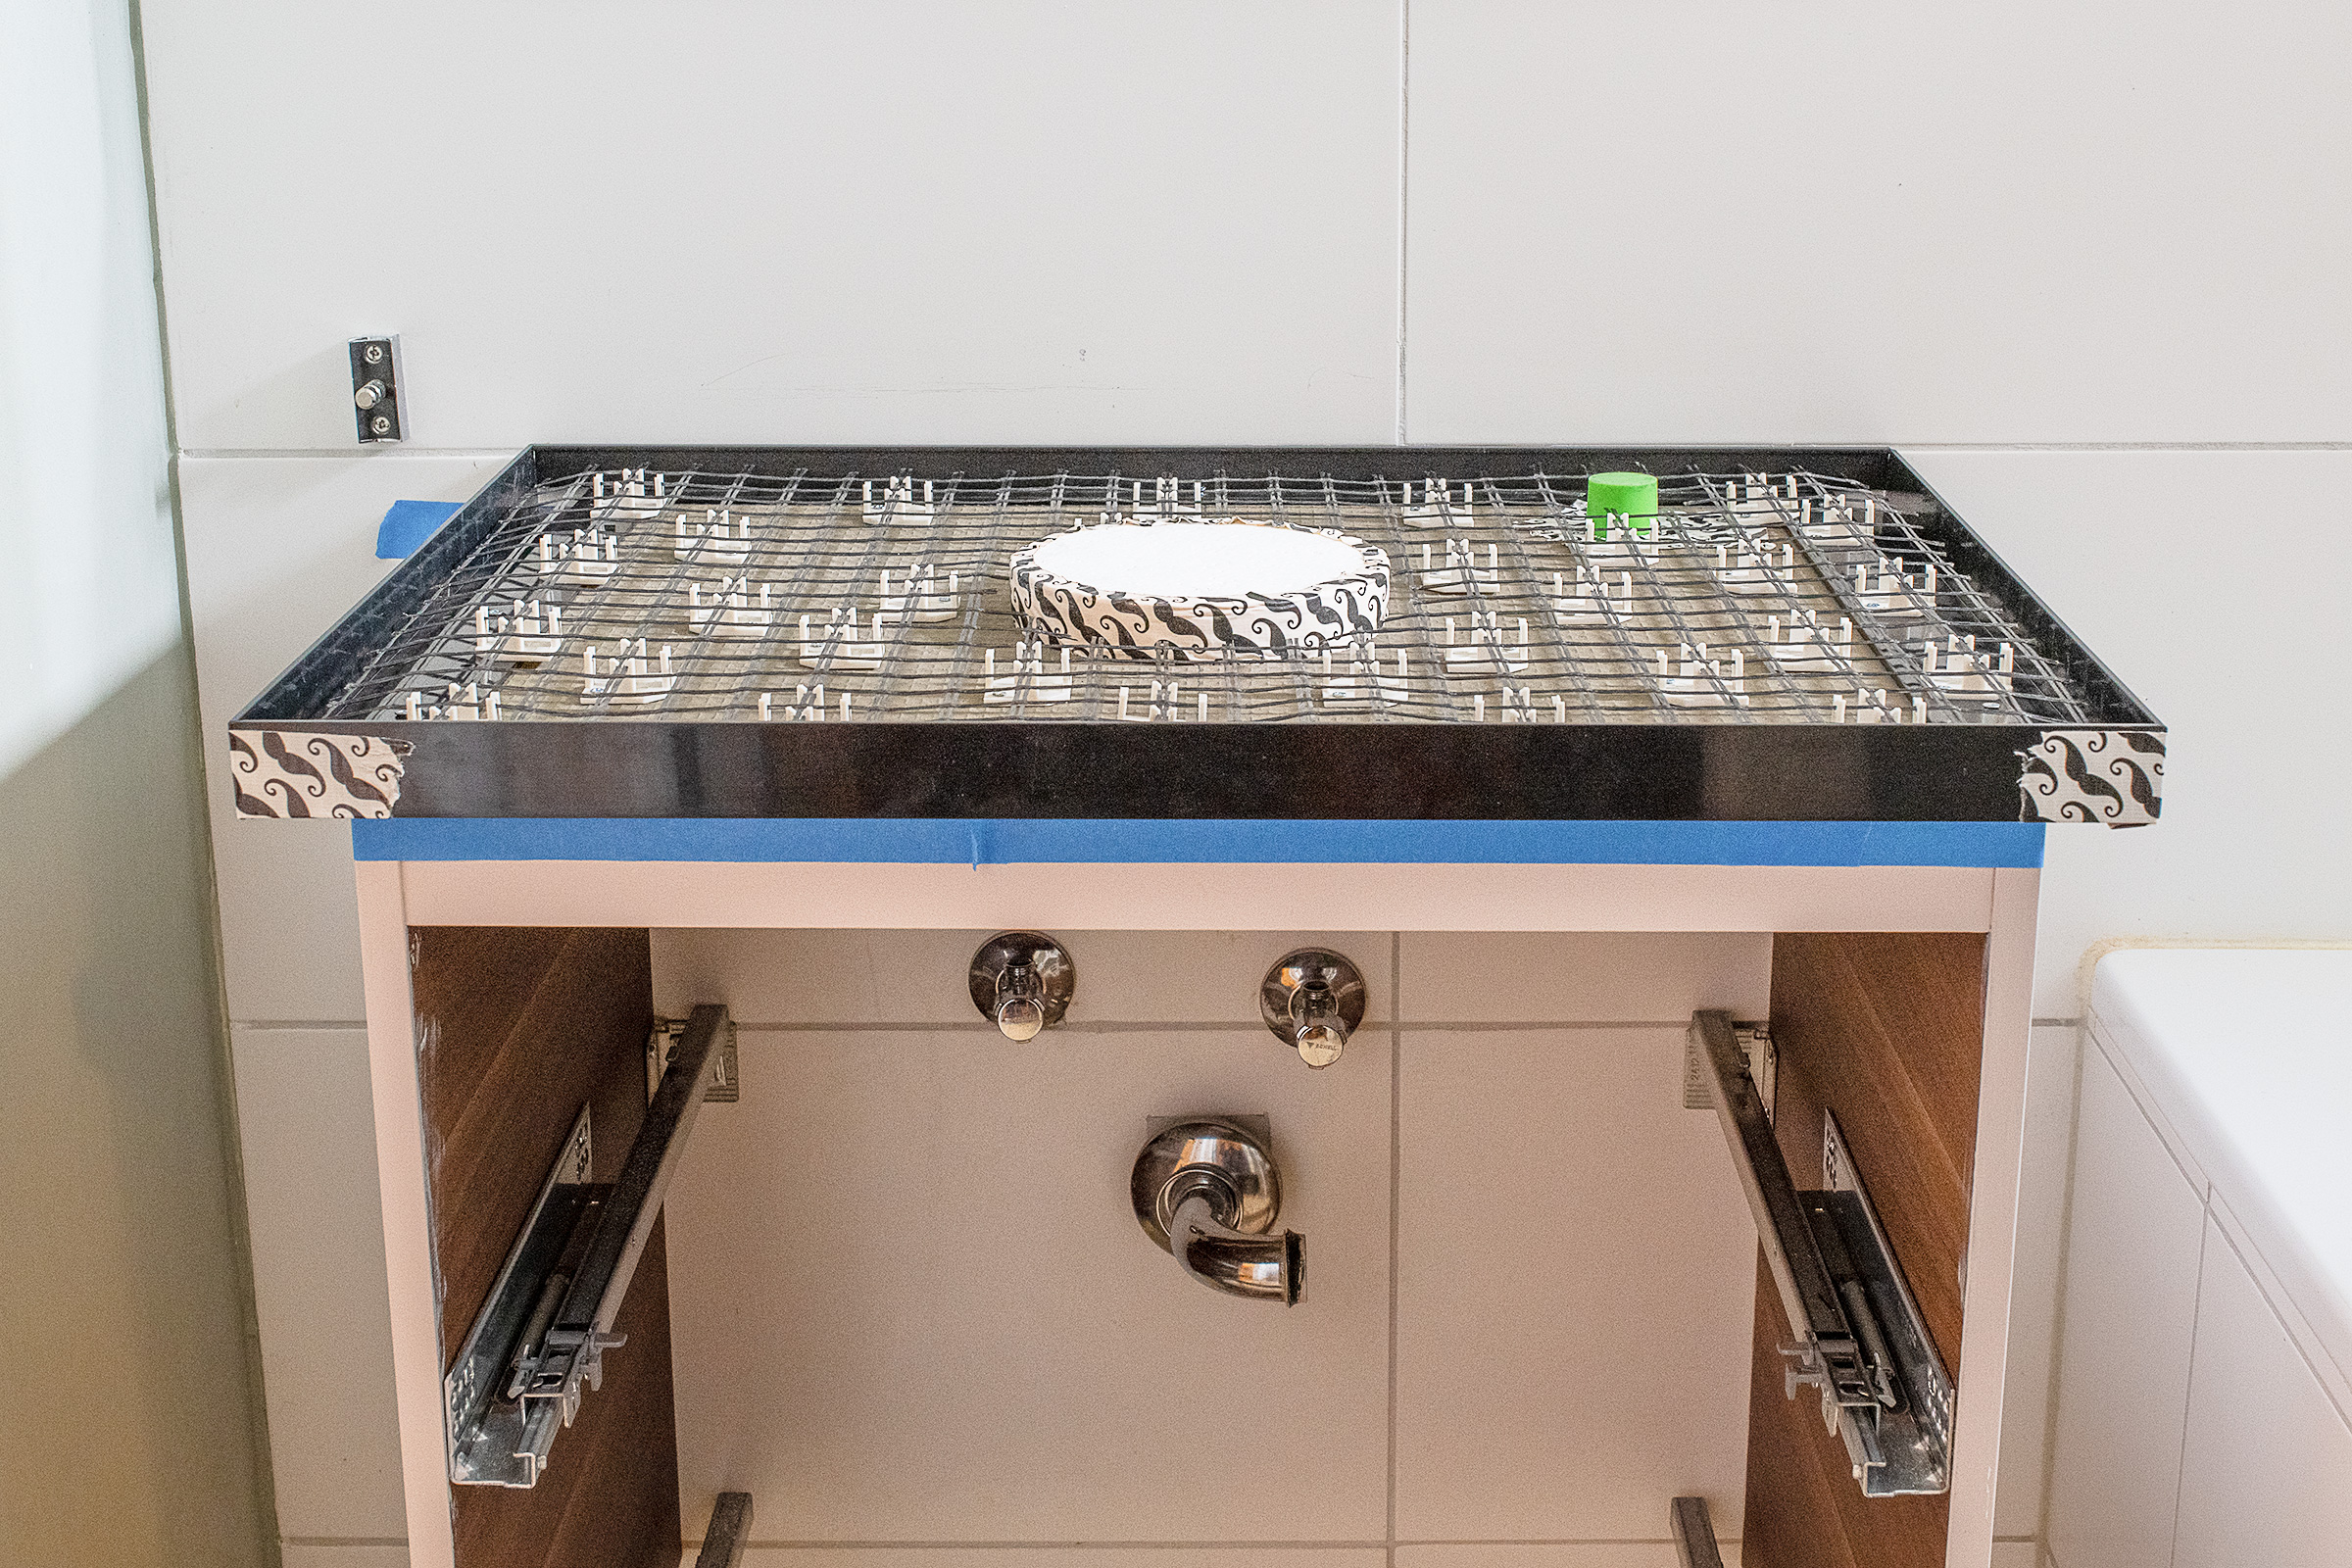
Then lay the mesh into your vanity unit and screw all of the little clips to the tile backer board.
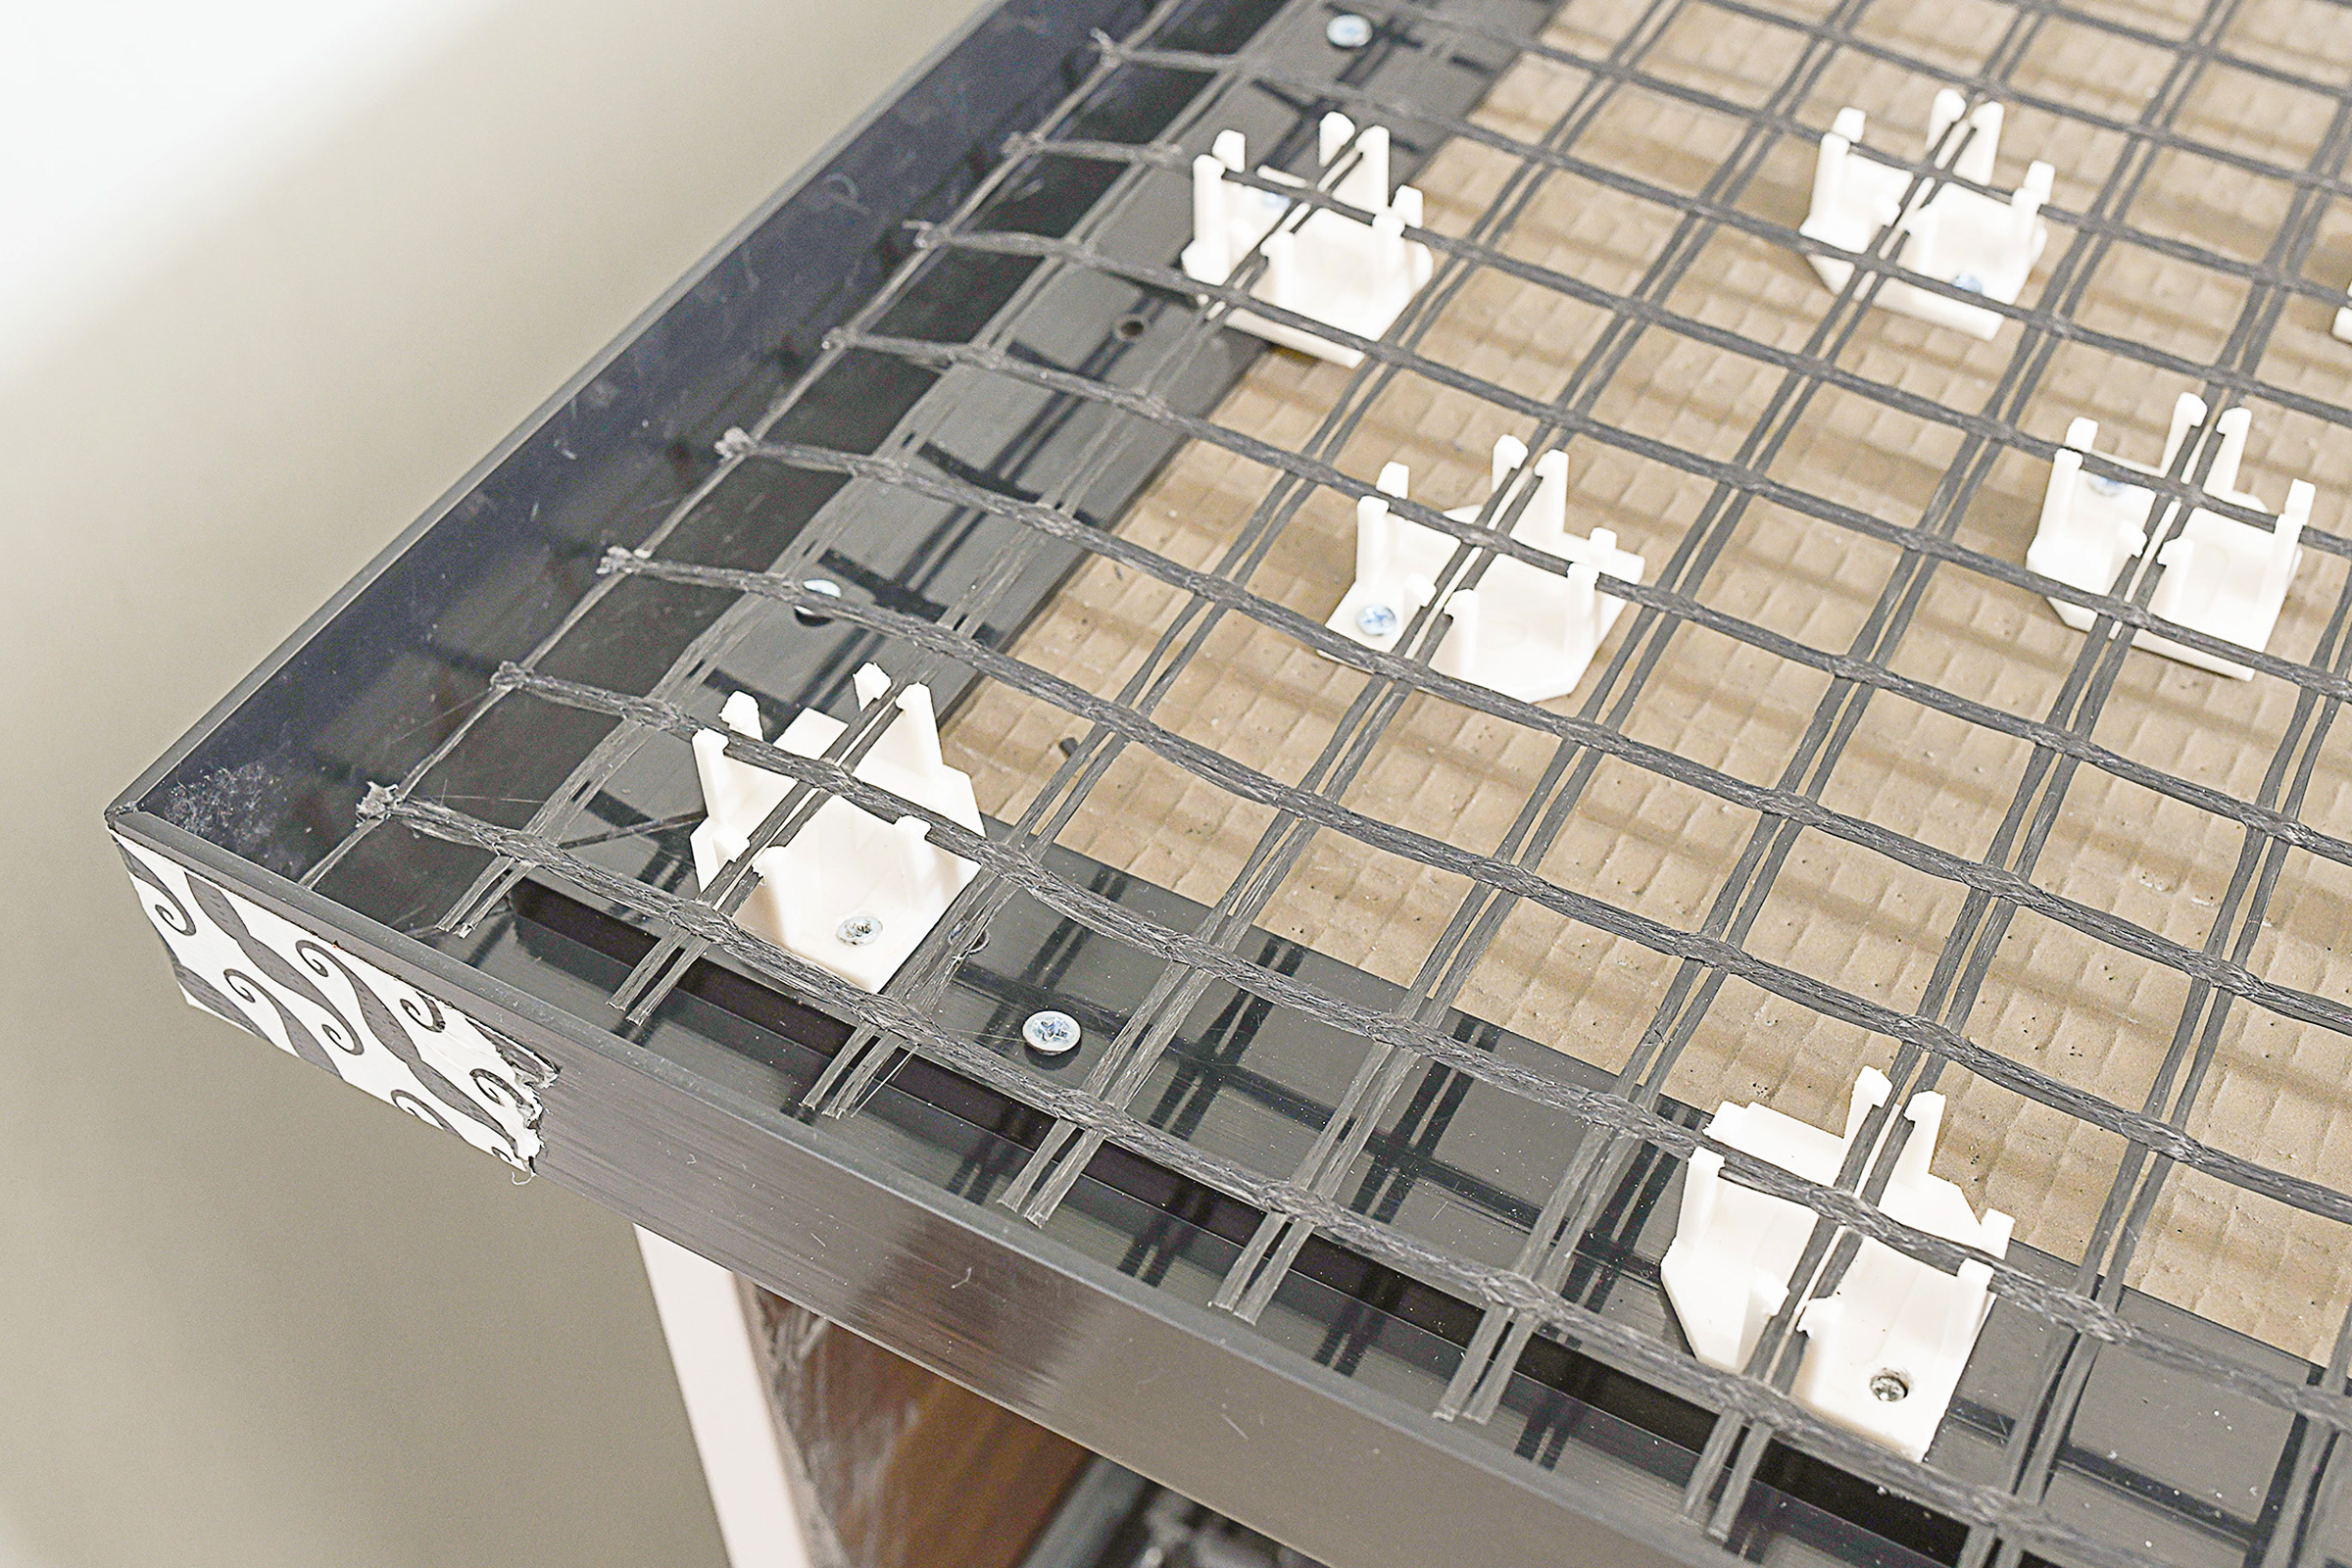
Tip: Make sure that none of the mesh touches the edging strips as it may end up being visible through the concrete when you remove the strips. It’s also a good idea to wear gloves when cutting the mesh as it’s really itchy!
Finally, seal the corners with some duct tape to make sure that absolutely no concrete can escape and that you end up with perfect corners.
POURING THE CONCRETE COUNTERTOP
Mix The Concrete
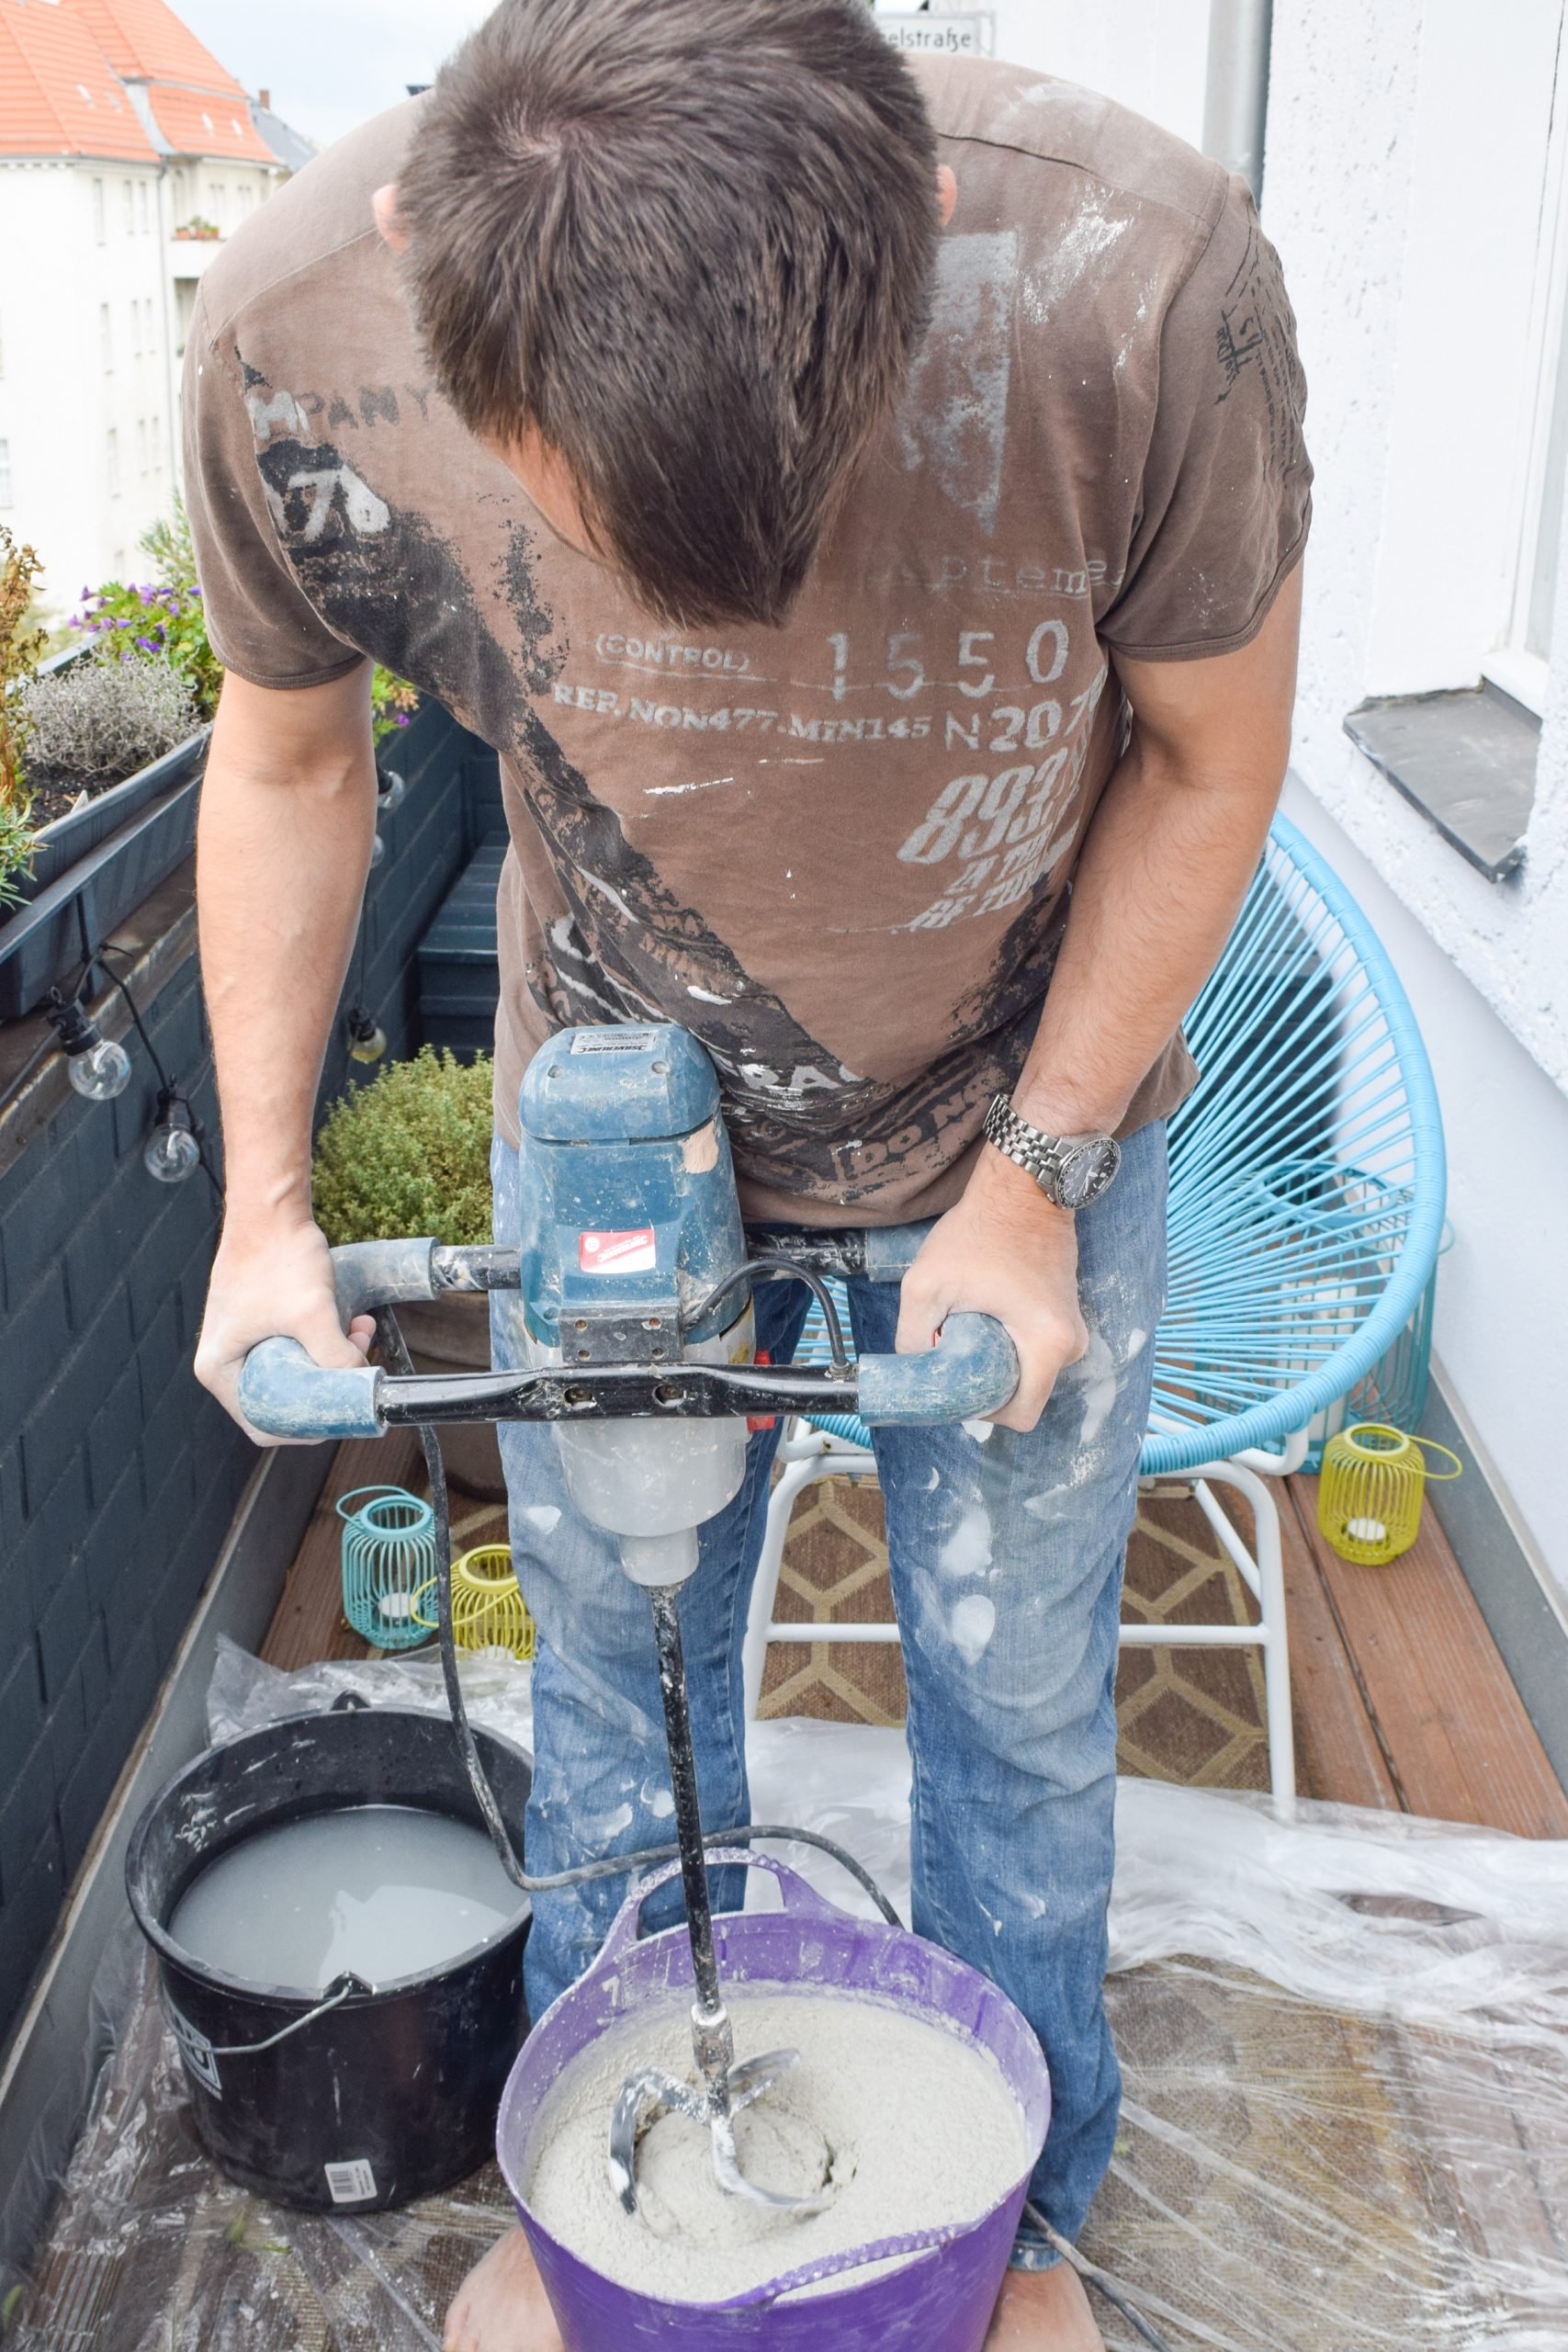
If you are using a ready-mixed concrete like the one we did (this is the concrete that we used) this step is really straightforward as you just have to weigh out the concrete and water before mixing everything together with a mixer.
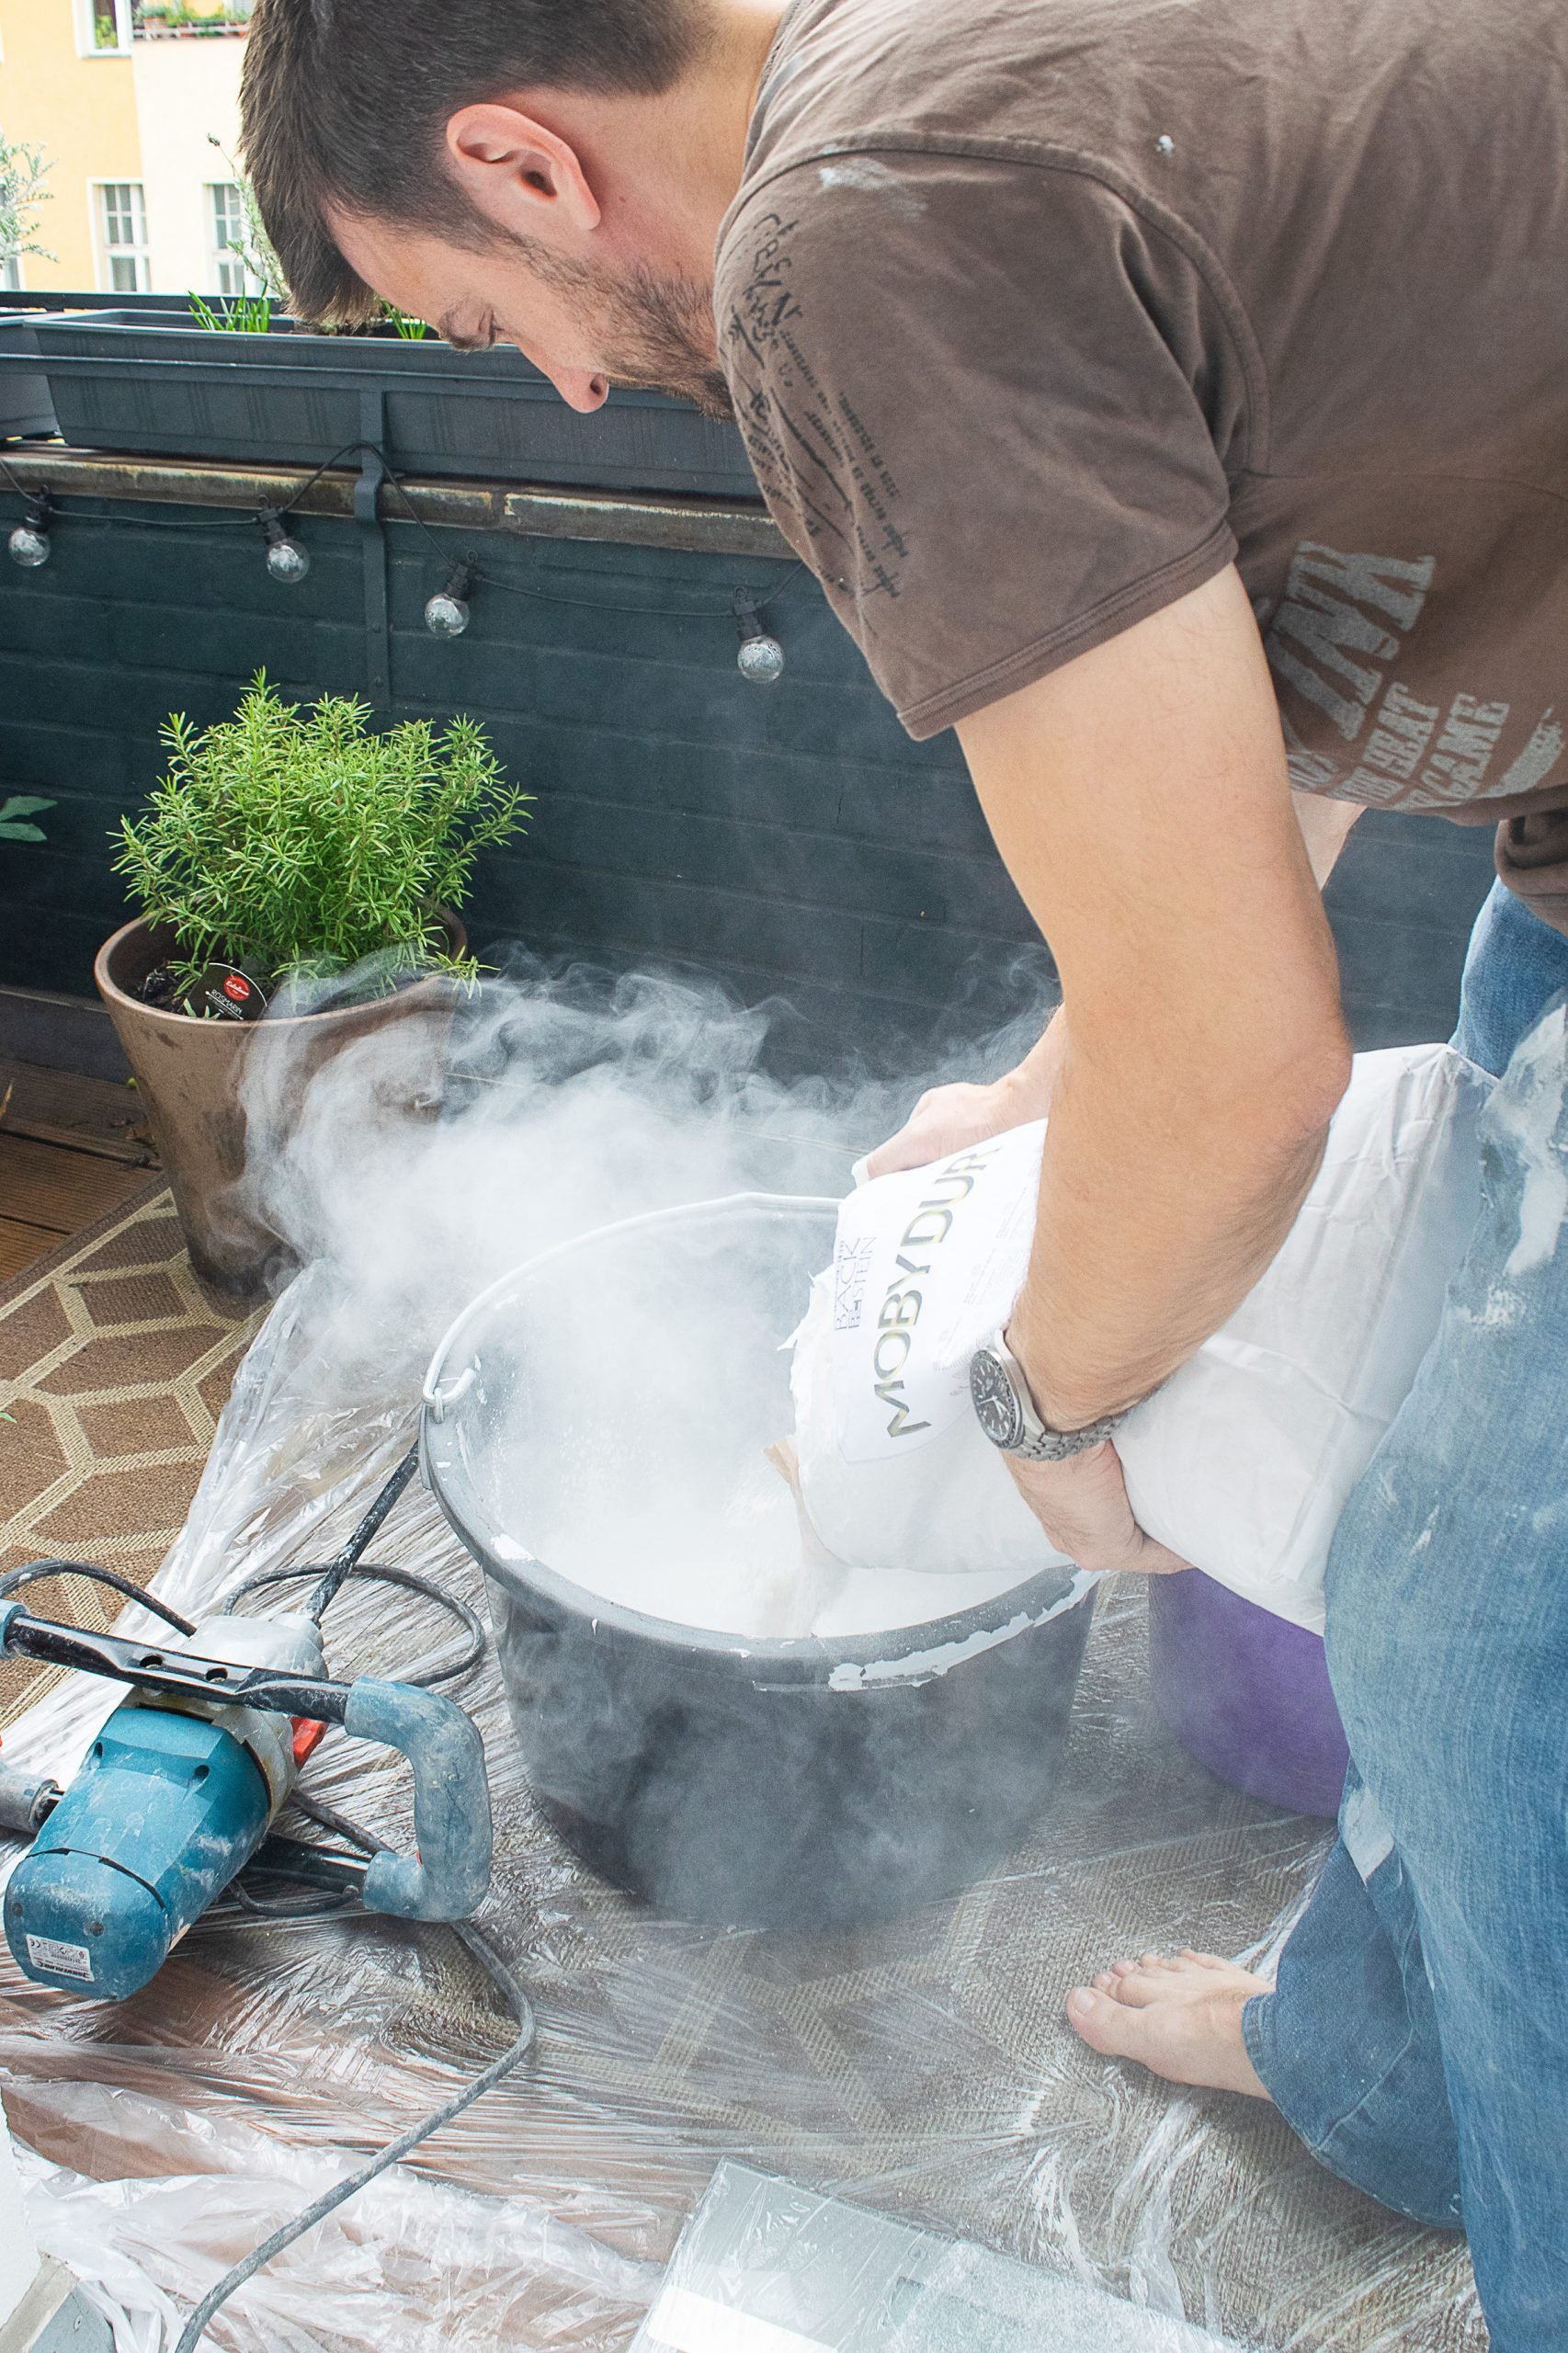
Ideally, you would use a concrete mixer which we would have hired for the project but didn’t fancy carrying up 89 steps! Our plaster mixer worked really well though for the small quantity we needed. Oh, and it goes without saying that you should wear shoes when doing any kind of DIY! Naughty Jan!
Tip: Working out your quantities for this project is one of the things we struggled with most. We did lots of calculations but ultimately used the calculator on the Möertelshop website (it’s also where we purchased our concrete) which turned out to be really accurate for this project. If you are using the concrete from the guys at Concrete Countertop Solutions (which is what we would recommend) I’d suggest asking them for advice as they are super helpful!
Pour The Concrete
After mixing the concrete for 10 minutes it’s just a matter of pouring it into the prepared mould and smoothing it out with a trowel.
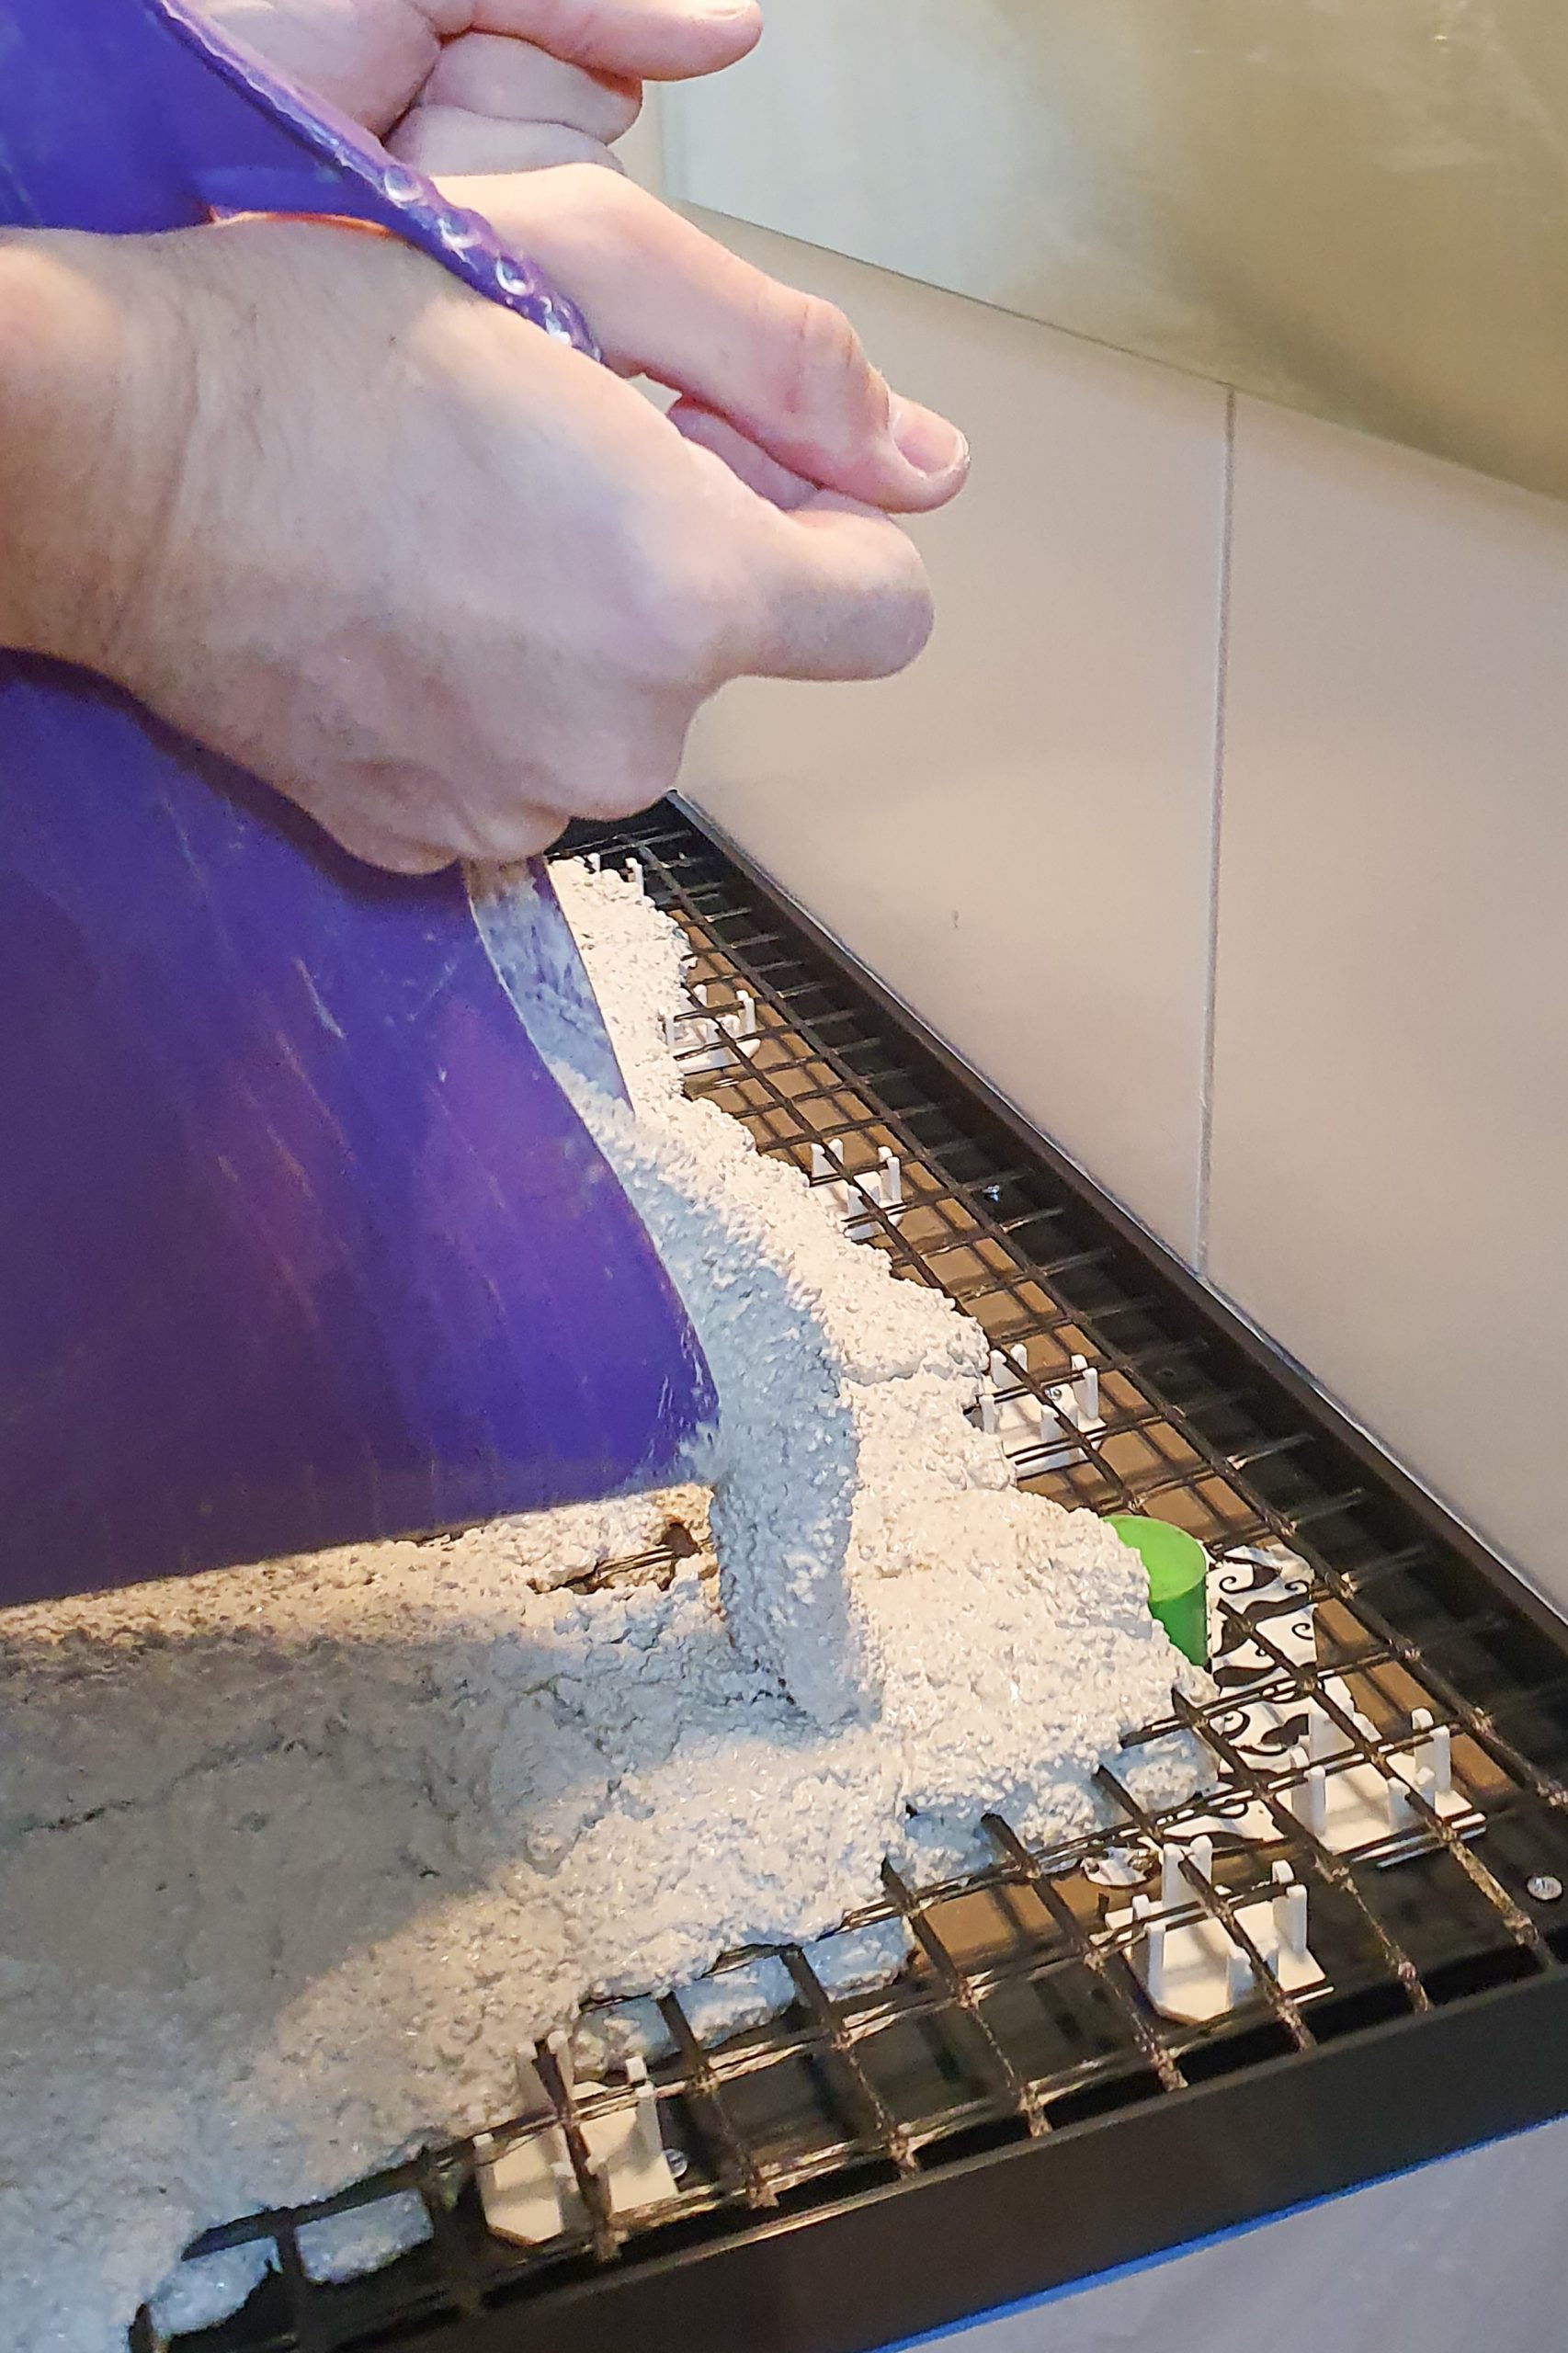
It’s important to make sure that your concrete is liquid enough to flow through the mesh and to work it’s way into every last little corner so that you’re not left with holes in your finished vanity unit.
Our concrete was slightly too thick which made it more difficult to spread out and we ended up poking our fingers into it to wobble the mesh around and try to get it to evenly distribute.
It’s important not to add too much water to concrete though as it will ultimately make it less stable and it can crack while drying out. If at all possible, I’d definitely recommend using the Concrete Countertop Solutions supplies and their formula allows it to be mixed much more liquid than other concretes.
Having said that, we are happy with the concrete we used (which is easier to source if you’re in Europe) especially as they use a white cement as a base which ultimately gives you a very light whitish concrete finish.
Tip: There are lots of extremely helpful videos on the videos on the Concrete Countertop Solutions website which I’d highly recommend checking out. They take you through all of the steps and give you a great overview of what steps are necessary to complete this project along with loads of helpful tips, too.
When you’ve poured your concrete into the vanity mould smooth it our with a trowel and make sure that it’s completely level and smooth as this will be your finished surface.
Smoothing the concrete is definitely easier said than done (especially if your concrete is a bit too thick as ours was) and I was admittedly really glad that our first concrete project was a fairly small surface which gave me a bit more time to get things as perfect as possible.
Something we learned during the process is how important it is to make sure that the concrete around and on the edging strips is as tidy and clean as possible. You can sand away small bits of concrete when it’s dry but if you have an uneven surface and bits of concrete on the edging strip it can cause the concrete to break when you snap off the edging strips later.
Then for the most difficult bit of this whole project. Waiting….
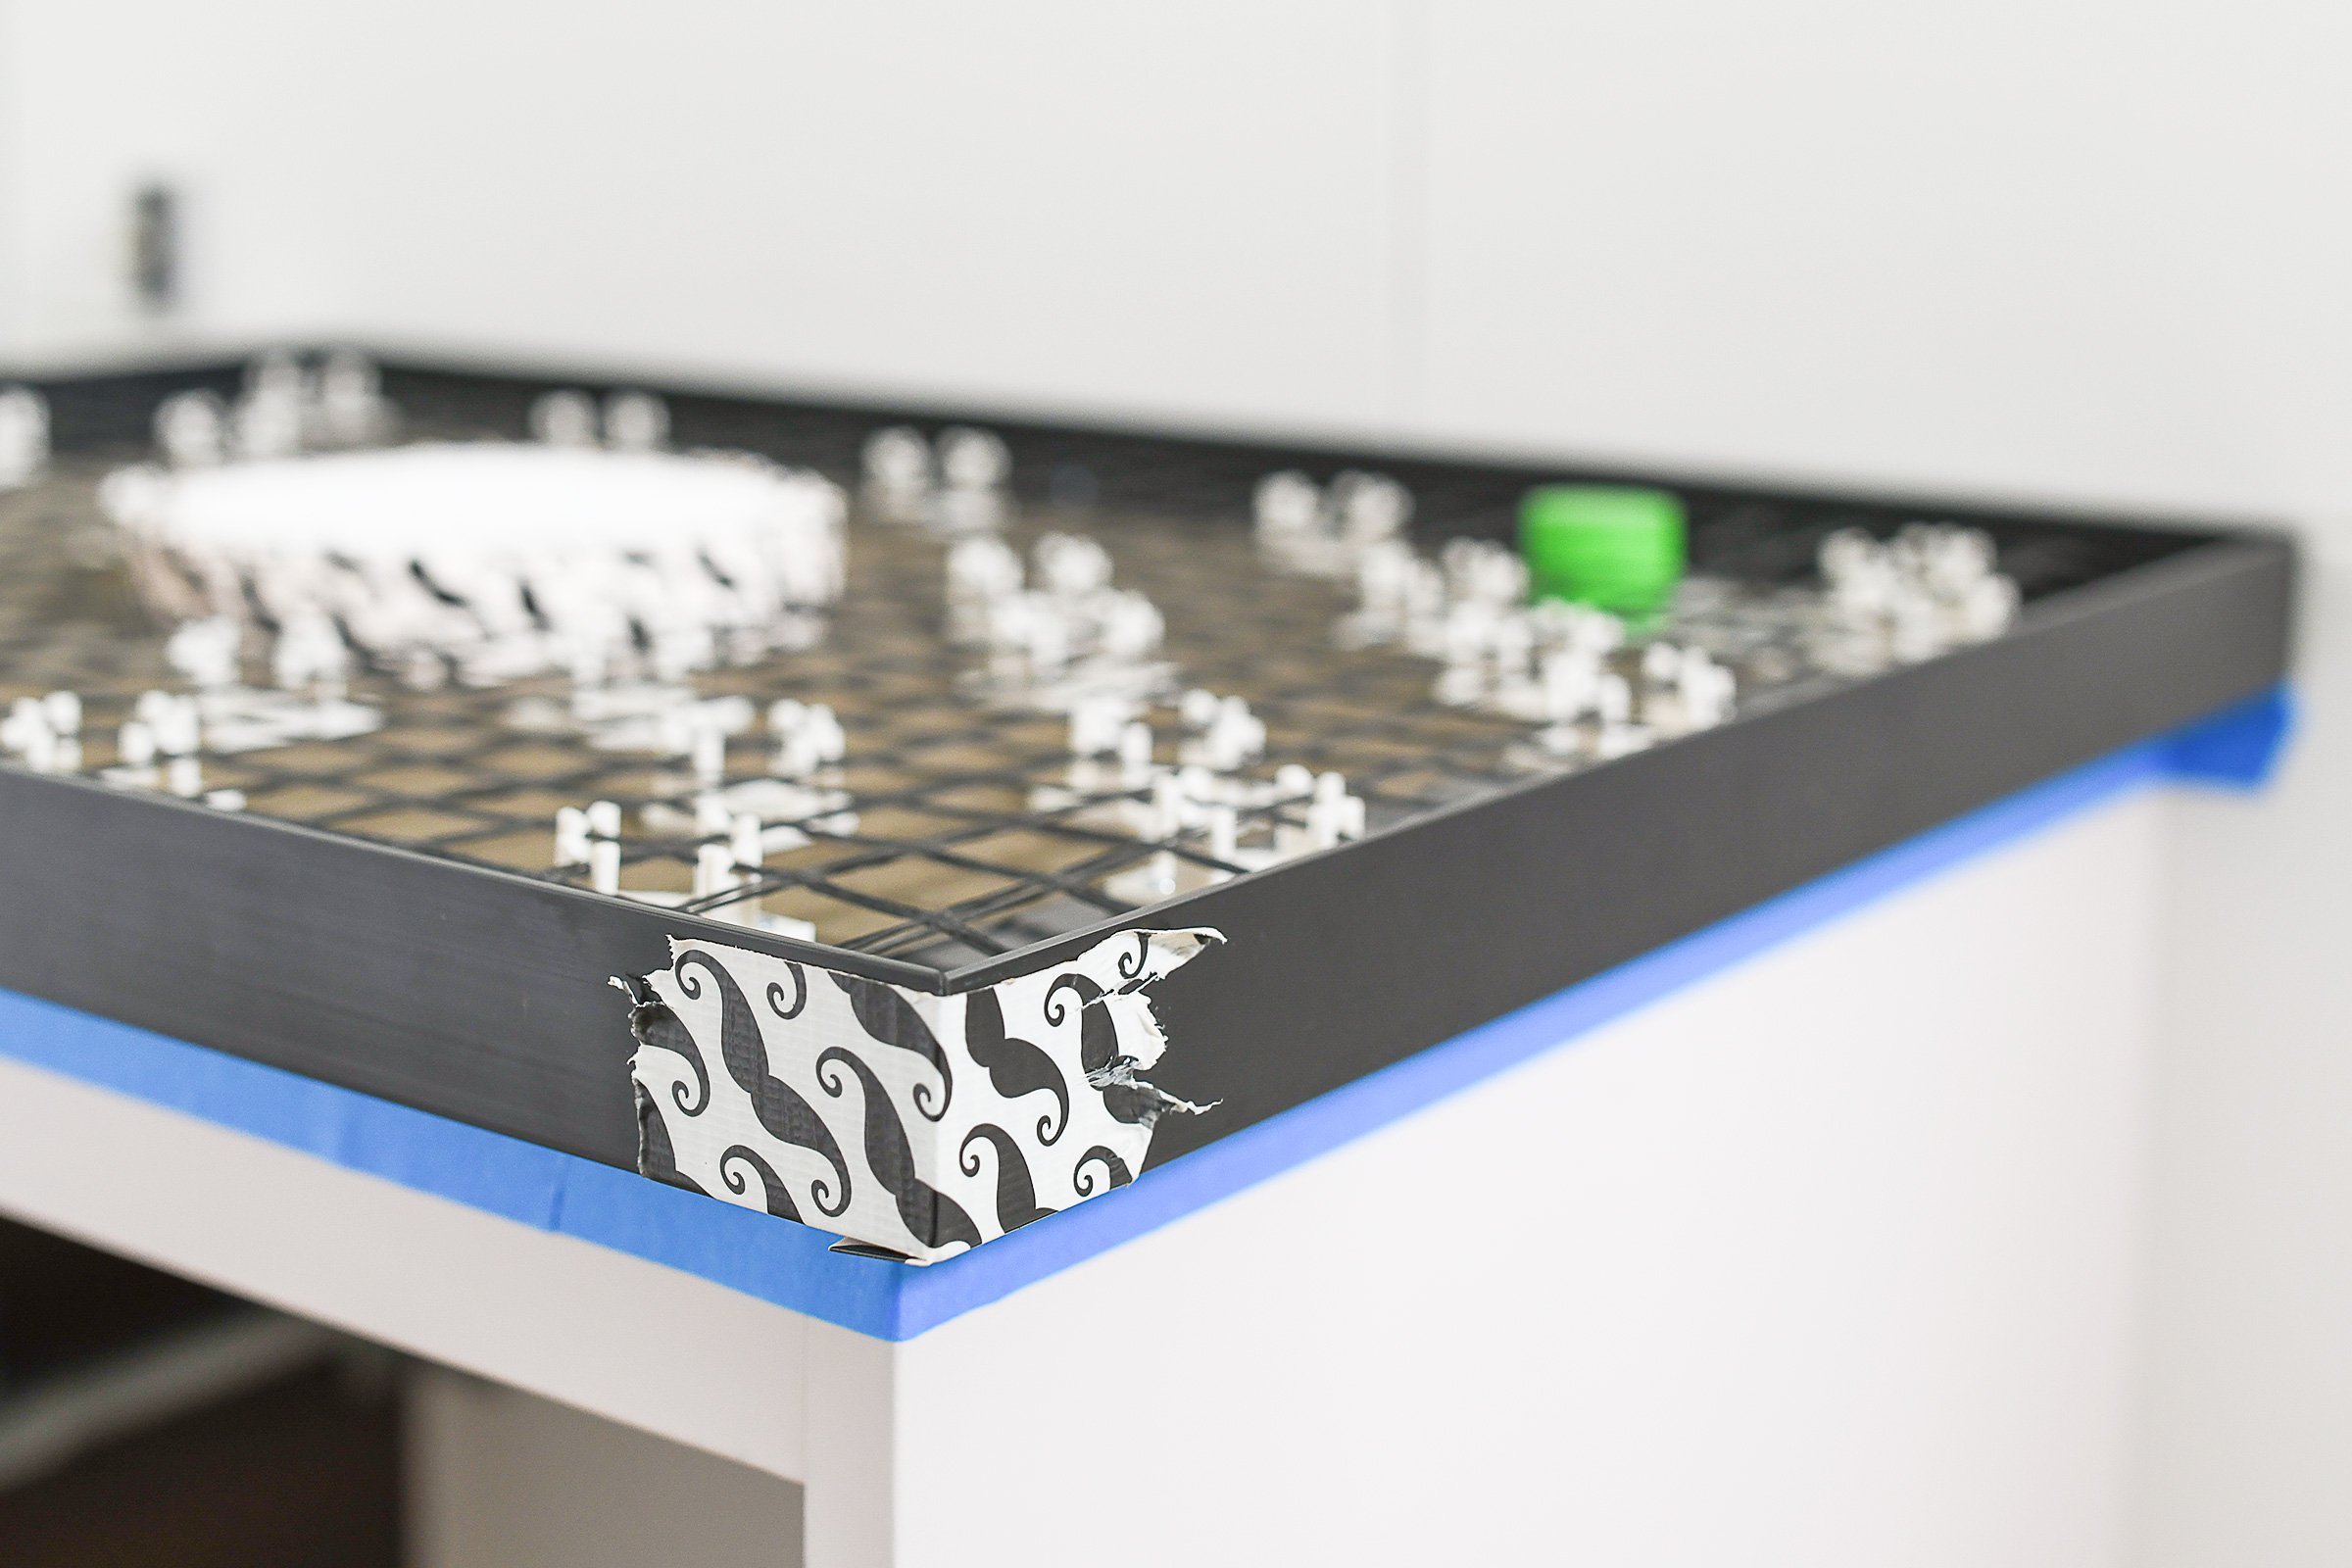
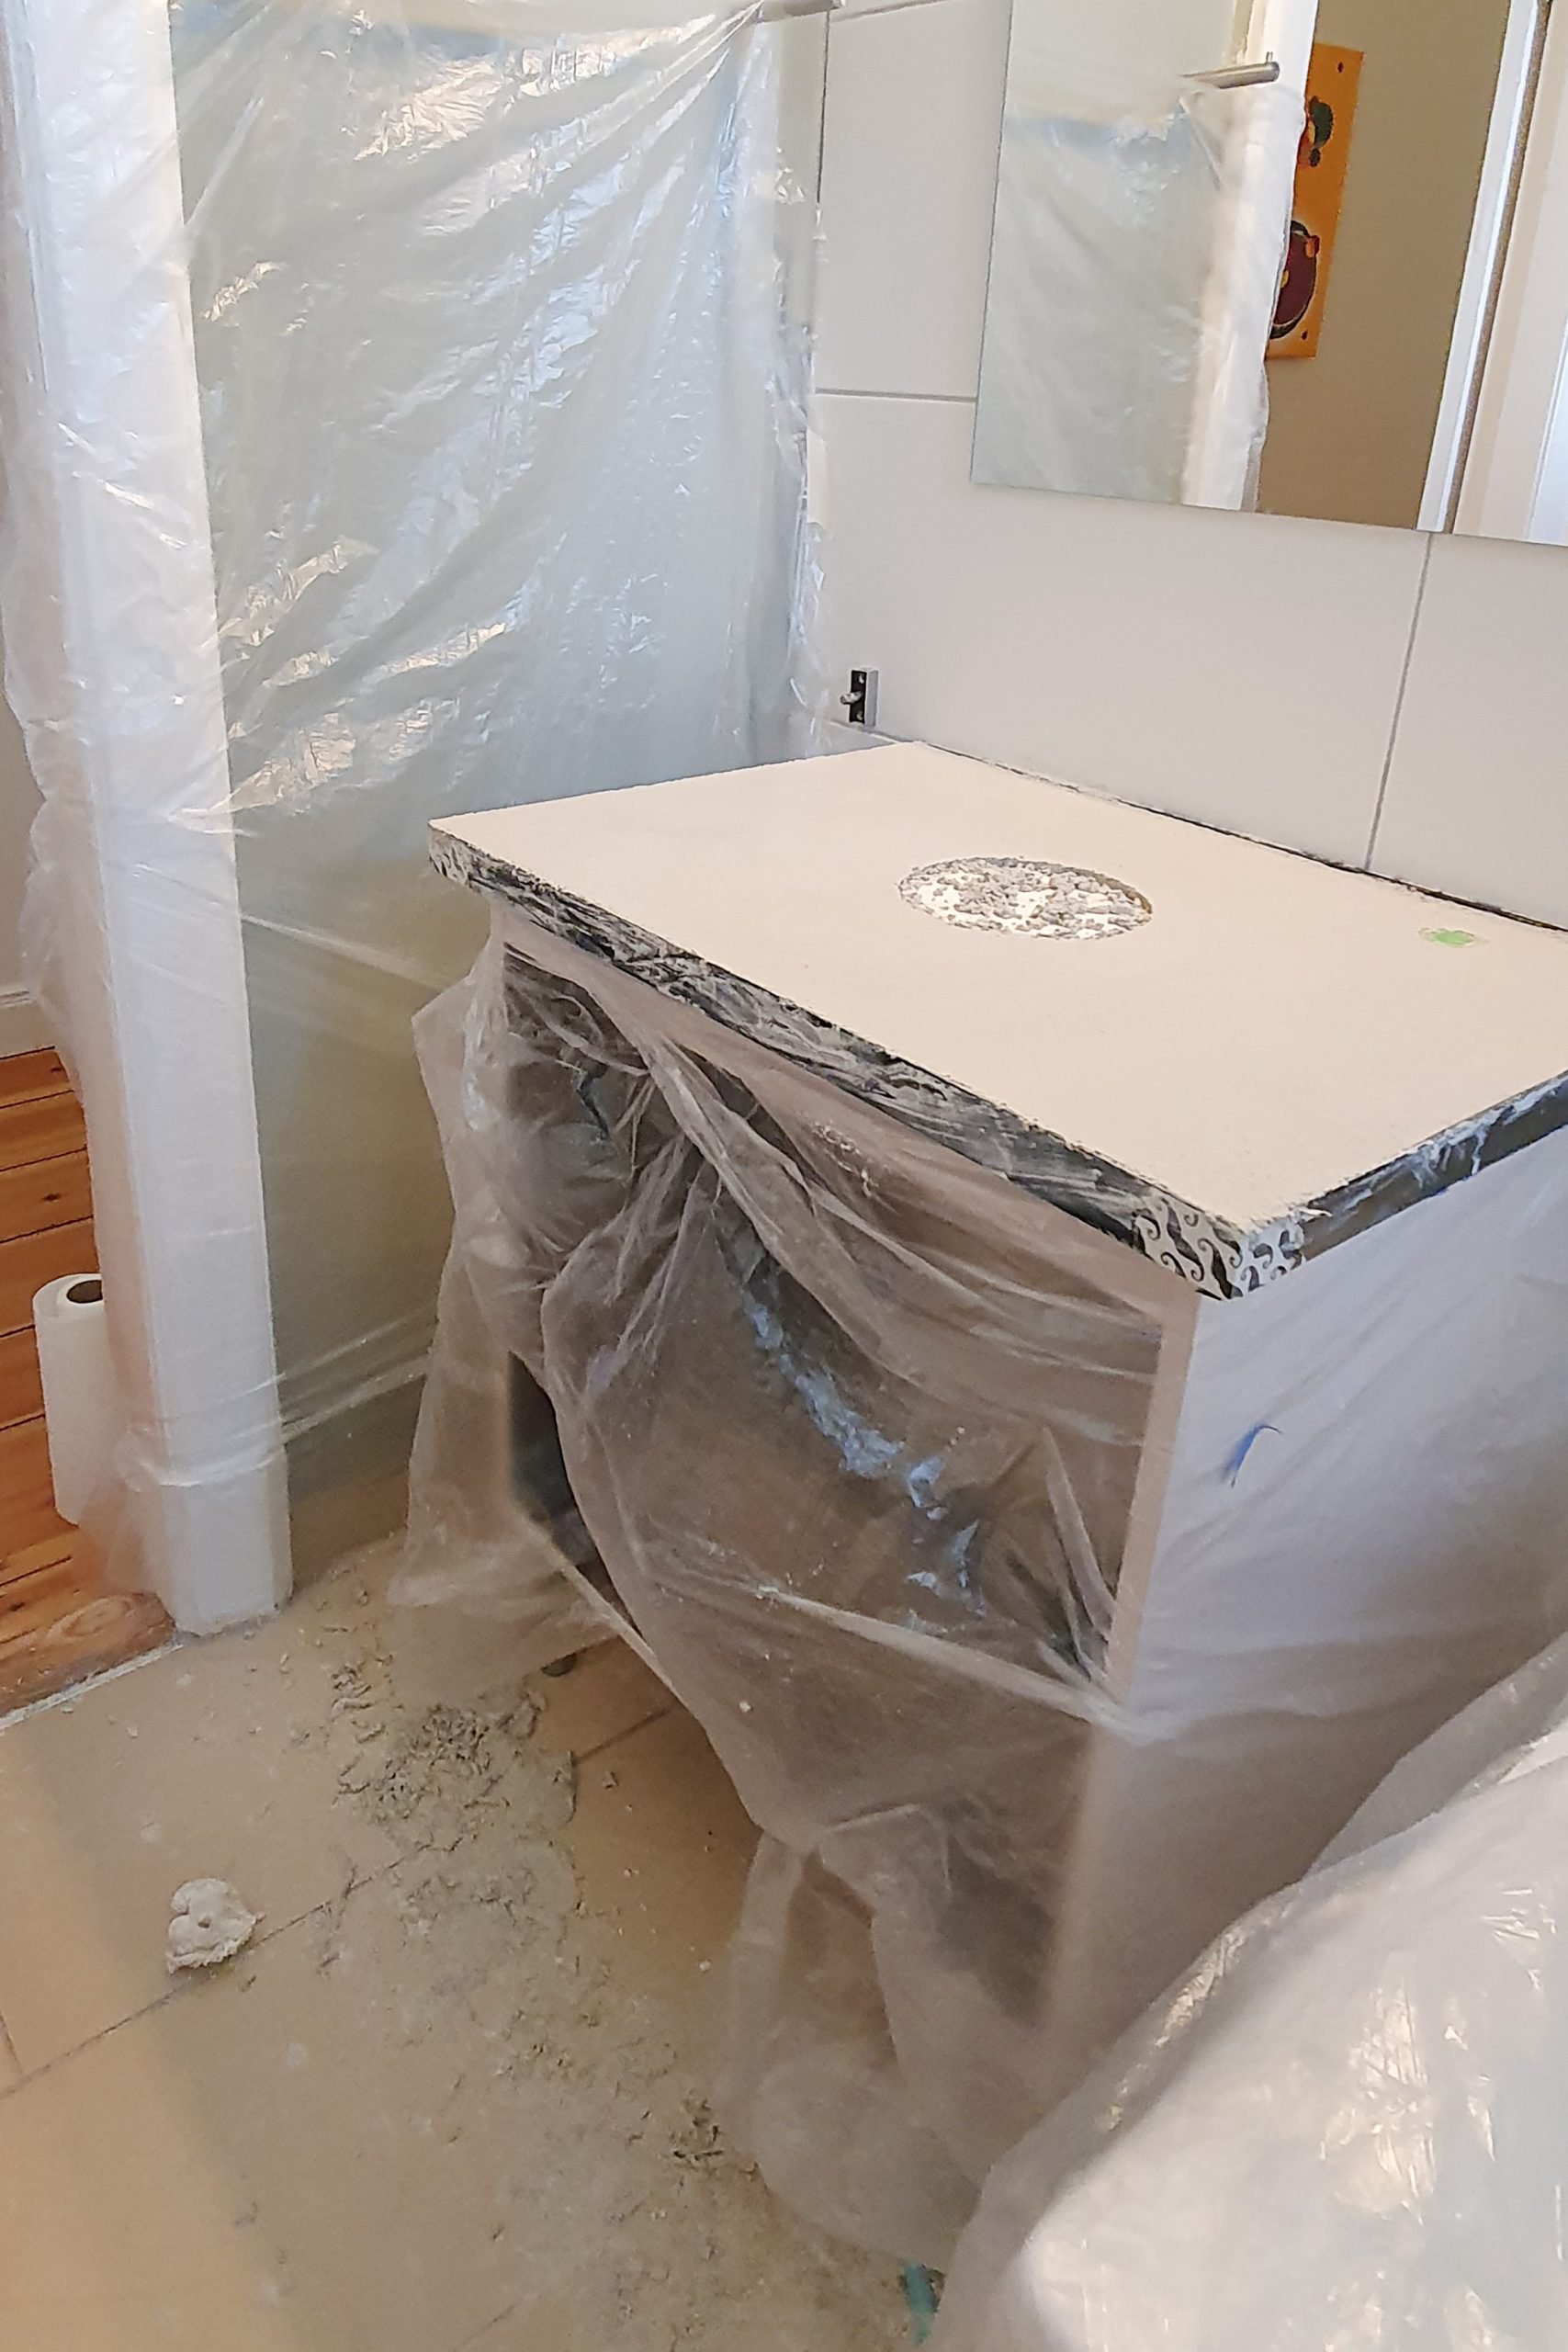
Remove The Edging Strips
We waited a full week before snapping off the edges (the strip against the wall stays in position)!
POLISHING (Optional) & SEALING YOUR DIY CONCRETE COUNTERTOP
The reason we started to polish the concrete in the first place is that we made a bit of a mess when smoothing it out.
As I already mentioned, our concrete was slightly too thick which not only made it more difficult to smooth but also meant that it started to dry quite quickly.
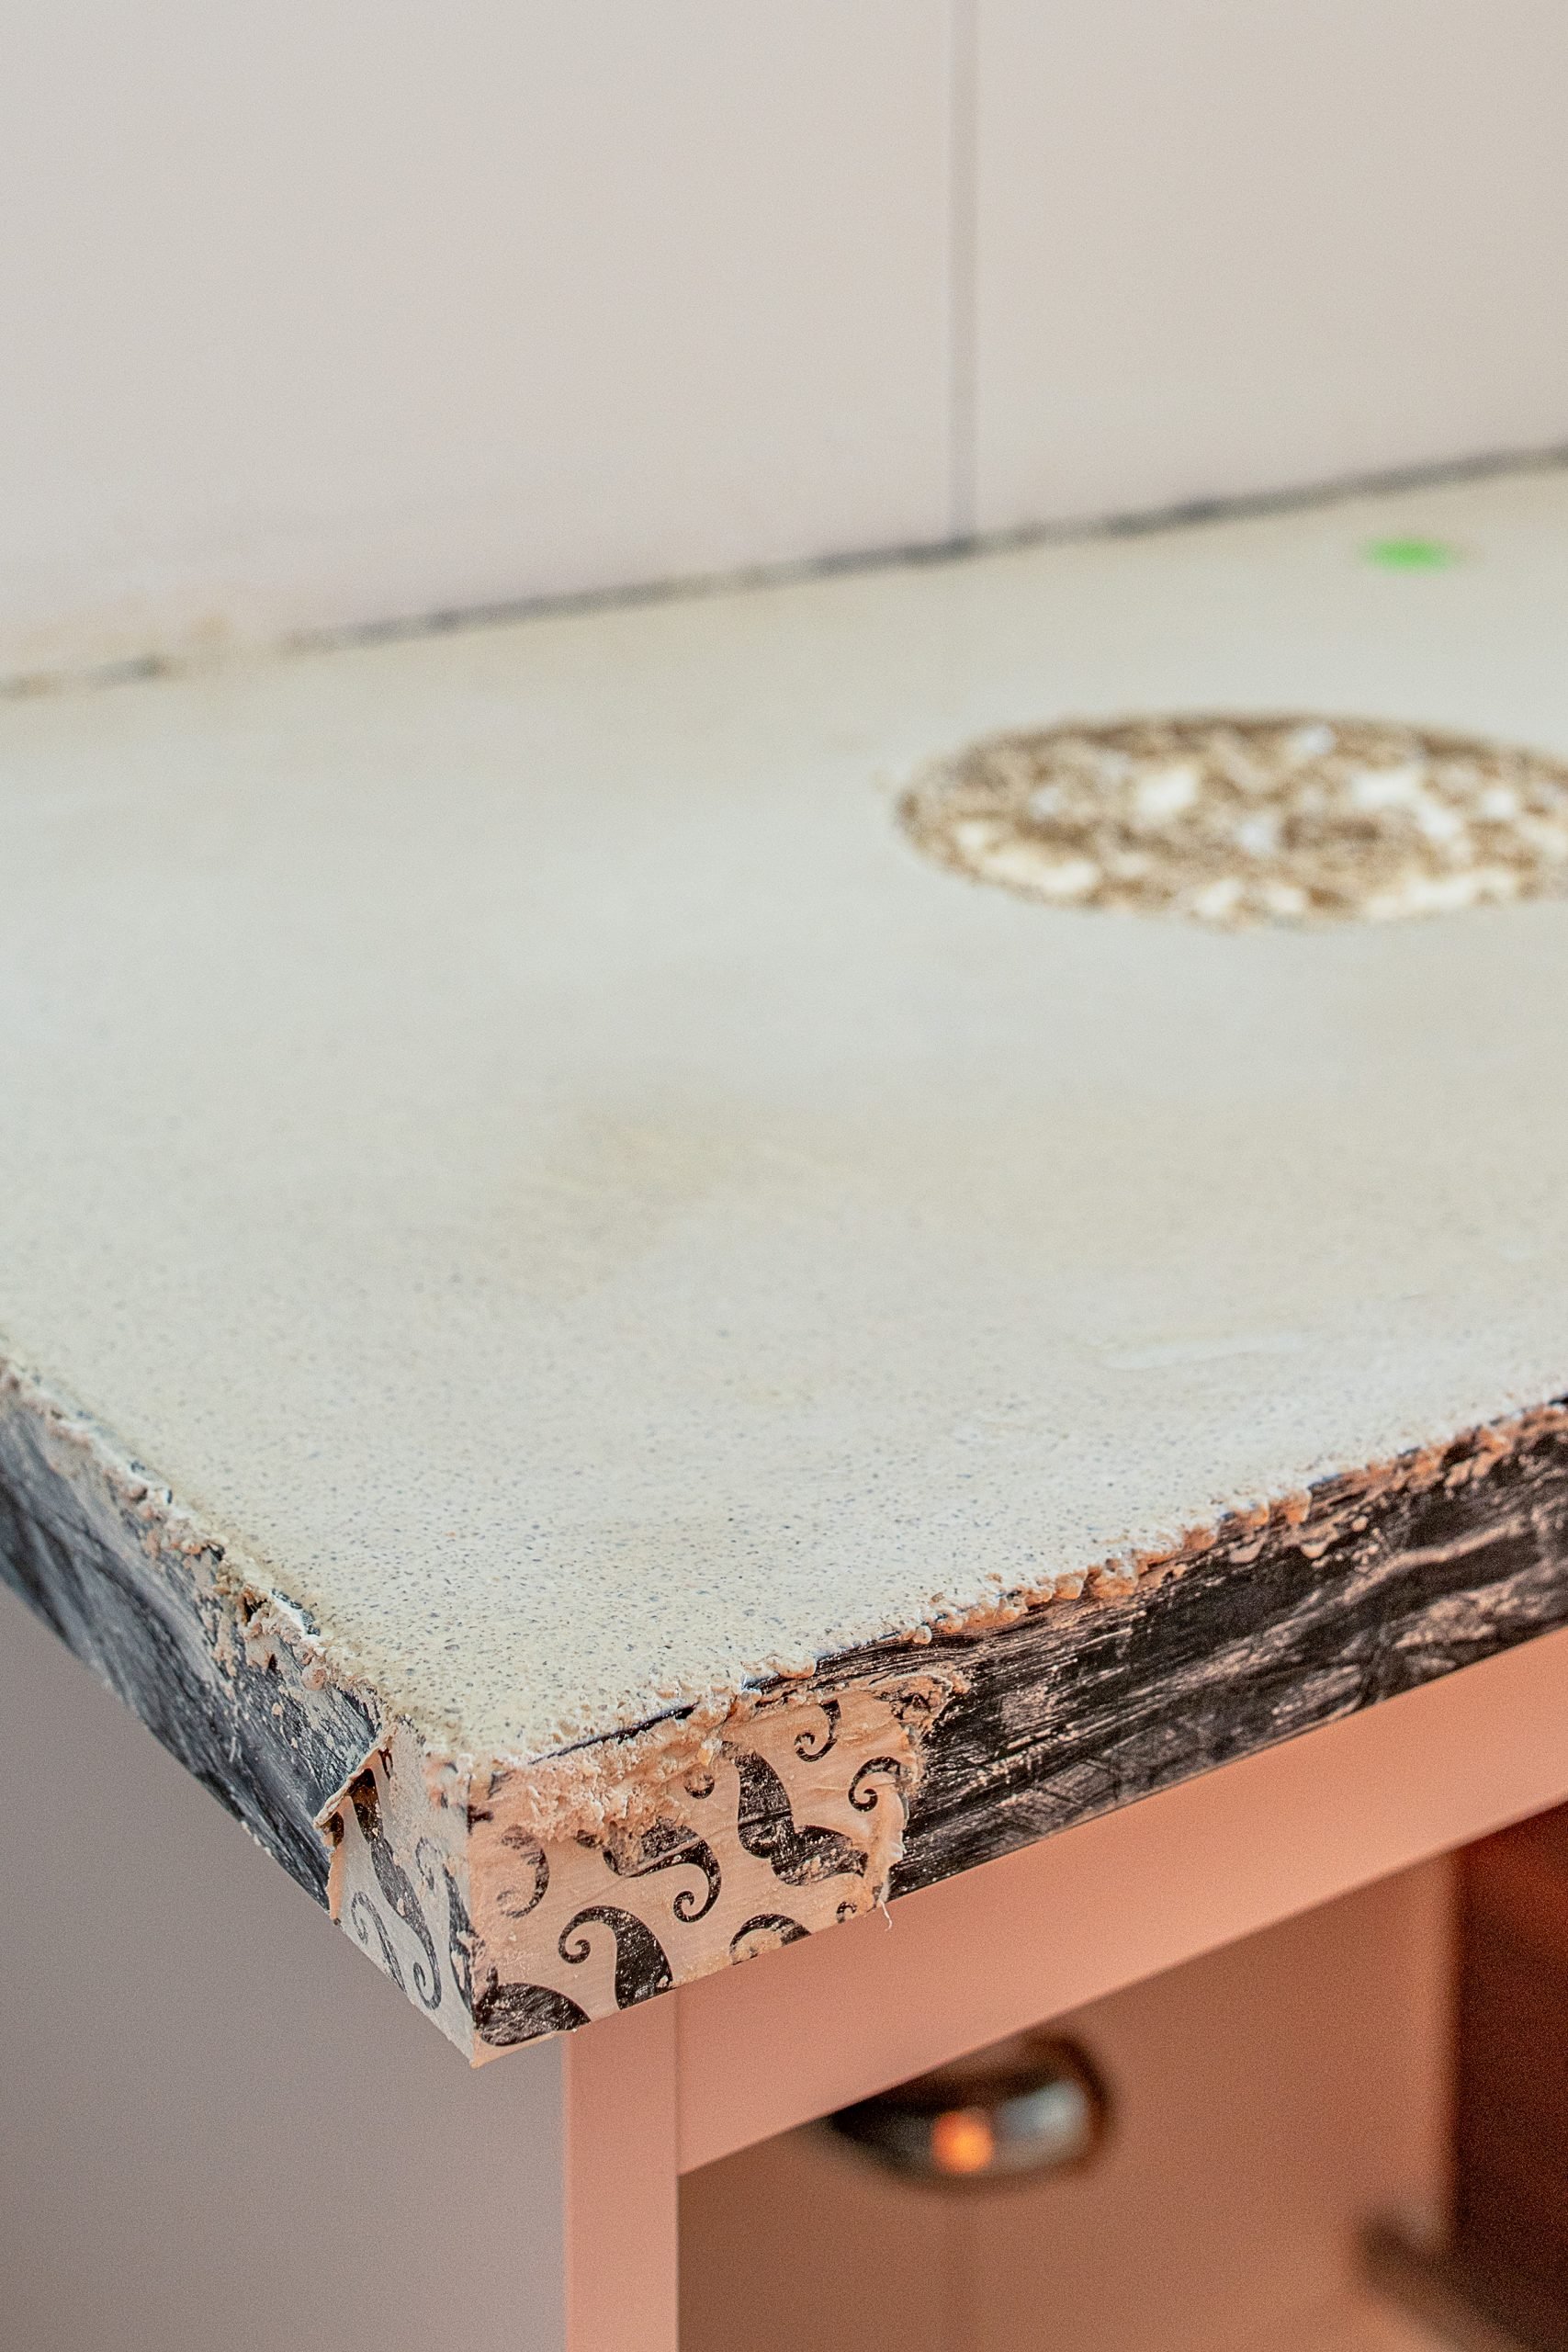
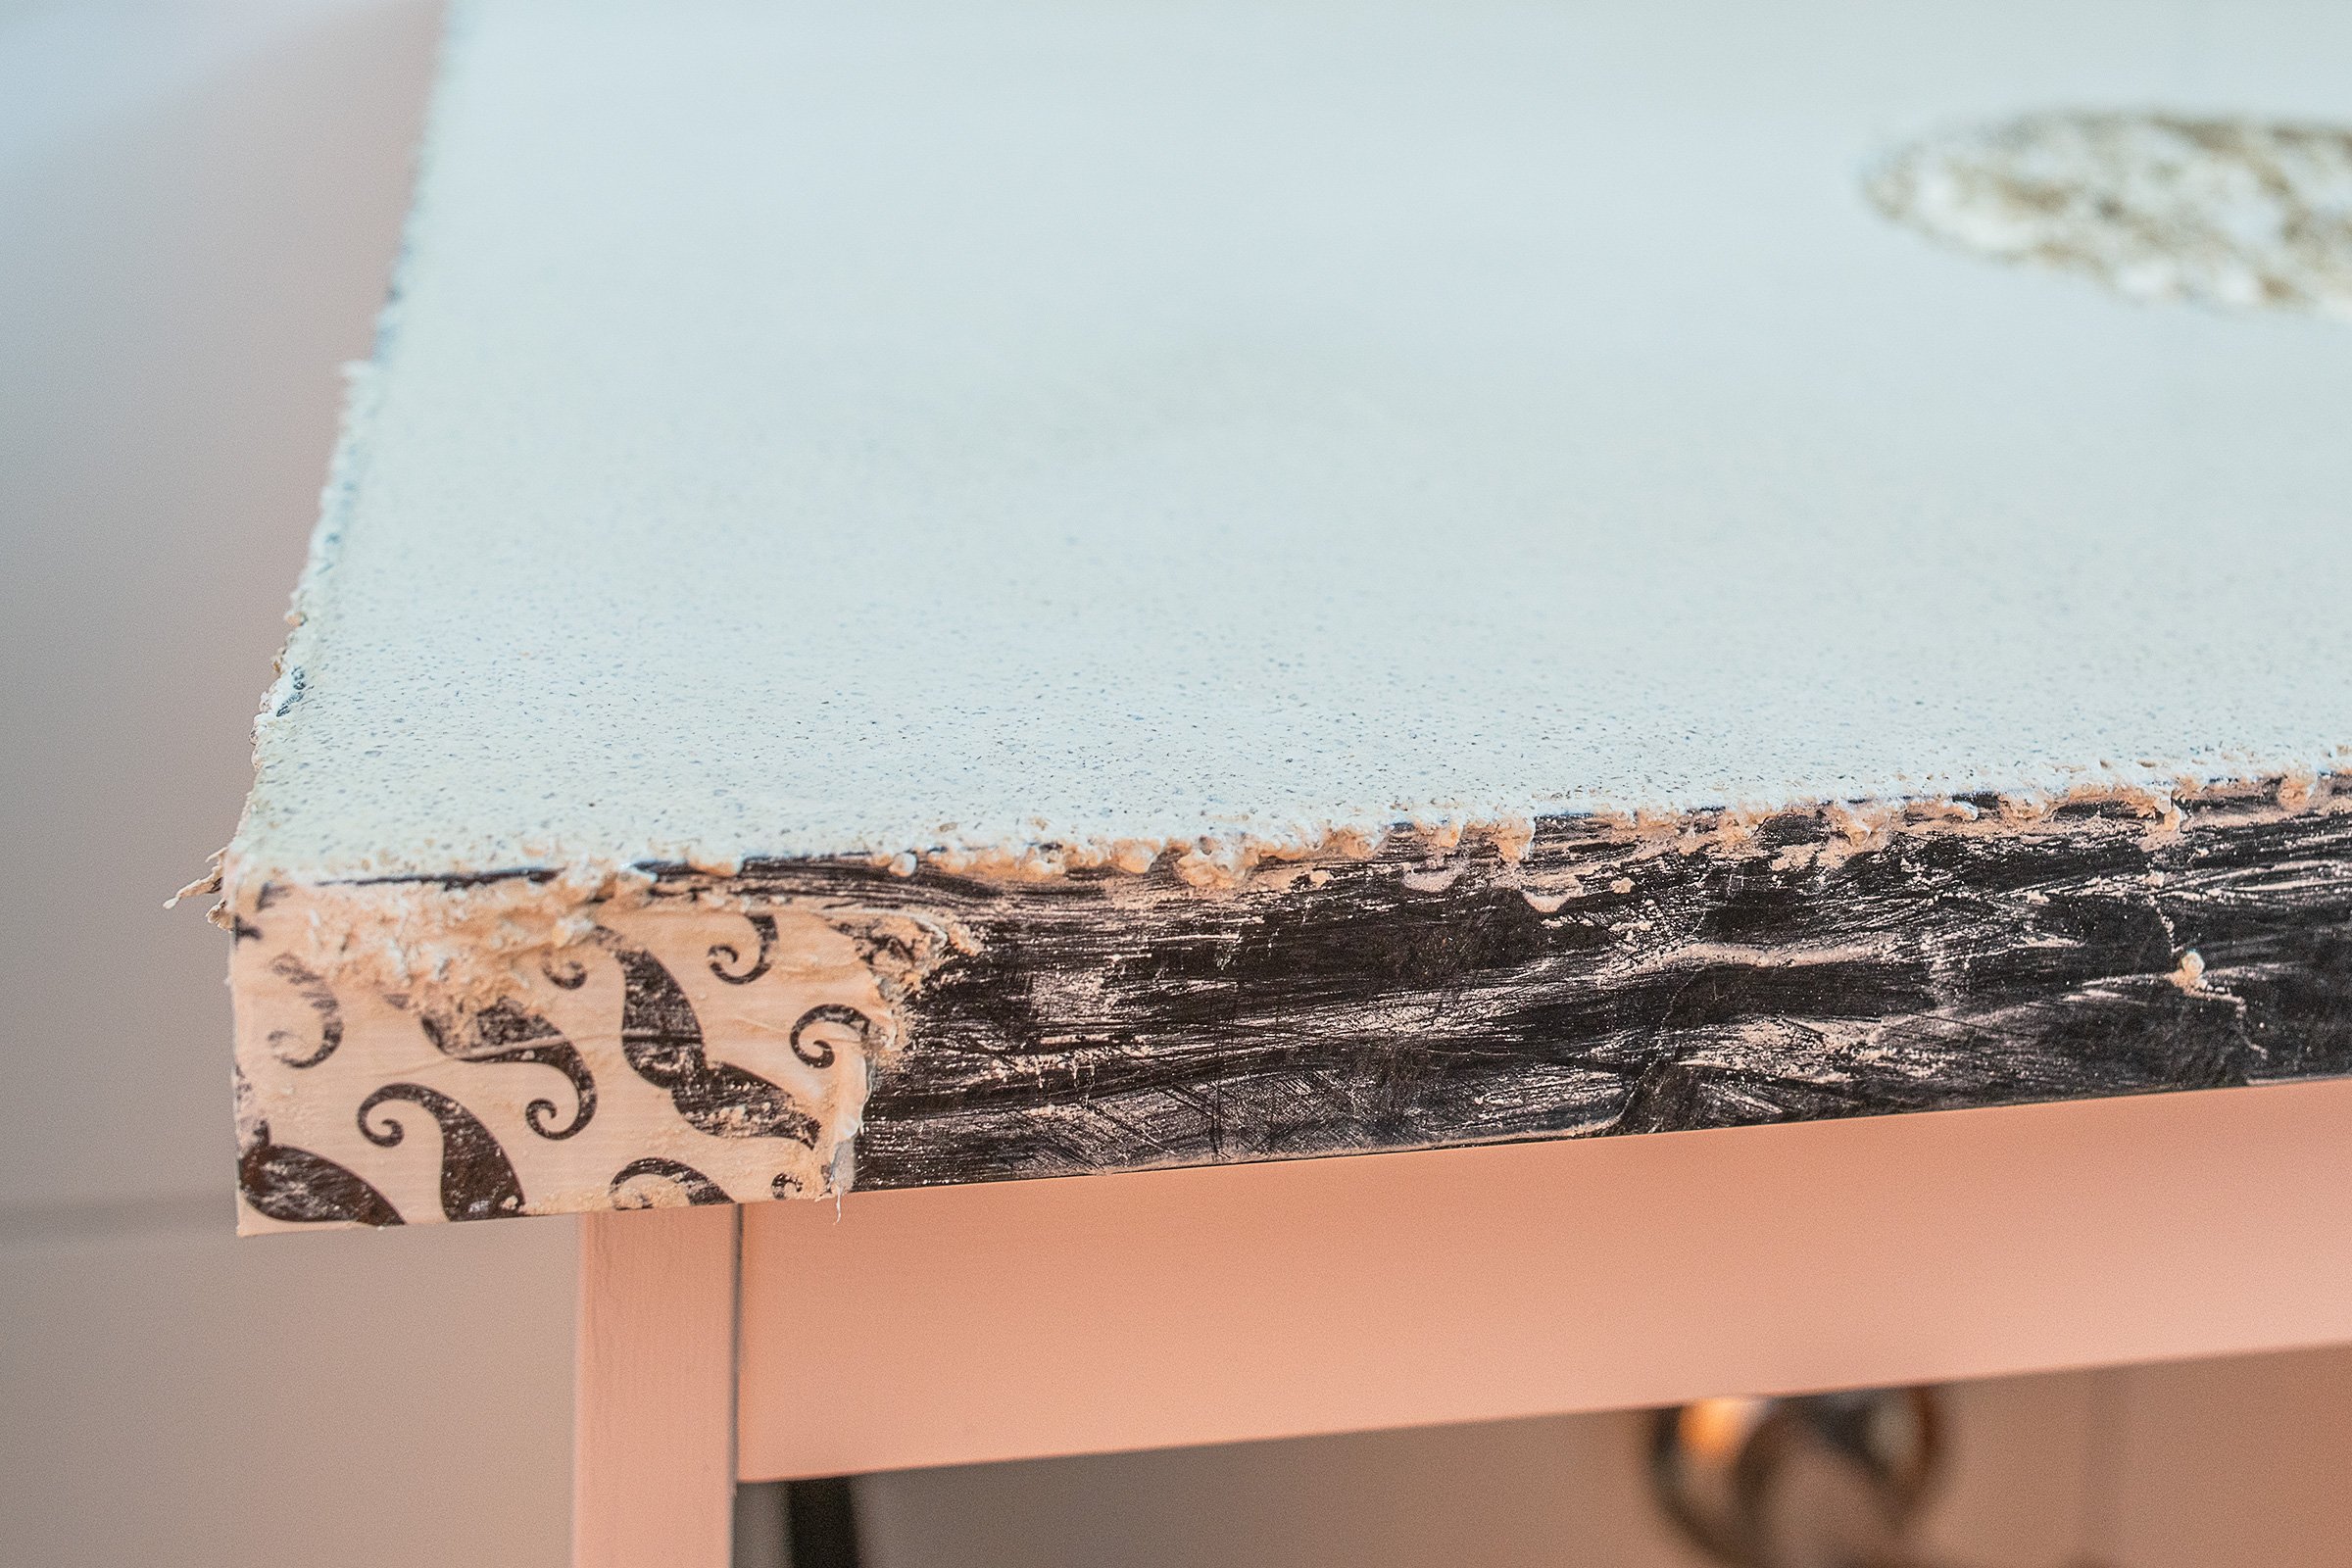
After smoothing it with our trowel, the surface did look smooth but in reality, there are a few small imperfections. The biggest issue, however, was that we left too much concrete on the edging strip which meant that we couldn’t snap it off without the risk of breaking the edge. As you can see, I was a bit impatient and accidentally broke the corner. Wait as long as you can possibly resist before snapping off the edges!
I tried hand sanding the edge but there was just too much concrete to remove which is why we opted to polish the surface with a diamond polishing pads to get rid of any lumps and bumps as well as the concrete that we’d annoyingly left on the edging strips.
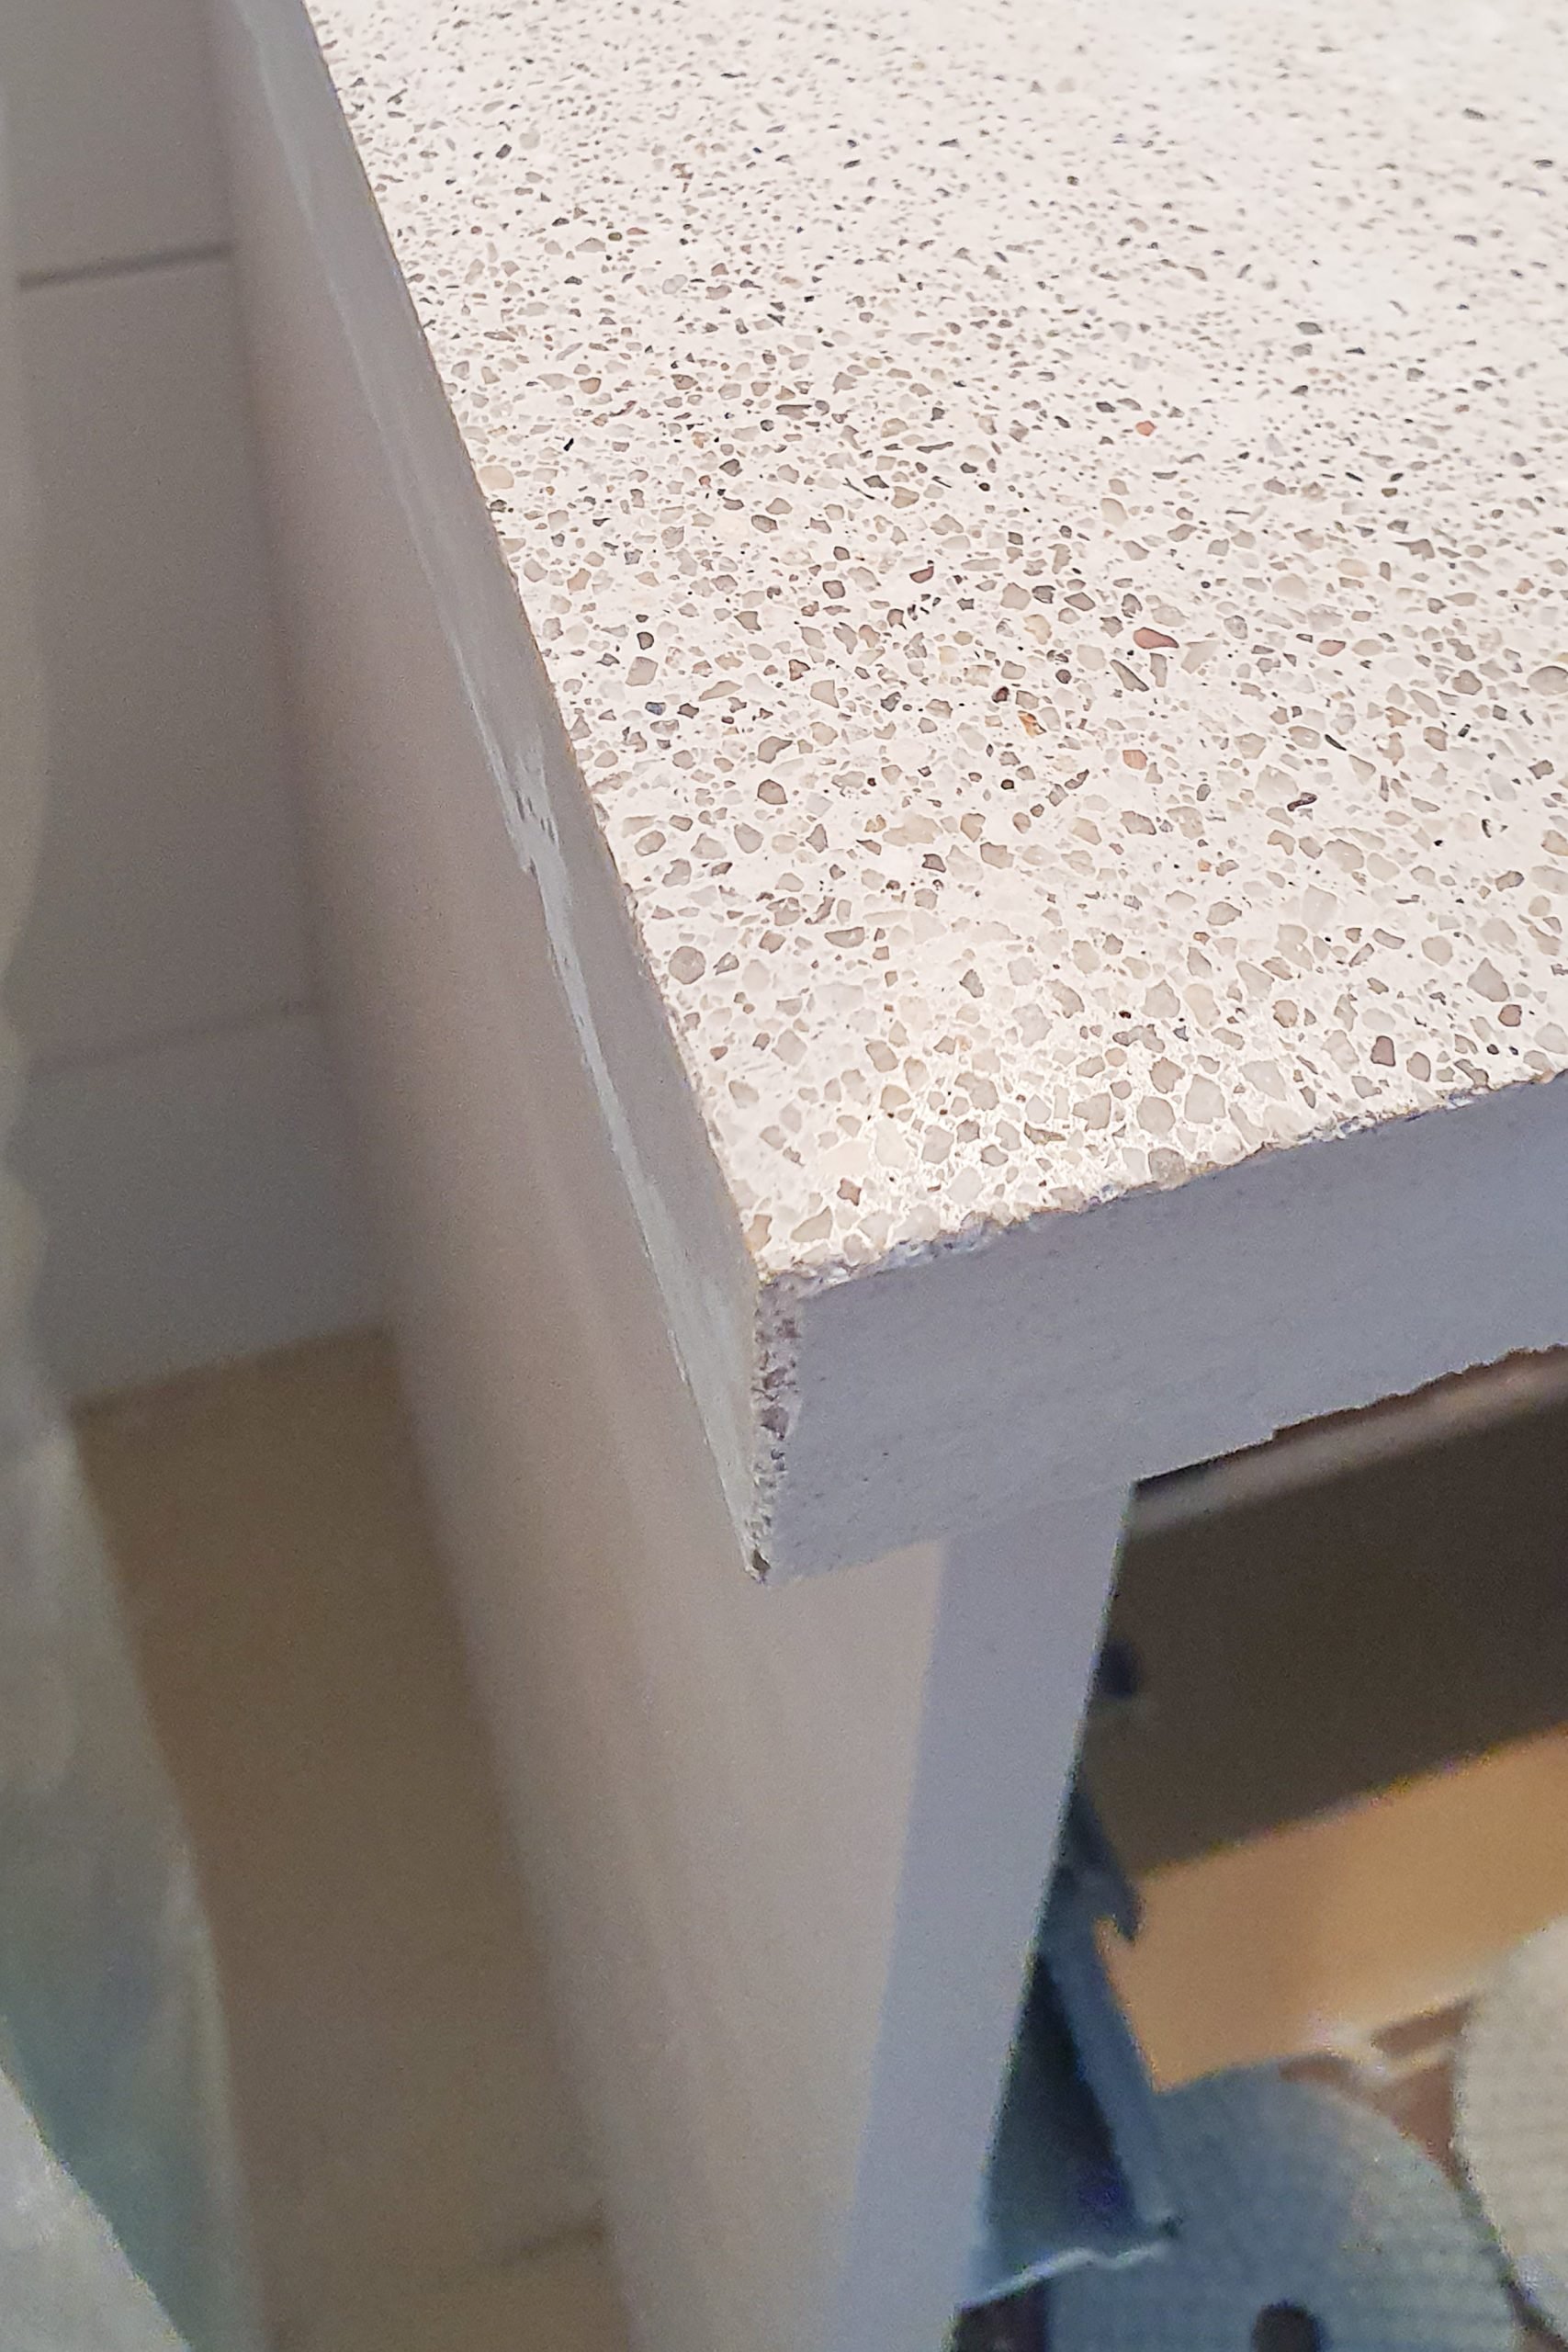
It turned out that this was a happy accident as polishing the surface reveals lots of the little sand and grit particles in the concrete mixture and leave you with a gorgeous, almost terrazzo-like effect.
SEALING
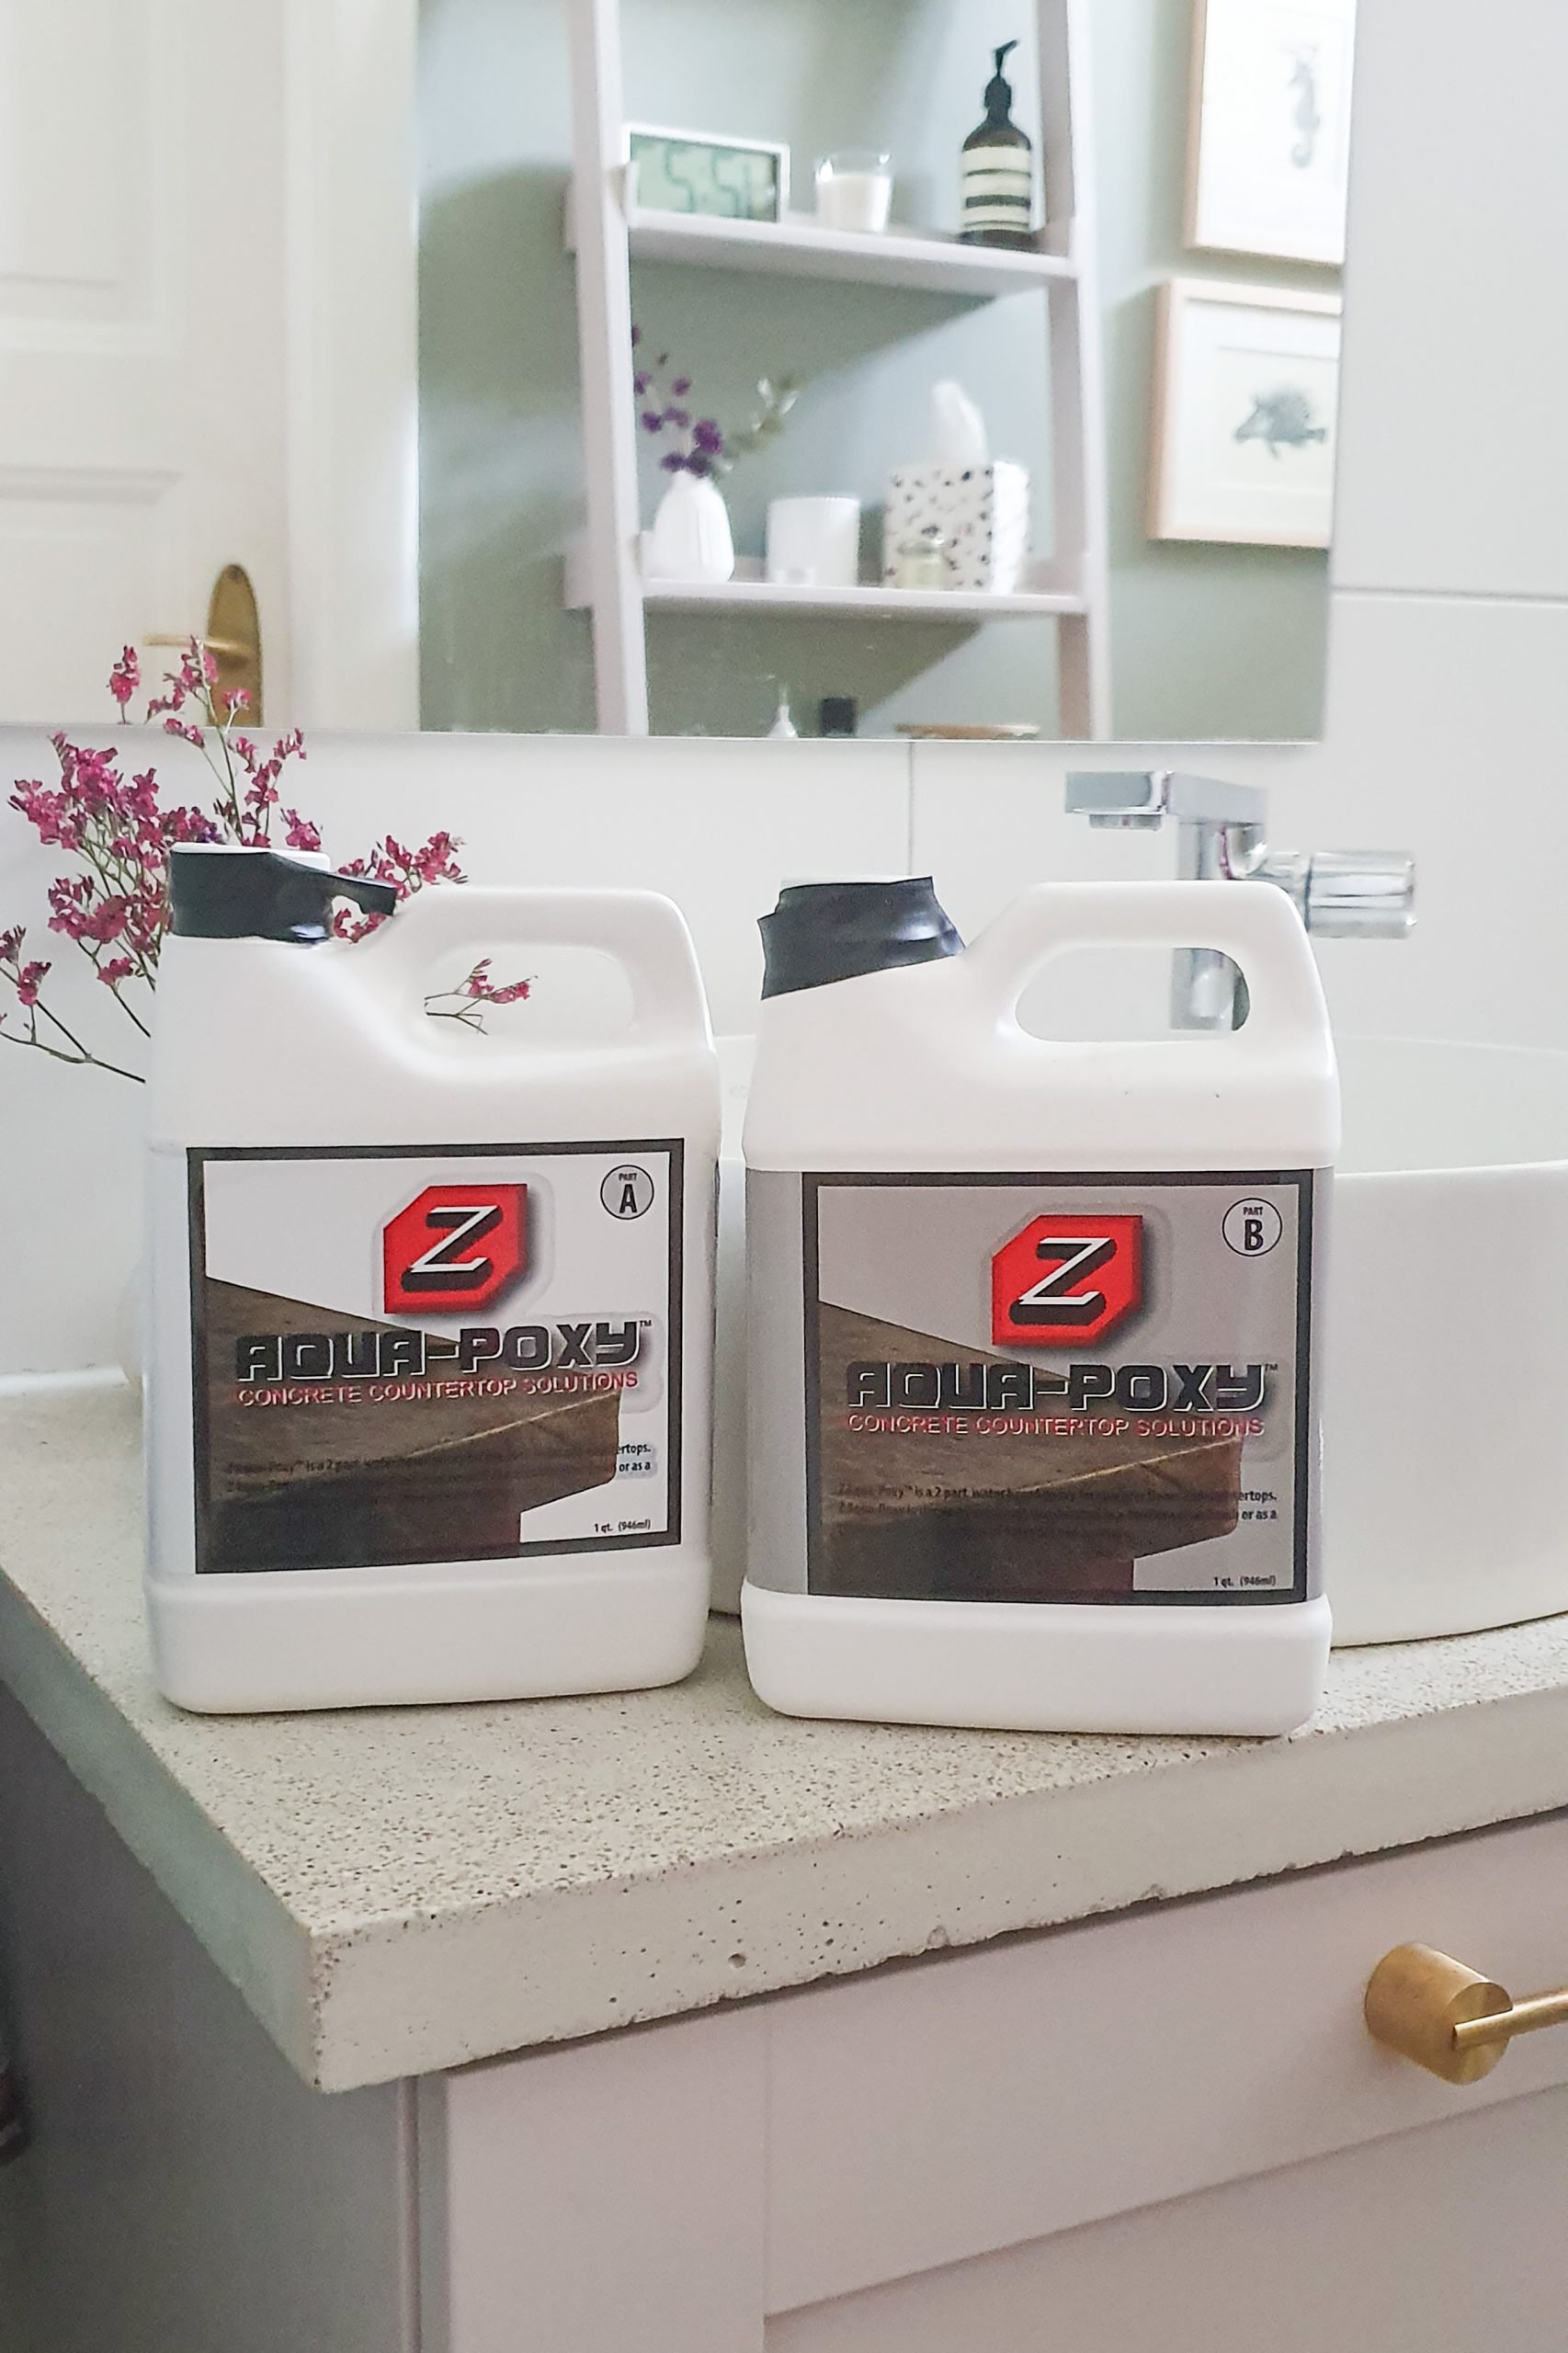
The last step necessary to complete your DIY concrete countertop is to seal it. We used the recommended Concrete Countertop Solutions sealer in a semi-gloss finish.
It’s just a matter of applying a couple of coats of the sealer with a foam roller (and a paintbrush for the edges) and giving each layer a sand with some fine sandpaper between coats to remove any air bubbles and imperfections.
All that’s left to do is wait for it to dry before installing your tap and washbasin!
PROJECT TIME & COST
I’m not going to lie, this wasn’t the quickest of projects to complete. All in all, we estimate that it took us about 11 hours to complete this project (plus time installing the tap and washbasin) spread over a couple of days.
Actually pouring the concrete and smoothing it only took about an hour but the prep work (about 6 hours) and polishing afterwards (about 4 hours) took up a lot of time.
We think it was time well spent (and I admit that we aren’t the quickest DIYers) but it is something to be aware of. The time we spent polishing the surface was obviously optional but we love the terrazzo look of our DIY concrete countertop but if you’d like a more even and monotone finish you probably won’t want to polish the surface anyway.
DIY Concrete Countertop Cost Breakdown:
We already owned all tools (and some of the supplies like duct tape) for this project so haven’t included them in the cost breakdown. It’s also worth pointing out that the edging strips, mesh, clips and concrete sealant which were all kindly gifted by Concrete Countertop Solutions come in larger packages and we only used a small amount to complete this project.
- Edging Strips (Gifted) – 140€ (there’s enough leftover for another project!)
- Mesh (Gifted) – 50€ (there’s enough leftover for another project!)
- Clips (Gifted) – 27€ (there’s enough leftover for another project!)
- Concrete Sealant (Gifted) – 120€
- Concrete – 45€
- Tap Knockout (Gifted) – 17€
- Tile Backer Board – 20€
- Silicone Sealant – 5€
- Screws – 5€
- Adhesive – 5€
- Dust Cover, Tape & Sandpaper – 4€
Optional for polishing:
- Diamond polishing pads – 30€
- Surface Grinding Dust Shroud for angle grinder – 20€
- Dust Masks – 10€
Total Cost: – 438€ (or 518€ including polishing the concrete)
We absolutely love our DIY concrete countertop and it not only looks amazing, it feels amazing, too! Best of all, it’s really hardwearing, too. We’ve not been gentle with it and it’s holding up beautifully!
We have some huge makeover plans for this year (you can see what we’ll be getting up to here) including more bathroom fun and more concrete projects!
Do you love concrete as much as we do? What would your ideal bathroom look like? Have you ever considered a concrete worktop? What would your ideal bathroom look like? If you could only have one – a shower or a bath – what would it be?
SHOP OUR DIY ESSENTIALS

Leave a Reply