The first winter in our new house was extremely cold. In fact, it was so bad, that Christine got chilblains on her toes!
One of the first things we did to tackle the cold, was to install insulation under our suspended timber floor in the living room. Thankfully we have a little dummy cellar that allowed us easy access to install the insulation boards from below so that we didn’t need to take up the floorboards.
You can find general information about insulating under floorboards here.
We ordered the insulation boards online and after they were delivered, it was my job to crawl into the cellar and spend some time with the spiders, sow bugs and rubble that call this place home. It was rather uncomfortable, but I heroically stood up to the challenge.
We divided the work between us. To start with I measured the distance between the joists under the floorboards. As most of them weren’t parallel, I measured at both ends and in the middle to ensure a perfect fit of the insulation. Christine then cut pieces off the rigid insulation board according to my measurements (actually a bit wider so that they would definitely fit with no space on either side).
I then placed the underfloor insulation board between the joists.
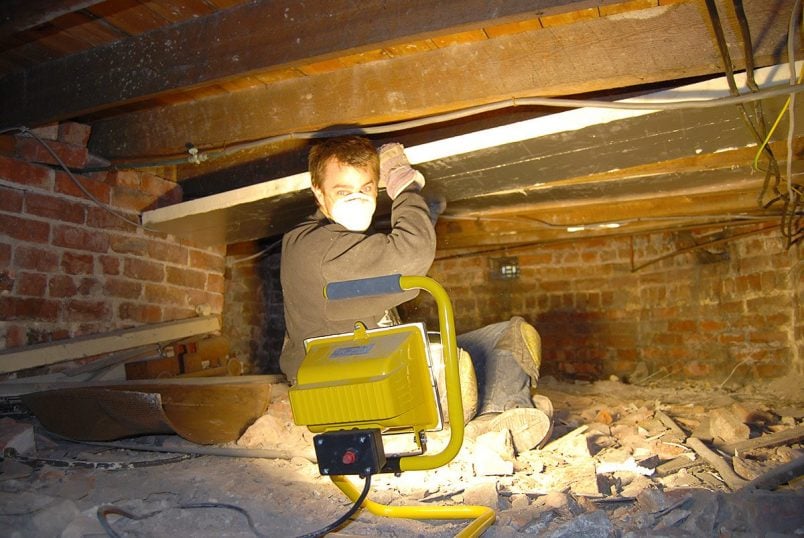
As the joists were sometimes at an angle, the bottom opening between them was smaller than the gap at the top, just under the floorboard.
This made it hard and fiddly to get the board into the correct position. Furthermore, the gaps between the last joists and the walls were uneven so that a few changes to the boards were needed to get the insulation to fit as snugly as possible. It is important, that no air can circulate around the insulation board; otherwise, it would dramatically reduce the insulating effect.
Whenever an insulation board wouldn’t exactly fit between the joists, we filled the gap with a thick foam draught excluder to make sure no air would circulate up to the floorboards.
You have to make sure that any air bricks in the wall are not covered as they are there to ensure a good circulation of air around the joists to prevent rot.
While I was down there, I also insulated the pipes that ran through the dummy cellar. Because we have reduced the heat loss through the wooden floorboards, the dummy cellar will be considerably colder, which will make it easier for pipes to freeze and possibly burst in the winter.
The work insulating our living room floor took us the best part of a weekend, but we noticed a direct change in the room temperature of 1°C for the better. The work should also save us money in the long run as the cost of insulating the floor was about £100 but should save us about £60 a year in heating costs.
To improve the insulation and reduce draughts further, we also insulated the gap between the floorboards and the skirting boards, but we will tell you more about that another time.
Adrian Tranter says
We have just started to use an insulation foil quilt roll into a loft space. This was used as an under eves insulator as part of a warm roof/deck, however the same material, which is stapled in place can be used to insulate directly to the underside of the joists and push through at the last run. We will use this when we do our own onder ground floor insulation. Great multi foil blanket that you cut to length and the YBS multifoil rolls at 1m x10m rolls work out to a similar cost the the thermal board. You will need a staple gun though.
Christine says
Great that you’re insulation your home, Adrian! Just be aware of the building physics aspect of insulation. Depending on the way your home is constructed you will have to allow for airflow. I would never recommend adding insulation to the underside of your joists as it can cause condensation to build above which could cause serious damage to the structure of your home. I would definitely recommend checking with a builder and/or architect before adding insulation! Don’t forget that any work like this also has to comply with building regs, too!
Cx
Underfloor insulation says
Hello,
Thank you for your helpful article. We are also looking to fix underfloor insulation under our suspended floor but I was wondering whether the insulation could be fixed on the joists instead of between the joists? Thought it might be even more air tight?many thanks
Christine says
I would make sure that the insulation is fixed directly under your floor and between the joists. You would otherwise create a pocket of air between the floor and insulation which could cause condensation. I personally don’t think it would make it more airtight. If you’re unsure (and we’re no experts) I’d get some help of a professional as every case is of course different and it all depends on your building situation.
Hope that’s some help.
Cx
Dougal says
Hi,
I took up all my downstair’s floorboards (as I didn’t have a large enough void underneath them) and stapled in some garden weed control liner and then filled with 200m loft insulation that was pushed into every gap where needed. It’s now my first UK chilly Winter and I’m surprised I’m getting cold drafts blowing in. I’ve siliconed around the underfloor air vents, between the skirting and the floorboards, but it’s still drafty and now feel I want to now go back to thick pile carpets. Can I fill around my total floor and skirting where the draft seems to be coming in from?
Christine says
Yes, you can. But we’d recommend not using silicone or caulk to do this. We found using insulating tape was much better (and quicker and easier). You can read about it here and here.
Hope that’s some help! Good luck!
Cx
Katie says
Hi, firstly – what an amazing blog! Thank you!
Can I ask, which insulation boards did you use? We were looking at Kingspan 25mm thick to do the same but not sure that is thick enough! Did you secure the boards in with anything or just rely on the tight fit?
Thank you again and congratulations on your beautiful house!
Christine says
Thanks for the complement Katie!
We used Celotex boards (which are pretty much the same as the Kingspan ones). Ours are 50mm thick and I wouldn’t recommend using any less! When installing them, we made sure that they fitted as snuggly as possible, as any air gaps will counteract any insulating properties. On the boards that didn’t fit perfectly, we sealed any gaps with a foam draught excluder (the kind you can buy on a roll) that we just squashed into place.
It was a really easy job to do and, probably because we have exposed floorboards, has made a huge difference!
You should also make sure that the insulation board is fitted up tight against the floorboard – without any airgaps. Also, if your insulation has just one side of foil, you have to install it foil side up (i.e. against the floorboards). We’ve not had any problems with damp, but it may be a good idea remove a board and check once a year, just to make sure!
Good luck!
Cx
PS. We will start to insulate the rest of our cellar this weekend. Hopefully we’ll be able to share the results soon!