We’re loosing our minds. Seriously. We keep saying that we’ll finish one project before starting another, but for some reason, we just can’t help ourselves.
Last week we shared the state of our kitchen floor with you.
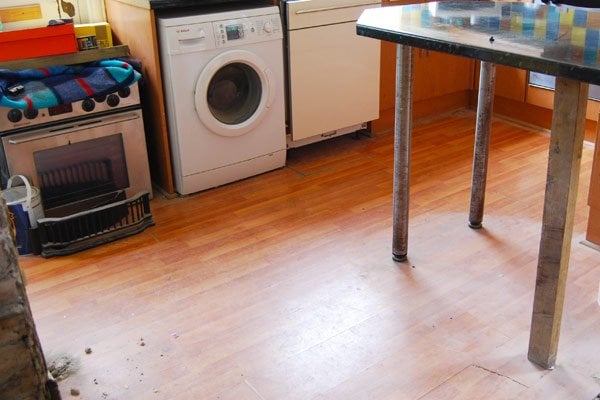
The pictures really don’t show how bad the dirty, sticky and mouldy mess really is. It’s disgusting.
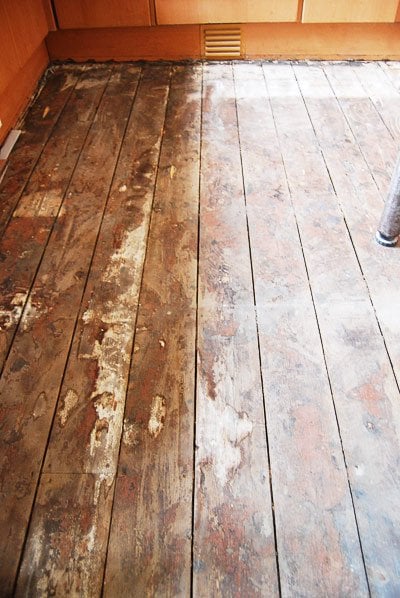
Well no longer! We went completely mad and spent the whole of Friday sanding the floorboards.
The floor was in such an awful state, that we weren’t sure what the floorboards would turn out like. The amount of gunk and dirt made it almost impossible to tell, but we had to do something!
Things didn’t go quite as smoothly as we would have liked and we had a few nasty surprises along the way.
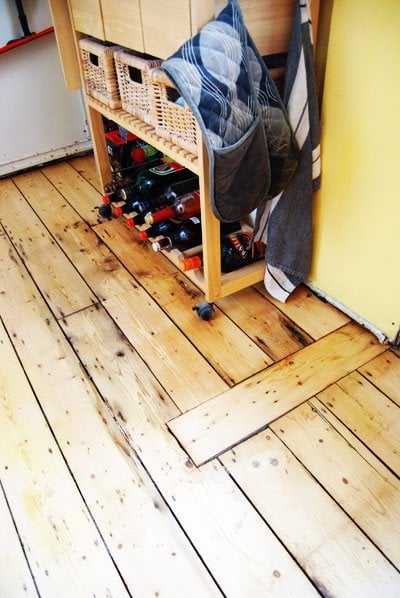
This was nasty surprise number one – Rotten floorboards. Yuk.
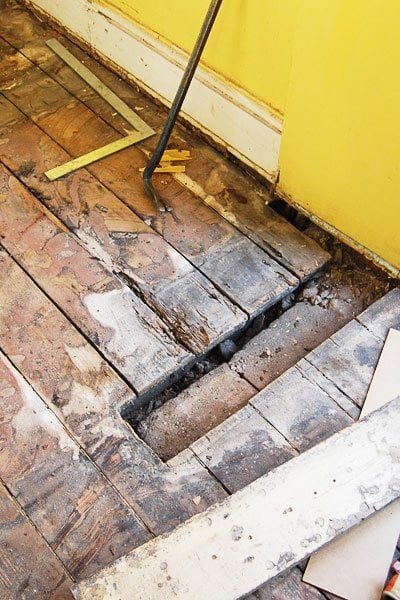
They obviously had to be replaced before we could even consider doing anything else. It turns out that there is a downside to having the original floorboards in the house. Whilst they are a great feature, they are a lot thicker and a bit wider than any modern replacement ones that we can buy.
So, we decided to replace the rotten ones with ones that we ripped up in the small back bedroom. Admittedly, this might not be the most intelligent thing that we’ve ever done, especially as there are now holes all over the bedroom floor!
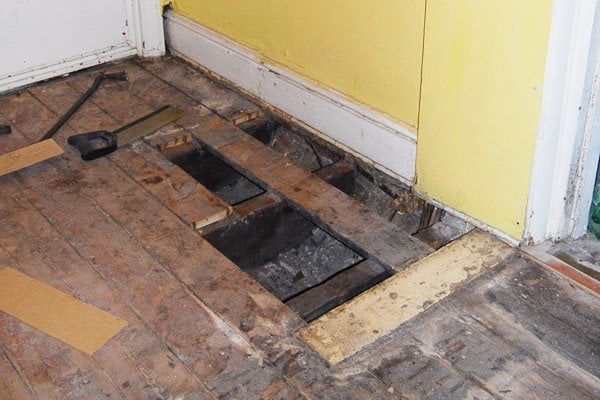
Replacing the boards was actually a lot easier than we’d expected. We just prised up the rotten ones with a crowbar and used a saw to cut them off over the centre of a joint. Then we just needed to cut the replacement to size and nail it into place.
Then we sanded the floor. I started on my own and worked flat out for the first 8 hours before Jan had time to help me for the final three hours.

While sanding, we came across our second nasty surprise. Woodworm.
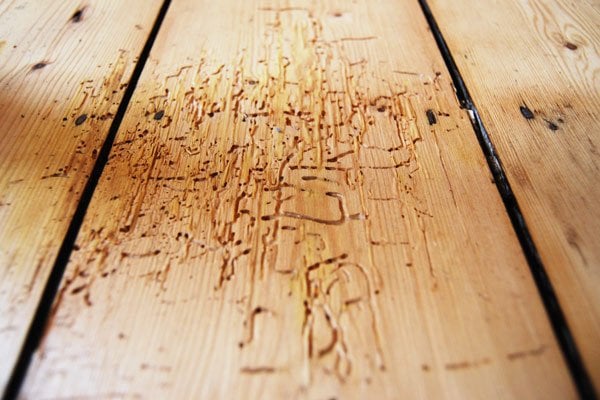
At first, it was just a really small patch, but as we sanded the floor, more and more areas popped up. We’ve not done anything about it yet, but we’ll definitely have to look into it in the future.
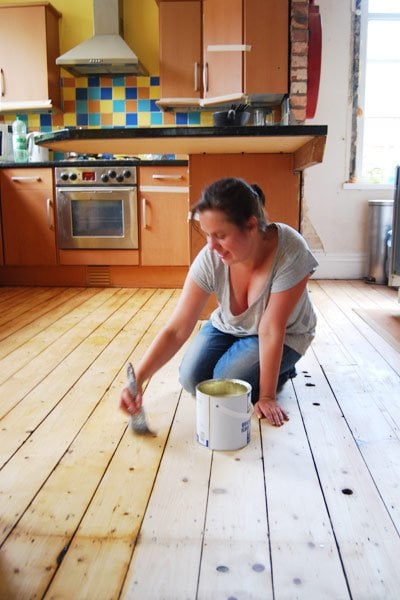
After hours of sanding, we were desperate to get the floor finished and with the last rays of daylight, we applied three coats of varnish to the floor.
We’re still concerned about how well the floorboards will hold up in the kitchen, but it’s such a huge improvement on before and there was no way we could have left it as it was.
Even the patched up area where the floorboards were rotten doesn’t look too bad.
The dining room and kitchen also feel much more like one room now, as the finished floor goes seamlessly from one area to another.
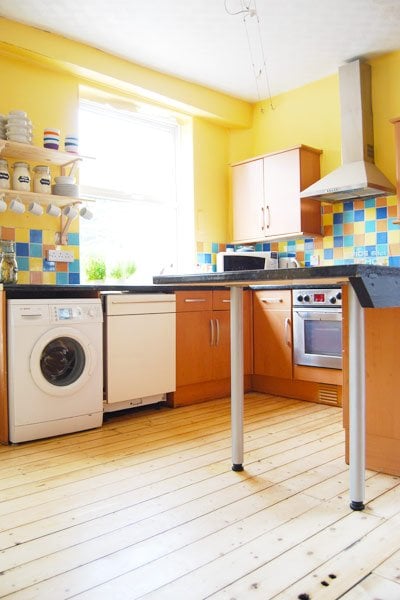
For the first time since moving into our home, I feel like I can walk barefoot around the house without catching some yucky infection! It’s all just so much cleaner and brighter.
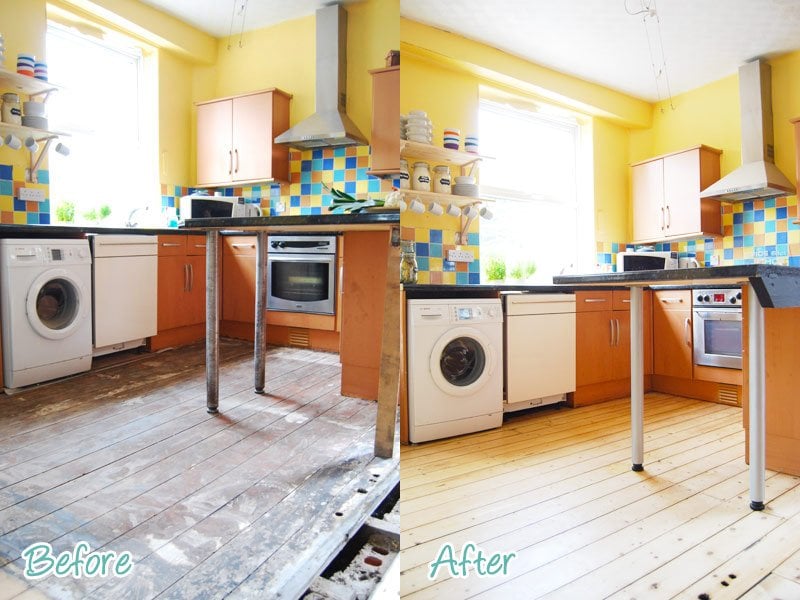
Considering the state of the floor before, we’re really happy with how it turned out.
Have you ever had a woodworm problem? Any ideas on how to treat it?
Alice says
Hiya, we have just sanded our floorboards and also discovered woodworm scars. Did you ever decide to fill yours in? And if so do you have any advice on the best method? Thanks, Alice
Christine says
No, we left ours as they were. We only had a couple of spots where there had been a bit of woodworm and decided to leave it as it (partly because we’d planned on ripping out the whole kitchen including the floor at some point). For us, it was part of the history of the house and didn’t really bother us. If you do decide to fill the holes, I’d recommend using a flexible filler as the floorboards will inevitably move slightly and you need the filler to be slightly flexible otherwise it’ll start to break. I’m sure their are some products available that are specifically for floors but we never used any.
Hope that helps a bit, Alice and good luck with your floors!
Cx
Nicola Le Rougetel says
Hi Christine
Such a helpful blog – thank you! I’m thinking about sanding our pine Victorian floorboards as they are covered in heel marks and really visible (but I think dead) woodworm. I just wondered, do you think sanding improves or worsens the appearance of the woodworm? We also have big black splotches all around the old nails (I’m guessing they got damp?)-is this something that also stays after sanding?
Your thoughts much appreciated!
Cheers, Nicola
Christine says
Thank you, Nicola! The heal marks should disappear but the woodworm will probably end up looking worse. We had a similar situation in the kitchen and, as most of the woodworm is in the wood, the more of the floor we sanded the more visible it became.
On the plus side, I assume that the black marks around the nails will disappear, too.
Hope that helps but let us know if you have any other questions!
Cx
Vanessa says
This is a huge improvement and although the worms are probably not the best, it’s provides an interesting unintentional design on the floor.
Christine says
Yep, it really couldn’t get much worse, could it? Varnishing the floor has essentially killed any woodworm, so nothing to worry about!
Cx
Anyssa says
I’ve read all your blog posts about sanding the floor (looks amazing!) but can’t figure out if you sanded between varnishings. Did you?
Christine says
Thanks, Anyssa! Normally we would sand between varnishing but because it’s the floor we didn’t bother. Yes, it’s the silky smooth finish you get when you sand between coats of varnish but we figured that it’s only the floor and that we wouldn’t be touching it too much.
Cx
Me says
Very nice. Would love to know about the sanding and staining process though. Details? Thanks!
Christine says
Thanks! It’s such an improvement on the horrible laminate flooring that used to be there. We shared a long post on how we sanded the floors here. None of our floorboards are stained, they’re just varnished with clear varnish (Granwax Aquathane in Satin).
Hope that’s some help!
Cx
Aaron FitzGerald says
Hi Christine, your floors look great, well done! I noticed you decide not to fill the gaps in your floorboards. Was this because you preferred the natural look? I’d like to leave my gaps unfilled as they aren’t too wide, just 2-3mm at worst. I’m a bit concerned about all the dust and dirt that will disappear down them though, especially in the hallway. Any tips or experience on that front?
thanks,
Aaron
Christine says
Thanks Aaron! We didn’t fill the gaps for a few reasons. First of all we couldn’t decide on a method. Some say that you should fill the gaps with a mixture of glue and sawdust (from the floorboards), but we heard that over time the mixture in the gap will come loose and fall through. Other methods include cutting thin strips of wood to fill the gaps (which sounds like a lot of work) or there are specialised products available (which can be expensive).
But overall we didn’t fill the gaps because we like the natural floorboard look. We’ve also insulated under our floors, so don’t need to worry about draughts.
Unless you’re a complete clean freak, I wouldn’t worry about the dirt and dust. Of course there is some, but you don’t really see it in the gaps as they are fairly dark. More importantly though, it just gets sucked up like all of the other dust and dirt when vacuuming.
Hope that’s some help!
Cx
Leslie Porter says
This project is absolutely so impressive. Two thumbs up for this. Hardwood floor maintenance is indeed so important in order to avoid scratching and dirt to settle in it that would make it dull and ugly. Floor sanding is so beneficial when it comes to floor maintenance. This helps in restoring floors without replacing everything. And what is more interesting about this, this can be done with low cost. This is one way of making floors beautiful again with less hassle of course.
Louise says
Good choice, and impressive carpenting. All the rest actually looks better now, not worse, so I guess that effect can go both ways? Now it looks more like a happy colorful kitchen rather than a kitchen trying to faults with eye-catching paint. The woodworms are most likely gone, you can mix wood-glue with sawdust to make an invisible filler in the same color. It will show a bit but not so much after the varnish.
Christine says
Thanks Louise! We also think the room looks so much nicer, at least the awful floor isn’t the first thing you notice. The biggest difference to us is that it’s so much cleaner now. I know that sounds weird, because we’d obviously cleaned the kitchen a lot, it just feels so much better.
Cx
Sarah says
The before and after are night and day! That floor looks great!
Christine says
Thanks Sarah! We’re really pleased with how it turned out – especially considering the state it was in before.
Cx
Magali@TheLittleWhiteHouse says
You did an amazing job. And it gives me hope as I would like one day to remove whatever is on the upstairs wood floor in my cottage. Everybody says I’m nuts and the floor will be ugly, but I know you can make it beautiful.
I bought a shelf eaten by woodworms, so if you find a natural idea to get rid of them, please share!
Christine says
Thanks Magali! It seems like wooden floorboards are really forgiving, so it sounds like yours could come up fine, too.
I’ll keep you posted on the woodworm
Cx