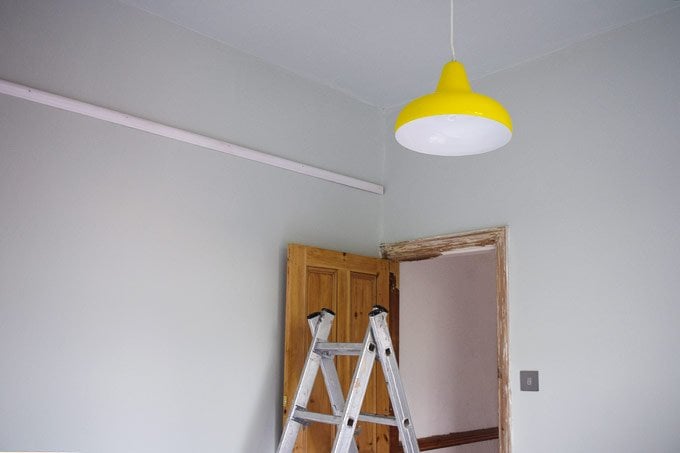
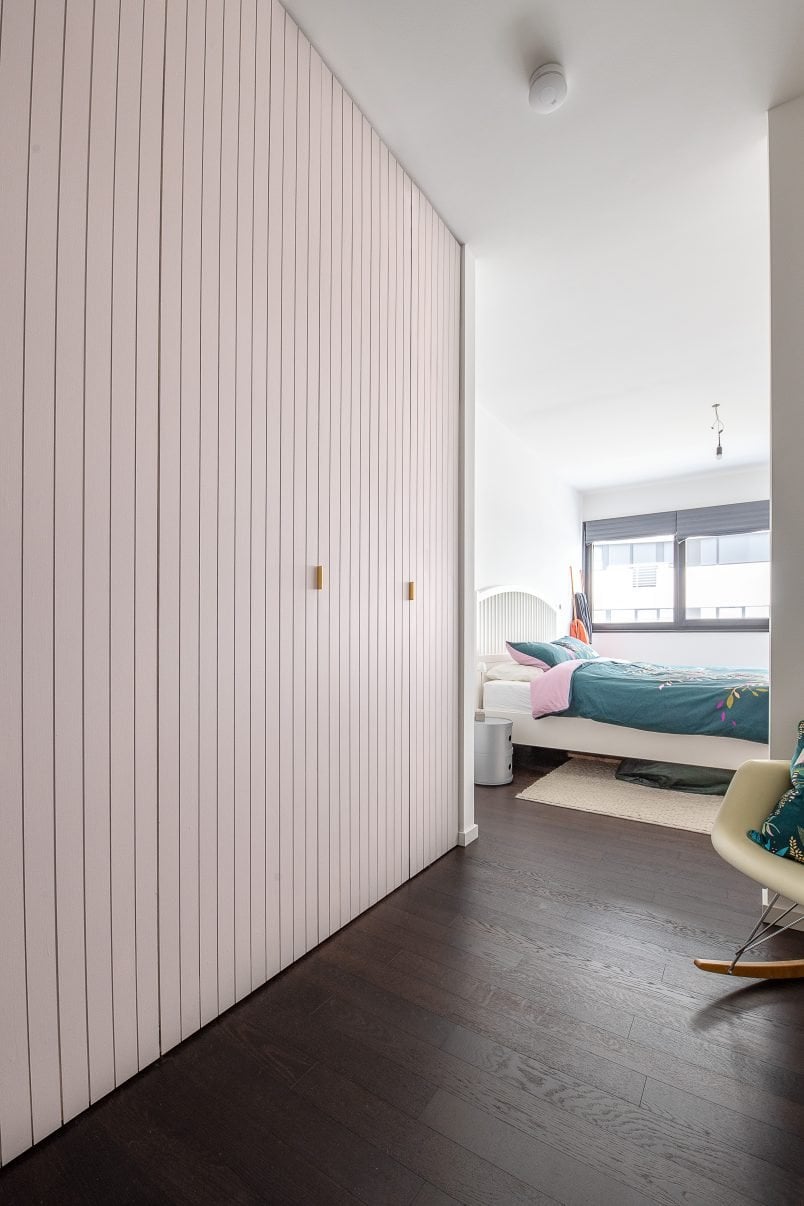
A few months ago we first revealed our newly plastered and painted fourth bedroom. We’re really happy with how it’s turning out and have now finally started to add a few finishing touches.
Whilst I’m in general happy with how the room is turning out and with the ceiling being the same colour as the walls, something just didn’t feel 100% right in this room.
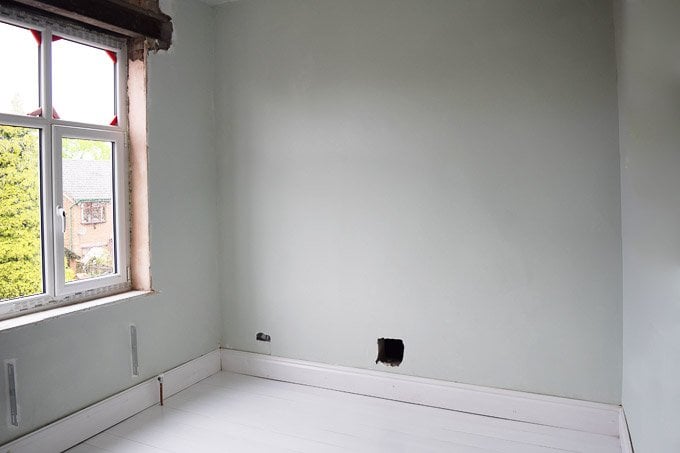
The bedroom would have originally had a picture rail (we saw the line where it had been before we replastered the room) but because we were worried that having a picture rail would accentuate the uneven ceiling, we had initially decided not to reinstate it in the room and instead paint everything including the ceiling the same colour.
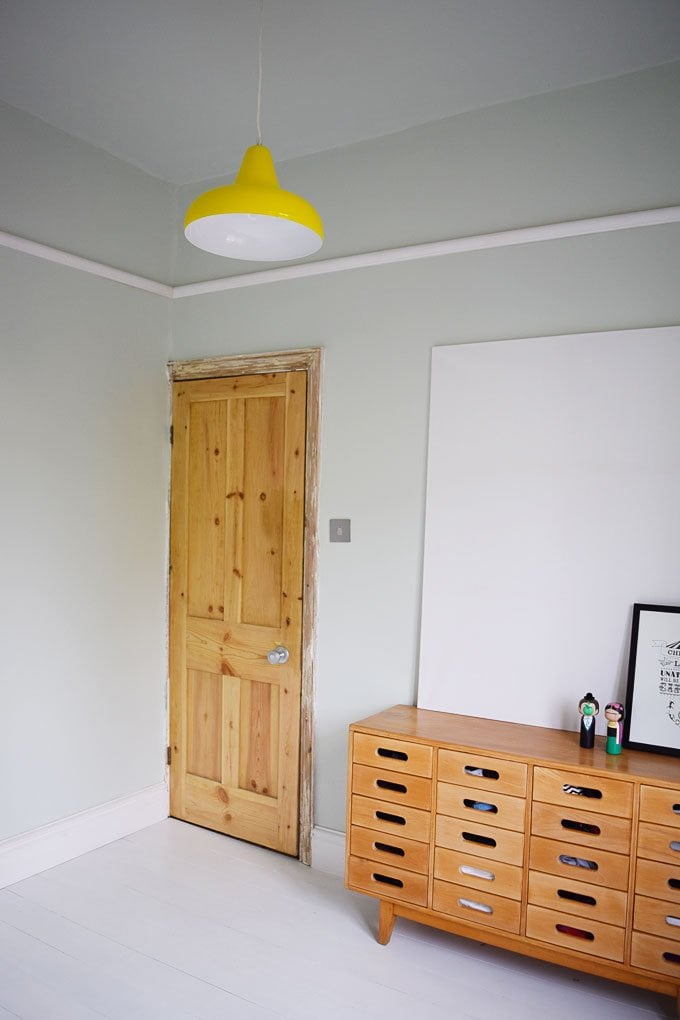
We’ve considered painting the ceiling white – which we still may do, but the one thing that we did feel was missing was the picture rail that we had originally discounted. All of the rooms that we’ve added it to, just have a much more finished feel to them and it’s also something that’s in keeping with the period style of our home.
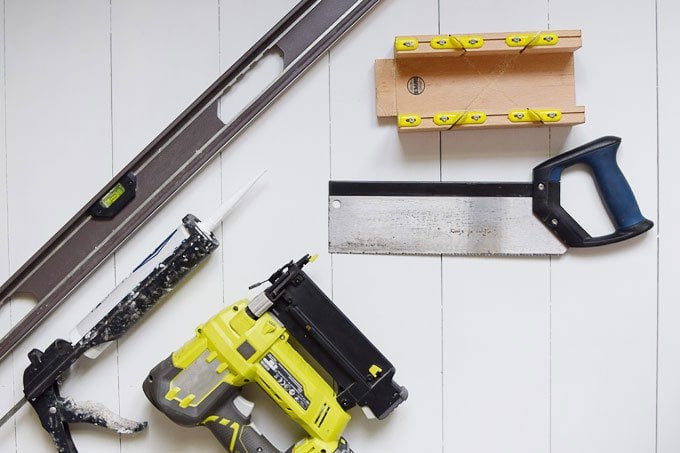
If you’re thinking of installing a picture rail, this is what you’ll need:
This post contains affiliate links. We only recommend products we love and think that you will, too! Read our full disclaimer here.
- Picture rail moulding
- Tape measure
- Nailer & nails or No-Nails
- Spirit level or a laser level
- Saw & mitre box or mitre saw
- Caulk & caulk gun
- Picture rail hooks
This is how to install a picture rail:
1. As always when doing any DIY, preparation is key to achieving a great finish. Make sure that the walls where you’re adding the picture rail are clean and free of wallpaper.
Any repairs or plastering should also be done before you add your picture rail. We also decided to paint our walls and paint the picture rail before attaching it. This way, you’re guaranteed a perfectly clean edge.
2. Measure your wall (start with the longest one) and then transfer the measurement to the piece of the picture rail. Double-check your measurements before cutting it to size.
3. To cut the necessary angles at the ends of the pieces of picture rail, use a mitre box and a fine saw or a mitre saw.
If you only have a few pieces of picture rail to attach, a mitre box and handsaw are more than enough to complete the job. We would however recommend investing in a mitre saw. Our budget-friendly mitre saw is easily one of our most used tools and we highly recommend it.
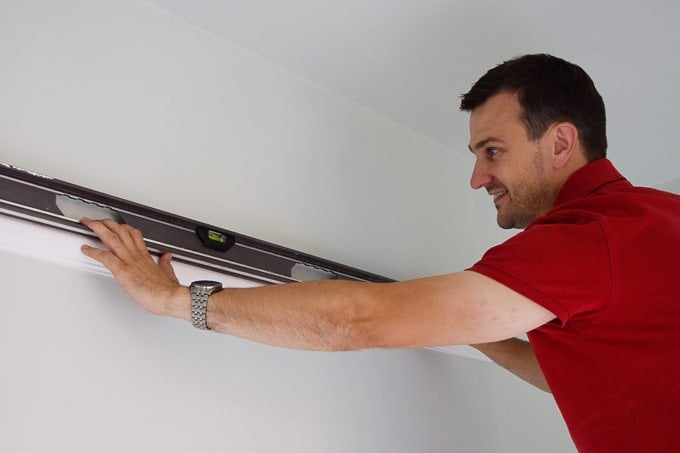
4. Hold the picture rail (get someone to help you) in position and use a spirit level to make sure that it’s perfectly level.
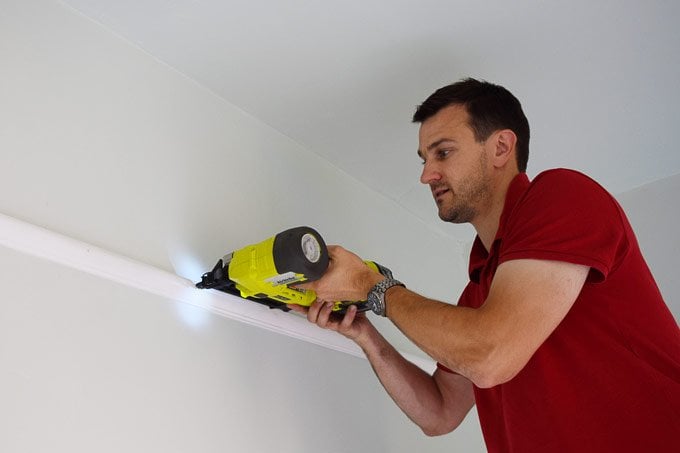
5. When it’s level either nail or glue it in place. If you’re nailing the picture rail, apply some glue to the back of the picture rail, place it against the wall and add a nail about every 50 cm. If you’re just using glue, you should spread an even zig-zag pattern over the back of the picture rail and press it firmly in place.
If you live in an old house, we recommend nailing the picture rail moulding in place as it’s likely that your walls aren’t straight and you have to firmly press the picture rail moulding against the plaster walls for it to stay in place. You can hold the picture rail while the glue dries, but nailing it in place will make it much easier and quicker.
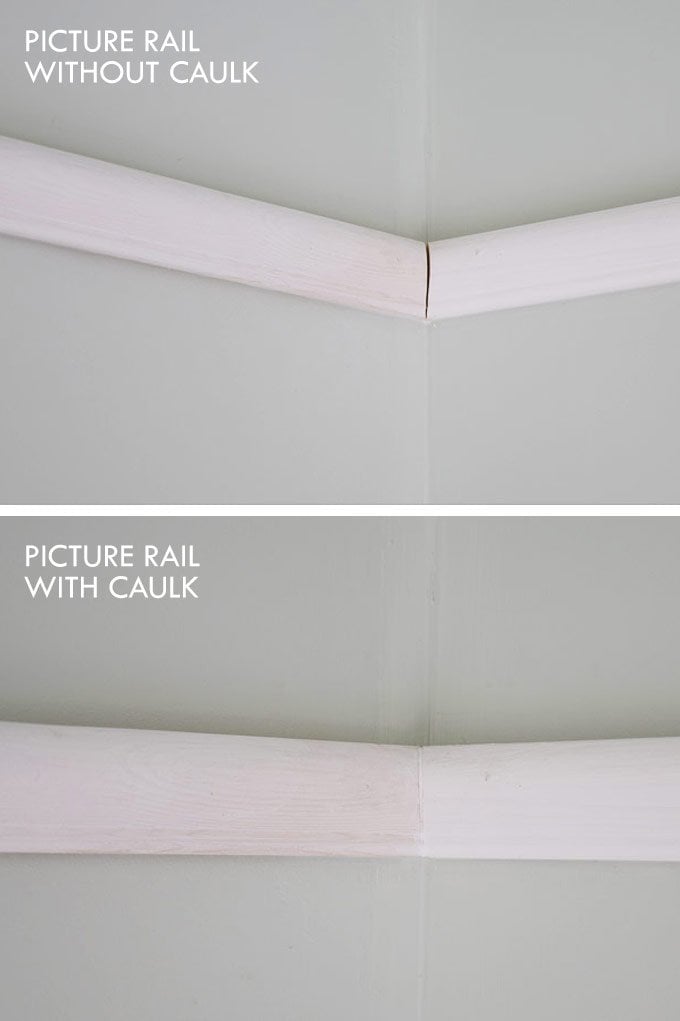
6. Don’t expect the corners in your room to be perfect 90° angles. It doesn’t matter too much if they are slightly off, but it’s worth checking and adjusting your cut if the angles are much smaller or larger than they should be.
Caulk will hide a lot, but it’s good to get your cut as exact as possible.
When applying the caulk to the corners, also fill any nail holes you made.
We’ve used both methods (glue and nails) – to install a picture rail in the past and both of them have worked well for us. Having said that, using a nail gun was much quicker as there’s no need to hold anything in place while it dries.
If you do decide to use a nailer (or nail by hand), don’t forget to make sure that you have no cables or pipes behind where you’re nailing!
How much does it cost to install a picture rail?
If you’re installing a picture rail yourself, it’s a very budget-friendly project to do. The exact cost will depend on the size of your room but as a rough guide, here’s the picture rail installation cost for this room.
- Picture rails | £38
- Primer & paint | £5
- No-nails glue | £8
- Nailer nails | £0.50
Total cost to install a picture rail: approximately £51.50
Top Tips For Installing Picture Rails:
- Paint it before hanging it – will ensure that you have perfectly tidy edges
- If you can, use a nailer rather than glue. We’ve used both methods and both work fine, but nailing is much quicker
- Don’t worry too much about perfect mitred joints – caulk is your friend!
What do you think finishes off a room? Do you love period features as much as we do?
Craig says
Hello
What Nail gun did you purchase for this job? There are so many variations out there. I wish to put up a picture rail and the wall isn’t traditional plaster over brick.
Thanks
Christine says
Using a nailer for this project definitely made it quicker and easier but you could just glue the picture rails to the walls with a strong adhesive, too. We absolutely love our nailer and always recommend it but it is an expensive tool if you’re only using it for one project. This is the nailer that we have and love (affiliate link). Everything we used is also linked in the post.
Hope that helps!
Cx
Thom says
Thank you for such a quick reply! That’s really good news. I have some panelling to tackle if the picture rails go well. I’ll be starting with just one room but have about 60 metres of picture rail to reinstate over time so I think it will be worth the investment; particularly as it is half price at your link and at other locations in the UK at the moment.
Christine says
Sounds like it’ll be a good investment for you – it’s easily our favourite tool and we use it for a lot more projects than we expected.
Cx
Thom says
Hello – this is a really useful post, thank you ever so much. I know this is a terribly old post but hopeful that you can answer a question for me.
It is about your walls and your nail gun. I’m thinking of buying the same gun for installing some dado and picture rails but was concerned that it may not work on solid walls. Are your walls solid or plasterboard? I presume they are solid from the age/era – ours are Edwardian and just wanted to check before shelling out for the gun. Huge thanks!
Christine says
We’re always happy to answer any questions (on any post!)! Yes, our walls were typical solid Edwardian brick and the nail gun we used was powerful enough to nail into the brick. Very occasionally, the nail would hit something where it would bend and not go into the wall but then it was just a matter of pulling it out and adding another nail just next to it.
Earlier this year we added panelling to our guest bedroom walls (https://www.littlehouseonthecorner.com/how-to-plan-and-install-panelling/) and we used the nail gun for that, too. Our walls at the moment are also brick and again it wasn’t a problem.
This is the nail gun (affiliate link) that we have and we absolutely love it. We use it for a lot of projects but it is an expensive tool and a bit of an investment.
Hope that helps and happy DIYing!
Cx
Gene says
My concern is how to place rail on the saw for corner cuts. Does the back go against the saw fence? Are corners cut upside down or the reverse? Which direction for inside corners and outside corners?
Christine says
It often helps to cut yourself a test corner to get your head around how the pieces go together. You can then use it as a reference.
For outer corners, you’re basically cutting the picture rail at an angle so that the front of the rail is longer than the back and for inner corners, it’s the opposite (the front is shorter than the back).
Hope that makes sense!
Cx
Michelle says
I want to back the original picture rail up in my guest bedroom, but I don’t have the original marks from where it originally was. Can I ask what the measurement is from the ceiling to the top of your picture rail? Looks really lovely it would really add the finish touch to my room!
Christine says
I’d suggest attaching it at a height that feels right to you, Michelle. I’ll depend on the overall proportions of your room but as a rough guide, our picture rail was about 50cm from the ceiling (with 2.8m high ceilings).
Hope that helps!
Cx
Steve Munslow says
But what if you have heavy pictures, old ones in ornate gesso frames? Is glue enough to hold the rail in place? I can’t thinking a lot of people put picture rail up as a purely visual thing.
Christine says
The glue is surprisingly strong and we had no pictures hanging pictures from our picture rails. Having said that, if you’re hanging something really heavy from your picture rail I’d probably add a nail or two.
Cx
Jane says
Great simple post. It is giving me the confidence to take the plunge and try to hang picture rails myself – especially the caulk tip, as mitring for the first time seems unlikely to be 100% accurate. Do you know what length nail you used? I’m thinking of purchasing a nail gun – a cheap one goes up to 35mm nails – would that be sufficient? I am new to diy – only tackled painting before – so don’t think I can justify an expensive gun at this stage.
Christine says
Thanks Jane. I completely agree with you about the nailer – we didn’t get ours till after 5 years of DIY (although we do wish we got it sooner). The nails we used are 50mm and if I’m honest, I don’t think that 35mm would be quite enough to hold it in place well. Our picture rail is 21mm tick at the widest point which would probably mean that a 35mm nail wouldn’t be long enough to go through the wood and plaster and into the wall.
Having said that, most of the other picture rails are glued to the wall with Nonails. Whilst it did take a lot more time waiting for the glue to set, it worked fine, too! We glued the picture rail in our guest bedroom – you can see the post about it here and more picture rail glueing here .
Oh, and for when you’ve installed your picture rail you can find our tips on clean caulking here.
Hope that’s some help! Good luck with your project!
Cx
Jennifer says
Hi! I’m hoping to add picture rail to my house too, but no stores nearby sell it. I will probably have to take a couple different mouldings and cobble them together to get the same effect. Yours looks lovely!
Christine says
Thanks Jennifer! We love how it finishes off the room, but if you can’t get hold of picture rail moulding (most DIY stores in the UK stock it), I’d suggest getting some little picture rail hooks before you start the project to make sure that they will fit over the moulding you’re attaching.
Cx
Naomi says
Great blog, I stumbled on it last night and was up until past 2am reading over a lot of your projects. I have to replace part of a picture rail and skirting and wondered what the make and model is of your nailer? Also slightly off topic but do you remember the colour and brand of wood stain you used on your hallway stairs makeover please?
Christine says
Aww, thanks for the compliment, Naomi! Our nailer is by Ryobi. We’re really happy with it, but it is by far the priciest tool that we own, so probably only an investment if you’re doing a lot of DIY (having said that, we use it more than we ever thought we would and love it).
The stain in the hallway is Fiddes Non-Grain Raising stain in Mahogany.
Good luck with your renovation!
Cx