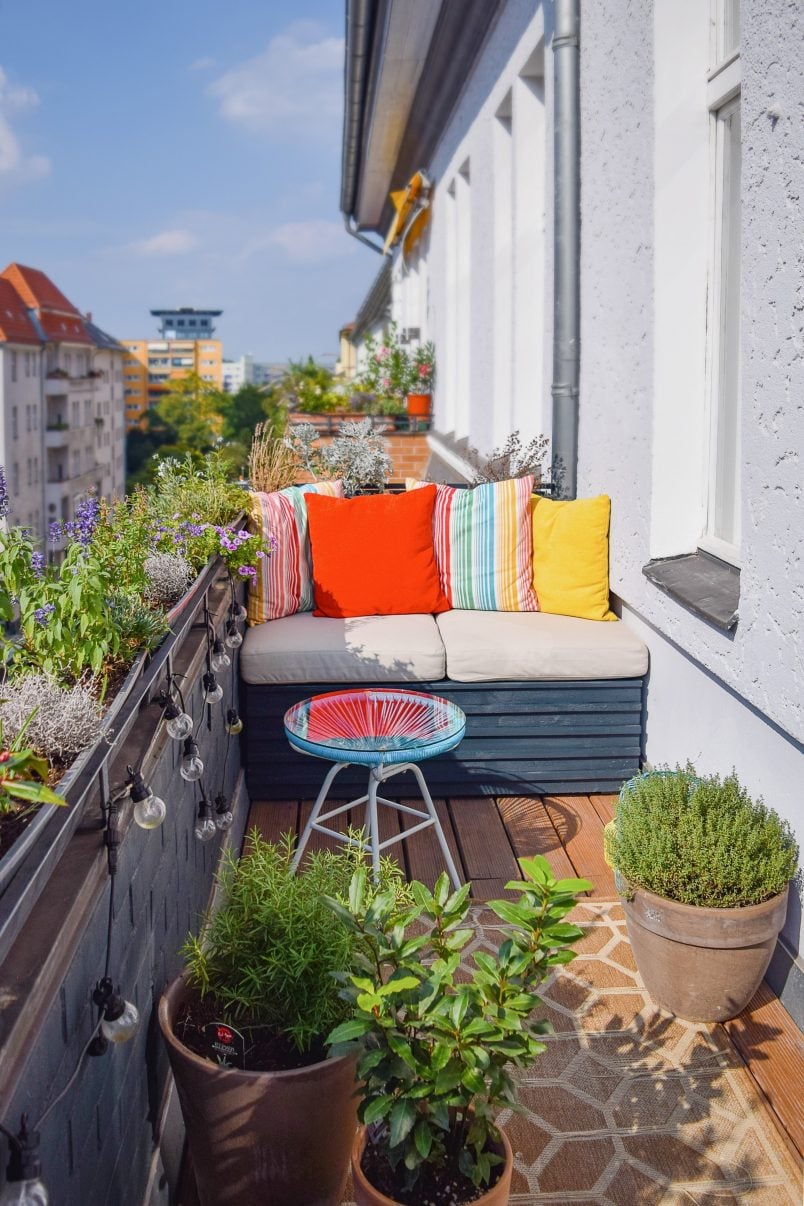
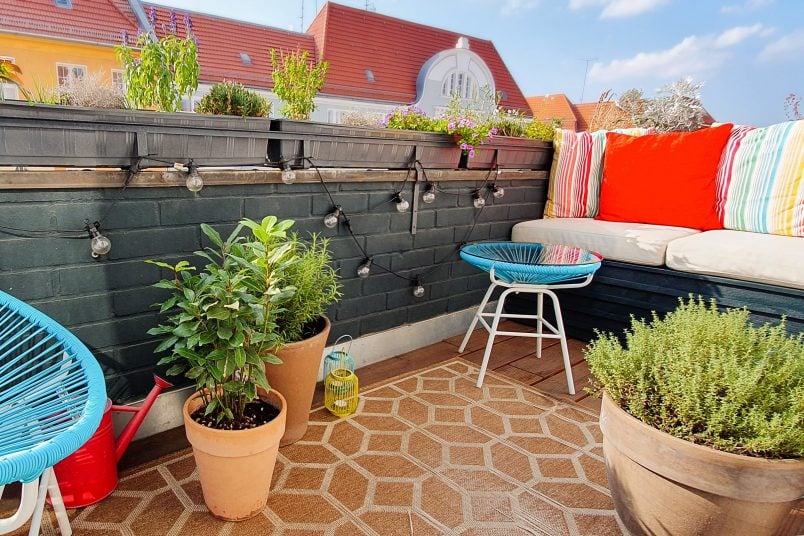
It’s always amazing how a few small changes can make such a big impact to how you use a room or space and our new DIY outdoor sofa is definitely one of those projects that has made a massive difference!
Autumn may be on the way, but we’re making the most of the last of the sunny weather and have already been spending much more time outside enjoying our new outdoor sofa while having a couple of alfresco drinks in the sunshine.
![]()
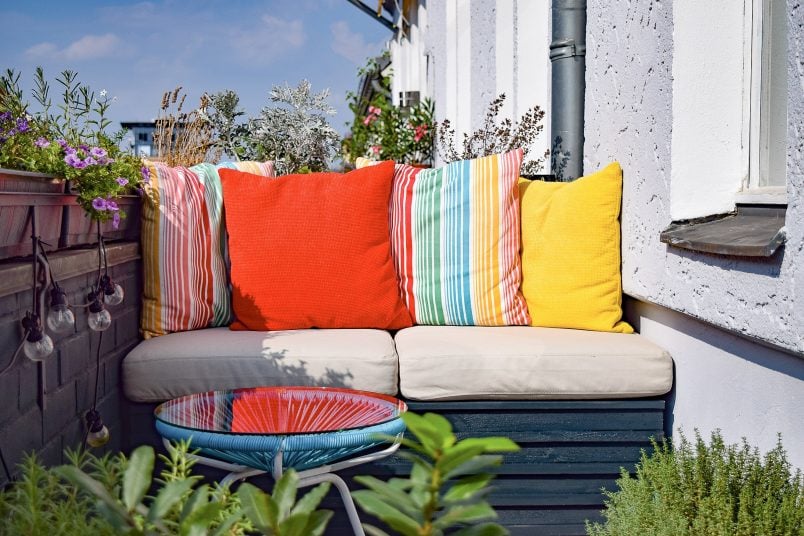
It’s a super comfortable place to relax on our sunny balcony and it gives us some much-needed hidden storage space, too!
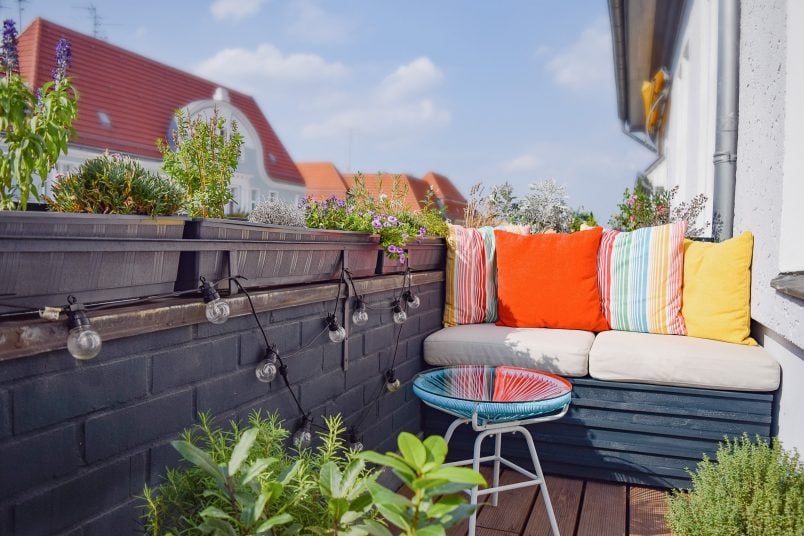
Like most of the projects we share, it was super simple and easy to build! Our sofa fit’s exactly into the narrow balcony space but you can obviously adjust the measurements to suit your garden or balcony. After all, that’s the beauty of DIY!
If you’d like to build your own DIY outdoor sofa with hidden storage, this is what you will need:

*This post contains affiliate links. As always, we only recommend products we love and think that you will, too!
Tools:
- Mitre Saw (or a fine saw if you prefer to saw by hand)
- Nailer & Nails – there isn’t a huge amount of nailing involved so you could easily use a hammer and nails instead. We absolutely love our nailer and would totally recommend it if you’re planning on DIYing regularly!
- Tape Measure & Pencil
- Paintbrush
- Optional: Cordless drill (if you’re nailing by hand this might be a good alternative)
Supplies:
- Timber – For a bench that’s 120cm x 60cm (Make sure to use timber that’s suitable outdoors!)
- 1 x Post – 2.5m x 7.8xm x 7.8cm
- 6 x Slatts (for the sides of the bench) – 2.5m x 4.8cm x 2.4cm
- 4 x Slatts (for the sides of the bench) – 2.0m x 4.8cm x 2.4cm
- 5 x Slatts (for the sides of the bench) – 2.0m x 3.8cm x 2.4cm
- 3 x Slatts (for the top of the bench) – 2.5m x 10cm x 1.8cm
- 1 x Slat (for the underside of the top of the bench) – 2.0m x 10cm x 1.8cm
Tip: As you can see, we bought different sized slats to minimise offcuts and reduce the amount of waste. The exact measurements will obviously depend on the size you’re building your bench and what supplies are available in your area!
- Nails (we used 50mm long nails)
- Sandpaper (around 120 grit)
- Cushions – We used Duvholmen from Ikea
- Paint – we painted our bench to match the colour we already painted our brickwork
This is how to build a DIY outdoor sofa:
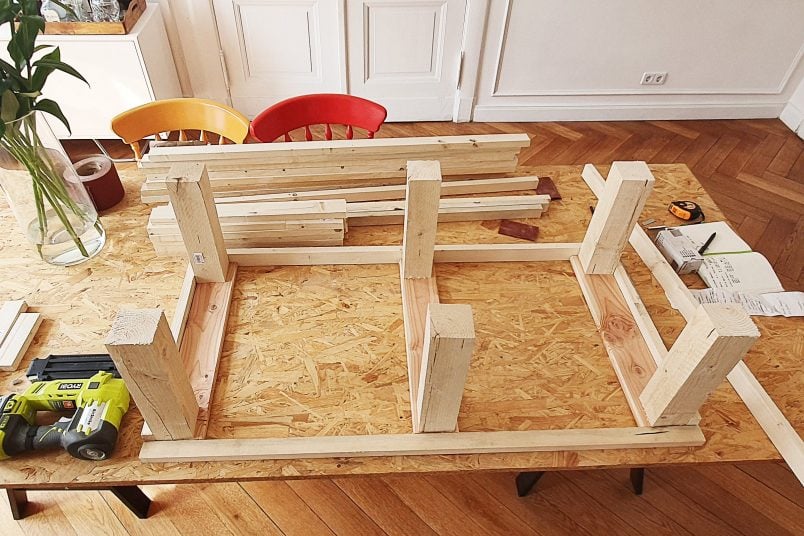
1. Measure, Cut & Sand
Start by cutting all of your pieces of timber to the sizes you need. If you’re using the same measurements as we did you’ll have to cut as follows:
- Cut the post (2.5m x 7.8xm x 7.8cm) into 6 x 34.6 cm long pieces
- Cut the 6 slats (2.5m x 4.8cm x 2.4cm) for the sides of the bench into 12 x 1.2m pieces
- Cut the 5 slats (2.0m x 3.8cm x 2.4cm) for the detail in the front side of the bench into 5 x 1.2m pieces
- Cut the 4 slats (2.0m x 4.8cm x 2.4cm) for the sides of the bench into 15 x 53.8cm pieces
- Cut the 3 slats (2.5m x 10cm x 1.8cm) into 6 x 1.2m pieces
- Cut the 1 slat (2.0m x 10cm x 1.8cm) into 3 x 35.8cm pieces
I know it sounds complicated but you’re basically just cutting all of the pieces of timber into a load of lengths.
We used our mitre saw for all of the cutting. It’s easily our most used DIY tool and it’s a tool we always highly recommend as it’s invaluable for so many projects! Apart from our cordless drill (we have this one and love it!), it’s easily our most used tool!

After cutting all of the pieces give each edge a sand to remove any rough edges. Don’t skip the sanding – after all, you probably don’t want to end up with a splinter somewhere sensitive when you sit on the sofa, do you?!
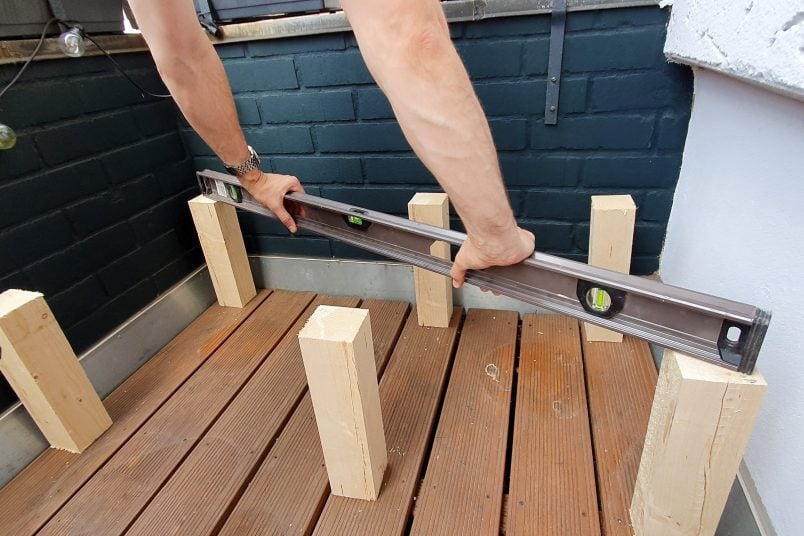
If you’re installing your sofa in a specific spot, it’s also a good idea to make sure that the tops of the main sofa supports are level in situ. The decking on our balcony is really wonky, which is why we had to shorten two of the supports slightly to make sure we’d end up with a level surface to sit on.
2. Assemble
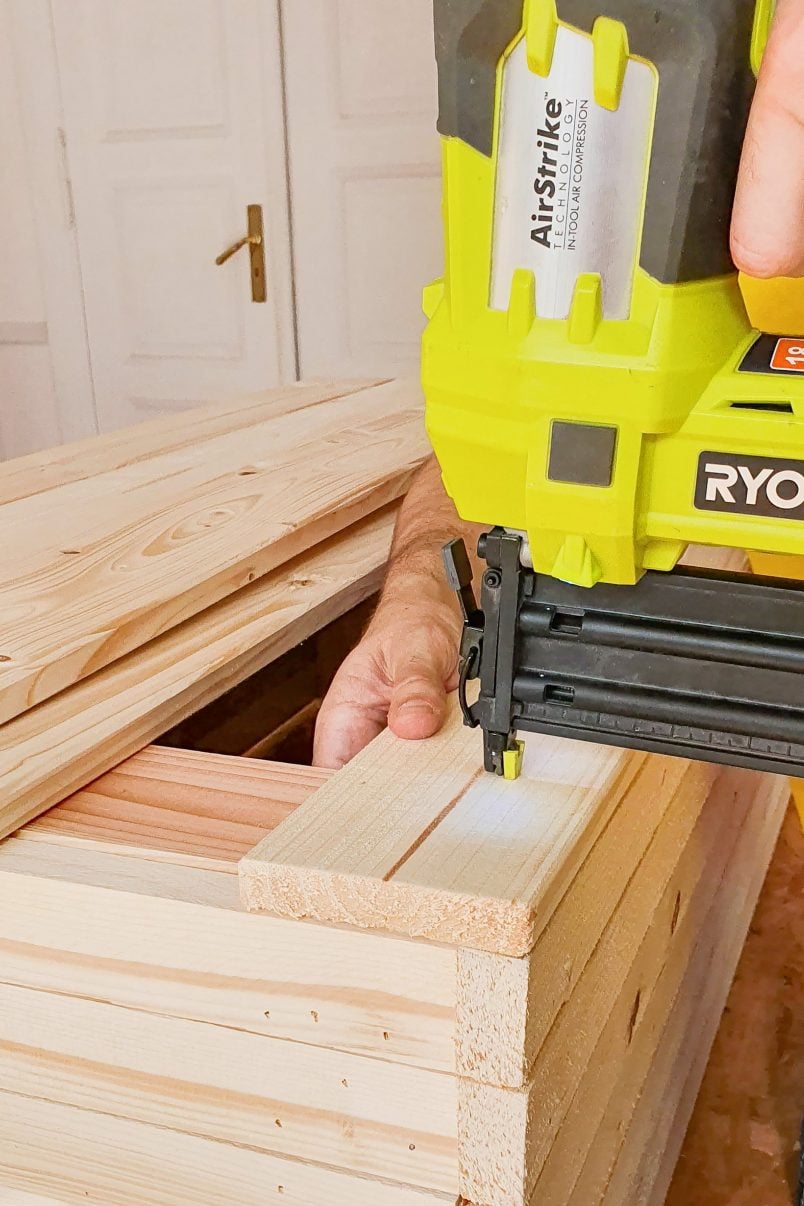
After cutting all of the slats, it’s time start to assembling the DIY outdoor sofa! Lay out the four main posts on a flat surface and then start to nail the slats to the posts.
For this, pretend that your sofa is upside down (which means you start nailing the top row of slats first). Then, nail the full first row of slats all around the main support posts.
Don’t forget to lay the three support pieces that will later be part of the lid of the sofa under the main support posts. This is so that the top of the slats that you’re nailing around the sides of the sofa will ultimately finish just under the edge of the seat.
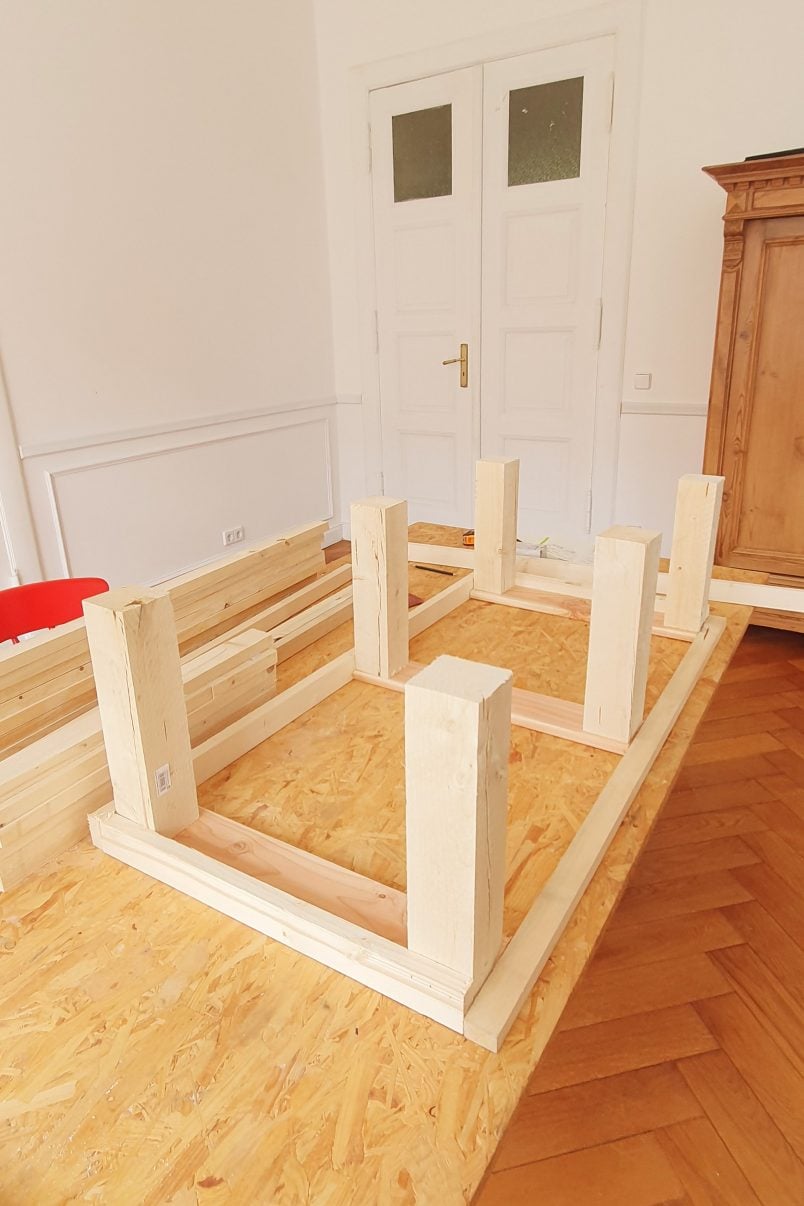
The two shorter sides should finish flush with the sides of the posts and the longer slats then finish flush with the outer edge of the slats.
Work your way around the sofa attaching row after row of the slats. The finished sofa will have 3 flat sides (the back and the short sides) the design of the front of the bench is however slightly different as we alternated the short and long side the panels to create a pattern and texture.
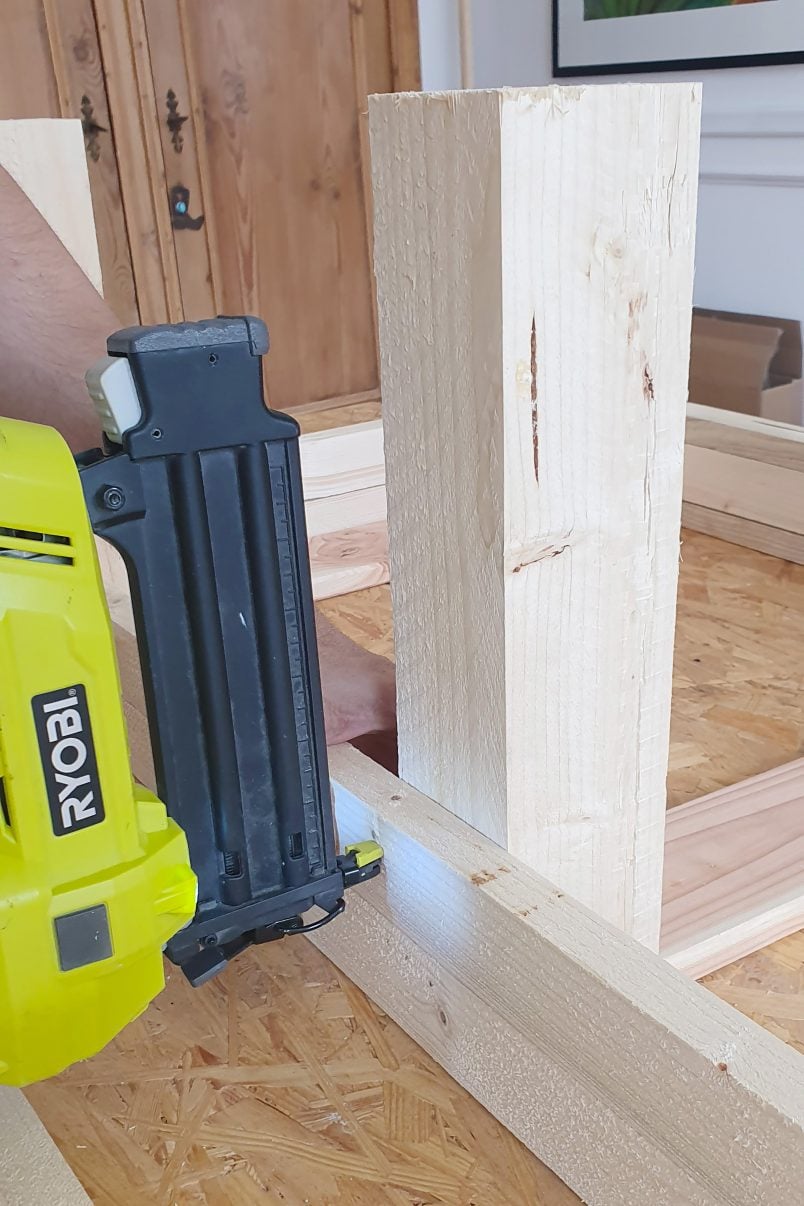
For this, we used two different slats. Both are 2.4cm thick but we installed one panel on its side to achieve the wavy front of the sofa. (The slat we nailed on its side is slightly less wide (it’s 3.8cm) just so that it doesn’t protrude too far out.)
All of the slats that are flat against the sides of the sofa are nailed straight through to the supporting posts. To be able to attach the slats that you’re installing at a 90° angle to the other slats, you’ll have to nail through them from the top and attach them to the other side slats you’ve already attached.

I’ve probably made all of this sound a lot more complicated than it is. Basically, you’re just nailing pieces of timber to the sides of the main sofa supports!
If you decide to build a pattern on the front of the sofa as we did, I’d definitely recommend checking that you start with the right type of slat first. We accidentally started with a slat that’s on its side but we should have started with one of the slats that’s installed flat against the supports.
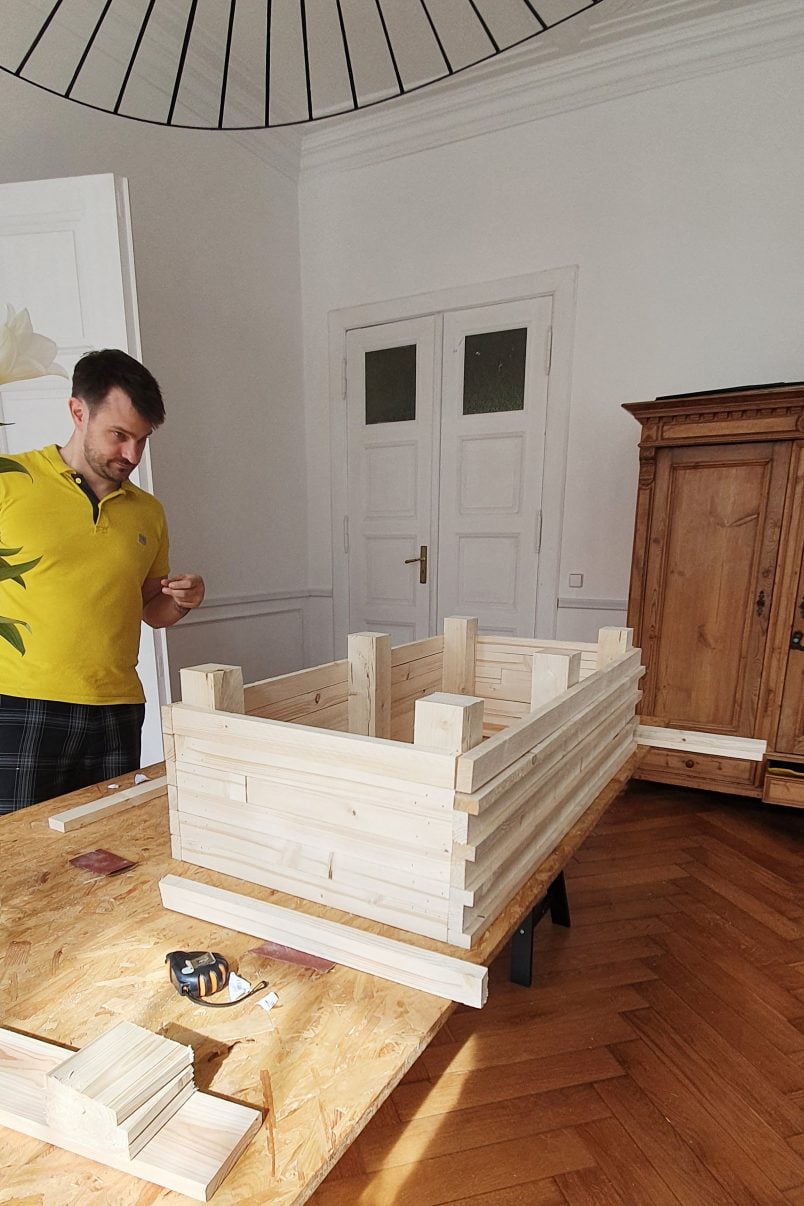
As you can see by the look on Jan’s face, he wasn’t exactly impressed when we realised our mistake and had to take all of the front panels off and reattach them again. Whoops!
When you’ve attached all of the sides you can build the top of the sofa. Swivel the whole thing around (remember, you were building it upside down) so that the top of the sofa is now on top and lay the 3 slats that will from the supports of the seat across the main support posts. They should finish flush with the top of the outer cladding.
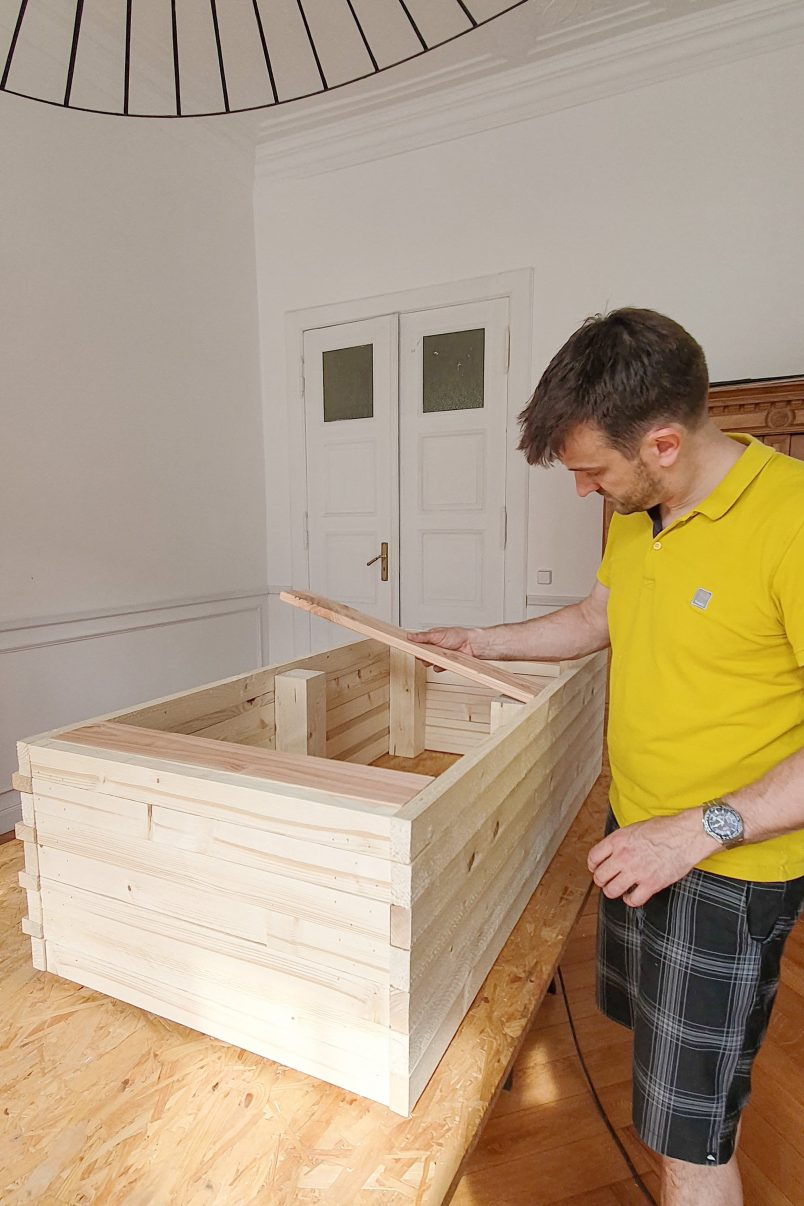
Then, lay the long pieces of timber that will form the actual seating area across them and nail them into place. Just make sure not to nail through to the main supports!
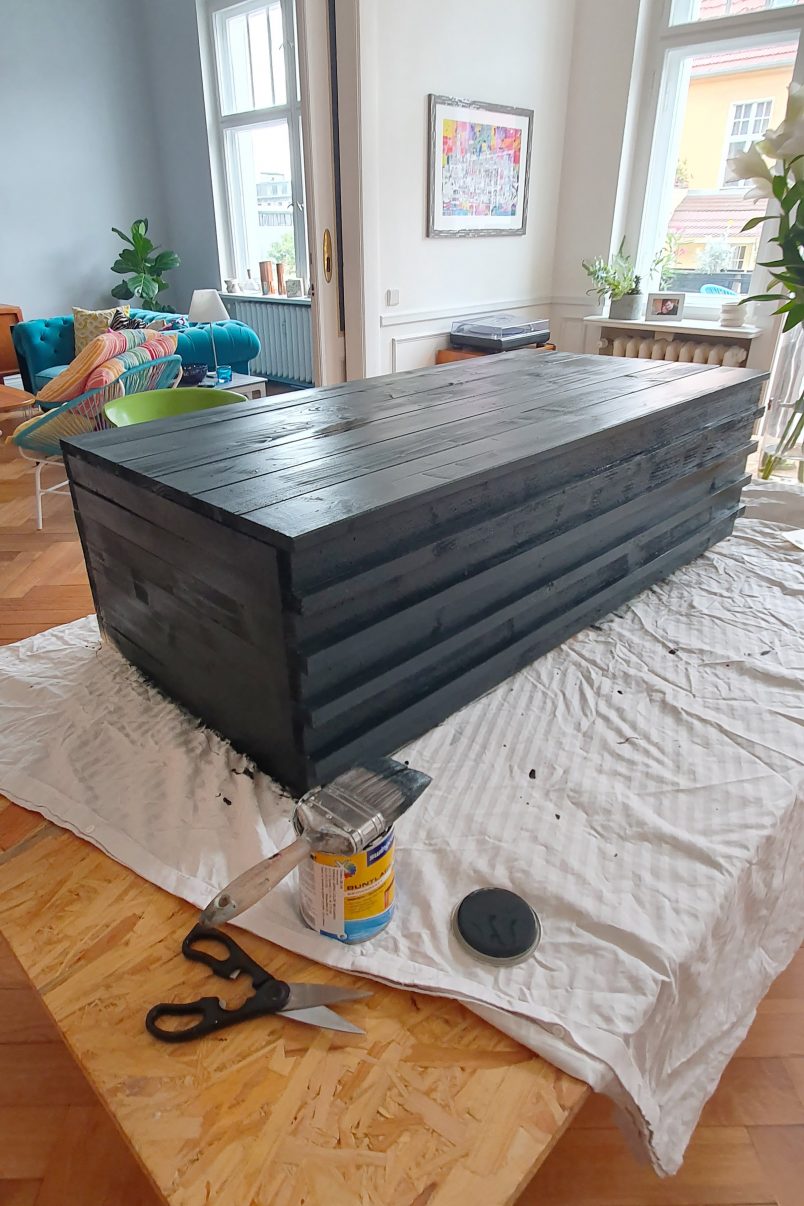
3. Paint
After nailing everything together, the DIY outdoor sofa is complete! All that’s left to do is give it a coat of paint!
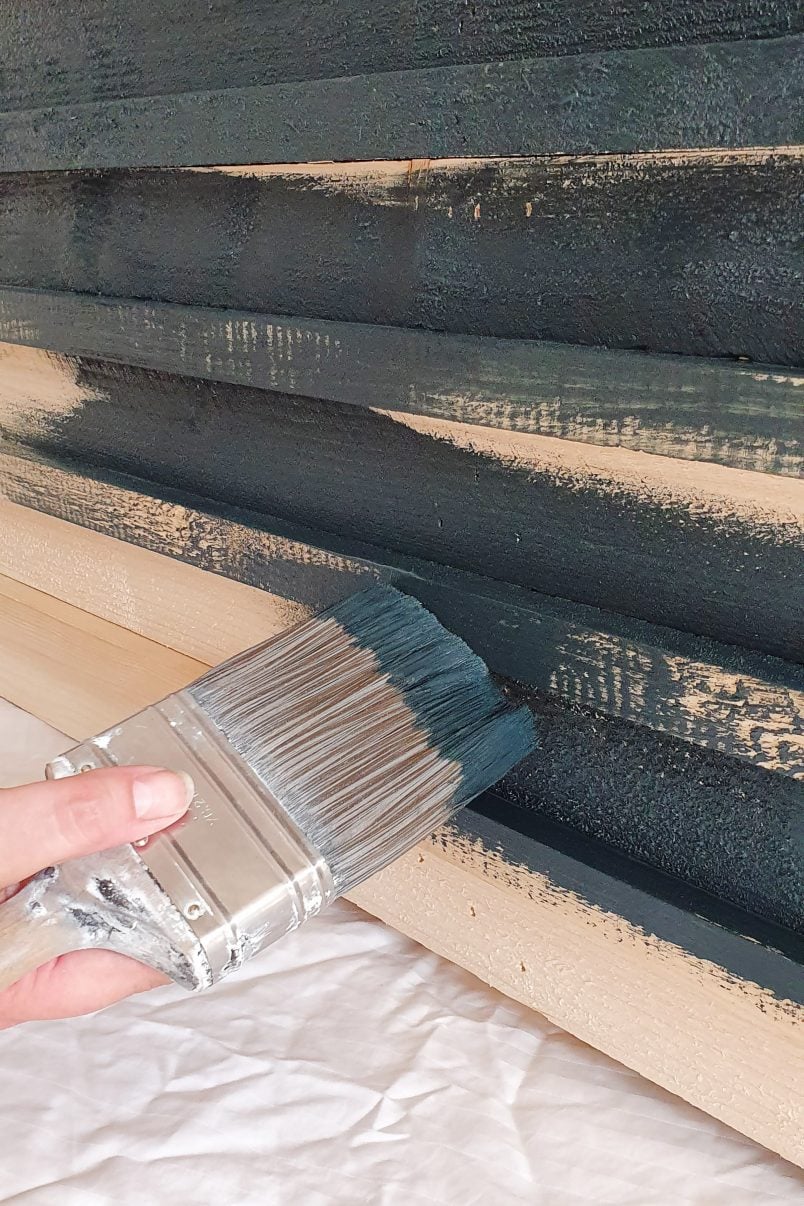
We wanted our bench to blend into the rest of our balcony which is why we used the same colour we painted the balcony brickwork. Obviously, the colour choice is up to you, just make sure that you choose a paint that’s suitable for outdoors.
4. Enjoy!
I absolutely love how this DIY outdoor sofa turned out and it’s really made our balcony much more functional. We actually had people round just after finishing the build (yep, there’s nothing like a bit of pressure to get a project finished) and it worked so well as 4 of us were comfortably able to sit in the corner of our balcony and enjoy the warm Berlin weather.
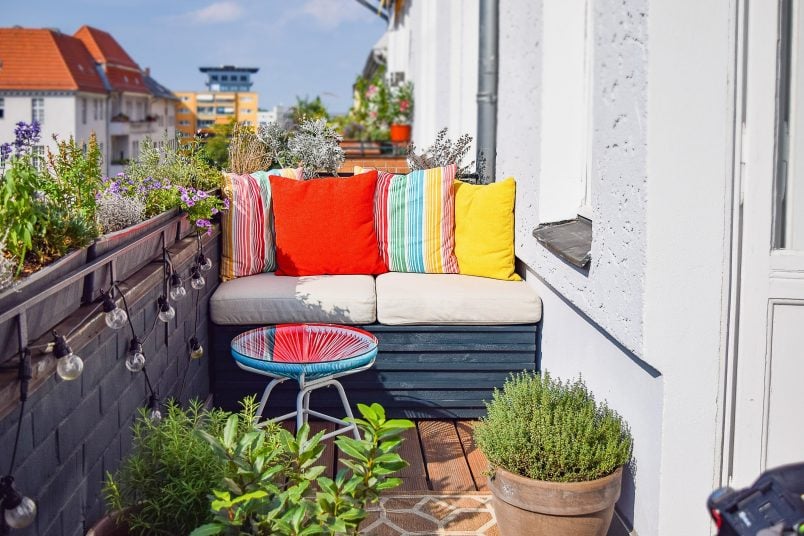
As much as the sofa is a super comfortable corner to sit and relax, there’s the added bonus of hidden storage! If you’ve been following us for a while, you’ll know that I love nothing more than hiding things. I hate cables, seeing fixings and junk is my No. 1 nemesis.
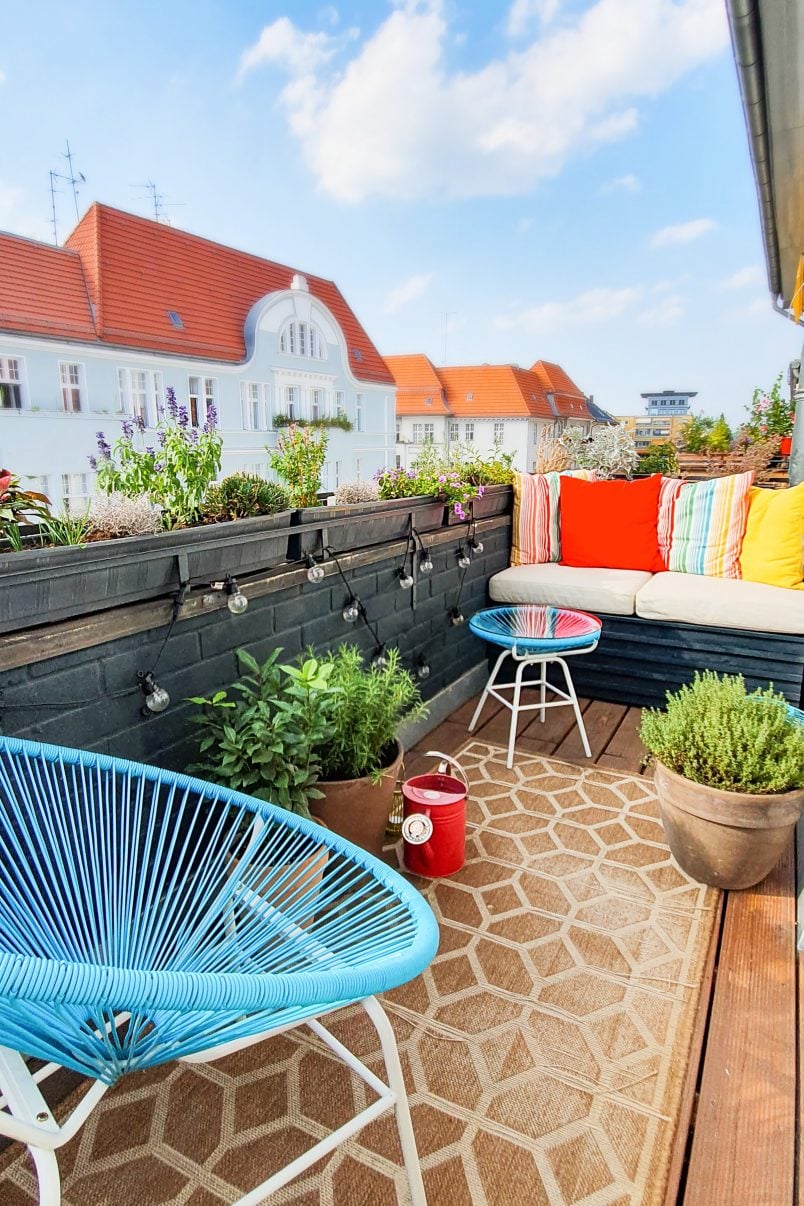
This sofa gives us more storage space than we could ever need to store our garden utensils and supplies. It’s obviously not watertight but it is large enough to add a watertight box if you wanted to store something that has to keep dry.
One of the best things about the sofa is how easy and, more importantly, how cheap it was to build.
Cost Breakdown:
Timber: 26€ – We used rough sawn timber for the sides and main structure of the sofa which is super affordable.
Paint: 14€
Seat cushions: 60€ Easily the most expensive bit of the bench are the cushions.
Total cost for the sofa: 100€
As you can probably tell, this is a super simple project to build. The Ikea cushions fit perfectly on top of the sofa and make it a really comfortable place to sit and relax.
There are still a few updates we’d like to do to the balcony including adding a parasol to protect us from the intense Berlin sun rays and a small dining area on the other side of the balcony would be great, too. I have a feeling we’ll be saving those updates for next summer, though!
We’d love to know what you think of our DIY outdoor sofa so leave us a comment below!
Leave a Reply